
Grand Elite 2 - Baby monitor Luvion - Free user manual and instructions
Find the device manual for free Grand Elite 2 Luvion in PDF.


| Product type | Baby monitor |
| Brand | Luvion |
| Model | Grand Elite 2 |
| Parent unit dimensions | 135 x 75 x 25 mm |
| Baby unit dimensions | 80 x 80 x 100 mm |
| Total weight | 450 g |
| Power supply | Rechargeable lithium-ion battery + 5V mains adapter |
| Battery life | Up to 10 hours |
| Range | Up to 300 m (outdoor) / 50 m (indoor) |
| Screen | 2.8-inch colour LCD screen |
| Screen resolution | 320 x 240 pixels |
| Connection | 2.4 GHz wireless |
| Night vision | Yes, infrared |
| Two-way communication | Yes, with speaker and microphone |
| Cry detection | Yes, adjustable |
| Room temperature | Display on screen |
| Night light | Integrated, remotely controllable |
| Safety | Compliant with standards, low emission |
| Maintenance | Clean with a soft, dry cloth |
| Warranty | 2 years |
| Spare parts | Available on Luvion website |
Frequently Asked Questions - Grand Elite 2 Luvion
User questions about Grand Elite 2 Luvion
0 question about this device. Answer the ones you know or ask your own.
Ask a new question about this device
Download the instructions for your Baby monitor in PDF format for free! Find your manual Grand Elite 2 - Luvion and take your electronic device back in hand. On this page are published all the documents necessary for the use of your device. Grand Elite 2 by Luvion.
USER MANUAL Grand Elite 2 Luvion

HANDLEIDING

INSTRUCTION MANUAL

MANUEL D'INSTRUCTIONS

BENUTZERHANDBUCH

MANUAL DE INSTRUÇÕES

EINER STECKDOSE AN. INSERT THE WIRE TAB OF THE RECHARGEABLE

LI-ION BATTERY INTO THE CONTACT SLOTS AS SHOWN, AND FITTHE BATTERY INTO THE COMPARTMENT
NL SLUIT HET STEKKERTJE VAN DE OPLAADBARE LI-ION BATTERIJ AAN OP HET AANSLUITPUNT ZOALS AANGEGEVEN, EN PLAATS DE BATTERIJ IN HET BATTERIJEN COMPARTIMENT
FR INSÉ REZ LA LANGUETTE MÉ TALLIQUE DE LA BATTERIE RECHARGEABLE LI-ION DANS LES FENTES DE CONTACT COMME INDIQUÉ, ET INSÉ REZ LA BATTERIE DANS LE COMPARTIMENT.
EN PLUG THE USB POWER CABLE INTO A USB OUTPUT FROM YOUR COMPUTER, OR THE USB-ADAPTER. CONNECT THE SMALL END OF THE USB POWER CABLE TO THE USB DC JACK ON THE MONITOR UNIT AS SHOWN
NL SLUIT DE USB-KABEL AAN OP EEN USB-UITGANG VAN UW COMPUTER, OF DE USB-ADAPTER. SLUIT HET KLEINE UITEINDE VAN DE USB-KABEL AAN OP DE USB-DC JACK OP DE MONITOR UNIT ZOALS AFGEBEELD
FR BRANCHEZ LE CÂ BLE D'ALIMENTATION USB À LA SORTIE USB DE VOTRE ORDINATEUR, OU À LA SORTIE USB ADAPTEUR. BRANCHEZ LA PETITE EXTRÉ MITÉ DU CÂ BLE D'ALIMENTATION USB AU PORT USB DC JACK SUR L'UNITÉ DE CONTRÔ LE, COMME INDIQUÉ.
WARNING: STRANGULATION HAZARD / WAARSCHUWING: VERSTIKKINGSGEVAAR / ATTENTION: RISQUE D'ÉTRANGLEMENT / WARNUNG: STRANGULATIONSGEFAHR
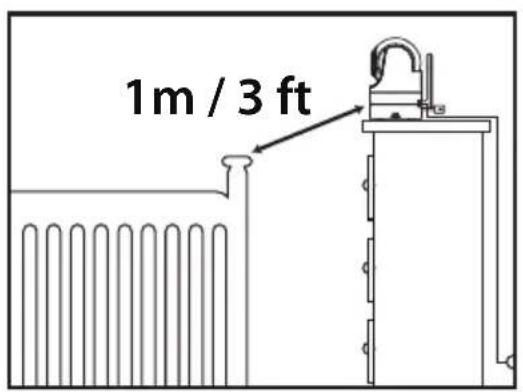
EN KEEP CORD OUT OF CHILD'S REACH. NEVER PLACE CAMERA OR CORDS WITHIN 1 METER / 3 FEET OF CRIB OR PLAYPEN. SECURE CORD AWAY FROM CHILD'S REACH. ONLY USE THE ADAPTERS PROVIDED.
NL HOUD HET SNOER UIT DE BUURT VAN KINDEREN. PLAATS NOOIT CAMERA OF SNOEREN BINNEN 1 METER / 3 METER VAN WIEG OF BOX. BEVESTIG DE SNOER BUITEN HET BEREIK VAN KINDEREN. GEBRUIK ALLEEN DE MEEGELEVERDE ADAPTERS.
FR GARDEZ LE CORDON HORS DE PORTÉ E DE L'ENFANT. NE JAMAIS PLACER LA CAMÉ RA OU LES CORDONS À MOINS DE 1 MÈ TRE D'UN BERCEAU OU D'UN PARC POUR BÉ BÉ . SÉ CURISEZ LE CORDON LOIN DE LA PORTÉ E DES ENFANTS. UTILISEZ UNIQUEMENT LES ADAPTATEURS FOURNIS.
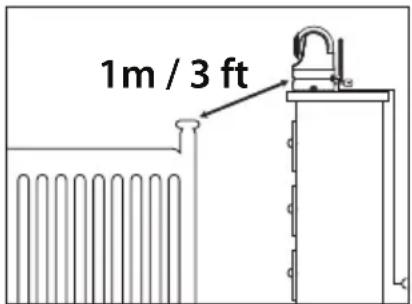
TABLE OF CONTENTS
-
Safety Instructions ....7
-
Overview 8
2.1 What's Included 8
2.2 Product Overview 9
2.3 Menu Options 10
- Getting Started 11
3.1 Powering Camera Unit 11
3.2 Wall Mounting Camera Unit 11
3.3 Monitor Unit Battery Installation 12
3.4 Charging and Powering the Monitor Unit 12
3.5 Registration (Pairing) 13
3.6 Temperature Scale Display Setting 14
- Using the Luvion Grand Elite 2 Monitor ....14
4.1 Set Up 14
4.2 Pan and Tilt 14
4.3 Night Vision Mode 14
4.4 Talk Mode 15
4.5 Sleep Mode (Video OFF with Audio ON) 15
- Menu Options 15
5.1 Volume 15
5.2 Brightness 16
5.3 Sleep Mode Delay (Video OFF, Audio ON) 16
5.4 Digital Zoom 16
5.5 Alarm 17
5.6 Camera Control 17
5.6.1 Delete a Camera 17
5.6.2 Add (pair) a Camera 17
5.6.3 View a Camera 18
5.6.4 Scan Camera 18
5.7 Warning Volume Setting 19
6 Using Optical Lenses 19
6.1 Aluminium Lens Hood 19
6.2 Optical Zoom Lens (optional) 19
6.3 Optical Wide Angle Lens (optional) 20
6.4 Cleaning your Optical Lens 20
-
Troubleshooting 20
-
Technical Specifications 23
1. SAFETY INSTRUCTIONS

WARNING:
• STRANGULATION HAZARD - Children have STRANGLED in cords.
Keep this cord out of the reach of children (more than 3ft (1m) away).
- NEVER PLACE THE CAMERA OR CORD IN OR NEAR CRIB OR PLAYPEN - Secure the cord at least three feet away from crib or playpen.
- CHOKING HAZARD - This product contains small parts which may cause choking, including the Optical Lens and Lens Hood.
- SHOCK WARNING - To prevent electric shock, NEVER use the transmitter or receiver near water, including near a bathtub, sink, laundry tub, wet basement, etc.
- CAUTION - Only insert a battery pack of the same type. Risk of explosion if battery is replaced with an incorrect type.
- Use only the AC adapters provided.
- Adult assembly is required. Keep small parts away from children when assembling.
• This product is not a toy. Do not allow children to play with it.
• This product is NOT intended to replace proper adult supervision of children.
- You MUST check your child's activity regularly, as this product will not alert parents to silent activities of a child.
- Before using this product, read and follow all instructions and warnings contained in this booklet.
• This product is intended for indoor use only.
- This product is not intended for use as a medical monitor and its use should not replace adult supervision.
- Test monitor before use and after changing camera location. Check reception regularly.
- Obstacles, such as concrete walls, may shorten the wireless signal transfer range.
- AJways unplug AC adapters from wall outlets and power sources during periods of non-use.
- Do not touch the plug contacts with sharp or metal objects.
2. OVERVIEW
2.1 WHAT'S INCLUDED

Monitor Unit

Camera Unit

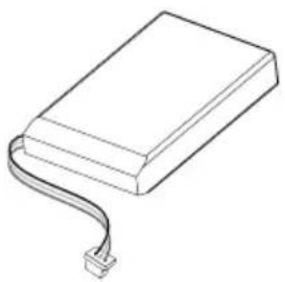
Rechargeable
Lithium Ion Battery
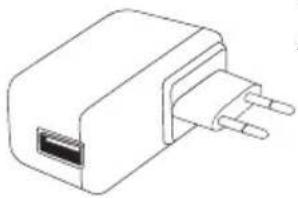
USB Output Adapter

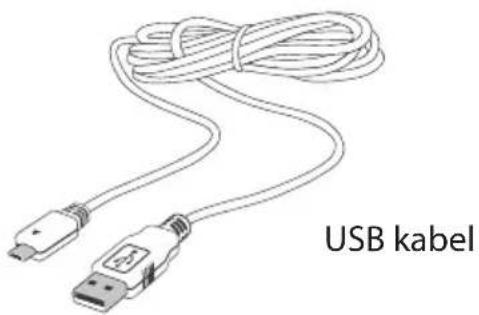
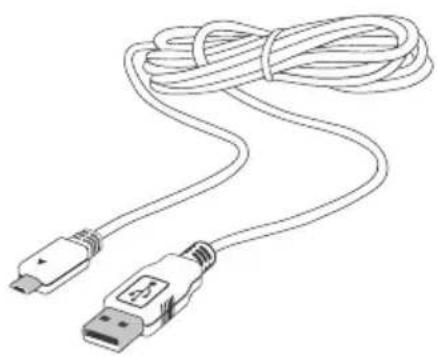
USB Power Cable

Camera Power Adapter

User Manual

Quickstart guide

Screw and Anchor
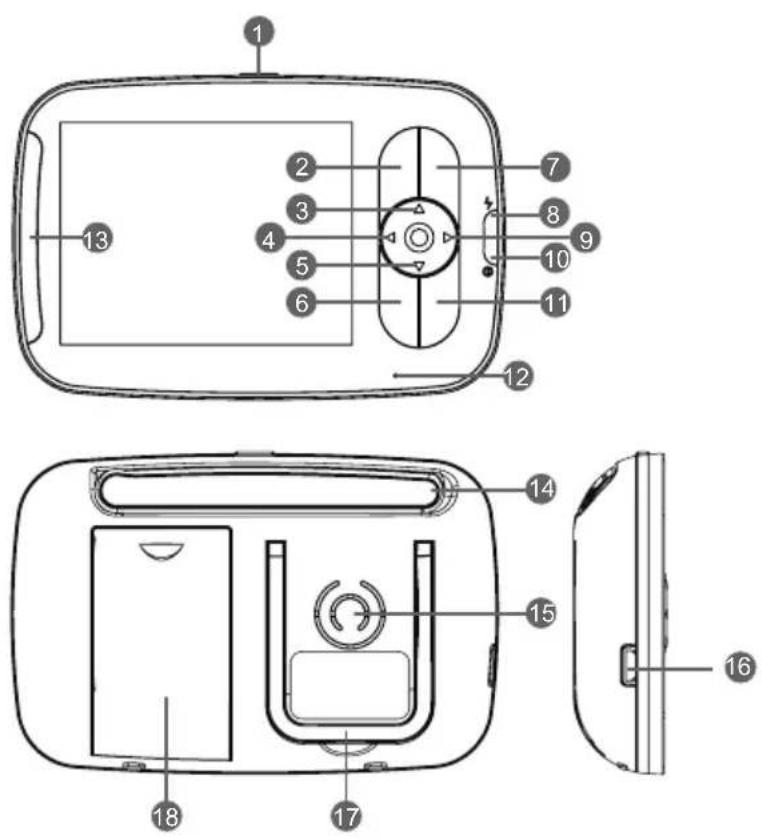
2.2 PRODUCT OVERVIEW


- Power ON/OFF/SLEEP Button
- MENU Button
- UP Button
- LEFT Button
- DOWN Button
- SHORT-CUT Button
- OK Button
- Charging LED Indicator
- RIGHT Button
- Power LED Indicator
- TALK Button
- Microphone
- Volume Level LED
- Antenna
- Speaker
- USB DC Jack
- Stand
- Battery Compartment

- ON/OFF Switch
- Microphone
- Power LED
- Infrared LEDs
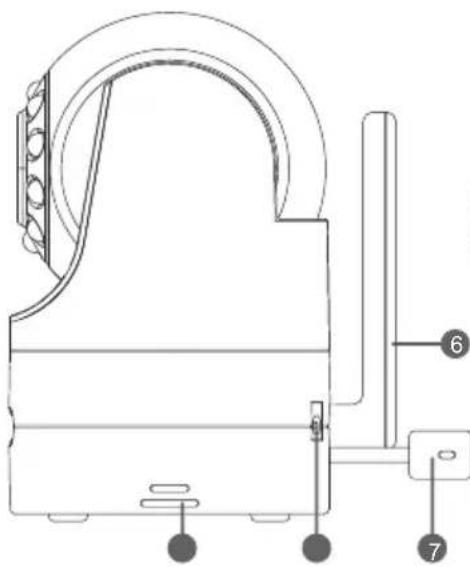
- Photo Sensor (Night Vision Mode)
- Antenna
- Temperature Sensor
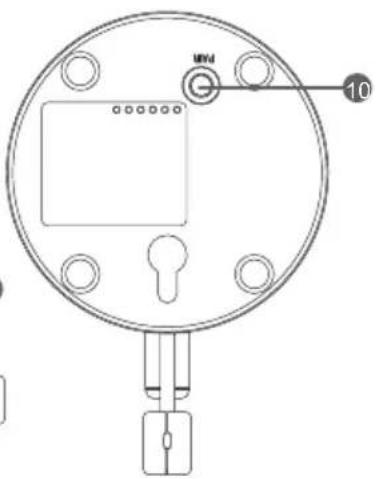
- DC Jack
- Speaker
- PAIR Key
2.3 MENU OPTIONS
Status Indication Overview (Upper Screen Bar)
| Icon Description Options | ||
 | Signal Strength Indicator 5 | levels |
| cam 1 / cam 2 / cam 3 / cam 4 | Camera Selected cam1 / cam | m2 / cam3 / cam4 / scan(x) |
| [177C] | Night Vision ( on / off ) | |
 | Alarm Setting ( on / off ) | |
 | Talk-back ( on / off ) | |
 | Current Camera Unit Temperature | 1-36 °C/ 34-97 °F |
 | Battery Power 4 levels, or fl | ashing red ( low battery ) |
Menu Options Overview (Lower Screen Bar)
| Icon Description Options | ||
 | Volume 8 levels | |
 | Screen Brightness 8 levels | |
 | Sleep Mode Delay 3min, 5min, off | |
 | Digital Zoom 1x,2x | |
 | Alarm Setting off , 2h, 4h, 6h | |
 | Camera Options | del, add, view, scan |
 | Warning Volume | high / low / off |
3. GETTING STARTED
3.1 POWERING CAMERA UNIT
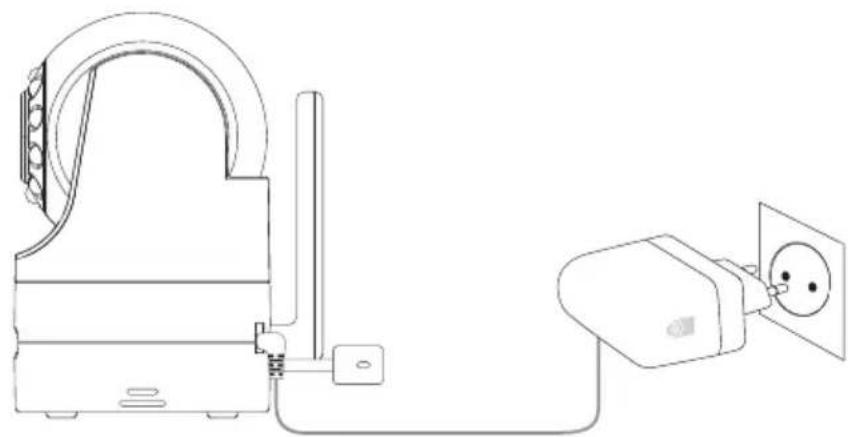
- Connect the Camera Power Adapter to the Camera Unit.
- Slide the ON / OFF Switch to the On position. The Power LED light on the Camera Unit will illuminate green.
- Position your Camera Unit no less than 3 feet away from your baby's crib. Ensure the power cord is not within reach of your baby.
• NOTE
Only use the enclosed Camera Power Adapter (5.9V DC / 1000mA).
3.2 WALL MOUNTING CAMERA UNIT
Before installation, check the reception and camera positioning of the location you intend to mount the camera by holding it to the wall. Ensure the desired location is no less than 1 meter / 3 feet away from your baby's crib.
- Pre-drill a hole in the wall using a 1/5 inch (6mm) drill bit.
- Insert wall anchor into the wall and tap gently with a hammer until the anchor is flush with the wall.
- Insert screw into the wall anchor and tighten until the screw only sticks out by about 1cm / 1/3 inch.
- Connect the Camera Power Adapter to the Camera Unit.
- Locate the hole on the bottom of the Camera Unit and slide the hole over the screw sticking out of the wall.
- Check to see that the Camera Unit is secure. If it is loose, you may need to tighten the screw more.
- Use wall clips (not included) to secure the power cord away from the crib or baby's reach.
3.3 MONITOR UNIT BATTERY INSTALLATION
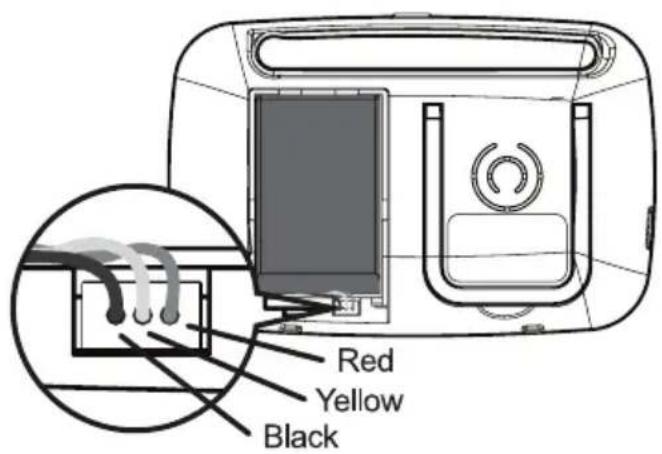
- Insert the Rechargeable Li-ion Battery into the Battery Compartment as shown above.
- Insert the wire tab of the Rechargeable Li-ion Battery into the contact slots as shown above.
- Replace the battery cover over the compartment.
3.4 CHARGING AND POWERING THE MONITOR UNIT
For best results, charge the Monitor Unit before use. After the initial charge, recharge normally as required. The Monitor Unit can be operated normally with power adapter plugged into the unit with the battery installed.
- Fit the USB Power Cable into the USB outlet of the USB Output Adapter. Plug the USB Output Adapter into the electrical outlet. Connect the small end of USB Power Cable to the USB DC Jack of the Monitor Unit.
- Press and hold the ⏻ POWER ON/OFF/SLEEP button for 2 seconds to turn ON the Monitor Unit. The POWER LED indicator will illuminate green to indicate the unit is ON.
- Once both the Camera and Monitor Units are switched on, the display on the Monitor Unit will show the video captured by the Camera Unit.
- If there is no connection or you are out of range, the video display will go off and the screen WARNING: Out of signal coverage will be shown on the LCD display. The unit will also beep every 10 seconds. Move the Monitor Unit closer to the Camera Unit until the link is re-established.
- Press and hold the ⏻ POWER ON/OFF/SLEEP button, until the progress bar finishes scrolling, to turn OFF the Monitor Unit.
• NOTE
The battery icon turns red on the LCD screen to indicate that the battery is low, and it gives a beep periodically. The battery needs to be recharged. Fully charging the battery takes about 7 hours.
When Charging
- During power OFF, when adapter is plugged in, an adapter logo will display on screen and the Charging LED Indicator will illuminate red to indicate charging, then turn blue to indicate that the battery is fully charged.
- During power ON, when adapter is plugged in, the Battery icon on screen's top right comer will show that the battery is charging. The Charging LED Indicator will also illuminated to indicate charging, then turn blue to indicate that the battery is fully charged.
• NOTE
You can use the Monitor Unit while it is being charged.
3.5 REGISTRATION (PAIRING)
The Camera Unit is pre-registered to your Monitor Unit. You do not need to register it again unless the Camera Unit loses its link with the Monitor Unit. To re-register your Camera Unit, or register a new Camera Unit, follow the procedure below:
- Press the MENU button of the Monitor Unit and the menu bar will pop up.
- Press the ◀ LEFT button or ▶RIGHT button until 📋Camera icon is highlighted.
- Press the ▲NP button or DOWN button until ADD icon is highlighted and press the OK button.
- Press the ▲NP button or DOWN button to select the desired Camera and press the OK button to start searching for a Camera Unit.
- Press and hold the PAIR button underneath the Camera Unit for at least 3 seconds. The power LED light (green LED light, located directly below the camera lens aperture) should flash green to indicate the Camera Unit is in pairing mode. If it does not flash, press and hold the PAIR button until the LED light flashes.
- If unsuccessful, delete the camera channel as per 5.6.1 on page 17, and attempt to pair again.
• NOTE
If a particular Camera Unit was previously registered with another Monitor Unit, registering with the current Monitor Unit will overwrite the old registration on the Camera Unit.
3.6 TEMPERATURE SCALE DISPLAY SETTING
The temperature reading from the temperature sensor at the back of the Camera Unit will be displayed on the top of the screen. To toggle between C and F:
- Press and hold the SHORT-CUT button for more than 3 seconds.
- Check that the temperature display reading on the screen has changed to your desired scale. If not, repeat step 1.
4. USING THE LUVION GRAND ELITE 2 MONITOR
4.1 SET UP
Place the Camera Unit in a convenient location (e.g. on a table or a shelf) and point the camera lens toward the area you want to monitor.
• NOTE
Do not place the Monitor Unit within baby's reach. If there is interference with the picture or sound, try moving the units to different locations, and ensure they are not close to other electrical equipment.
4.2 PAN AND TILT
The Camera Unit can be remotely controlled from the Monitor Unit.
- Press ▲ UP button or ▼DOWN button to tilt upward or downward.
- Press the ◀ LEFT button or ▶RIGHT button to pan left or right.
The Camera Unit has 8 high-intensity infrared LEDs for picking up clear images in the dark. When the built-in photo sensor detects a low level of ambient light, the LEDs will automatically activate and the screen on the Monitor Unit will display in black and white. The icon will be displayed on the screen.
4.4 TALK MODE
Press and hold the 🎯 TALK button on the Monitor Unit to talk to your baby through the Camera Unit's loudspeaker. A 🎯 icon will be displayed at the top of the LCD screen.
4.5 SLEEP MODE (VIDEO OFF WITH AUDIO ON)
Short press the ⏻ POWER ON/OFF/SLEEP button to tum the LCD screen OFF while keeping the audio ON. This mode conserves power. Short press the ⏻ POWER ON/OFF/SLEEP button to tum screen back on.
5. GRAND ELITE 2 MONITOR MENU OPTIONS
5.1 VOLUME
- Press the MENU button and the menu bar will pop up.
- Press the LEFT button or RIGHT button until volume icon is highlighted.
- Press the ▲P button or DOWN button to select the desired volume level from level 1-8 (The default volume level setting is level 4). Level 0 is mute.

• TIP: SHORT-CUT MENU
This product offers a quick shortcut menu. This is useful when you are sleeping and want to adjust the volume or brightness quickly, without the need to enter into the menu bar. Press the SHORT-CUT button on the Monitor Unit. Do not hold the button down as this will toggle the temperature scale reading. The menu bar (image above) will appear. Press the LEFT and RIGHT button to adjust brightness, or ▼ and ▼ DOWN button to adjust volume. This menu bar will disappear in 5 seconds if no button is pressed.
5.2 BRIGHTNESS
- Press the MENU button and the menu bar will pop up.
- Press the ◀ LEFT button or ▶RIGHT button until Brightness icon is highlighted.
- Press the ▲P button or DOWN button to select the desired brightness level from level1-8 (The default brightness level setting is level 4).
5.3 SLEEP MODE DELAY (VIDEO OFF, AUDIO ON)
This sets the delay time for the screen to turn off automatically (entering SLEEP MODE).
-
- Press the MENU button and the menu bar will pop up.
-
- Press the LEFT button or RIGHT button until standby icon is highlighted.
-
- Press the ▲ UP button or ▼DOWN button to select the desired time from 3min, 5min and OFF. (The default AUTO sleep setting is 5min)
- Press OK to select the desired delay time.
5.4 DIGITAL ZOOM
This product offers digital zoom. Please see more on the next section of this user manual to learn how to use optical zoom with digital zoom.
- Press the MENU button and the menu bar will pop up.
- Press the ◀ LEFT button or ▶RIGHT button until 🕒 Digital Zoom icon is highlighted.
- Press ▲P button or DOWN button to select desired digital zoom 1x or 2x. (Default setting is 1x)
- Press the OK button to confirm.
5.5 ALARM
- Press the MENU button and the menu bar will pop up.
- Press the ◀ LEFT button or ▶RIGHT button until Alarm Icon is highlighted.
- Press the ▲NP button or DOWN button to select the desired time from 2h, 4h, 6h and OFF. (The default setting is OFF)
- Press the OK button to confirm.
5.6 CAMERA CONTROL
5.6.1 Delete a camera
- Press the MENU button and the menu bar will pop up.
- Press the ◀ LEFT button or ▶RIGHT button until 📄 cam icon is highlighted, and the de add/view/scan menu will pop up.
- Press the ▲P button or DOWN button to select the DEL icon, and pressthe OK button to confirm.
- cam 1 / cam 2 / cam 3 / cam 4 will pop up, press the ▲HP button or DOWN button to select the desired CAM, and press the OK button to delete that registration on your Monitor Unit.
• NOTE
A CAM channel needs to be deleted before pairing to a new Camera Unit.
5.6.2 Add (pair) a camera
- Press the MENU button and the menu bar will pop up.
- Press the ◀ LEFT button or ▶RIGHT button until 📄 cam icon is highlighted, and the de add New / scan menu will pop up.
-
Press the ▲P button or DOWN button to select ADD icon, and press the OK button to confirm.
-
cam 1 / cam 2 / cam 3 / cam 4 will pop up, press the ▲P button or DOWN button to select the desired CAM, and press the OK button to start searching for a Camera Unit
-
Press and hold the PAIR key underneath the Camera Unit for at least 3 seconds. The power LED light (green LED light, located directly below the camera lens aperture) should flash green to indicate the Camera Unit is in pairing mode. If it does not flash,
press and hold the PAIR key until the LED light fl ashes.
- If unsuccessful, delete the camera channel as per 5.6.1 on page 17, and attempt to pair again.
• NOTE
A Camera Unit can only be registered to one Monitor Unit at any one time.
5.6.3 View a camera
- Press the MENU button and the menu bar will pop up.
-
- Press the ◀ LEFT button or ▶RIGHT button until 📄 cam icon is highlighted, and the del / add / New / scan menu will pop up.
- Press the ▲NP button or DOWN button to select VIEW icon, and press the OK button to confirm.
- cam 1 / cam 2 / cam 3 / cam 4 will pop up, press the ▲ UP button or ▼DOWN button to select the desired Camera Unit to view.
· TIP: QUICK METHOD TO CYCLE THROUGH CAM CHANNELS
Quick method to view desired camera instead of entering into the menu bar: directly press the OK button to cycle through paired cameras: cam 1 / cam 2 / cam 3 / cam 4 / scan(x).
5.6.4 Scan camera
This function automatically cycles through your paired camera channels to display each camera for 10 seconds. This function is only useful if you have more than 1 Camera Unit paired.
- Press the MENU button and the menu bar will pop up.
- Press the ◀ LEFT button or ▶RIGHT button until CAM icon is highlighted, and the del/add/view/scan menu will pop up.
- Press the ▲P button or DOWN button to select SCAN icon, and press the OK button to confirm.
- The screen will then display the video from different paired cameras in a loop of cam 1 / cam 2 / cam 3 / cam 4, changing every 12 seconds.
• NOTE
When in Scan mode, the Monitor Unit will stop scanning and alert you if one of the
Camera Unit is out of range or is not switched ON.
5.7 WARNING VOLUME SETTING
This controls the volume of an audio 'beep' sound from the Monitor Unit to alert you when the unit is low on battery or out of range.
- Press the MENU button and the menu bar will pop up.
- Press the LEFT button or RIGHT button until Warning Volume icon is highlighted.
- Press the ▲NP button or DOWN button to select high / low / off.
- Press the OK button to confirm.
6. USING OPTICAL LENSES

WARNING:
- CHOKING HAZARD - Optical Lenses (and the provided Lens Hood) are small parts. Keep Camera Unit away from baby's reach at all times. Always ensure that the lenses are screwed tightly onto the Camera Unit.
This product is the first-ever video monitor that offers Optical Lens compatibility, giving you more control over the viewing distance and viewing angle.
6.1 ALUMINIUM LENS HOOD
The Camera Unit comes fitted with a Lens Hood. This is an aluminium hood which protects the aperture of the Camera Unit. This setup provides a normal video effect.
6.2 OPTICAL ZOOM LENS (OPTIONAL)
Unlike digital zoom, using an optical Zoom Lens (sold separately) provides zooming without compromising picture clarity. It is recommended to use an optical zoom lens when closer to a specific point. If this is not enough, turn digital zoom to 2X to see even further.
6.3 OPTICAL WIDE ANGLE LENS (OPTIONAL)
The Optical Wide Angle Lens (sold separately) is available to obtain a wider range of vision around the Camera Unit. These lens provide a zoomed-out effect, allowing you to see more around the Camera Unit. This setup is recommended for surveillance use or monitoring
movement in playroom or large rooms.
Visit www.luvionshop.com to purchase your Optical Wide Angle or Optical Zoom Lens.
6.4 CLEANING YOUR OPTICAL LENS
Smudges and dust on the optical lens can diminish sharpness and reduce video quality. Remove smudges and dust on the lens by using a micro-fi ber cloth or a piece of lens tissue to wipe the lens surface in a circular motion.
7. TROUBLESHOOTING
| Product does not switch on | Confirm that the Camera and Monitor Unit are ON (check Power LED indicator).The battery may be depleted; recharge or replace battery.Confim that power adapters are properly connected. |
| Reception interference (static) | The Camera and Monitor Unit may be too far apart.The battery power may be too low.Other electronic devices may be interfering with the signal.The Camera or Monitor Unit may be in close proximity to large metallic objects causing interference.Use of other 2.4GHz products, such as wireless networks (WiFi routers), Bluetooth systems, or microwave ovens, may cause interference with this product. Keep Camera and Monitor Unit at least 5ft (1.5m) away from these items, or turn them off if they appear to cause interference. |
| Camera Unit loses link with the Monitor Unit | ·If the Camera Unit is too far away with low reception, move the Camera Unit closer to the Monitor Unit.·Reset both units by disconnecting them from battery and electrical power. Wait about 15 seconds, then reconnect.·Large metallic objects, including doors, refrigerators, mirrors, fi ling cabinets, and also reinforced concrete, may block the radio signal if between the Camera and Monitor Unit.·The signal strength may be reduced when in close proximity to radio or electrical equipment, such as TVs, computers, cordless or mobile phones, fl fluorescent lights or dimmer switches.·Use of other 2.4GHz products, such as wireless networks (WiFi routers), Bluetooth systems, or microwave ovens, may cause interference with this product. Keep Camera and Monitor Unit at least 5ft (1.5m) away from these items, or turn them off if they appear to cause interference.·Pair the Camera Unit under a different channel. (refer to page 17, chapter 5.6.2) |
| No picture from a Camera Unit | ·Check all connections to the camera. Confi rm that the adapter is plugged in.·Try recharging or replacing the battery pack.·Confi rm that all cameras and monitors are both ON.·Make sure that the Camera Unit is within range of the monitor.·Confi rm that the Camera and Monitor Unit are paired.·Adjust the monitor antenna to vertical position. |
| No sound from Monitor Unit | ·Volume setting may be too low. Adjust to a higher setting. |
| Picture is black and white | ·Night vision LED may be ON. Night vision mode operates in black and white.·Tum on room lights to force monitor out of night vision mode. |
| The picture playback is not smooth (choppy video with low frame rate) | Try moving the Camera Unit closer to the Monitor Unit.Remove obstructions between the Camera and Monitor Unit.Adjust the monitor antenna to vertical position.Use of other 2.4GHz products, such as wireless networks (WiFi routers), Bluetooth systems, or microwave ovens, may cause interference with this product. Keep Camera and Monitor Unit at least 5ft (1.5m) away from these items, or tum them off if they appear to cause interference. |
| Camera Unit power LED changes brightness | This is normal. The Power LED indicator is set to dim when in the dark, and brighten when ambient light is detected. |
| Noise (static, beeping) | Battery power may be too low; recharge or replace battery.Possible alarm ring alert.Possible out of signal alert. |
| Noise interference on your Monitor Unit | Volume may be set too high on the Monitor Unit. Lower volume.The Camera and Monitor Units may be too close. Move them further apart.The Camera Unit may be too far away and out of range.Move the Camera Unit closer to the Monitor Unit.Make sure the Camera and Monitor Units are placed away from other electrical equipment, such as a television, computer or cordless/mobile telephone. |
| The rechargeable battery will not charge or no charge light | The USB Output Adapter may not be properly connected.Battery pack may not be properly connected inside the battery compartment. Reconnect the wire tab of battery.Try using the other USB Power Cable included.There may be no power from the USB outlet. Switch to another electrical outlet (if using USB Output Adapter) or another USB power source (if using computer/laptop USB power). |
| Pairing failed | Make sure that the Power Adapter is connected to the Camera Unit.Confi rm that the Camera Unit is turned ON (Power LED indicator shows green light).Try pairing to another CAM channel. |
Video not clear with stagnant spots/marks on the screen
- Optical lens dirty. Smudges and dust on the optical lens can diminish sharpness and reduce video quality. Remove smudges and dust on the lens by using a micro-fiber cloth or a piece of lens tissue to wipe the lens surface in a circular motion.
8. TECHNICAL SPECIFICATIONS
SYSTEMS GENERAL
RF Frequency: 2400 MHz - 2483.5 MHz
Type of Modulation: GFSK
Type of Spread Spectrum: FHSS
Selectable Camera Channels: 4
Data Rate: 3Mbps
Channel Bandwidth: 3.375 MHZ
Transmission Range: up to 300m (line of sight, no obstruction)
CAMERA UNIT
Input Voltage: 100-240V AC @ 50/60Hz
Operating Voltage: 5.9V, 1000mA
IR / Night Vision: 8 IR LED's, 1 Low light sensor
Picture sensor: GC0308 1/6.5' Color CMOS
Built-Lens: f 2.5mm, F 2.8
Operating Temperature: 0° C (+32°F) to +50°C (122°F)
Power Adapter: Input: 100-240V AC, 50/60Hz 200mA;
Output: 5.9V, 1000mA
Exposure Control: Auto
White Balance Control: Auto
Vertical Turning Angle: 95° UP, 25° DOWN
Horizontal Turning Angle: 135° both left and right
MONITOR UNIT
Input Voltage: 100-240V AC @ 50/60Hz
Operating Voltage: 5.0V, 500mA
Resolution (Pixel): 320x240
Battery: 1200mAh Li-ion 3.7V rechargeable
battery
LCD Display: 3.5" TFT color display at 320 x 240 RGB
colors
Power Adapter: Input: 100-240V AC, 50/60Hz 200mA;
Output: 5.0V, 500mA
Duration (Standby Mode): Up to 10 Hours
Duration (Screen ON): Up to 6 Hours
Time to charge full: Up to 7 Hours
• NOTE
Outdoor use in France, Italy, Russia and Ukraine is not allowed

CE
This device is for indoor use only
This item is in compliance with the essential requirements and other relevant provisions of Directive 1999/5/EC.
This item is branded under the infant optics brandname in the US.
INHOUDSOPGAVE
WAARSCHUWING:
Camera

Oplaadbare Lithium Ion Batterij

USB adapter

Camera Adapter
Snelstartgids

- Power ON/OFF/SLEEP Knop
- MENU Knop
- OMHOOG Knop
- LINKS Knop
- OMLAAG Knop
- SHORT-CUT Knop
- OK Knop
- Spannings LED Indicator
- RECHTS Knop
- Spannings LED Indicator
- TALK Knop
- Microfoon
- Volume Level LED
- Antenne
- Speaker
- USB DC Jack
- Standaard
- Batterij Compartiment
NL

- ON/OFF Schakelaar
- Microfoon
- Spannings LED
- Infrarood LEDs

- DC Jack
- Speaker
- PAIR Knop
2.3 MENU OPTIES
5.7 WAARSCHUWING VOLUME INSTELLINGEN
Resolutie (Pixels): 320x240
Batterij: 1200mAh Li-ion 3.7V herlaadbare batterij
LCD Scherm: 3.5" TFT-kleurenscherm 320 x 240 RGB-kleuren
Power Adapter: Input: 100-240V AC, 50/60Hz 200mA;
Output: 5.0V, 500mA
This device is for indoor use only
AVERTISSEMENT:
2.2 APERÇU DU PRODUIT
- ON / OFF
- Microphone
- LED d'alimentation
- LED infrarouges

This device is for indoor use only
This item is in compliance with the essential requirements and other relevant provisions of Directive 1999/5/EC.
INHALT
3.5 Kopplung (Pairing) 71
3.6 Temperatureinstellungen 71
! ACHTUNG:
6.2 OPTISCHES ZOOMOBJEKTIV (OPTIONAL)
This device is for indoor use only
AVISO:
Unidade de Monitor

Unidade de câmara
Adaptador USB
Outdoor use in France, Italy, Russia and Ukraine is not allowed

CE
This device is for indoor use only
This item is in compliance with the essential requirements and other relevant provisions of Directive 1999/5/EC.
Luvion Premium Babyproducts
Delft, The Netherlands
Visit us on www.Luvion.com


- TABLE OF CONTENTS
- SAFETY INSTRUCTIONS
- WARNING
- OVERVIEW
- 2.1 WHAT'S INCLUDED
- 2.2 PRODUCT OVERVIEW
- 2.3 MENU OPTIONS
- GETTING STARTED
- 3.1 POWERING CAMERA UNIT
- NOTE
- 3.2 WALL MOUNTING CAMERA UNIT
- 3.3 MONITOR UNIT BATTERY INSTALLATION
- 3.4 CHARGING AND POWERING THE MONITOR UNIT
- WHEN CHARGING
- 3.5 REGISTRATION (PAIRING)
- 3.6 TEMPERATURE SCALE DISPLAY SETTING
- USING THE LUVION GRAND ELITE 2 MONITOR
- 4.1 SET UP
- 4.2 PAN AND TILT
- 4.4 TALK MODE
- 4.5 SLEEP MODE (VIDEO OFF WITH AUDIO ON)
- GRAND ELITE 2 MONITOR MENU OPTIONS
- 5.1 VOLUME
- TIP: SHORT-CUT MENU
- 5.2 BRIGHTNESS
- 5.3 SLEEP MODE DELAY (VIDEO OFF, AUDIO ON)
- 5.4 DIGITAL ZOOM
- 5.5 ALARM
- 5.6 CAMERA CONTROL
- 5.6.1 DELETE A CAMERA
- 5.6.2 ADD (PAIR) A CAMERA
- 5.6.3 VIEW A CAMERA
- TIP: QUICK METHOD TO CYCLE THROUGH CAM CHANNELS
- 5.6.4 SCAN CAMERA
- 5.7 WARNING VOLUME SETTING
- USING OPTICAL LENSES
- 6.1 ALUMINIUM LENS HOOD
- 6.2 OPTICAL ZOOM LENS (OPTIONAL)
- 6.3 OPTICAL WIDE ANGLE LENS (OPTIONAL)
- 6.4 CLEANING YOUR OPTICAL LENS
- TROUBLESHOOTING
- TECHNICAL SPECIFICATIONS
- SYSTEMS GENERAL
- CAMERA UNIT
- MONITOR UNIT
- INHOUDSOPGAVE
- WAARSCHUWING
- 2.3 MENU OPTIES
- 5.7 WAARSCHUWING VOLUME INSTELLINGEN
- AVERTISSEMENT
- 2.2 APERÇU DU PRODUIT
- INHALT
- ACHTUNG
- 6.2 OPTISCHES ZOOMOBJEKTIV (OPTIONAL)
- AVISO
Brand : Luvion
Model : Grand Elite 2
Category : Baby monitor