
YT-82003 - Hammer Yato - Free user manual and instructions
Find the device manual for free YT-82003 Yato in PDF.

User questions about YT-82003 Yato
0 question about this device. Answer the ones you know or ask your own.
Ask a new question about this device
Download the instructions for your Hammer in PDF format for free! Find your manual YT-82003 - Yato and take your electronic device back in hand. On this page are published all the documents necessary for the use of your device. YT-82003 by Yato.
USER MANUAL YT-82003 Yato
natural_image
Black and white photo of a VACI 1000 manual oil shaver tool (no text or symbols visible)PL EN DE RU UA LT LV CZ SK HU RO ES FR IT NL GR BG PT HR AR
natural_image
Close-up of a mechanical component with labeled parts, showing a curved structure and mounting holes (no readable text or symbols)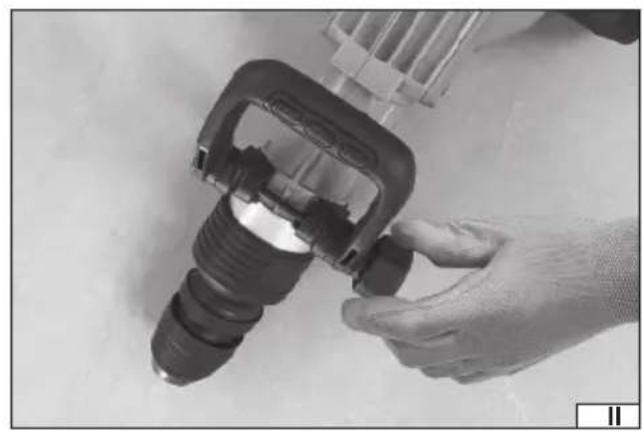
natural_image
Close-up of a hand holding a mechanical tool with a cylindrical component, no visible text or symbols
natural_image
Close-up of two hands using a mechanical tool, one holding a cylindrical component and the other a black-handled tool (no text or symbols visible)PL
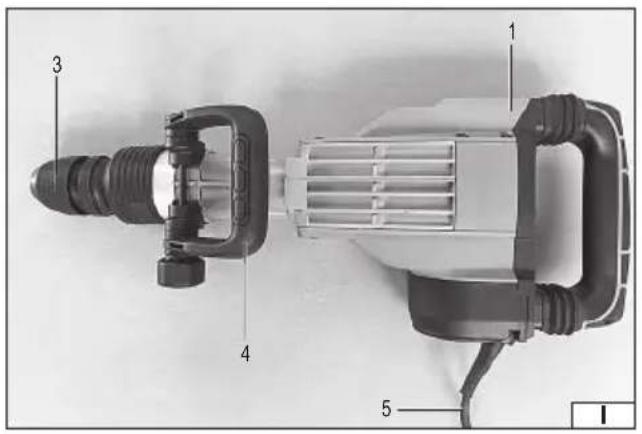
- body with main handle
- electric switch
- tool holder
- tool holder lock
- additional handle
- power cord with plug
- speed control
- service indicator
DE
Read the operating instruction
Wear protective goggles
Wear hearing protectors
Second class of insulation
Working tool mounting system
Mains voltage and frequency
This symbol indicates that waste electrical and electronic equipment (including batteries and storage cells) cannot be disposed of with other types of waste. Waste equipment should be collected and handed over separately to a collection point for recycling and recovery, in order to reduce the amount of waste and the use of natural resources. Uncontrolled release of hazardous components contained in electrical and electronic equipment may pose a risk to human health and have adverse effects for the environment. The household plays an important role in contributing to reuse and recovery, including recycling of waste equipment. For more information about the appropriate recycling methods, contact your local authority or retailer.
PRODUCT CHARACTERISTICS
The demolition hammer is an ordinary tool, class II insulation, intended for demolition and chiseling work in natural and artificial stone, marble, etc. using working tools equipped with an SDS max grip. The correct, reliable and safe operation of the power tool depends on its proper use, therefore:
Before using the product, read the entire manual and keep it.
The supplier is not liable for any damage resulting from failure to comply with the safety regulations and recommendations of this manual.
EQUIPMENT
The product is delivered complete, the package should include:
- demolition hammer,
- cutter,
- punch.
TECHNICAL PARAMETERS
| Parameter Unit of measurement Value | ||
| Catalogue number YT-82003 | ||
| Nominal voltage [V~] 220-240 | ||
| Nominal frequency [Hz] 50-60 | ||
| Rated power [W] 1700 | ||
| Stroke frequency [min] | ^-1 800-1700 | |
| Single Impact Energy [J] 40 | ||
| Mass | [kg] | 11.8 |
| Noise level | ||
| - sound pressure | [dB] | 96 ± 3 |
| - power | [dB] | 103 ± 2.3 |
| Vibration level (main/auxiliary handle) | [m/s ^2 ] | 10.4 ± 1.5 / 10.7 ± 1.5 |
| Insulation class | II | |
| Degree of protection | IPX0 |
GENERAL POWER TOOL SAFETY WARNINGS
Warning! Please read all safety warnings, illustrations and specifications provided with this power tool. Failure to follow them may result in electric shock, fire or serious injury.
Save all warnings and instructions for future reference.
The term "power tool" used in the warnings refers to all corded and cordless electric power tools.
Workplace safety
Keep your work area clean and well lit. Clutter and poor lighting can cause accidents.
Do not operate power tools in explosive atmospheres, such as in the presence of flammable liquids, gases or fumes.
Power tools create sparks which may ignite the dust or fumes.
Do not allow children or bystanders into the work area. Loss of concentration can cause loss of control.
Electrical safety
The plug on the electric cord must match the outlet. Do not modify the plug in any way. Do not use any plug adapters with grounded power tools. An unmodified plug that matches the outlet reduces the risk of electric shock.
Avoid body contact with grounded surfaces such as pipes, radiators, and refrigerators. Grounding your body increases the risk of electric shock.
Do not expose power tools to precipitation or moisture. Water or moisture entering a power tool will increase the risk of electric shock.
Do not overload the power cord. Do not use the power cord to carry, pull, or disconnect the plug from the wall outlet. Keep the power cord away from heat, oil, sharp edges, and moving parts. A damaged or entangled power cord increases the risk of electric shock.
When working outdoors, use extension cords designed for outdoor use. Using an extension cord designed for outdoor use
EN
reduces the risk of electric shock.
If using a power tool in a damp environment is unavoidable, a residual current device (RCD) should be used as protection against supply voltage. The use of an RCD reduces the risk of electric shock.
Personal safety
Stay alert, watch what you are doing and use common sense when operating a power tool. Do not use a power tool while tired or under the influence of drugs, alcohol or medication. Even a moment of inattention while operating a power tool can result in serious personal injury.
Use personal protective equipment. Always wear eye protection. The use of personal protective equipment such as dust masks, non-skid safety shoes, hard hats, and hearing protection reduces the risk of serious personal injury.
Prevent accidental starting. Ensure that the power switch is in the “off” position before connecting to power source and/or battery pack, picking up or carrying the power tool. Carrying a power tool with your finger on the switch or energizing a power tool that has the switch in the “on” position can result in serious injury.
Remove any wrench or key that is used to adjust the power tool before turning it on. A wrench or key left attached to a rotating part of the power tool may result in serious injury.
Do not overreach or overextend. Maintain proper posture and balance at all times. This will make it easier to control the power tool in the event of unexpected situations while working.
Dress appropriately. Do not wear loose clothing or jewelry. Keep hair and clothing away from moving parts of the power tool. Loose clothing, jewelry, or long hair can be caught in moving parts.
If devices are provided for the connection of dust extraction or dust collection facilities, ensure that these are connected and used correctly. The use of dust extraction reduces the risk of dust-related hazards.
Don't let the experience gained from frequent use of the tool cause you to become careless and ignore safety rules. Careless action can cause serious injuries in a split second.
Use and care of power tools
Do not overload the power tool. Use the correct power tool for the selected application. The correct power tool will provide better and safer work when used for the designed load.
Do not use a power tool if the power switch does not turn it on and off. A tool that cannot be controlled with the power switch is dangerous and must be repaired.
Disconnect the plug from the power outlet and/or remove the battery pack if detachable from the power tool before making any adjustments, changing accessories, or storing the tool. Such precautions will prevent the power tool from being switched on accidentally.
Store the tool out of the reach of children, do not allow persons unfamiliar with the power tool or these instructions to use the power tool. Power tools are dangerous in the hands of untrained users.
Maintain power tools and accessories. Check the tool for misalignment or binding of moving parts, breakage of parts and any other condition that may affect the power tool's operation. Any damage should be repaired before using the power tool. Many accidents are caused by poorly maintained tools.
Cutting tools should be kept clean and sharp. Properly maintained cutting tools with sharp edges are less likely to bind and are easier to control during operation.
Use power tools, accessories and attachments etc. in accordance with these instructions, taking into account the type and conditions of work. Use of tools for work other than those designed may result in a hazardous situation.
Keep handles and gripping surfaces dry, clean and free from oil and grease. Slippery handles and gripping surfaces do not allow safe operation and control of the tool in hazardous situations.
Repairs
Have your power tool repaired only by authorized service centers, using only original spare parts. This will ensure proper safety of your power tool.
ADDITIONAL SAFETY INSTRUCTIONS
Wear hearing protection. Exposure to noise can cause hearing loss.
Use the tool with the additional handles supplied with the tool. Loss of control can result in personal injury to the operator.
When performing an operation where the inserted tool may contact a hidden live wire or a power cord, hold the power tool by insulated gripping surfaces. An inserted tool contacting a live wire may cause metal parts of the tool to become live, which could cause an electric shock to the tool operator.
Warnings related to drilling with long drill bits
Always start drilling at a low speed and with the tip of the drill bit in contact with the workpiece. At higher speeds, the drill bit is likely to bend if allowed to spin freely without contacting the workpiece, resulting in injury.
Apply pressure only in a straight line with the drill and do not apply excessive pressure. The drill may bend causing breakage and loss of control resulting in injury.
EN
INSTALLATION OF EQUIPMENT ELEMENTS
NOTE! Accessories may only be installed when the power supply is disconnected. Pull the power cord plug out of the mains socket!
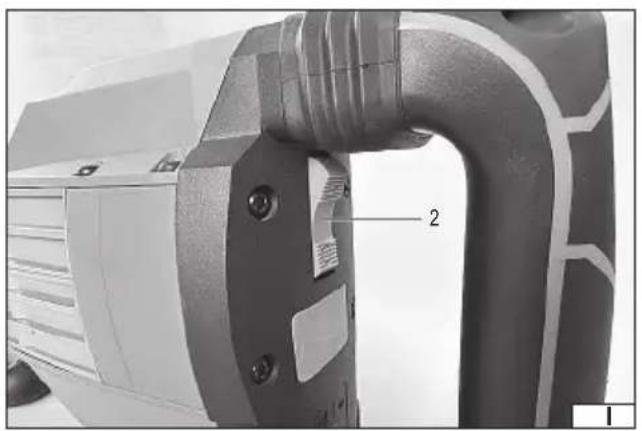
Additional handle setting (II)
The additional handle can be adjusted to the position that ensures the most safe, ergonomic and efficient work.
Adjust the handle to the desired position and then lock it in place by firmly and securely tightening the locking knob.
Due to the nature of the work, the tightness of the locking knob should be checked while using the product.
Assembly and disassembly of working tools (III)
Clean the selected tool of dirt and rust and lubricate the SDS MAX chuck with a thin layer of grease.
Pull the tool handle toward you and hold it in this position.
Insert the cleaned tool into the hole. If necessary, turn the tool so that it enters the holder without resistance.
Release the handle and the tool should automatically lock into the holder.
Check whether the tool is securely seated. To do this, simply try to pull the tool out of the SDS MAX holder. If the chisel or chisel slides out of the holder, repeat the assembly steps.
PRODUCT USE
Before starting work, check that the housing and the connecting cable with the plug are not damaged. If damage is found, further work is prohibited!
Preparatory activities
Select the appropriate working tool: punch or cutter.
Clean the tool, lubricate the handle of the selected tool with a thin layer of grease.
Insert the working tool into the product's tool holder.
Insert the plug into the electrical outlet.
Wear hearing protection, eye protection, and work gloves.
Starting and stopping the product
Take a balanced position, hold the hammer with both hands and, after making sure that the working tool is not touching anything, start the product by moving the switch to the I – on position.
Hold the tool in this state for a few seconds so that the grease reaches all elements of the drive mechanism, at the same time check if the product shows any symptoms of improper operation. Too much noise, too high vibration level, suspicious smell or the appearance of smoke. If no symptoms of improper operation are observed, you can start using the product.
After finishing work, turn off the hammer by moving the switch to the O position – off.
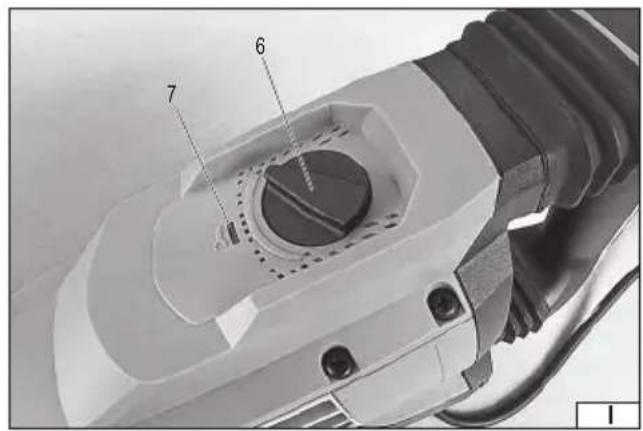
Speed control
The hammer is equipped with smooth speed regulation, which is performed by setting the knob (I). Turning the knob clockwise increases the speed of rotation, while turning it counterclockwise decreases the speed. Changing the speed results in changing the impact frequency and the energy of a single blow. Smooth regulation is possible within the range specified in the table.
Product work
It is recommended that in the initial period of use, the work with the tool should not be too intensive, this will allow the mechanical parts to wear in. It is also recommended to use longer breaks in work in order to cool the hammer. As the elements inside the hammer wear in, the intensity of work can be increased and the breaks needed for cooling the tool can be shortened.
Note! Sometimes it may happen that the hammer will not transfer the impact to the working tool, even though the engine is running. The cause of this condition is usually too thick oil. If the product is used in low temperatures, it should be allowed to work for about 5 minutes to warm up.
Rest the working tool on the surface being machined, grab the hammer by both handles and activate the switch. If the working tool does not start working, push the hammer towards the surface being machined. This is not a result of incorrect operation, but of protection against working without load.
When working, apply only the pressure necessary for the tool to work properly. Applying too much pressure to the working tool can damage the working tool and the mechanisms of the impact hammer, and will also result in reduced efficiency.
If the product is to be used to chisel a thick surface, chiseling should be done in layers. Each time chisel a layer of small thickness.
Take regular breaks while working.
Additional notes
During work, do not exert too much pressure on the processed material and do not make sudden movements, so as not to dam-
EN
age the working tool and the drill. Take regular breaks during work. Do not allow the tool to be overloaded, the temperature of the external surfaces must never exceed 60 ^ . After finishing work, turn off the tool and then remove it from the mains socket and perform maintenance and inspection.
The declared vibration total value has been measured using a standard test method and can be used to compare one tool with another. The declared vibration total value can be used in a preliminary assessment of exposure.
Note! Vibration emission during tool operation may differ from the declared value depending on how the tool is used.
Note! Safety measures to protect the operator must be defined that are based on an assessment of exposure in the actual conditions of use (including all parts of the operating cycle, such as times when the tool is switched off or idle and activation time).
MAINTENANCE AND INSPECTIONS
Lubrication
Before using drills or chisels, always clean them and apply a thin layer of grease to the tool shank.
Service indicator
The service indicator (I) informs about the wear of the carbon brushes or the failure of the hammer. When the brushes are worn, the device switches off automatically - about 8 hours earlier a warning appears in the form of a lit or flashing indicator. If the indicator flashes at regular intervals, it means that the hammer is damaged. In both cases, you should stop working immediately and take the tool to an authorized service center of the manufacturer.
NOTE! Before starting any adjustments, maintenance or servicing, unplug the tool from the power outlet. After finishing work, check the technical condition of the power tool by visually inspecting it and assessing: the body and handle, the electric cable with the plug and bending protection, the operation of the electric switch, the patency of the ventilation slots, the sparking of the brushes, the noise level of the bearings and gears, the start-up and the smoothness of the operation. During the warranty period, the user may not add any power tools or replace any components or parts, as this will void the warranty. Any irregularities observed during the inspection or during work are a signal to carry out repairs at a service point. After finishing work, the housing, ventilation slots, switches, additional handle and covers should be cleaned, for example, with an air jet (with a pressure of no more than 0.3 MPa), a brush or a dry cloth without using any chemicals or cleaning fluids. Clean the tools and handles with a dry, clean cloth.
DE
PRODUKTMERKMALE
PRODUKTA RAKSTUROJUMS
ĎALŠIE BEZPEČNOSTNÉ POKYNY
- ciocan demolator,
- cutter,
- pumn.
PARAMETRI TEHNICI
CARACTÉRISTIQUES DU PRODUIT
DODATNE SIGURNOSNE UPUTE
Nosite zaštitu za sluh. Izloženost buci može uzrokovati gubitak sluha.
Koristite alat s dodatnim ručkama koje ste dobili s alatom. Gubitak kontrole može dovesti do osobne ozljede operatera.
Kada izvodite radnju pri kojoj umetnuti alat može doći u kontakt sa skrivenom žicom pod naponom ili kabelom za napaja-nje, držite električni alat za izolirane ručke. Umetanje alata u kontakt sa žicom pod naponom može dovesti do toga da metalni dijelovi alata postanu pod naponom i može dovesti do strujnog udara rukovatelja alatom.
Upozorenja vezana uz bušenje dugim svrdlima
مにするة Agricultural Industry, Agricultural Industry, and the Industrial Industry in the United States.
We declare and guarantee with full responsibility that the following products:
meet requirements of the following European Standards / Technical Specifications:
and fulfill requirements of the following European Directives:
Machinery and safety elements
Restriction of the Use of Certain Hazardous Substances
Serial number: concern all serials numbers of item(s) mentioned in this declaration
The person authorized to compile the technical file:
We declare and guarantee with full responsibility that the following products:
fulfil requirements of the following European Directive: 2000/14/WE
Manufacturer quality-control system, examination of the manufacturer's technical file and periodical inspection by notified body |
Measured sound power level on an equipment representative for this type: 103 dB(A)
Guaranteed sound power level for this equipment: 105 dB(A)
(Place and date of issue)
V-CE PREZES ZARZADU
JAN SZMIDT
(Name and signature of authorized person)

