XTPP101 - Battery charger Xtorm - Free user manual and instructions
Find the device manual for free XTPP101 Xtorm in PDF.

| Type de produit | Battery charger with external battery and wireless charging |
| Marque | Xtorm |
| Modèle | XTPP101 |
| Alimentation | Mains (AC) via supplied adapter, USB-C PD (input/output), wireless charging |
| Sorties | 2 USB-C ports (shared 15W max in AC mode, 30W max for a single device if battery full), wireless charging (15W max) |
| Batterie interne | Rechargeable, capacity not specified (estimated 5000 mAh) |
| Indicateur LED | 4 LEDs showing battery level in 25% increments |
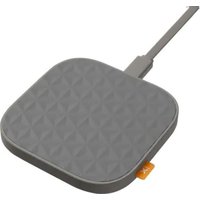
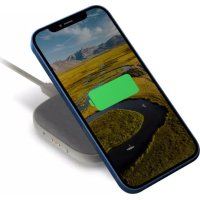
| Charge sans fil | Compatible with smartphones and AirPods cases, activation by button, green indicator |
| Fonctions principales | Mains charging, wireless charging, use as power bank |
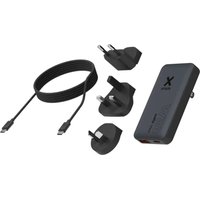
| Accessoires fournis | Detachable USB-C cable, mains adapter with interchangeable plugs (EU, US, etc.) |
| Sécurité | Do not expose to water, do not disassemble, avoid heat sources, keep out of reach of children |
| Entretien et nettoyage | Clean with a soft, dry cloth |
| Recyclage | Follow WEEE procedures for batteries and accumulators |
| Garantie | Void if used improperly |
Frequently Asked Questions - XTPP101 Xtorm
User questions about XTPP101 Xtorm
0 question about this device. Answer the ones you know or ask your own.
Ask a new question about this device
Download the instructions for your Battery charger in PDF format for free! Find your manual XTPP101 - Xtorm and take your electronic device back in hand. On this page are published all the documents necessary for the use of your device. XTPP101 by Xtorm.
USER MANUAL XTPP101 Xtorm
natural_image
Line drawing of a portable phone with two plug connectors and a circular cover (no text or symbols)SPECIFICATIONS PRODUCT OVERVIEW1 2
Wall Charger

AC 100V-240V; 50-60Hz; 0.8A Max

2x USB-C PD 30W Output
Power Bank

10,000mAh Li-Poly / 36.5Wh
USB-C PD 18W Input
2x USB-C PD 20W Output
15W Wireless Output (7.5W iPhone, 10W Samsung)

86×86×32 mm

293 grams
EU plug: 13 grams, UK plug: 18 grams

Manual, 2x Built-in USB-C cables, EU & UK Plug, built-in US plug, Pouch
When using multiple outputs
AC charging
See chapter 5
Power Bank charging
When using 2 outputs
Share 15W/
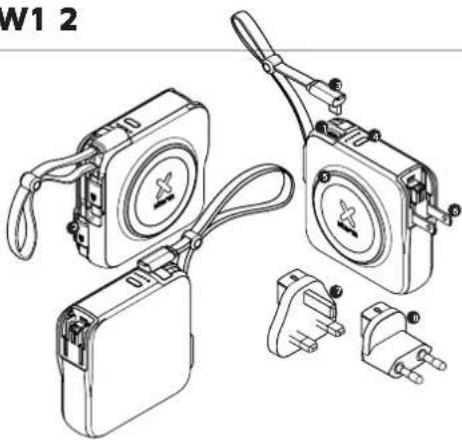
natural_image
Technical line drawing of a mechanical device with multiple components and connectors (no text or symbols)Output
USB-C PD 20W

Output built-in cable USB-C PD 20W

USB-C PD 20W detachable cable (60W max)

Button

15W Wireless Output (7.5W for iPhone)

US plug

UK plug

EU plug
CHANGING THE PLUGS AC CHARGING3 4
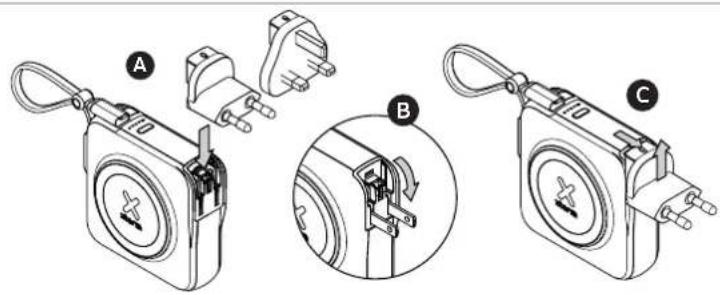
3A Attach the preferred plug in the adapter through the sliding mechanism until you hear a 'click' sound.
3B To use the US plug, fold down the metal pins.
3C To remove the plug, push the button on top forward and remove the plug.
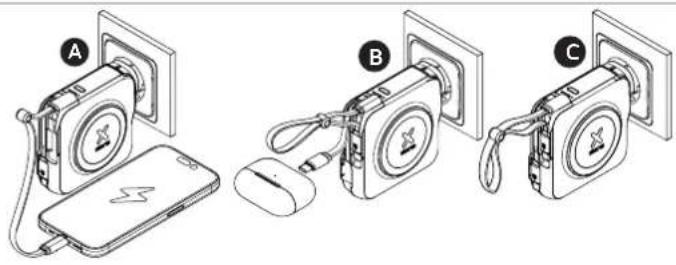
4A Use the provided cable to charge your devices, or, plug in your own cable into the USB-C output.
4B Use the built-in cable to charge your devices.
4C Plug in the charger to automatically charge the internal power bank.
SPLIT AC CHARGING5
5A When charging a single device, and the internal power bank is fully charged, max output is 30W. When using both USB-C connections, both devices share 15W max.
5B If the power bank isn't fully charged, it recharges at 1-10W, depending on the power demand of connected USB-C devices, which have output priority during pass-through. Total shared power is max 15W (5V/3A).
| USB-C Device Power Demand | Powerbank Recharge Rate | Priority |
| OW Up to 10W Powerbank gets full input | ||
| <10W 5W Shared with device | ||
| ≥10W 0W Device receives all input |
WIRELESS CHARGING 6
natural_image
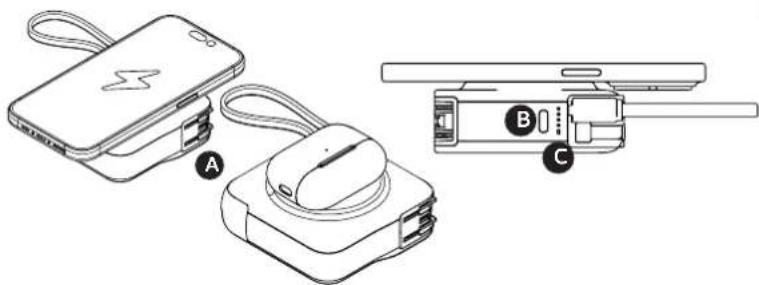
Line drawings of three electronic devices: a battery pack, a smartwatch, and a handheld device (no text or symbols present)6A Place your smartphone or AirPod case on the charging pad.
6B Press the power button if charging does not automatically start.
6C A green LED will appear when wireless charging is active.
Wireless output does not work in AC charge mode.
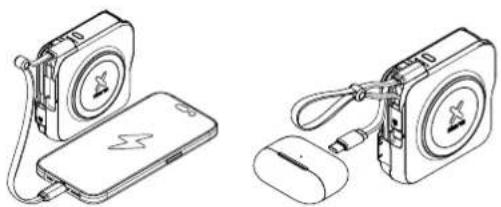
USING THE POWER BANK7
LED POWER INDICATOR 8
natural_image
Technical line drawings of two electronic devices: a charging device and a mouse, both with no visible text or symbols.7A Connect the USB-C end of the charging cable to the USB-C PD output of the Power Bank and the other end to the input of your device. The charging will start automatically. Charging some devices requires a charging cable other than the one supplied. 7B The power bank can be charged using AC charging or using the built-in detachable USB-C cable.
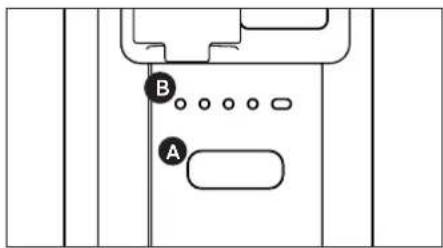
8A Press the Power Button once to display the battery level remaining in the Power Bank via the LED lights. Press the Power Button twice turn off the LED lights. 8B Each lit LED light indicates 25% remaining energy in the Power Bank. At 4 lit lights, the Power Bank is fully charged.
IN THE BOX9
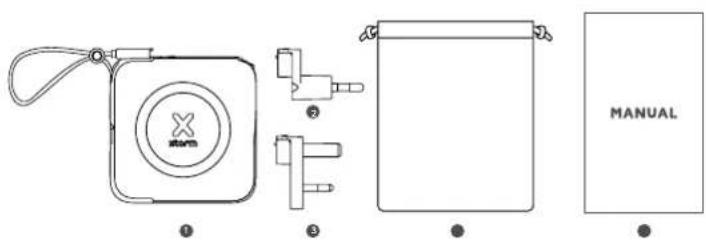
XTPP101 3in1 Travel
1 Charger with 2x built-in USB-C cables
② EU plug
UK plug
4 Pouch
5 Manual
US plug is integrated in the 3in1 charger. (see chapter 3)
EN - ENGLISH
1. SPECIFICATIONS
2. PRODUCT OVERVIEW
3. CHANGING THE PLUGS
3.A. Attach the preferred plug in the adapter through the sliding mechanism until you hear a 'click' sound.
3.B. To use the US plug, fold down the metal pins.
3.C. To remove the plug, push the button on top forward and remove the plug.
4. AC CHARGING
4.A. Use the provided cable to charge your devices, or, plug in your own cable into the USB-C output.
4.B. Use the built-in cable to charge your devices.
4.C. Plug in the charger to automatically charge the internal power bank.
5. SPLIT AC CHARGING
5.A. When charging a single device, and the internal power bank is fully charged, max output is 30W. When using both USB-C connections, both devices share 15W max.
5.B. If the power bank isn't fully charged, it recharges at 1-10W, depending on the power demand of connected USB-C devices, which have output priority during pass-through. Total shared power is max 15W (5V/3A).
6. WIRELESS CHARGING
6.A. Place your smartphone or AirPod case on the charging pad.
6.B. Press the power button if charging does not automatically start.
6.C. A green LED will appear when wireless charging is active. Wireless output does not work in AC charge mode.
7. USING THE POWER BANK
7.A. Connect the USB-C end of the charging cable to the USB-C PD output of the Power Bank and the other end to the input of your device. The charging will start automatically. Charging some devices requires a charging cable other than the one supplied.
7.B. The power bank can be charged using AC charging or using the built-in detachable USB-C cable.
8. LED POWER INDICATOR
8.A. Press the Power Button once to display the battery level remaining in the Power Bank via the LED lights. Press the Power Button twice turn off the LED lights.
8.B. Each lit LED light indicates 25% remaining energy in the Power Bank. At 4 lit lights, the Power Bank is fully charged.
9. IN THE BOX
NL - NEDERLANDS
1. SPECIFICATIES
2. PRODUCTOVERZICHT
3. DE STEKKERS VERVANGEN
6. DRAADLOOS OPLADEN
2. APERÇU DU PRODUIT
3. REMPLACEMENT DES BOUGIES
2. PRODUKTA PÄRSKATS
3. SVECÍŠU NOMAINA
3.A. Pievienojiet velamo kontaktdakšu adapterim, izmantojot bidamo mehanismu, lidz atskan 'klikška' skana.
3.B. Lal izmantotu ASV kontaktdakšu, nolleclet metala tapas.
3.C. Lai nonemtu kontaktdakšu, nospiediet augšpusė esošo pogu uz priekšu un nonemiet kontaktdakšu.
4. MAINSTRÄVAS UZLÄDE
EN When recycling this product, please follow WEEE battery recycling procedures. Contact your local recycling organization for more information.
XTORM SAFETY CHECK WARNINGS


1. TEMPERATURE CONTROL
Provided with a temperature control chip that prevents overheating.

2. OVERLOAD PROTECTION
Protects both the internal battery as well as the battery of the attached device from overcharging.

3. SECURED POWER MANAGEMENT
Automatically picks the correct charging speed and efficiently devides power between attached devices.

4. SHORT CIRCUIT PROTECTION
Breaks the circuit automatically when an overcurrent is detected. This protects the Xtorm charger and your device from short circuit damage.

5. A-CLASS BATTERY CELLS
We only use the best battery cells that provide the fast charging you need and meet all safety requirements.

6. HIGH EFFICIENCY
Our power products are built to power your device as efficient as possible. This ensures the least possible loss of energy during the charging process.
EN Warnings
Don't crop, dissemble or attempt to repair the charger by yourself. Avoid exposure to water or high humidity. Don't expose to any heat source. Keep out of reach of children. Don't use in the presence of flammibia gas. The warranty will lose in the event of limproper use. Telco Accessories has tested the product in a test environment. All statements/declarations made by Telco Accessories about the operation of the product are based on the results obtained from such tests. These results/statements/declarations cannot be guaranteed, for example in cases of deviating or injudicious use and/or use in a different environment.