
AM121 Evoke - Power bank Xtorm - Free user manual and instructions
Find the device manual for free AM121 Evoke Xtorm in PDF.


| Product Type | External Battery (Power Bank) |
| Brand | Xtorm |
| Model | AM121 Evoke |
| Battery Capacity | 10000 mAh (typical) |
| Input Port | Micro USB or USB-C (5V/2A) |
| Output Port(s) | 2x USB-A (5V/2.1A each) |
| Total Output | Up to 2.1A per port, combined up to 3A |
| Charging Time | Approximately 5-6 hours with 2A charger |
| Dimensions | 140 x 70 x 15 mm (approx) |
| Weight | Approximately 220 g |
| LED Indicator | 4 LED lights for battery level |
| Safety Protections | Overcharge, over-discharge, short circuit, overcurrent, temperature protection |
| Materials | Polycarbonate shell, lithium polymer battery |
| Operating Temperature | 0°C to 45°C |
| Storage Temperature | -20°C to 60°C |
| Compliance | CE, RoHS, FCC |
| Included Accessories | Micro USB cable, user manual |
| Warranty | 2 years (subject to local regulations) |
| Maintenance | Wipe with dry cloth. Do not expose to water or high temperatures. |
| Repairability | Battery is non-removable. For disposal, follow local e-waste regulations. |
Frequently Asked Questions - AM121 Evoke Xtorm
User questions about AM121 Evoke Xtorm
0 question about this device. Answer the ones you know or ask your own.
Ask a new question about this device
Download the instructions for your Power bank in PDF format for free! Find your manual AM121 Evoke - Xtorm and take your electronic device back in hand. On this page are published all the documents necessary for the use of your device. AM121 Evoke by Xtorm.
USER MANUAL AM121 Evoke Xtorm


Xtorm chargers are always pre-charged. This means you can start using your new Solar Charger from the moment you remove it from the box.

The Xtorm Solar Charger automatically stops charging when the connected device is fully charged. This means you do not have to worry about overcharging your mobile devices.

Due to the rubberized housing and the protected openings this Solar Charger is protected against splashing of water from any direction to the IPX4 classification.

All Xtorm Solar Chargers are equipped with extremely efficient solar panels. With an efficiency of 22%, these panels can generate a lot of power with a small surface area. These SunPower® panels are the best solar panels available on the consumer market.

All Xtorm products have a 2 year warranty in case something goes wrong. We ensure that you will receive a replacement if the product fails within 2 years.
EN:Warnings
Don't drop, dissemble or attempt to repair the charger by yourself.
Don't expose to any heat source. Keep out of reach of children.
Don't use in the presence of flammable gas.
NL: Waarschuwing
(1) 2016.4.11: Non-ferent by Revisionsing Govt.
ES: Atención
(1) 2023, Exploration of the Solar Energy Corporation
\* THIS MANUAL IS AVAILABLE IN DIFFERENT
LANGUAGES ON OUR WEBSITE

Hoofdveste 19 3992 DH Houten The Netherlands T: + 31 (0) 30 635 4800 F: + 31 (0) 30 635 4801 www.xtform.eu

4/7
CHARGE 2 DEVICES AT THE SAME TIME
▲ Important
When charging 2
devices at the same time, the total output
time, the total output of the Solar Charger is
of the Solar Charger is devided between the
two devices.
E.g. when charging a tablet
and smartphone; connec the tablet to see 1 and
the tablet to port 1 and the smartphone to port 2.
5/7
CHARGE THE SOLAR CHARGER | BY SUNLIGHT

natural_image
Illustration of a portable solar cell with an orange fuse and a yellow sun icon (no text or symbols)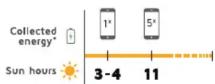
Place the Solar Charger in direct
sunlight and the batte charged automatically.
charges automatically.
Expect 1 sunny day to charge
75% of Solar Charger's battery. The Evoke is charged up to 100%
The Evoke is charged up in around 11 sun hours*
Expect 3-4 sun hours to collect enough energy to recharge a smartphone from 0% to 100%.
Best illumination
angle


Best time
of the day


(No text)
Best decree
of cloudiness


Best place to charge
outside the house


Do not left out


The following table
The solar charging doesn't work
behind a window


he following
ns for
ctions
check 7/7
* By ideal conditions
6/7
CHARGE THE SOLAR CHARGER

For the first time charging we recommend that you charge the solar charger by USB with the included cable.
Also, when the internal battery of the Solar Charger is completely empty, you may have to charge it by USB power for a few minutes. Sometimes the charger needs a small energy boost before being able to generate solar power into energy.

MICRO USB
Connect the micro USB cable with USB IN.
natural_image
Illustration of a silver laptop with black screen and keyboard, next to a white USB switch (no text or symbols visible)
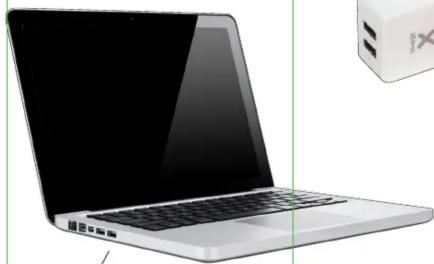
METHOD 1: Connect the USB cable to the USB Port of your PC/laptop.
Expect 10-12 hours* charging time (100%)
METHOD 2: Connect the USB cable to your AC adapter
Expect 6-7 hours* charging time (100%)
* By ideal conditions
7/7
POWER INDICATOR
natural_image
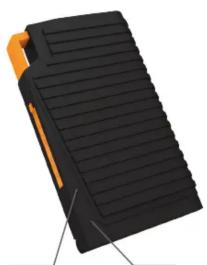
Black rectangular electronic device with orange handle and ribbed top, shown with base connection (no text or symbols visible)POWER BUTTON
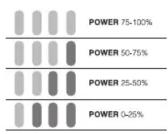
LED POWER INDICATORS
CHARGING INDICATION
Press button 1x
LIGHT ON
LIGHT OFF
BLE WITH

Smartphone

Tablet

Digital camera

USB devices

E-reader
iPhone, iPod, MP3 player,
MP-4 prayer, portable speaker, drone, GPS, car navigation, wireless headphone
portable (micro USB), portable controller
game console, USB (flash) light
USB fan, power bank, GoPro
and much more.


Brand : Xtorm
Model : AM121 Evoke
Category : Power bank