
BU100 - Power bank Xtorm - Free user manual and instructions
Find the device manual for free BU100 Xtorm in PDF.


| Product Type | Portable Power Bank |
| Brand | Xtorm |
| Model | BU100 |
| Battery Type | Lithium-ion |
| Capacity | 10000 mAh |
| Input Port | Micro USB (5V, 2.0A) |
| Output Port(s) | USB-A (5V, 2.4A max) |
| Number of Outputs | 1 |
| Dimensions | Approx. 150 x 70 x 15 mm |
| Weight | Approx. 250 g |
| Charging Time (via Micro USB) | Approx. 5-6 hours |
| LED Indicators | 4 LED battery level indicator |
| Protection Features | Overcharge, Overdischarge, Short Circuit, Overcurrent |
| Operating Temperature | 0°C to 45°C |
| Storage Temperature | -20°C to 60°C |
| Material | Plastic casing |
| Compatibility | Smartphones, tablets, and other USB-charged devices |
| Includes | Power bank, Micro USB charging cable, User manual |
Frequently Asked Questions - BU100 Xtorm
User questions about BU100 Xtorm
0 question about this device. Answer the ones you know or ask your own.
Ask a new question about this device
Download the instructions for your Power bank in PDF format for free! Find your manual BU100 - Xtorm and take your electronic device back in hand. On this page are published all the documents necessary for the use of your device. BU100 by Xtorm.
USER MANUAL BU100 Xtorm
Xtorm keeps people charged wherever and whenever needed. Whether you need your own Power Bank or a bigger Charging Solution, with Xtorm products you will always have some extra energy at hand! With Xtorm Business products we offer a whole new product line that is completely focused on providing charging solutions on a large scale. Nowadays our everyday lives revolve around mobile devices, people bring their smartphone, tablet or laptop everywhere they go. If any of these items would run out of energy we would be feeling very powerless. That is why everyone is in need of power. With the Xtorm Business product line we offer companies a solution to provide their customers with power they need.

More energy.

xtorm
Business

natural_image
Line drawing of a toolbox with six compartments (no text or symbols)USER MANUAL
BU100 - Charge 'n Go 6
INDEX
page
- SPECIFICATIONS & OVERVIEW ____ 1
- IN THE BOX ____ 3
- DESCRIPTION AND FUNCTION ____ 5
- INTENDED USE ____ 5
- NOTES ON SAFETY 6
- WARRANTY AND LIABILITY ____ 7
- TROUBLE SHOOTING ____ 7
- NOTE ON WASTE DISPOSAL ____ 8
- CONNECTING AND OPERATING ____ 9
1. SPECIFICATIONS & OVERVIEW

Color:
Black
Dimensions Power Bank:
65×135×15mm
Dimensions Base station:
305×185×202mm
Input:
100-240V AC
/50-60Hz
Output AC adapter:
18V
Output Power Bank:
6x5V/1.5A
Battery capacity:
5000mAh
Weight without AC adapter:
1000grams
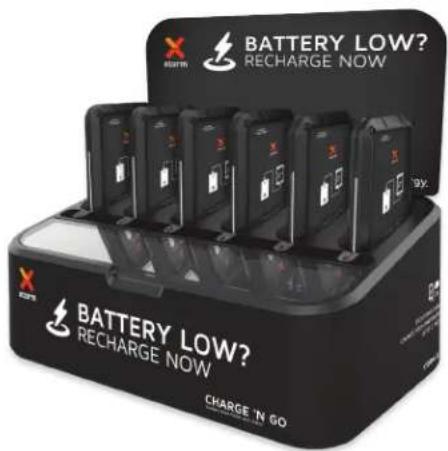
POWER BANK DOCK
CHARGE 'N GO 6
6X 5000 mAh




2
IN THE BOX
1x

AC adapter
(100 - 240 V / 50 - 60 Hz)
1x

Power cord
(Optional UK/US/EU/AUS)
1x
Charge 'n Go 6 base station
3
1x

User manual
6x

Power Bank
(5000mAh)
9x

Charging cables
2x USB C connector (20cm)
3x Micro USB connector (20cm)
3x Apple Lightning 8 pins connector* (20cm)
1x Apple 30 pins connector* (20cm)
*All Apple cables are certified by Apple.
4
3. DESCRIPTION AND FUNCTION
The Charge 'n Go 6 is a charging solution ideal for hospitality venues, public places and events. Each Power Bank holds 5000 mAh on a full charge.
4. INTENDED USE
Use this device only in dry or interior rooms. If you do not attend to the regulations and safety notes it might cause fatal accidents, injuries and damages to property.
5. NOTES ON SAFETY

ATTENTION! Only skilled electricians may assemble and disassemble the housing of the product. There is a risk of electric shock and short circuit.
• This product is not a toy and is not meant for children. It contains small parts which can be swallowed and injure when used inappropriately.
- Please install the system and attached devices in a way that individuals cannot be injured and objects cannot be damaged for example by dropping and stumbling.
- Please remove the packing materials, because children may cut themselves on them while playing. Furthermore, there is a risk of swallowing and inhalation of incidentals and insulation material.
• To prevent fire or shock hazard avoid places with high temperature, or humidity, or places that may come in contact with water.
- Do not install the product near air conditioner openings, or places with an excessive amount of dust, smoke or vibrations.
- Place the product only on horizontal and flat surfaces to avoid falling.
• Do not modify or alter the product and accessories.
• Do not use any damaged parts.
• Plug and unplug all cables and adaptors slowly and carefully.
• If trouble occurs, immediately disconnect the device from the wall socket.
- During transport, observe the details listed in the Chapter 'Specifications' and 'Care, maintenance and transport' and implement measures suitable for transport e.g. use of original package.
- For questions, defects, mechanical damages, malfunctions, and other functional problems which cannot be resolved by this manual, please contact your dealer for repair or replacement.
6
WARRANTY AND LIABILITY

• The manufacturer grants a 1 year warranty to a new device.
• Product warranty only applies to the product itself, as the manufacturer has no influence on installation.
In case of any fault or damage to your device, please contact your dealer and if necessary provide your sales slip or invoice as evidence of the purchase. Your dealer will either repair the fault on site or send it to the manufacturer. The work of our technicians will be considerably easier when the fault is described in detail. If your dealer cannot be contacted, you can also contact the manufacturer directly.
• The manufacturer is not liable for damage to persons or property caused by improper installation or operation.
• Any use other than described in this user manual is not permitted, and causes loss of warranty, loss of guarantee and non-liability.
• We reserve our right for misprints and changes of the device, packing or user manual.
7.
TROUBLE SHOOTING
| PROBLEM | HELP |
| The device does not charge | • When a device is fully charged it will automatically stop charging, therefore no charging is shown.• Check all connections for tight fitting |
| Failure of the Female USB function | Make sure to use a fitting and compatible USB charging cable |
| Other problems | Contact Xtorm at: +31 30 635 4800 |
7
8
NOTE ON WASTE DISPOSAL

According to the European WEEE directive, electrical and electronic equipment must not be disposed with consumers waste. The consumer is committed by law to deposit electrical and electronic devices to a public collecting point or to the dealer at the end of the devices lifetime. Particulars are regulated in national right. The symbol shown on the product, in the manual or on the packaging refers to these terms. This way of disposing used devices contributes to environmental protection.
9
CONNECTING AND OPERATING
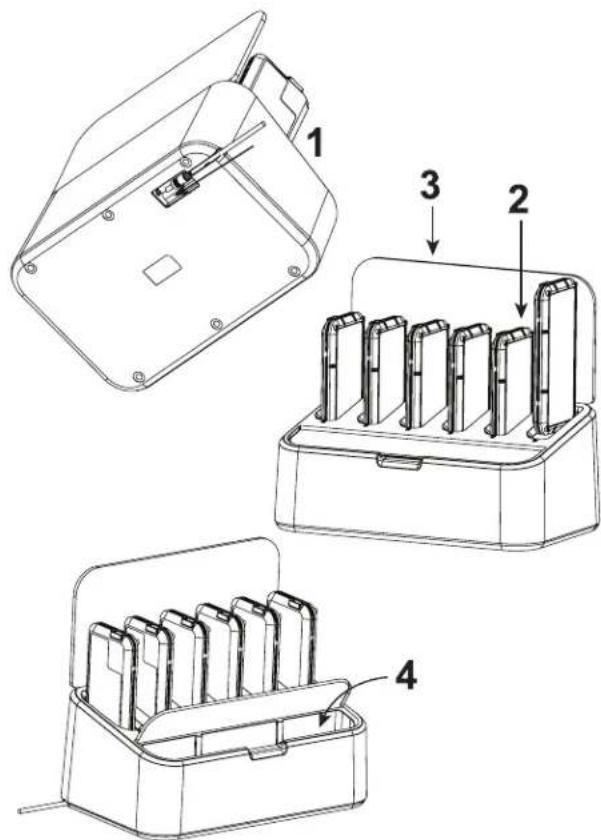
- Connect the included power cord to the AC adapter then to the Charge 'n Go 6.
- Place the Power Banks in the slots for charging.
- Advertising board.
- Charging cables storage box.
9
10


Brand : Xtorm
Model : BU100
Category : Power bank