
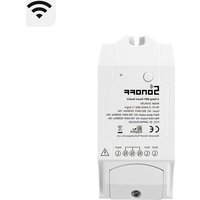
RFR3 - Smart switch Sonoff - Free user manual and instructions
Find the device manual for free RFR3 Sonoff in PDF.

| Product type | Smart switch |
| Model | RFR3 |
| Brand | Sonoff |
| Input power | 100-240 V AC, 50/60 Hz, 10 A max |
| Output power | 100-240 V AC, 50/60 Hz, 10 A max |
| Wi-Fi | IEEE 802.11 b/g/n, 2.4 GHz |
| RF frequency | 433.92 MHz |
| Material | PC V0 (flame retardant plastic) |
| Dimensions | 91 x 43 x 25 mm |
| Weight | Less than 1 kg |
| Recommended installation height | Less than 2 m |
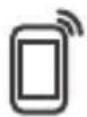
| Compatible operating systems | Android and iOS |
| App | eWeLink |
| Main functions | Remote on/off, scheduling, voice control, sharing, smart scenes, state synchronization |
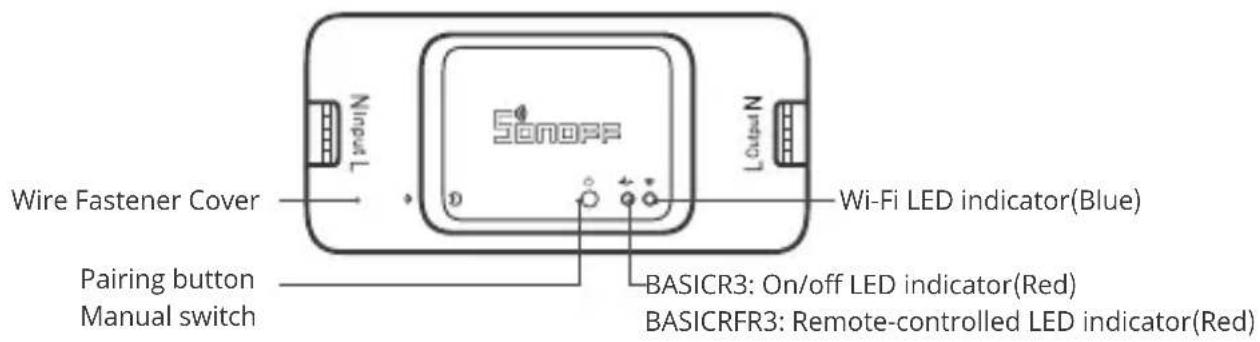
| LED indicators | Wi-Fi (blue) and remote (red) |
| Pairing modes | Touch (quick) and compatible |
| RF remote control | Yes, frequency 433.92 MHz, can be paired/unpaired |
| Switching capacity | 10 A max |
| Maintenance and cleaning | Clean with a dry cloth |
| Safety | Do not touch during use; installation and repair by a qualified professional |
| Repairability | Contact a professional for any repairs |
Frequently Asked Questions - RFR3 Sonoff
User questions about RFR3 Sonoff
0 question about this device. Answer the ones you know or ask your own.
Ask a new question about this device
Download the instructions for your Smart switch in PDF format for free! Find your manual RFR3 - Sonoff and take your electronic device back in hand. On this page are published all the documents necessary for the use of your device. RFR3 by Sonoff.
USER MANUAL RFR3 Sonoff
natural_image
Technical line drawing of a mechanical component with a blue arrow indicating direction (no text or symbols present)拆下保护盖,先接线再安装压线柱。
单火线输出接线示意:
确保零火线接入无误。
3. 下载 “易微联” APP

Android™ & iOS
4. 上电
恢复出厂设置
Operating Instruction
1. Power off
To avoid electric shocks, please consult the dealer or a qualified professional for help when installing and repairing! Please do not touch the switch during use.
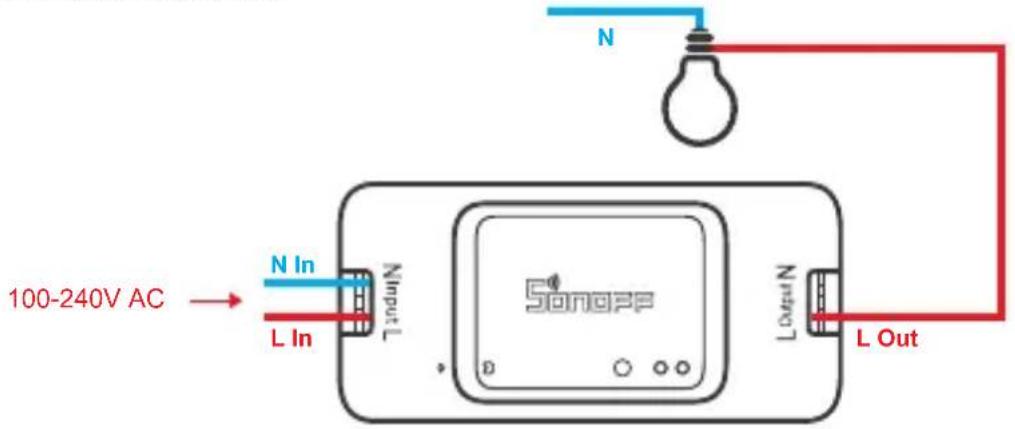
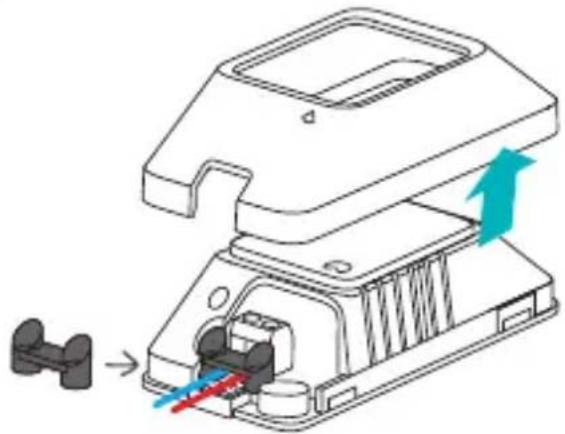
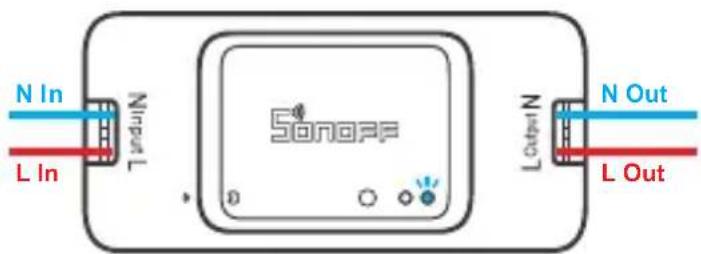
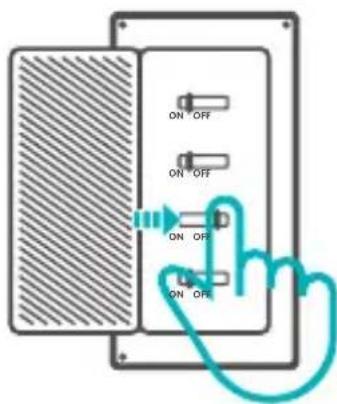
2. Wiring instruction
natural_image
Technical illustration of a mechanical device with internal components and directional arrows indicating movement (no text or symbols)Remove the Protective cover, then connect wires before fixing the wire fastener.
To make sure a full installation, please align "with "when securing the protective cover.
Ceiling lamp wiring instruction:

One live wire wiring instruction:
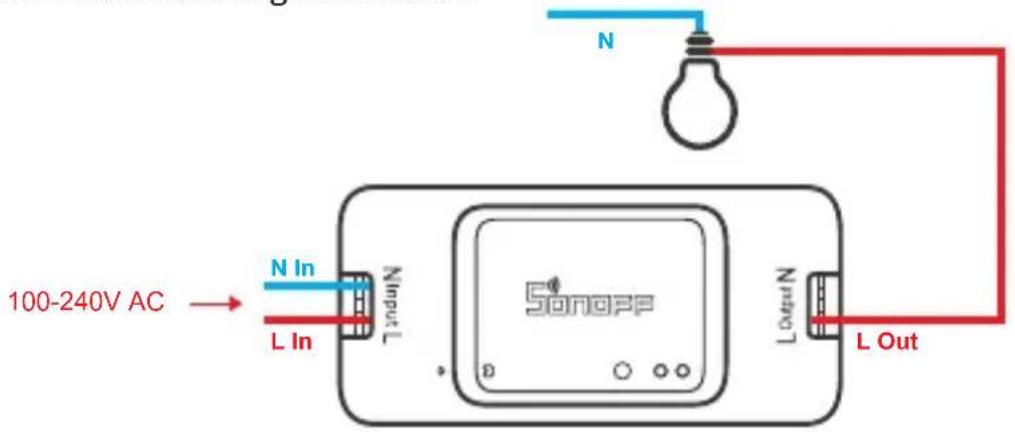
Make sure the neutral wire and live wire connection is correct.
3. Download APP


Android™ & iOS
4. Power on
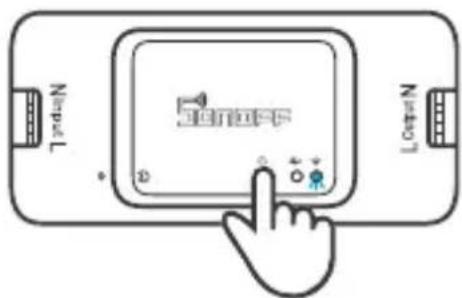
After powering on, the device will enter the quick pairing mode (Touch) during the first use. The Wi-Fi LED indicator changes in a cycle of two short and one long flash and release.
The device will exit the quick pairing mode (Touch) if not paired within 3mins. If you want to enter this mode, please long press the manual button for about 5s until the Wi-Fi LED indicator changes in a cycle of two short and one long flash and release.
5. Add the device
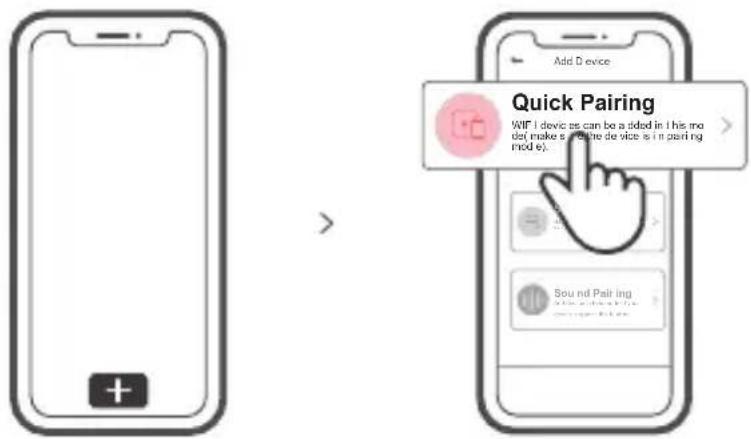
Tap "+" and select "Quick Pairing", then operate following the prompt on the APP.
Compatible Pairing Mode
If you fail to enter Quick Pairing Mode (Touch), please try "Compatible Pairing Mode " to pair.
1 Long press Pairing button for 5s until the Wi-Fi LED indicator changes in a cycle of two short flashes and one long flash and release. Long press Pairing button for 5s again until the Wi-Fi LED indicator flashes quickly. Then, the device enters Compatible Pairing Mode.
2 Tap "+" and select "Compatible Pairing Mode" on APP.
Select Wi-Fi SSID with ITEAD-***** and enter the password 12345678, and then go back to eWeLink APP and tap "Next". Be patient until pairing completes.
Specifications
| Model | BASICR3/BASICRFR3 |
| Input | 100-240V AC 50/60Hz 10A Max |
| Output | 100-240V AC 50/60Hz 10A Max |
| Operating systems | Android & iOS |
| Wi-Fi | IEEE 802.11 b/g/n 2.4GHz |
| RF | 433.92MHz |
| Material | PC V0 |
| Dimension | 91x43x25mm |
BASICR3 does not support the remote controller with 433.92MHz.
Product Introduction
The device weight is less than 1 kg. The installation height of less than 2 m is recommended.
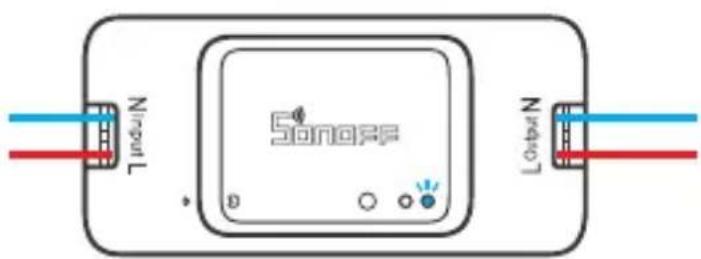
Wi-Fi LED indicator status instruction
| Wi-Fi LED indicator status | Status instruction |
| Quick Pairing ModeFlashes (one long and two short) | |
| Keeps on | Device is connected successfully |
| Flashes quickly | Compatible Pairing Mode |
| Flashes quickly once | Unable to discover the router |
| Flashes quickly twice | Connect to the router but fail to connect to Wi-Fi |
| Flashes quickly three times | Upgrading |
Features
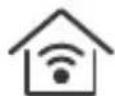
Turn on/off the device from anywhere, schedule power on/off and share APP with your family to control.
Remote Control

Single/Countdown Timing

Voice Control
Share Control

Smart Scene

Sync Status LAN Control Power Report State Control

Camera Linking

RF Remote Controller Pairing
The BASICRFR3 supports the remote controller with 433.92MHz frequency brand to turn on/off, and each channel can learn it independently, which is local short-range wireless control not Wi-Fi control.
Pairing Method:
Long press the pairing button for 3s until the red LED indicator flashesred once, then short press the remote control button you want to pair for successful learning.
Clearing Method:
Long press the pairing button for 5s until the red LED indicator flashesred twice, then short press the learned button corresponding to the remote controller to clear code values of all learned buttons.
Switch Network
If you need to change the network, long press the pairing button for 5s until the Wi-Fi LED indicator changes in a cycle of two short and one long flash and release, then the device enters quick pairing mode and you can pair again.
Factory Reset
Deleting the device on the eWeLink app indicates you restore it to factory setting.
Common Problems
Q: Why my device stays "Offline"?
A: The newly added device needs 1 – 2mins to connect Wi-Fi and network. If it stays offline for a long time, please judge these problems by the blue Wi-Fi indicator status:
- The blue Wi-Fi indicator quickly flashes once per second, which means that the switch failed to connect your Wi-Fi:
① Maybe you have entered a wrong Wi-Fi password.
② Maybe there's too much distance between the switch your router or the environment causes interference, consider getting close to the router. If failed, please add it again.
③ The 5G Wi-Fi network is not supported and only supports the 2.4GHz wireless network.
④ Maybe the MAC address filtering is open. Please turn it off.
If none of the above methods solved the problem, you can open the mobile datanetwork on your phone to create a Wi-Fi hotspot, then add the device again.
- Blue indicator quickly flashes twice per second, which means your device has connected to Wi-Fi but failed to connect to the server.
Ensure steady enough network. If double flash occurs frequently, which means you access an unsteady network, not a product problem. If thenetwork is normal, try to turn off the power to restart the switch.
Betriebsanweisung
1. Ausschalten
natural_image
Technical line drawing of a mechanical component with directional arrows indicating movement or force (no text or symbols)natural_image
Technical line drawing of a mechanical component with a blue arrow indicating direction, showing internal components and a small inset view (no text or symbols)natural_image
Technical illustration of a mechanical component with a blue arrow indicating motion or force, showing internal parts and a small inset view (no text or symbols)natural_image
Technical line drawing of a mechanical component with directional arrows indicating movement or force (no text or symbols)The BASICRFR3 supports the remote controller with 433.92MHz frequency brand to turn on/off, and each channel can learn it independently, which is local short-range wireless control not Wi-Fi control.
Método de pareamento:
Changes or modifications not expressly approved by the party responsible for compliance could avoid the user's authority to operate the equipment.
This device complies with part 15 of the FCC Rules. Operation is subject to the following two conditions: (1) This device may not cause harmful interference, and (2) this device must accept any interference received, including interference that may cause undesired operation.
FCC Radiation Exposure Statement:
This equipment complies with FCC radiation exposure limits set forth for an uncontrolled environment. This equipment should be installed and operated with minimum distance20cm between the radiator & your body. This transmitter must not be co-located or operating in conjunction with any other antenna or transmitter.
Note:
This equipment has been tested and found to comply with the limits for a Class B digital device, pursuant to part 15 of the FCC Rules. These limits are designed to provide reasonable protection against harmful interference in a residential installation. This equipment generates, uses and can radiate radio frequency energy and, if not installed and used in accordance with the instructions, may cause harmful interference to radio communications. However, there is no guarantee that interference will not occur in a particular installation. If this equipment does cause harmful interference to radio or television reception, which can be determined by turning the equipment off and on, the user is encouraged to try to correct the interference by one or more of the following measures:
— Reorient or relocate the receiving antenna.
— Increase the separation between the equipment and receiver.
— Connect the equipment into an outlet on a circuit different from that to which the receiver is connected.
— Consult the dealer or an experienced radio/TV technician for help.
Hereby, Shenzhen Sonoff Technologies Co., Ltd. declares that the radio equipment type BASICR3/BASICRFR3 is in compliance with Directive 2014/53/EU. The full text of the EU declaration of conformity is available at the following internet address:
https://sonoff.tech/usermanuals
TX Frequency:
WiFi: 2412-2472MHz
RX Frequency:
WiFi: 2412-2472MHz SRD: 433.92MHz
Output Power:
11.69dBm(802.11b) 13.85dBm(802.11g) 13.74dBm(802.11n20)

Shenzhen Sonoff Technologies Co., Ltd.
1001, BLDG8, Lianhua Industrial Park, shenzhen, GD, China
ZIP code: 518000 Website: sonoff.tech
MADE IN CHINA


- 下载 “易微联” APP
- 上电
- 恢复出厂设置
- Operating Instruction
- Power off
- Wiring instruction
- Download APP
- Power on
- Add the device
- Compatible Pairing Mode
- Product Introduction
- Wi-Fi LED indicator status instruction
- Features
- RF Remote Controller Pairing
- Pairing Method:
- Clearing Method:
- Switch Network
- Factory Reset
- Common Problems
- Betriebsanweisung
- Ausschalten
- Método de pareamento:
- FCC Radiation Exposure Statement:
- Note:
Brand : Sonoff
Model : RFR3
Category : Smart switch