85550G-FM - Cooktop AEG - Free user manual and instructions
Find the device manual for free 85550G-FM AEG in PDF.

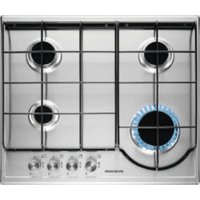
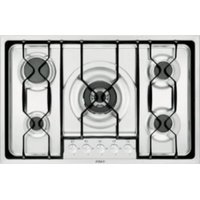
| Product type | Built-in gas hob |
| Brand | AEG |
| Model | 85550G-FM |
| Category | Hob |
| Number of burners | 4 (auxiliary, semi-rapid, rapid, triple crown) |
| Gas type | Natural gas (G20) / LPG (G30/G31) - adjustable |
| Maximum total power | 10 kW (1+2+3+4 kW) |
| Supply voltage | 220-240 V ~ 50-60 Hz |
| Gas connection | Rigid copper pipe Ø12 mm or steel flexible hose (UNI standard) |
| Electrical connection | Three-core cable (brown phase, blue neutral, yellow-green earth) |
| Surface material | Stainless steel |
| Grates | Removable, steel |
| Controls | 4 rotary knobs with integrated ignition and thermocouple safety |
| Ignition | Integrated electric, press 3-4 seconds |
| Safety | Automatic safety valves (gas shut-off if flame extinguished) |
| Cleaning | Damp cloth, avoid abrasive products and steam, do not wash in dishwasher |
| Maintenance | Clean gas ports, remove grates and caps for hand washing |
| Warranty | European warranty, conditions in the supplied booklet |
| After-sales service | Contact AEG authorized after-sales service (numbers by country) |
| Spare parts | Request original parts from the after-sales service |
| Approvals | Complies with EC directives 90/396, 73/23, 89/336, 93/68 |
Frequently Asked Questions - 85550G-FM AEG
User questions about 85550G-FM AEG
0 question about this device. Answer the ones you know or ask your own.
Ask a new question about this device
Download the instructions for your Cooktop in PDF format for free! Find your manual 85550G-FM - AEG and take your electronic device back in hand. On this page are published all the documents necessary for the use of your device. 85550G-FM by AEG.
USER MANUAL 85550G-FM AEG
GB User and installation instructions 12
Built-in hob
Hob cleaning and maintenance 13
Assistance and replacement parts 13
Warranty terms 13
European Guarantee 13
Safety instructions 15
Installation 16
Technical data 19
Introduction
Thank you for choosing a AEG product. Before using the appliance, please read the information and advice in this manual. In this way you will be able to make best use of the appliance and also ensure its lasting efficiency. Keep this handbook for further reference.
Use
Lighting the burners
The control knobs on these models incorporate the ignition and safety device. To light the burners, proceed as follows:
I. Turn the required knob.
2. Keep the knob pressed down for 3-4 seconds to allow the sparks to ignite the gas coming out of the flame-spreader and to allow the thermocouple to heat up.
3. After 3-4 seconds release the knob, turning it anticlockwise to adjust the flame as required. If the flame does not stay alight, repeat the operation from point I.

Symbols
cock closed;
: ignition;
: max. gas delivery;
a : min. gas delivery.
Burner use
For lower gas consumption and better efficiency, it is advisable to use pots of widths suitable for the burners, making sure the flame does not go beyond the edges (comply with the table on page 19).
Automatic safety valve
This safety device automatically closes the gas cock if one of the burners accidentally goes out due to draughts, a pot spilling over, or a temporary interruption of the gas supply. This device is activated approx. 30 seconds after the flame has gone out.
Hob cleaning and maintenance
Before carrying out any hob cleaning or maintenance, always unplug the appliance or disconnect the power by means of the main switch.
- Never use steam appliances, scouring pads, steel wool, muriatic acid or other products which could scratch or mark the surface.
- Do not leave acid or alkaline substances on the hob.
- Never use sharp objects, as they could damage the seals between the trim and worktop.
- Do not use products containing sands, alkalis, acids, chlorides, oven sprays, detergents usually used cleaning dishwashers.
- To prevent scale deposits from forming, always thoroughly dry the appliance after going over it with a damp cloth.
- Immediately remove any foods with high sugar content that spill onto the hob.
- Remove grime with a damp cloth.
- The grates, burner caps and flame-spreaders can be removed from the hob and cleaned with hot soapy water, thoroughly drying them afterwards. NEVER CLEAN THEM IN A DISHWASHER. Make sure the gas outlet zones are perfectly clean.
- The natural colour of the pot grids in the pot holder section could alter over time, due to the heat.
Assistance and replacement parts
Before leaving the factory this appliance was tested and adjusted by expert and specialised personnel in order to ensure best operation. Any repairs or adjustments subsequently required must be carried out with maximum care and attention.
Therefore always contact the Dealer who sold the product or our nearest Service Centre, specifying the type of problem, appliance model (Model), product number (Prod. No.) and the serial number (Ser. No.). These details are given on the label on the last page. Always demand the use of original replacement parts.
Warranty terms
Your new appliance is covered by warranty. The warranty terms are given in full in the booklet "Warranty provisions - Service Centres" included inside the appliance.
Carefully keep the receipt or waybill together with the booklet, as documentation of the purchase (and purchase date) of your appliance.
Show these documents to the personnel i case of assistance by the Service Centre. Otherwise the Service Centre will be obliged to charge your for any repairs.
In case of need, you can find the nearest Centre by consulting the booklet "Warranty provisions - Service Centres" or the Yellow Pages under Electrical appliances/Repairs.
European Guarantee
This electrical appliance is guaranteed by Electrolux in each of the countries listed below, for the period specified in the appliance warranty or, otherwise, by the law in the country of use. If you move to any of the countries listed below, also the appliance warranty will be transferred with the following conditions:
The appliance warranty starts from the date of first purchase, which must be proven by showing a valid purchase document issued by the seller.
The warranty period and the conditions offered (e.g. labour and/or replacement parts) shall refer to the conditions existing in the new country of residence for the same type of products.
The warranty is strictly personal and is in the name of the original appliance purchaser and cannot be transferred to another user.

The appliance must be installed and used in compliance with the instructions supplied by Electrolux, only for domestic use and in any case not for business or professional activities.
The appliance must be installed in compliance with all the current regulations in the new country of residence.
The provisions of the European Guarantee do not prejudice the owner's rights according to the law.
| www.electrolux.com | ||
| ✓ | ||
| Albania | +35 5 4 261 450 | Rr. Pjeter Bogdani Nr. 7 Tirane |
| Belgique/België/Belgien | +32 2 363 04 44 | Bergensesteenweg 719, 1502 Lembeek |
| Česká republika | +420 2 61 12 61 12 | Budějovická 3, Praha 4, 140 21 |
| Danmark | +45 70 11 74 00 | Sjaellandsgade 2, 7000 Fredericia |
| Deutschland | +49 180 32 26 622 | Muggenhofer Str. 135, 90429 Nürnberg |
| Eesti | +37 2 66 50 030 | Mustamãe tee 24, 10621 Tallinn |
| España | +34 902 11 63 88 | Carretera M-300, Km. 29,900 Alcalá de Henares Madrid |
| France | www.electrolux.fr | |
| Great Britain | +44 8705 929 929 | Addington Way, Luton, Bedfordshire LU4 9QQ |
| Hellas | +30 23 10 56 19 70 | 4, Limnou Str., 54627 Thessaloniki |
| Hrvatska | +385 1 63 23 338 | Slavonska avenija 3, 10000 Zagreb |
| Ireland | +353 1 40 90 753 | Long Mile Road Dublin 12 |
| Italia | +39 (0) 434 558500 | C.so Lino Zanussi, 26 - 33080 Porcia (PN) |
| Latvija | +37 17 84 59 34 | Kr. Barona iela 130/2, LV-1012, Riga |
| Lithuania | +370 5 27 80 609 | Verkiú 29, 09108 Vilnius, Lithuania |
| Luxembourg | +35 2 42 43 13 01 | Rue de Bitbourg, 7, L-1273 Hamm |
| Magyarország | +36 1 252 1773 | H-1142 Budapest XIV, Erzsébet királyné utja 87 |
| Nederland | +31 17 24 68 300 | Vennootsweg 1, 2404 CG - Alphen aan den Rijn |
| Norge | +47 81 5 30 222 | Rislokkvn. 2, 0508 Oslo |
| Österreich | +43 18 66 400 | Herzigasse 9, 1230 Wien |
| Polska | +48 22 43 47 300 | ul. Kolejowa 5/7, Warsaw |
| Portugal | +35 12 14 40 39 39 | Quinta da Fonte - Edificio Gonçalves Zarco - Q 35 -2774-518 Paço de Arcos |
| Romania | +40 21 451 20 30 | B-dul Timisoara 90, S6, Bucharest |
| Schweiz - Suisse - Svizzera | +41 62 88 99 111 | Industriestrasse 10, CH-5506 Mägenwil |
| Slovenija | +38 61 24 25 731 | Tržaška 132, 1000 Ljubljana |
| Slovensko | +421 2 43 33 43 22 | Electrolux Slovakia s.r.o., Electrolux Domace spotrebíce SK, Seberíniho 1, 821 03 Bratislava |
| Suomi | +35 8 26 22 33 00 | Konepajanranta 4, 28100 Pori |
| Sverige | +46 (0)771 76 76 76 | Electrolux Service, S:t Göransgatan 143, S-105 45 Stockholm |
| Türkije | +90 21 22 93 10 25 | Tarlabasi caddesi no : 35 Taksim Istanbul |
| Russien | +7 095 937 7837 | 129090 Moskva, Олипейский посмент, 16, БД "Олимник" |
Always contact qualified personnel in the following cases:
- installation (refer to the installation section);
-doubts regarding operation.
Contact an authorised service centre in the following cases:
- immediately after unpacking, in case of doubts about the integrity of the appliance;
- replacing or damaged power cable;
- appliance malfunction or poor operation, requesting original replacement parts.
General instructions
To ensure safe and efficient operation of this appliance:
- only contact authorised service centres;
- always demand the use of original replacement parts;
- the appliance is designed for non-professional, domestic use; do not modify its characteristics;
- the dataplate gives the symbols indicating the countries for which the instructions apply;
- appliance electrical safety is guaranteed only when it is connected to an earthing system in compliance with the current regulations;
- do not touch the pot grids during use, since they become very hot. Keep children away from the appliance;
- only use the appliance for cooking food;
- before any cleaning or maintenance operations, or in case of malfunction, disconnect the appliance from the mains power supply;
- always check that the control knobs are in the off position when the appliance is not in use.
Do not allow children to touch:
- the controls or the appliance in general;
- the packing components (bags, polystyrene, staples, etc.);
- the appliance, during and immediately after use, since the hob becomes very hot;
- an unused appliance (make any potentially hazardous parts safe).
Do not:
- touch the appliance with wet parts of the body;
- use the appliance when barefoot;
- pull the appliance or power cable to unplug it;
- carry out improper or hazardous operations;
- leave the power cables of other electric appliances on hot parts of the appliance;
- expose the appliance to atmospheric agents;
- use the appliance as a support surface;
- use flammable fluids near the appliance;
- use adapters, multisockets or extension leads;
- allow anyone except qualified personnel to install or repair the appliance.
Important
- Do not place unstable or deformed pots on the burners, since they may tip over or cause spills.
- If the appliance has a lid, make sure the burners are cold before closing it.
- Close the gas supply cock when the hob is not in use.
- Before installation, make sure the gas supply is compatible with appliance specifications. The arrangement for the gas usable is given on the label on the bottom of the tray. This appliance is not connected to a fume extraction device and must be installed and connected in compliance with the current regulations. Pay particular attention to the applicable regulations on ventilation. The use of a gas cooking appliance produces heat and humidity in the room where it is installed. Ensure the room is adequately ventilated:
keep natural ventilation openings open, or install a mechanical ventilation device (extractor hood with exhaust duct). In case of intensive or prolonged use of the appliance, it may be necessary to provide additional ventilation, for example by opening a window, or more efficient ventilation, by increasing the fan speed (if present).
The manufacturer declines any liability for damage due to: incorrect installation, improper, wrong or unreasonable use.
Installation
The necessary operations for installation, including gas and electrical connections, are described below.
Such operations must be carried out by qualified personnel in accordance with current regulations, since their performance by unskilled people may constitute a hazard.
The manufacturer declines any liability for injury or damage due to non-compliance with these provisions.
THE GAS CONNECTION MUST COMPLY WITH UNI 7129 AND UNI 7131 STANDARDS.
Preparing the cabinet
This handbook regards a class 3 built-in cooking hob.
Prepare the opening in the top according to the measurements given in fig. 1.
The opening must be made in the most convenient position, taking into account that the gas pipe must not come into contact with the sides of a possible oven under the hob.
Fitting in the cabinet
After carrying out the connection operations, apply the sealing strip around the hole and position the hob.
Carefully tighten the fixing hooks (fig. 2). Remove any excess sealing strip.
Note
If the appliance is not installed above an oven, a separator baffle must be arranged (fig. 3).
Flush fitting (85550 G-FM model only)
- Prepare the opening in the top according to the measurements given in fig. 1b.
- Mill the top along the entire edge of the opening, making sure to respect the measurements indicated in fig. 1b and 4.
- The opening must be made in the most convenient position, taking into account that the gas pipe must not come into contact with the sides of a possible electrical appliance installed under the hob.
After carrying out the necessary connections, spread the silicone sealant around the opening, at the milling, and position the hob. - Position the hooks, supplied as accessories, in their special seats, on the fixing profiles.
- Carefully tighten the fixing hooks (fig. 4).
- Remove any excess sealant.
Connection to the gas supply
Before connecting the appliance to the gas supply, in compliance with the current regulations, make sure it is arranged for the type of gas to be used.
Otherwise, carry out the operations described in the section "Replacing injectors" (page 17). For liquefied gas, use pressure regulators complying with the current regulations.
Connection to the gas pipe can be carried out in two ways:
A Connect the gas hob using a 12mm diameter rigid copper pipe, as shown in fig. 5. To ensure a good seal, fit the elastomer gasket supplied as an accessory (standard UNI EN 682).
B Connect the hob using a continuous-surface flexible steel tube (standard UNI 9891). Also in this case, to ensure a good seal use the gasket supplied as an accessory. The current regulations on gas systems, and in particular the above-mentioned UNI standards must be respected.
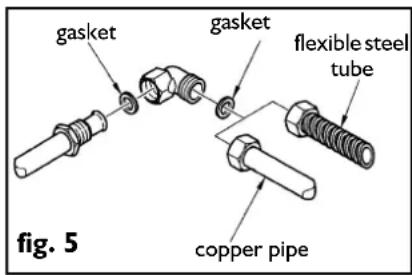
After carrying out the connection use soapy water to check for any leaks.
Ventilation of rooms
Make sure the room where the appliance is installed has permanent ventilation openings towards the outside or ventilation ducts to ensure an adequate air flow, as prescribed by the current regulations. All openings made must:
I. have a section of at least 100cm^2
2. be made in such a way that they cannot be obstructed from inside or outside;
3. be provided with suitable protection to ensure that the ventilation opening is not reduced;
4. be at a suitable height from floor so that they do not hinder the exhausting of fumes.
If openings are made in the wall of an adjacent room, the latter must have direct ventilation and must not be:
I. a bedroom;
2. a common area of the building;
3. a room with fire risk.
Before testing the appliance, make sure the room where the ventilation opening is made is not in low pressure due to the operation of another user and that the ventilation between the two rooms is guaranteed by permanent free openings, for example by increasing the gap between the bottom of the door and the floor. The fumes must be exhausted by means of a hood which, in turn, must be connected to a chimney, flue, or directly to the outside.
Accessing the hob
To access the tray containing the functional parts, proceed as follows:
- remove the grates, burner caps and flame-spreaders;
- remove the knobs, sliding them off their pins;
- remove the screws fixing the burners to the hob; for the flush version, also undo the two screws fixing the tray in the front part of the same.
- lift the hob.
Important: for the flush version, before proceeding as described above, remove the entire hob from the top by unscrewing the fixing hooks.
Connection to the power supply
The AEG cooking hob comes with a 3-core power cable with free terminals
If the hob is permanently connected to the power supply, install a circuit breaker having a contact opening distance that allows complete disconnection in the conditions of overvoltage category III. Make sure:
a) the plug and socket are suitable for a 16 A current;
b) both are easily reached and positioned so that no live part can be accessed when inserting or removing the plug;
c) the plug can be inserted without difficulty and is accessible with the appliance installed;
d) the hob does not rest against the plug when installed in the cabinet;
e) the terminals of two appliances are not connected to the same plug;
f) a 3 × 0.5 ~mm^2 H05VV-F type cable is used when replacing the power cable;
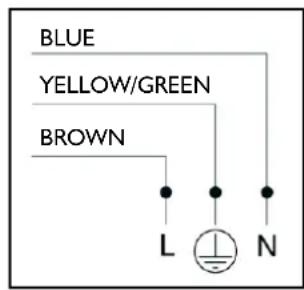
g) to respect the polarities of the free terminals (Brown=Line Blue=Neutral Yellow/Green=Earth).
NB: Make sure the characteristics of your household electrical system (voltage, max. power and current) are compatible with those of your AEG hob.
Replacing injectors
NB: All the products are factory-set for natural gas (G20).
If a different type of gas is to be used, change the injectors as follows:
I. remove the grates, burner caps and flame-spreaders;
2. unscrew and remove the injectors and replace them with those supplied, corresponding to the mains gas, making sure the marking is that given in the table (page 19);
3. refit the flame-spreaders, burner caps and grates;
4. these burners do not require air adjustment.
Important
When converting the appliance to a different type of gas, place the corresponding sticker (supplied as an accessory) in the special space on the dataplate. For operation with LPG. (G30 or G31) the minimum adjustment screw must be screwed down. These appliances are supplied in cat. II 2H3+.
Minimum flame adjustment
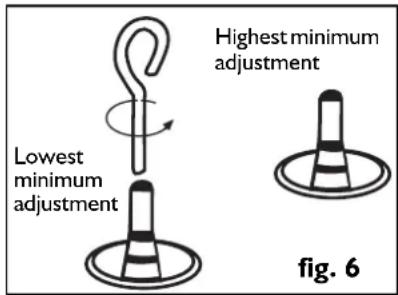
- Remove the knobs (push-on type).
- Light the burners and adjust the minimum flame by turning the adjustment screw clockwise to decrease the flame and anticlockwise to increase it (fig. 6). The screwdriver for adjustment is supplied with the accessories.
Appliance cat. II 2H3+
| Type of gas Burner | Injector marking | Nominal heating capacity in kW | Reduced heating capacity in kW | |
| Natural gas (methane) | Auxiliary | 70 | 1.0 | 0.5 |
| Semi-rapid | 96 | 2.0 | 0.6 | |
| G20 20 mbar | Rapid | 119 | 3.0 | 1.1 |
| Triple crown | 146 | 4.0 | 2.1 | |
| Liquefied petroleum gas (LPG) | Auxiliary | 50 | 1.0 | 0.5 |
| Semi-rapid | 71 | 2.0 | 0.6 | |
| G30 29 mbar | Rapid | 86 | 3.0 | 1.1 |
| G31 37 mbar | Triple crown | 98 | 4.0 | 2.1 |
| Table of recommended pots | ||||
| Burner Ø Pots in cm | ||||
| Auxiliary | max. Ø 18 | |||
| Semi-rapid | max. Ø 18 | |||
| Rapid | max. Ø 22 | |||
| Triple crown | max. Ø 30 | |||


The use of larger pots than those indicated can cause excessive overheating of the knobs and top and, in case of prolonged use, yellowing of the cover (if in stainless steel).
AEG declines any liability for damage due to such use.
Total heating capacity: see dataplate on the bottom of the hob.
Air necessary for combustion: 2m^3 /h per kW of installed power - see dataplate.
Power supply voltage 220-240 V 50-60 Hz.

The appliance complies with the following EC Directives:
-90/396/EEC (Gas);
-
73/23/EEC dated 19/02/73 (Low Voltage);
-
89/336/EEC dated 03/05/89 (Electromagnetic Compatibility);
-93/68/EEC dated 22/07/93 as amended.
Sommaire
Introduction 20
Utilisation 20