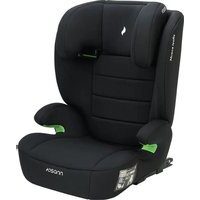
Musca Isofix - Child car seat Osann - Free user manual and instructions
Find the device manual for free Musca Isofix Osann in PDF.


| Brand | Osann |
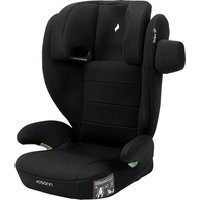
| Model | Musca Isofix |
| Product type | i-Size child booster seat (car seat) |
| Approval | Regulation No. 129 (i-Size) |
| Use (height) | Children from 100 to 150 cm |
| Installation position | Forward-facing only |
| Installation with Isofix | Isofix connectors + 3-point seatbelt (recommended) |
| Installation without Isofix | 3-point seatbelt only |
| Child restraint system | Vehicle's 3-point seatbelt |
| Isofix connectors | Retractable with extensions, green locking indicator |
| Headrest | Height-adjustable (lever at the back) |
| Belt guide | Diagonal on headrest, lap belt under armrest |
| Cover | Machine washable at 30°C, delicate cycle |
| Care | Do not use solvents, do not iron, do not bleach, dry at low temperature |
| Safety | Do not use forward-facing for children <3 years, replace after accident, regular inspection |
| Customer service | +49 (0)7731 970077 |
Frequently Asked Questions - Musca Isofix Osann
User questions about Musca Isofix Osann
0 question about this device. Answer the ones you know or ask your own.
Ask a new question about this device
Download the instructions for your Child car seat in PDF format for free! Find your manual Musca Isofix - Osann and take your electronic device back in hand. On this page are published all the documents necessary for the use of your device. Musca Isofix by Osann.
USER MANUAL Musca Isofix Osann
natural_image
Icon of an open book with an information symbol inside a yellow circle (no text or symbols)DE
ENFRIT
NL
ESCZPL
SK
1 & 2):
natural_image
Diagram showing a vehicle head with a red arrow indicating transformation (no text or symbols present)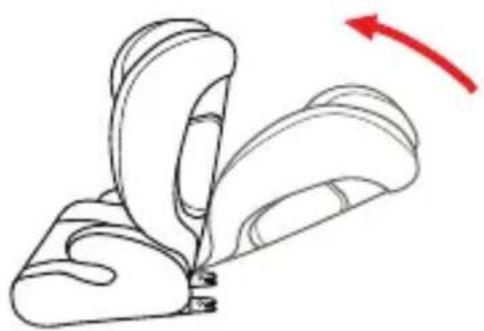
natural_image
Line drawing of a car seatbelt with a red curved arrow indicating rotation (no text or symbols)natural_image
Illustration of a hand pressing down on a device with red directional arrows indicating movement (no text or symbols)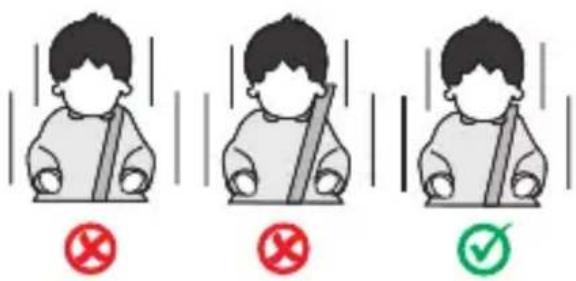
Isofi x-Konnektoren
natural_image
Illustration of a hand using a tool to adjust or install a component, with a red arrow indicating direction (no text or symbols present)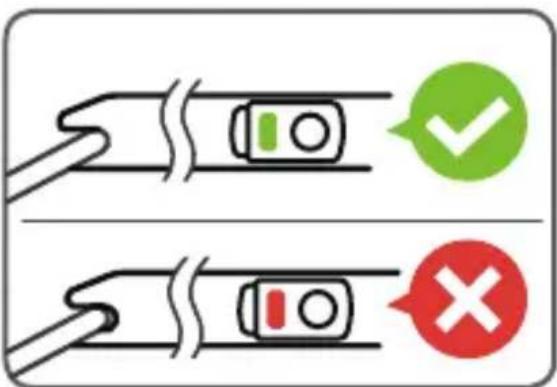
Thank you for choosing our child car seat. If you need help with this product, please contact our customer service.
HOW TO USE
• This product is suitable for children between 100 and 150cm in height.
- Forward-facing installation for children between 100 to 150 cm in height made possible thanks to the Isofi x connectors. The child is strapped in with the car's 3-point seat belt. Alternatively, the child car seat in the 100–150 cm size class can also be fitted using the 3-point seat belt only. Connection with the Isofi x connectors is not mandatory, but it is recommended.
NOTE
This is an optimised i-Size children's booster seat. It is approved under Regulation No. 129 for use primarily on "i-Size vehicle seats" as specified by vehicle manufacturers in the vehicle manual.
If in doubt, the manufacturer of the enhanced child restraint system or the retailer should be consulted.
IMPORTANT - DO NOT USE THE CHILD CAR SEAT IN THE DIRECTION OF TRAVEL UNTIL THE CHILD HAS REACHED THE AGE OF 3.

1 & 2): When used with Isofi x: This only applies if Isofi x connectors are available and the seat is recognised as i-Size-compatible in the vehicle manual.
The following table provides information about the fastening devices and methods:
| Height range | Installation direction | Installation Type | Child safety device | |
| 100–150 cm | Forward-facing | Isofi x connectors & 3-point car seat belt | i-Size booster seat | 3-point car seat belt |
| 100–150 cm | Forward-facing | 3-point car seat belt | i-Size booster seat | 3-point car seat belt |
WARNING
- Please read through these instructions carefully before use in order to guarantee the safety of your child. Retain the instructions. Non-compliance with the instructions in this manual may result in serious injuries to your child.
- For Isofi x installation: Be sure to read the car manufacturer's manual.
- Do not use load-bearing contact points other than those described in the instructions and indicated on the child restraint system.
- Do not use this child car seat at home. It has been designed exclusively for use in a car.
- Do not leave your child unsupervised in the seat at any time.
- The child seat must be replaced if it has been subject to severe mechanical stress in an accident.
- For safety reasons, the child car seat must be secured in the vehicle even when there is no child sitting in the child car seat.
- Always make sure that all straps that attach the child car seat to the vehicle are secure and that all belts that restrain the child are adjusted to fit the child's body. Ensure that the belts are not twisted.
- Items of luggage and other objects that could cause injury in the event of a collision must be properly secured.
- The rigid elements and plastic parts of a child restraint system must be positioned and installed so that they cannot become jammed by a movable seat or a vehicle door.
- It is important that belts that sit low hold the child's pelvis firmly in place. Your child should always be fastened in to stop them falling out.
- It is dangerous to make changes or additions to the product without approval from the responsible authority. Non-compliance with the installation instructions provided by the manufacturer of the child restraint system may also present risks to the safety of your child.
- This child seat is designed for children with a maximum height of 150 cm. Never overload the child seat by transporting more than one child or additional loads in it.
- The child restraint system must not be used without the seat cover.
- The seat cover must not be replaced by a cover other than that recommended by the manufacturer, as this seat cover is an important component of the restraint system.
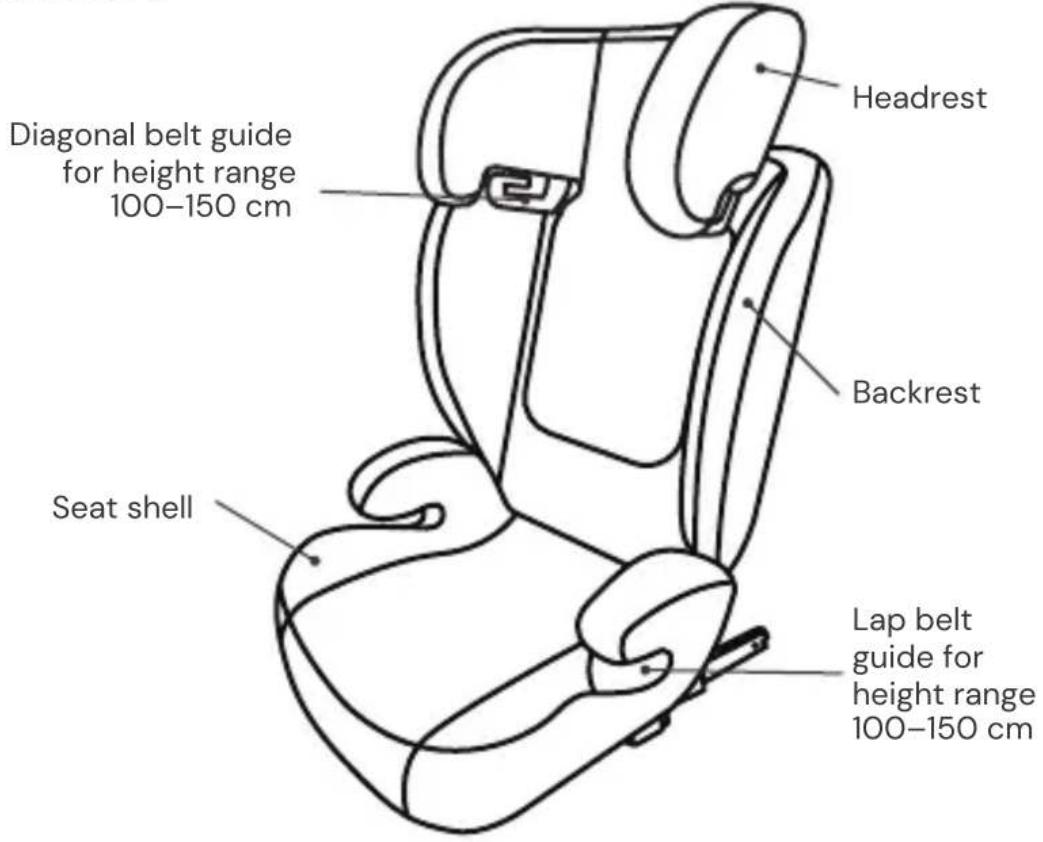
SEAT PARTS
Front view
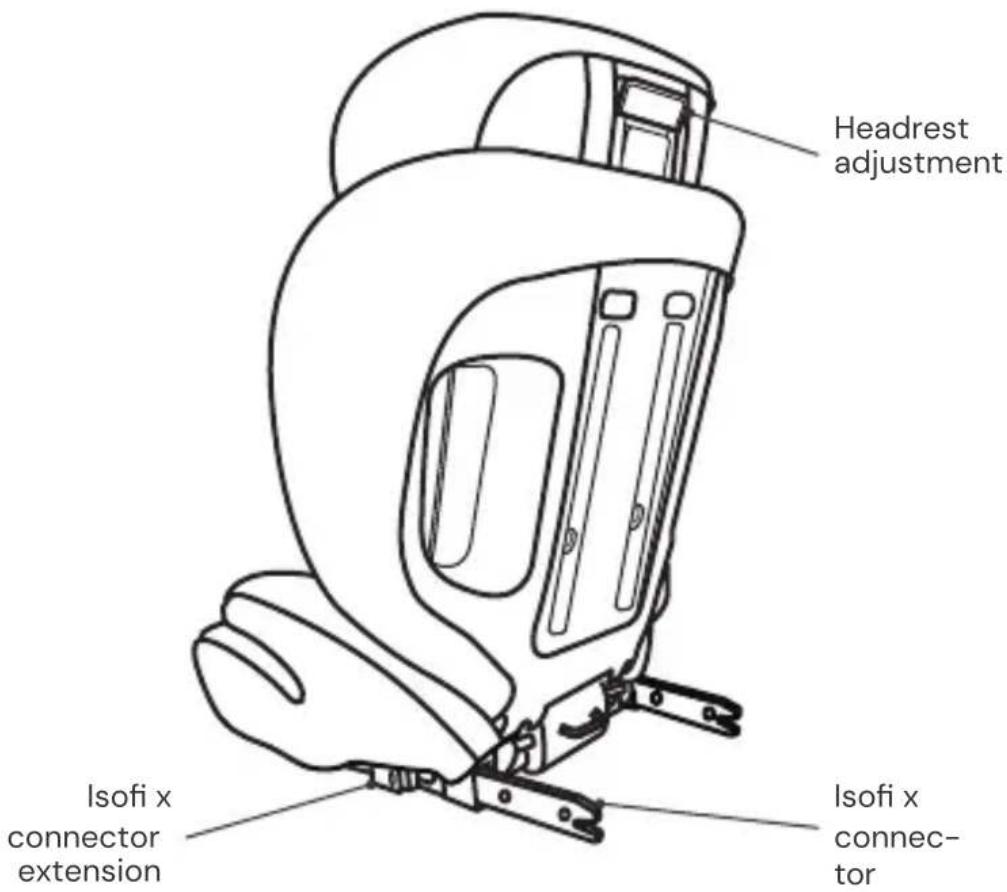
Rear view
CLEANING
To guarantee long-term use of your child car seat, do not use any solvents, abrasive cleaners or aggressive cleaning agents to clean the car seat. Check the stability of the fabric and the seams after each wash. When washing the fabric, carefully follow the instructions on the label (see below).

Wash at 30°C, gentle wash cycle

DO NOT iron

DO NOT bleach

DO NOT dry clean

Tumble dry at low temperature
MAINTENANCE
Check the condition of the product for possible damage at regular intervals. In the event of damage, the child car seat must no longer be used and must be kept out of the reach of children.
In case of any issues, please contact
Osann customer service on +49 (0)7731 970077.
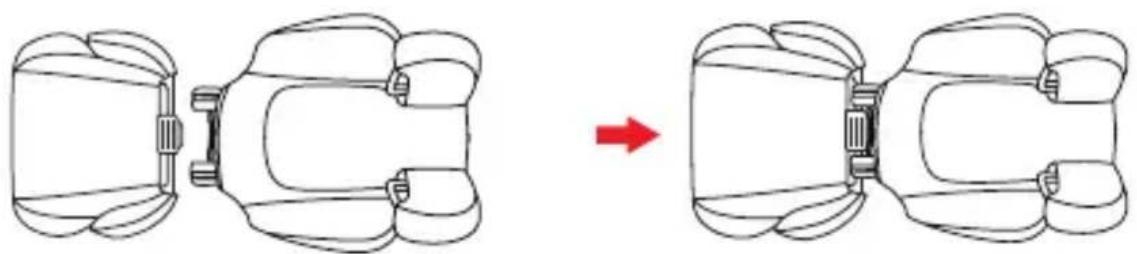
Assembling the backrest & seat shell (variant-dependent)
• The child car seat is delivered unassembled.
- Please take the backrest and hook it into the seat shell at a shallow angle.
- Hold the seat shell firmly and push the backrest upwards until it is fully engaged.
- Use of the child car seat without a backrest is not permitted.
natural_image
Diagram showing a vehicle head assembly before and after, with no text or symbols present.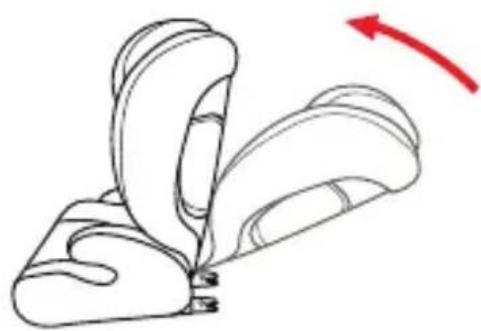
natural_image
Line drawing of a mechanical component with a red arrow indicating rotation (no text or symbols)Adjusting the headrest
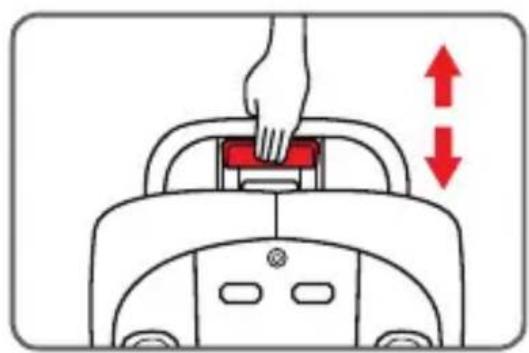
- Pull up the headrest adjustment lever on the back of the child car seat and adjust the height of the headrest.
- Thread the diagonal belt of the car's 3-point seat belt through the diagonal belt guide on the headrest.
- Make sure that the diagonal strap of the car's 3-point seat belt comes out of the diagonal strap guide on the headrest just above your child's shoulders.
- Release the lever and ensure that the headrest is engaged.
natural_image
Illustration of a hand pressing down on a device with red directional arrows indicating movement (no text or symbols)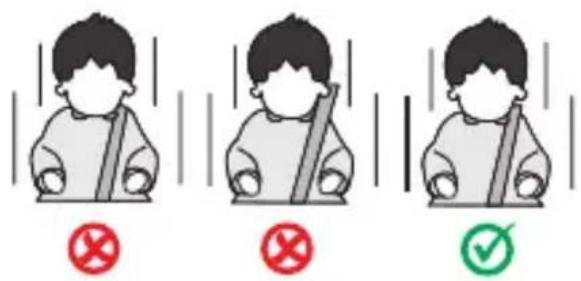
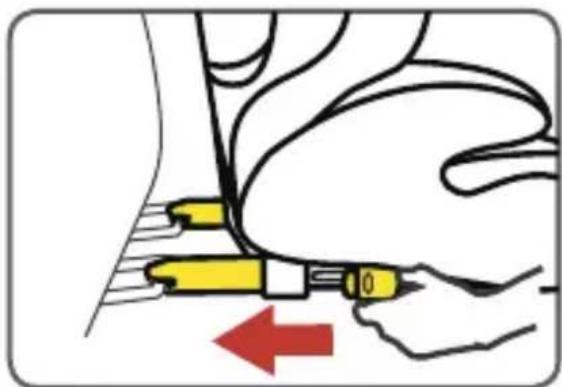
Isofi x connectors
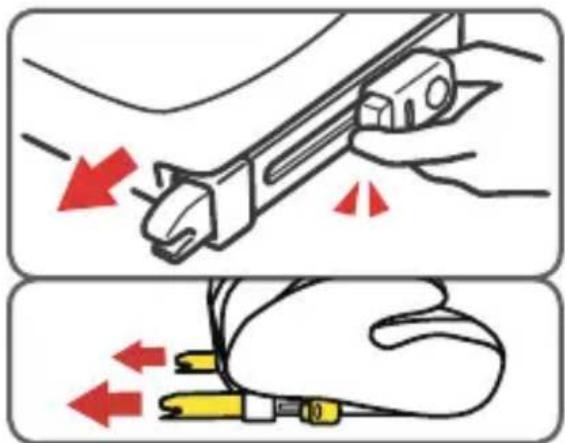
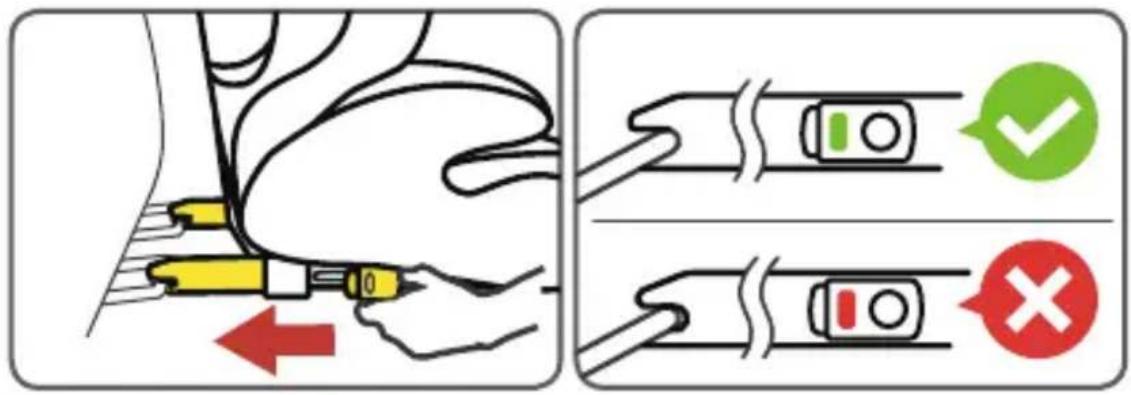
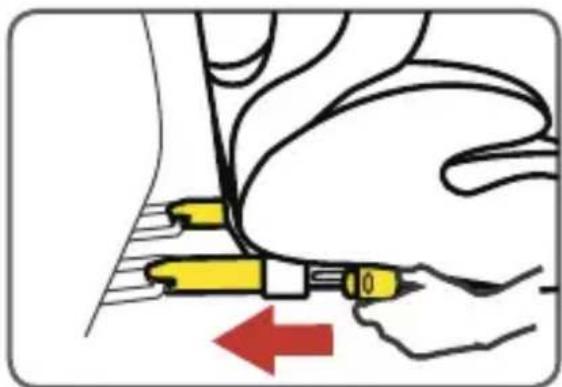
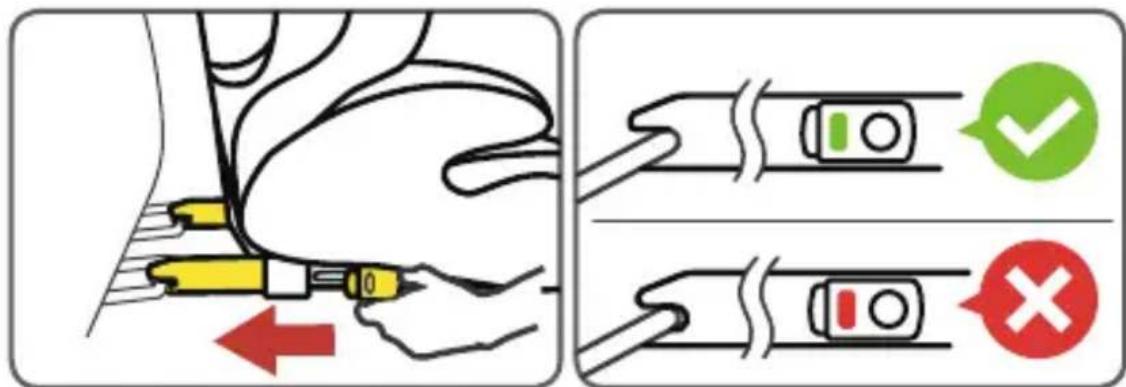
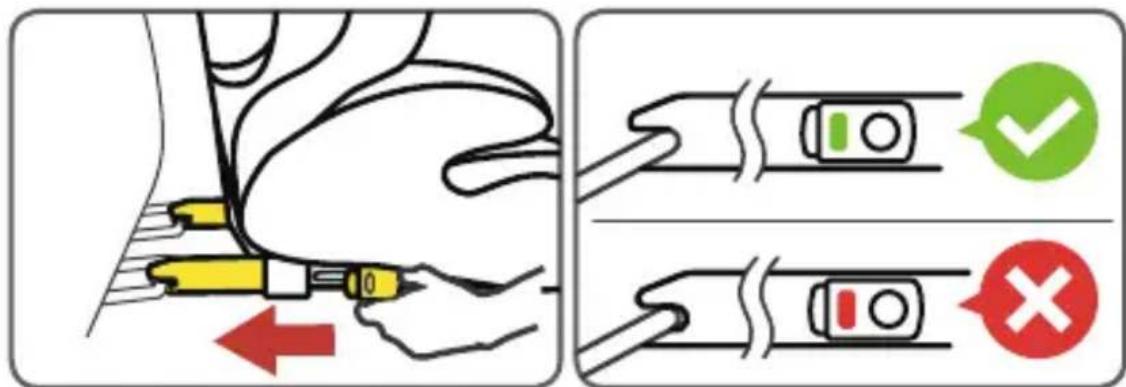
- Press the two lateral Isofi x connector buttons in order to extend the length of the Isofi x connectors.
- Guide the Isofi x connectors onto the Isofi x anchor points on the seat of the vehicle and ensure that they lock into position.
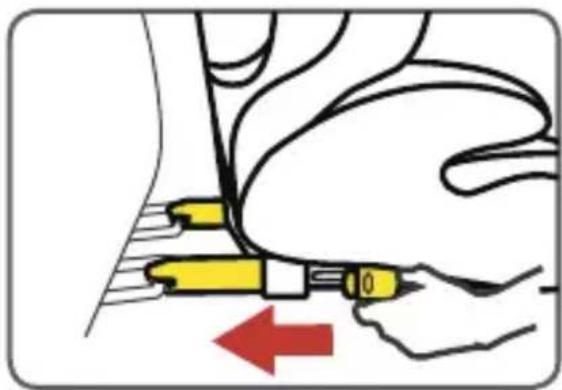
- Push the child car seat in until it rests securely against the backrest of the seat of the vehicle. Ensure that both Isofi x indicators are showing green.
natural_image
Illustration showing two-step instructions for using a tool to adjust the grip of a device, with red arrows indicating motion (no text or symbols present)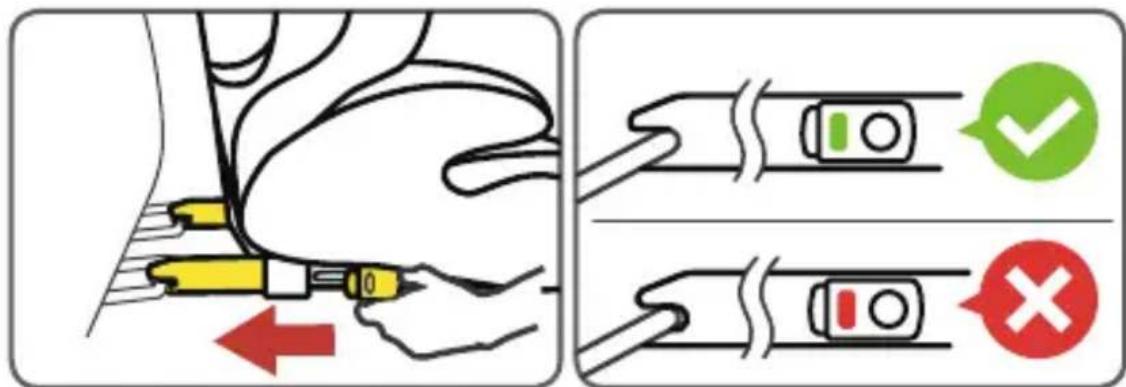
INSTALLATION OF THE CHILD CAR SEAT
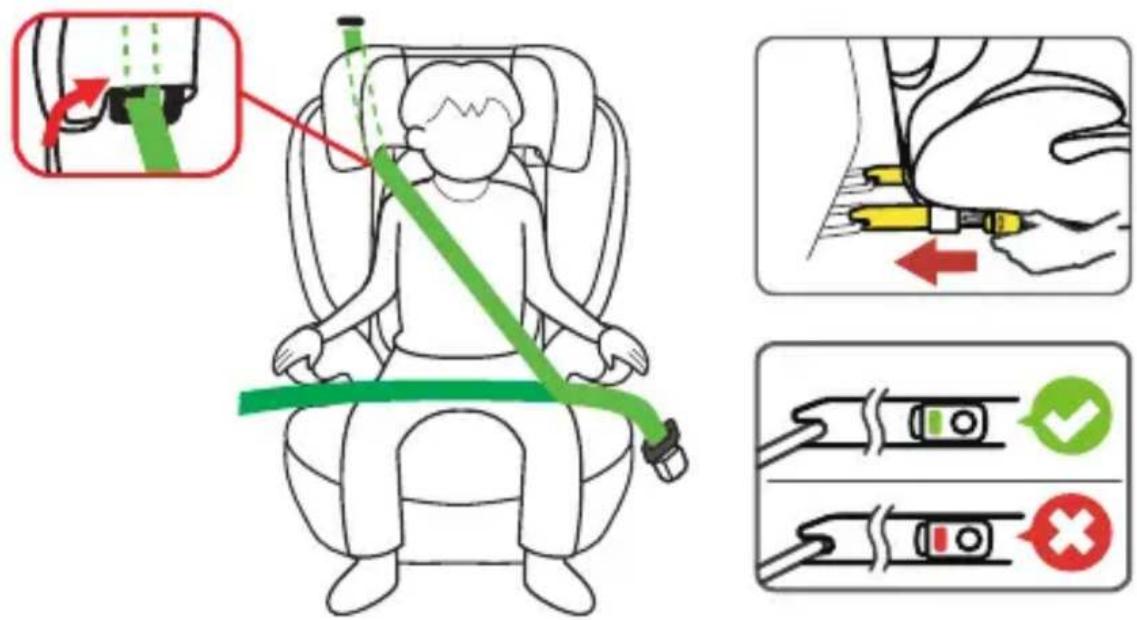
Height range 100–150 cm, forward-facing
-
Press the two lateral Isofix connector buttons in order to extend the length of the Isofi x connectors.
-
Guide the Isofi x connectors to the Isofi x anchor points on the car seat and snap them into place.
-
Push the child car seat in until it rests securely against the backrest of the car seat. Ensure that both Isofi x indicators are switched to green.
-
Thread the diagonal belt of the 3-point car seat belt through the diagonal belt guide on the headrest of the child car seat.
-
Thread the lap belt of the car's 3-point belt through the first lap belt guide (below the armrest) in the seat area of the child car seat.
-
Put your child in the child car seat.
-
Adjust the height of the headrest so that the child's head is fully in the headrest and the diagonal belt comes out through the belt guide at the level of the child's shoulders.
-
Fasten the belt buckle of the 3-point seat belt until you hear a click.
-
Make sure that both the diagonal belt and the lap belt run through the second lap belt guide (below the armrest) on the child car seat, which faces the car's seat belt buckle.
-
Pull on the diagonal strap to tighten it. Make sure that the straps are not twisted.
Installation without Isofi x:
Alternatively, the child car seat in the 100-150 cm size class can also be fitted with the 3-point seat belt only. Attaching the seat with the Isofi x connectors is not absolutely essential but is recommended.
natural_image
Diagram showing a vehicle head assembly before and after, with a red arrow indicating the process (no text or symbols present)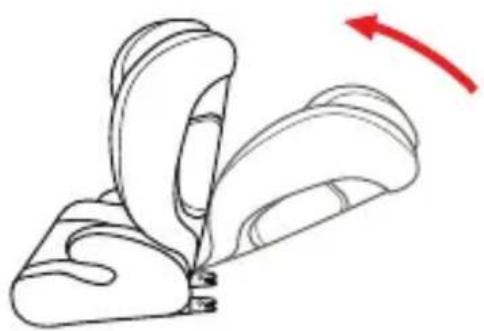
natural_image
Line drawing of a car seatbelt with a red curved arrow indicating rotation (no text or symbols)natural_image
Illustration of a hand pressing down on a device with red directional arrows indicating movement (no text or symbols)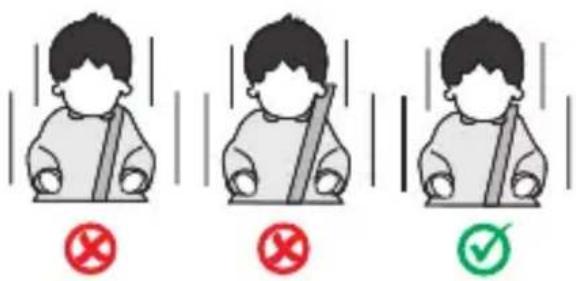
Connecteurs Isofi x
natural_image
Illustration of a hand holding a tool with a red arrow indicating direction (no text or symbols)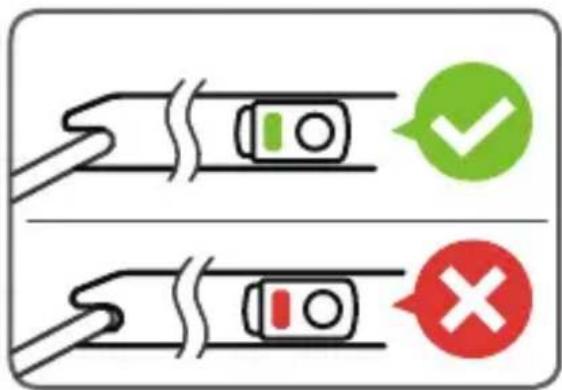
INSTALLATION DU SIÈGE AUTO POUR ENFANT
natural_image
Diagram showing a vehicle's side profile before and after assembly, with no text or symbols present.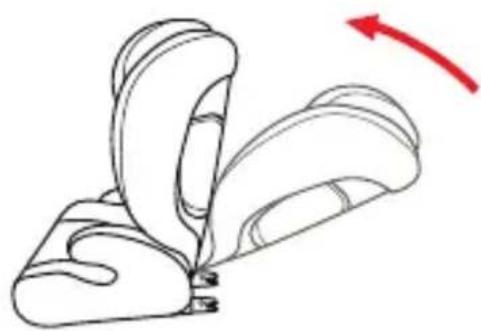
natural_image
Line drawing of a mechanical component with a red arrow indicating rotation (no text or symbols)natural_image
Illustration of a hand pressing down on a device with red directional arrows indicating movement (no text or symbols)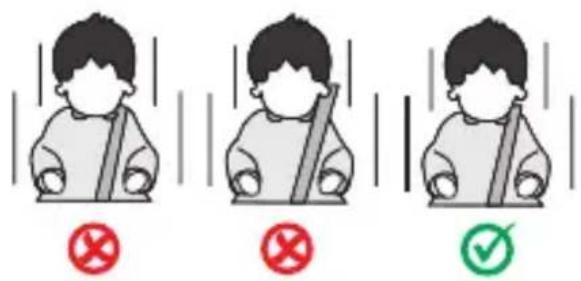
Connettori Isofi x
MONTAGGIO DEL SEGGIOLINO AUTO PER BAMBINI
natural_image
Diagram showing a vehicle head assembly before and after, with a red arrow indicating the process (no text or symbols present)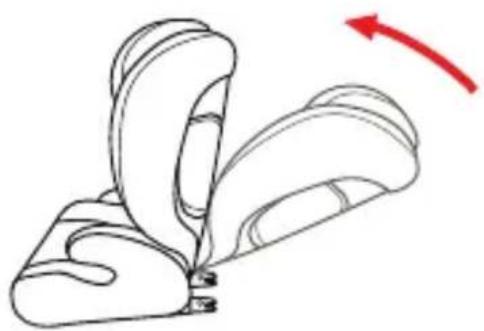
natural_image
Line drawing of a car seatbelt with a red curved arrow indicating rotation (no text or symbols)natural_image
Illustration of a hand pressing down on a device with red directional arrows indicating movement (no text or symbols)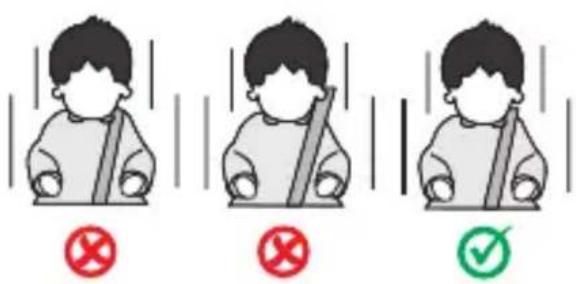
Isofi x-connectoren
natural_image
Illustration of a hand using a tool to adjust or install a component, with a red arrow indicating direction (no text or symbols present)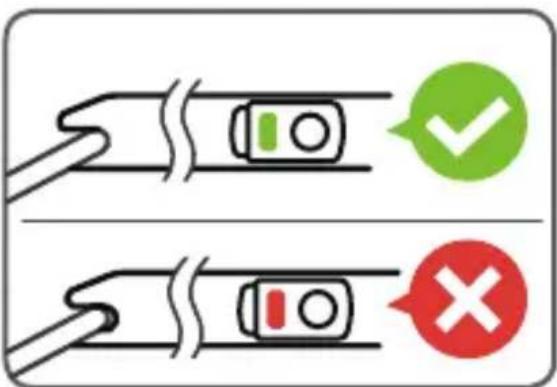
MONTAGE VAN HET AUTOSTOELTJE
natural_image
Diagram showing a vehicle's side profile before and after assembly, with no text or symbols present.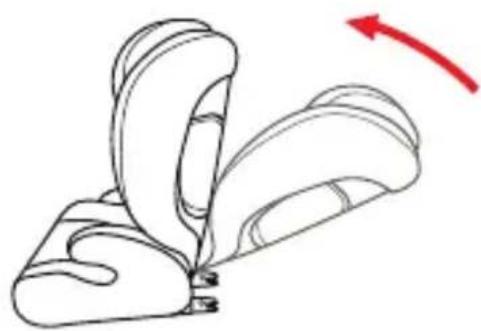
natural_image
Line drawing of a mechanical component with a red arrow indicating rotation (no text or symbols)natural_image
Illustration of a hand pressing down on a device with red directional arrows indicating movement (no text or symbols)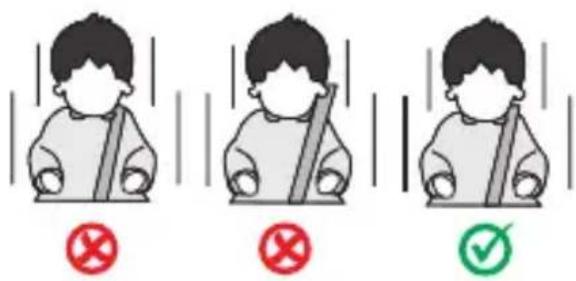
Conectores Isofi x
natural_image
Diagram showing a vehicle head with a red arrow indicating transformation (no text or symbols present)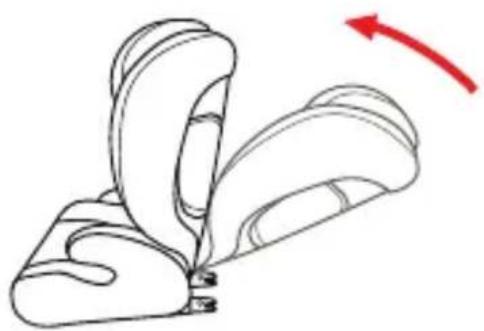
natural_image
Line drawing of a car seatbelt with a red curved arrow indicating rotation (no text or symbols)natural_image
Illustration of a hand pressing down on a device with red directional arrows indicating movement (no text or symbols)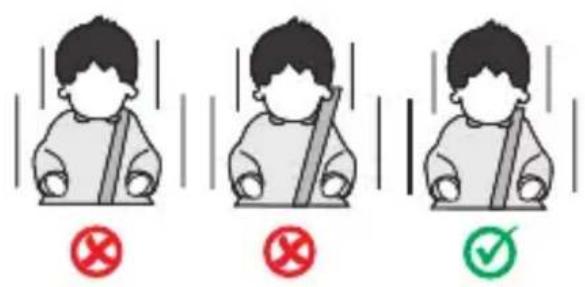
Konektory Isofi x
natural_image
Illustration showing two-step instructions for using a tool to adjust the grip of a car (no text or symbols present)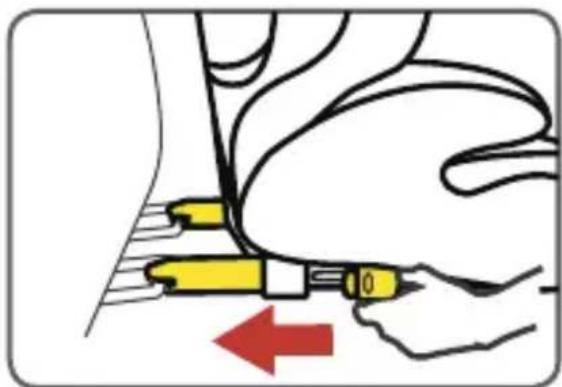
natural_image
Illustration of a hand using a tool to adjust or install a component, with a red arrow indicating direction (no text or symbols present)
MONTÁŽ DĚTSKÉ AUTOSEDAČKY
natural_image
Diagram showing a vehicle head assembly before and after, with no text or symbols present.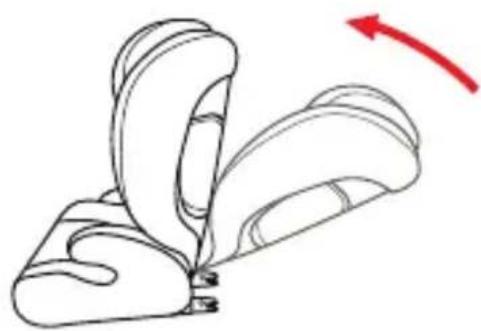
natural_image
Line drawing of a mechanical component with a red arrow indicating rotation (no text or symbols)Regulacja zagłówka
natural_image
Illustration of a hand pressing down on a device with red directional arrows indicating movement (no text or symbols)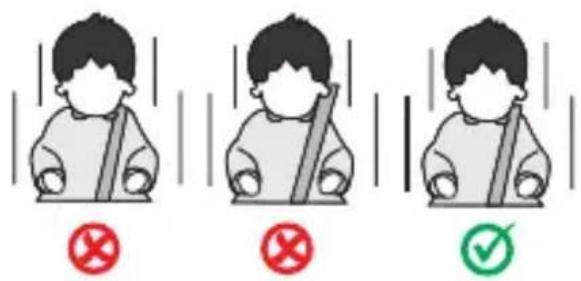
Łączniki ISOFIX
MONTAŻ FOTELIKA SAMOCHODOWEGO
natural_image
Diagram showing a vehicle head assembly before and after assembly, with no text or symbols present.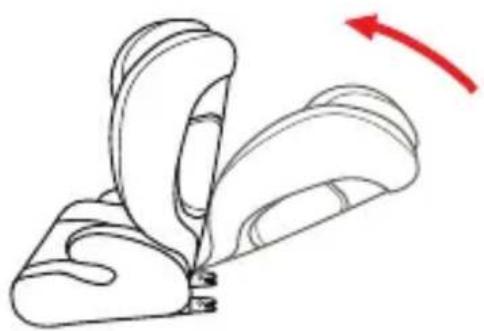
natural_image
Line drawing of a car seatbelt with a red curved arrow indicating rotation (no text or symbols)natural_image
Illustration of a hand pressing down on a device with red directional arrows indicating movement (no text or symbols)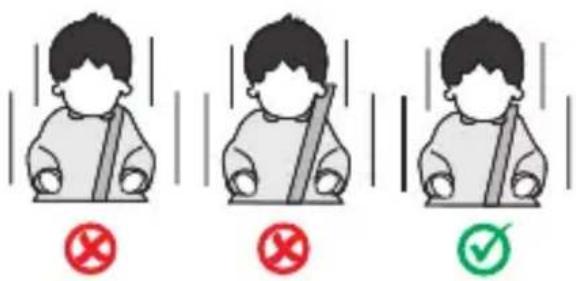
Konektory Isofi x
natural_image
Illustration showing two-step instructions for using a tool to lift a piece of material, with red arrows indicating motion (no text or symbols present)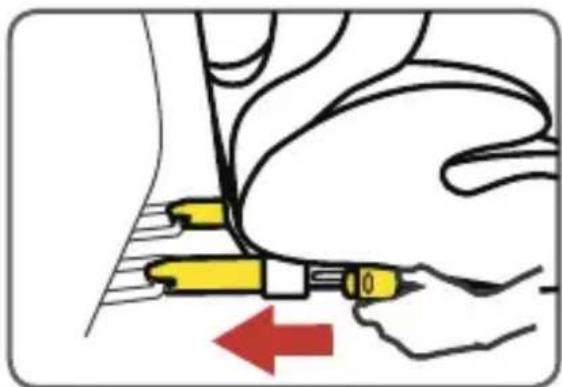
natural_image
Illustration of a hand using a tool to adjust or install a component, with a red arrow indicating direction (no text or symbols present)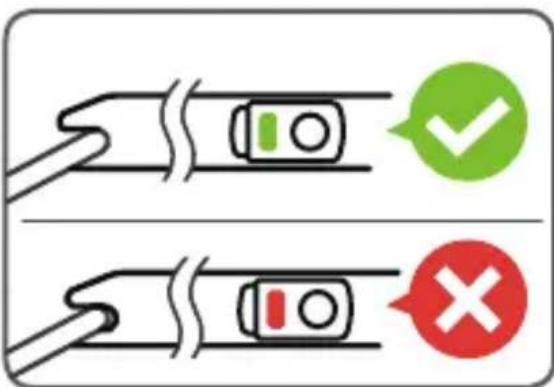
MONTÁŽ DETSKEJ AUTOSEDAČKY
- Isofi x-Konnektoren
- HOW TO USE
- NOTE
- WARNING
- SEAT PARTS
- CLEANING
- MAINTENANCE
- Assembling the backrest & seat shell (variant-dependent)
- Adjusting the headrest
- Isofi x connectors
- INSTALLATION OF THE CHILD CAR SEAT
- Installation without Isofi x:
- Connecteurs Isofi x
- INSTALLATION DU SIÈGE AUTO POUR ENFANT
- Connettori Isofi x
- MONTAGGIO DEL SEGGIOLINO AUTO PER BAMBINI
- Isofi x-connectoren
- MONTAGE VAN HET AUTOSTOELTJE
- Conectores Isofi x
- Konektory Isofi x
- MONTÁŽ DĚTSKÉ AUTOSEDAČKY
- Regulacja zagłówka
- Łączniki ISOFIX
- MONTAŻ FOTELIKA SAMOCHODOWEGO
- MONTÁŽ DETSKEJ AUTOSEDAČKY
Brand : Osann
Model : Musca Isofix
Category : Child car seat