OX3211C - Oven Atag - Free user manual and instructions
Find the device manual for free OX3211C Atag in PDF.

User questions about OX3211C Atag
0 question about this device. Answer the ones you know or ask your own.
Ask a new question about this device
Download the instructions for your Oven in PDF format for free! Find your manual OX3211C - Atag and take your electronic device back in hand. On this page are published all the documents necessary for the use of your device. OX3211C by Atag.
USER MANUAL OX3211C Atag
natural_image
Exterior view of a stainless steel oven with open door and digital display (no visible text or symbols)handleiding
meersystemen oven
mode d'emploi
four conventionnel
Bedienungsanleitung
HOE ZET IK DE DISPLAY "STANDBY"?
text_image
= 5:00 O₂ P₄₅ ① - + °C ② G ③ SELECTtext_image
-12:00 ① - + °C ② G ③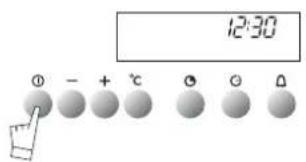
text_image
12:30 ① - + ℃ ② ③ ④
text_image
-12:00 0 - + °C 0 G Δ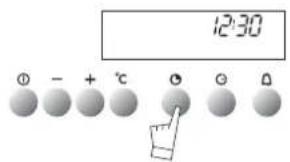
text_image
12:30 ⊕ - + °C ⊙ ⊙ ⊙NUR BEI MODELL DX3011CU
text_image
= P -500 "O" ρVp ① - + °C Q G Q SELECTThank you for choosing an Atag oven. You have made the right choice.
To get the most out of your new cooking aid we suggest you read and follow the advice contained in this manual.
Atag is continually improving its technology so that it can provide the best oven there is and the one you have chosen has the most innovative features. By combining the various functions and accessories you will get the greatest use out of your oven and produce the best results from your favourite recipes.
We hope you will find cooking with our oven an enjoyable experience that brings pleasure to all.
information for the user
safety instructions 5
care for the environment 6
your oven, how it works
explanation of controls 7
how to use your oven
setting the time 8
cooking straightaway 9
customising the cooking temperature 10
programming the cooking 10
delaying the cooking 11
using the timer 11
using the child safety feature 12
setting the display to stand-by mode 12
different cooking methods
description of features 13
oven accessories
accessories 14
how to clean by pyrolysis 15-16
installer's information
connecting up 17
electrical connection 17
housing 18
general maintenance 19
changing the light bulb 19
troubleshooting 20
Warning
Keep this user guide with your appliance. If the appliance is ever sold or transferred to another person, ensure that the new owner receives the user guide. Please become familiar with these recommendations before installing and using your oven. They were written for your safety and the safety of others.
SAFETY INSTRUCTIONS
— This oven was designed for use by private individuals in their homes. It is intended solely for cooking foodstuffs. This oven does not contain any asbestos-based components.
— Please make sure children do not play with the appliance.
— When you receive the appliance, unpack it or have it unpacked immediately. Give it an overall inspection. Make note of any concerns or reservations on the delivery slip and make sure to keep a copy of this form.
— Your appliance is intended for standard household use. Do not use it for commercial or industrial purposes or for any other purpose than that for which it was designed.
— Do not modify or attempt to modify any of the characteristics of this appliance. This would be dangerous to your safety.
— WARNING: accessible parts may be hot when in use. It is advisable to keep small children away from the appliance.
— Never pull your appliance by the door handle.
— Before using your oven for the first time, heat it while empty for approximately 15 minutes. Make sure that the room is sufficiently ventilated. You may notice a particular odour, or a small release of smoke. All of this is normal.
— WARNING: accessible parts may become hot when the grill is used. It is advisable to keep children away from the appliance.
— When in use, the appliance becomes hot. Be careful not to touch the heating elements located inside the oven.
— When placing dishes inside or removing them from the oven, do not place your hands close to the upper heating elements and use heat-protective kitchen gloves.
— During pyrolysis, the exposed surfaces become hotter than during normal use. It is advisable to keep small children away from the oven.
— Before beginning a pyrolysis cleaning cycle in your oven, remove all parts of your grids, trays and accessories and remove major spill residue. During pyrolysis, exposed surfaces become hotter than during normal use. It is advisable to keep small children away from the oven.
— At the end of cooking, do not pick up oven or grill items (grid, rotisserie,...) with your bare hands.
— Never place aluminium foil directly in contact with the floor of the oven (see the chapter on oven description), as accumulated heat may cause deterioration of the enamel.
— Do not place heavy weights on the oven door when open, and make sure that children cannot climb or sit on it.
— The oven must be turned off when cleaning inside the oven.
— This appliance is not intended to be used by persons (including children) with reduced physical, sensory or mental abilities, or persons lacking experience or awareness, unless using it with the help of a person responsible for their safety, or under supervision and with prior instruction in its use.
— In addition to the accessories supplied with your oven, only use dishes capable of withstanding high temperatures (follow the manufacturer's instructions).
— After using your oven, make sure that all the controls are in their stop position.
— Do not use your oven as a larder or to store any items after use.
— Never use steam or high-pressure devices to clean the oven (requirement imposed by electrical safety concerns).
— For your safety, your oven is equipped with an AUTOMATIC STOP, if you forget to turn off your oven by mistake. After 23-and-a-half hours of operation, the AS (Automatic Stop) feature is activated and your oven stops running. AS appears instead of the time and a series of 2 successive beeps is emitted for a short time.
Care for the ENVIRONMENT
— This appliance's packing materials are recyclable. Recycle them and play a role in protecting the environment by depositing them in municipal containers provided for this purpose.

— Your appliance also contains many recyclable materials. It is therefore marked with this logo to indicate that used appliances must not be mixed with other waste. Recycling of the appliances organised by your manufacturer will thus be undertaken in optimum conditions, in accordance with European directive EC/2002/96 relating to electrical and electronic equipment waste. Consult your city hall or your retailer to find the drop-off points for used appliances that is nearest to your home.
— We thank you for your help in protecting the environment.
Warning
Installation should only be performed by installers and qualified technicians.
This appliance complies with the following European directives:
- Low Voltage Directive EEC/73/23 modified by directive EEC/93/68 for insertion of EC marking.
- Electromagnetic Compatibility Directive 89/336/EEC modified by directive 93/68/EEC for insertion of EC marking.
- EC regulation no. 1935/2004 concerning materials and objects intended for contact with food substances.
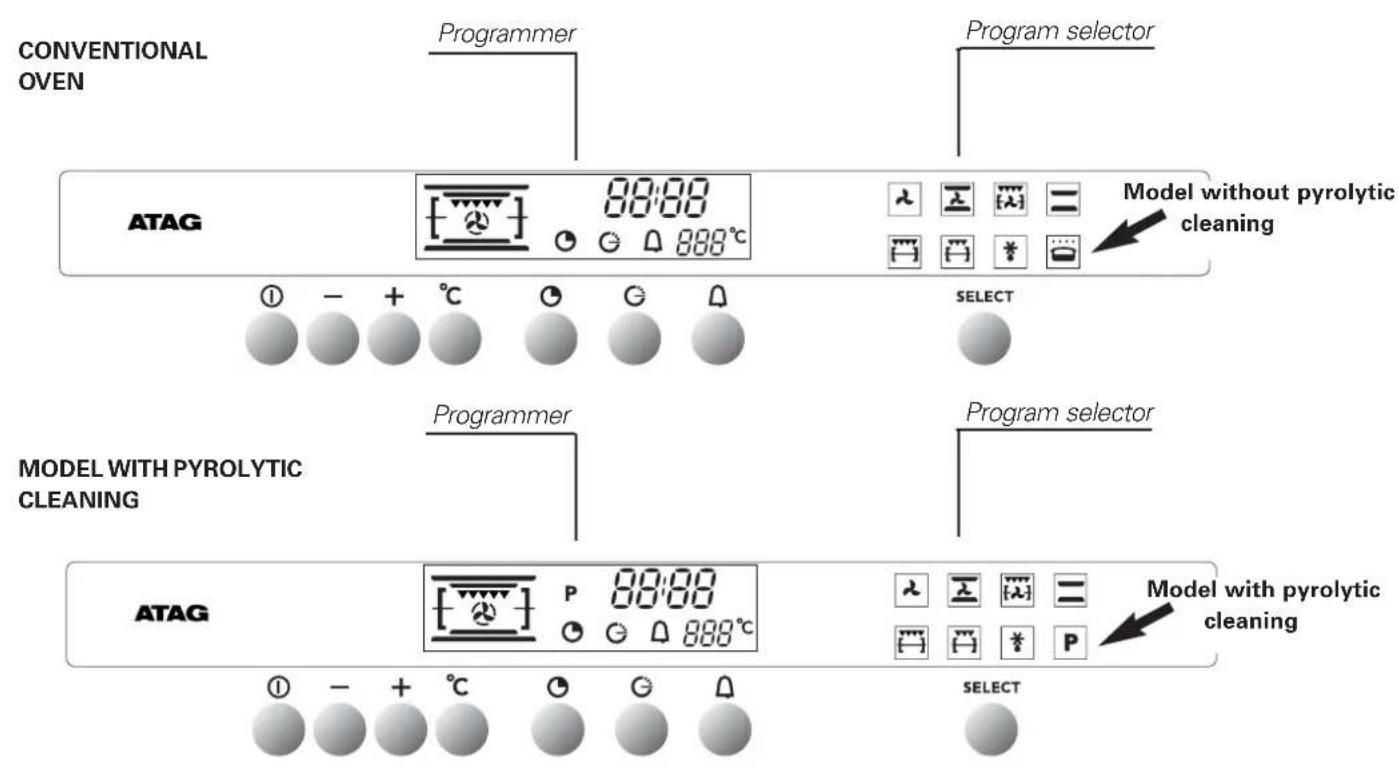
your oven, how it works explanation of controls
text_image
CONVENTIONAL OVEN Programmer Program selector ATAG 88:88 888°C Model without pyrolytic cleaning SELECT MODEL WITH PYROLYTIC CLEANING Programmer Program selector ATAG 88:88 888°C Model with pyrolytic cleaning SELECTYour programmer in detail
text_image
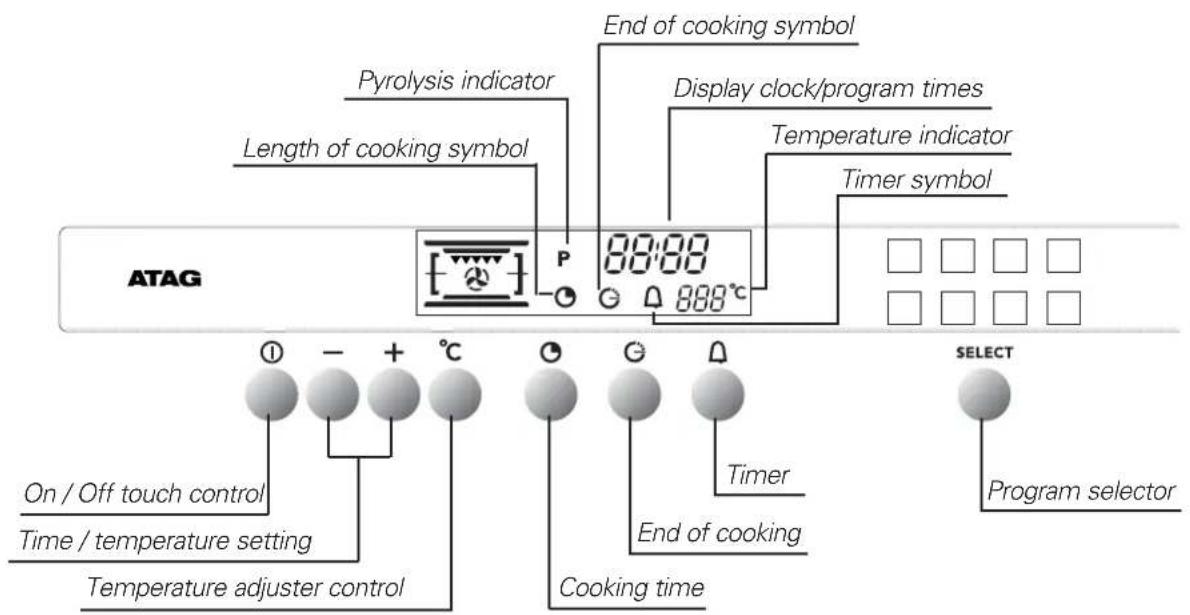
ATAG Pyrolysis indicator Length of cooking symbol End of cooking symbol Display clock/program times Temperature indicator Timer symbol 88:88 888°C On / Off touch control Time / temperature setting Temperature adjuster control End of cooking Cooking time Timer End of cooking SELECT Program selector
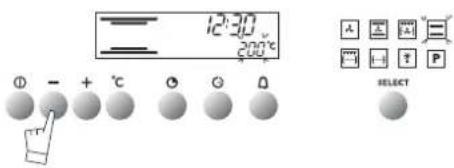
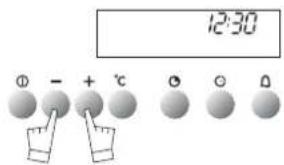
When the oven is installed
The time display flashes.
Set the time using + or - (holding the touch control down makes the numbers move on more quickly).
Example: 12:30.
Press the START/STOP touch control to confirm your setting.
NOTE: If the time is not confirmed using the START/STOP control within a few seconds, it is automatically memorized.
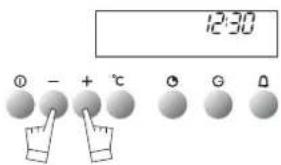
Resetting the time on the clock
Press touch controls and at the same time for a few seconds until the time display flashes.
Set the time using the + or - touch controls.
Press the touch control to memorize.
NOTE: If the time is not confirmed using the touch control within a few seconds, it is automatically memorized.

text_image
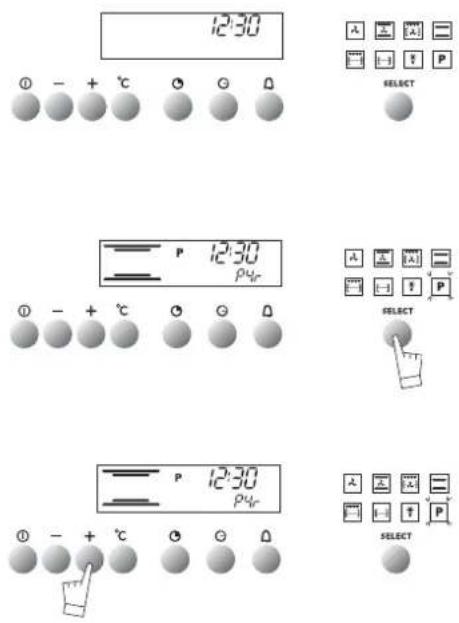
12:30 220°C ① - + °C ○ G △ SELECT 12:30 220°C ① - + °C ○ G △ SELECT 12:35 220°C ① - + °C ○ G △ SELECTSelect the cooking mode
Select the program of your choice with the SELECTcontrol:
Example: position
You can scroll through the cooking programs by keeping your finger on the touch control. SELECT The proposed temperature is displayed:
Example: 220^ C .
- Push the START/STOP touch control to start cooking. Your oven proposes the most frequently used temperature. You may nevertheless adjust this temperature yourself.
- Press the °C touch control. The °C symbol flashes.
- Adjust the temperature using the + or - touch controls.
- Confirm your choice by pressing the °C touch control. (If the temperature is not registered using the °C, touch control within a few seconds, it is memorized automatically).
During cooking the temperature selected will continue to flash until the oven arrives at the temperature you have chosen. The selected temperature then remains steady.
- When the oven reaches the selected temperature, it will bleep for 3 seconds.
Exception: Variable power grill:
- Power level proposed: - 4 - = 100%
- Can be adjusted from - 1 - = 50% to - 4 - = 100%
NOTE: The door should only be left open when the grill ( ) is used at maximum power (-4-).
When other settings are being used, the door should remain closed.
- Stop cooking by pressing the START/STOP button for 1 second.
IMPORTANT :
Accessible parts may become hot during use. Young children should be keep away.
how to use your oven
customising the cooking temperature
text_image
12:30 ON/O Φ - + °C Θ Θ Θ SELECTWhen you select your cooking mode, or during cooking, you can modify the temperature:
Press the °C touch control for about 2 seconds until the temperature figures start flashing.
Adjust the temperature setting using the + or - touch controls to indicate the temperature you wish to memorize.
Confirm your choice by pressing the °C touch control.
The next time you use your oven, the temperature you have just registered will memorized.
You may repeat this operation for personalizing cooking temperatures as often as you like.
how to use your oven
delaying the cooking
text_image
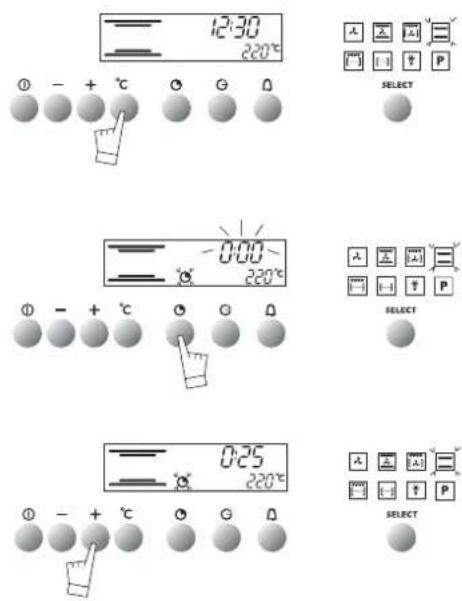
12:30 220°C ① - + °C ○ G 0 SELECT -0:00 220°C ① - + °C ○ G 0 SELECT 0:25 220°C ① - + °C ○ G 0 SELECTSet the mode of cooking required and adjust the temperature if necessary.
example: conventional cooking setting temperature 220°C.

- Press the "cooking time" touch control
The cooking time flashes as 0.00; the symbol also flashes to indicate that it may be adjusted.
Use the + or - touch controls to adjust the figure to the time required.
Example: 25 min. cooking.
The adjusted time is automatically validated after a few seconds or
may be confirmed by pressing on the touch control again.
The symbol then stops flashing. The oven then heats up.
At the end of the cooking time the oven bleeps for a few minutes and the symbol flashes.
Stop the bleeps by pressing on the START/STOP touch control for 1 second. You can consult or change the end of the cooking time at any time by
pressing the touch control.
To cancel your program, press the START/STOP touch control.
text_image
-1300 220°C Φ - + °C Θ Θ Ω
text_image
14:00 220°C ① - + °C G G Δ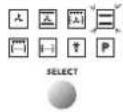
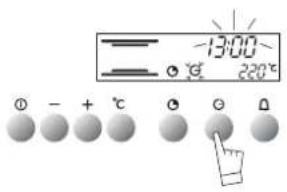
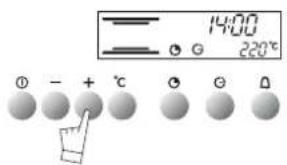
Carry out the same procedure as for programmed cooking. After setting the cooking time.
Press the "end of cooking", touch control; the time for the end of cooking is indicated and flashes, as does the symbol to indicate that it may be adjusted.
example : It is 12.30.
You have programmed a cooking time of 30 min.
The end of cooking time indicated is 1 pm (13.00).
Adjust the end of cooking time using the +or -touch controls.
example : End of cooking time: 2 pm (14.00).
Once the end of cooking time has been programmed, the end of cooking symbol stops flashing.
The oven will now start heating up in time for cooking to be finished by 2 pm (14.00).
When cooking finishes the oven gives a series of beeps for a few minutes.
To switch the beeps off, press the START/STOP touch control for one second.
NOTE: You may consult or change the end of cooking time at any time by pressing the G.
To cancel your program, press the START/STOP touch control.
how to use your oven
using the timer
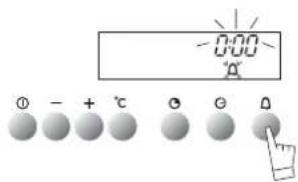
text_image
0:00 ① - + °C ② ③ ④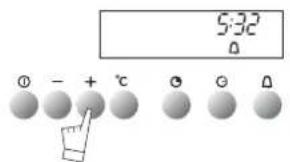
text_image
5:32 0 - + °C 0 0 0Your oven is fitted with an electronic timer for your use other than in conjunction with the oven.
ATTENTION: This program is separate from the oven. It cannot be used to stop automatic cooking. This program may never-theless be used even when the oven is in use. In this case, the timer display takes priority over the clock display.
Press the timer touch △. The display flashes and the timer symbol appears and flashes.
Press the + or - touch controls to obtain the length of time required (up to 59 minutes and 59 seconds).
The display stops flashing after a few seconds and the timer starts, counting down the time in seconds. When the time is up, the timer bleeps to warn you and the symbol flashes.
Stop the bleeping by pressing the 🔒 touch control or START/STOP. Normal time is now displayed.
NOTE: You may change the remaining time at any point by pressing the 🔒 touch control and using the + or - touch controls. To cancel the timer program, set the time at 0.00 and press START/STOP.
how to use your oven using the child safety feature
text_image
12:00 n-0 Φ - + ℃ Θ Θ Θ n-0 (key)In order to prevent your oven being turned on unintentionally, you may lock the controls.
To do this:
- Press on the START/STOP touch control until it bleeps.
Keep pressing on the touch control until the bleep stops and a key appears on the indicator panel.
-To unlock the controls, repeat the operation.
-Press the START/STOP touch control until you hear a long bleep.
Keep your finger on the touch control until the bleep stops and
the key disappears from the display panel.
NOTE: Only the "separate timer" program remains operational.
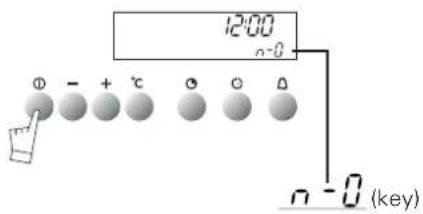
how to use your oven setting the display to stand-by mode
text_image
12:30 Φ - + °C Θ Θ ΩTo reduce your oven's power consumption to a minimum when it is not in use, you can put your readout system in STANDBY MODE.
To carry out this operation, proceed as follows:
GOING INTO STANDBY MODE:
- Your oven must be in normal time readout mode.
- Press both the + and - controls for five seconds at the same time.
- The display reads "Lcd off".
- Take your fingers off the two controls.
- 30 seconds later your readout will switch off.
Your oven is now in standby mode; whenever you are in the normal time readout mode, it will turn off automatically after 30 seconds.
COMING OUT OF STANDBY MODE:
- Your oven must be in the normal time readout mode.
- Press the + and - controls for five seconds at the same time.
- The display will then read "Lcd on".
- Take your fingers off the two controls.
- You are now out of the STANDBY MODE; the readout is now permanently lit.
text_image
12:30 ① - + ℃ ② G ③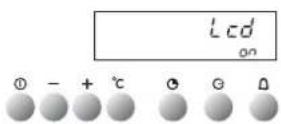
*
| PROGRAMS | Parts of the oven in operation | DESCRIPTION OF THE OVEN'S PROGRAMS | Recommended positions |
temperature:min./pre-selected/max.35°/ 180° 235° FAN HEATING FAN HEATING | 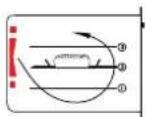 | The heat source comprises an element located at the back of the oven; the air is sucked up by a central fan and redistributed on the sides.There is no need to pre-heat the oven except for very short cooking times (e.g. biscuits on more than one level) or for foods, which need to be sealed (e.g. roast beef).Circulating heat is particularly suitable:- for keeping white meats tender;- for vegetables and fish;- for cooking on a number of shelves (up to 3) at once. | 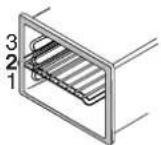 |
| temperature:min./pre-selected/max.35°/ 200° 275°[SW7K] COMBINATION MODE |  | Three heat sources are combined: a lot of heat from the bottom to cook pastry, some circulating heat for succulent cooking all the way through, and a bit of grill to brown the food nicely.- For quiches, pies, juicy fruit tarts. | 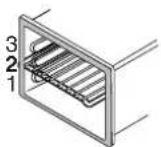 |
temperature:min./pre-selected/max.180°/ 195° 230° TURBOGRIL TURBOGRIL | 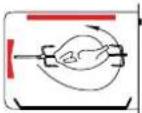 | This mode combines the fan effect and the grill, using them alternately. The grill cooks the food by infrared radiation, while the fan circulates the air so that the food does not burn.- For sealing and cooking through red and white meat;- For cooking poultry up to 1 kg gently;- Not suitable for very large pieces of meat, which would be too close to the grill, leaving them cooked on the outside but not cooked on the inside. | 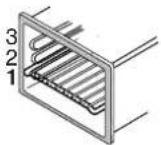 |
temperature:min./pre-selected/max.35°/ 220° 275° CONVENTIONAL CONVENTIONAL | 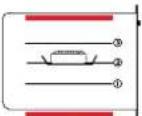 | This mode combines the upper and lower heat sourses.Ideal for slow, delicate cooking.- For succulent game;- For gentle simmering;- For successful bread. | 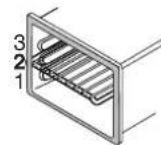 |
1 to 4 HIGH GRILL HIGH GRILL |  | The HIGH grill covers the full surface of the oven shelf.The MEDIUM grill is equally efficient, but covers a smaller area.Recommended for grilling chops, sausages, toast or prawns placed on the grid. | 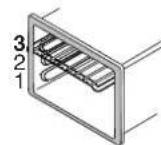 |
1 to 4 MEDIUM GRILL MEDIUM GRILL | 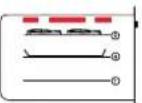 | IMPORTANT: leave the door open when using setting 4. | 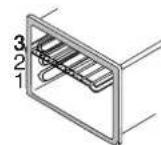 |
temperature:min./pre-selected/max.30°/ 40° 50° DEFROST DEFROST | 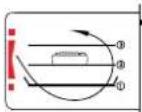 | Defrosting is done by the fan circulating air around the food to be defrosted.The temperature never exceeds 50°C, so defrosting is perfect.- For defrosting meat and poultry, use the oven shelf placed above the drip pan or the baking sheet.Never use the liquid produced by defrosting; it is not fit for human consumption. | 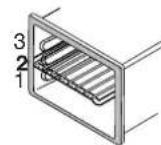 |
| temperature:min./pre-selected/max.35°/ 80° /100° [KEPT WARM] | 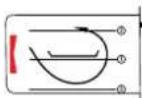 | The oven is kept warm by the fan, which circulates the hot air around the food. | 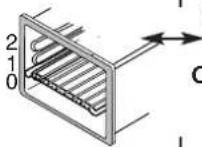 |
ONLY ON MODEL OX3011CU
When in use the oven gets hot.
Do not touch any heating element inside the oven. Keep young children away.
oven accessories accessories
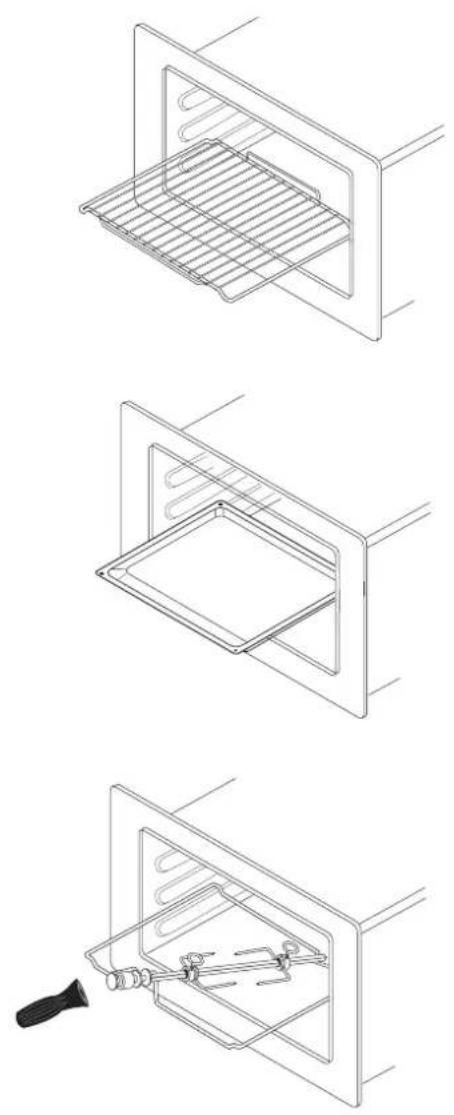
Safety grid with handle
Equipped with a handle at the front to make it easy to grasp. The grid can be used to hold all dishes and moulds containing foodstuffs to be cooked or browned. It can be used for barbecues (to be placed directly on the grid).
Multi function pans (reserved for pastries)
It serves as a cake dish and has a sloped edge. It is used for cooking pastries such as cream puffs, meringues, madeleines, puff pastry, etc.
Rotisserie spit
This comprises a spit, 2 prongs, a removable handle and a cradle, which fits into the 3rd shelf level from the bottom. To use the rotisserie, fit the spit into the hole in the back wall of the oven.
Place the drip pan on the oven shelf placed in its lowest position in the oven.
Important recommendations:
Never cover the inside of the oven with aluminium foil to economize on cleaning. You may overheat the oven and damage the enamel.
- After cooking never touch your casseroles (grill, spit, dripping pan, spit cradle etc.) with bare hands.
Only on model ZX3092C, ZX3011C
What is pyrolysis?
- Pyrolysing involves cleaning the oven by heating to a high temperature (pyrolysis) in order to remove grime and dirt inside the oven caused by splashing or dripping during cooking. The smoke and smell this produces are removed by being passed through a catalyst.
- The oven has three pyrolysis cycles suited to all situations
- An economic cycle that lasts 1h30 (the oven is locked for 2 hours to allow for cooling down). This cycle consumes 25% less the standard pyrolysis cycle. When used regularly (every two or three times you cook meat) this cycle keeps the oven clean under any conditions.
A medium cycle that lasts 1h 45 (the oven is locked for 2hours 15m to allow for cooling down). This cycle cleans dirty ovens efficiently.
A super-cleaning cycle that lasts 2 hours (the oven is locked for 2 hours 30m to allow for cooling down). This cycle is for really dirty ovens..
- For safety reasons the door is automatically locked shut after about 5 minutes of pyrolysing.
Why use the pyrolysis program?
- Your oven smokes when you pre-heat it, or it smokes a lot during cooking.
- Your oven smells when it has cooled down after cooking certain types of food (lamb, fish, grills, etc).
- Don't wait until the oven is very grimy before carrying out pyrolysing.
- It is not necessary to use the program each time the oven is used; it depends on the amount of grime in the oven.
When to use the pyrolysis program
| COOKING PRODUCING NO GRIME | sponge cakes, vegetables, pastries, quiches, soufflés, etc. | Cooking without splashing; pyrolysing is not necessary. |
| COOKING PRODUCING SOME GRIME | meat, fish (in a dish), stuffed vegetables | pyrolysing may be necessary every three times the oven is used. |
| COOKING PRODUCING A LOT OF GRIME | large pieces of meat; cooking on the spit: duck, turkey, leg of lamb, etc. | pyrolysing may be carried out after cooking of this type if there has been a lot of splashing. |
A few hints
To reduce splashing, check that you are using:
- the right position advised in your instruction book;
- the right height inside the oven;
- the right temperature.
If the food still produces splashing and smoke, reduce the temperature on the thermostat.
text_image
12:30 ① - + °C ② ③ ④ SELECT P 12:30 P4r ① - + °C ② ③ ④ SELECT P 12:30 P4r ① - + °C ② ③ ④ SELECT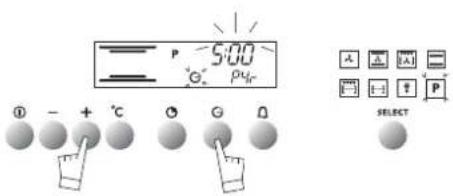
text_image
= 500 °C ρdₜ ① - + °C Q G Q SELECTHow to use the pyrolysis program
Remove any accessories from the oven and wipe off any excess grime.
Check that the programmer displays normal time and that it is not flashing.
Press the program selection touch control until the "pyrolysis" program appears.
Your oven displays the pyrolysis symbol that correspond to 1 two-hour pyro. (non-adjustable).
You can select the two other cycles 1h45, or 1h30 non-adjustable, by pressing the - or +.
The oven cannot be used for 2h, 2h 15 or 2h 30. These times allow for cooling down until the door is automatically unlocked.
Press the START/STOP touch control.
- The door is locked during pyrolysing (after about 5 minutes).
- You can consult the finishing time for the pyrolysis cycle by
pressing touch control Ⓗ At the end of pyrolysing the symbol remains lit until the door is automatically unlocked.
Stop the oven by pressing the START/STOP touch control.
Use a damp cloth for removing the white ash after the oven has cooled down.
The oven is now ready for use.
Note: The pyrolysing temperature cannot be altered. During the cleaning cycle the light is switched off. If your oven is still
not clean after pyrolysing you have delayed cleaning too long. Repeat the pyrolysis program.
IMPORTANT :
Do not hang any cloths or towels on the oven door handle.
During the pyrolysis cycle, the front of the oven gets hotter than during normal cooking.
Keep young children away.
How to program your pyrolysis to start when you want
Follow the instructions given in the section entitled "How to use the pyrolysis program", then:
Press touch control Ⓗ the finishing time for the pyrolysis
program flashes and the symbol also flashes to show that this time can be modified.
Set the time the program is due to finish by pressing the
+ or - touch controls..
example: End of the pyrolysis program at 5h00.
When the pyrolysis program is over, press the START/STOP touch control.
As a specialist, you alone are competent to install and connect up Atag appliances.
Our guarantee therefore applies only and exclusively to appliances which have been installed and connected up by you in accordance with the provisions of current regulations. Failure to meet this requirement would incur the fitter's liability and release the Atag company from any liability.
text_image
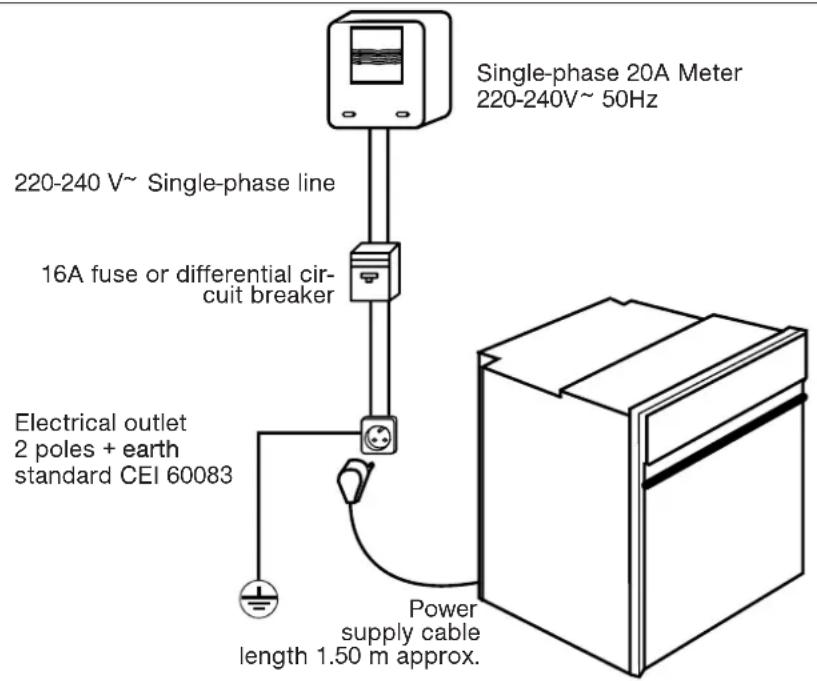
Single-phase 20A Meter 220-240V~ Single-phase line 16A fuse or differential cir- cuit breaker Electrical outlet 2 poles + earth standard CEI 60083 Power supply cable length 1.50 m approx.electrical connection
The appliance must be fitted correctly to guarantee electrical safety. During fitting and maintenance operations, the appliance must be unplugged from the electrical grid. Fuses must be switched off or removed.
The electrical connections are made before the appliance is installed in its housing.
Ensure that:
- the electrical installation has sufficient voltage,
- the electrical wires are in good condition,
- the diameter of the wires complies with the installation requirements.
Your oven must be connected with a (standard) power cable with 3 conductors of 1.5mm2 (1 live + 1 neutral + earth) which must be connected to a 220-240V\~ single-phase grid by means of a 1 live + 1 neutral + earth CEI 60083 standard power socket or via an all-poles cut-off device in compliance with the installation rules.

Warning
The safety wire (green-yellow) is connected to the appliance's terminal and must be connected to the earth terminal of the electrical set-up.
It is necessary to allow disconnection of the appliance from the supply after installation, unless the appliance incorporates a switch complying with 24.3. The disconnection may be achieved by having the plug accessible or by incorporating a switch in the fixed wiring in accordance with the wiring rules. If the power cable is damaged, it must be replaced by the manufacturer, its after-sales service department or a similarly qualified person to avoid danger.
text_image
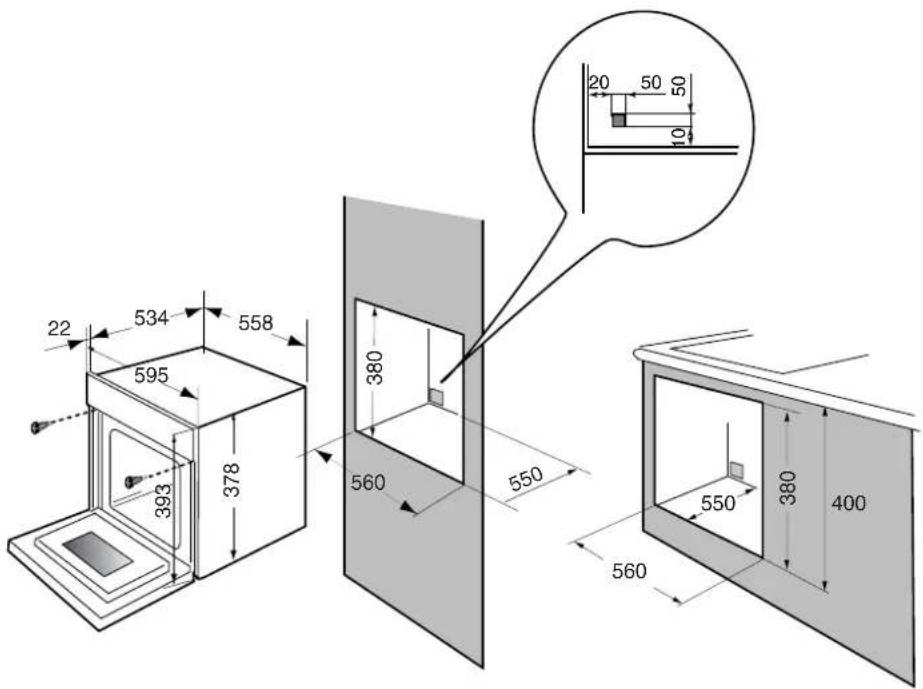
22 534 558 595 393 378 380 560 550 20 50 50 10 550 380 400 560The oven can be installed under a work top or in a column of cabinetry (open* or closed) having the appropriate dimensions for built-in installation (see adjacent diagram).
Your oven has optimised air circulation that allows it to achieve remarkable cooking and cleaning results if the following guidelines are followed:
- Centre the oven in the cabinet so as to guarantee a minimum distance of 5 mm between the appliance and the cabinet beside it.
- The material or coating of the cabinet must be heat-resistant.
- For greater stability, attach the oven in the cabinet with two screws through the holes provided for this purpose on either side of the front inner panel.
To do this:
1) Remove the rubber screw covers to access the mounting holes.
2) Drill a hole in the cabinet panel to avoid splitting the wood.
3) Attach the oven with the 2 screws.
4) Replace the rubber screw covers (they also absorb the shock caused by closing the oven door).
(*) if the cabinet is open, its opening must be 70 mm (maximum).
Leave the oven to cool down before cleaning it manually.
Do not use harsh abrasive cleaners or sharp metal scrapers to clean the oven door glass since they can scratch the surface, which may result in shattering of the glass.
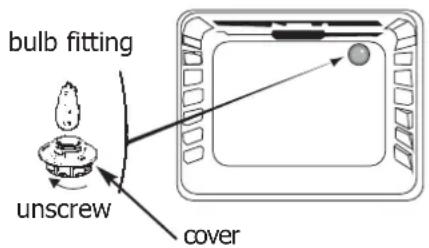
changing the light bulb
- The bulb is located in the back of the oven.
WARNING! Disconnect the oven before touching the bulb to avoid any electric shock; leave the oven to cool down if necessary.
- Turn the protective shade to the left a quarter of a turn.
- Unscrew the bulb in the same direction.
The bulb used is a:
- 15 W
-220-240V - 300°C
-
E 14 screw-fitting bulb
-
Change the bulb, then refit the protective shade.
- Plug the oven back in.
Note: It is easier to unscrew the shade and bulb if you wear a rubber glove.
text_image
bulb fitting unscrew cover| IF YOU REALIZE THAT | POSSIBLE CAUSES | WHAT SHOULD YOU DO? |
| The oven isn't heating | The oven isn't connected to the power supply.The fuse has blown.The temperature selected is too low.Other causes. | - Connect to power supply.- Change the fuse, checking that it is 16A.- Contact the After-Sales Service. |
| The light inside the oven isn't working. | The lamp is unusable.The oven isn't connected to the power supply or the fuse has blown. | - Change the bulb.- Connect to power supply or change fuse. |
| The cooling fan keeps working after the oven is turned off. | The fan should stop after no longer than 1 hour, as soon as the temperature of the oven falls to approx. 125°C.If it has not stopped after 1 hour | - Nothing.- Contact the After-Sales Service. |
| Pyrolysing doesn't start | The door isn't shut properly.The clock time on the programmer is flashing.Other causes. | - Make sure the door is closed correctly- Set the hour of the day before starting up the pyrolysis- Call the After-Sales Service |
| The door lock during pyrolysing isn't working. | The lock is not effective immediatelyThe door lock only becomes effective approx. 5 minutes after the start of the cycle.. | If it hasn't locked after 10 minutes, contact the After-Sales Service. |
| The rotisserie spit keeps turning after the end of cooking | The rotisserie spit motor keeps working until the selector is returned to the zero setting, or the door is opened, or 30 minutes after the end of the cooking time.This program avoids the food burning once the oven has stopped four. | - Nothing. |
| Smoke is being produced during cooking | 1.Cooking temperature too high2. Dirty oven | 1. Reduce the cooking temperature2. Clean the oven by pyrolysis if this program is available |
| There's no light inside the oven while the pyrolysis program is operating | The lighting is only meant to come on for the cooking programs. | The pyrolysis cycle produces temperatures, which are too high for the lighting to work properly. |
| There's a noise inside the oven after the end of cooking | The fan in the upper part of the oven (not visible) is working (even if the oven is set to the "off" position). | This is normal; the fan of a pyrolysis oven stays on until the oven has cooled down. |
In all cases, if you are unable to solve the problem yourself, please contact the After-Sales Service without delay.