WD-25 G - Vacuum Cleaner FAR - Free user manual and instructions
Find the device manual for free WD-25 G FAR in PDF.

| Product Type | Cordless stick vacuum with washing |
| Brand | FAR |
| Model | WD-25 G |
| Dimensions (H x W x D) | Approx. 120 x 28 x 24.5 cm |
| Rated Power | 180 W |
| Battery Type | Li-ion 22.2 V |
| Battery Capacity | 2500 mAh |
| Charging Time | Approx. 4 to 6 hours |
| Clean Water Tank Capacity | 0.6 L |
| Dirty Water Tank Capacity | 0.4 L |
| Operating Modes | High speed, quick suction (without water), low speed |
| Self-cleaning | Yes, 0.5 minute cycle |
| Accessories Included | Charging base, adapter, cleaning brush, storage box, manual |
| Brush Type | Removable rotating brush |
| Filter | HEPA filter in dirty water tank |
| Recommended Maintenance | Clean the dirty water tank and filter after each use; clean the brush regularly |
| Warranty | 2-year legal warranty of conformity (according to the seller) |
| Intended Use | Domestic, hard floors (tile, wood, laminate, etc.) |
| Charger Power Supply | Model MC2805B-V: input 100-240 V ~ 50-60 Hz 0.5 A max, output 25-29 V |
| Standby Consumption | 0.2 W |
| Weight | Not specified in the manual |
Frequently Asked Questions - WD-25 G FAR
User questions about WD-25 G FAR
0 question about this device. Answer the ones you know or ask your own.
Ask a new question about this device
Download the instructions for your Vacuum Cleaner in PDF format for free! Find your manual WD-25 G - FAR and take your electronic device back in hand. On this page are published all the documents necessary for the use of your device. WD-25 G by FAR.
USER MANUAL WD-25 G FAR
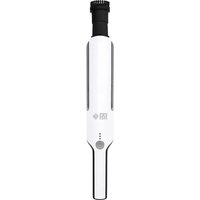
natural_image
Black vacuum cleaner with adjustable arm and base (no visible text or symbols)WD-25 G
MANUEL D'INSTRUCTIONS
natural_image
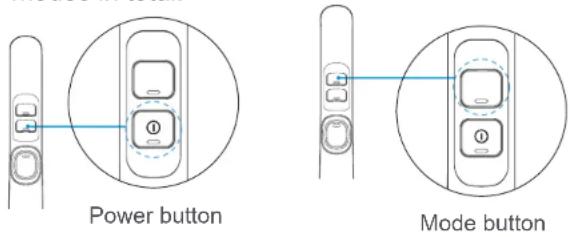
Diagram showing a vertical panel with four switches and one square button, connected by a blue line to a circular outline (no text or symbols)Bouton mode
- Auto-nettoyage
natural_image
Diagram of a device with a close-up view showing internal components (no text or symbols)natural_image
Illustration of a hand holding a spray gun above a device with airflow arrows (no text or symbols)natural_image
Illustration of a bathroom sink with faucet and fixtures, plus a wooden plank on a mat (no text or symbols)
natural_image
Diagram showing a hand holding a device next to a cylindrical device with a blue arrow indicating rotation (no text or symbols present)natural_image
Illustration of a hand holding a faucet with a partially assembled device (no text or symbols)natural_image
Diagram of a hand holding a device next to a vacuum cleaner (no text or symbols visible)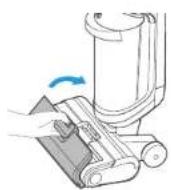
Dépannage
Thank you for choosing FAR quality. This product has been developed by our team of professional and according to European regulations in force. In order to get the most out of your new appliance, we recommend that you read this instruction manual carefully and keep it for future reference.
TABLE OF CONTENTS
Important safety instructions ....GB-2
Product overview GB-8
Operating instructions......GB-10
Cleaning and maintenance GB-15
Troubleshooting GB-19
Customer service GB-21
Technical specifications GB-23
Disposal of your old appliance ....GB-24
Important safety instructions
- This product is suitable for use on hard floors in home environment, including waxed floors, stone floors, rubber floors, marble surfaces, granite floors, terrazzo floors, solid wood floors, laminate floors, bamboo floors and various mirror tiles, porcelain tiles and other flat floor surfaces. The product may not work optimally when used on uneven surfaces.
- Do not use this product near or on flammable or explosive objects, there will be a risk of fire and explosion. Do not use this product near a working fireplace or heater to prevent deformation of its casing.
- Do not vape hot substances (unextinguished cigarette butts, matches or hot ashes), ultra-fine substances (e.g. lime, cement, wood chips, plaster dust, ashes or charcoal dust), hazardous substances (e.g. solvents or descaling agents), chemical substances (e.g. acids or cleaning agents etc.) and other substances with uncertain physical properties.
-
Do not use this scrubber to clean detergent, paraffin, petrol, alcohol, paint or perfume, since such liquids may causeshort circuit, fire or explosion in the device.
-
Do not use the scrubber to clean any burning or smoking objects, such as ashes from unextinguished heat sources, burning cigarettes or matches. Stains of strong greasy, sticky or staining properties such as shoe polish, paint or pigments are not covered by this product.
- Do not touch the plug or any live part of the product with wet hands to avoid electric shock. Stop using the product if the plug is damaged. In such case, please call our professional maintenance staff to replace the plug to prevent any hazards.
- Keep airflow paths and moving parts of this product away from long hair, loose clothing, fingers and other parts of your body. Do not point vacuum hoses, attachment tips or tools at your eyes or ears, or put them in your mouth.
- Use cleaners made by us and our approved manufacturers, do not add other solutions into the cleaners to prevent the generation of toxic and harmful fumes. When using the product, in case of current leakage, high motor temperature and abnormal noise, such as overheating, noise, odor or weak suction force, please stop using the product immediately and call our professional maintenance personnel for help. After using the machine, please empty the waste water tank in time to avoid odor and keep the ventilation path
clear to avoid blockage causing a decrease in suction force and heating
of the motor, thus affecting the service life of the scrubber. After using the machine, please store it in a dry place since humidity may affect its insulation and service life. The scrubber body and floor brush have an energized setting and cannot be soaked or rinsed with water.
- Please check the opening of the nozzle regularly. If it is blocked, please clear it in time to avoid blockage which may reduce the suction force and affect the performance of the product.
-
Please make sure that the product is powered off before changing its rolling brush.
• In case of any of the following conditions, please do not use the product and send it to our designated service department for repair: -
The product has fallen off and is visibly damaged or not functioning properly;
- If the supply cord is damaged, it must be replaced by the manufacturer, its service agent or similarly qualified persons in order to avoid a hazard.
- Do not disassemble the enclosed machine yourself, there are no customer serviceable parts in this machine and do not attempt to alter the machine as this will result in danger.
- Use of voltages that do not comply with the specifications of the product will damage the
product and may cause injury to the user. The correct voltage rating is shown on the nameplate.
- Due care must be taken when cleaning stairs with this product to prevent falls.
- Do not shake the machine up and down or bump it violently to prevent sewage from flowing into the motor.
- When the motor is working, do not lift or carry the product up or down, and do not place it on any of its sides or on any flat surfaces to prevent backflow water from entering the motor.
- To prevent tripping and falling of any person, the product should be placed against a wall after using it.
- Do not use the product if the clean water tank and the waste water tank are not installed properly.
- Do not place any small objects at the air outlet and do not block the outlet. Remove any small objects that may obstruct the air flow to prevent the machine from overheating.
- Do not get the machine wet, otherwise there will be a risk of fire due to short circuit of the machine.
- All technical data and other information provided herein are obtained by us or by the appointed third-party testing company and are subject to final interpretation by us.
ENGLISH
- This appliance is intended to be used in household and similar applications such as:
- staff kitchen areas in shops, offices and other working environments;
- farm houses;
- by clients in hotels, motels and other residential type environments;
- bed and breakfast type environments.
- This appliance can be used by children aged from 8 years and above and persons with reduced physical, sensory or mental capabilities or lack of experience and knowledge if they have been given supervision or instruction concerning use of the appliance in a safe way and understand the hazards involved. Children shall not play with the appliance. Cleaning and user maintenance shall not be made by children without supervision.
- CAUTION: This hose contains electrical connections:
- do not use to suck up water (for vacuum cleaners only);
- do not immerse in water for cleaning;
- the hose should be checked regularly and must not be used if damaged.
- The plug must be removed from the socket-outlet before cleaning or maintaining the appliance.
ENGLISH
- WARNING: For the purposes of recharging the battery, only use the detachable supply unit provided with this appliance MC2805B-V.
- This appliance contains batteries that are only replaceable by skilled persons.
- Warning: Rotating parts have a risk of jamming.
- The appliance is only to be used with the power supply unit provided with the appliance.
- A hazard may occur if the appliance runs over the supply cord.
- Precautions regarding charging and user maintenance, please refer to the following paragraph of the instruction manual.
| + | Symbol IEC 60417-5005(2002-10) | Plus; positive polarity |
| — | Symbol IEC 60417-5005(2002-10) | Minus; negative polarity |
| D□CFor type of adapter | [symbol IEC 60417-6181 (2013-03)] | detachable supply unit |
| [symbol ISO 7000-0790 (2004-01)] | read operator's manual |
Product overview
Make sure all parts are included in the device packaging. If you have a problem with your device or parts, contact a local service center or the store where you purchased the product.
- Front view

• List of Accessories
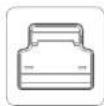
Base x 1
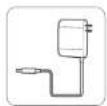
Adapter x 1
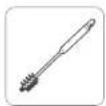
Brush x 1
Manual x 1
Storage box x 1
• Accessories Introduction
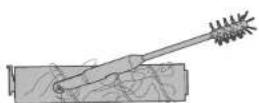
Cleaning brush: The cleaning brush has brush at one end and can be used to clean the stubborn dirt attached to the waste water tank and the pipes below.

Operating instructions
• Preparation before use
Handle assembly and disassembly
Assembly: Insert the end of the hand into the port of the host machine vertically until a "click" could be heard at the bottom.
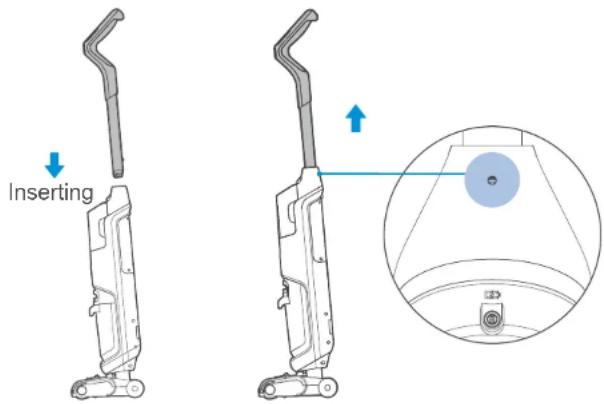
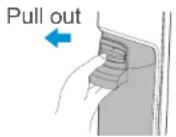
Disassembly: To disassemble the handle for storage, use a tool like a screwdriver to insert into the round hold at the back of the machine to the bottom while pull out the handle vertically.
- Machine charging
Note: Charge the product before using it for the first time.
- Place the machine on the base.
- Insert the charging end of the adapter into the charging port of the machine (as shown in the figure above), and connect the plug to a
220-240V\~ socket. The indicator will be in solid blue during the charging process. - It will take about 4-6 hours to fully charge the machine. After it is fully charged, the indicator will go off.
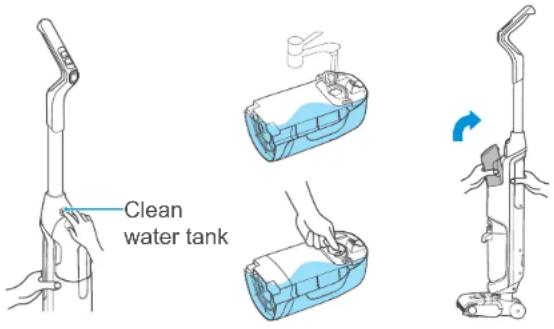
- Filling clean water tank
Note: Only the clean water tank shall be filled with water, but not the waste water tank.
- Hold the machine with one hand and press the clean water tank release button with the other hand to remove the clean water tank.
- Open the sealing cover of the clean water tank, fill the tank with tap water and close the sealing cover.
- Install the clean water tank with the sealing cover inwards on to the machine until a click could be heard.
• Power on and cleaning
- To power on the machine for cleaning, step on the floor brush and pull the handle in an inclined way until a click could be heard. At this moment, the machine will be in the working condition.
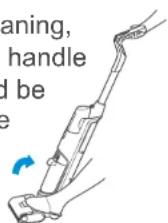
-
After starting work, just press the switch button to power on the machine, and press the button again to power the machine off.
-
Press the mode button to switch to high-speed mode, press the button again to switch to rapid suction mode(without water spray out), and press the button for the third time to switch to low-speed mode. There are three modes in total.
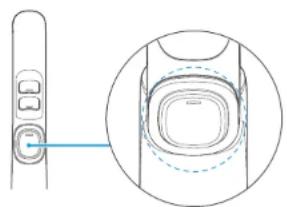
- Self-cleaning
After completing the cleaning process, press the self-cleaning button to start the self-cleaning process, which may be completed in 0.5 minute.
natural_image
Diagram of a device with a close-up view showing internal components (no text or symbols)Self-Clean
Cleaning and maintenance
- Cleaning waste water tank
Note: After cleaning, the machine shall be placed on its base, but not any place exposing to direct sunlight or moisture.
To ensure the performance of the machine, please maintain its parts regularly.
Before cleaning the machine, please power it off first. When using water or neutral detergent to clean the machine, make sure that the cleaning cloth is dried to prevent water from entering to the electric elements of the machine.
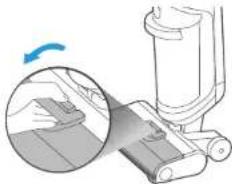
- Remove the waste water tank by pushing the tank button down with the thumb downward and pulling it outwards at the same time.
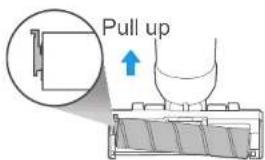
- Hold the tank with one hand and pull up the upper cover of the waste water tank with the other hand.
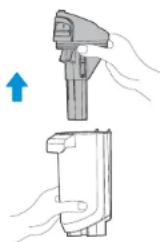
natural_image
Illustration of a hand holding a device with an upward arrow, no text or symbols present- Empty the tank and use the cleaning brush to remove any deposited stains (if any) on the inner wall of the tank.
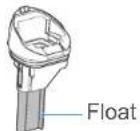
- Remove the HEPA from the waste water tank and check if the float is caught by any foreign matter.
- After removing the HEPA, rinse the tank with clean water and fully dry it before reassembling it back in the same way.
- A click will indicate the successful installation of the waste water tank.

natural_image
Illustration of a faucet pouring liquid into a bowl, and a wooden tool with a handle lying on a surface (no text or symbols)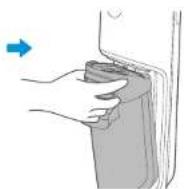
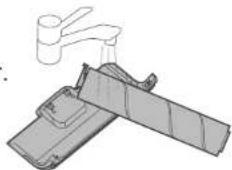
• Cleaning floor brush cover and rolling brush
Note: It is recommended to clean and dry the rolling brush cover and rolling brush timely after each use to ensure the cleanliness of the machine. Any stains at the nozzle shall be cleaned with a wet rag. Do not flush it with water.
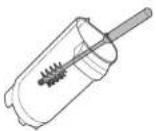
- Take the floor brush cover off by pressing the snaps as shown in the figure.
natural_image
Illustration of a vacuum cleaner with a magnified view showing the blade and handle (no text or symbols)- Pull the lever at the left end of the rolling brush to remove the rolling brush.
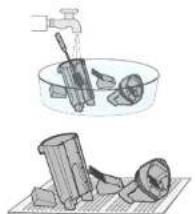
- Clean anything on the rolling brush.
- Use clean water to wash the rolling brush and its cover.
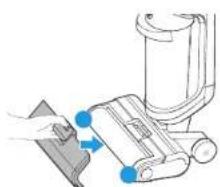
natural_image
Diagram of a faucet and mechanical device (no text or symbols)- After the cleaning is completed, pinch the brush lever with one hand, align the other side of the brush with the right end cover, then put the lever end into the slot. The brush is successfully installed.
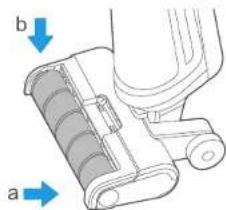
natural_image
Diagram of a vacuum cleaner with labeled parts (a and b), showing internal structure without any text or symbols.If the machine is not used immediately, the brush can be placed in a ventilated place to dry before installation.
- After cleaning, align the snap joint on both ends of the brush cover with the slots on both ends of the brush, rotate and press the brush cover lever until a click could be heard.
natural_image
Illustration of a hand inserting a device into a device component (no text or symbols visible)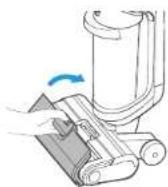
Troubleshooting
If you have a problem with your appliance, first review the following table and try the suggestions provided.
| Problem Cause Solution | ||
| The scrubber does not work. | - Rolling brush is jammed by hair or other objects- The waste water tank is full- Insufficient water in the clean water tank- Low battery | - Clean the rolling brush- Clean the waste water tank- Refill the clean water tank- Charge the machine |
| Low suction force | - Rolling brush, brush cover and waste water tank are not installed properly- Brush is jammed by hair or other objects- Nozzle or pipe is blocked- The filter screen above the float is dirty- The filter of the waste water tank is dirty or missed | - Install again- Clean the rolling brush- Clean the obstacles in the nozzle or the pipe- Clean the filter screen- Clean or install the filter |
| Noise from fan operation | - The nozzle is blocked- The water in waste water tank has reached specified level | - Remove any obstacles in the nozzle- Clean the waste water tank |
| No water from the floor brush | - Insufficient water in the clean water tank- The clean water tank is not installed properly | - Refill the clean water tank- Reinstall the clean water tank |
ENGLISH
ENGLISH
| Problem Cause Solution | ||
| Water leakage at the air outlet | The float of the waste water tank is caught by any foreign matterThe filter of the waste water tank is not dried after cleaning and using | Remove any foreign matters at the floatDry the filter after cleaning and using the machine |
| Water leakage at the bottom of the floor brush | The waste water tank or its filter is not installed | Install the waste water tank or its filter |
If the problem persists, please contact the service center.
Customer service
We decline liability for any damage or accident derived from any use of this appliance which is not in conformity with the instructions contained in this manual.
In accordance with Article L. 217 of the Consumer Code, your product benefits from a legal guarantee of conformity of 2 years.
Purchase of the device in a Conforama store:
If you have a problem with your product, before going to your Conforama store, please get in touch with our aftersales services for electrical household appliances:
https://sav-client.conforama.fr/

09 69 32 05 05
From Monday to Saturday, 08:30 to 19:00
Price of a local call
This instruction manual is also available on our website: www.conforama.fr
If you need access to the list of spare parts and technical, documentation for your product, please go to https://sav-pieces.conforama.fr. There you will be able to buy spare parts for repairing your product or having it repaired.
Purchase of the device in a BUT store:
Contact our After-Sales Service, before going to your BUT store:

09 78 97 97 97
From Monday to Friday from 09:00 to 19:00, and
Saturday 09:00 to 18:00
Price of a local call
This instruction manual is also available on our website: www.but.fr.
If you need access to the list of spare parts and technical documentation for your product, please go to https://pieces-detachees-butelectro.sfg.fr
There you will be able to buy spare parts for repairing your product or having it repaired.
Technical specifications
| Model WD-25 G | |
| Size (H x W x D) Approx. 120 x 28 x 24,5 cm | |
| Performance (without accessories) 180 W | |
| Battery 22,2 V, Li-ion | |
| Battery capacity 2500 mAh | |
| Fresh water tank capacity 0,6 l | |
| Waste water tank capacity 0,4 l | |
| MAINS ADAPTOR | |
| Model | MC2805B-V |
| Input voltage / AC frequency | 100-240 V ~ 50-60 Hz 0,5 A Max |
| Output voltage / current / power | 25-29 V |
The product has been designed to meet Commission
Regulation with regard to ecodesign requirements for electric power consumption off mode & standby mode of electrical and electronic household equipment. The technical information of each mode:
| Mode | Power consumption(Watts) | The period(Miunutes) |
| Off | N/A | N/A |
| Standby | 0.2W | ≤10 |
ENGLISH
Disposal of your old appliance

European directive 2012/19/EU on Waste from
Electrical and Electronic Equipment (WEEE),
requires that used household appliances are
not thrown into the normal municipal waste stream.
Used appliances must be collected separately in order to optimize the rate of recovery and recycling of materials that compose them, and to reduce the impact on human health and on the environment.
The crossed bin symbol is affixed to all the products to remind you of the obligations of separated collection.