
WTR 3000 BT - Radio GRUNDIG - Free user manual and instructions
Find the device manual for free WTR 3000 BT GRUNDIG in PDF.

| Product type | Radio alarm clock with FM tuner and Bluetooth |
| Brand | Grundig |
| Model | WTR 3000 BT |
| Dimensions (W × H × D) | 259 × 136 × 165 mm |
| Weight | 2,52 kg |
| Power supply | 230 V~, 50/60 Hz |
| Power consumption (operation) | < 20 W |
| Standby power consumption | < 1 W (0.785 W with clock display) |
| Audio output power | 5 W (DIN 45324, 10% THD) |
| Frequency bands | FM 87.5 – 108 MHz; Bluetooth 2402 – 2480 MHz |
| Bluetooth range | Up to 9 m |
| Inputs | AUX IN (3.5 mm jack), USB (charging and updates) |
| Outputs | Headphone jack (3.5 mm jack) |
| Antenna | Telescopic antenna |
| FM station memory | 10 presets |
| Main functions | Dual alarm, programmable sleep timer, equalizer (EQ), RDS display, contrast and backlight adjustment |
| Display | Backlit LCD screen |
| Electrical class | Class II (double insulation) |
| Protection | Protected against water splashes |
| Cleaning | Soft dry cloth; do not use detergents |
| Disposal | Compliant with WEEE, recycling at collection point |
| Package contents | Power cable, instruction manual |
Frequently Asked Questions - WTR 3000 BT GRUNDIG
User questions about WTR 3000 BT GRUNDIG
0 question about this device. Answer the ones you know or ask your own.
Ask a new question about this device
Download the instructions for your Radio in PDF format for free! Find your manual WTR 3000 BT - GRUNDIG and take your electronic device back in hand. On this page are published all the documents necessary for the use of your device. WTR 3000 BT by GRUNDIG.
USER MANUAL WTR 3000 BT GRUNDIG
natural_image
Exterior view of a vintage portable radio with a mesh grille and control knob (no visible text or symbols on the device body)EN DE FRITES
FI TR ROND

natural_image
Abstract grayscale curved shape on white background, no text or symbols present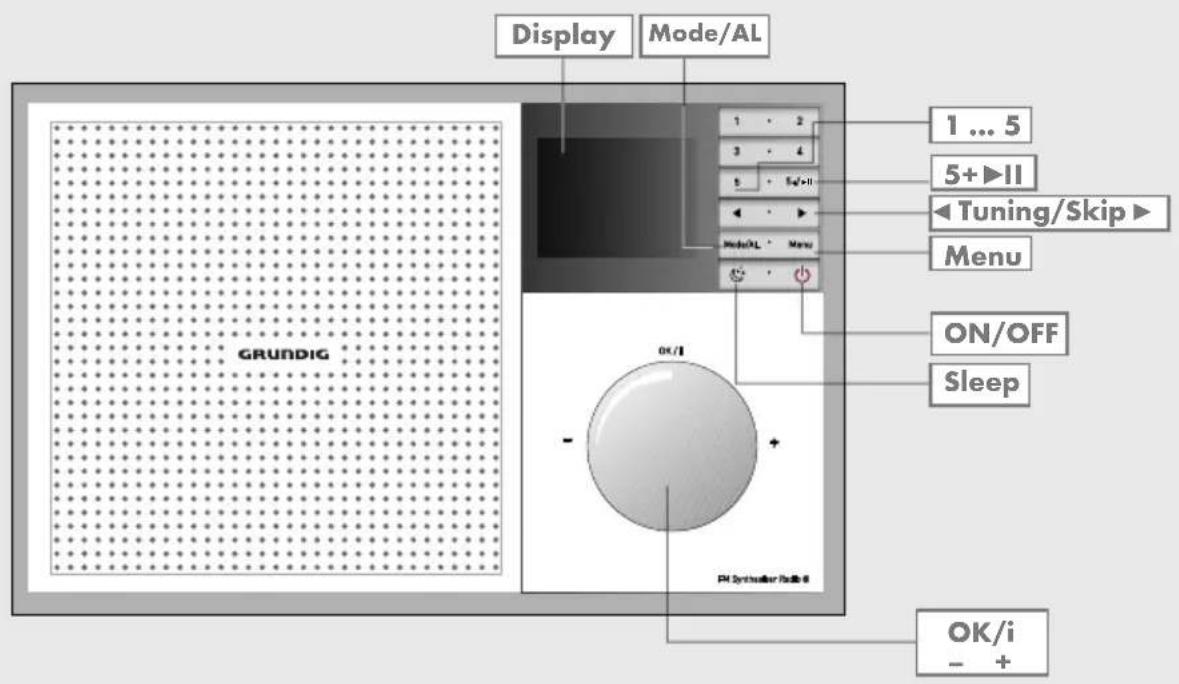
ENGLISH 05-13
DEUTSCH 14-22
FRANÇAIS 23-32
SUOMI 33-42
NORSK 43-51
ITALIANO 52-60
ESPAÑOL 61-69
TÜRKÇE 70-81
ROMÂNĂ 82-91
■ This device is designed for the playback of audio signals.
Any other use is expressly prohibited.
■ Make sure the device is protected from dripping or splashing water.
- Do not place any vessels such as vases on the device. These may be knocked over and spill fluid on the electrical components, thus presenting a safety risk.
- Do not place any naked flames such as candles on the device.
■ Only use the device in a moderate climate.
■ Ensure that the device is adequately ventilated by placing it at least 10 cm from any other object. Do not cover the device with newspapers, table cloths, curtains, etc.
If malfunctions occur due to static electricity charges or fast transient (burst), reset the device. To do this, pull out the power plug and connect it again after a few seconds.
- When deciding where to place the device, please note that furniture surfaces are covered by various types of varnish and plastic, most of which contain chemical additives. These additives can corrode the device supports, leaving residues on the furniture surfaces which can be difficult or impossible to remove.
- Do not use any cleaning agent, as this may damage the casing. Clean the device with a clean, dry cloth.
■ Never open the device casing. The manufacturer will not accept any liability for damage resulting from improper handling.
■ Make sure the power plug is freely accessible.
Note, prolonged listening at loud volumes with the earphones can damage your hearing.
RF Exposure Warning
■ This equipment must be installed and operated in accordance with provided manual.
The device comprised a built-in antenna, and must not be co-located or operating in conjunction with any other antenna or transmitter.
■ The only way to completely disconnect the device from the mains is to unplug the mains cable.
Technical data

This device is noise-suppressed according to the applicable EU directives. This product fulfils the European directives 2014/53/
EU, 2009/125/EC and 2011/65/EU.
You can find the CE declaration of conformity for the device in the form of a pdf file on the Grundig Homepage www.grundig.com/downloads/doc.
The type plate is located on the back side of the device.
Power supply: 230 V\~, 50/60 Hz
Max. power consumption:
Operating < 20 W, Stand-by < 1 W
Output:
DIN 45324, 10% THD 5 W
Frequency band:
FM 87.5 ...108.0 MHz
Dimension and weight:
B × H × T 259 × 136 × 165 mm
Weight approx. 2.52 kg
Frequency bands: 2402 - 2480 MHz
Maximum radio-frequency power transmitted: < 20 dBm
The power consumption of the product in networked standby (only one bluetooth port):
0.785W with clock display.
Technical and design modifications reserved.
Compliance with the WEEE Directive and Disposing of the Waste Product:
This product complies with EU WEEE Directive (2012/19/EU). This product bears a classification symbol for waste electrical and electronic equipment (WEEE).

This product has been manufactured with high quality parts and materials which can be reused and are suitable for recycling. Do not dispose of the waste product with normal domestic and other wastes at the end of its service life. Take it to the collection center for the recycling of electrical and electronic equipment. Please consult your local authorities to learn about these collection centers.
Compliance with RoHS Directive
The product you have purchased complies with EU RoHS Directive (2011/65/EU). It does not contain harmful and prohibited materials specified in the Directive.
Package information

Packaging materials of the product are manufactured from recyclable materials in accordance with our National Environment Regulations. Do not dispose of the packaging materials together with the domestic or other wastes. Take them to the packaging material collection points designated by the local authorities.

The lightning flash represented by the arrow symbol in an equilateral triangle is intended to alert users to the presence of the high voltage within the device which could cause an electric shock.

This equipment is a class II or double insulated electrical appliance. It has been designed in such a way that it does not require a safety connection to electrical earth.

Please read the entire manual carefully before operating this device.
POWER SUPPLY
Mains operation
Check that the mains voltage on the type plate (on the back of the device) corresponds to your local mains supply. If this is not the case, contact your specialist dealer.
1 Plug the mains cable supplied into the »AC« socket on the device.
2 Plug the mains cable into the socket (230 V\~, 50/60 Hz).
Caution:
■ The device is connected to the mains with the power cable. Pull out the power cable when you want to completely disconnect the device from the mains.
Unplug the mains plug to disconnect the device from the mains. Make sure the power plug is easily accessible during operation and not hindered by other objects.
■ The mains plug or appliance coupler is used as disconnect device, the disconnect device shall remain readily operable.
See the figure on page 3.
Controls on the front
Display Shows various information such as channel name, time, alarm time, volume and the menu.
ON/OFF Push the button, switches the device on and off.
OK/i Confirms settings.
- In+FM mode: displays RDS station information. Turn the button, adjusts the volume.
1 ... 5 Preset buttons for storing and selecting radio stations.
Menu Opens the menu.
Sleep Sets the sleep timer.
5+ ▶II In FM mode: activates the second level of preset buttons 6 to 10.
In Bluetooth mode: starts and pauses playback.
◀ Tuning/Skip ▶ In FM mode: tunes FM radio stations. Selects menu options.
In Bluetooth mode: select the previous or next track.
Mode/AL Press to switch among modes in power on mode, press to enable Alarm in standby mode.
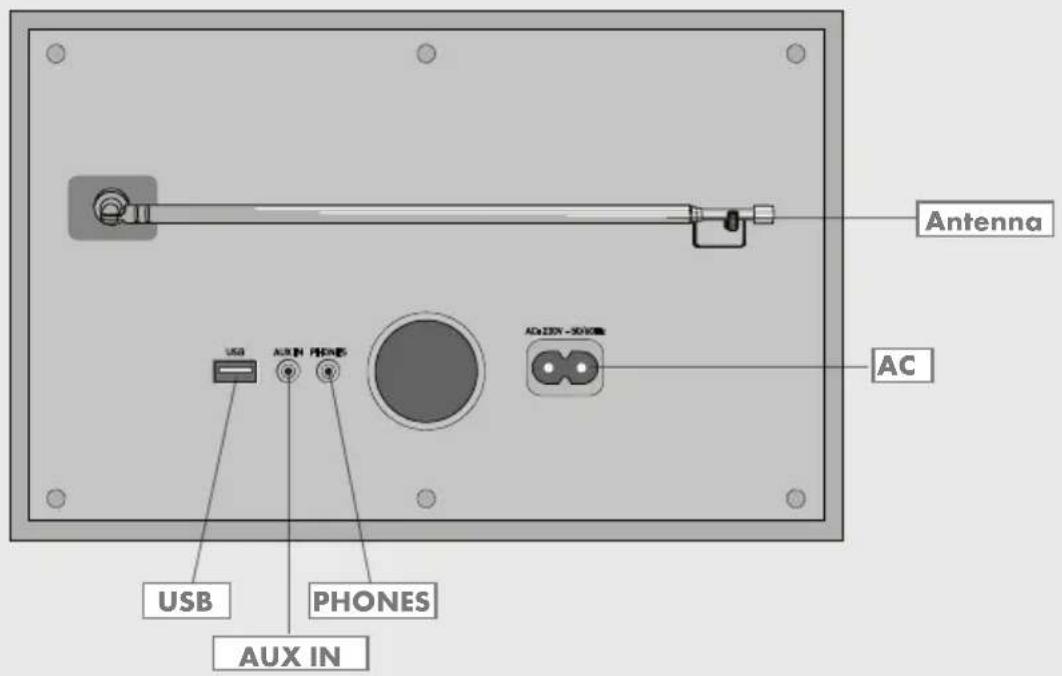
Controls on the back
Antenna Telescopic antenna.
USB USB socket for upgrading the software of the device and charging external devices.
AUX IN Audio signal input (stereo/mono) for connecting to an external device.
PHONES Earphone socket (3.5 mm stereo plug).
AC Connection socket for power cable supplied.
Tuning and storing radio stations (FM) – first installation
When the device is switched on for the first time or after factory reset, the Auto Tuning System will start to.
Scan the FM waveband and store the first 10 radio stations as presets 1 to 10.
The time is updated automatically.
For the best FM reception, it is sufficient to extend the telescopic antenna and direct it accordingly.
2 Press »ON/OFF« to switch on the device.
- The automatic station search starts, searches and stores the radio stations.
- Displays that 10 FM radio stations are stored at the presets.
Tuning and storing FM radio stations – after a removal
You can activate the Auto Tuning System again. That is reasonable, if you will use the device in another place or search new radio stations.
1 Press »ON/OFF« to switch on the device.
- Display: the frequency of a FM radio station.
2 Open the menu with »Menu«.
3 Select the option »ATS« with »◀▶« and confirm by pressing »OK/i«.
- It starts the automatic station search.
- The automatic station search starts, searches and stores the radio stations.
Programming FM radio stations – manually
1 Select the input source FM with »Mode/AL«.
2 Open the menu with »Menu«.
3 Confirm the option »Scan« by pressing »OK/i«.
- Display: »Scan All«.
Note:
- You can select whether the device will scan radio stations with weak signal (display »Strong«) or all radio stations (display: »A11«).
4 Select the desired option with »◀▶« and confirm by pressing »OK/i«.
5 Press »Menu« to switching off the menu
6 Press and hold down »◀« or »▶« to search the desired radio station.
- The automatic station search starts, and stops at the next station with a strong signal;
or
press briefly »◀« or »▶« until you have found the frequency you want.
- The frequency changes in steps of 50 kHz.
7 To store the FM radio station on a preset, press and hold down the required preset button »1« to »5«, until »F: I« appears.
Note:
■ Press the »5+ ▶II«symbol button until »F« appears and flash, press »1« to »5« for presets 6 to 10.
Setting the clock format (12 or 24 hours)
1 Press »ON/OFF« to switch on the device.
2 Open the menu with »Menu«.
3 Select the option »System Settings« with »◀▶« and confirm by pressing »OK/i«.
4 Select the option »Time/Date« with »◀▶« and confirm by pressing »OK/i«.
- Display: »Set Time/Date«.
5 Select the option »Format« with »◀▶« and confirm by pressing »OK/i«.
- Display: »Format 24H«.
6 Select the desired clock format (12 or 24 hours) by pressing »◀▶«.
7 Press »OK/i« to confirm the setting.
8 Press »Menu« to end the setting.
Updating the time – automatically
The device will normally update the time automatically, when a time signal is received. You can select from which source (FM) the update starts or you can disable this function.
1 Press »ON/OFF« to switch on the device.
2 Open the menu with »Menu«.
3 Select the option »System Settings« with »◀▶« and confirm by pressing »OK/i«.
4 Select the option »Time/Date« with »◀▶« and confirm by pressing »OK/i«. - Display: »Set Time/Date«.
5 Select the option »Auto« with »◀▶« and confirm by pressing »OK/i«. - Display: »Auto ON«.
6 Select the option »ON« with left or right symbol and confirm by pressing »OK/i«.
Note:
■ Select the option »OFF« with left or right symbol and confirm by pressing »OK/i« to deactivating automatic update time.
7 Press »Menu« to end the setting.
Updating the time – manually
1 Press »ON/OFF« to switch on the device.
2 Open the menu with »Menu«.
3 Select the option »System Settings« with »◀▶« and confirm by pressing »OK/i«.
4 Select the option »Time/Date« with »◀▶« and confirm by pressing »OK/i«.
- Display: »Set Time/Date«.
5 Confirm the option »Set Time/Date« by pressing »OK/i«.
- Display: e.g. »00:00 Jan 1 2017«.
6 Set the hours with »◀▶« and confirm by pressing »OK/i«.
7 Set the minutes with »◀▶« and confirm by pressing »OK/i«.
8 Set the month with »◀▶« and confirm by pressing »OK/i«.
9 Set the day with »◀▶« and confirm by pressing »OK/i«.
10 Set the year with »◀▶«.
11 Press »OK/i« to confirm the setting.
12 Press »Menu« to end the setting.
General functions
Switching on and off
1 Press »ON/OFF« to switch the device on and off.
Adjusting the volume
1 Rotate volume knob to adjust the volume.
Adjusting the tone
1 Open the menu with »Menu«.
2 Select the option »System Settings« with »◀▶« and confirm by pressing »OK/i«.
3 Select the option »E Q« with »◀▶« and confirm by pressing »OK/i«.
- Display e.g.: »My EQ«.
4 Select the desired option with »◀▶« and confirm by pressing »OK/i«.
5 Press »Menu« to end the display.
Listening with headphones
1 Connect the headphones to the »PHONES« headphone jack (ø 3.5 mm). - This switches off the loudspeakers.
Caution:
■ Excessive sound pressure from the earphones or headphones can cause hearing loss.
FM mode
For the best FM reception, it is sufficient to extend the telescopic antenna and direct it accordingly.
Selecting the input source FM
1 Select the input source FM with »Mode/AL«. - Display: the frequency of a FM radio station.
Selecting stored stations
1 Select the station you want using the preset buttons »1« to »5« (presets 1 to 5) or using »5+ ▶II« and the preset buttons »1« to »5« (presets 6 to 10).
Displaying RDS station informations
RDS (Radio Data System) is an information system which is transmitted additionally by most FM stations.
Notes:
■ It may take some time before all RDS information is available.
■ GRUNDIG has no influence on the correctness of such information.
1 Press »OK/i« repeatedly.
- The following display appears in succession: The name of the radio station, radio text (if offered), station type (PTY), the current time and date.
Listening to an external source
1 Use a standard audio cable to connect »AUX IN« on the back of the device to an AUDIO OUT socket on the external equipment.
2 Press »ON/OFF« to switch on the device.
3 Select the input source for the external device with »Model/AL«.
- Display: »AUX IN«.
4 Rotate volume knob to adjust the volume.
5 Start playback on the external device.
Note:
If no audio signal is available on socket »AUX IN«, the device switches automatically to Stand-by mode after 15 minutes. For further use switch on the device again.

Bluetooth®
Bluetooth device compatibility
Your WTR 3000 BT connects with all Bluetooth devices that support the A2DP profile including the most smartphones, laptops and tablets.
Selecting the input source Bluetooth
1 Select the input source Bluetooth with »Mode/AL«.
- Display: »Bluetooth« and »Searching«.
Pairing Bluetooth device
1 Activate on the Bluetooth device the Bluetooth function.
2 Start on the Bluetooth device the search function.
- After a short period of time, your Grundig WTR 3000 is displayed on the Bluetooth device.
3 Select the Grundig WTR 3000 on the Bluetooth device and connect it.
4 Once the Bluetooth device is connected to your device, the WTR 3000 BT will display »Bluetooth« and »Connected«.
Note:
Although the WTR 3000 BT can only stream audio from one device at a time, it is capable of being paired with up to eight devices.
Connecting a paired Bluetooth Device
Notes:
- You will only need to pair your Bluetooth device with the unit one time.
■ The next time your Bluetooth device and the WTR 3000 BT are in range of each other, and the Bluetooth feature is turned on, they will automatically connect.
■ The WTR 3000 BT will only automatically connect to the last Bluetooth Device it was connected to.
If your paired device does not automatically connect, navigate to the Bluetooth menu on your device and select the unit from the list.
Play Audio signal from your Bluetooth device
1 Start playback on the Bluetooth Device.
2 Adjust the volume using »- +«.
3 End playback on the Bluetooth Device.
Notes:
■ Various functions may also be controlled from the WTR 3000 BT. Select Playback-Pause using »5+ ▶II«, press »5+ ▶II« again to resume playback; select previous title by pressing »«, select next title by pressing »«.
- Keep in mind that depending on the used Bluetooth device and the structural conditions the wireless range can be up to 9 m.
Disconnect the Bluetooth device
1 Switch off the Bluetooth function at the Bluetooth device or long press »OK/i« button.
- Display changes to: »Searching«.
Reconnecting the Bluetooth device
1 If you move out of range or turn off the Bluetooth feature on your device, the unit will disconnect from your device.
2 To reconnect, simply access the Bluetooth Manager on your Bluetooth device and select the Grundig WTR 3000.
Note:
In case of the registered Grundig WTR 3000 cannot connect to the Bluetooth device again, please remove the Grundig WTR 3000 from the Bluetooth device list, search and connect again.
Automatic shutdown
If Bluetooth is selected as input source and no Bluetooth device is connected, the WTR 3000 BT switches automatically to Stand-by mode after 15 minutes.
Setting the alarm times and mode
Note:
- You can select the »Alarm Setup« menu also by pressing and holding down »Mode/AL« in stand by mode.
1 Press »ON/OFF« to switch on the device.
2 Open the menu with »MENU«.
3 Select the option »System Settings« with »◀▶« and confirm by pressing »OK/i«.
4 Select the option »Alarm« with »◀▶« and confirm by pressing »OK/i«. - Display: »Alarm i« and »Alarm2« flash.
5 Select the option »Alarm I« with left and right button and confirm by pressing »OK/i«. - Display: »Alarm I Info«.
6 Activate the alarm stand-by with »◀ ▶« (»Alarm On«) and confirm by pressing »OK/i«. - Display: »Alarm On«.
7 Set Wake Up time with left and right symbol and confirm by pressing »OK/i«.
8 Set the hours with »◀▶« and confirm by pressing »OK/i«.
9 Set the minutes with »◀▶« and confirm by pressing »OK/i«.
10 Select »Alarm source« ( "Beef" = signal tone) or »FM« = FM station) with »◀▶« and confirm by pressing »OK/i«.
Note:
If the alarm is set to »FM«, it will be the last listened station when alarm.
11 Select the alarm volume with »◀▶« and confirm by pressing »OK/i«. - Display: »Volume 9«.
12 Set initial alarm volume with left and right symbol and confirm by press »OK/i«.
13 Press »Menu« to end the setting. - Display: » 🔊 «.
Interrupting the alarm
1 Press »OK/i« while the alarm is sounding.
- Display: »Alarm« flash. - The alarm (signal tone or radio) stops.
Note:
The alarm will sound again depending on how often a button has been pressed (1 time = after 5 minutes, 2 times = 10 minutes, 3 times = 15 minutes, 4 times = 20 minutes, 5 times = 25 minutes, 6 times = 30 minutes. The total alarm time is 30 minutes.
Cancelling alarm stand-by
1 Press »ON/OFF« while the alarm is sounding.
- Display: the current time and alarm. - The alarm (signal tone or radio) stops, but the alarm function remains activated for the next day at the same time.
Activating and deactivating the alarm
1 Press »ON/OFF« to switch off the device.
2 Press »Mode/AL« to deactivate or reactivate the alarm stand-by.
Note:
■ 1 time = alarm 1 On, 2 times = alarm 1 On and alarm 2 On, 3 times = alarm 1 Off and alarm 2 On, 4 times = alarm 1 Off and alarm 2 Off.
Sleep Timer
The device has a sleep timer which switches off in radio mode at a preset time. It is possible to adjust the sleep time between 90 and 15 minutes in 15 minute increments.
Select the switch-off time for the sleep timer
1 Press »ON/OFF« to switch on the device.
2 Press sleep logo to adjust the sleep time.
- Display: »Sleep Timer Off«
3 Set the switch-off time with »◀▶« (in 15 minutes increments) and confirm by pressing »OK/i«.
- Display: » «.
Notes:
- You can set the switch-off time also by pressing »« (in 15 minutes increments).
Switch off the sleep timer
1 To switch off the sleep timer earlier, press sleep logo and adjust to »Sleep Timer Off« and confirm by press »OK/i«.
SPECIAL FUNCTIONS
Set the display illumination
1 Open the menu with »Menu«.
2 Select the option »System« with »◀▶« and confirm by pressing »OK/i«.
3 Select the option »Back light« with »◀◀« and confirm by pressing »OK/i«.
4 Press »Menu« to end the setting.
Set the display contrast
This can be optimized by the contrast depending on the angle of display.
1 Open the menu with »Menu«.
2 Select the option »System« with »◀▶« and confirm by pressing »OK/i«.
3 Select the option »LCD contrast« with »◀
▶« and confirm by pressing »OK/i«.
4 Select the contrast with »◀▶« and confirm by pressing »OK/i«.
5 Press »Menu« to end the setting.
Call up the software version
1 Open the menu with »Menu«.
2 Select the option »System Settings« with »◀▶« and confirm by pressing »OK/i«.
3 Select the option »Software Ver.« with »◀▶« and confirm by pressing »OK/i«.
- Display: actual software version.
4 Press »Menu« to end the display.
Deleting all settings (Reset)
This function enables you to reset all the custom settings back to the default settings. All settings are lost when you do this.
1 Open the menu with »Menu«.
2 Select the option »System« with »◀▶« and confirm by pressing »OK/i«.
3 Select the option »Factor y Reset« with »◀▶« and confirm by pressing »OK/i«.
- A safety confirmation is displayed.
4 Select the option »Yes« with »▶«. 5 Press »OK/i« to confirm setting.
FM 87,5 ...108,0 MHz
FM 87,5 ...108,0 MHz
FM 87,5 ...108,0 MHz
Mitat ja paino:
| x k x s 259 x 136 x 165 mm
Paino noin 2.52 kg
Taajuuskaistat:
2402 - 2480 MHz
Drifts < 20 W, Standby < 1 W
Effekt:
DIN 45324, 10% THD 5 W
Frekvensbånd:
FM 87,5 ...108,0 MHz
Mål og vekt:
B × H × T 259 × 136 × 165 mm
Vekt omtrent. 2.52 kg
Frekvensbånd:
2402-2480 MHz
Maksimal radiofrekvenseffekt utstrålt:<20 dBm
Produktets strømforbruk i nettverksstandby (kun én Bluetooth-port): 0.785W med klokkedisplay.
FM 87.5 ...108.0 MHz
Dimensioni e peso:
B x H x T 259 x 136 x 165 mm
Peso appross.. 2.52 kg
Bande di frequenza:
2402 - 2480MHz
FM 87.5 ...108.0 MHz
Dimensiones y peso:
An x Al x La 259 x 136 x 165 mm
Peso aproximado: 2.52 kg
FM 87.5 ...108.0 MHz

- RF Exposure Warning
- Technical data
- Compliance with the WEEE Directive and Disposing of the Waste Product:
- Compliance with RoHS Directive
- Package information
- POWER SUPPLY
- Mains operation
- Caution:
- Controls on the front
- Controls on the back
- Tuning and storing radio stations (FM) – first installation
- Tuning and storing FM radio stations – after a removal
- Programming FM radio stations – manually
- Note:
- Setting the clock format (12 or 24 hours)
- Updating the time – automatically
- Updating the time – manually
- General functions
- Switching on and off
- Adjusting the volume
- Adjusting the tone
- Listening with headphones
- FM mode
- Selecting the input source FM
- Selecting stored stations
- Displaying RDS station informations
- Notes:
- Listening to an external source
- Bluetooth®
- Bluetooth device compatibility
- Selecting the input source Bluetooth
- Pairing Bluetooth device
- Connecting a paired Bluetooth Device
- Play Audio signal from your Bluetooth device
- Disconnect the Bluetooth device
- Reconnecting the Bluetooth device
- Automatic shutdown
- Setting the alarm times and mode
- Interrupting the alarm
- Cancelling alarm stand-by
- Activating and deactivating the alarm
- Sleep Timer
- Select the switch-off time for the sleep timer
- Switch off the sleep timer
- SPECIAL FUNCTIONS
- Set the display illumination
- Set the display contrast
- Call up the software version
- Deleting all settings (Reset)
- Mitat ja paino:
- Taajuuskaistat:
- Effekt:
- Frekvensbånd:
- Mål og vekt:
- Maksimal radiofrekvenseffekt utstrålt:<20 dBm
- Dimensiones y peso:
Brand : GRUNDIG
Model : WTR 3000 BT
Category : Radio