
IVR 100/30-Pp Sc Hepa - Vacuum Cleaner Kärcher - Free user manual and instructions
Find the device manual for free IVR 100/30-Pp Sc Hepa Kärcher in PDF.

| Brand | Kärcher |
| Model | IVR 100/30-Pp Sc Hepa |
| Product type | Industrial wet/dry vacuum |
| Tank capacity | 100 L |
| Maximum vacuum | 200 in H₂O (50 kPa) |
| Compressed air consumption | 115 CFM (54 l/s) |
| Minimum compressed air pressure | 80 psi (5.5 bar) |
| Nominal suction hose diameter | DN 50 |
| Compressed air connection | 1/2 in (Chicago) |
| Air supply hose length | 15 m |
| Dimensions (L × W × H) | 987 × 760 × 1870 mm |
| Operating weight | 133 kg |
| Maximum ambient temperature | 40 °C |
| Sound pressure level | 70 dB(A) |
| Filtration type | HEPA filter + bag filter |
| Power supply | Compressed air (pneumatic) |
| Use | Suction of non-flammable dusts, granules, sludges and liquids |
| Electrical protection | Mandatory grounding |
| Parking brake | Yes (on swivel casters) |
| Routine maintenance | Regular filter cleaning, emptying the collection container |
| Warranty | According to country conditions (see manual) |
| Spare parts | Original KÄRCHER accessories and parts |
Frequently Asked Questions - IVR 100/30-Pp Sc Hepa Kärcher
User questions about IVR 100/30-Pp Sc Hepa Kärcher
0 question about this device. Answer the ones you know or ask your own.
Ask a new question about this device
Download the instructions for your Vacuum Cleaner in PDF format for free! Find your manual IVR 100/30-Pp Sc Hepa - Kärcher and take your electronic device back in hand. On this page are published all the documents necessary for the use of your device. IVR 100/30-Pp Sc Hepa by Kärcher.
USER MANUAL IVR 100/30-Pp Sc Hepa Kärcher
natural_image
Two industrial vacuum lift machines with wheels and control handles, shown from different angles (no visible text or symbols)A

natural_image
Close-up of a black cable being inserted into a cylindrical container, with arrows indicating direction (no text or symbols)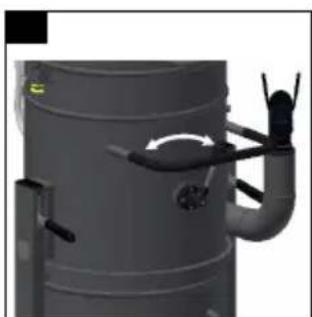
natural_image
3D rendering of a large cylindrical industrial vessel with attached piping and a small valve (no visible text or symbols)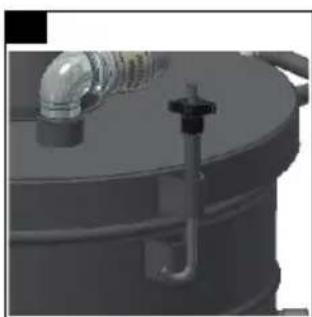
natural_image
Close-up of a cylindrical industrial tank with pipes and a valve (no visible text or symbols)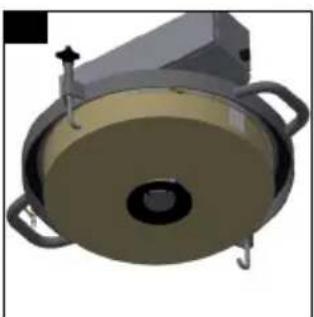
natural_image
3D rendering of a mechanical component with mounting brackets and a central circular feature (no text or symbols visible)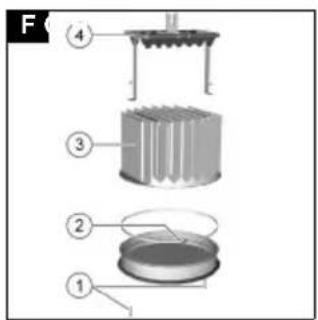
natural_image
3D diagram of a cylindrical device with an upward arrow indicating motion or force, mounted on a base with tools (no text or symbols)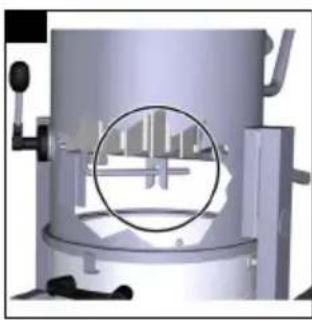
natural_image
3D rendering of a mechanical device with a circular inset showing a cityscape (no text or symbols visible)Contents
Important Saftey Instructions .... 3
Intended use 5
Environmental protection .... 5
Accessories and spare parts...... 6
Scope of delivery 6
Warranty.... 6
Safety instructions.... 6
Device description.... 6
Initial startup.... 6
Operation 6
Transport....7
Storage 7
Care and service.... 8
Troubleshooting guide.... 9
Technical data 10
Important Saftey Instructions READ ALL INSTRUCTIONS BEFORE USING THIS MACHINE
- Inform your dealer immediately if there is any shipping damage.
- Completely remove the accessories from the box.
- The suction unit is not suitable for sucking up hazardous dusts as asbestos. Please consult your Kärcher branch or your Kärcher dealer with regard to such applications.
- Only operate the vacuum from a grounded outlet. Refer to the Technical data for the necessary main fuse.
- Connect to a properly grounded outlet only. See Grounding Instructions. When using an electrical machine, basic precautions should always be followed, including the following: This vacuum is intended for commercial use.
1 DISCONNECT VACUUM CLEANER FROM POWER CIRCUIT before removing the cover, performing maintenance work, and when not in use.
2 DO NOT LEAVE the machine unattended when plugged in.
3 ALWAYS CHECK THE POWER SUPPLY CORD for damage or signs of any aging before each use.
4 DO NOT PULL OR CARRY VACUUM CLEANER BY CORD. Do not close door on cord or pull cord around sharp edges.
5 KEEP CORD AWAY FROM HEAT AND OIL. Do not leave cord lying around after job is complete. It can become a tripping hazard.
6 DO NOT RUN VACUUM OVER CORD.
7 TURN SWITCH TO OFF before unplugging power supply cord.
8 DO NOT UNPLUG BY PULLING-CORD. To unplug, grasp plug, not cord.
9 DO NOT GRASP PLUG WITH WET HANDS.
10A DAMAGED CORD OR PLUG should only be replaced by an authorized service center representative. DO NOT ATTEMPT TO REPAIR POWER CORD.
11TO AVOID SHOCK, do not expose to rain. Store indoors.
12USE ONLY AS RECOMMENDED BY THIS MANUAL. Use only with recommended attachments.
13 KEEP HAIR, CLOTHING, LOOSE JEWELRY, FINGERS and all parts of the body away from openings and moving parts.
14DO NOT BLOCK OR OBSTRUCT OPENINGS. Keep openings free of lint, hair, dust, and anything that restricts air flow.
15DO NOT PICK UP ANYTHING THAT IS BURNING, smoldering, or smoking such as matches, ciga- rettes, or hot ashes.
16DO NOT USE TO VACUUM COM-BUSTIBLE EXPLOSIVE MATERIALS, such as coal, grain, and other finely divided combustible material.
17DO NOT USE TO VACUUM COM-BUSTIBLE, hazardous, toxic, or carcinogenic materials, including gasoline, diesel fuel, acetone, paint thinner, heating oils, undiluted acids and solvents, pesticide, and asbestos.
18USE RECOMMENDED FILTERS when vacuuming drywall materials.
19DO NOT USE WITHOUT FILTER and/or dust bag in proper place.
20CONNECT VACUUM CLEANER WITH PROPERLY GROUNDED OUTLET ONLY. See grounding instructions.
21DO NOT ALLOW VACUUM CLEANER TO BE USED AS A TOY. Keep children away from Vacuum Cleaner.
22DO NOT LEAVE UNATTENDED while Vacuum Cleaner is running.
23DO NOT USE IF CORD, PLUG, FILTER, OR VACUUM CLEANER IS IN POOR CONDITION. If the Vacuum Cleaner has been dropped, damaged, exposed to weather, or dropped into water; have it checked by an authorized service.
24 ALWAYS USE EYE PROTECTION when operating Vacuum Cleaner.
25USE EXTRA CAUTION when operating on stairs.
26STAY ALERT! Do not use Vacuum Cleaner when you are tired or under the influence of drugs, alcohol or medication.
SAVE THESE INSTRUCTIONS
This vacuum is intended for commercial use.
SAFETY INSTRUCTIONS GROUNDING INSTRUCTIONS
- This appliance must be grounded. If it should malfunction or break down, grounding provides a path of least resistance for electric current to reduce the risk of electric shock.
- This appliance is equipped with a cord having an equipment grounding conductor and ground plug.
- The plug must be inserted into an appropriate outlet that is properly installed and grounded in accordance with all local codes and ordinances.
WARNING:
- Improper connection of the equipment grounding conductor can result in a risk of electric shock.
- Check with a qualified electrician or service person if you are in doubt as to whether the outlet is properly grounded.
- Do not modify the plug provided with the appliance.
- If it will not fit the outlet, have a proper outlet installed by a qualified electrician.
- This appliance is for use on a nominal 120-volt circuit, and has a grounded plug that looks like the plug illustrated in Fig.A.
- A temporary adapter that looks like the adapter illustrated in Fig.B, may be used to connect this plug to a two-pole receptacle as shown in Fig.B, if a properly grounded outlet is not available.
- The temporary adapter should be used only until a properly grounded outlet (Fig.A) is installed by a qualified electrician.
- The green colored rigid ear, lug, or the like extending from the adapter must be connected to a perma-
nent ground such as a properly grounded outlet box cover.
- Whenever the adapter is used, it must be held in place by a metal screw.
IN ALL CASES, MAKE SURE THE RECEPTACLE IN QUESTION IS PROPERLY GROUNDED. NEVER REMOVE GROUNDING PRONG FROM POWER PLUG. EXTENSION CORDS
Use only three-wire extension cords that have three-prong grounding-type plugs and three-pole receptacle that accepts the appliance's plug. Replace damaged or worn cord immediately. DO NOT ATTEMPT TO REPAIR POWER CORD.
Note: In Canada, the use of a temporary adapter is not permitted by the Canadian Electrical Code.
Servicing of double-insulated machines
In a double-insulated machine, two systems of insulation are provided instead of grounding. No grounding means is provided on a double-insulated machine, nor should a means for grounding be added to the machine. Servicing a double-insulated machine requires extreme care and knowledge of the system, and should be done only by qualified service personnel. Replacement parts for a double-insulated machine must be identical to the parts they replace.
Intended use
Use the device as a wet/dry vacuum cleaner:
- To vacuum up swarf, granulate, sludge and non-flammable liquids
• In business and industry
Intended use
⚠ WARNING
Inhalation of dusts that are harmful to health
Harmful to health
Never use the appliance for vacuuming dusts that are harmful to health.
Note
Use the device indoors only.
The device is intended for:
- Vacuuming non-flammable and non-explosive substances
• Vacuuming dust and coarse dirt - Industrial use
Any other use will be regarded as improper use.
Environmental protection
The packing materials can be recycled. Please dispose of packaging in accordance with the environmental regulations.
Electrical and electronic appliances / devices contain valuable, recyclable materials and often components such as batteries, rechargeable batteries or oil, which - if handled or disposed of incorrectly - can pose a potential threat to human health and the environment. However, these components are required for the correct operation of the appliance / device. Appliances / devices marked by this symbol are not allowed to be disposed of together with the household trash.
Notes on the content materials (REACH)
Current information on content materials can be found at: www.kaercher.de/REACH
Accessories and spare parts
Only use original accessories and original spare parts. They ensure that the appliance will run fault-free and safely. Information on accessories and spare parts can be found at www.kaercher.com.
Scope of delivery
The scope of delivery for the appliance is shown on the packaging. During unpacking, check the contents for completeness. If any accessories are missing or in the event of any shipping damage, please notify your dealer.
Warranty
The warranty conditions issued by our relevant sales company apply in all countries. We shall remedy possible malfunctions on your appliance within the warranty period free of cost, provided that a material or manufacturing flaw is the cause. In a warranty case, please contact your dealer (with the purchase receipt) or the next authorized customer service site. (See overleaf for the address)
Safety instructions
Note
Use the device indoors only.
⚠️CAUTION
Danger of injury
Hands can become trapped when removing and replacing the suction head, filter unit or collection container. Wear suitable protective gloves.
ATTENTION
Risk of damage
Damage to the device.
Do not vacuum without a filter or with a damaged filter.
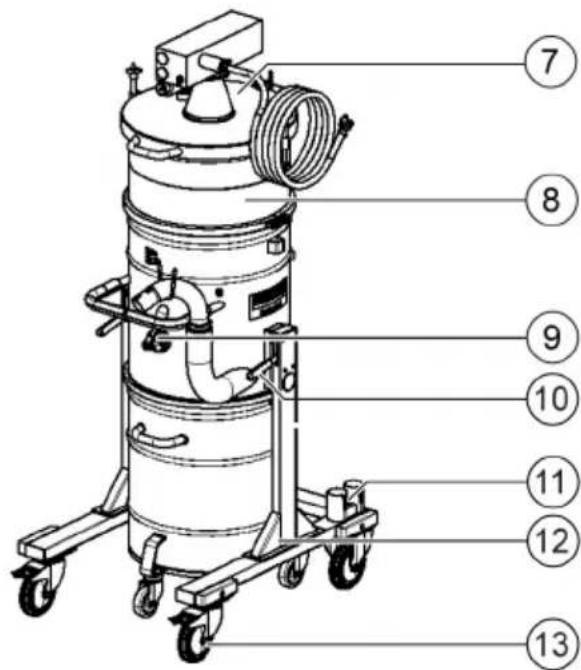
Device description
For the figures, please refer to the graphics page
Illustration A
①Collection container
② Lever for lowering the collection container
③Push handle
④ Suction hose connection
⑤ Pocket filter
⑥Suction head
⑦ Suction head lock
⑧Hepa filter
⑨Filter cleaning handle
⑩ Lever for lowering the collection container
⑪Accessory holder
⑫Chassis
⑬Steering rollers with parking brake
Initial startup
For the figures, please refer to the graphics page
- Bring the device into the working position and secure with the parking brake, if necessary.
- Ensure that the suction head is fitted correctly.
- Check if the potential equalization cable is connected correctly.
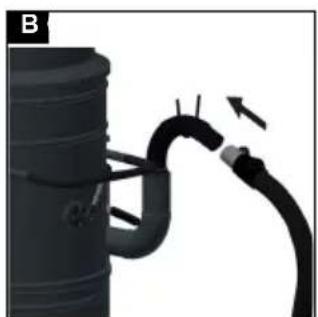
- Insert the suction hose into the suction hose connection.
Illustration B - Plug the desired accessory onto the suction hose.
Operation
ATTENTION
Danger due to rolling away
Danger of injury
Apply the parking brake during operation.
Only move the device at walking pace. Have a second person help you on sloped/uneven ground, if necessary.
1 Connect the compressed air supply.
2 Charge to the required air pressure (6 bar / 87 psi)
3 Open the air pressure cock.
Suction process
- Insert the suction nozzle in the tapered connector on the suction hose handle.
- When vacuuming liquids and dust, only insert the suction nozzle half way into the material being vacuumed in order to convey sufficient air.
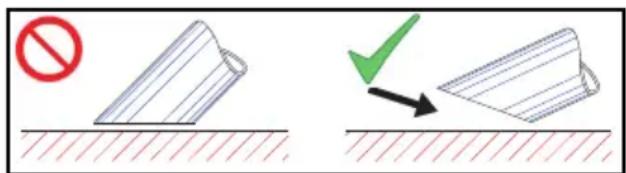
- Do not place the suction nozzle down with its entire surface.
- Hold the suction nozzle at an angle to the suction surface so that the material to be vacuumed is sucked up together with air.
Cleaning the dust filter
Note
Clean the filter regularly to avoid a loss of suction power.
Illustration C
- Move the filter cleaning handle back and forth several times to clean the filter.
Emptying the collection container
- Switch off the device and disconnect from the compressed air supply.
- Clean the dust filter.
- Lower the collection container by pulling up the lever.
-
Empty the collection container into the disposal facility.
-
Dispose of or recycle the contents in accordance with statutory provisions.
Note
Move the collection container on its rollers only. Do not use a crane or e.g. a forklift for this.
Removing the suction head
- Disconnect the compressed air supply.
- Open the suction head lock. Illustration D
- Lift off the suction head and set it down on a suitable surface.
Finishing operation
- Disconnect the compressed air supply.
- Empty and clean the collection container.
- Remove the accessory and clean and dry if necessary.
Transport
⚠️CAUTION
Failure to observe the weight
Risk of injury and damage Be aware of the weight of the device during transport and storage.
- When transporting in vehicles, secure the device against slipping and tipping over according to the applicable guidelines.
Storage
△CAUTION
Failure to observe the weight
Risk of injury and damage Be aware of the weight of the device during transport and storage.
- Store the device indoors only.
Care and service
-
Rinse the device and accessories at regular intervals with a suitable liquid and allow them to dry.
-
Regularly check the pocket filter for damage. Replace the pocket filter if damaged.
Maintenance table
| Interval Check Measure | ||
| Daily Check the pocket filter for contamination | Clean the contaminated pocket filter | |
| Compressed air display Ensure an optimum compressed air supply of 5.6 bar | ||
| 3-6 months Check the pump for contamination | Service the pump | |
| Annually Filter foam Replace | ||
Replacing the surface filter
- Loosen the screw connections of the clamping rings.
Illustration E
- Remove the baffle plate.
- Remove the filter.
- Fit a new filter.
Note
Ensure that the filter has been inserted correctly.
5. Fit the baffle plate.
- Fit the clamping rings and screw tight.
Replacing the pocket filter
Illustration F
① Screws
②Clamping ring
③Pocket filter
④Cleaning fixture
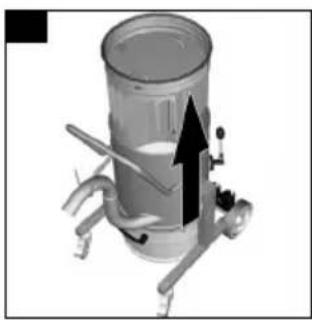
- Remove the suction head.
Illustration G
- Remove the filter unit from the device using the handles and turn it over.
- Remove the screws and remove the cleaning fixture.
- Loosen the clamping ring screw connection.
- Remove the pocket filter.
- Fit the new pocket filter.
During installation, take care to ensure that the lug on the filter insert engages the shaft.
Illustration H
- Fit the clamping ring and tighten.
- Fit the cleaning fixture and tighten.
Troubleshooting guide
The malfunctions listed can be rectified by the user. Ringler Customer Service should be contacted in the event of any other malfunctions: Tel. +49 (0) 7171 94888 0.
| Error Cause Rectification | ||
| Reduced suction performance | The suction hose or the suction nozzle is blocked. | Remove the blockage. |
| The installed compressed air filter / controller is blocked or faulty. | Remove the blockage and/or replace the compressed air filter/controller. | |
| The suction hose is leaky. ● | Replace the suction hose. | |
| The suction hose is not seated properly in the suction fitting. | Fit the suction hose correctly. | |
| The collection container is full. | Empty the collection container. | |
| The surface filter is contaminated. | Clean or replace the filter. | |
| The seal between the drive unit and the collection container is faulty. | Replace the seal. | |
| The compressed air filter in the connection sleeve is contaminated. | Clean or replace the compressed air filter. | |
Technical data
| IVR 100/30 PpSc | IVR 100/30 PpSc Hepa | ||
| Compressed air supply (min.) psi (bar) 80 (5.5) 80 (5.5) | |||
| Tank content gal (l) 26.4 (100) 26.4 (100) | |||
| Compressed air consumption CFM (l/s) | 115 (54) 115 (54) | ||
| Vacuum in H | _2O (kPa) | 200 (50) 200 (50) | |
| Nominal width of the suction hose DN 50 DN 50 | |||
| Nominal width vacuum hose (min.) | DN 50 DN 50 | ||
| Chicago coupling dimension | in | 1/2 | 1/2 |
| Air supply hose length | ft (m) | 50 (15) | 50 (15) |
| Length x width x height | in (mm) | 38.8 x 29.9 x62.2 (987 x760 x 1581) | 38.8 x 29.9 x73.6 (987 x760 x 1870) |
| Typical operating weight | Ibs (kg) | 235 (107) | 293 (133) |
| Ambient temperature | °F (°C) | 104 (+40) | 104 (+40) |
| Sound pressure level | dB(A) | 70 | 70 |
| Deviation KpA | dB(A) | 2 | 2 |
Subject to technical changes without notice.
natural_image
Icon showing a gear and wrench inside a square frame (no text or symbols)http://www.kaercher.com/dealersearch

2-2-HC-A5-GS-awx2508


- Contents
- Important Saftey Instructions READ ALL INSTRUCTIONS BEFORE USING THIS MACHINE
- SAVE THESE INSTRUCTIONS
- WARNING:
- IN ALL CASES, MAKE SURE THE RECEPTACLE IN QUESTION IS PROPERLY GROUNDED. NEVER REMOVE GROUNDING PRONG FROM POWER PLUG. EXTENSION CORDS
- Servicing of double-insulated machines
- Intended use
- ⚠ WARNING
- Inhalation of dusts that are harmful to health
- Note
- Environmental protection
- Notes on the content materials (REACH)
- Accessories and spare parts
- Scope of delivery
- Warranty
- Safety instructions
- ⚠️CAUTION
- Danger of injury
- ATTENTION
- Risk of damage
- Device description
- Illustration A
- Initial startup
- Operation
- Suction process
- Cleaning the dust filter
- Illustration C
- Emptying the collection container
- Removing the suction head
- Finishing operation
- Transport
- Failure to observe the weight
- Storage
- △CAUTION
- Care and service
- Replacing the surface filter
- Illustration E
- Replacing the pocket filter
- Illustration F
- Illustration G
- Troubleshooting guide
Brand : Kärcher
Model : IVR 100/30-Pp Sc Hepa
Category : Vacuum Cleaner