LAVATHERM 71273AC - Washing machine AEG - Free user manual and instructions
Find the device manual for free LAVATHERM 71273AC AEG in PDF.

User questions about LAVATHERM 71273AC AEG
0 question about this device. Answer the ones you know or ask your own.
Ask a new question about this device
Download the instructions for your Washing machine in PDF format for free! Find your manual LAVATHERM 71273AC - AEG and take your electronic device back in hand. On this page are published all the documents necessary for the use of your device. LAVATHERM 71273AC by AEG.
USER MANUAL LAVATHERM 71273AC AEG
natural_image
Interior of a laundry room with two washing machines and three hanging clothes on a wall (no visible text or symbols)INHOUD
- VEILIGHEIDSVOORSCHRIFTEN 3
- BESCHRIJVING VAN HET PRODUCT 5
- ACCESSOIRES 6
- BEDIENINGSPANEEL 7
- VOORDAT U HET APPARAAT VOOR DE EERSTE KEER GEBRUIKT 8
- PROGRAMMA'S 8
- BEDIENING VAN HET APPARAAT 10
- AANWIJZINGEN EN TIPS 12
- ONDERHOUD EN REINIGING 13
- PROBLEMEN OPLOSSEN EN ONDERHOUD 17
- TECHNISCHE INFORMATIE 19
- MONTAGE.... 19
VOOR PERFECTE RESULTATEN
text_image
Technical diagram of a washing machine with numbered parts for identificationnatural_image
Line drawing of a two-tiered washing machine with front-mounted dish, showing front panel and side picture (no text or symbols)natural_image
Line drawing of a washing machine connected to a sink with a piping bag (no text or symbols)Naam accessoire: DK11.
natural_image
Diagram showing circular flow with arrows and a light source, no text or symbols presentnatural_image
Pure electrical circuit lines without any symbolsnatural_image
Pure electrical circuit lines without any symbolsnatural_image
Technical line drawing of a mechanical component with an upward arrow indicating motion (no text or symbols)natural_image
Illustration of a hand holding a wooden tray with a curved lid and a black arrow indicating rotation (no text or symbols)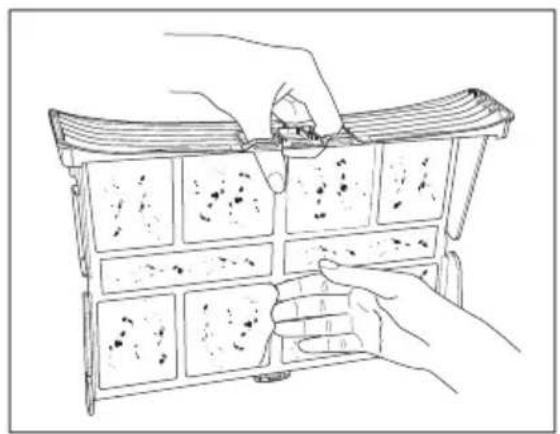
natural_image
Line drawing of hands installing or adjusting a grid-like object with no visible text or symbols
natural_image
Line drawing of a faucet pouring liquid into a storage tray (no text or symbols)natural_image
Line drawing of hands inserting a box into a drawer with an arrow indicating direction (no text or symbols)
natural_image
Line drawing of a hand pouring liquid into a bowl (no text or symbols)natural_image
Diagram showing a car wheel and its impact on the dashboard, with no text or symbols present.natural_image
Technical line drawing of a wall-mounted door frame structure with two side-mounted clips (no text or symbols)natural_image
Technical line drawing of a mechanical device with internal components and mounting base (no text or symbols)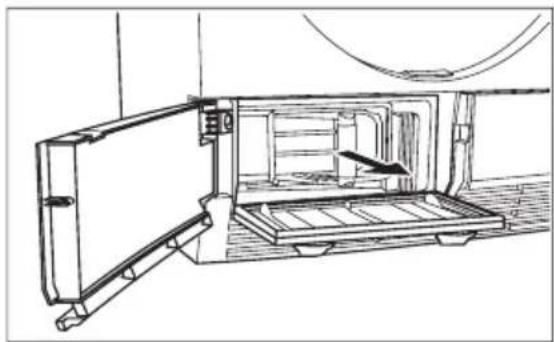
natural_image
Technical line drawing of a mechanical device with an open door and internal components (no text or symbols)
natural_image
Line drawing of a hand washing a bucket with a tool, no text or symbols presentnatural_image
Diagram of a hand holding a circular device with arrows indicating motion or force, no text or symbols presenttext_image
Labeled diagram of a washing machine with numbered parts for identificationnatural_image
Line drawing of a two-tiered washing machine with front-mounted dish, showing front panel and side picture (no text or symbols)natural_image
Line drawing of a washing machine connected to a sink with a faucet (no text or symbols)natural_image
Diagram showing bidirectional arrows and a circular shape with a light source, no text or symbols presentnatural_image
Pure electrical circuit lines without any symbolsnatural_image
Pure electrical circuit lines without any symbolsnatural_image
Technical line drawing of a mechanical component with an arrow indicating upward motion (no text or symbols)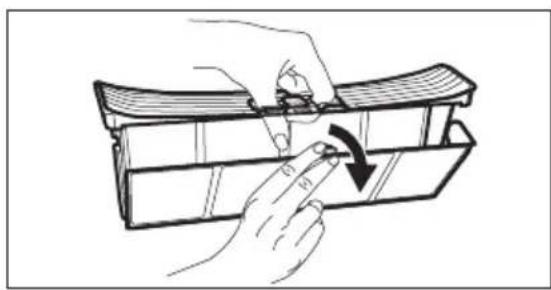
natural_image
Illustration of a hand holding a curved object with a black arrow indicating rotation (no text or symbols)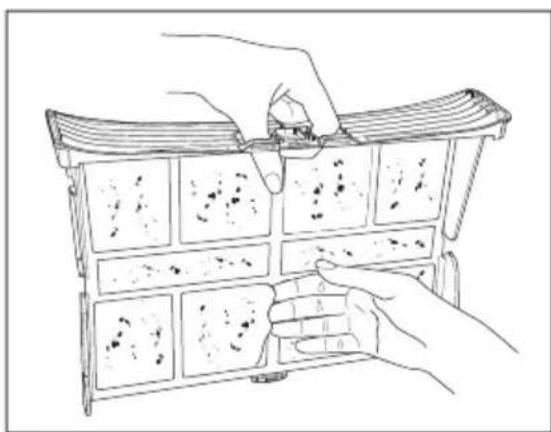
natural_image
Line drawing of hands installing or adjusting a grid of small objects on a folding shelf (no text or symbols visible)natural_image
Line drawing of a faucet pouring liquid into a grid-patterned storage tray (no text or symbols)natural_image
Line drawing of hands inserting a box into a drawer into a cabinet (no text or symbols)natural_image
Illustration of a hand pouring liquid into a bowl with a tool, no text or symbols presentnatural_image
Diagram showing a car interior with curved surfaces and directional arrows, no text or symbols presentnatural_image
Technical line drawing of a wall-mounted door frame with two side-mounted clips, mounted on a brick wall (no text or symbols)natural_image
Technical line drawing of a mechanical device with internal components and a curved top section (no text or symbols)natural_image
Technical line drawing of a mechanical assembly with an open door and internal components (no text or symbols)natural_image
Line drawing of a hand using a tool to clean or wash a container with water, no text or symbols presentnatural_image
Line drawing of a hand holding a circular device with arrows indicating motion or force, no text or symbols presentwww.aeg.com/productregistration

text_image
Technical diagram of a washing machine with numbered parts for identificationnatural_image
Line drawing of a two-tiered washing machine with front-mounted dish, showing front panel and side picture (no text or symbols)natural_image
Line drawing of a washing machine connected to a sink with a faucet (no text or symbols)natural_image
Pure electrical circuit lines without any symbolsnatural_image
Pure electrical circuit lines without any symbolsnatural_image
Technical line drawing of a mechanical component with an upward arrow indicating motion (no text or symbols)
natural_image
Illustration of a hand holding a curved object with a black arrow indicating rotation (no text or symbols)natural_image
Line drawing of hands installing or adjusting a wooden folding cabinet with multiple compartments (no text or symbols visible)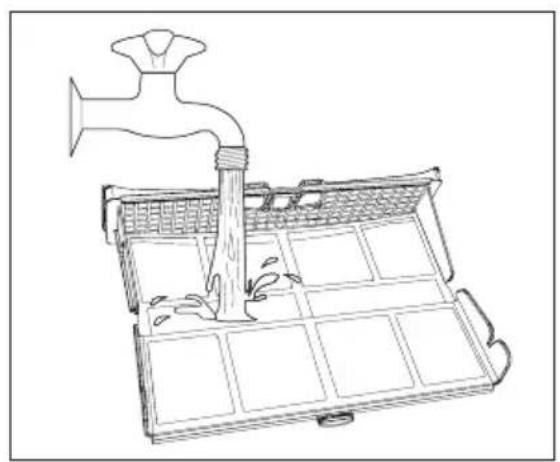
natural_image
Line drawing of a faucet pouring liquid into a storage tray (no text or symbols)natural_image
Illustration of hands inserting a box into a drawer with an arrow indicating direction (no text or symbols)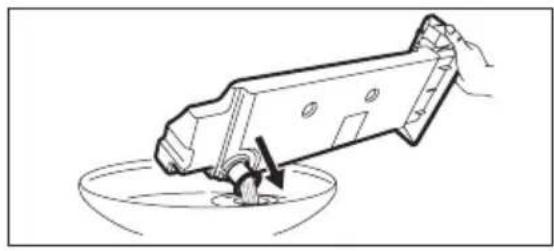
natural_image
Illustration of a hand pouring liquid into a bowl (no text or symbols)natural_image
Diagram showing a car interior with curved surfaces and directional arrows, no text or symbols presentnatural_image
Technical line drawing of a wall-mounted door frame with two side-mounted buckets, mounted on a brick wall (no text or symbols)natural_image
Technical line drawing of a mechanical device with internal components and mounting base (no text or symbols)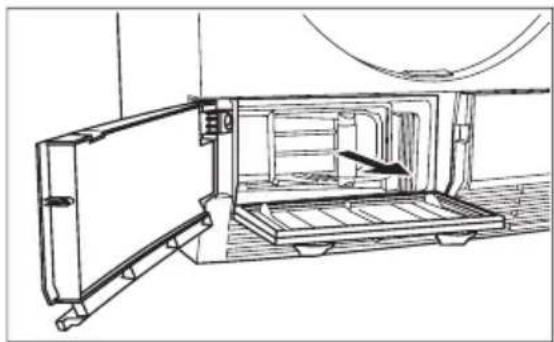
natural_image
Technical line drawing of a mechanical assembly with an open door and internal components (no text or symbols)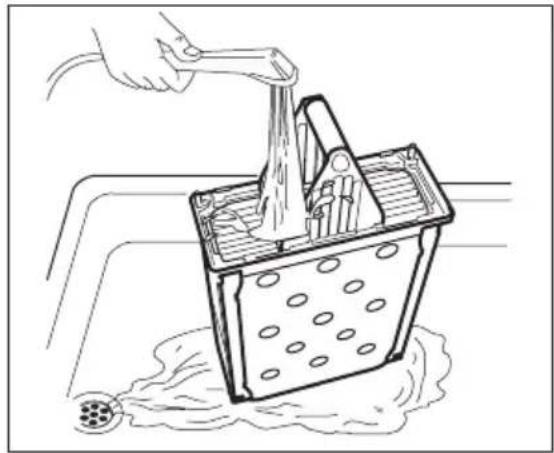
natural_image
Line drawing of a hand washing a bucket with a tool, no text or symbols presentnatural_image
Line drawing of a hand holding a circular device with arrows indicating motion or force (no text or symbols)Thank you for choosing this AEG product. We have created it to give you impeccable performance for many years, with innovative technologies that help make life simpler – features you might not find on ordinary appliances. Please spend a few minutes reading to get the very best from it.
Visit our website for:

Get usage advice, brochures, trouble shooter, service information: www.aeg.com

Register your product for better service: www.aeg.com/productregistration

Buy Accessories, Consumables and Original spare parts for your appliance: www.aeg.com/shop
CUSTOMER CARE AND SERVICE
We recommend the use of original spare parts.
When contacting Service, ensure that you have the following data available.
The information can be found on the rating plate. Model, PNC, Serial Number.

Warning / Caution-Safety information

General information and tips

Environmental information
Subject to change without notice.
1. ⚠️ SAFETY INSTRUCTIONS
Before the installation and use of the appliance, carefully read the supplied instructions. The manufacturer is not responsible if an incorrect installation and use causes injuries and damages. Always keep the instructions with the appliance for future reference.
1.1 Children and vulnerable people safety

WARNING!
Risk of suffocation, injury or permanent disability.
- This appliance can be used by children aged from 8 years and above and persons with reduced physical, sensory or mental capabilities or lack of experience and knowledge if they have been given supervision or instruction for the operation of the appliance by a person who is responsible for their safety.
- Do not let children play with the appliance.
- Keep all packaging away from children.
- Keep all detergents away from children.
- Keep children and pets away from the appliance door when it is open.
- Cleaning and user maintenance shall not be made by children without supervision.
1.2 Installation
- Remove all the packaging.
- Do not install or use a damaged appliance.
- Obey the installation instruction supplied with the appliance.
- Make sure that the floor where you install the appliance is flat, stable, heat resistant and clean.
- Do not install or use the appliance where the temperature is less than 5°C or higher than 35°C.
- Do not install the appliance behind a lockable door, a sliding door or a door with a hinge on the opposite side,
where the appliance door can not be fully opened.
• Always be careful when you move the appliance because it is heavy. Always wear safety gloves.
• Always move the appliance vertically.
- The rear surface of the appliance must be put against the wall.
- Make sure that there is air circulation between the appliance and the floor.
- Make sure the carpet does not obstruct the ventilation openings in the base of the appliance (if applicable).
- Exhaust air must not be discharged into a flue which is used for exhausting fumes from appliances burning gas or other fuels. (if applicable)
- If the tumble dryer is put on top of a washing machine, use the stacking kit. The stacking kit, available from your authorized vendor, can be used only with the appliance specified in the instructions, supplied with the accessory. Read it carefully before installation (Refer to the Installation leaflet).
- Ensure you have good ventilation in the installation room to avoid the back flow of gases into the room from appliances burning other fuels, including open fires.
- The appliance can be installed as freestanding or below the kitchen counter with correct space (Refer to the Installation leaflet).
- When the appliance is put in its permanent position, check if it is fully level with the aid of a spirit level. If it is not, adjust the feet until it is.
Electrical connection

WARNING!
Risk of fire and electrical shock.
- The appliance must be earthed.
- Make sure that the electrical information on the rating plate agrees with the power supply. If not, contact an electrician.
-
Always use a correctly installed shock-proof socket.
-
Do not use multi-plug adapters and extension cables.
- Make sure not to cause damage to the mains plug and to the mains cable. Should the appliance power supply cable need to be replaced, this must be carried out by our Service Centre.
- Connect the mains plug to the mains socket only at the end of the installation. Make sure that there is access to the mains plug after the installation.
- Do not pull the mains cable to disconnect the appliance. Always pull the mains plug.
- Do not touch the mains cable or the mains plug with wet hands.
- This appliance complies with the E.E.C. Directives.
1.3 Use

WARNING!
Risk of fire, explosion, electric shock or damage to the appliance
- Use this appliance in a household only.
- Do not change the specification of this appliance.
- The final part of the drying cycle occurs without heat (cool down cycle) to ensure that the items will not be damaged.
If you stop the appliance before the end of the drying cycle, immediately remove and spread out all items, so that the heat can dissipate. - If you use fabric softener or similar products, obey the instructions on the packaging.
- Do not run the appliance without a filter. Clean the lint filter before or after each use.
- Wipe away lint that has accumulated around the appliance.
- Do not dry the damaged items which contain padding or fillings.
-
Do not dry items such as foam rubber (latex foam), shower caps, waterproof textiles, rubber backed articles and clothes or pillows fitted with foam rubber pads..
-
Before drying items that have been in contact with substances such as cooking oil, acetone, alcohol, petrol, kerosene, spot removers, turpentine, waxes and wax removers, wash them in hot water with an extra amount of detergent.
- Do not dry items in the appliance if industrial chemicals have been used for cleaning.
- Make sure that no gas lighters or matches have been left in the pockets of the clothing.
- Only dry fabrics which are applicable to dry in the tumble dryer. Follow the instructions on the fabric label.
- Do not dry not washed items in the appliance.
- If you have washed your laundry with a stain remover start an extra rinse cycle before you start the dryer.
- Do not drink or prepare food with the condensed water. It can cause health problems to people and pets.
- Do not sit or stand on the open door.
- Obey the maximum load volume of 7 kg (refer to the "Programme chart" chapter).
- Do not dry dripping wet clothes in the tumble dryer.
1.4 Care and Cleaning

WARNING!
Risk of injury or damage to the appliance.
- Before maintenance, deactivate the appliance and disconnect the mains plug from the mains socket.
- Do not use water spray and steam to clean the appliance.
- Clean the appliance with a moist soft cloth. Only use neutral detergents. Do not use abrasive products, abrasive cleaning pads, solvents or metal objects.
1.5 Disposal

WARNING!
Risk of injury or suffocation.
- Disconnect the appliance from the mains supply.
- Cut off the mains cable and discard it. Remove the door catch to prevent children and pets to get closed in the appliance.
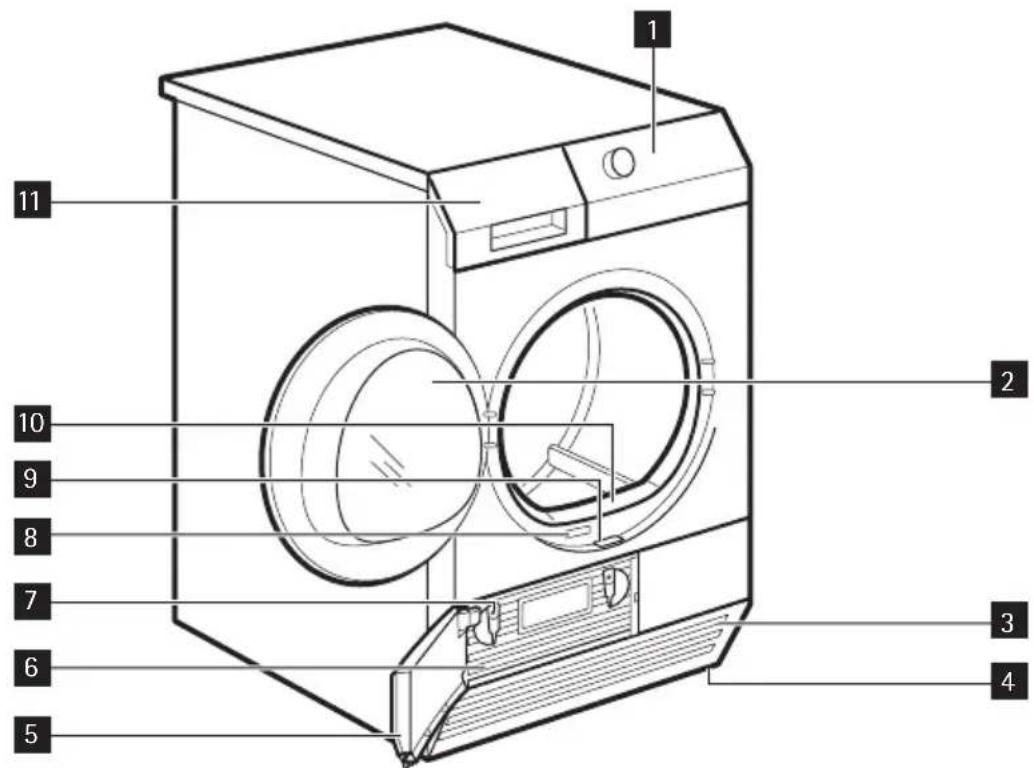
2. PRODUCT DESCRIPTION
text_image
Technical diagram of a front-loading washing machine with numbered parts labeled for identification.1 Control panel
2 Load door (reversible)
3 Airflow slots
4 Adjustable feet
5 Condenser door
6 Condenser cover
7 Lock knobs
8 Rating plate
9 Sliding button to open the condenser door
10 Filter
11 Water container
3. ACCESSORIES
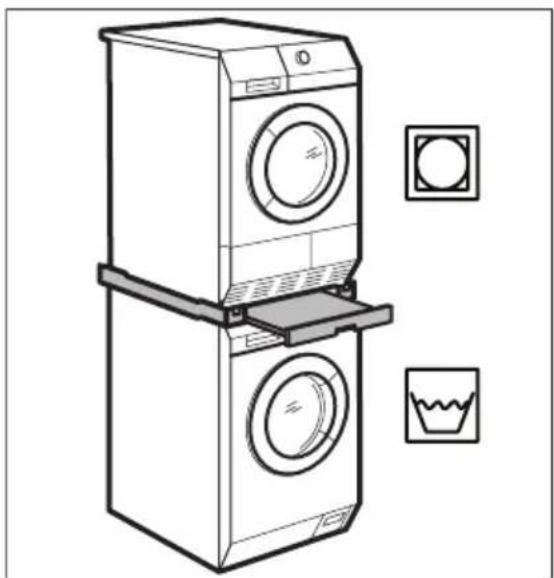
3.1 Stacking kit
natural_image
Line drawing of a two-tiered washing machine with front-mounted dish, showing front panel and side picture (no text or symbols)Accessory name: SKP11, STA8, STA9 Available from your authorized vendor. Stacking kit can be used only with the washing machines specified in the leaf- let. See the leaflet attached. Read carefully the instructions supplied with the accessory.
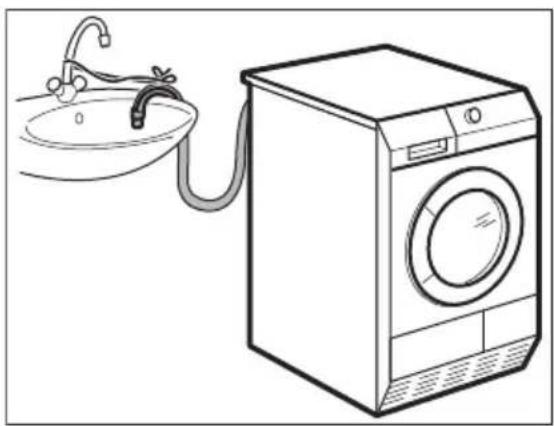
3.2 Draining kit
natural_image
Line drawing of a washing machine connected to a sink with a faucet (no text or symbols)Accessory name: DK11.
It is available from your authorized vendor (can be attached to some types of the tumble dryers)
The accessory for through draining of the condensed water into a basin, siphon, gully, etc. After the installation, the water container is drained automatically. The water container must stay in the appliance.
The installed hose must be on the height from minimum of 50 cm to maximum of 1 m from floor level. The hose cannot be in loop. Decrease the length of the hose if necessary.
Read carefully the instructions supplied with the accessory.
4. CONTROL PANEL
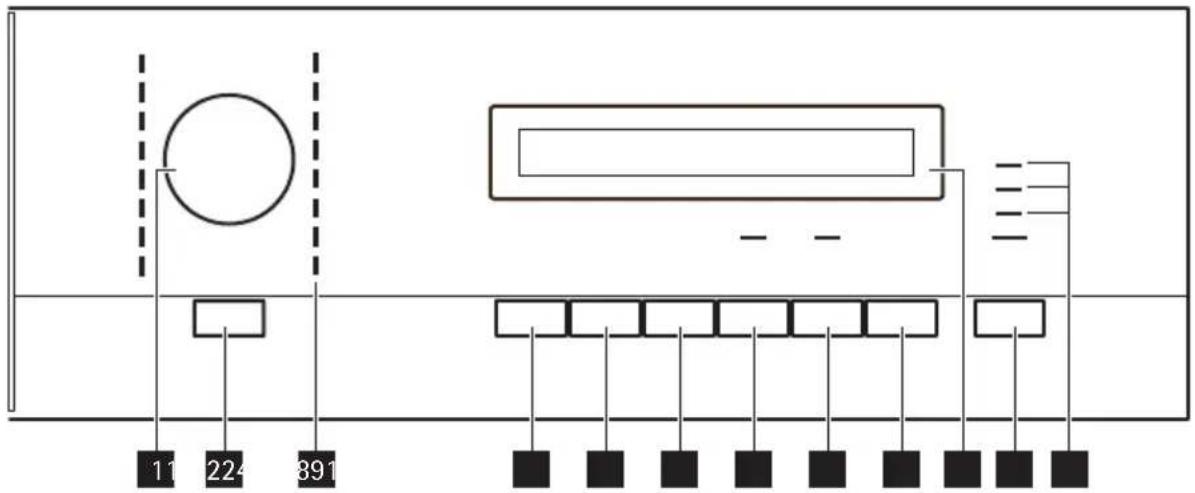
text_image
11 224 8911 The programme dial
2 The On/Off (Aan/Uit) push button
3 The programme indicators
4 The Dry Plus (Drogen Plus) push button
5 The Delicate (Behoedzaam) push button
6 The Anticrease (Anti-kreuk) push button
7 The Buzzer (Zoemer) push button
8 The Time Drying (Droogtijd) push button
9 The Delay Start (Startuitstel) push button
10 The display
11 The Start/Pause push button
12 The indication lamps: drain the water container, clean the filter, clean the condenser
4.1 Display

text_image
MAX | Ø | 90°30" | 1111 Y ☐ ☐ ☑ 2.00| Symbol Description | |
| MIN | default dryness level |
| MED | moderate extra dryness |
| Symbol Description | |
| MAX | maximum extra dryness |
| delicate | |
| delay start | |
| 30m / 90 | anti-crease time |
| drying cycle phase indicator | |
| cooling cycle phase indicator | |
| crease guard cycle phase indicator | |
| child lock activated | |
| 2.00 | cycle time indication |
| 10' - 2.00 | time programme selection (10 min. - 2h.) |
| 30' - 20h | delay start selection (30 min. - 20h.) |
5. BEFORE FIRST USE
Clean the tumble dryer drum with a moist cloth or set a short programme
(e.g. 30 minutes time programme) with the load of moist cloths.
- PROGRAMMES
| Pro-grammes | Load 1) | Properties | Available functions | Fabric mark |
| Cottons (Katoen) | ||||
| Extra Dry (Extra Droog) | 7 kg | To dry cotton pieces of clothing. Drying level: extra dry. | all except Time Drying (Droogtijd) |  |
| Cupboard Dry (Kast-droog) 2) | 7 kg | To dry cotton pieces of clothing. Drying level: cupboard dry. | all except Time Drying (Droogtijd) |  |
| Iron Dry (Strijkdroog) 2) | 7 kg | To dry cotton pieces of clothing. Drying level: applicable to iron. | all except Time Drying (Droogtijd) |  |
| Jeans 7 kg | To dry leisure clothing such as jeans, sweat-shirts of different material thicknesses (e.g. at the neck, cuffs and seams). | all except Time Drying (Droogtijd) |  | |
| Bed Linen (Bedden-goed) | 3 kg | To dry bed linen such as: single and double sheet, pillowcase, bedspread. | all except Time Drying (Droogtijd) |  |
| Duvets (Dekbed) | 1,5 kg | To dry single duvet and pillows (with feather, down or synthetic fillings). | all except Anticerase (Anti-kreuk) and Time Drying (Droog-tijd)3) |  |
| Time (Tijd) 7 kg | To dry laundry with the time set by the user. The time value must be related to the load. To dry one item or small quantities of the laundry we recommend to use short times. | all except Dry Plus (Drogen Plus) |  | |
| Programmes | Load 1) | Properties | Available functions | Fabric mark |
| Extra Quick Mixed (Mix Extra Kort) | 3 kg | To dry cotton and synthetic fabrics, uses low temperature. | all except: Delicate (Behoedzaam) and Time Drying (Droogtijd) |  |
| Synthetics (Synthetica) | ||||
| Extra Dry (Extra Droog) | 3 kg | To dry synthetic pieces of clothing. Drying level: extra dry. | all except Time Drying (Droogtijd) |  |
| Cupboard Dry (Kastdroog) 2) | 3 kg | To dry synthetic pieces of clothing. Drying level: cupboard dry. | all except Time Drying (Droogtijd) |  |
| Iron Dry (Strijkdroog) | 3 kg | To dry synthetic pieces of clothing. Drying level: applicable to iron. | all except Time Drying (Droogtijd) |  |
| Easy Iron (Strijkvrij) | 1 kg (or 5 shirts) | To dry easy care fabrics such shirts and blouses; for minimum ironing effort. The results can be different for to the different types of fabric and its finish. Put fabrics in the tumble dryer straight. After the cycle, immediately remove dried fabrics and put on a cloths hanger. | all except Time Drying (Droogtijd) 3) |  |
| Active Wear (Sport Intensief) | 2 kg | To dry outdoor pieces of clothing, technical, sports, pile fabrics, waterproof and breathable jackets, shell jacket teamed with a removable fleece or inner insulation. | all except Anticrease (Anti-kreuk) and Time Drying (Droogtijd) 3) | |
| Sports (Sportkled-ing) | 2 kg | To dry sportswear, thin and light fabrics, microfiber, polyester, which are not ironed. | all except Time Drying (Droogtijd) | |
| Delicates (Fijne Was) | 2 kg | To dry delicate fabrics. | all except Time Drying (Droogtijd) 3) |  |
| Wool Refresh (Wol Opfrissen) | 1 kg | To refresh the cloths made of wool . The cloths become soft and cosy. We recommend to remove the cloths immediately after the programme end. | Buzzer (Zoemer) , Delay Start (Startuitstel) 3) | |
1) maximal weight of dry clothes
2) For test institutes only:
To make a performance test use the standard programmes which are specified in the EN 61121 document. If is necessary to correct the remaining moisture level of the laundry, adjust the programme with the Dry Plus (Drogen Plus) function.
3) Delicate (Behoedzaam) activated by default
7. USING THE APPLIANCE
7.1 Preparing the laundry

Dry only the laundry applicable to dry in the tumble dryer. Make sure if the laundry is applicable to dry in the tumble dryer. Do the check of the fabric mark on the clothes.
| Fabric mark | Property |
| [KHBD] | Applicable to dry in the tumble dryer |
 | Applicable to dry in the tumble dryer at standard temperature |
| [WKHB] | Applicable to dry in the tumble dryer at decreased temperature |
 | Not applicable to dry in the tumble dryer |
Correctly prepare the laundry:
- close zips, button up duvet covers and attach loose ties or ribbons (e.g. ribbons of aprons) - laundry can tangle
- make sure the pockets are empty - remove metal items (paper clips, safety pins, etc.).
- turn items with 2 fabric layers inside out (e.g. cotton lined anoraks, the cotton fabric layer must be external).
Dry only: - cotton and linen with Cottons (Katoen) programmes
• synthetic and mixtures with Synthetics (Synthetica) programmes
• separately the strong coloured textiles and the light coloured textiles - colours can bleed
- cotton jersey and knitwear only with the applicable programmes - items can shrink

Do not put more laundry than the maximum load which is 7kg.
7.2 Loading the laundry
- Pull the appliance door
- Load loosely the laundry.
- Close the appliance door.

CAUTION!
Do not lock the laundry in between the appliance door and rubber seal.
7.3 Switching on the appliance
Push the On/Off (Aan/uit) button to activate or to deactivate the appliance.
When the appliance is on, some indications come in to the view on the display.
7.4 Auto stand-by function
To decrease the energy consumption, the automatic stand-by function deactivates the appliance:
- if the Start/Pause button was not pushed in the time of 5 minutes.
• after 5 minutes from the programme end.
Push the On/Off (Aan/uit) button to activate the appliance.
7.5 Setting a programme
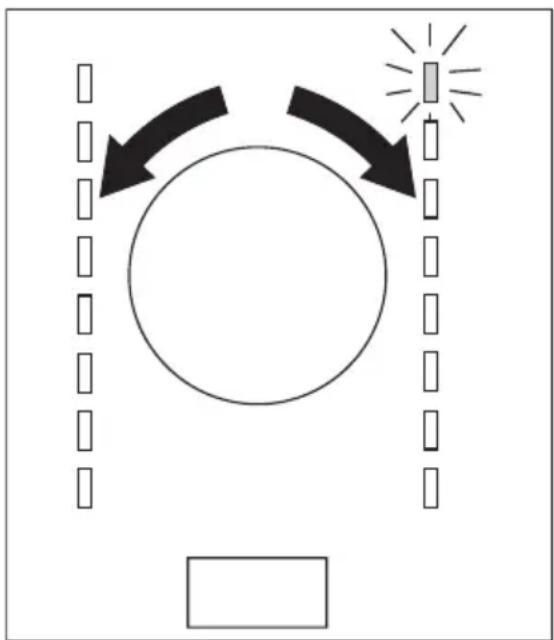
natural_image
Diagram showing circular flow with arrows and a light source, no text or symbols presentUse the programme dial to set the programme. The possible time to complete the programme come into view on the display.

The drying time you see is related to the load of 5 kg for cotton and jeans programmes. For the other programmes the drying time is related to the recommended loads. The drying time of the cotton and jeans programmes with the load more than 5 kg is longer.
7.6 Special functions
Together with the programme you can set 1 or more special functions. To activate or deactivate the function push the applicable push button.
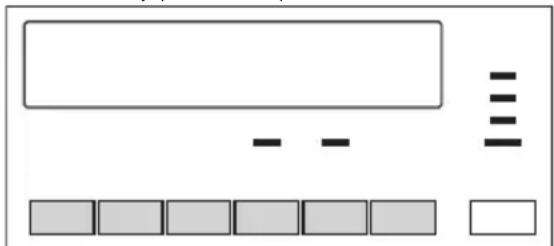
natural_image
Pure electrical circuit lines without any symbolsWhen the function is activated the LED above the push button or symbol on the display comes into view.
7.7 The Dry Plus (Drogen Plus) function
This function helps to get the laundry more dried. There are 3 possible selections:
MIN - the default selection which is related to the programme.
MED — the selection to get the laundry lightly dried.
MAX — the selection to get the laundry more dried.
7.8 The Delicate
To dry more lightly the sensitive and temperature sensitive textiles (e.g. acrylic, viscose). For fabrics with the symbol on the fabric label. Programme operates with decreased heat.
7.9 The Anticrease (Anti-kreuk) function
Extends anticrease phase (30 minutes) at the end of the drying cycle to 90 minutes. This function prevents laundry from creases. Laundry can be removed during the anticrease phase.
7.10 The Buzzer (Zoemer) function
When the buzzer function is activated you can hear the buzzer at the:
- cycle end
- anti-crease phase start and end
- cycle interruption
The buzzer function is by default always on. You can use this function to activate or deactivate the sound.
Operates only with the Time (Tijd) programme. Lets the user to set special time of drying programme from minimum 10 min. to maximum of 2 hours (in 10 min. steps).
7.12 The Delay Start (Startuitstel) function

Let to delay the start of a drying programme from minimum of 30 minutes to maximum of 20 hours.
- Set the drying programme and functions.
- Push the Delay Start (Startuitstel) button again and again until the necessary time of the delay come into the view on the display (e.g. 12h if the programme has to start after 12 hours.)
- To activate the Delay Start (Startuit-stel) function, push the Start/Pause button. The time to start decreases on the display.
7.13 Child lock function
The child lock can be set to prevent the children to play with the appliance. The child lock function locks all push buttons and the programme dial (this function does not lock On/Off (Aan/Uit) button). To activate the child lock function push the Dry Plus (Drogen Plus) and Delicate (Behoedzaam) buttons at the same time until the symbol come into view on the display. To deactivate push again the above buttons until the symbol go out of view.
You can activate the child lock function:
- before you push the Start/Pause button - the appliance cannot start
- after you push the Start/Pause button - all the push buttons and the programme dial are deactivated
7.14 Starting a programme
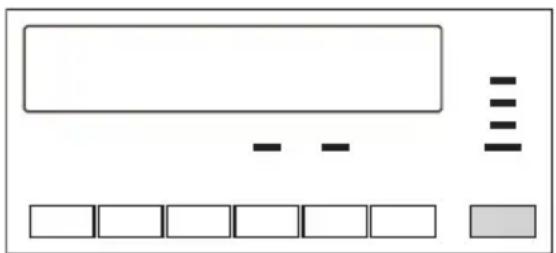
natural_image
Pure electrical circuit lines without any symbolsTo activate the programme push the Start/Pause button. The LED above the push button changes the colour to red.
7.15 Change a programme
To change a programme, push the On/Off (Aan/Uit) button to deactivate appliance. Push the On/Off (Aan/Uit) to activate the appliance and then set the programme again.
7.16 At the end of programme
When the drying cycle is completed, the symbol flashes on the display. If the Buzzer (Zoemer) function is on, an acoustic signal sounds intermittently for one minute.
To remove the laundry:
- Push the On/Off (Aan/Uit) button for 2 seconds to deactivate the appliance.
- Open the appliance door.
- Remove the laundry.
- Close the appliance door.

After each drying cycle:
- clean the filter
- drain the water container
(See chapter CARE AND CLEANING.)
8. HINTS AND TIPS
8.1 Ecological hints
- Do not use fabric softener to wash and then dry. In the tumble dryer laundry becomes soft automatically.
- Use the condensate as distilled water, e.g. for steam ironing. If necessary clean the condensate before (e.g. with a coffee filter) to remove possible small pieces of fluff.
- Always keep the airflow slots on the bottom of the appliance clear.
- Use the load volumes specified in the programmes chapter.
- Make sure that is good airflow in the appliance installation position.
- Clean the filter after each drying cycle.
- Spin good the laundry before drying.
8.2 Water hardness and conductivity
Water hardness can be different for different locations. Water hardness has an effect on the water conductivity and the operation of the conductivity sensor in the appliance. If you know the value of the water conductivity you can adjust the sensor to dry with the better results. To change the sensor conductivity:
- Turn the programme dial to available programme.
- Push at the same time the Dry Plus (Drogen Plus) and the Anticrease (Anti-kreuk) buttons. Hold down until one of the symbols go into view on the display:
-
[0] low conductivity <300 μS/ cm
-
CO= moderate conductivity 300-600 μS/cm
-
COE high conductivity >600 μS/cm
-
Push the Start Pause button again and again until you set necessary level.
- To memorise the setting push at the same time the Dry Plus (Drogen Plus) and the Anticrease (Anti-kreuk) buttons.
8.3 Water container full — indication
By default the indication LED is always on. It comes into the view at the end of the cycle or when the water container is full. When you use an external equipment to drain the container, the LED can be off.
To activate or deactivate the indication:
- Turn the programme dial to available programme.
- Push at the same time the Dry Plus (Drogen Plus) and Buzzer (Zoemer) buttons and hold down until you see the correct setting:
- the LED is off and the symbol goes into the view - The LED is permanently off
- the LED is on and the symbol goes into the view - The LED is activated
9. CARE AND CLEANING
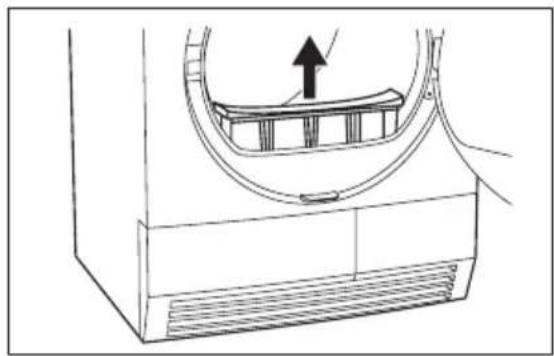
9.1 Cleaning the filter
At the end of each cycle the filter LED is on to tell you that the filter must be cleaned.

The filter collects the fluff. The fluff occurs while the cloths are dried in the tumble dryer.
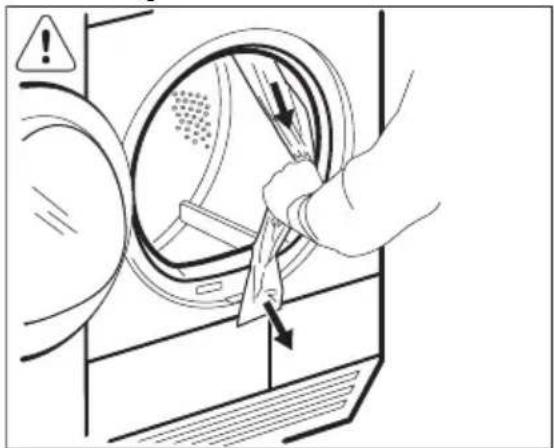
To clean the filter:
natural_image
Technical line drawing of a mechanical component with an upward arrow indicating motion (no text or symbols)- Open the door.
- Pull the filter.
natural_image
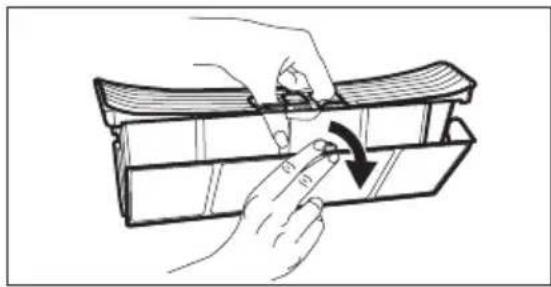
Illustration of a hand holding a wooden tray with a curved handle and a black arrow indicating rotation (no text or symbols)- Open the filter.
natural_image
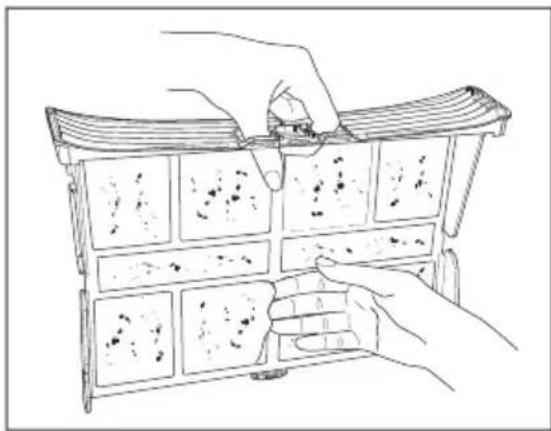
Line drawing of hands installing or adjusting a grid-like object with visible dots and numbers (no text or symbols)- Use a moist hand to clean the filter.
natural_image
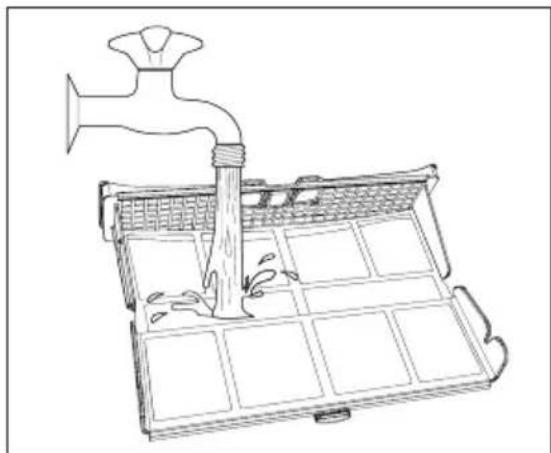
Line drawing of a faucet pouring liquid into a grid-patterned storage tray (no text or symbols)-
If necessary clean the filter with warm water using a brush. Close the filter.
-
Remove fluff from the filter socket. For this a vacuum cleaner can be used.
- Put the filter inside the filter socket.

CAUTION!
Do not operate the tumble dryer without the filter or with damaged or blocked filter.

Clean the filter after each drying cycle. Clogged filter increases the cycle time and causes higher energy consumption.
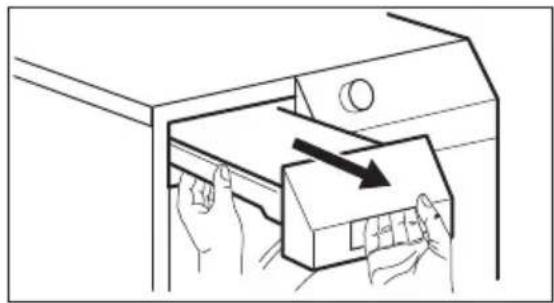
9.2 Draining the condensed water container
Drain the condensed water container after each drying cycle. If the condensed water container is full, the programme breaks off automatically and the drain the condensed water con-
tainer LED is on. To continue the programme, drain the condensed water container and press the start button.

To drain the condensed water container automatically you can install draining accessory (see chapter: ACCESSORIES)
To drain the condensed water container:
natural_image
Line drawing of hands inserting a box into a drawer with an arrow indicating direction (no text or symbols)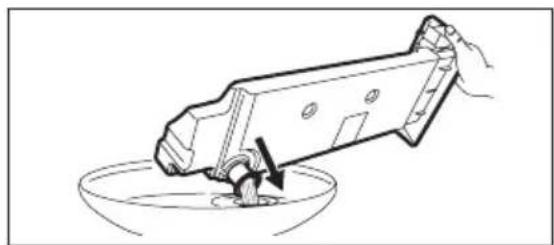
natural_image
Line drawing of a hand pouring liquid into a bowl (no text or symbols)-
Pull the condensed water container and keep it in horizontal position.
-
Move the plastic connection out and drain the condensed water container into a sink or equivalent receptacle.
-
Move plastic connection in and install water container.

WARNING!
Risk of poisoning. The condensed water is not applicable to drink or to prepare food.
9.3 Cleaning the condenser
If the condenser LED is on, the condenser must be cleaned.

The condensed water can be used as distilled water, e.g. for steam ironing. If necessary filter the condensed water (e.g. with a coffee filter) to remove possible residue and small pieces of fluff.
To clean the condenser:
natural_image
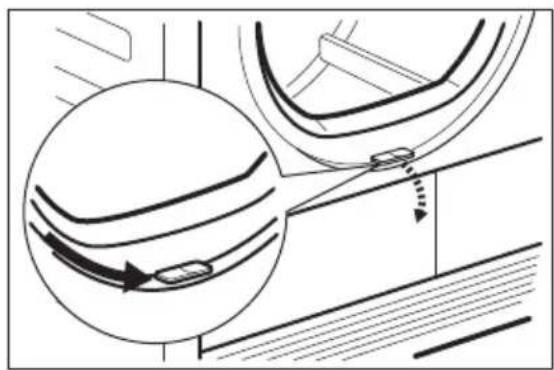
Diagram showing a car wheel and its side mirror mechanism, with no visible text or symbols-
Open the loading door.
-
Move the release button on the bottom of the door opening and open the condenser door.
natural_image
Technical line drawing of a wall-mounted door frame with two hanging clips, mounted on a brick wall (no text or symbols)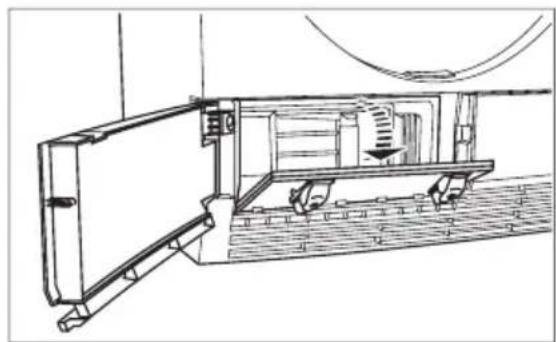
natural_image
Technical line drawing of a mechanical device with internal components and mounting base (no text or symbols)
natural_image
Technical line drawing of a mechanical assembly with an open door and internal components (no text or symbols)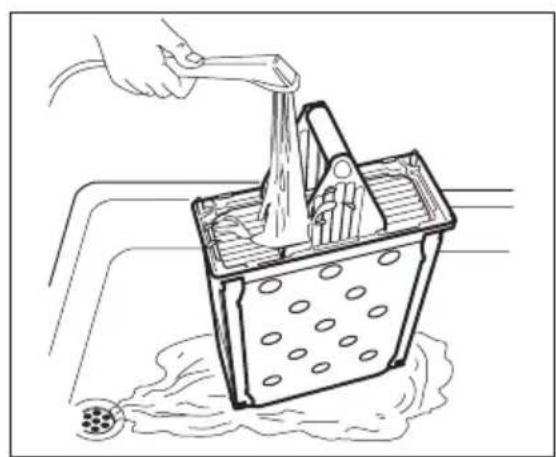
natural_image
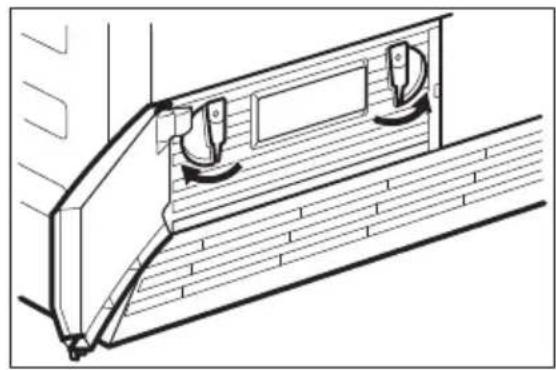
Line drawing of a hand using a tool to lift a bucket into a water-filled container (no text or symbols)- Turn the 2 blockages to unlock the condenser lid.
- Lower the condenser lid.
- Catch the handle and pull the condenser out from the bottom compartment. Move condenser horizontally to do not spill remaining water.
- Clean the condenser in vertical position over a basin or paddling. Rinse through with a hand shower.
- Put the condenser back inside the bottom compartment.
- Close the condenser lid.
- Lock the 2 blockages until they snap.
- Close the condenser door.

CAUTION!
Do not operate the tumble dryer when the condenser is blocked with fluff. This could cause the damage to the tumble dryer. This also increases energy consumption.
Do not use sharp objects to clean the condenser. The damaged condenser could cause leaks.
Do not operate the tumble dryer without the condenser.
9.4 Cleaning the drum

WARNING!
Disconnect the appliance before you clean it.
Use a standard neutral soap detergent to clean the inner surface of the drum
and drum ribs. Dry the cleaned surfaces with a soft cloth.

CAUTION!
Do not use abrasive materials or steel wool to clean the drum.
9.5 Cleaning the control panel and housing
Use a standard neutral soap detergent to clean the control panel and housing. Use a moist cloth to clean. Dry the cleaned surfaces with a soft cloth.

CAUTION!
Do not use furniture cleaning agents or cleaning agents which can cause corrosion to clean the appliance.
10. TROUBLE SHOOTER AND SERVICE
10.1 Troubleshooting
1) If there is an error message on the display (e.g. E51): Turn the tumble dryer off and on. Make a selection of the new programme. Push the Start/Pause button. Does not operate? - contact the service centre and give the error code.
| Problem1) | Possible cause Remedy | |
| The tumble dryer does not operate. | The tumble dryer is not connected to mains supply. | Connect in at mains socket.Check fuse in fuse box (domestic installation). |
| The loading door is opened. Close the loading door. | ||
| The On/Off button was not pushed. | Push the On/Off button. | |
| The Start/Pause button was not pushed. | Push the Start/Pause button. | |
| The appliance is in the standby mode. | Push the On/Off button. | |
| Unsatisfactory drying results. | Incorrect programme selection. | Do the selection of the applicable programme.2) |
| The filter is clogged. | Clean the filter.3) | |
| The Dry Plus function was in minimum mode. | Change the Dry Plus function to the moderate or maximum mode. | |
| The condenser is clogged. | Clean the condenser.3) | |
| Too high volume of the load. | Obey the maximum load volume. | |
| The airflow grill is clogged. | Clean the airflow grill in the bottom of the appliance. | |
| Dirt on the inner surface of the drum. | Clean the inner surface of the drum. | |
| Too high water hardness. | Set applicable water hardness4). | |
| The door does not close. | The filter not locked in the position. | Put the filter in the correct position. |
| The laundry is locked between the door and the seal. | Put the load correctly in the drum. | |
| Err (Error) on the display. | You try to change the programme or the function after the start of the cycle. | Turn the tumble dryer off and on. Make the new selection. |
| The function you try to activate is not applicable with the selected programme. | Turn the tumble dryer off and on. Make the new selection. | |
| No drum light 5) | Defective drum light. | Contact the service centre to replace the drum light. |
| Abnormally elapsing time on the display. | The time to end is calculated on the basis of the volume and dampness of the laundry. | The automatic procedure — this is not the appliance malfunction. |
| Programme inactive. | The water container is full. | Drain the water container3), push the Start/Pause button. |
| Drying cycle too short. | Too small laundry volume. | Do the selection of time programme. The time value must be related to the load. To dry one item or small quantities of the laundry we recommend to use short times. |
| The laundry is too dry. | Do the selection of time programme or higher drying level (e.g. Extra Dry) | |
| Drying cycle too long 6) | The filter is clogged. Clean the filter. | |
| Too high volume of the load. | Obey the maximum load volume. | |
| The laundry not spun sufficiently. | Spin correctly the laundry. | |
| Very high room temperature - this is not the appliance malfunction. | If possible, lower the room temperature. | |
2) follow the programme description — see PROGRAMMES chapter
3) see CARE AND CLEANING chapter
4) see section WATER HARDNESS in HINTS AND TIPS chapter
5) Only the tumble dryers with drum light.
6) Note: After maximum 5 hours the drying cycle ends automatically (see Drying cycle complete section).
11. TECHNICAL INFORMATION
CE
| height x width x depth 850 x 600 x 540 mm (maximal 575 mm) | |
| drum volume 104 l | |
| maximum depth with the load door opened | 1030 mm |
| maximum width with the load door opened | 950 mm |
| adjustable height 850 mm (+ 15 mm - feet regulation) | |
| the appliance weight 37 kg | |
| maximum load volume 7 kg | |
| voltage 230 V | |
| frequency 50 Hz | |
| necessary fuse 16 A | |
| total power 2800 W | |
| energy efficiency class B | |
| energy consumption kWh/cycle 1) | 4,29 kWh |
| annual energy consumption2) | 504 kWh |
| left-on mode power absorption 0,41 W | |
| off mode power absorption 0,41 W | |
| type of use Domestic | |
| permitted ambient temperature + 5°C to + 35°C | |
1) 7 kg of cotton, centrifuged at 1000 rpm with reference to EN 61121
2) Energy consumption per year in kWh, based on 160 drying cycles of the standard cotton programme at full and partial load, and the consumption of the low-power modes. Actual energy consumption per cycle will depend on how the appliance is used (REGULATION (EU) No 392/2012).
12. INSTALLATION
12.1 Unpacking

CAUTION!
Before use all parts of the transport packaging must be removed.
To remove the polystyrene blockages:
- Open the load door.
- Pull plastic hose with the polystyrene blockages out from the drum.
natural_image
Illustration of a hand holding a circular device with arrows indicating motion or force, no text or symbols presentIt is possible to adjust the height of the tumble dryer. To do that adjust the feet (see picture).
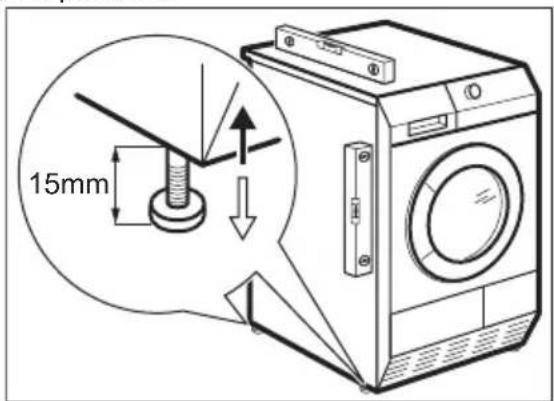
text_image
15mm12.2 Installation under a counter
The appliance can be installed as freestanding or below the kitchen counter with correct space (see picture).
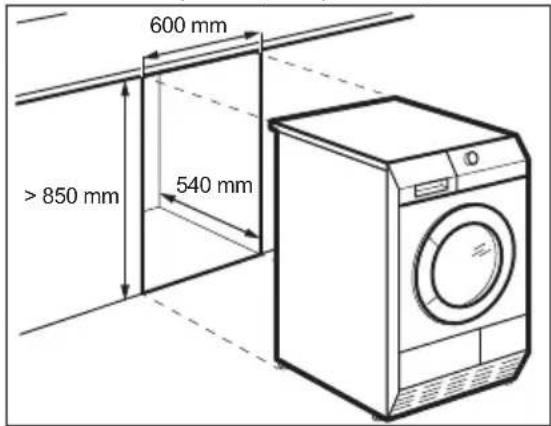
text_image
600 mm > 850 mm 540 mmThe load door can be installed by the user in the opposite side. It can help to easily put and remove the laundry or if there is a limit to install the appliance. (see separate leaflet).
13. ENVIRONMENT CONCERNS
Recycle the materials with the symbol ⚙. Put the packaging in applicable containers to recycle it. Help protect the environment and human health and to recycle waste of electrical and electronic
appliances. Do not dispose appliances marked with the symbol ✉ with the household waste. Return the product to your local recycling facility or contact your municipal office.
CE