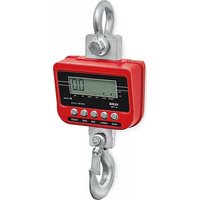
H-11927 - Scale Uline - Free user manual and instructions
Find the device manual for free H-11927 Uline in PDF.


User questions about H-11927 Uline
0 question about this device. Answer the ones you know or ask your own.
Ask a new question about this device
Download the instructions for your Scale in PDF format for free! Find your manual H-11927 - Uline and take your electronic device back in hand. On this page are published all the documents necessary for the use of your device. H-11927 by Uline.
USER MANUAL H-11927 Uline
natural_image
Line drawing of a digital scale measuring instrument with hooks and adjustment knobs (no text or symbols)SAFETY

WARNING! Disconnect all power to this unit before installing, cleaning or servicing. Failure to do so could result in bodily harm or damage to the unit.

CAUTION! Only qualified persons should service this scale.
Before connecting or disconnecting any components, disconnect all power to the unit.
Failure to observe these precautions could result in bodily harm or damage to the scales.
- Use crane scale only for lifting and weighing of freely movable loads.
-
Do not stand or walk under suspended loads.
-
Do not exceed nominal load of crane scale.
- Only use original adaptor. Other adaptors could cause damage to the scale.
- Pluggable equipment must be installed near an easily accessible electrical outlet.
- Avoid unstable power sources. Do not use near large users of electricity such as welding equipment or large motors.
- Avoid sudden temperature changes, vibration, wind and water.
- When working with the crane and crane scale, wear personal safety equipment (helmet, safety shoes, etc.).
PARTS
FRONT VIEW REAR VIEW
text_image
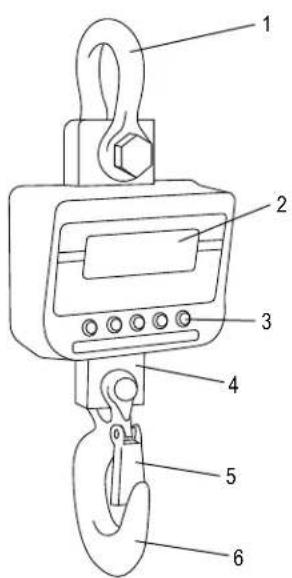
Diagram of a digital measuring device with numbered parts labeled 1 through 6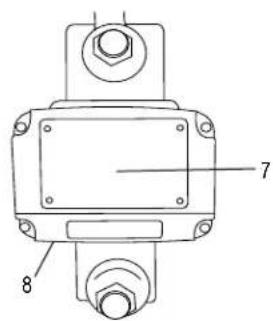
text_image
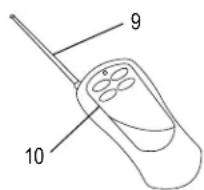
7 8REMOTE CONTROLLER
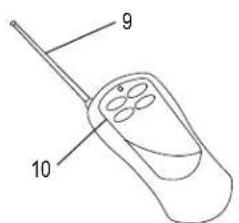
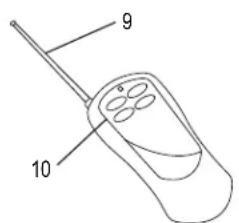
text_image
9 10| # DESCRIPTION |
| 1 Loop |
| 2 Weight Display |
| 3 Keyboard |
| 4 Load Housing |
| 5 Safety Bracket |
| 6 Hook |
| 7 Battery Cover |
| 8 AC Adaptor Jack |
| 9 Antenna |
| 10 Controller Keyboard |
TECHNICAL DATA
GENERAL SPECIFICATIONS
| Maximum Capacity | 3,300 lb. |
| Minimum Capacity | 10 lb. |
| Readability 0.5 lb. | |
| Max. Divisions 1/6,600 | |
| Tare Range -3,299.5 lb. | |
| Linearity +/- 1 lb. | |
| Weighing Units lb./kg. | |
| Display 6 digits 1.18" | LCD digital display |
| Housing Die-casting Aluminum | |
| Operation Temperature 14°F-104°F | |
| Power | Input: AC 100-240 V 50-60 Hz.Output: DC 12 V/2,500 mAhStandard Rechargeable Battery (7.4 V/5,200 mAh)Battery Name: Li-ion BatteryBattery Mode: 18,650/2S2P/5,200 mAh/7.4 VBattery Cell: 18,650/2,600 mAh/3.7 VBattery Shelf Period: 1 year |
| Battery Life | Approx. 60 Hours (with backlight)Approx. 72 Hours (without backlight) |
| Remote Control | Alkaline Battery 12 V/23 A*Dimensions (W x D x H) 48 x 16 x 95 mm |
| Keypad 5 Mechanical Keys | |
| IP Protection | IP65 |
| Scale Dimensions (W x D x H) | 7.9 x 5.1 x 18.8" |
| Weight | 18 lb. |
BATTERY SPECIFICATIONS
| Items | Parameter | Comments |
| Rated Capacity | 5,200 mAh | Discharge: 0.2 CCut-off voltage: 2.75 V |
| Minimum Capacity | 5,000 mAh | |
| Energy | 38.48 Wh | ---- |
| Nominal Voltage | 7.4 V | ---- |
| Open Voltage | 7.6–8.2 V | ---- |
| Load Voltage | ≥7.4 V | 10 |
| Internal Impedance | ≤250 m | AC 1 KHz (after standard charge) |
| Charge Voltage | 8.4 V | ---- |
| Standard Charge Current | 2,600 mA | 0.5 C |
| Maximum Charge Current | 2,600 mA | 0.5 C |
| Standard Discharge Current | 1,040 mA | 0.2 C |
| Maximum Discharge Current | 2,600 mA | 0.5 C |
| Discharge Cut-off Voltage | 5.5 V | ---- |
| Operating Temperature | 32°–113°F | Charge |
| -4°–140°F | Discharge | |
| Storage Temperature | -4°–140°F | Less than 1 month |
SETUP
INSTALLATION
- Use scale in a location that is free of excessive vibrations, heat and humidity.
- Position scale so that sun's rays do not directly hit display panel.
- The unit must be installed at the right height to allow easy reading of the display and convenient keyboard operation.
- The loads that hang on the hook should be vertical loads.
POWER CONNECTION
- Connect the adaptor pin into the indicator adaptor jack. Adaptor jack is located below the scale. (See Figure 1)
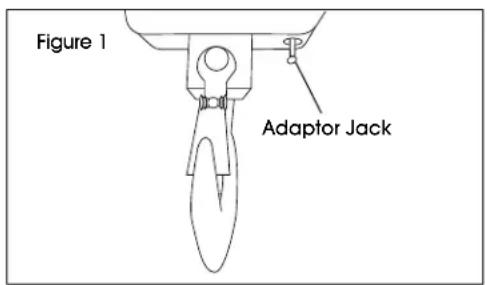
text_image
Figure 1 Adaptor Jack
IMPORTANT! Adaptor connects into AC power socket. Pluggable equipment must be installed near an easily accessible socket outlet with a protective ground/earth contact.
RECHARGEABLE BATTERY

NOTE: Charge the battery before using the scale for the first time.
- The indicator above indicator indicates that the battery is getting low. If scale continues to be used without proper charging, LO-BAT words will flicker on the display.
- Approximately 30 minutes of instrument usage are left, after which scale will shut off automatically.
- Use the supplied battery charger to charge the battery immediately, or scale cannot be used.
CHARGING THE BATTERY
- Charge the battery for at least five hours prior to first use.
- When the scale is plugged in, the internal battery will be charged.
- Verify that the AC power socket outlet is properly protected.
- LED under the right side of the weight display indicates battery charging status.
• Yellow: Battery is being charged.
• Red: Battery is nearly discharged.
• Green: Battery is completely charged.
BATTERY MAINTENANCE
- Do not use any other type of power adaptor than the one supplied with the scale.
- Rechargeable battery should be charged every three months when not in use.
- If the scale is not used for an extended time, remove the battery from the battery compartment to avoid leakage.
- Store the battery in a sealed bag or box in a dry, temperate environment.
OVERVIEW OF CONTROLS
KEYBOARD
HOLDUNIT/M+TARE
ZERO ON/OFF
| KEY PRIMARY FUNCTION SECONDARY FUNCTION | ||
| HOLD | Reading lock key. Used to lock the reading value. Clear the active digits in setting mode. | |
| UNIT/M+ | Used to change the weighing units. Hold the key to add the value to the accumulation memory.Right arrow key. Used to move the digit to the right.Escape key. Used to escape from menu setting. | |
| TARE | Used to perform a tare function. Subtracts weights. Setup menu key. Used to enter the setup menu during self-checking.To change the menu option in menu setting. | |
| ZERO | Zero key. Used to clear and zero the display. | Enter key. Used to enter the selected menu, sub-menu and setting. |
| ON/OFF | ON/OFF key. Turns the scale on/off. | ---- |
DISPLAY INDICATORS REMOTE CONTROLLER
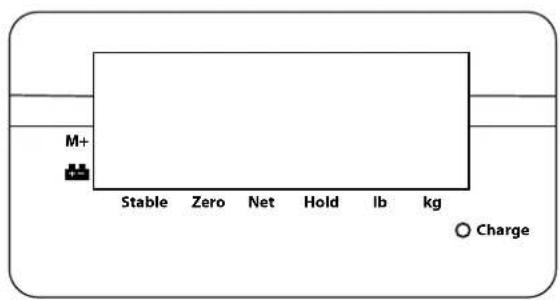
text_image
M+ Stable Zero Net Hold lb kg Charge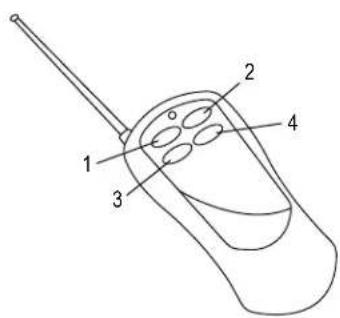
text_image
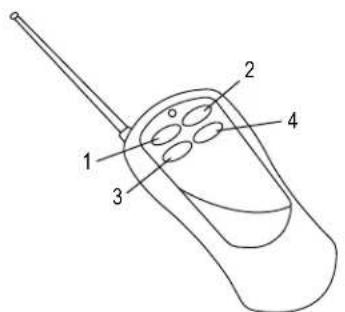
Diagram of a handheld device with labeled parts 1, 2, 3, and 4| DISPLAY | DESCRIPTION |
| M+ | Accumulation indicator. Indicates value has been added to the accumulation memory. |
| Battery indicator. The battery should be charged when the symbol is on. | |
| Stable | Stable indicator. Indicates the scale weight is stable. |
| Zero | Zero indicator. Indicates the scale is at zero. |
| Net | Net indicator. Indicates scale is displaying the net weight. |
| Hold | Lock indicator. When this indicator on, scale is in reading data lock mode. |
| lb/kg | Weighing units indicator. |
| Charge | Charging indicator. Indicates the battery charging status. |
| KEY | FUNCTION |
| 1 | For using accumulate and weighing units selection. |
| 2 | For using hold value. |
| 3 | For using enter zero. |
| 4 | For using tare. |
OPERATION
INTIAL START-UP
Allow scale to warm up for 15 minutes after turning on the first time.
ON/OFF
- Switch on the scale by pressing ON/OFFkey. Display will show the scale version and will start self-checking.
- After self-checking, display will show normal weighing mode.
- To switch off the scale, press ON/OFF key again.
ZERO
Set the display to zero any time by pressing the ZERO key to ensure that the weighing starts at zero.
TARE
Tare allows the scale to automatically deduct the weight of the container used to hold item samples.
TARING A CONTAINER
- Load weight on the hook.
- Press TARE key. Zero is displayed, and tare is subtracted. The ▼ indicator above "Net" appears.
- Remove weight from the hook. Tared weight is displayed. It can set only one tare value. It will be shown with a negative value.
CLEARING TARE
- To clear the tare value, remove the load from the hook.
- Press TARE key. Zero is displayed. The ▼indicator above "Net" disappears.
- Tare weight is cleared.
SELECTING WEIGHING UNITS
- Load the weight on the hook.
- Press UNIT/M+ key in normal weighing mode. The weighing units will be converted from kg to lb.
OVERLOAD WARNING
Do not add an item that is over the maximum capacity. When display shows --GL--, remove the item on the hook to avoid damage to the load cell.
HOLD
- Press HOLD key to lock the current weight value in normal weighing mode. The ▼indicator above "Hold" appears.
- Press HOLD key again. Display will return to normal weighing mode and the ▼ indicator above "Hold" disappears.
ACCUMULATED TOTAL

NOTE: The scale can be set to accumulate manually by pressing and holding the UNIT/M+ key.

NOTE: Before every accumulation, scale needs to return to zero. Only hold UNIT/M+ key when weight is stable. If weight is less than 20d, accumulation will be invalid.
ACCUMULATION
- The weight displayed will be stored in memory when the UNIT/M+ key is pressed and held, and the weight is stable.
- The display will show RCC of then the total in memory for two seconds before returning to normal. After accumulation, the indicator on the right side of "M+" appears.
- Remove the weight, allow the scale to return to zero and put a second weight on. Press and hold the UNIT/M+ key. The display will show ACC 02 and then show the new total.
- Repeat until all weights have been added.
MEMORY RECALL
To view the totals in memory, press and hold the UNIT/M+ key in zero point. The number weighed followed by the total weight will be displayed for two seconds.
MEMORY CLEAR
Press ZERO key to clear the memory. The ◀indicator on the right side of "M+" disappears.
OPERATION CONTINUED
AUTO POWER-OFF SETTING
When the auto power-off time is enabled, the scale will automatically turn off when there has been no load on the platform and the scale is stable at zero position for a specific period of time (in minutes). To enable the function, see parameter F8 OF.
- Press TARE key to select the options.
- Press ZERO key to confirm.
- Press UNIT/M+ key to escape from the settings.
| F8 OF | Of 0 To set auto off function turn off, for scale always on. |
| Of 5 Set to turn off after 5 minutes of inactivity. | |
| Of 10 Set to turn off after 10 minutes of inactivity. | |
| Of 20 Set to turn off after 20 minutes of inactivity. | |
| Of 30 Set to turn off after 30 minutes of inactivity. |
BACKLIGHT SETTING
- Hold ZERO key in normal weighing mode. The display will show 8H RU.
- Press TARE key to select the options.
- Press ZERO key to confirm.
| Bk au | To set auto option. When scale is in use, backlight will be on and when off, backlight will turn off. |
| Bk on | To set always on. After turning on the power, backlight will be on. |
| Bk of To | set backlight off. No backlight during operation. |

NOTE: If the battery gets low, the backlight function will not be available.
TIME AND DATE SETTING
TIME SETTING
- Turn on the scale.
- Press TARE key during startup until display shows PI---.
- Input password. The default password is 000.
-
Press UNIT/M+ key to move the active digit. Press TARE key to increment a digit. Press ZERO key to confirm. Display will show FO CAL.
-
Press TARE key until display shows FS TI.
-
Press ZERO key to enter. Time starts to blink.
-
Use UNIT/M+ key to move the active digit. Press TARE key to increment a digit.
-
Press ZERO key to confirm and return to setting mode.
DATING SETTING
- Turn on the scale.
- Press TARE key during startup until display shows PI---.
- Input password. The default password is 000.
- Press UNIT/M+ key to move the active digit. Press TARE key to increment a digit. Press ZERO key to confirm. Display will show FO CAL.
- Press TARE key until display shows F6 OR.
- Press ZERO key to enter. The date starts to blink.
- Using UNIT/M+ key to move the active digit. Press TARE key to increment a digit.
- Press ZERO key to confirm and return to setting mode.
REMOTE CONTROLLER
Crane scale comes with a remote control. There are four keys on the remote.
Pull out the antenna before operating the remote control. The operating distance is approximately 100', but exact distance depends on the environment.
The red LED must light up when any button is pressed. If it does not light up, replace batteries in the remote control.
OVERLOAD RECORDS
Do not add an item that is over the maximum capacity. When reading shows ---DL--- and a beeping sound is heard, remove the item on the hook to avoid damage to the load cell.
Once overloaded, the overload records will be recorded. See parameter F9 OVE.
CHECK OVERLOAD RECORDS
- Turn on the scale.
- Press TARE key during startup until display shows P_i ---.
- Input password. The default password is 000.
- Press UNIT/M+ key to move the active digit. Press TARE key to increment a digit. Press ZERO key to confirm. Display will show FO CAL.
- Press TARE key until display shows F9 OUE.
- Press ZERO key to confirm. The display will show the overload number.
- Using TARE key to select the overload number option.
- Press ZERO key to confirm. The date, time and the overload weight will be shown on the display.
PARAMETERS
PARAMETER SETTING
ENTER THE MENU
- Turn on the scale.
- Press TARE key during startup until display shows PI---.
- Input password. The default password is 000.
-
Press TARE key to increment a digit.
-
Press UNIT/M+ key to move the active digit.
-
Press ZERO key to confirm. Display will show F0 CRL.
ENTER THE SELECTED MENU
- Press ZERO key to confirm which will be displayed.
- Press TARE key to choose menu.
- Press UNIT/M+ key to escape from the setting menu.
SELECT THE MENU
ESCAPE FROM THE MENU
MENU BLOCK
| MENU DESCRIPTION | ||||
| FO CAL | Line Linear Calibration | |||
| Unline Normal Calibration | ||||
| F1 CAP | Ut kg. Single | 1,500 | To select the capacity 1.5 t / 3 t | |
| 3,000 | ||||
| Ut lb. | Single | 3,300 | To select the capacity 3,300 lb. / 6,600 lb. | |
| 6,600 | ||||
| F2 SP | Slow | Set AD Speed. | ||
| Mid | ||||
| Fast | ||||
| F3 INP | To show the internal counts. | |||
| F4 GPA | Set your local gravity value. | |||
| FS TI | 00:00 | Set Time | ||
| F6 OR | 00:00:00 | Set Date | ||
| F7 ST | ON | Multi-tare function on | ||
| OFF | Multi-tare function off | |||
| F8 OF | Set Automatic Turn-off | |||
| 0 | Scale will turn off after five minutes. | |||
| 5 | ||||
| 10 | Scale will turn off after 10 minutes. | |||
| 20 | Scale will turn off after 20 minutes. | |||
| 30 | Scale will turn off after 30 minutes. | |||
| F9 OVE | To view the counts of overload | |||
CALIBRATION
Single point calibration uses two calibration points: zero and any weight between 1/3 of the scale's capacity and the full weight of the scale capacity. Refer to the calibration weights charts below.
CALIBRATION WEIGHT (LB.)
| MODEL # | 1/3 WEIGHT (MINIMUM) | FULL CAPACITY (MAXIMUM) |
| TN-3300lb | 1,100 lb. | 3,300 lb. |
CALIBRATION IN LB MODE
- Press ON/OFF key to turn on the scale.
- Press TARE key during startup until display shows PI---.
- Input password. The default password is 000.
- Press TARE key to increment a digit. Press UNIT/M+ key to move the active digit.
- Press ZERO key to confirm. Display will show F0 CRL.
- Press TARE key to select FI CAP.
- Press ZERO key to confirm. Display will show UT HG.
- Press TARE key to select ut lb.
- Press ZERO key to enter. Display will show SINGLE.
- Press ZERO key to confirm. Display will show 3300.
- Press ZERO key to confirm and return to setting mode.
- Press TARE key until display shows FO CAL.
- Press ZERO key to enter calibration. Display will show ONLINE.
- Press ZERO key to confirm. Display will show UNLOAD.
- Empty the hook. When the ▼Indicator above "Stable" appears, press ZERO key to confirm. Display will show calibration weight value.
- Weight value can be changed. Use HOLD key to clear the active digits. Use UNIT/M+ key to move the active digit right. Use TARE key to increment a digit.
- Press ZERO key to confirm.
- Display will show LORD. Add calibration mass weight on the hook.
- When the ▼ indicator above "Stable" appears, press ZERO key to confirm. Display will show PASS.
- Remove the weight from the hook. It will self-check and return to normal weighing mode.
CALIBRATION IN KG MODE
- Press ON/OFF key to turn on the scale.
- Press TARE key during startup until display shows PI---.
- Input password. The default password is 000.
- Press TARE key to increment a digit.
- Press UNIT/M+ key to move the active digit.
- Press ZERO key to confirm. Display will show F0 CRL.
- Press TARE key to select F1 CRL.
- Press ZERO key to confirm. Display will show UT PC.
- Press ZERO key to enter. Display will show SINGLE.
- Press ZERO key to confirm. Display will show 1500.
- Press ZERO key to confirm and return to setting mode.
- Press TARE key until display shows FO CRL.
- Press ZERO key to enter calibration. Display will show ONLINE.
- Press ZERO key to confirm. Display will show UNLOAD.
- Empty the hook. When the ▼ indicator above "Stable" appears, press ZERO key to confirm. Display will show calibration weight value.
- Weight value can be changed. Use HOLD key to clear the active digits. Use UNIT/M+ key to move the active digit right. Use TARE key to increment a digit.
- Press ZERO key to confirm.
- Display will show LOAO. Add calibration mass weight on the hook.
- When the ▼ Indicator above "Stable" appears, press ZERO key to confirm. Display will show PASS.
- Remove the weight from the hook. It will self-check and return to normal weighing mode.
TROUBLESHOOTING
ERROR CODES
| ERROR MESSAGE DESCRIPTION SOLUTION | ||
| Err 4 | Zero setting error. | Zero setting range exceeded due to switching on (4% max).Ensure no weight is on the scale. |
| --OL-- | Over range. | Remove the load.Recalibrate. |
| LO-BAT | Low battery indicator. Charge the battery. | |
| FAIL | Calibration error. Check the test weights and recalibrate. | |
| Err 17 | Tare out of range. Remove weight or overload. Remove the load and restart scale again. | |
| Err 6 | A/D value out of range. Ensure no weight is on the scale. Check the load cell connectors. | |
SEGURIDAD

text_image
Diagram of a digital measuring device with numbered parts labeled 1 through 6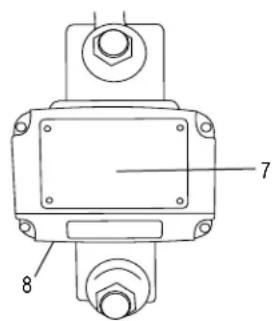
text_image
7 8CONTROL REMOTO
text_image
9 10text_image
M+ Stable Zero Net Hold lb kg Charge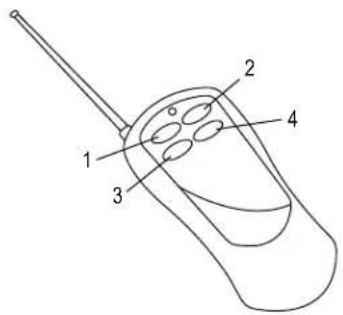
text_image
Diagram of a handheld device with labeled parts 1, 2, 3, and 4text_image
Diagram of a digital measuring device with numbered parts labeled 1 through 6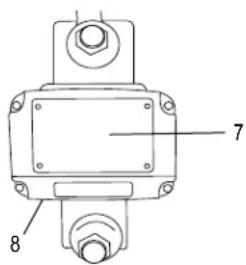
text_image
7 8TÉLÉCOMMANDE
text_image
M+ Stable Zero Net Hold lb kg Charge