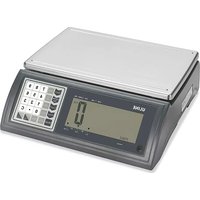
H-5819 - Scale Uline - Free user manual and instructions
Find the device manual for free H-5819 Uline in PDF.


User questions about H-5819 Uline
0 question about this device. Answer the ones you know or ask your own.
Ask a new question about this device
Download the instructions for your Scale in PDF format for free! Find your manual H-5819 - Uline and take your electronic device back in hand. On this page are published all the documents necessary for the use of your device. H-5819 by Uline.
USER MANUAL H-5819 Uline
natural_image
Line drawing of a digital balance scale with a display and keypad (no text or symbols)OVERVIEW OF CONTROLS
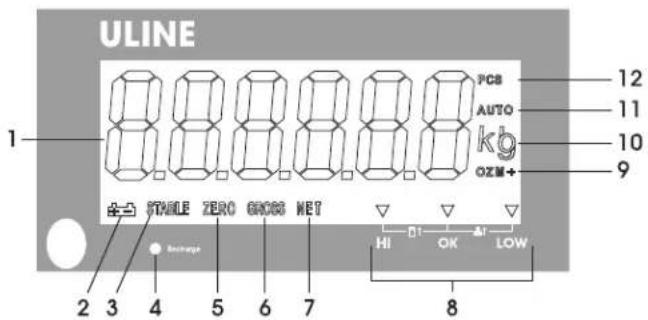
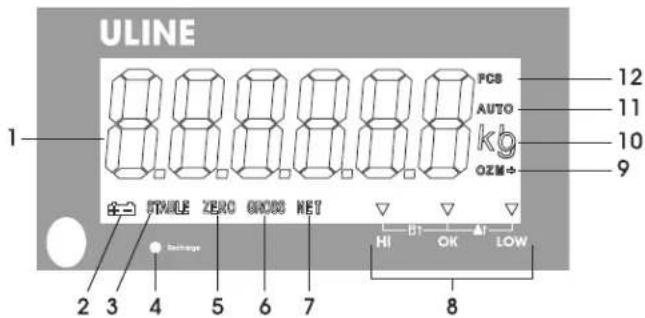
DISPLAY
text_image
ULINE 1 PCB AUTO kg OZM+ 12 11 10 9 STABLE ZERO GROSS NET HI OK LOW 2 3 4 5 6 7 8KEYPAD
text_image
1 Zero Tare 7 8 9 16 2 Sample Size Set U.WT 4 5 6 3 Count U/N/G 1 2 3 4 Print PLU 0 • C 14 5 Mode Units M+ MR HI MC LO 8 9 10 11 12 13DISPLAY DEFINITIONS
| # | NAME | DESCRIPTION |
| 1 | DISPLAY | Displays the total weight, unit weight and number of counted items. |
| 2 | Battery indicator. Indicates battery is low and needs to be recharged. | |
| 3 | STABLE | Stable indicator. Indicates the scale weight is stable. |
| 4 | RECHARGE | Charging indicator. Indicates the battery charging status. |
| 5 | ZERO Zero indicator. Indicates the scale is at zero. | |
| 6 | GROSS | Gross indicator. Indicates scale is displaying the gross weight. |
| 7 | NET | Net indicator. Indicates scale is displaying the net weight. |
| 8 | HI / OK / LOW | Limits indicator. Indicates the High-Low limits in weighing and counting. |
| 9 | M+ | Accumulation indicator. Indicates the scale is in the accumulation mode. |
| 10 | LB / OZ / G / KG | Weighing unit indicator. Indicates current weighing unit. |
| 11 | AUTO | Automatic accumulation indicator. Indicates the scale is in automatic accumulation mode. |
| 12 | PCS | Counting indicator. Indicates the scale is in the counting mode. |
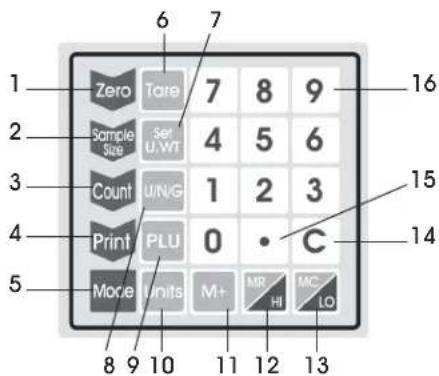
KEYPAD DEFINITIONS
| # | NAME | DESCRIPTION |
| 1 | ZERO | Zero key. Used to clear and zero the display. |
| 2 | SAMPLE SIZE | Sample size key. Used when keying in the sample amount. |
| 3 COUNT | Count key. Used to enter the counting operation. | |
| 4 PRINT Print key. Used to send data to a printer or PC. | ||
| 5 MODE | Mode key. Used to select the application mode – weighing, counting, check weighing, check counting or accumulation. | |
| 6 | TARE | Tare key. Used to zero out the weight of a container being used to hold small parts. |
| 7 | SET U. WT | Set Unit Weight key. Used to manually key in the unit weight. |
| 8 | U / N / G | Unit / Net / Gross Weight key. Used to show the unit, net or gross weight. |
| 9 | PLU | Unit Weight Memory key. Used to store weights into scale memory. |
| 10 | UNITS | Units key. Used to change weighing unit. |
| 11 M+ | Memory key. Used to add current weight or count to memory. | |
| 12 | MR / HI | Memory Recall key. Used to show total accumulated weights or counts in memory.HI key. Used to set high limit. |
| 13 | MC / LO | Memory Clear key. Used to clear accumulated weights or counts from memory.LO key. Used to set low limit. |
| 14 | C | Clear key. Used to clear incorrect numeric values. |
| 15 • | Decimal key. Used to enter decimal place when values are entered manually. | |
| 16 | 0-9 | Numeric keys. Used to enter values manually. |
SETUP

WARNING! Disconnect all power to the scale before installing, cleaning or servicing. Failure to do so could result in bodily harm or damage to the scale.
SELECTING THE LOCATION
The scale MUST be placed on a stable and level work surface. Do not place on uneven or wobbly surfaces.
The scale should always be used in an environment that is free from excessive air currents, corrosives, vibration and temperature or humidity extremes. These factors will affect displayed weight readings.
Avoid placing the scale next to or near:
- Fans.
• Air conditioning or heat vents. - Open windows or doors.
• Vibrating, rotating or reciprocating equipment. - Large users of electricity like welding equipment or large motors.
- Static electricity and equipment that generates static electricity.
- Magnetic fields and equipment that generates magnetic fields.
- Direct sunlight.
• Dusty or dirty environments. - Damp or wet environments.

CAUTION! Scale is not waterproof. Avoid direct contact with water, high humidity and condensation. Do not spray or immerse scale in water. Data may become unstable or scale may malfunction. Turn power off and allow scale to dry before reuse.
REMOVING THE SHIPPING SCREW
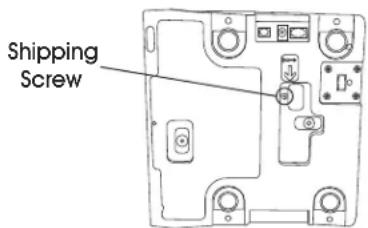
Remove shipping screw from bottom side of scale before use with a Phillips screwdriver. (See Figure 1)
Figure 1
text_image
Shipping ScrewINSTALLING THE PLATFORM
- Place the scale on a flat surface.
- If desired, remove protective covering from the scale platform.

NOTE: If needed, use an adhesive remover to remove left over residue.
- Place the platform on top of the scale.

CAUTION! Do not press down with excessive force. This could damage the load cell.
LEVELING
The scale is equipped with a level indicator located to the left of the display.
Use the adjustable leveling feet located on the bottom of the scale until the bubble appears in the center of
Figure 2
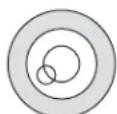
Not Level Level
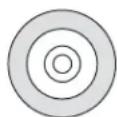
the indicator. (See Figure 2)
Check leveling indicator every time scale is moved to a new location to verify scale is balanced.
CONNECTING POWER
The scale can operate continuously by connecting directly to AC power or can operate 70 hours on a fully charged battery.

WARNING! Only use the original adapter and battery that came with the scale. Using an alternative adapter or battery could damage the scale.
AC ADAPTER
Plug the AC adapter into the adapter socket on the right side of the scale. Plug the AC adapter plug into a standard 110 v outlet.
BATTERY
The scale is equipped with a rechargeable battery
When the battery voltage is low, a battery symbol will appear in the lower left hand corner of the display. The scale will automatically turn off 30 minutes after the battery symbol appears.
OPERATION
CHARGING THE BATTERY
When the battery indicator appears in the lower lefthand corner of the display, the battery needs to be recharged.
Plug the AC adapter into the scale to charge the battery. Scale does not need to be turned on. It will take 12 hours to fully charge the battery.
The charging indicator is located on the bottom left of the display, to the left of the word RECHARGE. The indicator light color will change to indicate the battery status:
- ORANGE – Battery is being charged.
- GREEN – Battery is fully charged.
BATTERY MAINTENANCE
Recharge the battery every three months when not in use.
If the scale is not used for an extended period of time, remove the battery from the battery compartment to avoid leakage. Store the battery in a sealed bag or box in a dry, temperate environment.
PRIOR TO USE
- Fully charge battery before using scale for the first time.
- Let the scale warm up for 15 minutes before use.

WARNING! NEVER drop items onto the platform. The scale is a sensitive precision instrument.

WARNING! Do not exceed the scale capacity and overload the scale.

WARNING! Do not stack items on the scale platform when the scale is not in use.
TURNING THE SCALE ON/OFF
Power switch is located on the right side of the scale.

CAUTION! Never power the scale on with weight on the platform.
-
To turn the scale on, press the switch forward and hold. The scale will show the version and capacity, then enter a self-test mode. After completing the self-test mode, the scale will enter the weighing application mode.
-
To turn the scale off, press the switch backward and hold.
CHANGE UNIT OF MEASURE
Press the UNITS key Units until the desired weighing unit appears – lb, oz, kg or g.
PAGE 3 OF 33 0825 IH-5819

NOTE: UNITS key operation is active in the weighing and check weighing applications. The weighing unit must be selected prior to the counting, check counting and accumulation applications.
CALIBRATION
The scale is calibrated before leaving the manufacturer's facility. Vibrations in shipping may cause the scale to fall out of calibration. Uline recommends re-verifying calibration in the field before first use. You must use a precision calibration weight to properly calibrate the scale. The calibration weight must be at least 1/3 of the scale's capacity and cannot exceed the scale's capacity.

NOTE: Calibration can be done in English system weight (lb.) or Metric system weight (kg).
SINGLE POINT CALIBRATION (SPAN)
Single point calibration uses two calibration points: zero and any weight between 1/3 of the scale's capacity and the full weight of the scale capacity. Refer to the calibration weights charts below.
CALIBRATION WEIGHT (lb.)
| Model # 1/3 WEIGHT (Minimum) FULL CAPACITY (Maximum) | ||
| H-5819 4 lb. | 11 lb. | |
| H-5820 | 9 lb. | 27 lb. |
| H-5821 | 19 lb. | 55 lb. |
| H-5822 | 37 lb. | 110 lb. |
CALIBRATION WEIGHT (kg.)
| Model # 1/3 WEIGHT (Minimum) FULL CAPACITY (Maximum) | ||
| H-5819 | 2 kg. | 5 kg. |
| H-5820 | 4 kg. | 12 kg. |
| H-5821 | 9 kg. | 25 kg. |
| H-5822 | 17 kg. | 50 kg. |
- Turn on the scale and press the TARE key Tare during the self-test. PO CAL will be shown on the display.
PO CAL
- Press the ZERO key Zero. Lb will be shown on the display.
a. If calibrating in lb., continue to step 3.
b. If calibrating in kg., press the TARE key Tare. F5 will be shown on the display.
- Press the ZERO key Zero. ULoRd will be shown on the display.
ULoRd
OPERATION CONTINUED
- Remove all weight from the platform.
- Once the stable indicator is shown on the display, press the ZERO key Zero. Digits on the display will start blinking.
- Use the numeric keys to enter the calibration weight you are using.
- Press the ZERO key Zero. LoRd will be shown on the display.
LoRd
- Place the calibration weight on the platform.
- Once the stable indicator is shown on the display, press the ZERO key Zero. SUCCESS will be shown on the display.
SUCCES
- Scale will enter a self-test mode. Remove weight before self-test mode is complete. After completing the self-test, the scale will enter the weighing mode.
MULTI-POINT CALIBRATION (LINEAR)
Multi-point calibration uses four calibration points: zero, 1/3, 2/3 and full weight capacity of the scale. Refer to the calibration weights charts below.
CALIBRATION WEIGHT (lb.)
| Model # | 1/3 WEIGHT | 2/3 WEIGHT | FULL CAPACITY |
| H-5819 2 lb. | 7 lb. | 11 lb. | |
| H-5820 | 7 lb. | 15 lb. | 27 lb. |
| H-5821 | 15 lb. | 30 lb. | 55 lb. |
| H-5822 | 30 lb. | 55 lb. | 110 lb. |
CALIBRATION WEIGHT (kg.)
| Model # | 1/3 WEIGHT | 2/3 WEIGHT | FULL CAPACITY |
| H-5819 | 1 kg. | 3 kg. | 5 kg. |
| H-5820 | 3 kg. | 6 kg. | 12 kg. |
| H-5821 | 6 kg. | 14 kg. | 25 kg. |
| H-5822 | 14 kg. | 25 kg. | 50 kg. |
- Turn on the scale and press the TARE key Tare during the self-test. PO CRL will be shown on the display.
PO CAL
- To select multi-point calibration, press the TARE key Tare. PILER will be shown on the display.
PILCR
- Press the ZERO key Zero. Lb will be shown on the display.
a. If calibrating in lb., continue to step 4.
b. If calibrating in kg., press the TARE key Tare.
F G will be shown on the display.
- Press the ZERO key Zero. LoRdG will be shown on the display.
LoRd0
- Remove all weight from the platform.
- Once the stable indicator is shown on the display, press the ZERO key Zero. LoRdl will be shown on the display.
LoRdl
- Place 1/3 of the scale capacity on the platform.
- Once the stable indicator is shown on the display, press the ZERO key Zero. LoRd2 will be shown on the display.
LoRd2
- Place 2/3 of the scale capacity on the platform.
- Once the stable indicator is shown on the display, press the ZERO key Zero. LoRd3 will be shown on the display.
LoRd3
- Place the full scale capacity on the platform.
- Once the stable indicator is shown on the display, press the ZERO key Zero. SUCCESS will be shown on the display.
SUCCES
- Scale will enter a self-test mode. Remove weight before self-test mode is complete. After completing the self-test, the scale will enter the weighing mode.
OPERATION CONTINUED
ZERO
If there is a minor weight displayed, without anything on the platform, press the ZERO key Zero to clear the display. The zero indicator will be shown on the display.
TARE
When weighing an item that is in a container, taring stores the container weight to memory so only the item weight is displayed.
To store tare weight into memory and set the display to zero:
- Place an empty container on the platform.
- Press the TARE key Tare. The net indicator will be displayed on the bottom of the display.
- The container's weight is then stored in the scale's memory and zero is displayed.
- Add pieces to the container.
- Tare function will vary in application modes.
a. If weighing, check-weighing or weighing in accumulation mode:
- As the pieces are added, the net weight will be displayed.
- Press the U/N/G key to display the gross weight and net weight.
b. If counting, check-counting or counting in accumulation mode:
- As the pieces are added, the total quantity will be displayed.
- PresstheU/N/G key U/N/G to display the unit weight, net weight, gross weight and total quantity.
- Removing the container from the platform will cause the scale to display the container's negative number. Pressing the TARE key Tare will readjust the scale to zero.
WEIGHING
Use this mode to weigh items.
-
Press the MODE key Mode until net is shown on the display.
-
Place item to be weighed on the scale platform. Weight will be shown on the display.
COUNTING

NOTE: The scale is a sensitive precision instrument. NEVER drop items onto the platform. NEVER exceed the scale capacity.
Use this mode to count parts of uniform weight.
SAMPLE OF UNIT WEIGHT
The scale cannot determine how many pieces are on a platform without a sample. There are two ways to calculate a sample weight.
- From Weighing Mode:
a. Press the MODE key Mode until net is shown on the display.
b. With nothing on the platform, press the ZERO key Zero The zero indicator will be shown on the display.
c. Place the objects intended for sampling on the platform.
d. Once the stable indicator appears, press the SAMPLE SIZE key [Sample Size]. Key in the sample quantity by using the numeric keys. This number will blink in the display.
e. Press the COUNT key Count . Place remaining objects on the platform. The total quantity will be displayed.
f. Press the U/N/G key U/N/G to display the unit weight, gross weight and total quantity.
g. Press the MODE key Mode four times to return to the weighing mode.
- From Counting Mode:
a. Press the MODE key Mode until PCS is shown on the display.
b. Repeat steps c-g above.
MANUAL ENTRY OF UNIT WEIGHT
Known unit weights can be entered manually.
- In weighing or counting mode, key in the unit weight by using the numeric keys. Press the Set U.WT key Set U.WT Scale will display zero.
- Place the objects for counting on the platform. The total quantity will be displayed.
- Press the U/N/G key U/N/G to display the unit weight, gross weight, and net weight
- Press the MODE key Mode four times to return to the weighing mode.
UNIT WEIGHT RECALCULATING
The unit weight will be averaged again if you add the remaining quantity gradually, by several lots. This will help eliminate errors caused by the possible weight variation among each object and lead to more accurate results.
When adding objects to the platform, be sure the quantity is less than those already on the platform. An alarm will sound a beep when the unit weight is averaged again.
OPERATION CONTINUED
LACK OF UNIT WEIGHT
The minimum weight must be at least 20 times the scale accuracy for accurate calculations. Refer to the minimum weights chart below.
MINIMUM WEIGHTS
| Model # | Minimum Sample Weight | Minimum Piece Weight |
| H-5819 0.002 lb. | 0.00005 lb. | |
| H-5820 0.01 lb. | 0.00025 lb. | |
| H-5821 0.02 lb. | 0.0005 lb. | |
| H-5822 0.04 lb. | 0.001 lb. |
If the unit weight is too light, another scale is needed. Continuing to use this scale will result in less accurate results.
CHECK WEIGHING
Use this mode to set a number for a weighing check. When the weight of the objects on the platform is less than or larger than the preset checking number, the indicators in the lower right hand corner of the display will show HI, OK or LOW.
Alarm beeping sounds can be enabled to beep when weights are in or out of limits. See page 9 to enable.
SET CHECK WEIGHT
- Press the MODE key Mode until E is shown on the display.
Cf nEt
- To set the high limit, press the HI key . Current high limit will be shown on the display.
- Key in the high limit by using the numeric keys and press the ZERO key Zero.
- To set the low limit, press the LO key . Current low limit will be shown on the display.
- Key in the low limit by using the numeric keys and press the ZERO key Zero.
- Press the MODE key Mode until 0-nET is shown on the display.
Cf nEt
- Place item to be weighed on the scale platform. Weight will be shown on the display. Scale indicators will show if weight is out of specified HI/LOW range.
CLEAR CHECK WEIGHT
- Press the MODE key Mode until CF E is shown on the display.
Cf nEt
- Press the HI key MR HI. Current high limit will be shown on the display.
- Enter 0 using the numeric keypad.
- Press the ZERO key Zero.
- Press the LO key MC Lo . Current low limit will be shown on the display.
- Enter 0 using the numeric keypad.
- Press the ZERO key Zero.
CHECK COUNTING
Use this mode to set a number for a counting check. When the number of objects on the platform is less than or larger than the preset checking number, the indicators in the lower right hand corner of the display will show HI, OK or LOW.
SET CHECK COUNT
- Press the MODE key Model until CI-PCS is shown on the display.
CF PCS
- To set the high limit, press the HI key MR HI . Current high limit will be shown on the display.
- Key in the high limit by using the numeric keys and press the ZERO key Zero.
- To set the low limit, press the LO key MC LO. Current low limit will be shown on the display.
- Key in the low limit by using the numeric keys and press the ZERO key Zero.
CHECK COUNT OPERATION
- Press the MODE key Mode until CI-PCS is shown on the display.
CF PCS
- Follow counting steps on pages 4-5. Scale indicators will show if the total quantity is out of specified HI/LOW range.
- Press the U/N/G key U/N/G to display the unit weight, gross weight and total quantity.
OPERATION CONTINUED
CLEAR CHECK COUNT
- Press the MODE key Mode until CI PCS is shown on the display.
CF PCS
- Press the HI key ON the display. Current high limit will be shown
- Enter 0 using the numeric keypad.
- Press the ZERO key Zero.
- Press the LO key on the display. MC LO Current low limit will be shown
- Enter 0 using the numeric keypad.
- Press the ZERO key Zero .
ACCUMULATION
Use this mode to measure the cumulative weight or counting values of a sequence of items. The maximum number of samples is 99 entries or the scale capacity.
MANUAL ACCUMULATION
- Follow steps above to weigh or count items on the platform.
- Once the stable indicator is shown on the display, press the M+ key M^+ . RC I will be shown on the display and the total value will be displayed for two seconds. Weighing or counting value will be stored into memory. If a printer is connected, the data will print. Once data is stored, the M+ indicator will be lit up on the lower right-hand corner of the display.
AC I
- Remove items from the platform. Display will return to zero or a negative value.
- Add additional items to the platform.
-
Once the stable indicator is shown on the display, press the M+ key M^+ . New data will be added to memory. Continue until all data is added.
-
If counting in accumulation mode:
- As the pieces are added, the total quantity will be displayed.
- Press the U/N/G key U/N/G to display the unit weight, gross weight and total quantity.
RECALL DATA
- Press the MODE key Mode until RCCU is shown on the display.
ACCU
NOTE: If unit weight was preset or added to memory, scale will automatically enter counting mode when accumulation mode is selected.
-
Press the MR key MR HI to display the total weighed value of items stored to memory. Number of accumulated values and total weighed value will be displayed for three seconds.
-
Press and hold the MR key MR HI to display the total counted value of items stored to memory. Number of accumulated values and total counted value will be displayed for three seconds
CLEAR DATA
- Press the MODE key Mode until RCCU shows on display.
ACCU
- To clear weighing and counting data stored to memory, press the MC key MC LO. CLERP will show on display.
AUTOMATIC ACCUMULATION
Use this mode to automatically add weighing and counting values to the scale memory and to print values if a printer is connected.

NOTE: Automatic accumulation must be enabled. See Enable Automatic Accumulation section on page 9.
When in the automatic accumulation mode, the auto indicator will be shown in the upper righthand corner of the display.
- Place items to be weighed or counted on the platform.
- Once the stable indicator is shown on the display, the scale will make a beeping sound.
- Remove items from the platform. Display will show REC I followed by the weighing or counting value. Weighing or counting value will be stored into memory. Once data is stored, the M+ indicator will be lit up on the lower right hand corner of the display.
AC I
- The scale will return to the weighing mode. Display will return to zero or a negative value.
OPERATION CONTINUED
- Add additional items to platform. New data will be added to memory. Continue until all data is added.
- To recall data and clear data, see sections above.
UNIT WEIGHT MEMORY
The scale can store and recall up 255 unit weights.
SETTING A UNIT WEIGHT
- Key in the unit weight by using the numeric keys.
- Press and hold the PLU key PLU . PLU will be shown on the display.
- Key in the unit weight name using the numeric keys. Names should be three digits between 001 and 255.
- Once keyed in, SRL' ### will be shown on the display. The scale makes a beeping sound and enters the counting mode.
RECALLING A UNIT WEIGHT
- Place items to be counted on the platform.
- Press the PLU key PLU. PLU will appear on display.
- Key in the three digit unit weight name by using the numeric keys. PL### will be shown on the display.
- Scale will recall the unit weight and then display the number of items on the platform.
RS-232
- Specifications:
• RS-232 output of weighing data
- ASCII CODE
• 600-9,600 Baud
- 8 data bits
- No Parity
- RS-232 (9-pin d type connector)
| Pin 2 | RXD | Input | Receiving Data |
| Pin 3 | TXD | Output | Transmission Data |
| Pin 5 | GND | — | Signal Ground |
9 Pin D Connector
Scale
Pin 2:
Pin 3:
Computer/Printer
Pin 3
Pin 2
Scale
Computer/Printer
Pin 5:
Pin 5

NOTE: If data is not getting in your computer/printer, interchange pin 3 and pin 2 connections.
- Continuously output protocol.
CONT: WEIGHING MODE
| S | T | , | G | S | k | g | CR | LF |
ENABLE WEIGHING UNITS
At startup, all weighing units are enabled – lb / oz / g / kg. Enter this menu to change enabled weighing units.

NOTE: Ib. weighing unit cannot be turned off.
- Turn on the scale and press the TARE key Tare during the self-test. PO CRL will be shown on the display.
PO CAL
- Press the TARE key Tare until P3 Unt is shown on the display.
- Press the ZERO key Zero to enter the menu.
- _g will be shown on the display. Press the TARE key Tare to select on or off. Press the ZERO key Zero to select the new setting.
- g will be shown on the display. Press the TARE key Tare to select on or off. Press the ZERO key Zero to select the new setting.
- o2 will be shown on the display. Press the TARE key Tare to select on or off. Press the ZERO key Zero to select the new setting.
- Press the TARE key Tare to view additional menus or press the MODE key Mode to exit the setup menu.
SETUP MENU
ENABLE ACCUMULATION
At startup, the accumulation mode is enabled. Enter this menu to turn the accumulation mode on or off.
- Turn on the scale and press the TARE key Tare during the self-test. PO CAL will be shown on the display.
PO CAL
- Press the TARE key Tare until P4 RCC is shown on the display.
- Press the ZERO key Zero to enter the menu.
- ACC will be shown on the display. Press the TARE key to select on or off. Press the ZERO key Zero to select the new setting.
- Press the TARE key Tare to view additional menus or press the MODE key Mode to exit the setup menu.
ENABLE AUTOMATIC ACCUMULATION
At startup, the automatic accumulation mode is not enabled. Enter this menu to turn the automatic accumulation mode on or off.
- Turn on the scale and press the TARE key Tare during the self-test. PO CRL will be shown on the display.
PO CAL
- Press the TARE key Tare until PS REo is shown on the display.
- Press the ZERO key Zero to enter the menu.
-
Press the TARE key Tare to change the setting.
-
AU on – Automatic Accumulation is on.
- AUoFF – Automatic Accumulation is off.
- PCont – Continuously send data to PC.
-
ASF – Send current data to printer.
-
Press the ZERO key Zero to select the new setting.
- Press the TARE key Tare to view additional menus or press the MODE key Mode to exit the setup menu.
PRINTER SET-UP
Enter this menu to select a printer.
- Turn on the scale and press the TARE key Tare during the self-test. PO CRL will be shown on the display.
PO CAL
- Press the TARE key Tare until PS PrE is shown on the display.
- Press the ZERO key Zero to enter the menu.
-
Press the TARE key Tare to change the setting.
-
tP – Ticket Printer
- LP-50 – Label Printer
• EPM – EPM205 Printer

NOTE: EPM will only be available for selection if automatic accumulation is set to auto.
- Press the ZERO key Zero to select the new setting.
- Press the TARE key Tare to view additional menus or press the MODE key Mode to exit the setup menu.
BAUD RATE
Baud rate is the RS232 transmission speed. If using a printer, both the printer and the scale must be set to the same baud rate. At startup, the baud rate is set at 9,600. Enter this menu to change the baud rate setting.
- Turn on the scale and press the TARE key Tare during the self-test. PO CRL will be shown on the display.
PO CAL
- Press the TARE key Tare until P8 bud is shown on the display.
- Press the ZERO key Zero to enter the menu.
- Press the TARE key Tare to change the setting.
• EPM
• b 1200
• b 2400
• b 4800
• b 9600
- Press the ZERO key Zero to select the new setting.
- Press the TARE key Tare to view additional menus or press the MODE key Mode to exit the setup menu.
SETUP MENU CONTINUED
BACKLIGHT
At startup, the backlight will automatically turn on when the scale is in use. Enter this menu to change the backlight setting.
- Turn on the scale and press the TARE key Tare during the self-test. PO CRL will be shown on the display.
PO CAL
- Press the TARE key display. Tare until P10bFL is shown on the
- Press the ZERO key Zero to enter the menu.
-
Press the TARE key Tare to change the setting.
-
BK AU – Backlight automatically turns on when the scale is in use.
- BK ON – Backlight is always on.
-
BK OFF – Backlight is never on.
-
Press the ZERO key Zero to select the new setting.
-
Press the TARE key Tare to view additional menus or press the MODE key Mode to exit the setup menu.
HI/LO LIMIT BEEPING SOUND
At startup, the beeping sounds are set to no sound. Enter this menu to change the beeping sound setting.
- Turn on the scale and press the TARE key Tare during the self-test. PO CAL will be shown on the display.
PO CRL
- Press the TARE key Tare until PII bP is shown on the display.
- Press the ZERO key Zero to enter the menu.
-
Press the TARE key Tare to change the setting.
-
Bep 1 – Beeping sounds between the limits.
- Bep 2 – Beeping sounds outside of the limits.
-
Bep 0 – No beeping sounds.
-
Press the ZERO key Zero to select the new setting.
-
Press the TARE key Tare to view additional menus or press the MODE key Mode to exit the setup menu.
AUTO POWER-OFF
When the auto power-off time is enabled, the scale will automatically turn off when there has been no load on the platform and the scale is stable at zero position for a specified period of time in minutes. At startup, the scale will automatically turn off after five minutes.
- Turn on the scale and press the TARE key Tare during the self-test. PO CRL will be shown on the display.
PO CAL
- Press the TARE key Tare until P13 SP is shown on the display.
- Press the ZERO key Zero to enter the menu.
-
Press the TARE key Tare to change the setting.
-
Of 0 – Auto power-off is off.
- Of 3 – Auto power-off at 3 minutes.
- Of 5 – Auto power-off at 5 minutes.
- Of 15 – Auto power-off at 15 minutes.
-
Of 30 – Auto power-off at 30 minutes.
-
Press the ZERO key Zero to select the new setting.
- Press the TARE key Tare to view additional menus or press the MODE key Mode to exit the setup menu.
MAINTENANCE
CLEANING

CAUTION! Disconnect the unit from the power supply before cleaning.
Use a mild detergent for the display, keypad and housing.

WARNING! Do not use solvents, chemicals, alcohol, ammonia or abrasives.
Use a stainless steel cleaning solution for the stainless steel platform.
Apply cleaner to a clean, damp cloth and wipe surface. Dry thoroughly.
TROUBLESHOOTING
| ERROR CODE CAUSE RECOMMENDATIONS | ||
| -OL- | Maximum capacity exceeded. Remove load from the platform. | |
 Bat loBlinking DisplayFaded Display Bat loBlinking DisplayFaded Display | Low battery. Recharge the battery. | |
| Err 4 | Scale needs to be recalibrated. Recalibrate the scale. | |
| FRIL | Calibration did not work. Recalibrate the scale. | |
| Load Lo | Calibration weight is too light. Use calibration weight that is equal to or exceeds minimum calibration weight. | |
| Load Hi | Calibration weight is too heavy. | Use calibration weight that is equal to or less than maximum calibration weight. |
If the problem persists or the troubleshooting section does not resolve or describe your problem, contact Uline Customer Service at 1-800-295-5510.
natural_image
Line drawing of a digital kitchen counter with a display and control panel (no text or symbols)APERÇU DES COMMANDES
AFFICHAGE
text_image
ULINE 1 PCB AUTO kg OZM 9 STYLE ZERO GROSS NET HI OK LOW 2 3 4 5 6 7 8ÉLÉMENTS DE L'AFFICHAGE
ACCUMULATION MANUELLE
EFFACEMENT DES DONNÉES
| S | T | , | G | S | / | □ | k | g | CR | LF |


