H-7978 - Scale Uline - Free user manual and instructions
Find the device manual for free H-7978 Uline in PDF.


User questions about H-7978 Uline
0 question about this device. Answer the ones you know or ask your own.
Ask a new question about this device
Download the instructions for your Scale in PDF format for free! Find your manual H-7978 - Uline and take your electronic device back in hand. On this page are published all the documents necessary for the use of your device. H-7978 by Uline.
USER MANUAL H-7978 Uline
natural_image
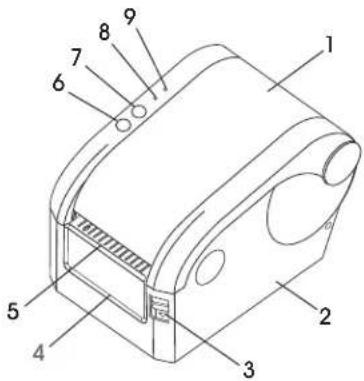
Line drawing of a mechanical device with no visible text or symbolsOVERVIEW OF CONTROLS
text_image
Technical diagram of a device with numbered components for identification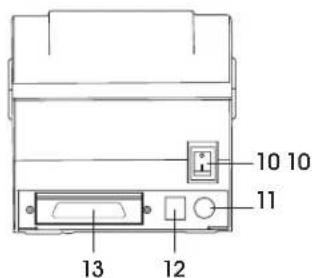
text_image
10 10 11 13 12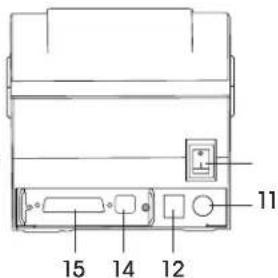
text_image
11 12 14 15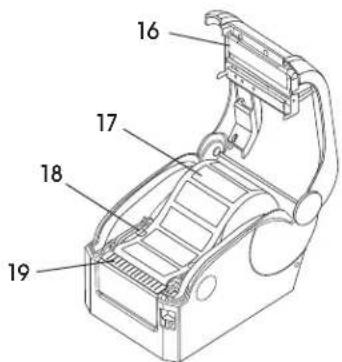
text_image
Technical diagram of a mechanical device with numbered parts labeled 16, 17, 18, and 19.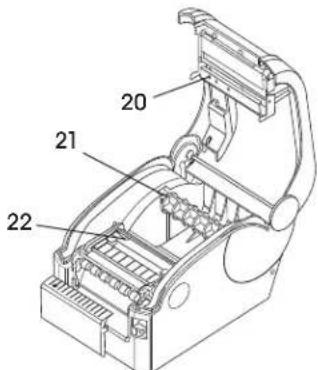
text_image
Technical diagram of a mechanical device with numbered components labeled 20, 21, and 22PARTS
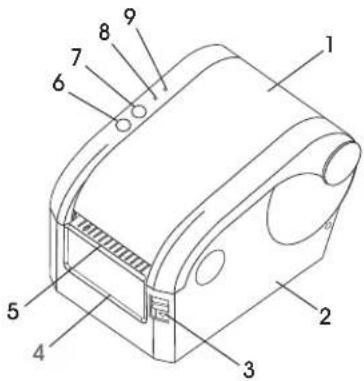
| # DESCRIPTION |
| 1 Top Cover |
| 2 Base Housing |
| 3 Top Cover Open Button |
| 4 Backing Paper Opening |
| 5 Label Opening |
| 6 Feed Button |
| 7 Pause Button |
| 8 Error Indicator |
| 9 Online/Power Indicator |
| 10 Power Switch |
| 11 Power Jack |
| 12 Cash Drawer Jack |
| 13 Parallel Interface |
| 14 USB Interface |
| 15 Serial Interface |
| 16 Print Head |
| 17 Label Roll |
| 18 Label Guide |
| 19 Label Presence Sensor |
| 20 Light Transmission Sensor Light Source |
| 21 Label Roll Spindle |
| 22 Light Transmission Sensor Receiver |
OVERVIEW OF CONTROLS CONTINUED

NOTE: The printer has two indicators – power (blue light) and error (red light) and two buttons – pause and feed.
INDICATORS
| INDICATOR STATUS PRINTER STATUS | |
| Power indicator (6) is on.Error indicator (7) is off. | Printer is powered and in normal print mode. |
| Power indicator (6) flashes slowly.Error indicator (7) is off. | Printer is paused. |
| Power indicator (6) flashes fast.Error indicator (7) is off. | Printed label is peel-off but not taken off. |
| Power indicator (6) is off.Error indicator (7) flashes fast. | Printer cover is open. |
| Power indicator (6) is off.Error indicator (7) flashes slowly. | Paper shortage or gap sensor calibration error. |
| Power indicator (6) flashes fast.Error indicator (7) flashes fast. | Printer overheat protection is activated. After one minute, the printer will recheck the temperature of the printhead. |
BUTTONS
| FUNCTION DESCRIPTION | |
| Feed Press the feed | button (9) when power indicator is on and error indicator is off.Label feeds to the beginning of the next label. |
| Pause Press the pause | button (8) during printing and the printing job is suspended. |
| Self-Test 1. Turn off the printer power (10).2. Make sure label roll is installed correctly and printer top cover is closed.3. Press the feed button (9) and turn on the printer power simultaneously. When the self-test paper prints out, release the feed button. | |
| Gap Sensor Calibration | 1. Turn on the printer power (10).2. Make sure the label roll is installed correctly and the top cover is closed.3. Press and hold the pause button (8), then turn the printer power on. The printer will automatically calibrate the gap sensor sensitivity and save the gap length into DRAM. Release the pause button. |
| Dump Mode | 1. Turn on the printer power (10).2. Make sure the label roll is installed correctly and the top cover is closed.3. Press and hold the pause (8) and feed (9) buttons, then turn on the printer power. When the power indicator (blue light) and error indicator (red light) light simultaneously, release both buttons. The printer changes to dump mode. |
OVERVIEW OF CONTROLS CONTINUED
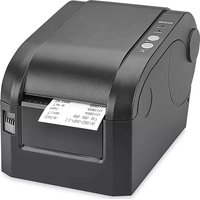
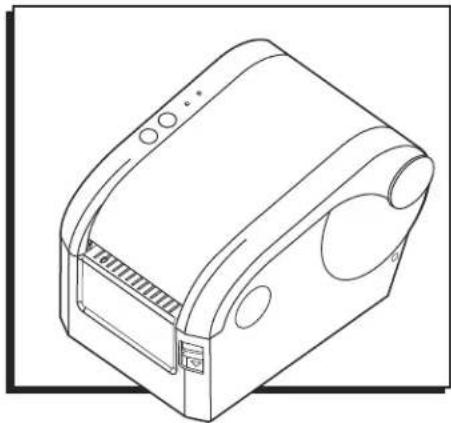
This label printer is designed for real-time and batch label printing, which is applicable in the field of transportation, logistics, post, retail sale, etc. The printer can be connected to other equipment with various interface cards, including parallel, serial, USB and LAN. Supports different paper media, including thermal paper roll, thermal label paper and label stock.
The printer provides direct thermal printing at selectable printing speeds of 2.0, 3.0, 4.0 and 5.0 inches per second. It accepts roll feed, die-cut and fan-fold labels. All common barcode formats are available. Font and bar codes can be printed in four directions and in 1-10 times enlargement size.
PRIMARY FUNCTIONS
• Supports continuous paper roll, non-continuous label roll and non-continuous adhesive paper.
- Supports thermal paper roll, thermal paper and label stock.
- Supports print media width from 16 – 82 mm.
• Auto paper adjusting function.
• Auto temperature control for durable printing.
- Module design for different applications.
SAFETY

WARNING! Read the following notes and warnings before using the printer.

CAUTION! The printhead is a heated part. Do not touch the printhead or other parts around it during and after the printing process.

CAUTION! Do not touch the printhead and plug-in parts to avoid printhead damage.

CAUTION! Do not touch the paper tear-off knife, as this may lead to serious injury.
- Do not touch the printhead with anything.
- Do not touch cutter blade.
- Do not bend the power cord excessively or place any heavy objects on it.

WARNING! Do not use the printer when it is out of order. This can cause a fire or electrocution.
- When connecting or disconnecting the plug, always hold the plug, but not the cord.
- Keep the desiccant out of the reach of children.
- Use only approved accessories.

CAUTION! Device should only be serviced by qualified personnel.
- Install the printer on a firm, level surface to minimize vibration while printing.
- Do not let water or other substances into the printer.
- Do not connect a telephone line into the peripheral drive connector.
- Unplug the printer from the power outlet if printer is not in use for a long period of time.
SETUP
SETTING UP THE PRINTER
UNPACKING
Unpack the printer package and inspect all parts according to the packing list. If any parts are missing, contact Uline Customer Service at 1-800-295-5510.
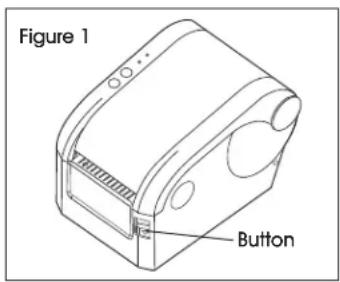
- Press the top cover open button to open the top cover. (See Figure 1)
text_image
Figure 1 ButtonSETUP CONTINUED
- Insert the label roll onto a paper roll spindle, and place paper roll into printer. (See Figure 2)
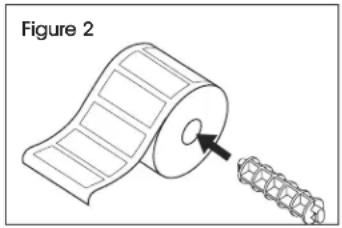
natural_image
Diagram showing a rolled paper or film being cut with a magnified inset of its edge, labeled 'Figure 2' (no text or symbols on the diagram itself)- Place tab on label roll spindle inside the paper roll mount. (See Figure 3)
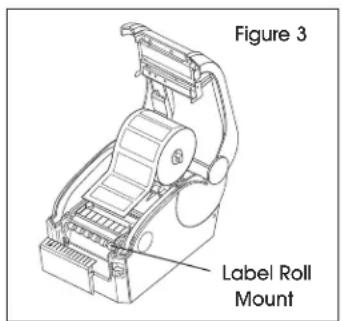
text_image
Figure 3 Label Roll Mount- Place the paper roll into the internal label roll mount. Ensure roll fits into tabs on either side of printer and paper printing side faces up. (See Figure 4)
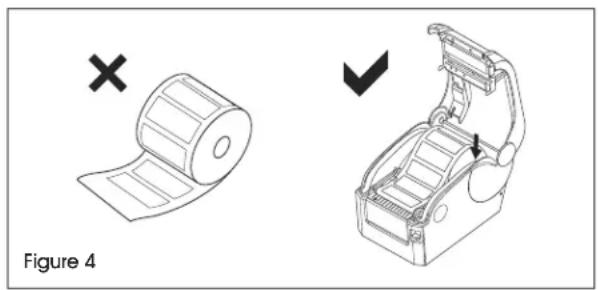
text_image
Figure 4- Ensure the printer power switch is off.
- The printer power jack is a three-pin socket for 24V DC power input. (See Figure 5) Plug the DC cord connector into the printer's power jack properly.
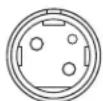
Figure 5

CAUTION!
- When connecting or disconnecting the plug, always hold the plug but not the cord.
- Avoid pulling the power cord to prevent cord damage, fire or electrocution.
- Avoid placing power cord around other overheated equipment to prevent power cord melting, which may cause a fire or electrocution.
- Unplug the printer when not in use.
DATA CABLE CONNECTION
- Ensure the printer power switch is off.
- Plug the data cable connector into correct interface.
- Plug the other end of the data cable into the host computer.

CAUTION! Do not plug in the data cable when the printer is on.

NOTE: To install adhesive paper or label roll, see Label Roll Installation on page 3.
There are five power-on utilities to set up and test printer hardware. These utilities are activated by pressing the feed button and pause button.
PRINTER SETUP WITH LP7510 DISPLAY INDICATOR

NOTE: All-weather and stainless steel indicators require hardwiring to connect to printer. See Hardwiring instructions on page 5.
- Use the gray interface cable provided with the printer. Connect cable to LP7510 and the printer.
- Press and hold the PRINT and HOLD keys down together for approximately two seconds. The meter will display CO-I. The one will be flashing.
- Press the ZERO key until the meter shows C06, then press the UNIT key once. The zero should be flashing. Then, press the ZERO key once. The meter should be showing C16. This is the date setting. Press ENTER. Use the left, right, up and down arrow keys to program the current date: left to right, year/month/day.
- After the date is programmed, press the PRINT key twice to set the time. Using the arrow keys again to program in the current time.
- After the time has been set, press the PRINT key twice. The meter will display C18 0. Press the ZERO key until meter shows C18 6. Then press the PRINT key twice. The meter will display C19 3. If not showing a 3, use arrow key to change to 3.
After setting C19, press the PRINT key once to C20 with the zero flashing. Press the UNIT key once. The 2 will be flashing. Press the ZERO key once to C30. Press the PRINT key one time. Meter will show C30 0. Press the ZERO key once. The meter should show C30 1. Press the PRINT key once, then the count key once. Meter should be back in weigh mode. The printer is ready to use.
SETUP CONTINUED
HARDWIRING

NOTE: Hardwiring is required to connect all-weather and stainless steel indicators to the printer. These instructions do not apply to standard floor scale indicators.
- Cut the RS-232 (9 pin) end of the factory cable off and strip back. There will be three wires: red, black and green.
- Remove the back from the readout and locate the the terminal strip marked: RXD, TXD, GRND.

NOTE: The green wire is TXD, black is GRND and red is RXD.
-
Replace the back on panel on the readout.
-
Power the read out up and while in weight mode, press and hold the PRINT and HOLD keys for approximately two seconds. The meter will show COI and the 1 will be flashing.
-
Press ZERO five times. The 6 will be flashing.
-
Press UNITS once. The 0 will be flashing.
-
Press ZERO twice. The meter will display C16.
-
Press PRINT once. This will allow the date setup. Left to right will be Year/Month/Date. Use the four arrow keys to program the date. Once set, press PRINT twice.
- Use arrow keys to program in the time. This is in 24 hour time only. Once set, press PRINT twice.
- Meter will display C18. Press ZERO until the screen shows C18 6.
- Press PRINT twice. Screen will read C19 3. If it does not end in 3, press the ZERO key until it does.
- Press PRINT once. Screen will read C20.
- Press UNITS once. The 2 will be flashing.
- Press ZERO key once. Screen will read C30.
- Press PRINT key once. Screen will read C30 0.
- Press ZERO key once. Screen will read C301.
- Press PRINT key once.
- Press TOTAL key once. The screen will revert back to weight mode and printer will be ready to use.

NOTE: If printer does not print, switch the green and red wires.
POWER ON UTILITIES
SELF-TEST
To start the printer self-test, follow these steps:
-
Turn off the printer power.
-
Make sure the paper roll is installed correctly and the printer top cover is closed.
- Press the feed button and turn on the power simultaneously. When the self-test paper comes out, release the feed button.
SELF-TEST SAMPLE PAGE
SELF-TEST Self-test Mode
VERSION: V1, 1 (2013.3.1)......Firmware Version
INTERFACE: USB and Serial ...... Interface Type
SERIAL PORT: SERIAL 9600, N, 8, 1 ....Serial Communication Parameters
ETHERNET: 10M/100M....LAN Communication Parameters
PROTOCOLS: TCP/IP
IP ADDR: 192.168.1.223
MAC ADDR: 00-28-9E-E6-15-D7
NETMASK: 255.255.255.0
GATEWAY: 192.168.1.1
SPEED: 5....Print Speed
DENSITY: 7....Print Darkness
SIZE: 57 mm, 40 mm....Paper Width
GAP: 2 mm, 0 mm ....Gap Distance
CODE PAGE: 437.....Code Page
MILEAGE (m): 44.488625....Printed Mileage (meter)
REFERENCE: 0 mm, 0 mm......Reference Offset
DIRECTION: 0, 0.....Print Direction
SHIFT: 0 ....Label Print Offset
OFFSET: 0 ......Paper Tear-Off Offset Printer Functions
SET PEEL: OFF ....Peel Off Mode
SET TEAR: ON....Tear-Off Mode
SET HEAD: ON ....Cover Opening Sensor
SET PRINTKEY: OFF....Press and Print Function
SET REPRINT, OFF....Auto Reprint Function
SET KEY1 (FEED), ON....Feed Button Function
SET KEY (PAUSE), ON ....Pause Button Function
TAIWANESE BIG5, TST24, BF2....Taiwanese
CHINESE GB2312: TSS24.BF2 ...... Chinese
KOREAN KSC5601: K....Korean
2 D BARCODE: QRCODE, Datamatrix, PDF417
******************************************************************************************
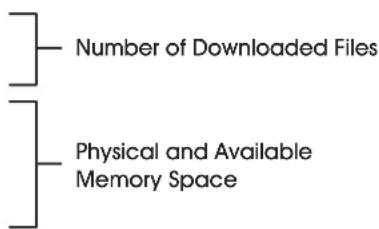
DRAM FILE: 0 FILE (S)
FLASH FILE: O FILE (S)
SECTOR SIZE: 4 KB
PHYSICAL DRAM: 2048 KBYTES
AVAILABLE DRAM: 1024 KBYTES FREE
PHYSICAL FLASH 2048 KBYTES
AVAILABLE FLASH 1024 KBYTES FREE
******************************************************************************************
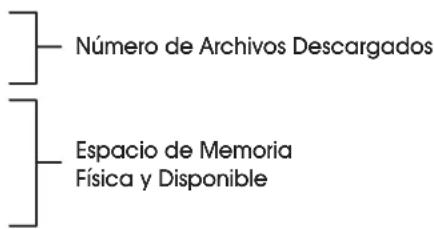
Button Function
text_image
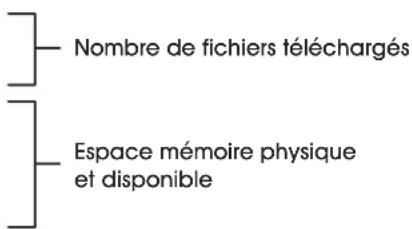
Number of Downloaded Files Physical and Available Memory SpacePOWER ON UTILITIES
GAP SENSOR CALIBRATION
Gap sensor sensitivity should be calibrated at the following conditions:
- A brand new printer.
- Label stock changed.
- Printer initialization.
This function is to reset the label gap sensor sensitivity when the printer power is turned on. Start the calibration of the gap sensor sensitivity after loading a different type of label roll or the printer is initialized.
To calibrate the gap sensor:
- Turn off the printer power.
- Make sure the label roll is installed correctly and the printer top cover is closed.
- Press and hold the pause button, then turn on the printer power. The printer will automatically calibrate the gap sensor sensitivity and save the gap length into DRAM. Release the pause button.

WARNING! Test print a weight. If no issues occur, scale is ready to use. Utilize Dump Mode or Printer Initialization for troubleshooting only.
DUMP MODE
- Turn off the printer power.
- Make sure the label roll is installed correctly and the printer top cover is closed.
- Press and hold the pause button and feed button, then turn on the printer power. When the power indicator (blue light) and error indicator (red light) light simultaneously, release both buttons. The printer is changed to dump mode and will print as shown below. (See Figure 6)

NOTE: Printer will not print if data is not more than one piece of label. Press the feed button to force the printer to print.
Figure 6
* NOW IN DUMP MODE *
SELFTE 0A 53 45 54 454C 46
ST 53 54 0D 0A
SKIP AUTO.BAS
User can download an auto execution file (AUTO.BAS) to flash memory. Printer will run the AUTO.BAS program immediately when turning on printer power. The AUTO.BAS program can be interrupted by the power-on utility.
Follow the steps below to skip the AUTO.BAS:
- Turn off the printer power.
- Press and hold the pause button and the feed button, then turn on the printer power. When the power indicator (blue light) dims and error indicator (red light) lights, release both buttons. The printer skips running the AUTO.BAS program. The power indicator lights up.
PRINTER INITIALIZATION
Printer initialization is used to clear DRAM and restore printer settings to factory defaults.

NOTE: Calibrate gap sensor sensitivity after the printer initialization.
Follow the steps below to initialize the printer:
- Turn off the printer power.
- Press and hold the pause button and feed button, then turn on the printer power. When the power indicator (blue light) lights and error code (red light) dims, release both buttons. The printer DRAM is cleared and printer settings are restored to defaults.

NOTE: The printer has two indicators: power (blue light) and error (red light), and two buttons: pause and feed.
MAINTENANCE
PRINTER CLEANING
Follow this maintenance section to keep printer in working good condition, extend its life and ensure good printing quality.
Use one of the following materials to clean the printer:
- Cotton swab • Lint-free cloth
• Vacuum/blower brush • 100% ethanol

CAUTION!
• Always turn off the printer power before cleaning the printer.
- Do not touch the printhead with your hand or tweezers, as this may cause damage to the printhead, platen roller or sensors.
- Use 100% ethanol only. Do not use medical alcohol, gasoline or acetone, which may damage the printhead and platen roller.
- Calibrate the sensors after cleaning. (See Page 6)
- Only turn on the printer and resume printing after the ethanol has dried completely.
CLEANING PROCESS
| PRINTER PART METHOD | |
| Print Head 1. Turn off | the printer power before cleaning the printhead.2. Allow the printhead to cool for at least one minute.3. Use a cotton swab and 100% ethanol to clean the printhead surface. |
| Platen Roller 1. Turn off | the printer power before cleaning the platen roller.2. Rotate the platen roller and use a 100% cotton swab or lint-free cloth to wipe it thoroughly with 100% ethanol. |
| Exterior Wipe with wet/damp cloth. | |
| Interior Use a vacuum | or blower brush to clean the dust. |
TROUBLESHOOTING
| OPERATING ISSUE RECOMMENDATIONS | |
| The printer is not working. Ensure the printer is connected to power.Ensure the label roll inside the printer is placed correctly.Ensure the cover of the printer is closed completely.Ensure the indicator is set up to have the print function activated. |
Call Uline Customer Service at 1-800-295-5510 for any technical questions or issues.
SPECIFICATIONS
| PARAMETERS | ||
| Printing Method Direct Thermal | ||
| Resolution 203 DPI | ||
| Print Width 0.6 - 3.2" (16 - 82 mm) | ||
| Print Speed Max. 127 mm/s; Min. 101 mm/s | ||
| Memory DRAM: 2M FLASH: 2M (XP-330B)DRAM: 4M FLASH: 2M (XP-350B) | ||
| Printhead Temperature Sensor | Thermal Sensitive Resistance | |
| Printhead Position Sensor Microswitch | ||
| Paper Detection Sensor Photoelectricity Sensor | ||
| Interface Serial+USB | ||
| Barcode Font Graphics | Barcode | CODE128, EAN128, ITF, CODE39, CODE93, EAN13, EAN13+2, EAN13+5, EAN8, EAN8+2, EAN8+5, CODABAR, POSTNET, UPC-A, UPCA+2, UPCA+5, UPC-E, UPCE+2, UPC-E+5, CPOST, MSI, MSIC, PLESSY, ITF14, EAN14 |
| Internal Font | Font 0 to Font 8Simplified Chinese, Traditional Chinese and Korean | |
| Enlargement and Rotation | 1 to 10 times enlargement in both directions 0°, 90°, 270°, 360° rotation | |
| Graphics | Mono PCX and BMP files can be downloaded into FLASH and DRAM. | |
| Media | Media Type | Continuous, sticker, fan-fold, etc. |
| Media Width | 0.6 - 3.2" (16 - 82 mm) | |
| Media Diameter | Max. 3.4" (85 mm), Or outer label paper roll (supports XP-350B) | |
| Media Core Diameter | Min. 1" (25 mm) | |
| Paper Off Mode | Tear-Off | |
| Power | Input | 24VDC, 2A |
| Environmental Conditions | Work | 41 ~ 113°F (5 ~ 45°C), 20 - 80%RH |
| Storage | 14 ~ 122°F (-10 ~ 50°C), ≤ 93%RH (40°C) | |
| Physical Dimensions | Diameter | 8.4 x 5.9 x 5.9" (220 x 150 x 150 mm) (L x W x H) (XP-350B) |
| Weight | 3.3 lbs. (1.5 kg) (XP-330B) | |
natural_image
Line drawing of a rectangular electronic device with ports and a side panel (no text or symbols)text_image
Technical diagram of a mechanical device with numbered components for identification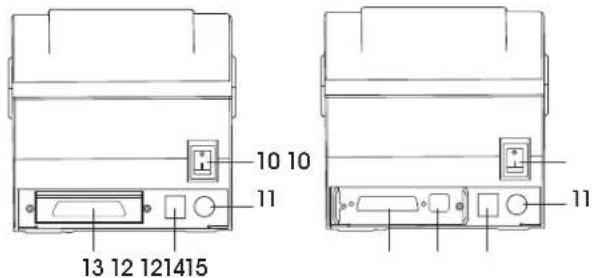
text_image
10 10 11 13 12 121415 11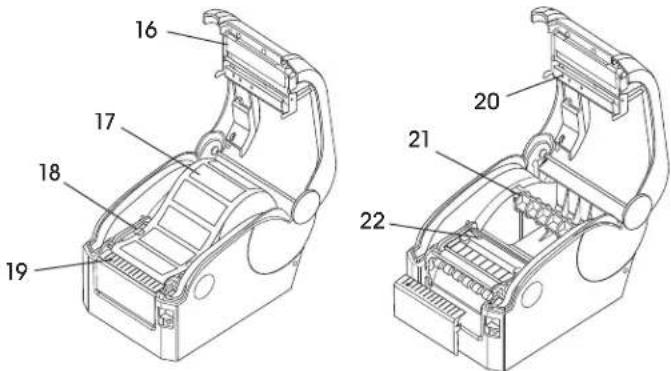
text_image
Technical diagram of a mechanical device with numbered components for identificationPARTES
SELF-TEST Self-test Mode
VERSION: V1, 1 (2013.3.1)......Firmware Version
INTERFACE: USB and Serial ..... Interface Type
SERIAL PORT: SERIAL 9600, N, 8, 1 ....Serial Communication Parameters
ETHERNET: 10M/100M....LAN Communication Parameters
PROTOCOLS: TCP/IP
IP ADDR: 192.168.1.223
MAC ADDR: 00-28-9E-E6-15-D7
NETMASK: 255.255.255.0
GATEWAY: 192.168.1.1
SPEED: 5....Print Speed
DENSITY: 7....Print Darkness
SIZE: 57 mm, 40 mm....Paper Width
GAP: 2 mm, 0 mm ....Gap Distance
CODE PAGE: 437.....Code Page
MILEAGE (m): 44.488625....Printed Mileage (meter)
REFERENCE: 0 mm, 0 mm......Reference Offset
DIRECTION: 0, 0.....Print Direction
SHIFT: 0 ....Label Print Offset
OFFSET: 0 ...... Paper Tear-Off Offset Printer Functions
SET PEEL: OFF ....Peel Off Mode
SET TEAR: ON....Tear-Off Mode
SET HEAD: ON .... Cover Opening Sensor
SET PRINTKEY: OFF....Press and Print Function
SET REPRINT, OFF....Auto Reprint Function
SET KEY1 (FEED), ON....Feed Button Function
SET KEY (PAUSE), ON ....Pause Button Function
TAIWANESE BIG5, TST24, BF2....Taiwanese
CHINESE GB2312: TSS24.BF2 ...... Chinese
KOREAN KSC5601: K....Korean
2 D BARCODE: QRCODE, Datamatrix, PDF417
******************************************************************************************
DRAM FILE: 0 FILE (S)
FLASH FILE: O FILE (S)
SECTOR SIZE: 4 KB
PHYSICAL DRAM: 2048 KBYTES
AVAILABLE DRAM: 1024 KBYTES FREE
PHYSICAL FLASH 2048 KBYTES
AVAILABLE FLASH 1024 KBYTES FREE
******************************************************************************************
Función de Botón
natural_image
Line drawing of a mechanical device with no visible text or symbolsAPERÇU DES COMMANDES
text_image
Technical diagram of a mechanical device with numbered components for identification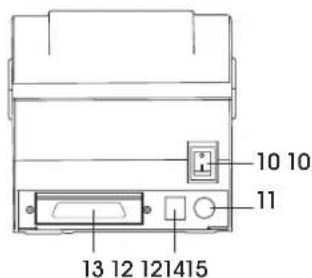
text_image
10 10 11 13 12 121415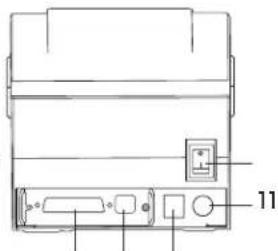
text_image
Technical diagram of a device rear panel with labeled ports and indicators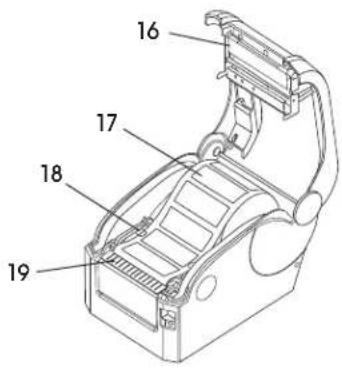
text_image
Technical diagram of a mechanical device with numbered parts labeled 16, 17, 18, and 19.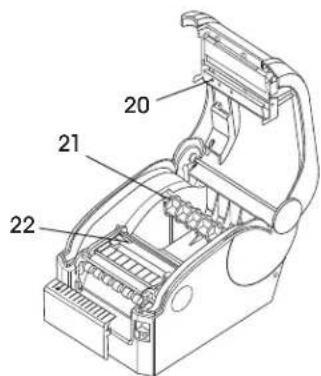
text_image
Technical diagram of a mechanical device with numbered components labeled 20, 21, and 22PIÈCES
text_image
Figure 1 BoutonCONFIGURATION SUITE
natural_image
Diagram showing a rolled paper or film being inserted into a coiled spring (no text or symbols present)natural_image
Diagram showing two mechanical components: a rolled roller and a partially assembled device, with no visible text or symbols.RACCORDEMENT DU CORDON D'ALIMENTATION
CHINESE GB2312: TSS24.BF2 ....Chinois
KOREAN KSC5601: K......Coréen
2 D BARCODE: QRCODE, Datamatrix, PDF417
******************************************************************************************
DRAM FILE: 0 FILE (S)
FLASH FILE: O FILE (S)
SECTOR SIZE: 4 KB
PHYSICAL DRAM: 2048 KBYTES
AVAILABLE DRAM: 1024 KBYTES FREE
PHYSICAL FLASH 2048 KBYTES
AVAILABLE FLASH 1024 KBYTES FREE