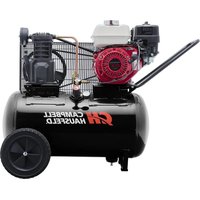
VT6171X - Compressor Campbell Hausfeld - Free user manual and instructions
Find the device manual for free VT6171X Campbell Hausfeld in PDF.


User questions about VT6171X Campbell Hausfeld
0 question about this device. Answer the ones you know or ask your own.
Ask a new question about this device
Download the instructions for your Compressor in PDF format for free! Find your manual VT6171X - Campbell Hausfeld and take your electronic device back in hand. On this page are published all the documents necessary for the use of your device. VT6171X by Campbell Hausfeld.
USER MANUAL VT6171X Campbell Hausfeld
Operating Instructions
Please read and save these instructions. Read carefully before attempting to assemble, install, operate or maintain the product described. Protect yourself and others by observing all safety information. Failure to comply with instructions could result in personal injury and/or property damage! Retain instructions for future reference.
Contractor Air Compressors
Description
Air compressor units are intended to provide compressed air to power pneumatic tools and operate spray guns. The pumps supplied are oil lubricated. A small amount of oil carryover is present in the compressed air stream. Applications requiring air free of oil or water should have the appropriate coalescing filter installed. The air compressor unit must be placed on a solid floor or solid ground. Any other use of these units will void the warranty and the manufacturer will not be responsible for problems or damages resulting from such misuse.
All models are equipped with cast-iron pumps. Gas engine models are equipped with an air governor for automatic idle down when the tanks reach a preset pressure. Model VT6131 is driven by a dual capacitor, 3450 RPM, 60 Hz, 120/240 dual-voltage motor with manual reset thermal protection. Honda engine models have a low-oil level shutdown.
Compressors include factory-mounted belt guards, ductile iron crankshafts, fly-wheels and ball bearings on crankshaft.
Safety Guidelines
This manual contains information that is very important to know and understand. This information is provided for SAFETY and to PREVENT EQUIPMENT PROB-LEMS. To help recognize this information, observe the following symbols.
DANGER
Danger indicates an imminently haz-
ardous situation which, if not avoided, will result in death or serious injury.
AWARNING
Warning indicates a potentially haz-
ardous situation which, if not avoided, could result in death or serious injury.
ACAUTION
Caution indicates a potentially haz-
ardous situation which, if not avoided, may result in minor or moderate injury.
NOTICE
Notice indicates important informa-
tion, that if not followed, may cause damage to equipment.
Unpacking
After unpacking the unit, inspect carefully for any damage that may have occurred during transit. Make sure to tighten fittings, bolts, etc., before putting unit into service.
▲WARNING
Do not operate unit if damaged
during shipping, handling or use. Damage may result in bursting and cause injury or property damage.
General Safety
Since the air compressor and other components (pump, spray guns, filters, lubricators, hoses, etc.) used make up a high pressure pumping system, the following safety precautions must be observed at all times:
- Read all manuals included with this product carefully. Be thoroughly familiar with the controls and the proper use of the equipment.

-
Follow all local safety codes as well as the United States Occupational Safety and Health Act (OSHA).
-
Only persons well acquainted with these rules of safe operation should be allowed to use the compressor.
-
Keep visitors away and NEVER allow children in the work area.
-
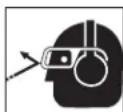
Wear safety glasses and use hearing protection when operating the pump or unit.
-
Do not stand on or use the pump or unit as a handhold.
-
Before each use, inspect compressed air system, fuel system and electrical components for signs of damage, deterioration, weakness or leakage.
DANGER
Breathable Air Warning
This compressor/pump is NOT equipped and should NOT be used "as is" to supply breathing quality air. For any application of air for human consumption, you must fit the air compressor/pump with suitable in-line safety and alarm equipment. This additional equipment is necessary to properly filter and purify the air to meet minimal specifications for Grade D breathing as described in Compressed Gas Association Commodity Specification G 7.1 - 1966, OSHA 29 CFR 1910. 134, and/or Canadian Standards Associations (CSA).
DISCLAIMER OF WARRANTIES IN THE EVENT THE COMPRESSOR IS USED FOR THE PURPOSE OF BREATHING AIR APPLICATION AND PROPER IN-LINE SAFETY AND ALARM EQUIPMENT IS NOT SIMULTANEOUSLY USED, EXISTING WARRANTIES ARE VOID, AND CAMPBELL HAUSFELD DISCLAIMS ANY LIABILITY WHATSOEVER FOR ANY LOSS, PERSONAL INJURY OR DAMAGE.
Repair or replace defective items before using.
- Check all fasteners at frequent intervals for proper tightness.
AWARNING
Motors, electrical equipment and controls can cause electrical arcs that will ignite a flammable gas or vapor. Never operate or near a flammable gas or vapor store flammable liquids or vicinity of the compressor.

General Safety (Con't)
AWARNING
Carbon
monoxide can cause severe nausea, fainting or death. Do not operate unit inside a closed building or a poorly ventilated area.

WARNING
Never operate compressor without a beltguard. Compressors can start automatically without warning. Personal injury or property could occur from contact with parts.
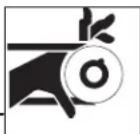
- Do not wear loose clothing or jewelry that will get caught in the moving parts of the unit.
ACAUTION
Compressor parts may be hot even if the unit is stopped.
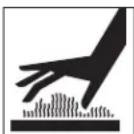
- Keep fingers away from a running compressor; fast moving and hot parts will cause injury and/or burns.
- If the equipment should start to vibrate abnormally, STOP the engine/motor and check immediately for the cause. Vibration is generally a warning of trouble.
AWARNING
NEVER refuel a running or hot engine. Explosive fuel can cause fires and severe burns. Avoid overfilling fu

- Check fuel level before starting the engine. Do not fill the gas tank indoors. Wipe off any spilled gas before starting the engine.
DANGER
Gasoline vapor is highly flammable.
Refill outdoors or only in well ventilated areas. Do not store, spill or use gasoline near an open flame or heat devices such as a stove, furnace, or water heater, which utilize a pilot light, or any device that can create a spark. If gasoline is accidentally spilled, move unit away from the spill area and avoid creating any source of ignition until gasoline vapors have dissipated.
- To reduce fire hazard, keep engine/motor exterior free of oil, solvent, or excessive grease.
AWARNING
Never remove or attempt to adjust
safety valve. Keep safety valve free from paint and other accumulations.
- Do not tamper with governor setting on engine. Overspeeding the unit severely shortens engine life and may also be very hazardous.
DANGER
Never attempt to repair or modify a tank! Welding, drilling or any other modification will weaken the ta in damage from rupture or Always replace worn or da

- Tanks rust from moisture build-up, which weakens the tank. Make sure to drain tank regularly and inspect periodically for unsafe conditions such as rust formation and corrosion.
- Fast moving air will stir up dust and debris which may be harmful. Release air slowly when draining moisture or depressurizing the compressor system.
- STOP the engine whenever leaving the work area, before cleaning, making repairs or inspections. When cleaning, repairing or inspecting, make certain all moving parts have stopped. Disconnect the spark plug wire and keep the wire away from the plug to prevent accidental starting.
- Allow engine to cool before storing.
SPRAYING PRECAUTIONS
AWARNING
Do not spray flammable materials in vicinity of open flame or near ignition sources including the compr

-
Do not smoke when spraying paint, insecticides, or other flammable substances.
-
Use a face mask/respirator when spraying and spray in a well ventilated area to prevent health and fire hazards.
-
Do not direct paint or other sprayed material at the compressor. Locate compressor as far away from the spraying area as possible to minimize overspray accumulation on the compressor.
-
When spraying or cleaning with solvents or toxic chemicals, follow the instructions provided by the chemical manufacturer.

Assembly
HOSE AND REGULATOR
Some units do not include a regulator. Purchase a 3/8" hose (1/4" min.) and a regulator that have a minimum rating that exceeds the maximum working pressure of the compressor.
RUBBER FEET
Attach the four rubber feet (using screws supplied) to the cross members under the tanks.
OIL DRAIN EXTENSION
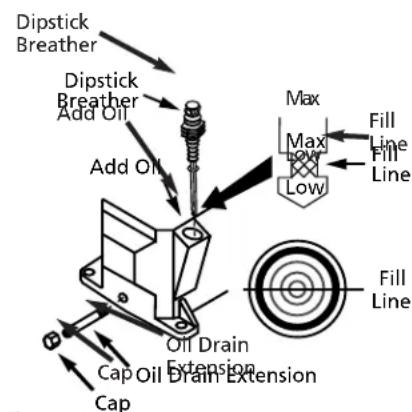
Some models include an oil drain extension and cap (found with the owner's manual). Install the oil drain extension and cap before adding oil to the pump. To avoid oil leaks, it is highly recommended to apply PTFE thread sealant tape or plumber's putty to the threads on each end of the oil drain extension. Screw the cap onto one end of the extension. Remove the oil drain plug from the base of the pump and install the oil drain extension (See Figure 1).
LUBRICATION
ACAUTION
THIS UNIT CONTAINS NO OIL!
Follow lubrication instructions before operating compressor.
Model Oil Capacity (oz.)
VT6131 11.5
All others 12
Ensure oil drain extension has been installed (if included) then remove the dipstick/ breather and fill pump with oil as indicated in the chart. Use single viscosity, ISO 100 (SAE 30), non-detergent compressor oil; Campbell Hausfeld P/N ST125300AV. Do not use a multi-viscosity oil such as 10W-30. Proper oil fill is illustrated in Figure 1.
text_image
Dipstick Breather Dipstick Breather Add Oil Add Oil Max Max Low Fill Line Fill Line Oil Drain Extension Cap Oil Drain Extension CapFigure 1
Assembly (Con't)
WIRING - MODEL VT6131 ONLY
Local electrical wiring codes differ from area to area. Source wiring, plug and protector must be rated for at least the amperage and voltage indicated on your motor nameplate, and meet all electrical codes for this minimum. Use a slow blow fuse type T or a circuit breaker.
ACAUTION
Overheating, short circuiting and fire
damage will result from inadequate wiring.
NOTE: 120 volt, 15 amp units can be operated on a 120 volt 15 amp circuit under the following conditions:
- No other electrical appliances or lights are connected to the same branch circuit.
- Voltage supply is normal.
- Circuit is equipped with a 15 amp circuit breaker or a 15 amp slow blow fuse type T.
If these conditions cannot be met or if nuisance tripping of the current protection device occurs, it may be necessary to operate the compressor from a 120 volt 20 amp circuit. To convert to 240 volt operation, see DUAL VOLTAGE MOTOR (Model VT6131 only).
GROUNDING INSTRUCTIONS
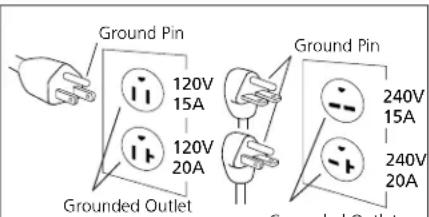
- This product is for use on a nominal 120 volt circuit and has a grounding plug that looks like the plug illustrated in Fig. 2. Make sure the product is connected to an outlet having the same configuration as the plug. This product must be grounded. In the event of an electric short circuit, grounding reduces the risk of electrical shock by providing an escape wire for the electric current. This product is equipped with a cord having a grounding wire with an appro-
PLUG AND CORD GAUGES FOR 120 VOLT OPERATION
Amps Cord Nema Plug
Not more than 15 3 wire 14 Gauge 125V, 15 Amp
Over 15 - 18 3 wire 14 Gauge 125V, 20 Amp
Over 18 - 20 3 wire 12 Gauge 125V, 20 Amp
Over 20 - 25 3 wire 12 Gauge 125V, 30 Amp
priate grounding plug (See Fig. 2). The plug must be plugged into an outlet that is properly installed and grounded in accordance with all local codes and ordinances.
text_image
Ground Pin 120V 15A Grounded Outlet 120V 20A Ground Pin 240V 15A 240V 20A Grounded OutletFigure 2
DANGER
Improper use of grounding plug can result in a risk of electrical shock.
NOTE: Do not use grounding adapter.
- If repair or replacement of the cord or plug is necessary, do not connect the grounding wire to either flat blade terminal. The wire with insulation having an outer surface that is green with or without yellow stripes is the grounding wire.
- Check with a qualified electrician or serviceman if grounding instructions are not completely understood, or if in doubt as to whether the product is properly grounded. Do not modify plug provided; if it will not fit the outlet, have the proper outlet installed by a qualified electrician.

PLUGS AND RECEPTACLES
- If the plug on the electrical cord of the unit is unfamiliar to you or will not fit your particular receptacle, the illustrations in figure 2 will help you understand why by illustrating the different plugs and the voltages they are to be used with.
- Make sure that the product is connected to an outlet having the same configuration as the plug.
- The receptacles must be connected to circuits rated to carry at least the voltage and amperages shown.
- NEVER have a receptacle replaced with one of a higher amperage before determining the change can be made according to all electrical codes affecting your particular area. The installation should be made by a qualified electrician. If the products must be reconnected for use on different types of circuits, the re-connection should be made by qualified personnel.
DUAL VOLTAGE MOTORS (MODEL VT6131 ONLY)
Dual voltage motors may be connected for either 120 volts or 240 volts. By comparing the plug on the cord with the receptacles shown below, you can determine for which voltage your compressor is factory wired.
text_image
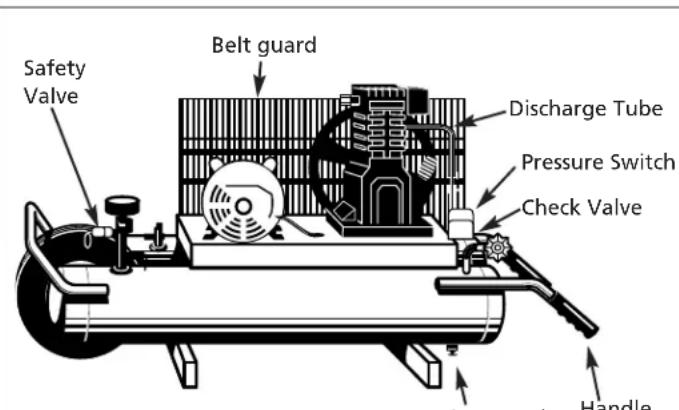
Safety Valve Belt guard Discharge Tube Pressure Switch Check Valve HandleFigure 3
text_image
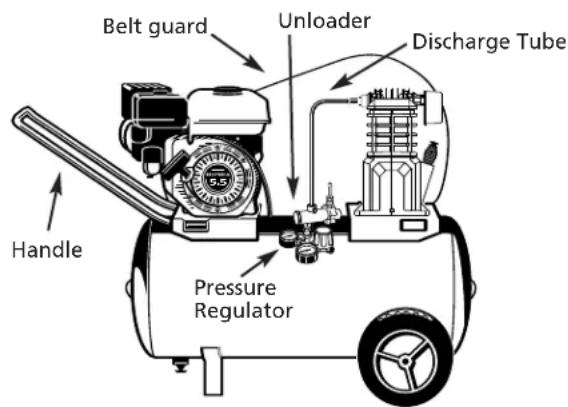
Belt guard Unloader Discharge Tube Handle Pressure RegulatorAssembly (Con't)
AWARNING
All wiring must be completed by a qualified electrician.
To change connections for alternate voltage (Model VT6131 only):
- Disconnect cord from power source.
- Remove motor terminal cover.
- Find connection diagram on back side of the cover or on motor nameplate and reconnect to desired voltage as indicated on diagram.
- Change plug to match voltage and current requirements.
WARNING
When converting to an alternate voltage,
be sure the green ground wire of the cord connects to the ground pin of the plug and to the metal body of the pressure switch.
Operation
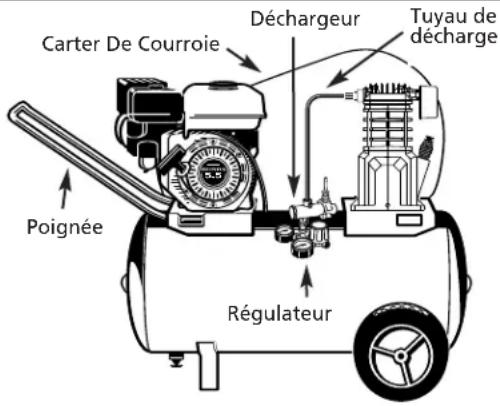
Pressure switch (Electric Models only) - Auto/Off Switch - In the "auto" position, the compressor shuts off automatically when tank pressure reaches the maximum preset pressure. In the "off" position, the compressor will not operate. This switch should be in the "off" position when connecting or disconnecting the power cord from the electrical outlet or when changing air tools.
Regulator - A regulator controls the amount of air pressure released at the hose outlet.
ASME Safety Valve - This valve automatically releases air if the tank pressure exceeds the preset maximum.
Discharge tube - This tube carries compressed air from the pump to the check valve. This tube becomes very hot during use. To avoid the risk of severe burns, never touch the discharge tube.
Check valve - One-way valve that allows air to enter the tank, but prevents air in the tank from flowing back into the compressor pump.
Handle - Designed to move the compressor.
AWARNING
Never use the handle to lift the the ground.
Belt Guard - Covers the belt, motor pulley and flywheel.
Drain Petcock - This valve is located on the bottom of the tank. Use this valve to drain moisture from the tank daily to reduce the risk of corrosion.
Reduce tank pressure below 10 PSI, then drain moisture from tank daily to avoid tank corrosion. Drain moisture from tank(s) by opening the drain petcocks located underneath each tank section.
NOTICE
Before starting the compressor, thor-
oughly read all component instruction manuals, especially the engine manual.
All lubricated compressor pumps discharge some condensed water and oil with the compressed air. Install appropriate water/oil removal equipment and controls as necessary for the intended application.
NOTICE
Failure to install appropriate
water/oil removal equipment may result in damage to machinery or workpiece.
NOTICE
Drain liquid from tank daily.
ACAUTION
Do not attach air tools to open end of
the hose until start-up is completed and unit checks OK.
START-UP - ELECTRIC MODEL VT6131
ACAUTION
Do not attach air tools to open end of
the hose until start-up is completed and the unit checks OK.
- Remove the breather and fill pump with approximately 11.5 oz. of SAE 30 industrial grade air compressor oil (P/N
ST125300AV). - Turn outlet valve counterclockwise to open air flow.
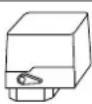
- Move pressure switch lever or
knob to the OFF position and plug in power cord. Move pressure switch to the AUTO position to run the unit.
OFF
AUTO
Figure 5
- Run the unit for 30 minutes, under no load, to break in pump parts.
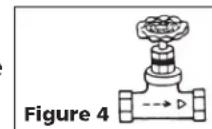
- Turn globe valve clockwise to shut off air flow and move the pressure switch lever or knob to OFF. The compressor is now ready for use.
NOTE: Electric models are equipped with a pressure switch that automatic-
MOISTURE IN COMPRESSED AIR
Moisture in compressed air will form into droplets as it comes from an air compressor pump. When humidity is high or when a compressor is in continuous use for an extended period of time, this moisture will collect in the tank. When using a paint spray or sandblast gun, this water will be carried from the tank through the hose, and out of the gun as droplets mixed with the spray material.
IMPORTANT: This condensation will cause water spots in a paint job, especially when spraying other than water based paints. If sandblasting, it will cause the sand to cake and clog the gun, rendering it ineffective.
A filter or air dryer in the air line, located as near to the gun as possible, will help eliminate moisture.
ly turns the motor OFF when the tank pressure reaches a preset level. After air is used from the tank and drops to a preset low level, the pressure switch automatically turns the motor back on.
START-UP GASOLINE MODELS
ACAUTION
The gas engine does not contain
oil. Add oil per the engine owner's manual before operating.
- Fill engine with oil and gasoline per instructions furnished with engine.
- Remove the compressor dipstick breather and fill pump to the proper oil level. See Lubrication section.
- Turn outlet valve or regulator knob counterclockwise to open air flow.
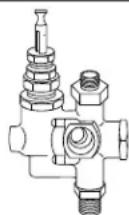
- Turn manual unloader lever up to a vertical position to allow the compressor pump to run without compressing air. (See Figure 6.)
Figure 6 - Unloaded Position
TO START GASOLINE ENGINE
- Move the choke lever to the CHOKE position and turn the stop lever to the ON position.
Operation (Con't)
- Pull start grip lightly until resistance is felt, and then pull briskly.
- As the engine warms up, gradually move the choke lever to the open position. See gas engine manual for more details.
- Run the compressor unloaded for approximately 30 minutes to break in the pump.
- After approximately 30 minutes, move the unloader lever down to the loaded position and turn the regulator knob clockwise (See Figure 7). The compressor will begin to pump air into the tank.
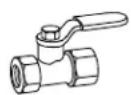
Ball Valve
Loaded Position
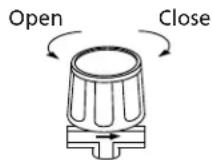
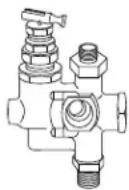
Globe Valve

Air Flow Direction
Figure 7
When maximum tank pressure is reached, the compressor automatically unloads, bringing the engine to idle. The engine remains at idle until tank pressure falls to a preset level. The engine then accelerates and the compressor pumps additional air into the tank.
Maintenance
AWARNING
Release all pressure from the system before attempting to install, service, relocate or perform any maintenance.
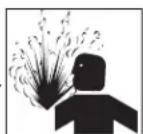
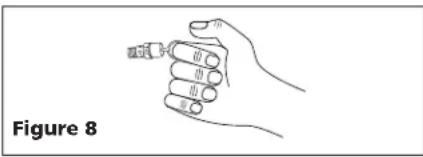
In order to maintain efficient operation of the compressor system, check the air filter, oil level and gasoline level before each use. The ASME safety valve should also be checked daily. Pull ring on safety valve and allow the ring to snap back to normal position. This valve automatically releases air if the tank pressure exceeds the preset maximum. If air leaks after the ring has been released, or the valve is stuck and cannot be actuated by
the ring, the ASME safety valve must be replaced.
natural_image
Line drawing of a hand holding a small object, labeled 'Figure 8' (no other text or symbols)ADANGER
Do not attempt to tamper with the
ASME safety valve.
With engine OFF, clean debris from engine, flywheel, tank, air lines and pump cooling fins.
TANK
ADANGER
Never attempt to repair or modify a tank! Welding, drilling or any other modification will weaken the ta in damage from rupture or Always replace worn, crack aged tanks.

NOTICE
Drain liquid from tank daily.
The tank should be carefully inspected at a minimum of once a year. Look for cracks forming near the welds. If a crack is detected, remove pressure from tank immediately and replace.
DRIVE BELT
Belts stretch is a result of normal use. When properly adjusted, the belt deflects about 1/2" with five pounds of pressure applied midway between the engine pulley and pump (See Figure 9).
1/2" Deflection
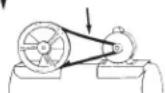
Figure 9
To adjust drive belt tension:
- Remove belt guard and loosen engine brace.
- Loosen the four fasteners holding the engine to the baseplate.
- Shift the motor in the proper direction. The belt must be properly aligned when adjustment is made.
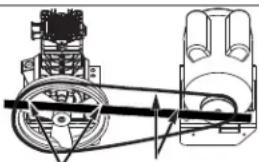
- To align belt, lay a straight edge against the face of the flywheel, touching the rim at two places (See Figure 10).
natural_image
Mechanical assembly diagram showing a wheel and gear mechanism (no text or labels)Touch Rim in Two Places
Straight Edge
Parallel With Belt
Figure 10
- Adjust flywheel or motor pulley so that the belt runs parallel to the straight edge.
- Use a gear puller to move the pulley on the shaft and tighten fasteners.
- Adjust brace and reinstall.
STORAGE
- When not in use, hose and compressor should be stored in a cool, dry place.
- Tanks should be drained of moisture. Hose should be disconnected and hung with open ends down to allow any moisture to drain.
MAINTENANCE SCHEDULE
Operation Daily Weekly Monthly 3 Months
Check Oil Level ●
Drain Tank ●
Check Air Filter ●
Check Safety Valve ●
Blow Dirt From Inside Motor ●
Check Belt Tightness ●
Change Oil ●
Troubleshooting Chart
(SEE GAS ENGINE MANUAL FOR ADDITIONAL INSTRUCTIONS)
| Symptom Possible Cause(s) Corrective Action | ||
| Low discharge pressure | 1. Air leaks2. Leaking valves | 1. Listen for escaping air. Apply soap solution to all fittings and connections. Bubbles will appear at points of leakage. Tighten or replace leaking fittings or connections2. Remove head and inspect for valve breakage, weak valves, scored valve seats, etc. Replace defective parts and reassemble |
| ACAUTIONBe sure that the old head gasket is replaced with a new one each time the head is removed3. Clean the air filter element4. Loosen motor clamping bolts and move the motor in a direction away from the compressor, being sure that the motor pulley is perfectly aligned with the flywheel. Tighten motor clamping bolts. The belt should deflect about 1/2" under 5-lbs of force. Do not "roll" belts over pulleys5. Replace any gaskets proven faulty on inspection6. Low pressure can be due to worn rings and cylinder walls. Correction is made by replacing the rings, cylinders, and pistons as required | ||
| 3. Restricted air intake4. Slipping belts5. Blown gaskets6. Low compression | ||
| Overheating | 1. Poor ventilation2. Dirty cooling surfaces | 1. Relocate the compressor to an area where an ample supply of cool, clean, dry and well-circulated air is available2. Clean the cooling surfaces of pump and motor/engine |
| Excessive belt wear | 1. Pulley out of alignment2. Belt too loose or too tight3. Belt slipping4. Pulley wobbles | 1. Realign motor pulley with compressor pulley2. Adjust tension (See Drive Belt Section)3. Adjust tension or replace belt (See Drive Belt Section)4. Check for worn crankshaft, keyway or pulley bore resulting from running the compressor or motor with loose pulleys. Check for bent pulleys or bent crankshaft |
| Unit stallsNOTE: Electric models are equipped with a pressure switch that automatically turns the motor OFF when the tank pressure reaches a preset level. After air is used from the tank and drops to a preset low level, the pressure switch automatically turn the motor back on | 1. Overloaded motor2. Improper lubrication3. Low oil level4. Defective check valve | 1. Have certified electrician check the motor and wiring, then proceed with his/her recommendations. Check motor voltage connection2. See LUBRICATION, under Assembly3. Check oil level. Fill if necessary4. Replace |
| Excessive noise (knocking) | 1. Loose motor or compressor pulley2. Lack of oil in crankcase3. Worn connecting rod4. Worn piston pin bushing5. Worn bearings6. Piston hitting the valve plate7. Noisy check valve | 1. Loose motor or compressor pulleys are a very common cause of compressors knocking. Tighten pulley clamp bolts and set-screws2. Check for proper oil level; if low, check for possible damage to bearings. Dirty oil can cause excessive wear3. Replace connecting rod4. Remove piston assemblies from the compressor and inspect for excess wear. Replace excessively worn piston pin or pistons, as required5. Replace worn bearings and change oil6. Remove the compressor head and valve plate and inspect for carbon deposits or other foreign matter on top of piston. Replace head and valve plate using new gasket7. Replace |
| Oil in the discharge air | 1. Worn piston rings2. Compressor air intake restricted3. Restricted breather4. Excessive oil in compressor5. Wrong oil viscosity6. Connecting rod out of alignment | 1. Replace with new rings2. Clean filter. Check for other restrictions in the intake system3. Clean and check breather for free operation4. Drain down to full level5. Use SAE 30 (ISO 100) non-detergent compressor oil6. Replace rod |
| Air leaking from unloader on pressure switch | Check valve stuck in open position | Remove and replace check valve |
Limited Warranty
-
DURATION: From the date of purchase by the original purchaser as follows: Standard Duty - One Year; Serious Duty - Two Years; Extreme Duty - Three Years; Maxus Model Series - Five Years.
-
WHO GIVES THIS WARRANTY (WARRANTOR):
Campbell Hausfeld / Scott Fetzer Company, 100 Production Drive, Harrison, Ohio, 45030, Telephone: (800) 543-6400
-
WHO RECEIVES THIS WARRANTY (PURCHASER): The original purchaser (other than for purposes of resale) of the Campbell Hausfeld compressor.
-
WHAT PRODUCTS ARE COVERED BY THIS WARRANTY: Any Campbell Hausfeld air compressor.
-
WHAT IS COVERED UNDER THIS WARRANTY: Substantial defects due to material and workmanship with the exceptions noted below.
-
WHAT IS NOT COVERED UNDER THIS WARRANTY:
A. Implied warranties, including those of merchantability and FITNESS FOR A PARTICULAR PURPOSE ARE LIMITED FROM THE DATE OF ORIGINAL PURCHASE AS STATED IN THE DURATION. If this compressor is used for commercial, industrial or rental purposes, the warranty will apply for ninety (90) days from the date of purchase. Extreme Duty Contractor Compressors are not limited to a ninety (90) day warranty when used in contractor applications. Four cylinder single-stage and two-stage compressors are not limited to a ninety (90) day warranty when used in commercial or industrial applications. Some States do not allow limitations on how long an implied warranty lasts, so the above limitations may not apply to you.
B. ANY INCIDENTAL, INDIRECT, OR CONSEQUENTIAL LOSS, DAMAGE, OR EXPENSE THAT MAY RESULT FROM ANY DEFECT, FAILURE, OR MALFUNCTION OF THE CAMPBELL HAUSFELD PRODUCT. Some States do not allow the exclusion or limitations of incidental or consequential damages, so the above limitation or exclusion may not apply to you.
C. Any failure that results from an accident, purchaser's abuse, neglect or failure to operate products in accordance with instructions provided in the owner's manual(s) supplied with compressor.
D. Pre-delivery service, i.e. assembly, oil or lubricants, and adjustment.
E. Items or service that are normally required to maintain the product, i.e. lubricants, filters and gaskets, etc.
F. Gasoline engines and components are expressly excluded from coverage under this limited warranty. The Purchaser must comply with the warranty given by the engine manufacturer which is supplied with the product.
G. Additional items not covered under this warranty:
- All Compressors
a. Any component damaged in shipment or any failure caused by installing or operating unit under conditions not in accordance with installation and operation guidelines or damaged by contact with tools or surroundings.
b. Pump or valve failure caused by rain, excessive humidity, corrosive environments or other contaminants.
c. Cosmetic defects that do not interfere with compressor functionality.
d. Rusted tanks, including but not limited to rust due to improper drainage or corrosive environments.
e. Electric motors, check valves and pressure switches after the first year of ownership.
f. Drain cocks.
g. Damage due to incorrect voltage or improper wiring.
h. Other items not listed but considered general wear parts.
i. Pressure switches, air governors and safety valves modified from factory settings.
- Lubricated Compressors
a. Pump wear or valve damage caused by using oil not specified.
b. Pump wear or valve damage caused by any oil contamination or by failure to follow proper oil maintenance guidelines.
- Belt Drive / Direct Drive / Gas Driven Compressors
a. Belts.
b. Ring wear or valve damage from inadequate filter maintenance.
c. Manually adjusted load/unload and throttle control devices.
-
RESPONSIBILITIES OF WARRANTOR UNDER THIS WARRANTY: Repair or replace, at Warrantor's option, compressor or component which is defective, has malfunctioned and/or failed to conform within duration of the warranty period.
-
RESPONSIBILITIES OF PURCHASER UNDER THIS WARRANTY:
A. Provide dated proof of purchase and maintenance records.
B. Portable compressors or components must be delivered or shipped to the nearest Campbell Hausfeld Authorized Service Center. Freight costs, if any, must be borne by the purchaser.
C. Use reasonable care in the operation and maintenance of the products as described in the owner's manual(s).
- WHEN WARRANTOR WILL PERFORM REPAIR OR REPLACEMENT UNDER THIS WARRANTY: Repair or replacement will be scheduled and serviced according to the normal work flow at the servicing location, and depending on the availability of replacement parts.
This Limited Warranty applies in the U.S., Canada and Mexico only and gives you specific legal rights. You may also have other rights which vary from State to State or country to country.
Notes
Please read and save these instructions. Read carefully before attempting to assemble, install, operate or maintain the product described. Protect yourself and others by observing all safety information. Failure to comply with instructions could result in personal injury and/or property damage! Retain instructions for future reference.
Figure 3
Robinet De Purge
Please read and save these instructions. Read carefully before attempting to assemble, install, operate or maintain the product described. Protect yourself and others by observing all safety information. Failure to comply with instructions could result in personal injury and/or property damage! Retain instructions for future reference.


