
SKSDV3012MT - Oven SKS - Free user manual and instructions
Find the device manual for free SKSDV3012MT SKS in PDF.


| Brand | SKS |
| Model | SKSDV3012MT |
| Product Type | Built-in Oven |
| Cavities | Double oven (upper and lower) |
| Oven Volume | Not specified in the manual (estimated: approximately 92 L for the upper oven, 46 L for the lower oven based on similar models) |
| Control Panel | LCD touchscreen with icons |
| Cooking Functions | Bake, Convection Bake, Convection Roast, Air Fry, RapidHeat Roast, Broil, Warm, Proof, Probe, Steam, Sous Vide, Combination Cook, Auto Cook, My Recipe |
| Power Supply | Electric (not specified in detail, estimated 240 V per standard) |
| Built-in Wi-Fi | Yes (compatible with LG ThinQ) |
| Built-in Camera | Yes (upper oven only) |
| InstaView Function | Yes (knock twice to see inside) |
| Control Lockout | Yes |
| Sabbath Mode | Yes |
| Self-Cleaning | Self Clean and Speed Clean |
| Water Tank for Steam | Yes (removable) |
| Meat Probe | Included (upper oven only) |
| Included Accessories | Heavy-duty racks (2), offset rack, sliding racks (4), broiler pan, grill, air fry basket, meat probe, manuals |
| Dimensions (approx.) | Width 76.2 cm, height 93 cm, depth 60 cm (estimated standard double oven) |
| Weight (approx.) | Approximately 90 kg (estimated for double oven) |
| Warranty | 3 years parts and labor (Canada) |
Frequently Asked Questions - SKSDV3012MT SKS
User questions about SKSDV3012MT SKS
0 question about this device. Answer the ones you know or ask your own.
Ask a new question about this device
Download the instructions for your Oven in PDF format for free! Find your manual SKSDV3012MT - SKS and take your electronic device back in hand. On this page are published all the documents necessary for the use of your device. SKSDV3012MT by SKS.
USER MANUAL SKSDV3012MT SKS
Read this owner's manual thoroughly before operating the appliance and keep it handy for reference at all times.
ENGLISH
SKSDV3012MT
74 Smart Diagnosis TM Feature
74 Using LG ThinQ to Diagnose Issues
74 Using Audible Diagnosis to Diagnose Issues
76 MAINTENANCE
76 Cleaning
76 Interior
76 Exterior
77 SpeedClean
79 Self Clean
81 Cleaning the Steam Feeder Tank
82 Cleaning Scale on Oven Bottom
82 Drying the Oven Interior (Upper Oven Only)
83 Using Evaporation Function
83 Periodic Maintenance
83 Changing the Oven Light
84 TROUBLESHOOTING
84 FAQs
84 Frequently Asked Questions
86 Before Calling for Service
86 Cooking
88 Parts & Features
89 Noises
89 Wi-Fi
90 LIMITED WARRANTY
90 USA
90 TERMS AND CONDITIONS
90 THIS LIMITED WARRANTY DOES NOT COVER
91 PROCEDURE FOR RESOLVING DISPUTES
93 CUSTOMER ASSISTANCE INFORMATION
93 CANADA
93 TERMS AND CONDITIONS
94 THIS LIMITED WARRANTY DOES NOT COVER
95 PROCEDURE FOR RESOLVING DISPUTES
4 IMPORTANT SAFETY INSTRUCTIONS
IMPORTANT SAFETY INSTRUCTIONS
READ ALL INSTRUCTIONS BEFORE USE
Safety Messages
Your safety and the safety of others are very important.
We have provided many important safety messages in this manual and on your appliance. Always read and follow all safety messages.

This is the safety alert symbol.
This symbol alerts you to potential hazards that can kill or injure you and others. All safety messages will follow the safety alert symbol and either the word WARNING or CAUTION.
These words mean:

WARNING
You may be killed or seriously injured if you do not follow instructions.

CAUTION
You may be injured or cause damage to the product if you do not follow instructions.
All safety messages will tell you what the potential hazard is, tell you how to reduce the chance of injury, and tell you what may happen if the instructions are not followed.
WARNING

WARNING
- To reduce the risk of explosion, fire, death, electric shock, injury or scalding to persons when using this product, follow basic precautions, including the following:
Installation
- Never allow anyone to climb, sit, stand or hang on the oven door. Injury might result from contact with hot food or the oven itself.
- Do not line the oven walls, racks, bottom, or any other part of the oven with aluminum foil or any other material. Doing so will disrupt heat distribution, produce poor baking results and cause permanent damage to the oven interior. (Aluminum foil will melt on the interior surface of the oven.)
- Do not use aluminum foil or any other material to line the oven bottom. Improper installation of oven liners may result in a risk of electric shock or fire.
- Make sure your appliance is properly installed and grounded by a qualified installer, according to the installation instructions. Any adjustment and service should be performed only by qualified installers or service technicians.
- Be certain that all packing materials are removed from the appliance before operating. Keep plastic, clothes, paper, and other flammable materials away from parts of the appliance that may become hot.
- The electrical power must be shut off while the electrical connections are being made.
- Improper connection of aluminum house wiring to copper leads can result in an electrical hazard or fire. Use only connectors designed for joining copper to aluminum and follow the manufacturer's recommended procedure closely.
- Important - Save for the local electrical inspector's use
Operation
- DO NOT TOUCH HEATING ELEMENTS OR INTERIOR SURFACES OF OVEN. Heating elements may be hot even though they are dark in color. Interior surfaces of an oven become hot enough to cause burns. During and after use, do not touch or let clothing or other flammable materials contact heating elements or interior surfaces of oven until they have had sufficient time to cool. Other surfaces, such as oven vent openings and surfaces near these openings, oven doors, and windows of oven doors, also get hot and may cause burns if not allowed to cool.
- Use care when opening door. The hot air and steam that escape can cause burns to hands, face and eyes. Let hot air or steam escape from the oven before removing or replacing food in the oven.
- Do not use plastic to cover food. Use foil or oven-safe lids only.
- Never attempt to dry a pet in the oven.
- Never use your appliance for warming or heating the room.
- Always use pot holders or oven mitts when removing food from an oven or cooktop. Cookware will be hot. Use only dry pot holders. Moist or damp pot holders on hot surfaces may result in burns from steam. Do not let the pot holder touch hot heating elements. Do not use a towel or other bulky cloth to remove food.
- Do not heat unopened food containers. Pressure in the containers may cause them to burst which may result in injury.
- Do not allow aluminum foil or the temperature probe to contact heating elements.
- Do not touch the oven racks while they are hot.
- Only arrange oven racks when the oven is cool. If a rack must be moved while the oven is hot, do not let the pot holder contact the hot heating element in the oven.
- Pull the oven rack to the stop-lock position when loading and unloading food from the oven. This helps prevent burns caused by touching hot surfaces of the door and oven walls.
- Do not use the oven if a heating element develops a glowing spot during use or shows other signs of damage. A glowing spot indicates the heating element may fail and present a potential burn, fire, or shock hazard. Turn the oven off immediately and have the heating element replaced by a qualified service technician.
- Do not leave children alone or unsupervised near the appliance when it is in use or is still hot. Children should never be allowed to sit or stand on any part of the appliance as they could be injured or burned.
- DO NOT block the oven vent during operation. This can damage the electric parts of the oven. Air must be able to move freely. The bottom vent trim should be properly assembled on the front bottom of oven before installing the oven door.
- Do not put large, heavy items such as whole turkeys on the open oven door.
Take care when the door is open to avoid injury. - If the door or door seals are damaged, the oven must not be operated until it has been repaired by a competent person.
- Do not allow children to crawl into the oven.
- Do not put your hand under the controller or between the door and bottom vent trim during operation. The outside of the oven can become very hot to the touch.
Maintenance
- Let hot cookware and utensils cool in a safe place, out of reach of small children.
- If the door glass, surface, or oven heating unit of the appliance are damaged, discontinue use of the appliance and call for service.
- Always disconnect power from the appliance before servicing.
- Before replacing the oven light, switch off the electrical power to the oven at the main fuse or circuit breaker panel.
- Never pour cold water over a hot oven for cleaning purposes.
6 IMPORTANT SAFETY INSTRUCTIONS
- Do not clean with metal scouring pads. Pieces can burn off the pad and touch electrical parts causing a risk of electric shock.
- Do not store any materials, other than manufacturer's recommended accessories, in this oven when not in use.
- Do not cover racks or any other part of the oven with metal foil. This will cause overheating of the oven.
- If the self-cleaning mode malfunction light goes on, or if the audible signal sounds, turn off or disconnect the appliance from the power supply and have it serviced by a qualified technician.
- If the oven is heavily soiled with oil, self-clean the oven before using the oven again. The oil could cause a fire.
- If there is a fire in the oven during self-clean, turn the oven off and wait for the fire to go out. Do not force the door open. Introduction of fresh air at self-clean temperatures may lead to a burst of flame from the oven. Failure to follow this instruction may result in severe burns.
- If your oven is dropped or damaged, have it thoroughly checked by a qualified service technician before using it.
Risk of Fire and Flammable Materials
- Do not store or use flammable material in or near the oven. Flammable materials include paper, plastic, pot holders, linens, wall coverings, curtains, and gasoline or other flammable vapors and liquids such as grease or cooking oil. These materials can be ignited when the oven is in use.
- Use extreme caution when moving or disposing of hot grease.
- Wear proper apparel. Do not wear loose-fitting or hanging garments, which may ignite if they contact hot surfaces, and cause severe burns.
- Do not use the oven for drying clothes. Only use the oven for its intended purpose.
- If cabinet storage is provided directly above the oven, use it to store items that are not frequently used and can be safely stored in an area subjected to heat. Temperatures may be unsafe for volatile items such as flammable liquids, cleaners or aerosol sprays.
- Do not use water on grease fires. Should an oven fire occur, leave the oven door closed and turn the oven off. If the fire continues, throw baking soda on the fire or use a fire extinguisher. Do not put water or flour on the fire. Flour may be explosive and water can spread a grease fire and cause personal injury.
Safety Standard for Button Cell or Coin Batteries
WARNING
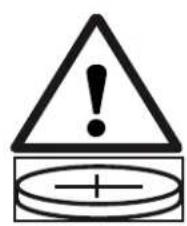
- INGESTION HAZARD: This product contains a button cell or coin battery.
- DEATH or serious injury can occur if ingested.
- A swallowed button cell or coin battery can cause Internal Chemical Burns in as little as 2 hours.
- KEEP new and used batteries OUT OF REACH of CHILDREN.
- Seek immediate medical attention if a battery is suspected to be swallowed or inserted inside any part of the body.
- Remove and immediately recycle or dispose of used batteries according to local regulations and keep away from children.
- Do NOT dispose of batteries in household trash or incinerate.
Even used batteries may cause severe injury or death. - Call a local poison control center for treatment information.
- Non-rechargeable batteries are not to be recharged.
- Do not force discharge, recharge, disassemble, heat above 140^ (60^) or incinerate.
- Doing so may result in injury due to venting, leakage or explosion resulting in chemical burns.
- Product contains non-replaceable batteries.
- Battery Type: MS621FE
Nominal Voltage : 3.0 V

CAUTION

CAUTION
- To reduce the risk of minor injury to persons, malfunction, or damage to the product or property when using this product, follow basic precautions, including the following:
Operation
- Always heat fat slowly, and watch as it heats.
- If frying combinations of oils and fats, stir them together before heating.
- Use a deep fat thermometer, if possible, to prevent overheating fat beyond the smoking point.
- Use the least possible amount of fat for effective shallow or deep-fat frying. Filling the pan with too much fat can cause spillovers when food is added.
- Accessible parts may become hot when the grill is in use.
- Do not place food or cookware on the bottom of the oven cavity. Doing so will cause permanent damage to the oven bottom finish.
- When using cooking or roasting bags in the oven, follow the manufacturer's directions.
- To protect against food-borne illnesses, cook meat and poultry thoroughly. The USDA has indicated the following as safe minimum internal temperatures for consumption:
Ground beef: 160^ (71°C)
- Poultry: 165^ F (74°C)
- Beef, veal, pork, or lamb: 145^ (63°C)
- Fish/seafood: 145^ (63°C)
- Do not use this oven for commercial purposes. It is made for household use only.
- The door or the outer surface may get hot when the appliance is operating.
- Do not use this oven for purposes other than cooking.
- Use caution if opening the door when the oven is operating. Hot surfaces can cause serious burns.
Maintenance
- Do not repair or replace any part of the appliance unless specifically recommended in the manual. All other servicing should be performed by a qualified technician.
- Do not use harsh, etching, abrasive cleaners or sharp metal scrapers to clean the oven door glass since they can scratch the surface. Scratches may cause the glass to shatter.
- Make sure oven lights are cool before cleaning.
- Do not clean the door gasket. The door gasket is essential for a good seal. Care should be taken not to rub, damage, or move the gasket.
- Never keep pet birds in the kitchen. The health of birds is extremely sensitive to the fumes released during an oven self-clean cycle. Fumes may be harmful or fatal to birds. Move birds to a well-ventilated room.
- Do not rinse trays and racks by placing them in water just after cooking. This may cause breakage or damage.
- The oven should be cleaned regularly and any food deposits should be removed. Failure to maintain the oven in a clean condition could lead to deterioration of the surface that could shorten the life of the appliance and possibly result in a hazardous situation.
- Clean in the self-clean cycle only parts listed in this manual. Before self-cleaning the oven, remove the broiler pan, all oven racks, the meat probe and any utensils or food from the oven.
- Do not store items of interest to children on the back guard or in cabinets above a cooking appliance. Children climbing on the oven to reach items could be seriously injured.
ENGLISH
10 PRODUCT OVERVIEW
PRODUCT OVERVIEW
Product Features
The appearance and specifications listed in this manual may vary due to constant product improvements.
Make sure to understand the name and function of each part.
Exterior/Interior
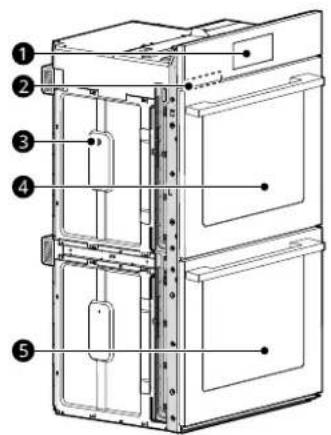
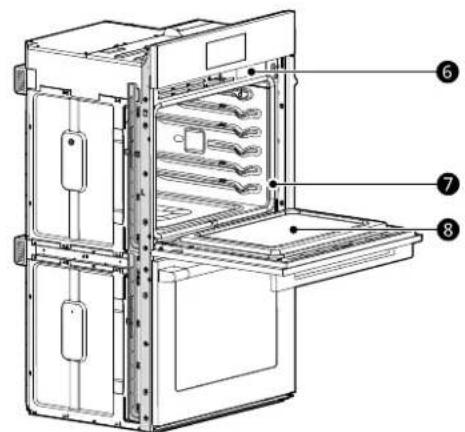
| 1 | Oven Controller | 5 | Lower Oven Door |
| 2 | Rating Label, Model and Serial Number Plate | 6 | Steam Feeder Tank |
| 3 | Spacer (2 per oven), one on each side | 7 | Gasket (1 per oven) |
| 4 | Upper Oven Door | 8 | Camera (Upper Oven Only) |
NOTE
- The model and serial number can be verified at the rating label.
Accessories
Accessories for Cooking
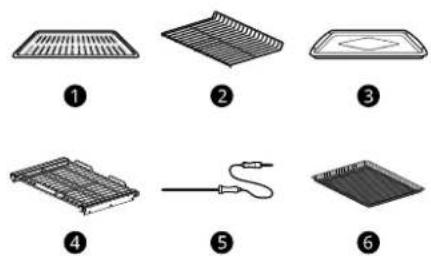
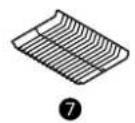
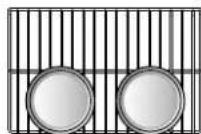
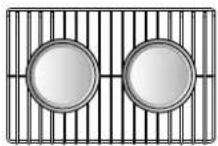
Grid (1 ea)
2Heavy Duty Rack (2 ea)
Broiler Pan (1 ea)
4Gliding Rack (4 ea)
Meat Probe (1 ea)
6Air Fry Rack (1 ea)
Offset Rack (1 ea)
separately purchased, unauthorized components or parts.
- The images in this guide may be different from the actual components and accessories, which are subject to change by the manufacturer without prior notice for product improvement purposes.
- Remove accessories from the base packing before disposing of it. The gliding racks are wrapped separately for the top and bottom ovens.
Accessories for Installation
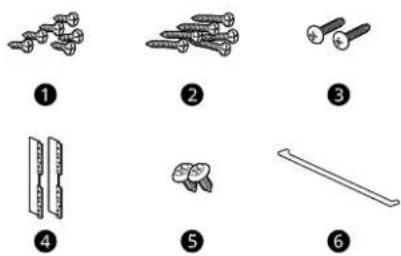
4x14 Wood Screws for Mounting (6 ea) (4 needed for installation and 2 extras)
23x27 Wood Screws for Mounting for Flush Installation (6 ea)
34x22 Self-Tapping Screws for Cover Bracket (2ea)
4 Cover Brackets for Flush Installation (2 ea)
4x10 Screws for Bottom Decorative Trim (2 ea)
Bottom Decorative Trim (1 ea)
Manuals
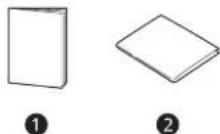
Owner's Manual (1 ea)
2 Installation Manual (1 ea)
NOTE
- Contact SKS Customer Service if any accessories are missing.
- For your safety and for extended product life, only use authorized components.
The manufacturer is not responsible for product malfunction or accidents caused by the use of
12 OPERATION
OPERATION
Operating Control Panel
Control Panel Features

LCD Display On/Off
LCD Touchscreen for Oven
Display Icons
Icons appear in display when activated.
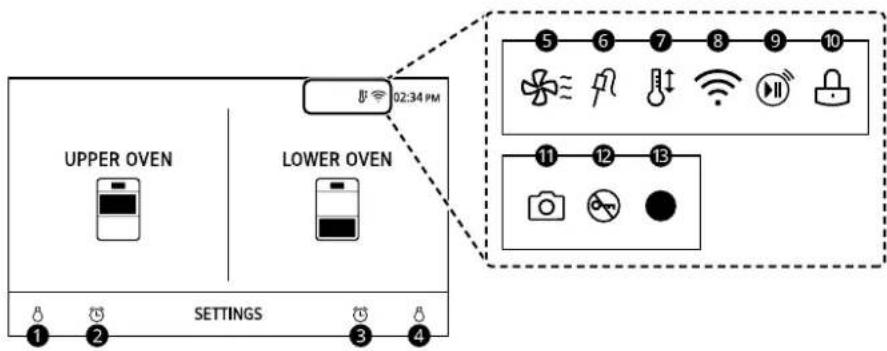
| ① Lamp Icon (Upper Oven) Press to turn light on/off | |
| ② Timer Icon (Upper Oven) Press to set a timer | |
| ③ Timer Icon (Lower Oven) Press to set a timer | |
| ④ Lamp Icon (Lower Oven) Press to turn light on/off | |
| ⑤ Oven Cooling Icon Appears during or after oven operation to indicate cooling fan is running in oven | |
| ⑥ Probe Icon Appears when probe is connected | |
| ⑦ Auto Conversion Icon Appears when Convection Auto Conversion is turned on | |
| Wi-Fi Icon • Appears when oven is connected to Wi-Fi • Appears when oven is disconnected from Wi-Fi or is not connected in application | |
| Remote Start Icon Appears when Remote Start is active | |
| Lock Icon Appears when Control Lock is on | |
| Camera Icon Appears when Camera is on | |
| Door Lock Icon Appears when Door Lock is on | |
| Recording Icon Appears when the camera is recording | |
ENGLISH
Energy Saving Tips
- Multiple-rack cooking saves time and energy. Whenever possible, cook foods requiring the same cooking temperature together in one oven.
- For optimal performance and energy savings, follow the guides for proper rack and pan placement.
- Reduce energy use by cleaning light oven soil with the SpeedClean feature instead of self-clean.
- Avoid opening the oven door more than necessary during use. This helps the oven maintain temperature, prevents unnecessary heat loss, and saves on energy use.
Changing Settings
Getting Started
After turning on the oven for the first time, adjust the settings to suit your preferences.
1 Press POWER on the LCD display.
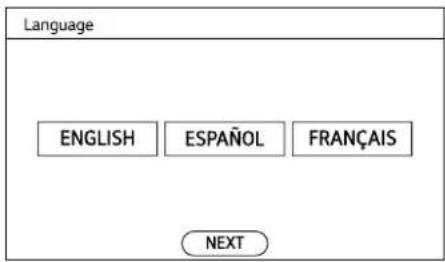
2 After the startup animation, select the desired language and press NEXT.
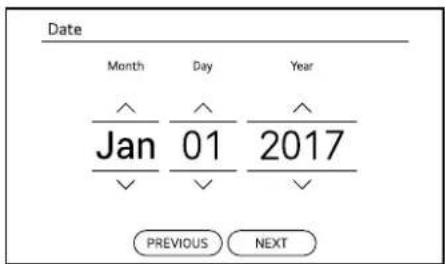
3 Scroll the fields up or down to set the correct date and press NEXT.
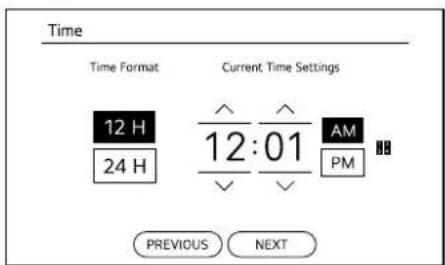
4 Set the correct time of day and choose between a 12-hour or 24-hour time format. Then press NEXT.
14 OPERATION
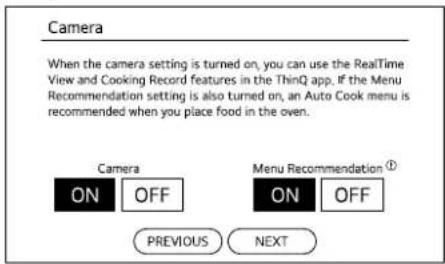
5 Select Camera ON or OFF. If ON is selected, select Menu Recommendation ON or OFF, and press NEXT.
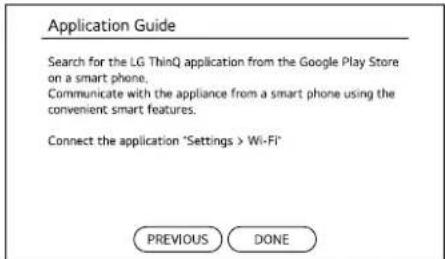
6 Read through the application guide in the display and press DONE.
7 The mode screen appears in the display.
Settings
To adjust settings after the initial setup, press the display to open the Main screen. Press SETTINGS at the bottom center of the Main screen.
Swipe the screen or press the < > arrow keys to navigate through the Settings screens.
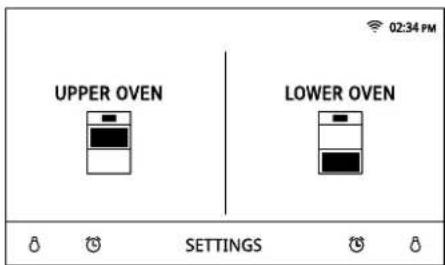
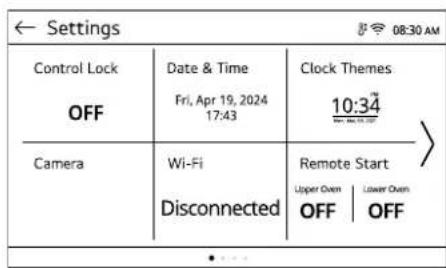
Location of Settings
Page 1: Control Lock, Date & Time, Clock Themes, Camera, Wi-Fi, Remote Start
Page 2: Sabbath, Brightness, InstaView, Display, Convection Auto Conversion, Language
Page 3: Volume, Preheat End Light, Temperature Adjustment, Temperature Units, Smart Diagnosis, Factory Data Reset
- Page 4: Open Source License
Control Lock
The Control Lock feature automatically prevents most oven controls from being turned on. It does not disable the clock or timer and the interior light is turned off.
Lock
1 Press SETTINGS at the center bottom of the Main screen.
2 Press Control Lock on the first Settings screen.
3 Press LOCK.
4 When Control Lock is turned on, the lock icon appears at the top of the display.
Unlock
1 Press any part of the screen while Control Lock is on.
2 A popup screen appears. Press UNLOCK for 3 seconds.
3 The lock icon disappears from the top of the display.
Date & Time
The date and time show in the LCD display when the ovens are not in use.
Setting Date
1 Press SETTINGS at the center bottom of the Main screen. Then press Date & Time on the Settings screen.
2 Press Date, and scroll to set the correct date.
3 Press OK.
Setting Time of Day
1 Press SETTINGS at the center bottom of the Main screen. Then press Date & Time on the Settings screen.
2 Press Time, and scroll to set the correct hour and minutes. You can also press the number pad icon and enter the desired numbers.
| Number pad icon |
3 Select either a 12-hour or 24-hour clock mode (12H/24H).
4 Press OK.
Clock Themes
There are six different clock themes available, including several analog and digital clocks.
Setting Clock Themes
1 Press SETTINGS at the center bottom of the Main screen.
2 Press Clock Themes on the first Settings screen and swipe to browse through the clock themes.
3 Select a clock theme and press OK.
Camera
The Camera, Menu Recommendation, RealTime View and Cook Record functions are available. The appliance must be connected to a home Wi-Fi network and the LG ThinQ application to use the RealTime View and Cook Record functions.
Setting Camera
1 Press SETTINGS at the center bottom of the Main screen, and press Camera in the first Settings screen.
2 Select ON or OFF on the left side and press OK.
3 If ON is selected, the Camera icon 1 appears at the top of the display.
| 1 |
Setting Menu Recommendation
1 Press SETTINGS at the center bottom of the Main screen, and press Camera in the first Settings screen.
2 Select ON or OFF on the right side and press OK.
Wi-Fi
Connect the appliance to a home Wi-Fi network to use Remote Start and other smart functions. See the Smart Functions section for more details.
Setting Up Wi-Fi
1 Press SETTINGS at the center bottom of the Main screen, and press Wi-Fi in the first Settings screen.

16 OPERATION
2 Follow the instructions in the Wi-Fi Guide in the display.
3 Select ON, OFF, or SET UP and press OK.
4 If ON is selected, the Wi-Fi icon appears at the top of the display.
5 Selecting RESET initializes the IP address.
Remote Start
Remotely starts or stops any manual cooking mode on the appliance. The appliance must be connected to a home Wi-Fi network to use Remote Start.
Setting Remote Start
1 Press SETTINGS at the center bottom of the Main screen, and press Remote Start in the first Settings screen.
2 Select ON or OFF and press OK.
3 If ON is selected, the Remote Start icon appears at the top of the display.
| Remote Start icon |
Sabbath Mode
Sabbath Mode is used on the Jewish Sabbath and Holidays.
While the oven is in Sabbath Mode, the temperature cannot be changed and the timer, light, and alarm functions are disabled. Only the cooking mode and set temperature appear in the display.
On double wall ovens, either oven or both ovens can be put in Sabbath Mode.
NOTE
- If the oven light is turned on and the Sabbath Mode is active, the oven light will turn off. Sabbath Mode can only be used in Bake mode.
Setting Sabbath Mode
1 Disconnect the probe. The Probe function is not available in Sabbath Mode.
2 Press SETTINGS at the center bottom of the Main screen, swipe to the second Settings screen, and press Sabbath.
3 Read the instructions, if needed, and select one of the ovens.
4 Set the desired temperature and cook time. Any cook time can be set from 1 minute to 73 hours 59 minutes. If only using one oven, press START.
5 If using both ovens, set the temperature and cook time for the second oven before pressing START.
6 To stop Sabbath Mode, press POWER on the LCD display.
NOTE
- If a cook time is set, the oven turns off automatically at the end of the cook time, without chiming. The oven remains in Sabbath Mode, but is turned off.
- If no cook time is set, the oven will not automatically turn off.
After a power failure, the display will turn back on in Sabbath Mode, but the oven will be off.
Brightness
Adjust the brightness of the LCD display from 20% to 100% in increments of 20% .
Setting Display Brightness
1 Press SETTINGS at the center bottom of the Main screen, swipe to the second Settings screen, and press Brightness.
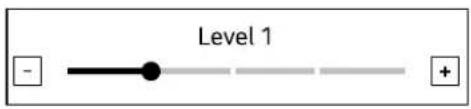
2 Adjust the display brightness by pressing and dragging the dot across the bar, by tapping anywhere on the bar, or by pressing + or -
3 Press OK.
Instaview
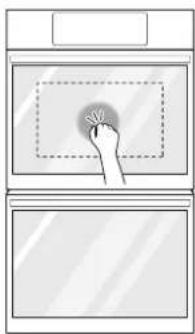
Knock twice on the center of the glass panel to reveal the contents of the oven without opening the door.
CAUTION
- Do not hit the glass door panel with excessive force. Do not allow hard objects like cookware or glass bottles to hit the glass door panel. The glass could break, resulting in a risk of personal injury.
NOTE
- Knocking twice on the glass panel turns the interior light on or off.
- The light does not turn off automatically.
- The InstaView function is disabled when the oven door is opened and for one second after closing the door.
- The InstaView function is disabled during Self Clean, Control Lock, Sabbath Mode and initial power input (on some models only).
- Tapping the edges of the glass panel may not activate the InstaView function.
-
The taps on the glass panel must be hard enough to be audible.
-
Loud noises near the oven may activate the InstaView function.
Setting Instaview
1 Press SETTINGS at the center bottom of the Main screen, swipe to the second Settings screen, and press InstaView.
1 Select ON or OFF and press OK.
Display
Set the length of time before the display sleeps. There are three options you can select.
- ON: Always on
OFF: Automatically turns off if idle for 30 minutes.
NIGHT OFF:Turns off from 10:00 PM to 5:00 AM.
Setting Display Option
1 Press SETTINGS at the center bottom of the Main screen, swipe to the second Settings screen, and press Display.
2 Select the desired option and press OK.
Convection Auto Conversion
There is no need to remember to convert standard recipe temperatures for convection cooking.
Convection Auto Conversion automatically subtracts 25^ / 14^ from the set temperature when a convection cooking mode is selected. The converted temperature appears in the display once preheating is finished.
For example, select Convection Bake and enter 350^ . The temperature will auto-convert to 325^ and display the converted temperature.
Convection Auto Conversion is turned ON by default.
Turning Convection Auto Conversion On/Off
1 Press SETTINGS at the center bottom of the Main screen, swipe to the second Settings
Temperature Units
Set the oven temperature display to show either Fahrenheit or Celsius units.
The oven defaults to Fahrenheit unless changed by the user.
Setting Temperature Units
1 Press SETTINGS at the center bottom of the Main screen, swipe to the third Settings screen, and press Temperature Units.
2 Select ^ F or ^ C and press OK.
Smart Diagnosis™
Smart DiagnosisTM can be run through a smartphone application or by calling for support. Place your smartphone's mouthpiece near the top left corner of the screen. See "Smart Diagnosis Function" in the Smart Functions section for detailed instructions.
1 Press SETTINGS at the center bottom of the Main screen, swipe to the third Settings screen, and press Smart DiagnosisTM.
2 Press START to start the diagnostic tone.
Factory Data Reset
This function returns all settings to the factory defaults.
CAUTION
- All stored data will be deleted.
1 Press SETTINGS at the center bottom of the Main screen, swipe to the third Settings screen, and press Factory Data Reset.
2 If you want to reset data to the factory defaults, press RESET and then OK.
Open Source License
This screen displays a list of the open source software contained in this product. Refer to the
indicated licenses for the terms and conditions of their use.
1 Press SETTINGS at the center bottom of the Main screen and swipe to the fourth Settings screen.
2 Press Open Source License.
Oven Cooling
The oven cooling icon appears in the display if the temperature inside the oven is high during or after operation. The icon disappears if the oven temperature is below 210^ (100^) .
| Oven Cooling Icon |
Timer
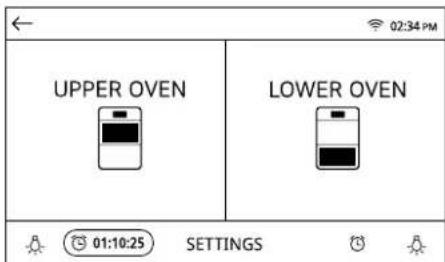
The oven timers don't affect oven operation or cooking time. Use them as extra kitchen timers. Once the time runs out, the oven chimes and "Timer 1 or 2 finished" appears in the display.
Setting the Timer
1 Press either clock icon at the bottom of the display.
| Clock icon |
2 Scroll through the numbers in the popup until the desired time appears in the display, or press the number pad icon to enter the numbers directly, and press OK.
| Number pad icon |
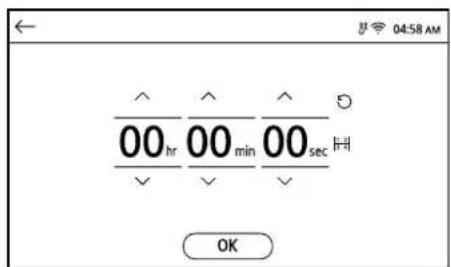
3 The time remaining appears next to the clock icon in the display.
Adjusting or Cancelling the Timer
1 Press the remaining time next to the clock icon in the display.
2 To cancel the timer, press the Reset icon in the popup. Then press OK.
| Reset icon |
3 To adjust the time, scroll the numbers in the popup until the desired time appears. Then press OK.
4 The remaining time in the display is adjusted.
Operating the Oven
Before Using the Oven
NOTE
- Because the oven temperature cycles, an oven thermometer placed in the oven cavity may not show the same temperature that is set on the oven.
- It is normal for the convection fan to run while preheating during a regular bake cycle.
- The convection fan motor may run periodically during a regular bake cycle.
- If the door is left open for longer than 30 seconds during baking, the heater turns off. The heater turns back on automatically once the door is closed.
- Avoid opening the oven door more than necessary during use. This helps the oven maintain temperature, prevents unnecessary heat loss, and saves on energy use.
- Because the oven temperature cycles, an oven thermometer placed in the oven cavity may not show the same temperature that is set on the oven.
- It is normal for the convection fan to run while preheating during a regular bake cycle.
- The convection fan motor may run periodically during a regular bake cycle.
- If the door is left open for longer than 30 seconds during baking, the heater turns off. The heater turns back on automatically once the door is closed.
- Avoid opening the oven door more than necessary during use. This helps the oven maintain temperature, prevents unnecessary heat loss, and saves on energy use.
Oven Vent
Areas near the vent may become hot during operation and may cause burns. Avoid placing plastics near the vent as heat may distort or melt the plastic.
It is normal for steam to be visible when cooking foods with high moisture content.

WARNING
- Do not block the vent opening at the bottom of the oven.
Using Heavy Duty Racks and Offset Rack
The racks have a turned-up back edge that prevents them from being pulled out of the oven cavity.

CAUTION
- Reposition oven racks before turning the oven on to prevent burns.
- Do not cover the racks with aluminum foil, or any other material, or place anything on the bottom of the oven. Doing so will result in poor baking and may damage the oven bottom.
- Only arrange oven racks when the oven is cool.
- Do not place objects heavier than 33 lb (15 kg) on the racks. Do not place heavy objects on the corners of the racks. Doing so can damage the racks.
- When using the Menu Recommendation function, do not place the offset rack in the first or second rack position from the bottom.
Removing Racks
1 Pull the rack straight out until it stops.
2 Lift the front of the rack and pull it out.
1 Pull the rack straight out until it stops.
2 Lift the front of the rack and pull it out.
Replacing Racks
1 Place the end of the rack on the support.
2 Tilt the front end up and push the rack in.
1 Place the end of the rack on the support.
2 Tilt the front end up and push the rack in.

Operating the Oven
Before Using the Oven
NOTE
Replacing Racks
Using Gliding Oven Racks
The gliding racks slide in and out on a frame. This keeps heavy cookware level and prevents it from sliding forward when the rack is completely extended.

CAUTION
- Place oven racks in the desired location before turning on the oven to avoid burns.
- Do not cover the racks with aluminum foil, or any other material, or place anything on the bottom of the oven. Doing so will result in poor baking and may damage the oven bottom.
Installing Gliding Racks
1 Start with the rack in the closed position. Hold the rack with one hand at the center front and the other hand at the back right corner.
2 Carefully insert the rack between the rack guides, and slide it back until the shelf drops into place.
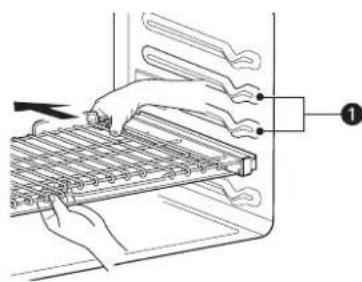
1Rack guides
3 Once the rack is secured in the back, pull the entire rack forward until the rack locks into place.
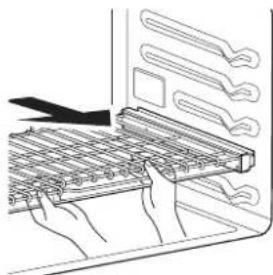
Removing Gliding Racks
1 With the rack in the closed position, grasp the front of the rack and frame and lift it. Slowly push the rack towards the back wall until it is free of the rack stop.
2 After disengaging the rack stop, lift the back of the rack and pull the rack and frame out between the rack guides.
Camera (Upper Oven Only)
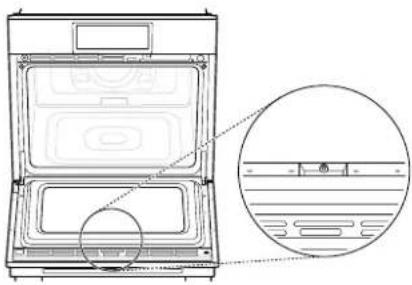
Before Using Camera

WARNING
- To avoid burns or other injuries, make sure the oven and oven door are cool before cleaning them.

CAUTION
- Do not use harsh, etching, abrasive cleaners or sharp metal scrapers to clean the oven door glass because they can scratch the surface. This may cause the camera recognition to perform poorly.
NOTE
Before using the camera function, clean the oven door glass.
- If the oven door glass is dirty, run the Self Clean function.
- The Camera function does not operate when the upper oven is in a cleaning mode.
- The LED in the door stays on while the camera function is operating.
22 OPERATION
Menu Recommendation
The camera in the oven can recognize food and recommend techniques, cook times and temperatures. If the Camera function and the Menu Recommendation function are On, the oven automatically displays recommendations when you put food items in the oven and close the door.
Using Menu Recommendation
1 Put food items in the oven and close the door.
2 After the camera recognizes the item, the display shows the recommended options.
3 Press a category to filter the options.
4 Scroll through or tap the letters to find and select an item.
5 Follow the recommendations in the display regarding accessories and rack position.
6 Press START.
NOTE
After the camera recognizes the food item, follow the Auto Cook Guide for details.
- If the camera does not recognize the food, follow the instructions in the camera setting menu on the oven.
- Place the food in the center of the rack on the provided accessories.
- Clean the oven door glass around the camera if it is dirty.
-
If the menu matching issue persists, check the available menus in Auto Cook.
-
The Menu Recommendation function does not operate if the upper oven is in any cooking mode or cleaning mode.
The recognition rate may be affected by the container and accessories used. For best results, use the accessories provided by LG.
The recognition rate is affected by food size, shape, and condition before cooking. For best results, follow the Auto Cook Guide.
RealTime View
See video from inside the oven while cooking using the LG ThinQ application. You can also take photos. The appliance must be connected to a home Wi-Fi network and the LG ThinQ application to use the RealTime View function.
Using RealTime View
1 Run the LG ThinQ application on a smartphone.
2 Select the connected oven to operate.
3 Press RealTime View.
4 Press the icon on the screen.
5 If the application is connected to the oven, the inside of the product can be seen on a smartphone.
NOTE
- If the inside of the product is not clearly visible through the camera, clean the oven door glass near the camera lens.
- If the Wi-Fi is not connected, data charges may apply.
- If the network signal is not strong enough, the video could lag.
- You may appear on screen if using the oven during monitoring.
- You can monitor the oven in real time, even when the LCD is turned off in the standby mode.
- If the oven is empty or the food is not placed appropriately, the screen in the app may not display clearly.
- The surrounding wireless environment can make the wireless network service run slowly.
Cook Record
The camera can record the cooking process and make a time-lapse video. The appliance must be connected to a home Wi-Fi network and the LG ThinQ application to use the Cook Record function.
Using Cook Record
1 Run the LG ThinQ application on a smartphone.
2 Select the connected oven to operate.
3 Turn on the Cooking Record function.
4 Select the desired video time: 5 seconds, 10 seconds or 20 seconds.
5 Cook while the oven is connected to Wi-Fi.
6 After the end of the cook, the time-lapse video is saved.
NOTE
- If the Wi-Fi connection of the product is unstable, the camera may not operate properly.
- Shots will be captured starting at least 4 minutes into the cook time. Videos are stored for 72 hours, and up to 10 videos can be stored at once.
- Videos are stored in the LG ThinQ application. They can be saved to the smartphone's album or shared.
Bake Mode
Bake is used to prepare foods such as pastries, breads and casseroles.
The oven can be programmed to bake at any temperature from 170^ (80^) to 550^ (285^) . The default temperature is 350^ (175^) .
Setting the Bake Function
1 Press UPPER OVEN or LOWER OVEN and select Bake in the cooking mode screen.
2 Set the oven temperature. Scroll through the numbers on the display or press the number pad icon to enter the numbers directly.
Number pad icon
12 1
3 If desired, set the cook time and delayed start time using the same method. Press the arrow key on the right side of the display to see the delayed start time settings.
4 Press START. The oven starts to preheat.
5 If the cook time is set, the remaining time appears in the display. If a delayed start time is set, the start time appears in the display.
6 A chime sounds once preheating is complete.
7 A chime sounds at the end of the set cook time and a notification appears in the display. Open the oven door and remove the food.
NOTE
- If no cook time is set, the oven turns off automatically after 12 hours.
Changing the Cook Settings
1 Press EDIT in the display to bring up the Cook Settings screen.
2 Adjust the settings using the number pad or scroll function.
3 Press START.
To Stop Cooking
Press STOP in the display, and press YES.
NOTE
- It is normal for the convection fan to operate periodically throughout a normal bake cycle in the oven. This is to ensure even baking results.
Baking Tips
- For best results, food should be placed on a single rack with at least 1^ to 112^ of air space between the pans and oven walls.

24 OPERATION
- Baking time and temperature will vary depending on the characteristics, size, and shape of the baking pan used.
- Check for food doneness at the minimum recipe time.
- Use metal bakeware (with or without a nonstick finish), heatproof glass-ceramic, ceramic or other bakware recommended for oven use.
- Dark metal pans or nonstick coatings will cook food faster with more browning. Insulated bakeware will slightly lengthen the cooking time for most foods.
- The oven bottom has a porcelain-enamel finish. To make cleaning easier, protect the oven bottom from excessive spillovers by placing a cookie sheet on the rack below the rack you are cooking on. This is particularly important when baking a fruit pie or other foods with a high acid content. Hot fruit fillings or other foods that are highly acidic may cause pitting and damage to the porcelain-enamel surface and should be wiped up immediately.
Recommended Baking Guide
Rack and Pan Placement
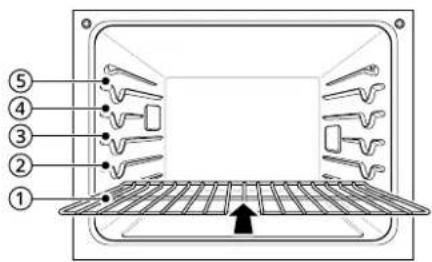
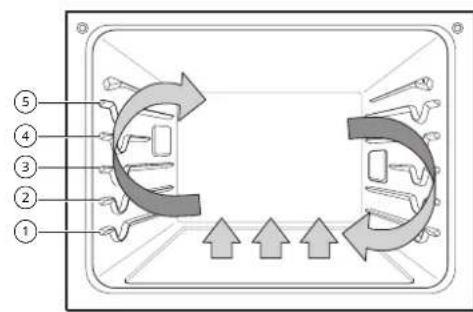
Baking results will be better if baking pans are centered in the oven as much as possible. If cooking on multiple racks, place the oven racks in the positions shown.
Multiple-rack cooking saves time and energy. Whenever possible, cook foods requiring the same cooking temperature together in one oven.
If baking with more than one pan, place the pans so that each one has at least 1" (25 mm) to 1 1/2" (38 mm) of air space around them.
Multiple Rack Position
②
(4)
Single Rack Position
Baking Rack Guide
| Type of Food | Rack Position |
| Angel food cake,frozen pies | ③ |
| Bundt or pound cakes | ② |
| Biscuits,muffins,brownies,cookies,cupcakes,layer cakes,pies | ③ |
| Casseroles | ② |
| Turkey,roasts,or ham | ① |
| Frozen pizza | ③ |
| Roast chicken | ② |
NOTE
- When baking cakes and cookies on multiple racks, use the Convection Bake mode and place racks in positions ② and ④ .
Convection Bake and Roast Mode
The convection system uses a fan to circulate the heat evenly within the oven. Improved heat distribution allows for even cooking and excellent results while cooking with single or multiple racks.
The oven can be programmed to bake at any temperature from 170^ (80^) to 550^ (285^) . The default temperature is 350^ (175^) .
Using Convection
1 Press UPPER OVEN or LOWER OVEN and select Convection Bake or Convection Roast in the cooking mode screen.
2 Set the oven temperature. Scroll through the numbers on the display or press the number pad icon to enter the numbers directly. If Convection Auto Conversion is turned on, the temperature after preheating will be 25^/14^ lower than the entered temperature.
Number pad icon
12
3 If desired, set the cook time and delayed start time using the same method. Press the arrow key on the right side of the display to see the delayed start time settings.
4 Press START. The oven starts to preheat.
5 If the cook time is set, the remaining time appears in the display. If a delayed start time is set, the start time appears in the display.
6 A chime sounds once preheating is complete.
7 A chime sounds at the end of the set cook time and a notification appears in the display. Open the oven door and remove the food.
NOTE
- If no cook time is set, the oven turns off automatically after 12 hours.
The heating elements and fan turn off immediately when the door is opened. They turn on again approximately 1 second after the door is closed. - Press STOP in the display to cancel Convection Bake and Convection Roast at any time.
- When preparing meats for roasting, use the broiler pan and grid. The broiler pan catches grease spills and the grid helps prevent grease splatters.
- The oven fan runs while convection baking and convection roasting. The fan stops when the door is opened. In some cases, the fan may shut off during a convection bake cycle.
Changing the Cook Settings
1 Press EDIT in the display to bring up the Cook Settings screen.
2 Adjust the settings using the number pad or scroll function.
3 Press START.
To Stop Cooking
1 Press STOP in the display, and press YES.
Tips for Convection Baking
- Use Convection Bake for faster and more even multiple-rack cooking of pastries, cookies, muffins, biscuits, and breads of all kinds.
- Bake cookies and biscuits on pans with no sides or very low sides to allow heated air to circulate around the food. Food baked on pans with a dark finish will cook faster.
- When using Convection Bake with a single rack, place oven rack in position ③. If cooking on multiple racks, place the oven racks in positions ② and ④.
- Multiple oven rack cooking may slightly increase cook times for some foods.
- Cakes, cookies and muffins have better results when using multiple racks.

26 OPERATION
Tips for Convection Roasting
The Convection Roast feature is designed to give optimum roasting performance. Convection Roast combines cooking with the convection fan to roast meats and poultry. The heated air circulates around the food from all sides, sealing in juices and flavors. Foods are crispy brown on the outside while staying moist on the inside. Convection roasting is especially good for large tender cuts of meat, uncovered.
Use a broiler pan and grid when preparing meats for convection roasting. The broiler pan catches grease spills and the grid helps prevent grease splatters.
1 Place the oven rack in position ① or ②.
2 Place the grid 1 in the broiler pan 2.
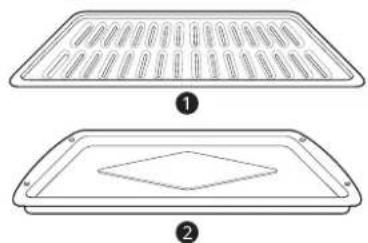
3 Place the broiler pan on the oven rack.
CAUTION
- Do not use a broiler pan without a grid.
- Do not cover the grid with aluminum foil.
- Position food (fat side up) on the grid.
Air Fry (Upper Oven Only)
This feature automatically increases the entered temperature by 45^ (25^) for optimal performance when using Air Fry.
The Air Fry mode on the upper oven can be programmed to cook at any temperature from 300 ^ F (150°C) to 500°F (260°C). The default temperature is 400°F (205°C).
The Air Fry function is specially designed for oil-free frying.
Setting the Air Fry Mode
1 Press UPPER OVEN and select Air Fry in the cooking mode screen.
2 Set the oven temperature. Scroll through the numbers on the display or press the number pad icon to enter the numbers directly.
| Number pad icon |
3 If desired, set the cook time and delayed start time using the same method. Press the arrow key on the right side of the display to see the delayed start time settings.
4 Press START.
5 If the cook time is set, the remaining time appears in the display. If a delayed start time is set, the start time appears in the display.
Changing the Cook Settings
1 Press EDIT in the display to bring up the Cook Settings screen.
2 Adjust the settings using the number pad or scroll function.
3 Press START.
To Stop Cooking
Press STOP in the display, and press YES.
NOTE
- No preheating is required when using the Air Fry mode.
- If cooking multiple batches, the later batches may take less time to cook.
- Wet batters and coatings will not crisp or set when using the Air Fry mode.
Tips for Air Fry
-
For best results, use the provided air fry tray.
-
The mesh section of the air fry tray can be cleaned in a dishwasher.
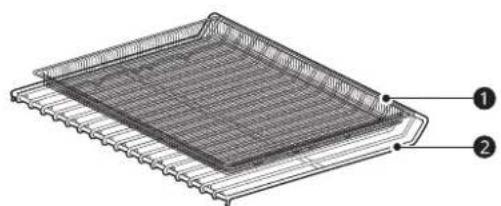
Air Fry Tray
2Heavy Duty Rack
- If you don't have the air fry tray, place food on a wire rack inside a foil-lined broiler pan.
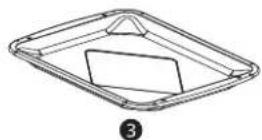
Broiler Pan
- For best results, cook food on a single rack placed in positions suggested in the chart in this manual.
- Spread the food out evenly in a single layer.
- Use either the optional air fry tray available from LG or a dark baking tray with no sides or short sides that does not cover the entire rack. This allows for better air circulation.
- If desired, spray the baking tray or air fry tray with a pan spray. Use an oil that can be heated to a high temperature before smoking, such as avocado, grapeseed, peanut or sunflower oil.
- Place a foil-lined baking tray on a rack in position 1 to catch the oil falling from the food. For high-fat foods like chicken wings, add a few sheets of parchment paper to absorb the fat.
- Check food often and shake it or turn it over for crisper results.
-
Prepared frozen foods may cook faster with the Air Fry mode than stated on the package. Reduce the cooking time by about 20 percent, check food early, and adjust cooking time as needed.
-
Use a food thermometer to make sure food has reached a safe temperature for consumption. Eating undercooked meats can increase your risk of food-borne illness.
- For the crispiest results, dredge fresh chicken wings or tenders in seasoned flour. Use 1/3 cup flour for 2 pounds of chicken.
Recommendations When Air Frying High-Fat Foods
Foods high in fat will smoke when using the Air Fry mode. For best results, follow these recommendations when air frying foods that are high in fat, such as chicken wings, bacon, sausage, hot dogs, turkey legs, lamb chops, ribs, pork loin, duck breasts, or some plant-based proteins.
CAUTION
- Never cover slots, holes, or passages in the oven bottom or cover entire racks with materials such as aluminum foil. Doing so blocks airflow through the oven and can result in carbon monoxide poisoning. Aluminum foil can also trap heat, causing a fire hazard or poor oven performance.
- Turn on your exhaust hood at a high fan setting before you start Air Fry and leave it on for 15 minutes after you're done.
- Open a window or sliding glass door, if possible, to make sure the kitchen is well-ventilated.
- Clean the grease filters on your exhaust hood regularly.
- Keep the oven free from grease buildup. Wipe down the interior of the oven before and after air frying (once the oven has cooled).
- Run oven cleaning cycles (SpeedClean or SelfClean) regularly, depending on how often and what types of food you Air Fry.
- Avoid opening the oven door more than necessary to help maintain the oven temperature, prevent heat loss, and save energy.
- Air-frying fresh chicken pieces such as wings or drumsticks with the skin left on can produce smoke as the fat renders at high temperatures. If the smoke is excessive, use the Convection Roast mode instead of Air Fry.
Recommended Air Frying Guide
- Arrange food evenly in a single layer.
- Put a foil-lined baking pan on a rack in position ② to catch drips. If needed, add parchment paper to absorb oil and reduce smoking.
28 OPERATION
- Flip food over during cooking to avoid burning it.
† High-fat items may produce more smoke when cooked using Air Fry. For less smoke, cook using Convection Roast mode.
| Recommended Items | Quantity(oz) | Temp. (°F) | Rack Position | Time Guide | |
| POTATOES-Frozen | |||||
| Frozen French Fries(Shoestring) | 20 425 | 3 | 15-25 - | ||
| Frozen French Fries(Crinkle cut, 10x10 mm) | 35 400 | 3 | 18-28 - | ||
| Frozen Sweet PotatoFries | 25 400 | 3 | 15-25 - | ||
| Frozen Tater Tots 50 425 | 3 | 18-28 - | |||
| Frozen Hash Browns 40 425 | 3 | 18-28 - | |||
| POTATOES-Fresh/Homemade | |||||
| Homemade French Fries(10x10 mm) | 25 425 | 3 | 20-30 C | Cut the potatoes and soak for 30 minutes in hot tap water. Drain and pat dry. Brush or lightly spray with 3 tbsp. of oil. Add salt and pepper to taste. | |
| Homemade PotatoWedges | 60 425 | 3 | 30-40 | ||
| CHICKEN-Frozen | |||||
| Frozen Chicken Nuggets,Crispy | 30 400 | 3 | 15-25 - | ||
| Frozen Chicken Strips 35 400 | 3 | 25-35 - | |||
| Frozen Hot Wings,Bone-in | 50 400 | 3 | 25-35 - | ||
| CHICKEN-Fresh, Skin on | |||||
| Fresh Chicken Wings† | 40 450 | 3 | 25-35 Brush or lightly spray with 1 tbsp. of oil. Add salt and pepper to taste. | ||
| Fresh Chicken Drumsticks† | 70 450 | 3 | 30-40 | ||
| Thighs 40 450 | 3 | 25-35 | |||
| Breasts 40 450 | 3 | 25-35 | |||
| OTHER | |||||
| Frozen Onion Rings,Breaded | 20 400 | 3 | 15-25 - | ||
| Frozen Spring Rolls (0.7 oz each) | 45 400 | 3 | 15-25 - | ||
| Thin Sausage (2.5 oz each,diameter 0.8") | 90 400 | 3 | 15-25 - | ||
| Recommended Items | Quantity (oz) | Temp. (°F) | Rack Position | Time Guide |
| Frozen Coconut Shrimp 25 | 400 | ③ | 15-25 Brush or lightly spray the surface of food with oil. | |
| Fresh Scallops on the half shell (35.3 oz) | 35 400 | ③ | 15-25 Melt 4 tbsp. of butter and brush on scallops. Mix 1/2 cup bread crumbs, 1 tbsp. minced garlic, 1/4 cup grated parmesan cheese and season to taste. Sprinkle mixture over scallops. | |
| Fresh Shrimp 50 400 | ③ | 15-25 - | ||
| Mixed Vegetables 35 425 | ③ | 13-23 Brush or lightly spray with 4 tbsp. of olive oil. Add salt and pepper to taste. |
ENGLISH
RapidHeat Roast (+) Mode (Upper Oven Only)
The RapidHeat Roast feature is designed to quickly roast poultry. The combination of intense heat from the upper and lower heating elements and heated air from the back heating element results in crispier food and shorter cooking times. The RapidHeat Roast is especially good for medium sized poultry (about 3.3 lb.)
The RapidHeat Roast+ feature (on the upper oven only) uses steam to roast poultry with more browning than the normal RapidHeat Roast function.
NOTE
The recommended cook time is 55~65 minutes for a whole chicken weighing 3.3 lb.
- Adjust the cook time according to the weight of the poultry.
- Place the oven rack in position ②.
RapidHeat Roast (+) is designed to reduce the cooking time. There is no need for preheating.
- This function is optimized for poultry, so the cooking temperature cannot be adjusted.
- It is normal for the fan to operate during the RapidHeat Roast (+) function.
- If the descending reminder appears, press OK to run the Descaling function.
- When the temperature rises in the oven, steam may not be visible.
Take care when opening the oven door during or after steam cooking. Hot steam can cause scalding.
After any steam cooking cycle, the drying function will run. It is normal to hear the steam pump running during the drying function.
Setting the RapidHeat Roast (+) Function
NOTE
- Make sure the steam feeder tank is filled with water before starting the RapidHeat Roast+ mode.
1 Press UPPER OVEN and select Rapidheat Roast (+) in the cooking mode screen.
2 If desired, set the cook time and delayed start time using the same method. Press the arrow key on the right side of the display to see the delayed start time settings.
3 Press START.
4 If the cook time is set, the remaining time appears in the display. If a delayed start time is set, the start time appears in the display.
Changing the Cook Settings
1 Press EDIT in the display to bring up the Cook Settings screen.
30 OPERATION
2 Adjust the settings using the number pad or scroll function.
3 Press START.
To Stop Cooking
Press STOP in the display, and press YES.
RapidHeat Roast Mode (Lower Oven Only)
Use the RapidHeat Roast mode to cook large cuts of meat.
Setting the RapidHeat Roast Mode
1 Press LOWER OVEN and select Rapid Heat Roast in the cooking mode screen.
2 If desired, set the cook time and delayed start time using the same method. Press the arrow key on the right side of the display to see the delayed start time settings.
3 Press START. The oven starts to preheat.
4 If the cook time is set, the remaining time appears in the display. If a delayed start time is set, the start time appears in the display.
NOTE
- If no cook time is set, the oven turns off automatically after 12 hours.
- It is normal for cooling fans to run after any cooking cycle is complete, to protect the control panel.
Changing the Cook Settings
1 Press EDIT in the display to bring up the Cook Settings screen.
2 Adjust the settings using the number pad or scroll function.
3 Press START.
To Stop Cooking
Press STOP in the display, and press YES.
NOTE
- The heating elements turn off after 30 seconds when the door is opened. They turn on again approximately 1 second after the door is closed.
- When preparing meats for roasting, use the broiler pan and grid. The broiler pan catches grease spills, and the grid helps prevent grease splatters.
- Press STOP in the display to cancel Roast at any time.
Broil Mode
Setting the Oven to Broil
Broiling uses an intense, radiant heat to cook food. Both the inner and outer broil elements heat during full broiling. Only the inner broil element heats during center broiling. The element(s) cycle on and off at intervals to maintain the oven temperature. The meat probe cannot be used with this mode.
Keep the oven door closed while broiling. Let the oven preheat for approximately 5 minutes before cooking food.

CAUTION
- Do not use a grid without a broiler pan. Oil can cause a grease fire.
- Do not cover the grid and broiler pan with aluminum foil. Doing so will cause a fire.
Always use a broiler pan and grid for excess fat and grease drainage. This will help to reduce splatter, smoke, and flare-ups. - Should an oven fire occur, leave the oven door closed and turn the oven off. If the fire continues, throw baking soda on the fire or use a fire extinguisher.
DO NOT put water or flour on the fire. Flour may be explosive and water can cause a grease fire to spread and cause personal injury. -
When using your broiler, the temperature inside the oven will be extremely high. Take care to avoid possible burns by:
-
Keeping the door closed when broiling
- Always wearing oven mitts when inserting or removing food items
NOTE
- This appliance is designed for closed-door broiling. Close the door to set the Broil function. If the door is open, the Broil function cannot be set and DOOR OPEN appears on the display. Close the door and reset the Broil function.
1 Place the food on the broiler pan grid.
2 Press UPPER OVEN or LOWER OVEN and press Broil in the cooking mode screen.
3 Scroll to set the desired temperature: LOW, MEDIUM, or HIGH.
4 If desired, set the cook time and delayed start time using the same method. Press the arrow key on the right side of the display to see the delayed start time settings.
5 Press START. The oven starts to preheat.
6 If the cook time is set, the remaining time appears in the display. If a delayed start time is set, the start time appears in the display.
7 A chime sounds once preheating is complete.
NOTE
- If the cook time is not set, the oven automatically turns off after 3 hours.
- The heating element(s) turn off immediately when the door is opened. They turn on again approximately 1 second after the door is closed.
- Press STOP in the display to cancel Broil at any time.
2 Adjust the settings.
3 Press START.
To Stop Broiling
Press STOP in the display, and press YES.
Tips for Reducing Smoke
Due to the intense heat associated with broiling, it is normal to experience smoke during the cooking process. This smoke is a natural byproduct of searing and should not cause you to worry. If you are experiencing more smoke than you are comfortable with, use the following tips to reduce the amount of smoke in your oven.
Always use a broiler pan. Do not use saute pans or regular baking sheets for safety reasons.
- The broiler pan should always be thoroughly cleaned and at room temperature at the beginning of cooking.
- ALWAYS run your cooktop ventilation system or vent hood during broiling.
- Keep the interior of your oven as clean as possible. Leftover debris from prior meals can burn or catch fire.
- Avoid fatty marinades and sugary glazes. Both of these will increase the amount of smoke you experience. If you would like to use a glaze, apply it at the very end of cooking.
If you are experiencing significant smoke with any food item, consider:
- Lowering the broiler to the LOW setting.
-
Lowering the rack position to cook the food farther away from the broiler.
Using the HIGH broil setting to achieve the level of searing you desire, and then either switching to the LOW broil setting, or switching to the Bake function. -
As a rule, fattier cuts of meat and fish will produce more smoke than leaner items.
- Adhere to the guidelines in the Recommended Broiling Guide section whenever possible.
Changing the Broil Settings
1 Press EDIT in the display to bring up the Cook Settings screen.

Recommended Broiling Guide
The size, weight, thickness, starting temperature, and your preference of doneness will affect broiling times.
This guide is based on meats at refrigerator temperature. For best results when broiling, use a pan designed for broiling.
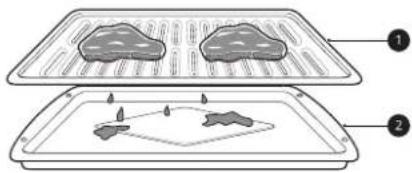
Grid
Broiler pan
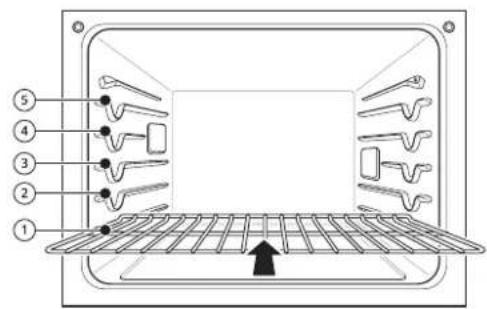
| Food | Quantity and/or Thickness | Rack Position | First Side Time (min.) | Second Side Time (min.) | Comments | |
| Ground Beef | 1 lb (9 patties) 1/2 to 3/4" thick | ⑤ | 4-6 3-4 | Space evenly. Up to 9 patties may be broiled at once. | ||
| Beef Steaks | 1" thick 1 to \( {1}^{1}/{}_{2}\mathrm{\;{lb}} \) | Rare | ④ | 6 | 2-3 | Steaks less than 1" thick cook through before browning. Pan frying is recommended.Slash fat. |
| Medium | ④ | 7 | 2-3 | |||
| Well done | ④ | 8 | 3-4 | |||
| \( {1}^{1}/{}_{2}{}^{\prime \prime } \)thick 2 to \( {2}^{1}/{}_{2}\mathrm{\;{lb}} \) | Rare | ④ | 10 4-6 | |||
| Medium | ④ | 12 6-8 | ||||
| Well done | ④ | 14 8-10 | ||||
| Chicken | 1 whole, 2 to \( {2}^{1}/{}_{2}\mathrm{\;{lb}} \), split lengthwise | ③ | 20 6-8 | Broil skin-side-down first. | ||
| 2 Breasts | ③ | 20 6-10 | ||||
| Lobster Tails | 2-410 to 12 oz each | ③ | 12-14 | Do not turn over. | Cut through back of shell. Spread open. Brush with melted butter before broiling and after half of broiling time. | |
| Fish Fillets | \( \frac{1}{4} \)to \( \frac{1}{2} \) " thick | ④ or ⑤ | 5-6 3-4 | Handle and turn very carefully. Brush with lemon butter before and during cooking, if desired. | ||
| Ham Slices(precooked) | \( \frac{1}{2} \) " thick | ④ | 5 | 3-5 | Increase time 5 to 10 minutes per side for 1 1/2" thick or home-cured ham. | |
| Pork ChopsWell done | \( 2\left( {{}^{1}/{}_{2}}\right) \) " thick | ④ or ⑤ | 7 | 6-8 | Slash fat. | |
| 2 (1" thick) about 1lb. | ④ or ⑤ | 9-10 7-9 | ||||
| Lamb Chops | 2 (1" thick)about 10 to 12 oz | Medium | ④ | 6 | 4-6 | Slash fat. |
| Well done | ④ | 8 | 7-9 | |||
| 2 (1 \( {}^{1}/{}_{2} \) " thick)about 1lb | Medium | ④ | 11 | 9 | ||
| Well done | ④ | 13 9-11 | ||||
| Salmon Steaks | 2 (1" thick) | ④ or ⑤ | 8 | 3-4 | Grease pan. Brush steaks with melted butter. | |
| 4 (1" thick) about 1 lb | ④ or ⑤ | 9 | 4-6 | |||
- This guide is only for reference. Adjust cook time according to your preference.
ENGLISH
NOTE
- The USDA advises that consuming raw or undercooked fish, meat, or poultry can increase your risk of food-borne illness.
- The USDA has indicated the following as safe minimum internal temperatures for consumption:
Ground beef: 160^ F (71.1 °C)
- Poultry: 165°F (73.9°C)
- Beef, veal, pork, or lamb: 145^ F (62.8 °C)
- Fish / Seafood: 145^ (62.8°C)
Tips for Broiling
Beef
-
Steaks and chops should always be allowed to rest for five minutes before being cut into and eaten. This allows the heat to distribute evenly through the food and creates a more tender and juicy result.
-
Pieces of meat that are thicker than two inches should be removed from the refrigerator 30 minutes prior to cooking. This will help them cook more quickly and evenly, and will produce less smoke when broiling. Cooking times will likely be shorter than the times indicated in the Broiling Chart.
- For bone-in steaks or chops that have been frenched (all meat removed from around the bone), wrap the exposed sections of bone in foil to reduce burning.
Seafood
- When broiling skin-on fish, always use the Lo broil setting and always broil the skin side last.
- Seafood is best consumed immediately after cooking. Allowing seafood to rest after cooking can cause the food to dry out.
- It is a good idea to rub a thin coating of oil on the surface of the broiling pan before cooking to reduce sticking, especially with fish and seafood. You can also use a light coating of non-stick pan spray.
Vegetables
Toss your vegetables lightly in oil before cooking to improve browning.
Warm Mode
This function will maintain an oven temperature of less than 200^ (93^) . It will keep cooked food warm for serving up to 3 hours after cooking has finished.
Setting the Warm Mode
1 Press UPPER OVEN or LOWER OVEN and select Warm in the cooking mode screen.
2 On the display, scroll to set the desired temperature: Low, Medium, or High. If desired, set a run time.
High: 200^ (93^)
Medium: 170^(77^)
- Low: 140^ (60^)
3 If desired, set the cook time and delayed start time using the same method. Press the arrow key on the right side of the display to see the delayed start time settings.
4 Press START.
5 If the cook time is set, the remaining time appears in the display.
Changing the Warm Settings
1 Press EDIT in the display to bring up the Cook Settings screen.
2 Adjust the settings as desired.
3 Press START.
To Stop the Warming Mode
Press STOP in the display, and press YES.
NOTE
- The Warm function is intended to keep food warm. Do not use it to cool food down.
Proof Mode
This feature maintains a warm oven for rising yeast-leavened products before baking.
Setting the Proof Mode
1 Press UPPER OVEN or LOWER OVEN and select Proof in the cooking mode screen.
2 On the display, scroll through the numbers to set a proofing time or press the number pad icon to enter the numbers directly.
| Number pad icon |
3 Press START. The remaining proofing time appears in the display.
NOTE
- If the proofing time is not set, the oven automatically turns off after 12 hours.
To Stop the Proof Mode
Press STOP in the display, and press YES.
NOTE
- To avoid lowering the oven temperature and lengthening proofing time, do not open the oven door unnecessarily. Check bread products early to avoid over proofing.
- Do not use the Proofing mode for warming food or keeping food hot. The proofing oven temperature is not hot enough to keep foods at safe temperatures. Use the Warm feature to keep food warm. Proofing does not operate when the oven is above 125^ . "Oven is too hot. Try again after it cools down." shows in the display.
- It is normal for the fan to operate during the Proof function.
The proof feature automatically provides the optimum temperature for the proofing process, and therefore does not have a temperature adjustment. - For best results, cover the dough with a cloth or with plastic wrap. (The plastic may need to be anchored underneath the container so the oven fan does not blow it off.)
Probe Mode (Upper Oven Only)
The probe accurately measures the internal temperature of meat, poultry and casseroles. Always unplug and remove the probe from the oven before removing food. Before using, insert the probe into the center of the thickest part of meat or into the inner thigh or breast of poultry, away from fat or bone. Place food in the oven and connect the meat probe to the jack. Keep the probe as far away from heat sources as possible.
The probe cannot be used in the Broil, Sous Vide, Steam Maintenance, Rapidheat Roast(+), Self Clean, Speed Clean, Warm or Proof modes.
- For thin cuts of meat, insert the probe in the thickest side of the meat.

Using the Meat Probe Feature

CAUTION
Always use an oven mitt to remove the temperature probe. Do NOT touch the broil element. Failure to follow this warning can result in severe personal injury.
- To avoid damage to the meat probe, do not use tongs to pull on the probe when removing it.
- Do not store the meat probe in the oven.
1 Insert the probe into the food.
2 Connect the probe to the jack in the oven. "Probe is connected" pops up in the display and the probe icon appears at the top of the display.
| Probe icon |
3 Press UPPER OVEN and select an appropriate cooking mode in the cooking mode screen.
4 Set the oven temperature. Scroll through the numbers on the display or press the number pad icon to enter the numbers directly.
The default probe temperature is 150^ (65 ^ C) but can be changed to any temperature between 80^ 27C and 210^ 100C.
| Number pad icon |
5 If desired, set the delayed start time using the same method. Press the arrow key on the right side of the display to see the additional settings.
6 Press START. If a delayed start time has been set, the start time appears in the display.

36 OPERATION
7 When the set probe temperature is reached, the oven shuts off automatically.
NOTE
- Calculating a total cooking time by weight is no longer necessary using this feature. See the Recommended Probe Temperature Chart to set the probe temperature.
Changing the Probe Temperature while Cooking
1 Press EDIT in the display to bring up the Cook Settings screen.
2 Adjust the settings as desired.
3 Press START.
To Stop Cooking
Press STOP in the display, and press YES.
NOTE
- Press STOP in the display at any time to cancel a cooking operation.
- To avoid breaking the probe, make sure food is completely defrosted before inserting.
- While the meat probe mode is running, Speed Clean does not respond.
Recommended Probe Guide
Recommended Probe Placement Chart
| Category Examples of Food Probe Placement | ||
| Ground Meat & Meat Mixtures | Meatloaf | Insert in the thickest part |
| Meatballs | ||
| Fresh Beef, Veal, Lamb Steaks, Roasts, Chops | Chops | Insert in the thickest part, away from bone, fat and gristle |
| Poultry | Whole Chicken or Turkey | Insert in the thickest part of thigh, avoiding bone |
| Poultry Breasts or Roasts | ||
| Duck, Goose, Pheasant | ||
| Stuffing (Alone or in Bird) | Insert in the thickest part of the dish | |
| Pork & Ham | Fresh Pork | Insert in the thickest part, away from bone, fat and gristle |
| Fresh Ham (Raw) | ||
| Precooked Ham (Reheat & Serve) | ||
| Leftovers & Casseroles | Leftovers | Insert in the thickest part of the dish |
| Casseroles | ||
| Seafood | Whole Fish | Insert in the thickest part of the fish |
| Fish Fillet (Side of Fish) | ||
| Fish Steaks or Portions | ||
Recommended Probe Temperature Chart
| Category Examples | Examples of Food | Target Internal Temp. | Desired Doneness |
| Ground Meat & Meat Mixtures | Meatloaf | 160 °F (71 °C) | |
| Meatballs | 165 °F (74 °C) | ||
| Fresh Beef, Veal, Lamb | Roasts | 145 °F (63 °C) | Rare: 120 °F (49 °C) Medium rare: 125 °F (52 °C) Medium: 130 °F (54 °C) Medium well: 135 °F (57 °C) Well done: 140 °F (60 °C) |
| Poultry | Whole Chicken or Turkey | 165 °F (74 °C) | |
| Poultry Breasts or Roasts | |||
| Duck, Goose, Pheasant | |||
| Stuffing (Alone or in Bird) | |||
| Pork & Ham | Fresh Pork | 145 °F (63 °C) | Well done: 170 °F (77 °C) |
| Fresh Ham (Raw) | Well done: 160 °F (71 °C) | ||
| Precooked Ham (Reheat & Serve) | 140 °F (60 °C) | ||
| Leftovers & Casseroles | Leftovers | 165 °F (74 °C) | |
| Casseroles | |||
| Seafood Whole Fish | 145 °F (63 °C) | ||
| Fish Fillet (Side of Fish) | |||
| Fish Steaks or Portions |
ENGLISH
Steam Function (Upper Oven Only)
Steam cooking uses the moist heat of steam to cook food. This is an ideal cooking method for delicate food items such as seafood, which can lose nutrients when boiled.
The upper oven provides 2 methods of steam cooking: Steam Combi and Sous Vide.

CAUTION
Take care when opening the oven door during or after steam cooking. Hot steam can cause scalding.
After any steam cooking cycle, the drying function will run automatically. It is normal to hear the steam pump running during the drying function.
Using the Steam Feeder Tank
The steam feeder tank is located over the upper oven cavity.
1 Gently push the front of the steam feeder tank to slide it out.
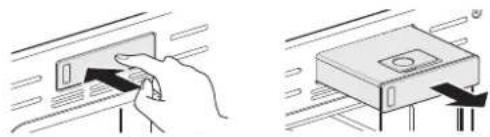
2 Remove the tank and place it on a flat surface.
3 Remove the tank cover or flip open the fill lid at the front of the tank cover.

38 OPERATION
4 Fill the tank to the max line located at the front of the tank. Use softened, filtered water, if possible. Hard water may clog the steam generator more quickly with scale buildup.
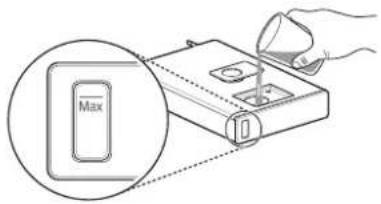
5 Assemble the cover or snap closed the fill lid.
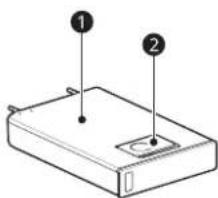
Tank cover
2Fill lid
CAUTION
Make sure the steam feeder tank cover and fill lid are closed before putting the tank in the oven.
- Use potable water only.
- Do not fill the steam feeder tank with any fluid or mixture other than water.
- Do not fill the steam feeder tank with hot water.
- Fill the steam feeder tank up to the line indicated on the front.
- Do not tilt the steam feeder tank while it is full.
Discard any remaining water and clean the steam feeder tank after cooking.
Use the steam feeder tank only for its intended purpose of providing water for steam cooking.
Monitor the water level in the tank and refill as needed for steam cooking. Use oven mitts to avoid burns when handling the hot tank.
6 Carefully insert the tank into the steam feeder slot, making sure to keep the tank level while carrying it. If the tank is not kept level, water will drain out of the tubes in the back.
7 Slide the tank into the slot until it clicks into place.
Sous Vide (Upper Oven Only)
Sous vide cooking uses steam to cook foods "low and slow." Use it to cook meat, fish, seafood, poultry or vegetables. Food must be vacuum packed in pouches.
It is not necessary to preheat the oven when using sous vide.
Refer to the cooking guide for recommended sous vide settings.
Benefits of Sous Vide
The lower temperatures and long cooking times used in sous vide cooking provide many benefits.
Healthier
Compared to other cooking methods, sous vide retains most of the original nutrients in food.
- Safe and Convenient
The long cooking times used in sous vide cooking allow food to be pasteurized. Because food is vacuum packed before cooking, the unopened pouches can be quickly chilled then easily stored after cooking.
Crisp and Moist Results
The fine temperature control of sous vide cooking is an excellent way to achieve the perfect texture when cooking meat and poultry. The low temperatures used retain more of the moisture in food than conventional cooking methods. After cooking, a final sear in a frying pan adds the perfect crisp finish.
Setting Sous Vide Mode
1 Fill the tank with water up to the max line located at the front of the tank.
2 Place the heavy duty rack in position 3 and place the sealed food bag on it.
3 Press UPPER OVEN and select STEAM COOK in the cooking mode screen.
4 Press Sous-vide in the display.
5 Select the desired temperature.
6 If desired, scroll to set the cook time and delayed start time. Press the arrow key on the right side of the display to see the delayed start time settings.
7 Press START.
8 Once cooking is finished, allow the oven to cool completely. Then wipe up any water left on the oven interior.
Changing the Sous Vide Settings
1 Press EDIT in the display to bring up the cook settings screen.
2 Adjust the settings as desired.
3 Press START.
To Stop Sous Vide Cooking
Press STOP in the display, and press YES.
NOTE
- As the temperature in the oven rises, steam may not be visible.
Sous Vide Cooking Guide
The size, weight, thickness, starting temperature, and your personal preferences will affect operating times. This guide is only for reference. Adjust the cook time according to your preference.
| Food | Quantity (oz) | Temp. (°F) | Time | ||
| Min Target Max | |||||
| Beef Steak (Medium rare) | 1" thick 14.1-17.6 oz | 135 - 2.5 | hr. 3 hr. | ||
| Chicken Breast 4.2-5.3 oz 149 - 2.5 hr. 3 hr. | |||||
| Salmon 1" thick | 7 oz | 140 - 2 hr. | 2.5 hr. | ||
| Asparagus 2.8 oz / 6 ea | 5.6 oz / 12 ea | 185 20 min. | 30 min. | 45 min. | |
Cook 30 mins. or 1 hour more if you use meats thicker than 1".
- If you use larger cuts of meat, cut to match the recommended weight. Be careful not to put pieces of meat too close together.
Steam Combi (Upper Oven Only)
The Steam-Combi mode heats food gradually, using both the oven heating elements and moist steam heat. The oven can be programmed to cook at any temperature from 210^ (100^) to 550^ (285^) . Preset temperature options start at 350^ (175^) .
Setting Steam Combi
1 Press UPPER OVEN and press STEAM COOK in the cooking mode screen.
2 Press Steam Combi in the display.
3 Select the desired temperature and steam level: LOW, MEDIUM, or HIGH.
4 If desired, scroll to set the cook time and delayed start time. Press the arrow key on the right side of the display to see the delayed start time settings.
5 Press START.

40 OPERATION
6 Once cooking is finished, allow the oven to cool completely. Then wipe up any water left on the oven interior.
NOTE
- Once Steam Combi cooking is started, an indicator on the display shows the status of the steam function.
Make sure the steam feeder tank is filled with water before starting the Steam Combi mode. If the water in the tank runs out during cooking, a chime sounds and a popup appears in the display. The oven continues to cook without steam. - Remember to drain the steam feeder tank after use.
- When the temperature rises in the oven, steam may not be visible.
- It is normal to hear the sound of boiling water from the steam generator while running the steam functions.
Setting Auto Cook Mode
1 Press UPPER OVEN or LOWER OVEN and press AUTO COOK in the cooking mode screen.
2 Press a category to filter the options.
3 Scroll through or tap the letters to find and select an item.
4 Follow the recommendations in the display regarding accessories and rack position.
5 Press START.
Changing the Steam Cook Settings
1 Press EDIT in the display to bring up the Cook Settings screen.
2 Adjust the settings as desired.
3 Press START.
To Stop Steam Cooking
Press STOP in the display, and press YES.
Auto Cook Mode
The Auto Cook function provides guidance for cooking foods or dishes that may be unfamiliar. It contains preset programs for cooking many popular food items, with information on recommended preheating, accessories, and rack position for optimal results.
Auto Cook Guide
- Preheat oven first for most items.
- Preheat for 5 minutes when broiling.
- If using probe, insert food and probe before preheating.
NOTE
- When cooking thin cuts of meat, insert the probe into the thickest part of the meat. If the probe is inserted incorrectly, the oven could turn off too soon. See the Probe section for instructions.
| Beef | ||||
| Menu | Amount Food Temp. | Remark Instructions | ||
| Cookware | Rack Position | |||
| Beef Tenderloin | 2~4 lb. Refrigerated | Probe cook | Ingredients Kosher salt, ground black pepper, garlic powder to taste Instructions Prepare beef tenderloin, trimmed. Brush or lightly spray with oil. Add salt, garlic powder and pepper to taste. Place the tenderloin on the grid on the broiler pan. | |
| Grid on broiler pan | 2 | |||
| Roast Beef | 2~4 lb. Refrigerated | Probe cook | Ingredients Kosher salt, ground black pepper, garlic powder to taste Instructions Prepare beef sirloin, trimmed. Brush or lightly spray with oil. Add salt, garlic powder and pepper to taste. Place the sirloin on the grid on the broiler pan. | |
| Grid on broiler pan | 2 | |||
| Prime Rib | 8~12 lb. Refrigerated | Probe cook | Ingredients Kosher salt, ground black pepper, garlic powder to taste Instructions Prepare the bone-in prime rib. Brush or lightly spray with oil. Add salt, garlic powder and pepper to taste. Place the prime rib in the roasting pan. | |
| Roasting pan | 2 | |||
| Steak - Ribeye | 1~3 lb. Refrigerated | When, oven beeps, turn food over. | Ingredients Kosher salt, ground black pepper to taste Instructions Prepare ribeye steaks, about 9~12 oz. each, thickness about 1~1.5 in. Brush or lightly spray with oil. Add salt and pepper to taste. Place the steaks on the grid on the broiler pan. When oven beeps, turn the steaks over. | |
| Grid on broiler pan | 3 | |||
| Pork | ||||
| Menu | Amount Food Temp. | Remark Instructions | ||
| Cookware Rack Position | ||||
| Pork Ribs | 2-4 lb. Refrigerated Ingredients | Kosher salt, ground black pepper to taste Instructions Prepare bone-in pork ribs, trimmed. Brush or lightly spray with oil. Add salt and pepper to taste. Place the pork ribs on the grid on the broiler pan. | ||
| Grid on broiler pan | 2 | |||
| Pork Chops | 2-6 EA Refrigerated Ingredients | Kosher salt, ground black pepper to taste Instructions Prepare bone-in pork chops, about 6 oz. each, trimmed. Brush or lightly spray with oil. Add salt and pepper to taste. Place the pork chops on the grid on the broiler pan. | ||
| Grid on broiler pan | 3 | |||
| Pork Loin | 2-4 lb. Refrigerated | Probe cook | Ingredients Kosher salt, ground black pepper to taste Instructions Prepare pork loin, about 4 inches in diameter, trimmed. Brush or lightly spray with 1 tbsp. of oil. Add salt and pepper to taste. Place the pork loin on the grid on the broiler pan. | |
| Grid on broiler pan | 2 | |||
| Pork Tenderloin | 2-4 lb. Refrigerated | Probe cook | Ingredients Kosher salt, ground black pepper to taste Instructions Prepare pork tenderloin, 2-3 inches in diameter, trimmed. Brush or lightly spray with 1 tbsp. of oil. Add salt and pepper to taste. Place the tenderloin on the grid on the broiler pan. | |
| Grid on broiler pan | 2 | |||
| Lamb | ||||
| Menu | Amount Food Temp. | Remark Instructions | ||
| Cookware | Rack Position | |||
| Rack of Lamb | 2~4 lb. Refrigerated | Probe cook | Ingredients Canola oil, kosher salt, ground black pepper to taste Instructions Prepare rack of lamb, trimmed. Brush or lightly spray with 1 tbsp. of oil. Add salt and pepper to taste. Place the rack of lamb on the grid on the broiler pan. | |
| Grid on broiler pan | 2 | |||
| Bone-in Leg of Lamb | 5~7 lb. Refrigerated | Probe cook | Ingredients Canola oil, kosher salt, ground black pepper to taste Instructions Prepare bone-in leg of lamb, trimmed. Brush or lightly spray with 1 tbsp. of oil. Add salt and pepper to taste. Place the leg of lamb in the roasting pan. | |
| Roasting pan 2 | ||||
| Sausage | |||
| Menu | Amount Food | Temp. | Instructions |
| Cookware Rack | k Position | ||
| Italian Sausage | 2~8 EA Refrigerated Prepare sausages, about 3.5 oz. each. Spray a rimmed sheet pan with cooking spray. Place the Italian sausages on the half sheet pan and space the sausages 1 1/2 in. apart from each other. | ||
| 1/2 Sheet Pan 3 | |||
| Hot Dogs | 2~8 EA Refrigerated Prepare hot dogs, about 2 oz. each. Spray a rimmed sheet pan with cooking spray Place the hot dogs on the half sheet pan and space the hot dogs 1 1/2 in. apart from each other. | ||
| 1/2 Sheet Pan 3 | |||
ENGLISH
| Fish | |||
| Menu | Amount Food Temp. | Instructions | |
| Cookware Rack Position | |||
| Fish Fillet | 2~4 EA Refrigerated Ingredients | Kosher salt, ground black pepper, oil to taste Instructions Prepare the fish fillets, about 7 oz. each, and about 1-1.5 in. thick. Brush or lightly spray with oil. Add salt and pepper to taste. Place the fillets on the grid on the broiler pan. | |
| Grid on broiler pan | 3 | ||
| Cod Fillet | 2~4 EA Refrigerated Ingredients | Kosher salt, ground black pepper, oil to taste Instructions Prepare the cod fillets, about 7 oz. each, and about 1-1.5 in. thick. Brush or lightly spray with oil. Add salt and pepper to taste. Place the fillets on the grid on the broiler pan. | |
| Grid on broiler pan | 3 | ||
| Salmon Fillet | 2~4 EA Refrigerated Ingredients | Kosher salt, ground black pepper, oil to taste Instructions Prepare the salmon fillets, about 7 oz. each, and 3/4 in. thick. Brush or lightly spray with oil. Add salt and pepper to taste. Place the fillets on the grid on the broiler pan. | |
| Grid on broiler pan | 3 | ||
| Baked Shrimp | 1~2 lb. Refrigerated Ingredients | Kosher salt, ground black pepper, oil to taste Instructions Prepare the shrimp, peel and delvein (if necessary). Brush or lightly spray with oil. Add salt and pepper to taste. Place the shrimp on the grid on the broiler pan. | |
| Grid on broiler pan | 3 | ||
| Tilapia Fillet | 2~4 EA Refrigerated Ingredients | Kosher salt, ground black pepper, oil to taste Instructions Prepare the tilapia fillets, about 7 oz. each, and about 1-1.5 in. thick. Brush or lightly spray with oil. Add salt and pepper to taste. Place the fillets on the grid on the broiler pan. | |
| Grid on broiler pan | 3 | ||
44 OPERATION
| Fish | |||
| Menu | Amount Food Temp. | Instructions | |
| Cookware Rack Position | |||
| Lobster Tails | 1~2 EA Refrigerated Ingredients | Salt, pepper to taste, 1 tbsp butter - melted Instructions Prepare the lobster tails, about 5 oz. each. Butterfly the lobster tails. Brush with melted butter. Add salt to taste. Place the lobster tails on the grid on the broiler pan. | |
| Grid on broiler pan | 3 | ||
| Salmon Steak | 2~4 EA Refrigerated Ingredients | Kosher salt, ground black pepper, oil to taste Instructions Prepare the salmon steaks, about 7 oz. each, and about 1.5~2 in. thick. Brush or lightly spray with oil. Add salt and pepper to taste. Place the salmon on the grid on the broiler pan. | |
| Grid on broiler pan | 3 | ||
| Tuna Steak | 2~4 EA Refrigerated Ingredients | Salt, pepper, oil to taste Instructions Prepare the tuna steaks, about 7 oz. each, and about 1.5~2 in. thick. Brush or lightly spray with oil. Add salt and pepper to taste. Place the tuna on the grid on the broiler pan. | |
| Grid on broiler pan | 3 | ||
| Poultry | ||||
| Menu | Amount Food Temp. | Remark Instructions | ||
| Cookware Rack Position | ||||
| Spatchcock Chicken | 4~6 lb / chicken | Refrigerated | Probe cook | Ingredients Kosher salt, ground black pepper, to taste Instructions Prepare the chicken, about 4~6 lb. Spatchcock the chicken by removing the backbone. Add salt, pepper and herbs to taste. Place the chicken with the skin side up on the grid on the broiler pan. |
| Grid on broiler pan | 2 | |||
| Chicken Drumsticks | 4~16 EA Refrigerated Ingredients | Kosher salt, ground black pepper, oil to taste Instructions Prepare the chicken drumsticks, about 4 oz. each. Brush or lightly spray with oil. Add salt and pepper to taste. Place the chicken drumsticks on the grid on the broiler pan. | ||
| Grid on broiler pan | 3 | |||
| Fresh Chicken Wings | 10~20 EA Refrigerated Ingredients | Salt, pepper, oil to taste Instructions Prepare the fresh chicken wings, about 3 oz. each. Brush or lightly spray with oil. Add salt and pepper to taste. Place the fresh chicken wings on the grid on the broiler pan. | ||
| Grid on broiler pan | 3 | |||
| Frozen Chicken Wings | 10~20 EA Refrigerated Ingredients | Kosher salt, ground black pepper, oil to taste InstructionsPrepare the frozen chicken wings, about 3 oz. each. Add salt and pepper to taste, if necessary. Place the frozen chicken wings on the grid on the broiler pan. | ||
| Grid on broiler pan | 3 | |||
| Chicken Breasts | 2~8 EA Refrigerated Ingredients | Kosher salt, ground black pepper, oil to taste InstructionsPrepare the fresh chicken breasts, about 6 oz. each. Brush or lightly spray with oil. Add salt and pepper to taste. Place the chicken breasts on the grid on the broiler pan. | ||
| Grid on broiler pan | 3 | |||
| Whole Chicken | 5~7 lb / chicken | Refrigerated | Probe cook | IngredientsKosher salt, ground black pepper, to taste InstructionsPrepare the whole chicken, about 5~7 lb. Truss the chicken. Add salt and pepper to taste. Place the whole chicken on the grid on the broiler pan. |
| Grid on broiler pan | 2 | |||
| Turkey Breasts | 1~4 EA Refrigerated | Probe cook | IngredientsKosher salt, ground black pepper, oil to taste InstructionsPrepare the turkey breasts, about 3 lb. each. Brush or lightly spray with oil. Add salt and pepper to taste. Place the turkey breasts on the grid on the broiler pan. | |
| Grid on broiler pan | 3 | |||
| Whole Turkey | 12~16 lb. Refrigerated | Probe cook | IngredientsKosher salt, ground black pepper, to taste InstructionsPrepare the whole turkey, about 12~16 lb. Add salt and pepper to taste. Place the whole turkey in the roasting pan. | |
| Rack in roasting pan | 2 | |||
| Turkey with Stuffing | 12~16 lb. Refrigerated | Probe cook | IngredientsKosher salt, ground black pepper, to taste InstructionsPrepare the turkey, about 12~16 lb. Add stuffing to the cavity of the turkey. Add salt and pepper to taste. Place the turkey with stuffing in the roasting pan. | |
| Rack in roasting pan | 2 | |||
| Satchcock Turkey | 7~12 lb. Refrigerated | Probe cook | IngredientsKosher salt, ground black pepper, to taste InstructionsPrepare the turkey, about 7~12 lb. Satchcock the turkey by removing the backbone. Add salt, pepper and herbs to taste. Place the turkey with the skin side up in the roasting pan. | |
| Rack in roasting pan | 2 | |||
ENGLISH
| Casseroles | ||||
| Menu | Amount | Food Temp. | Remark Instructions | |
| Cookware | Rack Position | |||
| Homemade Lasagna | 1 casserole(serves 6) | Room | When the oven beeps,remove the cover on the food. | Ingredients1 lb. ground beef, cooked32 oz ricotta cheese2 cups mozzarella cheese1/2 cup grated parmesan cheese2 eggs2 24-oz jars tomato sauce1 box no-boil lasagna sheetsInstructionsServes 61) Combine the ricotta cheese, 1 cup of mozzarella cheese and 1/4 cup of parmesan cheese in a bowl. Add the eggs and combine.2) Spread 1 cup of tomato sauce on the bottom of the baking dish.3) Lay down 4 lasagna sheets, then 1 cup tomato sauce and 1/2 of the ricotta cheese mixture. Top with half of the cooked meat.4) Repeat steps 2 and 3.5) Top with 4 more lasagna sheets and the remaining tomato sauce.6) Sprinkle with the remaining mozzarella and parmesan cheeses.7) Place the baking dish on the rack for the image recognition.8) Remove the baking dish while preheating and cover with foil.9) After preheating, place the covered baking dish on the rack.10) When the oven beeps, remove the foil.11) Continue baking until cooking is complete. |
| 13 x 9 inch baking dish | 2 | |||
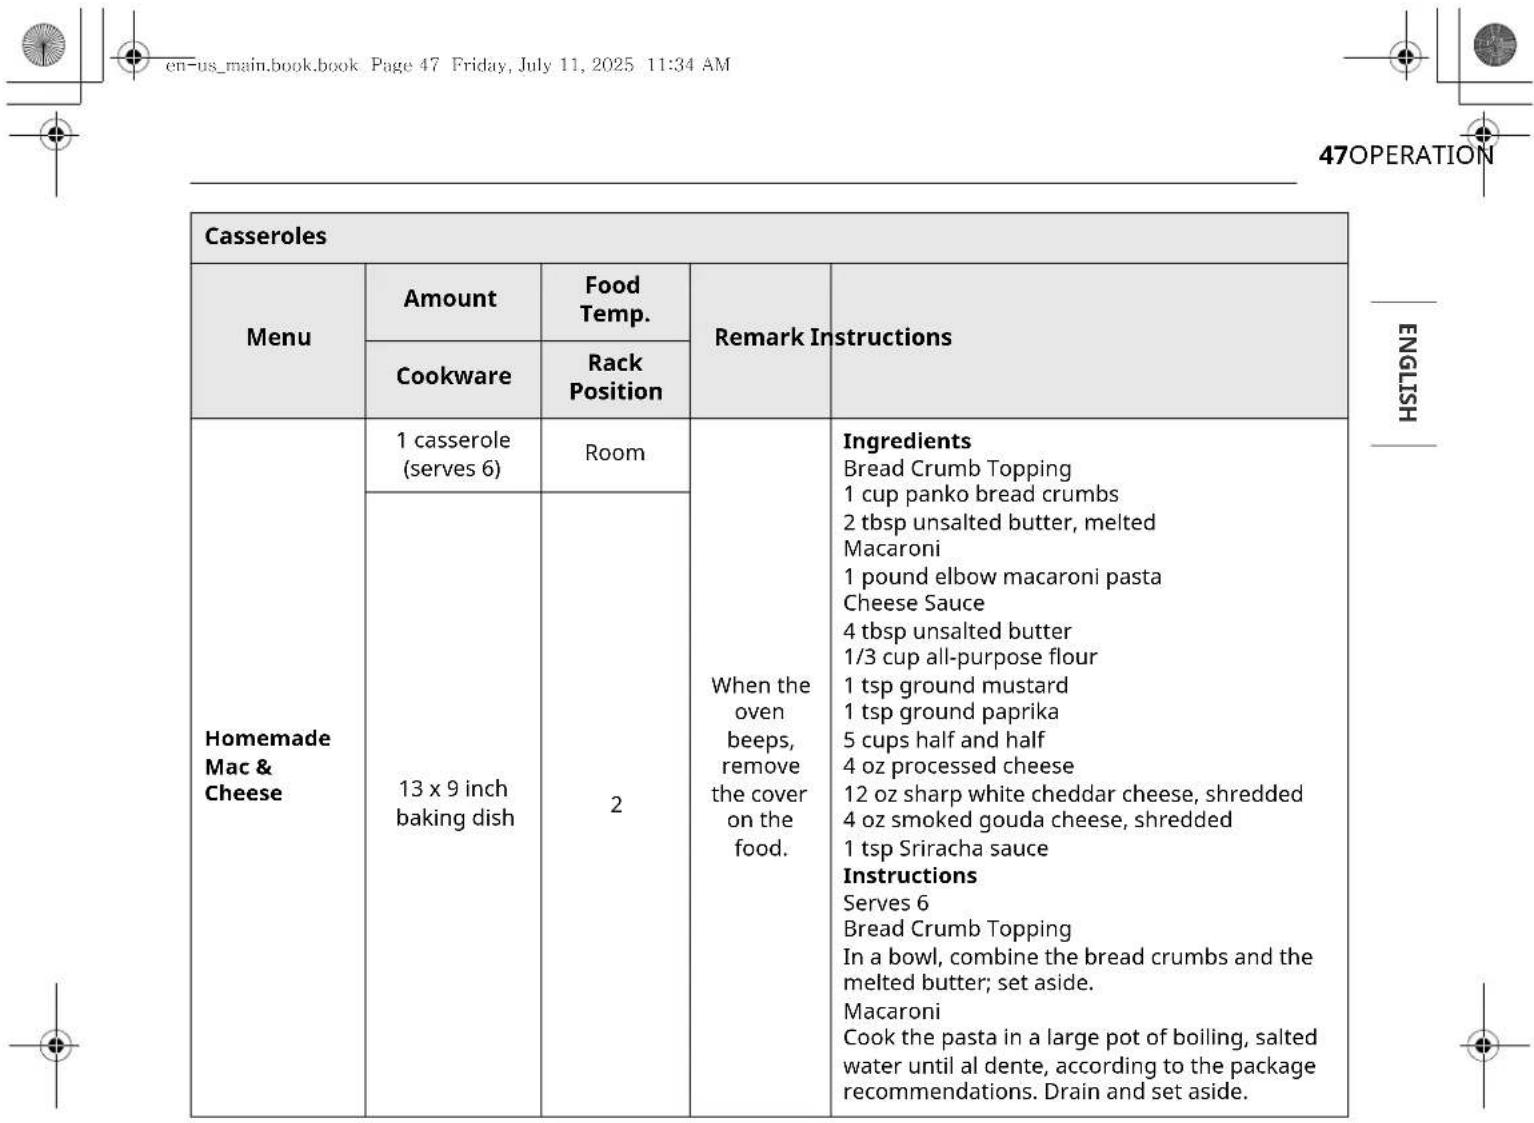
| Casseroles | ||||
| Menu | Amount | Food Temp. | Remark Instructions | |
| Cookware | Rack Position | |||
| Homemade Mac & Cheese | 1 casserole (serves 6) | Room | When the oven beeps, remove the cover on the food. | Cheese Sauce 1) In the same pot the pasta was cooked in, melt the 4 tbsp butter over medium heat. Add the flour and stir to combine with the butter. 2) Stir the ground mustard and paprika into the butter-flour mixture. Cook this mixture for 2 minutes, stirring frequently. 3) Whisk in the half and half slowly to avoid lumps. 4) Bring the half and half and butter-flour mixture to a simmer, stirring occasionally all the way to the bottom of the pot. 5) Lower the heat and stir frequently for five minutes until the sauce has thickened. 6) Add the processed cheese and stir to melt it into the sauce. 7) Off the heat, add the cheddar and gouda cheeses, a little bit at a time, until all the cheeses are melted into the sauce. 8) Stir in the Sriracha sauce. 9) Add the drained pasta and stir to combine with the cheese sauce. 10) Transfer the pasta and cheese sauce mixture to a casserole dish. 11) Top evenly with the bread crumb mixture. 12) After preheating, place the baking dish in the oven. |
| 13 x 9 inch baking dish | 2 | |||
| Gratin Potatoes | 1 casserole (Serves 6~8) | Room | When the oven beeps, remove the cover on the food. | Ingredients 1 tbsp unsalted butter, room temperature 1 garlic clove, smashed 2 1/2 pounds Yukon Gold potatoes or 4-5 russet potatoes, washed 2 1/2 cups heavy cream 4 oz Gruyere or Parmesan cheese, grated kosher salt and ground black pepper to taste Instructions 1) Generously butter the casserole dish. 2) Rub the smashed garlic clove all over the buttered casserole dish. 3) Cut the potatoes into 1/8 inch thick slices using a knife or a mandolin. 4) Build the dauphinoise by placing a portion of the heavy cream onto the bottom of the casserole dish. 5) Follow this with some of the sliced potatoes, the cheese, and salt and pepper. 6) Add more of the heavy cream and repeat with the potatoes, cheese, and salt and pepper. 7) Continue to build and layer the potatoes to fill the casserole dish. 8) Place the baking dish on the rack for the image recognition. 9) Remove the baking dish while preheating the oven and cover the top layer of potatoes with parchment paper. Press down on the paper so it touches the potatoes. 10) After preheating, place the covered baking dish directly on the rack. 11) When the oven beeps, remove the parchment paper. |
| 13 x 9 inch baking dish | 2 | |||
ENGLISH
| Pizza | |||
| Menu | Amount | Food Temp. | Instructions |
| Cookware | Rack Position | ||
| Frozen Thin Crust | 1 pizza (about 18.5 oz) | Frozen | 1) Remove the pizza from the packaging. 2) Place the pizza directly on the rack for the image recognition. 3) Remove the pizza while preheating the oven. 4) After preheating, place the pizza directly on the rack. |
| Directly On Rack | 3 | ||
| Frozen Rising Crust | 1 pizza (about 29 oz) | Frozen | 1) Remove the pizza from the packaging. 2) Place the pizza directly on the rack for the image recognition. 3) Remove the pizza while preheating the oven. 4) After preheating, place the pizza directly on the rack. |
| Directly On Rack | 3 | ||
| Homemade Pizza | 14-inch pizza (serves 6~8) | Room | Ingredients Dough 8 oz all-purpose flour 1/2 tbsp kosher salt 1/2 cup warm water, about 115 °F 1/8 tsp sugar 1/2 tbsp active dry yeast 1 tbsp olive oil + more for brushing Homemade Sauce 1 28-oz can of whole peeled tomatoes (preferably San Marzano) 1 6-oz can of tomato paste, 1 tbsp fresh basil, roughly chopped 2 tbsp olive oil, or olive oil blend, 1 tbsp kosher salt 1/2 tsp black pepper, 1 tbsp granulated garlic, 1 tbsp sugar ※ Store bought sauce can be used instead for simplicity. Pizza 1/2 to 3/4 cup sauce, 8 oz shredded mozzarella cheese |
| Pizza Pan 3 | |||
| Homemade Pizza | 14-inch pizza(serves 6~8) | Room | InstructionsDough1) In the bowl of an electric stand mixer, whisk together the flour and salt.2) In a separate bowl, add the water, sugar, yeast, and olive oil.3) Whisk together the yeast mixture. Set it aside until it foams and bubbles, about 3-5 minutes.4) Place the mixer bowl onto the mixer stand and attach the dough hook.5) Add the yeast mixture to the flour and begin mixing the dough on medium speed for 8 1/2 minutes. If the dough is not completely combined, mix for another minute. If the dough is sticking to the bowl, add another 1/4 cup of flour and mix for another minute. If the dough is too dry, add another 1/4 cup of water and mix for another minute.6) Pick the dough up and begin to form a ball by gently folding the dough under itself.7) Place onto a lightly oiled sheet pan.8) Brush the dough ball with olive oil to keep it moist.9) Cover with plastic wrap and allow dough to rise until doubled in size, about an hour or so.10) Turn the dough ball onto a lightly floured surface.11) Begin shaping the dough ball by pressing down with your fingertips into the dough to form a 6-inch-round circle.12) Use a small amount of flour as needed to prevent sticking. |
| Pizza Pan 3 | |||
ENGLISH

| Pizza | |||
| Menu | Amount | Food Temp. | Instructions |
| Cookware | Rack Position | ||
| Homemade Pizza | 14-inch pizza(serves 6~8) | Room | Sauce 1) Open the cans of tomatoes and empty them into a blender. 2) Roughly chop the basil. 3) Add the tomato paste, chopped basil, and spices to the blender. 4) Blend the ingredients until the sauce is well blended, about 30 seconds. Pizza 1) To stretch the dough, place the dough onto a lightly floured surface and gently press into a circle, flipping several times and adding a pinch of flour if the dough is sticky. Once you have a 6- or 8-inch circle, begin rolling with the rolling pin to gently stretch the dough, turning it slightly to keep the circle shape. 2) Place your pizza dough onto a lightly floured pizza peel or nonstick pizza pan. You can cut the dough with a pizza cutter to form a circle or to make it smaller. 3) Use the dough docker to make indents in the dough. 4) These holes prevent bubbles in your pizza crust. 5) Evenly spread the sauce over the entire surface of the dough, leaving a 1-inch gap around the outer edge of the dough. 6) Place the cheese on top of the sauce. 7) Leave about a half-inch border from the sauce edge. The cheese is going to spread and will stay on top of your pizza this way. 8) Place the pizza pan or peel in the oven for image recognition. 9) Remove the pizza while preheating. 10) After preheating, place the pizza pan on the rack or use the peel to transfer the pizza to a pizza stone. 11) After cooking, cool for 5 minutes before slicing. |
| Pizza Pan 3 | |||
| Pastries | |||
| Menu | Amount Food Temp. | Instructions | |
| Cookware Rack Position | |||
| Refrigerated Croissants | 2~8 EA Refrigerated Prepare the 1/2 Sheet Pan 3 | croissants. Roll the croissant triangles into croissant shapes. Place the croissants on the ungreased half sheet pan. Place the half sheet pan in the oven for image recognition. Remove the half sheet pan while preheating. After preheating, place the half sheet pan with the croissants back in the oven. | |
| Frozen Dinner Rolls | 2~6 EA Frozen Place the frozen 1/2 Sheet Pan 3 | inner rolls on the half sheet pan. Place the half sheet pan in the oven for image recognition. Remove the half sheet pan while preheating. After preheating, place the half sheet pan with the frozen dinner rolls back in the oven. | |
| Vegetables | ||||
| Menu | Amount Food Temp. | Remark Instructions | ||
| Cookware Rack Position | ||||
| Baby Carrots | 15-30 oz Refrigerated Ingredients | Kosher salt, ground black pepper, oil to taste Instructions 1) Wash and peel (if necessary) the baby carrots. 2) Brush or lightly spray with oil. 3) Add salt and pepper to taste. 4) Place the baby carrots on the half sheet pan. | ||
| 1/2 Sheet Pan | 3 | |||
| Carrots, Diced | 15-30 oz Refrigerated Ingredients | Kosher salt, ground black pepper, oil to taste Instructions 1) Peel and cut carrots into 1/2~3/4 in. cubes. 2) Brush or lightly spray with oil. 3) Add salt and pepper to taste. 4) Place the carrots on the half sheet pan. | ||
| 1/2 Sheet Pan | 3 | |||
| White Mushrooms | 5-20 oz Refrigerated Ingredients | Kosher salt, ground black pepper, oil to taste Instructions 1) If desired, cut mushrooms into halves. 2) Brush or lightly spray with oil. 3) Add salt and pepper to taste. 4) Place the mushrooms on the half sheet pan. | ||
| 1/2 Sheet Pan | 3 | |||
| Vegetables | ||||
| Menu | Amount Food Temp. | Remark Instructions | ||
| Cookware Rack Position | ||||
| Asparagus | 5~20 oz Refrigerated Ingredients | Kosher salt, ground black pepper, oil to taste Instructions1) Trim the heartier, woody ends of the asparagus and discard.2) Brush or lightly spray with oil.3) Add salt and pepper to taste.4) Place the asparagus on the half sheet pan. | ||
| 1/2 Sheet Pan | 3 | |||
| Broccoli | 15~30 oz Refrigerated Ingredients | Kosher salt, ground black pepper, oil to taste Instructions1) Cut the broccoli into bite-size florets.2) Brush or lightly spray with oil.3) Add salt and pepper to taste.4) Place the broccoli on the half sheet pan. | ||
| 1/2 Sheet Pan | 3 | |||
| Cauliflower | 15~30 oz Refrigerated Ingredients | Kosher salt, ground black pepper, oil to taste Instructions1) Cut the cauliflower into bite-size florets.2) Brush or lightly spray with oil.3) Add salt and pepper to taste.4) Place the cauliflower on the half sheet pan. | ||
| 1/2 Sheet Pan | 3 | |||
| Brussels Sprouts | 15~30 oz Refrigerated Ingredients | Kosher salt, ground black pepper, oil to taste Instructions1) Cut brussels sprouts in half, or in quarters if they are large.2) Brush or lightly spray with oil.3) Add salt and pepper to taste.4) Place the brussels sprouts on the half sheet pan. | ||
| 1/2 Sheet Pan | 3 | |||
| Beets, Diced | 15~30 oz Refrigerated Ingredients | Kosher salt, ground black pepper, oil to taste Instructions1) Peel and cut beets into 1/2~3/4 in. cubes2) Brush or lightly spray with oil.3) Add salt and pepper to taste.4) Place the diced beets on the half sheet pan. | ||
| 1/2 Sheet Pan | 3 | |||
| Sweet Potatoes, Diced | 15~30 oz Room Ingredients | Kosher salt, ground black pepper, oil to taste Instructions 1) Peel and cut sweet potatoes into 1/2~3/4 in. cubes. 2) Brush or lightly spray with oil. 3) Add salt and pepper to taste. 4) Place the sliced sweet potatoes on the half sheet pan. | ||
| 1/2 Sheet Pan | 3 | |||
| Sweet Potato, Whole | 1~4 EA (8 oz each) | Room | 1) Wash and prick the skin all over the sweet potatoes. 2) Place the sweet potatoes directly on the rack. | |
| Directly On Rack | 3 | |||
| Cherry Tomatoes | 15~30 oz Refrigerated Ingredients | Kosher salt, ground black pepper, oil to taste Instructions 1) Wash the cherry tomatoes. 2) Remove stems, if present. 3) Brush or lightly spray with oil. 4) Add salt and pepper to taste. 5) Place the cherry tomatoes on the half sheet pan. | ||
| 1/2 Sheet Pan | 3 | |||
| Corn on the Cob | 1 sheet (8~12 oz each) | Refrigerated | When oven beeps, turn food over. | Ingredients Kosher salt, ground black pepper, to taste, 1/2 tbsp. of oil per (1/2) piece Instructions 1) Remove husks and silk from corn cobs and cut cobs in half. 2) Brush or lightly spray with oil. 3) Add salt and pepper to taste. 4) Place the corn on a half sheet pan. 5) When the oven beeps, turn the food over. |
| 1/2 Sheet Pan | 3 | |||
| Green Beans | 10~20 oz Refrigerated Ingredients | Kosher salt, ground black pepper, oil to taste Instructions 1) Wash the green beans. 2) Brush or lightly spray with oil. 3) Add salt and pepper to taste. 4) Place the green beans on a half sheet pan. | ||
| 1/2 Sheet Pan | 3 | |||
ENGLISH
| Potatoes | |||
| Menu | Amount Food Temp. | Instructions | |
| Cookware | Rack Position | ||
| Home Fries | 15~30 oz Room 3 | Ingredients | For 15 oz of Yukon Gold potatoes2 tbsp olive oil1 tsp kosher salt1/2 tsp ground black pepper1 tsp smoked paprika1/2 tsp garlic powder2 tbsp chopped parsley, for garnish Instructions1) Dice potatoes into 1" cubes and place on half sheet pan.2) Season the potatoes with salt, spices, and olive oil. Mix thoroughly.3) Roast for 20 min depending on the size, stirring halfway through the cooking process.4) Garnish with fresh herbs for color and serve immediately. |
| 1/2 Sheet Pan 3 | |||
| Potato Wedges | 15~30 oz Room 3 | Ingredients | Kosher salt, ground black pepper, oil to taste Instructions1) Wash and cut the potatoes into wedges.2) Brush or lightly spray with oil.3) Add salt and pepper to taste.4) Place the potatoes on a half sheet pan. |
| 1/2 Sheet Pan 2 | |||
| Smashed Potatoes | 15~30 oz Room 3 | Ingredients | Kosher salt, ground black pepper, oil to taste Instructions1) Cook russet potatoes in boiling water for 15 minutes and then strain and chill.2) Combine all spices in a small mixing bowl.3) Smash the potatoes using the side of a knife to flatten.4) Place smashed potatoes on a half sheet pan.5) Add olive oil and seasoning. |
| 1/2 Sheet Pan 2 | |||
| Desserts | ||||
| Menu | Amount | Food Temp. | Remark Instructions | |
| Cookware | Rack Position | |||
| Apple Pie | 1 pie (serves 6) | Room | Ingredients Pie Crust 2 1/2 cups pastry flour, 1 tsp salt, 1 tsp sugar 2 sticks unsalted butter, cut into small pieces and well chilled 4-6 tbsp ice water, as needed Apples 8 tart apples, like Granny Smith 2 tbsp lemon juice, 1/4 cup sugar, 1/2 tsp ground cinnamon 1/2 tsp kosher salt, 1 tbsp unsalted butter, cut into small pieces Instructions Pie Crust 1) Use a food processor with a blade attachment to combine the pastry flour, salt and sugar. 2) Add the chilled butter pieces and pulse until it resembles coarse meal. 3) Add ice cold water a tablespoon at a time and mix until the dough just comes together. 4) Turn the dough onto a lightly floured counter and bring the dough together. 5) Divide the dough into 2 equal portions and flatten each into a disk. Wrap each in plastic wrap and refrigerate for an hour. | |
| Pie pan directly on rack and catch pan on rack below | 3 | |||
| Apple Pie | 1 pie (serves 6) | Room | Apples 1) Peel, core, quarter and thinly slice the apples and place them in a large bowl. 2) Toss the apples with the lemon juice, followed by the sugar, cinnamon, and kosher salt. To Assemble the Pie 1) On a well floured counter, roll each pie dough out to 12 inches in diameter. Use one rolled out pie dough to line a deep pie pan. 2) Add the apples to the pie pan and dot with 1 tbsp butter. 3) Use the other pie dough to cover the filling. Tuck the top crust under the bottom crust all around. Pinch together to close. 4) Cut a few slits in the top crust to allow steam to escape. In a small bowl, combine 1 egg and 1 tbsp milk. Brush the egg wash over the top crust. 5) Place the pie in the oven for image recognition. 6) Remove the pie while preheating the oven. 7) After preheating, place the pie pan directly on the rack and a foil-lined catch pan on the rack below. 8) Cool on a rack for 1 hour before serving. | |
| Pie pan directly on rack and catch pan on rack below | 3 | |||
| Desserts | ||||
| Menu | Amount | Food Temp. | Remark Instructions | |
| Cookware | Rack Position | |||
| Brownies | 1 Pan (serves 6) | Room | Ingredients 1/2 stick unsalted butter, 6 oz semisweet chocolate, chopped 1/2 cup dark brown sugar, 1 cup sugar, 3 large eggs 1/4 cup cocoa powder, 1/2 tsp kosher salt 1/2 cup + 2 tbsp all-purpose flour Instructions Serves 6 1) Line an 8"x8" baking pan with parchment paper. 2) In a microwave-safe bowl, combine the butter and chocolate. 3) Microwave in short intervals and stir after each interval until melted and smooth. 4) Add the sugars and whisk until combined. 5) Add the eggs one at a time, mixing until incorporated. 6) Sift the cocoa powder, salt and flour into the bowl and mix until combined. 7) Pour the batter into the 8"x8" baking pan. 8) Place the baking pan in the oven for image recognition. 9) Remove the pan while preheating the oven. 10) After the oven preheats, place the pan back in the oven. 11) After cooking, let the brownies cool for 15 minutes in the pan before slicing. | |
| 8x8 inch pan 3 | ||||
ENGLISH

| Desserts | ||||
| Menu | Amount | Food Temp. | Remark Instructions | |
| Cookware | Rack Position | |||
| Scones | 1 sheet of 24 scones | Room | Ingredients 2/4 cups pastry flour, 2 tsp sugar, 2 tbsp + 1 tsp baking powder 4 1/2 tsp kosher salt, 3 sticks unsalted butter, chilled and cut into small pieces 6 cups all-purpose flour, 3 cups buttermilk Instructions Makes 24 scones 1) Use a food processor with the blade attachment to combine the pastry flour, sugar, baking powder and salt. 2) Add the chilled butter pieces and pulse until the mixture resembles coarse meal. 3) In a large bowl, combine the all-purpose flour with the mixture from the food processor. 4) Add the buttermilk and mix until the dough comes together. 5) Turn the dough onto a floured surface and roll out to 1 1/2 in. thick. 6) Cut the dough into the desired shape or use a round biscuit cutter. 7) Transfer the cut scones to a parchment lined half sheet pan. 8) Place the half sheet pan in the oven for image recognition. 9) Remove the half sheet pan while preheating the oven. 10) After the oven preheats, place the scones back in the oven to cook. | |
| 1/2 Sheet Pan | 3 | |||
| Sponge Cake | 2 cakes Room Ingredients | 1 cup cake flour, 6 large eggs, separated 1 cup sugar, 3/4 cup sugar for egg yolks, 1/4 cup sugar for egg whites 2 tsp vanilla, 1/4 tsp salt Instructions 1) Grease the bottom and sides of two 9" cake pans with unsalted butter. Line the bottoms of the cake pans with parchment paper and butter the paper. Dust the pans with all-purpose flour. 2) Use an electric mixer with a whisk attachment to combine the egg yolks with 3/4 cup sugar. Beat on medium high for 5 minutes until the egg yolk mixture is thick and pale in color. 3) In a clean bowl, use an electric mixer with a whisk attachment to beat the egg whites until soft peaks form. Slowly add 1/4 cup sugar and continue beating until stiff, glossy peaks form. 4) Fold 1/3 of the yolk mixture at a time into the whipped whites. 5) Sift the cake flour over the egg mixture and gently fold it in. 6) Divide the batter equally between the pans. 7) Place the pans in the oven for image recognition. 8) Remove the pans while preheating the oven. 9) After preheating the oven, place the pans in the oven and bake. 10) Let the cakes cool for 5 minutes before inverting onto a cooling rack. | ||
| 9 in. cake pans | 3 | |||
ENGLISH
| Desserts | ||||
| Menu | Amount | Food Temp. | Remark Instructions | |
| Cookware | Rack Position | |||
| Cheesecake | 1 cake (serves 6-8) | Room | Ingredients Cookie Crust 1 stick unsalted butter, room temperature 2 tbsp granulated sugar, 1 cup brown sugar, 1 egg 1 cup all-purpose flour, 1/4 tsp baking soda 1/8 tsp baking powder, 1/4 tsp salt Cheesecake Batter 2 lb. cream cheese, room temperature, 1 1/2 cups granulated sugar 2 eggs, 2 egg yolks, 5 tbsp heavy cream, 1/2 tsp vanilla extract Instructions Cookie Crust 1) Preheat the oven to 350 °F in the Bake mode. 2) Pan spray and line the 9" springform cake pan with parchment paper. 3) Place the butter in the bowl of a stand mixer and begin to soften it with the paddle attachment. 4) Add the sugar and brown sugar and cream them with the butter until well blended, 3 to 5 minutes. 5) Add the egg to the mixture and combine. 6) Add the flour, baking soda, baking powder and salt to the mixer bowl and mix gently until just combined. 7) Remove the bowl from the mixer and empty it into the prepared pan. Gently press the cookie dough down to line the entire bottom of the springform pan. 8) Place the pan in the oven and bake for 20 minutes. 9) Allow the cookie to cool while preparing the cheesecake batter. | |
| 9" springform pan in water bath | 3 | |||
| Cheesecake | 1 cake (serves 6-8) | Room | Cheesecake Batter 1) Place the cream cheese in the bowl of a stand mixer and mix to soften it. 2) Add the sugar and mix until well combined, about 5 minutes. 3) Add the eggs and egg yolks slowly to ensure they are well combined. 4) Add the heavy cream and vanilla extract and mix until just combined. 5) Pour the batter on top of the cooled cookie crust in the springform pan. 6) Wrap the bottom of the springform pan with foil, carrying it up the sides. 7) Place the foil-wrapped springform pan into a larger casserole dish. 8) Add just enough water to the casserole dish to reach up the sides of the pan but not above the foil. 9) Place the cheesecake in the oven for image recognition. 10) Remove the cheesecake while the oven is preheating. 11) After preheating, place the casserole dish with the cheesecake in the oven and bake. 12) Allow the cake to cool in the water bath for 1 hour. After an hour, remove it from the water bath and place it in the refrigerator overnight in the springform pan. | |
| 9" springform pan in water bath | 3 | |||
ENGLISH
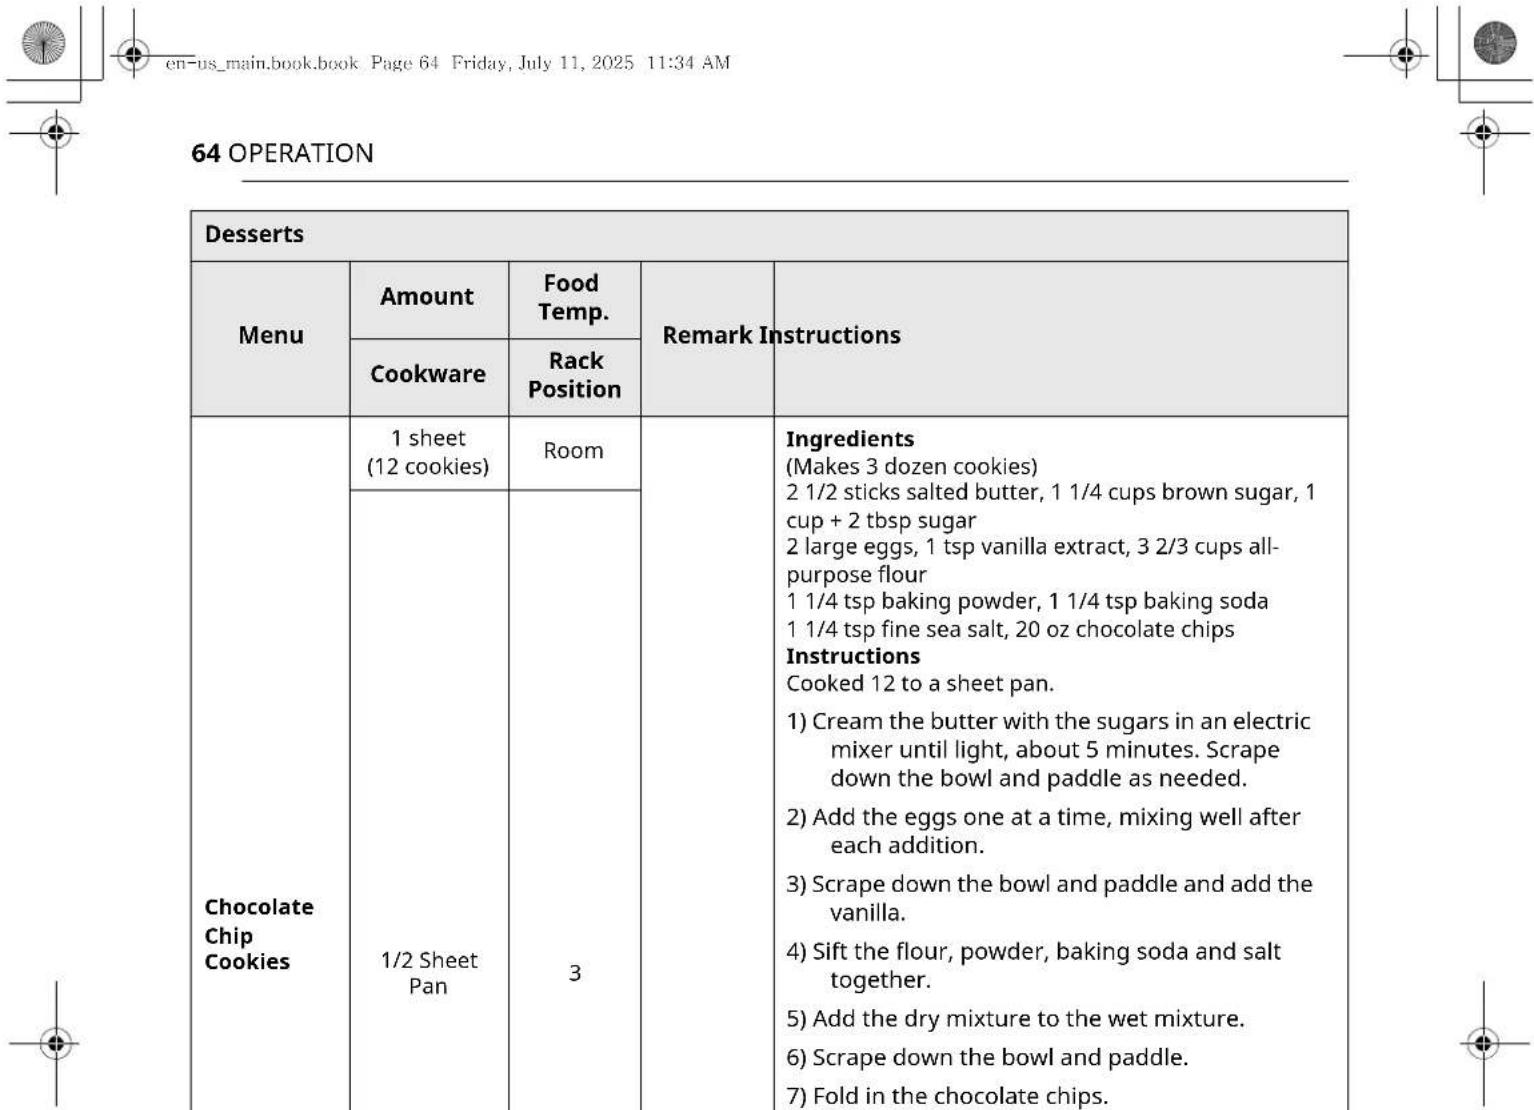
64 OPERATION
| Desserts | ||||
| Menu | Amount | Food Temp. | Remark Instructions | |
| Cookware | Rack Position | |||
| Chocolate Chip Cookies | 1 sheet (12 cookies) | Room | Ingredients (Makes 3 dozen cookies) 2 1/2 sticks salted butter, 1 1/4 cups brown sugar, 1 cup + 2 tbsp sugar 2 large eggs, 1 tsp vanilla extract, 3 2/3 cups all-purpose flour 1 1/4 tsp baking powder, 1 1/4 tsp baking soda 1 1/4 tsp fine sea salt, 20 oz chocolate chips Instructions Cooked 12 to a sheet pan. 1) Cream the butter with the sugars in an electric mixer until light, about 5 minutes. Scrape down the bowl and paddle as needed. 2) Add the eggs one at a time, mixing well after each addition. 3) Scrape down the bowl and paddle and add the vanilla. 4) Sift the flour, powder, baking soda and salt together. 5) Add the dry mixture to the wet mixture. 6) Scrape down the bowl and paddle. 7) Fold in the chocolate chips. 8) Line half sheet pans with parchment paper. 9) Scoop the cookie dough onto the pans in a 3x4 pattern. 10) Place a half sheet pan in the oven for image recognition. 11) Remove the half sheet pan while preheating the oven. 12) After preheating, place the half sheet pan in the oven. Bake the cookies one half sheet pan at a time. | |
| 1/2 Sheet Pan | 3 | |||
| Baguette | 2 demi baguettes | Room | Steam Cook | Ingredients0.25 oz package active dry yeast, about 3/4 tbsp of yeast11 oz water, about 100°F18 oz bread flour1 tbsp of saltInstructions1) In a small bowl dissolve the yeast in the warm water using a whisk.2) Add the yeast and water mixture to the bowl of an electric mixer.3) Add the bread flour and salt to the bowl.4) Use the dough hook to mix the dough on low speed for 7 minutes.5) Place the dough into a bowl and let it rise for 30 minutes or until doubled in size.6) Punch the dough down and let it rise again until doubled in size.7) Remove the dough and place it on a work surface.8) Divide the dough into 2 equal pieces.9) Shape each piece into a small baguette.10) Place the baguettes onto a parchment lined half sheet pan.11) Cover the baguettes with plastic wrap and allow to double in size.12) After the baguettes have doubled in size, use a serrated knife and slash each baguette with 3 four inch long, half inch deep, diagonal slashes.13) Place the baguettes on the half sheet pan.14) Place the half sheet pan in the oven for image recognition.15) Remove the half sheet pan while preheating the oven.16) After preheating, place the half sheet pan back in the oven. |
| 1/2 Sheet Pan | 3 | |||
ENGLISH
| Desserts | ||||
| Menu | Amount | Food Temp. | Remark Instructions | |
| Cookware | Rack Position | |||
| Fruit Tart | 1 tart Room Ingredients | Tart Dough 2 cups all-purpose flour, 1 1/2 tbsp sugar, 1 tbsp brown sugar 1 1/2 sticks unsalted butter, cold and cut into small pieces 1 whole egg, 1 egg yolk, 2 tbsp ice water Pastry Cream 2/3 cup sugar, 1/4 cup cornstarch pinch of kosher salt, 2 large eggs, 2 cups milk 2 tbsp unsalted butter, cut into small pieces, 2 tsp vanilla Instructions Tart Dough 1) Place the flour and sugars into the work bowl of a food processor and pulse to combine. 2) Add the cold pieces of butter and pulse until the mixture resembles coarse meal. 3) Add the whole egg, egg yolk and the ice water and pulse until the dough just forms a ball. 4) Remove from the work bowl and form into a disc. Wrap the dough in plastic wrap and place it in the refrigerator while the filling is being made. Pastry Cream 1) In a saucepan, combine the sugar and milk. Gently warm it to a lazy simmer. 2) In a bowl, combine the eggs, cornstarch, salt and vanilla. Add the warm milk mixture to the egg mixture in small amounts to temper the eggs and avoid cooking them. 3) Return everything back to the saucepan and cook the custard until it thickens and begins to bubble. 4) Strain through a fine mesh strainer and stir in the butter. Cool the pastry cream to room temperature before using. | ||
| Tart pan 3 | ||||
| Fruit Tart | 1 tart Room To Assemble the Tart | 1) Remove the tart dough from the refrigerator. 2) Place the dough on a lightly floured work surface. 3) Sprinkle a little more flour on the dough and roll the dough out to 1/8" thick. 4) Gently spray the tart pan with pan spray and line the tart pan with the dough. 5) Place the tart pan in the oven for image recognition. 6) Remove the tart pan while preheating the oven. 7) After preheating the oven, place the tart pan back in the oven. 8) After cooking, allow the tart shell to cool completely before adding the pastry cream and decorating with fresh fruit. | ||
| Tart pan 3 | ||||
| Muffins | 1 Pan Room Ingredients | 2 cups all-purpose flour, 1/2 cup sugar, 2 tsp baking powder 1/2 tsp kosher salt, 3/4 cup milk 1/2 cup unsalted butter, melted and cooled, 2 large eggs Instructions 1) Line a muffin pan with paper liners and set aside. 2) In a small bowl, whisk the flour, sugar, baking powder, and salt together. 3) In a medium bowl, whisk the milk, butter, and eggs together until well combined. 4) Add the dry ingredients to the wet ingredients and stir with a silicone spatula just until combined. 5) Divide the batter evenly between the muffin cups. 6) Place the muffin pan in the oven for image recognition. 7) Remove the muffin pan while preheating the oven. 8) After preheating is done, place the muffin pan in the oven. | ||
| Muffin pan 3 | ||||
ENGLISH
| Toast | ||||
| Menu | Amount Food Temp. | Remark Instructions | ||
| Cookware | Rack Position | |||
| Bagels | 2~4 EA Room | Slice the bagels in half along the narrow edge. Place the bagels with the inner side up on the grid on the broiler pan. | ||
| Grid on broiler pan | 3 | |||
| Bread Slices | 2~4 EA Room | When oven beeps, turn food over | Place bread slices on the grid on the broiler pan. When the oven beeps, flip the bread over. | |
| Grid on broiler pan | 3 | |||
| English Muffins | 2~4 EA Room | Slice the English | muffins in half | along the narrow edge. Place the English muffins with the inner side up on the grid on the broiler pan. |
| Grid on broiler pan | 3 | |||
| Frozen Products | |||
| Menu | Amount Food Temp. | Instructions | |
| Cookware | Rack Position | ||
| Chicken Nuggets | 10-40 EA (0.6 oz each) | Frozen | Place frozen chicken nuggets on the LG air fry tray with a catch pan below. |
| Air Fry Tray 3 | |||
| Chicken Tenders | 6-24 EA (1 oz each) | Frozen | Place frozen chicken tenders on the LG air fry tray with a catch pan below. |
| Air Fry Tray 3 | |||
| Mozzarella Sticks | 6-24 EA (1 oz each) | Frozen | Place frozen mozzarella sticks on the LG air fry tray with a catch pan below. |
| Air Fry Tray 3 | |||
| Mac & Cheese | 1 casserole (40oz) | Frozen | 1) Remove casserole from packaging. 2) Place the casserole on the half sheet pan in the oven for image recognition. 3) Remove the casserole and half sheet pan while preheating the oven. 4) After preheating, place the half sheet pan with the frozen mac and cheese back in the oven. |
| 1/2 Sheet Pan 3 | |||
| Burritos | 2-8 EA (5 oz each) | Frozen | 1) Remove burritos from packaging. 2) Place the burritos on the half sheet pan in the oven for image recognition. 3) Remove the burritos and the half sheet pan while preheating the oven. 4) After preheating, place half sheet pan with burritos back in the oven. |
| 1/2 Sheet Pan 3 | |||
| Biscuits | 5-20 EA (2 oz each) | Frozen | Remove the package and place the frozen biscuits on the LG air fry tray with a catch pan below. |
| Air Fry Tray 3 | |||
| Tater Tots | 1-4 servings Frozen Place the frozen tater tots on the LG air fry tray with a catch pan below.1 serving is about 12 oz. | ||
| Air Fry Tray 3 | |||
| French Fries Straight | 1-4 servings Frozen Place frozen | french fries on the LG air fry tray with a catch pan below.1 serving is about 5 oz. | |
| Air Fry Tray 3 | |||
| French Fries Crinkle | 1-4 servings Frozen Place frozen | french fries on the LG air fry tray with a catch pan below.1 serving is about 8 oz. | |
| Air Fry Tray 3 | |||
| Hash Browns Patties | 4-16 EA (2.3 oz each) | Frozen | Place frozen hash browns on the LG air fry tray with a catch pan below. |
| Air Fry Tray 3 | |||
| Sweet Potato Fries | 1-4 servings Frozen Place frozen | sweet potato fries on the LG air fry tray with a catch pan below.1 serving is about 6 oz. | |
| Air Fry Tray 3 | |||
| Onion Rings | 1-4 servings Frozen Place frozen | onion rings on the LG air fry tray with a catch pan below.1 serving is about 5 oz. | |
| Air Fry Tray 3 | |||
| Breaded Fish Fillets | 4-16 EA (2 oz each) | Frozen | Place frozenbreaded fish fillets on the LG air fry tray with a catch pan below. |
| Air Fry Tray 3 | |||
| Breakfast Sausages | 6-24 EA (1 oz each) | Frozen | Place frozen breakfast sausages on the LG air fry tray with a catch pan below. |
| Air Fry Tray 3 | |||

CAUTION
- Take care when opening the oven door during or after steam cooking. Hot steam can cause scalding.
- After any steam cooking cycle, the drying function will run automatically. It is normal to hear the steam pump running during the drying function.
My Recipe Mode
For frequently used cooking menus, you can combine up to three different temperatures and cooking modes into one hot key.
Creating My Recipe
- When combining two or more cooking modes, a cooking time or probe temperature must be set before selecting an additional cooking mode.
The Probe function cannot be used with the Broil, Sous Vide, Steam Maintenance, Rapid Heat Roast ^+ ,Warm, or Proof modes.
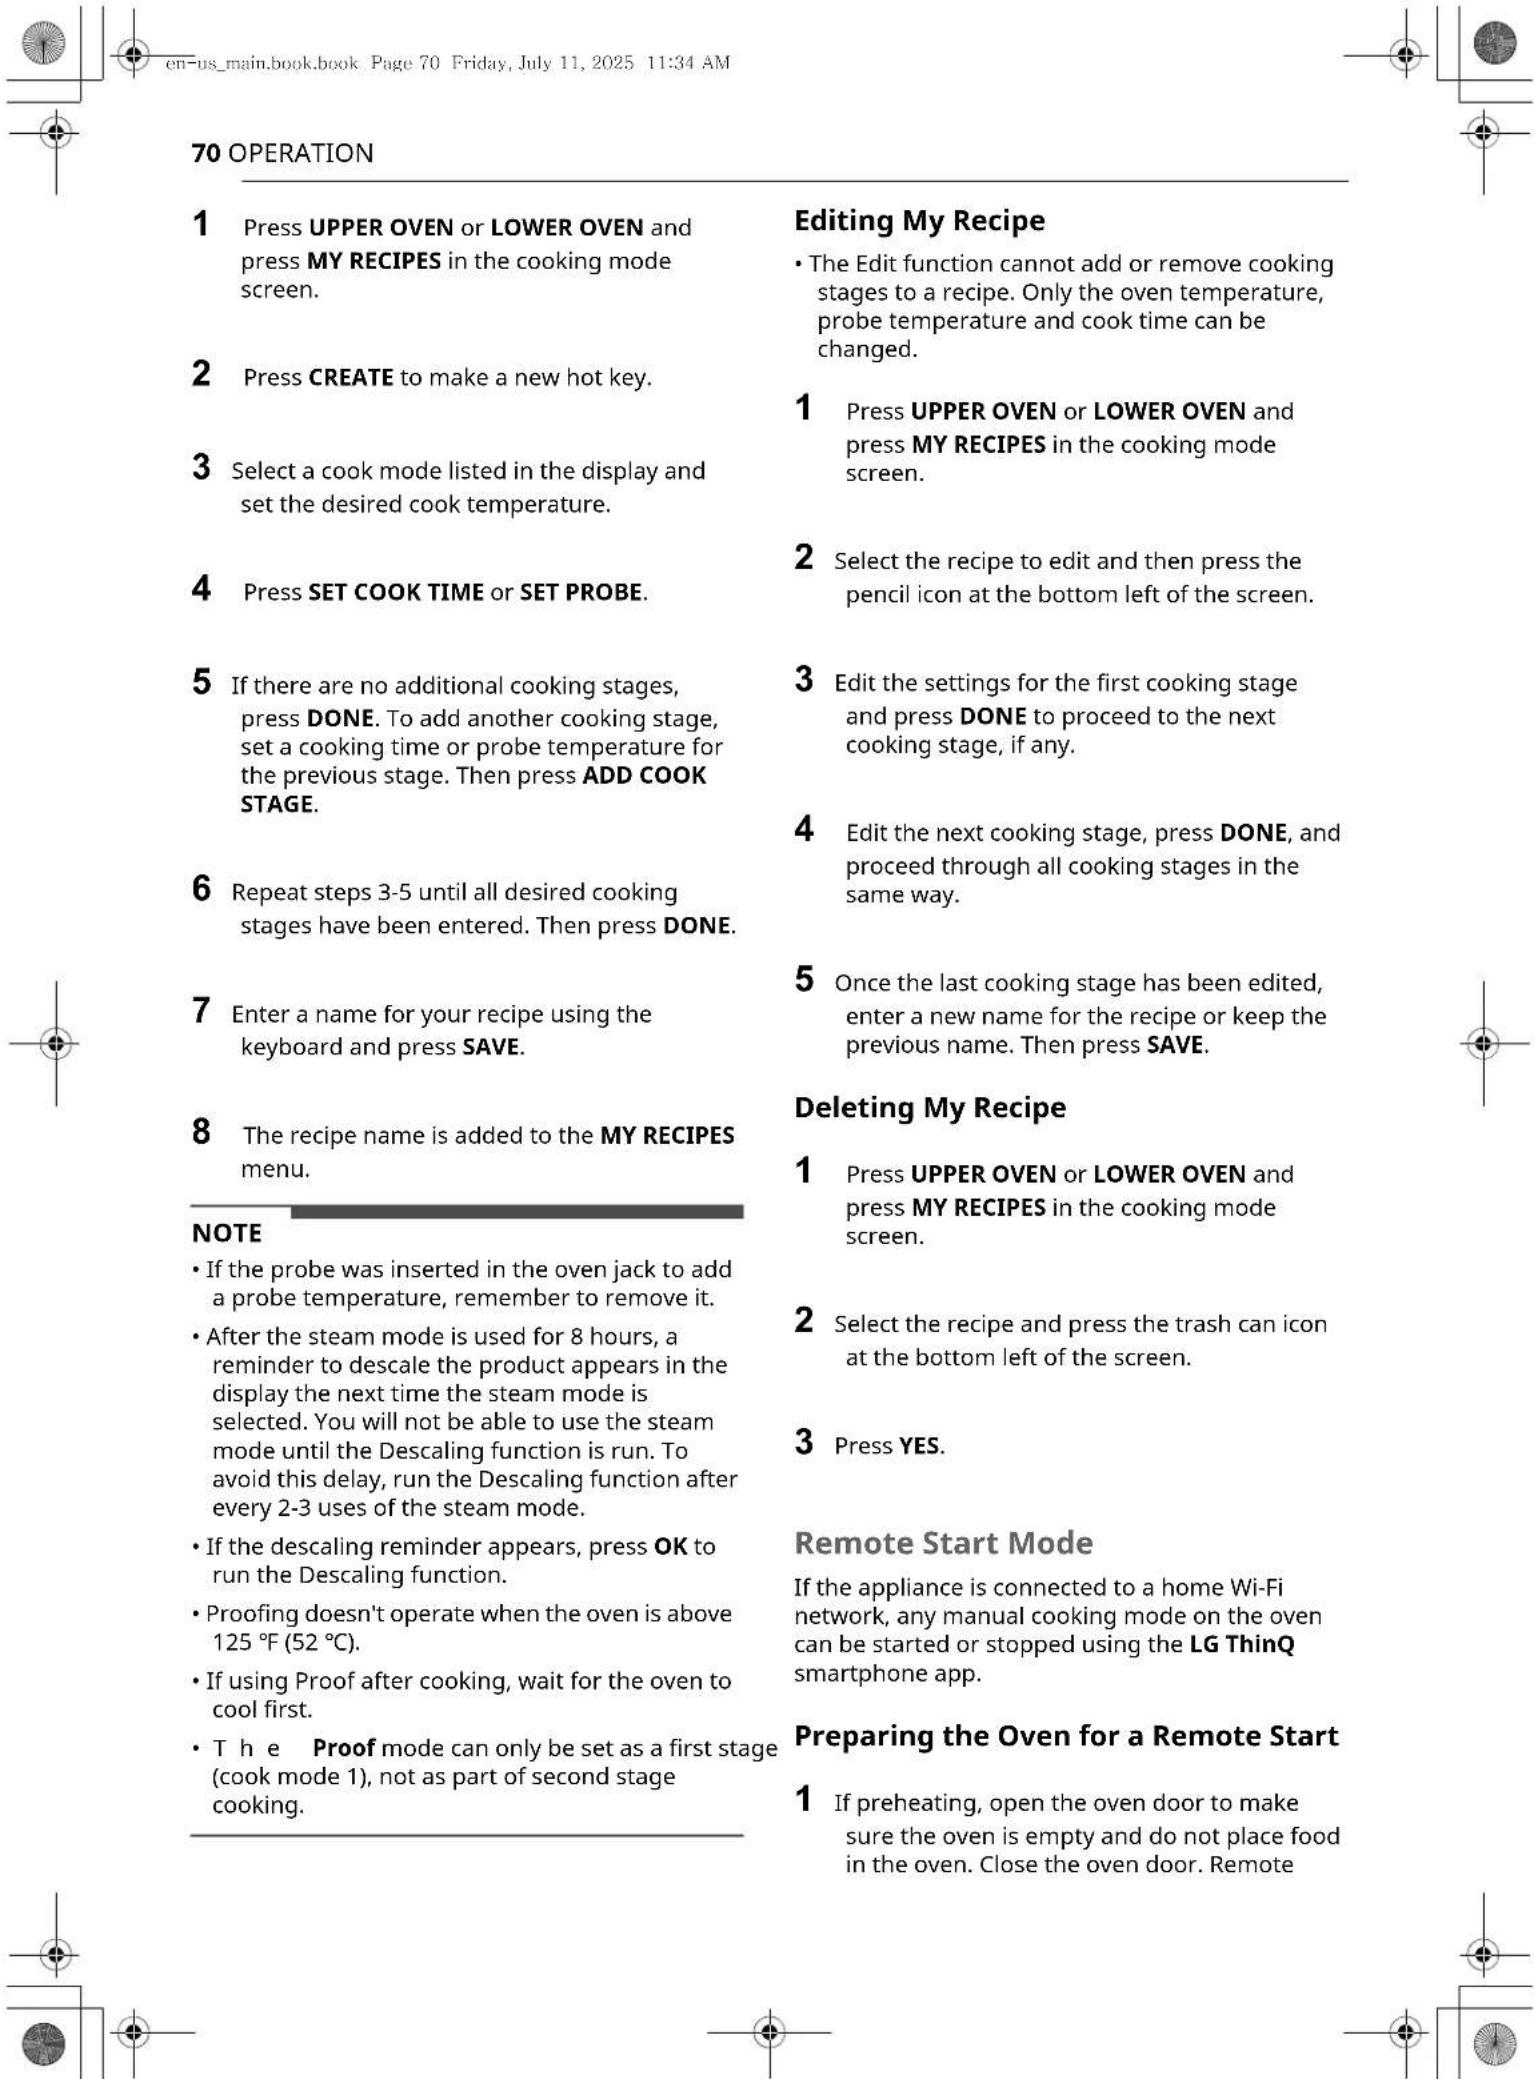
| NOTE •Remote Start is disconnected in the following situations: -Remote Start is never set up in the smartphone app. -The Remote Start status is "ready". -Remote Start experiences a problem during operation. •The Wi-Fi icon on the display shows the status of the appliance's network connection. If the Wi-Fi icon is not lit, use the smartphone app to select the Wi-Fi network or register the product again. •A faulty Wi-Fi connection could delay the Remote Start function. •Disconnect the probe if attached. |
72 SMART FUNCTIONS
SMART FUNCTIONS
LG ThinQ Application
This feature is only available on models with Wi-Fi.
The LG ThinQ application allows you to communicate with the appliance using a smartphone.
LG ThinQ Application Features
- SpeedClean™
- Allows you to set SpeedClean™ alerts, read the instruction guide, and simulate and compare energy consumption when using SpeedClean™ versus self clean cycles.
- Smart Diagnosis™
- This function provides useful information for diagnosing and solving issues with the appliance based on the pattern of use.
- Settings
- Allows the user to change oven settings, including the hour mode, preheat alarm light, beeper volume, temperature units, convection auto conversion, thermostat adjustment and language.
- Remote Start
- Remotely start every manual cooking modes or turn off the oven.
Monitoring
- This function helps you check the current status, remaining time, cook settings and end time on the smartphone.
Product Notifications
- Turn on the Push Alerts to receive appliance status notifications. The notifications are triggered even if the LG ThinQ application is not open.
- Timer
- You can set the timer from the application.
NOTE
-
In the following cases, you must update the network information for each appliance in the LG ThinQ application under Device Cards Settings Change Network.
-
wireless router is changed
- wireless router password is changed
-
Internet service provider is changed
-
This information is current at the time of publication. The application is subject to change for product improvement purposes without notice to users.
Installing LG ThinQ Application and Connecting an LG Appliance
Models with QR Code
Scan the QR code attached to the product using the camera or a QR code reader application on your smartphone.
Models without QR Code
1 Search for and install the LG ThinQ application from the Google Play Store or Apple App Store on a smartphone.
2 Run the LG ThinQ application and sign in with your existing account or create an LG account to sign in.
3 Touch the add (+) button on the LG ThinQ application to connect your LG appliance. Follow the instructions in the application to complete the process.
NOTE
To verify the Wi-Fi connection, check that the Wi-Fi indicator on the control panel is lit.
- The appliance supports 2.4 GHz Wi-Fi networks only. To check your network frequency, contact your Internet service provider or refer to your wireless router manual.
- LG ThinQ is not responsible for any network connection problems or any faults, malfunctions, or errors caused by network connection.
- The surrounding wireless environment can make the wireless network service run slowly.
- If the distance between the appliance and the wireless router is too far, the signal becomes weak. It may take a long time to connect or fail to install the application.
- If the appliance is having trouble connecting to the Wi-Fi network, it may be too far from the router. Purchase a Wi-Fi repeater (range extender) to improve the Wi-Fi signal strength.
- The network connection may not work properly depending on the Internet service provider.
- The Wi-Fi may not connect or the connection may be interrupted because of the home network environment.
- If the appliance cannot be connected due to problems with the wireless signal transmission, unplug the appliance and wait about a minute before trying again.
- If the firewall on your wireless router is enabled, disable the firewall or add an exception to it.
- The wireless network name (SSID) should be a combination of English letters and numbers. (Do not use special characters.)
- Smartphone user interface (UI) may vary depending on the mobile operating system (OS) and the manufacturer.
- If the security protocol of the router is set to WEP, network setup may fail. Change the security protocol (WPA2 is recommended), and connect the product again.
Radio Equipment Specifications
| Type | Operating Frequency Range | Output Power (Max.) |
| Wireless LAN | 2400 MHz - 2472 MHz | <1 W |
| Bluetooth† | 2400 MHz - 2483.5 MHz |
† This feature is only available on some models.
FCC Notice
This equipment has been tested and found to comply with the limits for a Class B digital device, pursuant to Part 15 of the FCC Rules. These limits are designed to provide reasonable protection against harmful interference in a residential installation. This equipment generates, uses, and can radiate radio frequency energy and, if not installed and used in accordance with the
instructions, may cause harmful interference to radio communications. However, there is no guarantee that interference will not occur in a particular installation. If this equipment does cause harmful interference to radio or television reception, which can be determined by turning the equipment off and on, the user is encouraged to try to correct the interference by one or more of the following measures:
- Reorient or relocate the receiving antenna.
- Increase the separation between the equipment and the receiver.
- Connect the equipment into an outlet on a circuit different from that to which the receiver is connected.
- Consult the dealer or an experienced radio/TV technician for help.
This device (transmitter module contained in this product) complies with part 15 of the FCC Rules. Operation is subject to the following two conditions:
(1) This device may not cause harmful interference and
(2) This device must accept any interference received, including interference that may cause undesired operation.
Any changes or modifications in construction of this device which are not expressly approved by the party responsible for compliance could void the user's authority to operate the equipment.
FCC RF Radiation Exposure Statement
This equipment complies with FCC radiation exposure limits set forth for an uncontrolled environment. This transmitter must not be collocated or operating in conjunction with any other antenna or transmitter.
This equipment should be installed and operated with a minimum distance of 20cm (7.8 inches) between the antenna and your body. Users must follow the specific operating instructions for satisfying RF exposure compliance.
Supplier's Declaration of Conformity
47 CFR 52.1077 Compliance Information
| Trade Name | LG or SKS or LG, SKS |
| Responsible Party LG | Electronics USA, Inc. |
| Address 111 Sylvan AvenueNorth BuildingEnglewood Cliffs, NJ 07632 | |
74 SMART FUNCTIONS
Email lg.environmental@lge.com
This device complies with part 15 of the FCC Rules. Operation is subject to the following two conditions:
(1) This device may not cause harmful interference, and
(2) This device must accept any interference received, including interference that may cause undesired operation.
Industry Canada Statement
This device contains licence-exempt transmitter(s)/receiver(s) that comply with Innovation, Science and Economic Development Canada's licence-exempt RSS(s). Operation is subject to the following two conditions:
(1) This device may not cause interference.
(2) This device must accept any interference, including interference that may cause undesired operation of the device.
IC Radiation Exposure Statement
This equipment complies with IC radiation exposure limits set forth for an uncontrolled environment.
This equipment should be installed and operated with a minimum distance of 20cm (7.8 inches) between the antenna and your body.
NOTE
- THE MANUFACTURER IS NOT RESPONSIBLE FOR ANY RADIO OR TV INTERFERENCE CAUSED BY UNAUTHORIZED MODIFICATIONS TO THIS EQUIPMENT. SUCH MODIFICATIONS COULD VOID THE USER'S AUTHORITY TO OPERATE THE EQUIPMENT.
Open Source Software Notice Information
To obtain the source code that is contained in this product, under GPL, LGPL, MPL, and other open source licenses that have the obligation to disclose source code, and to access all referred license terms, copyright notices and other relevant documents, please visit https://opensource.lge.com.
LG Electronics will also provide open source code to you on CD-ROM for a charge covering the cost of performing such distribution (such as the cost of
media, shipping, and handling) upon email request to opensource@lge.com.
This offer is valid to anyone in receipt of this information for a period of three years after our last shipment of this product.
Smart Diagnosis™ Feature
Use this feature to help you diagnose and solve problems with your appliance. NFC or Wi-Fi equipped models can also transmit data to a smartphone using the LG ThinQ application.
NOTE
- For reasons not attributable to LGE's negligence, the service may not operate due to external factors such as, but not limited to, Wi-Fi unavailability, Wi-Fi disconnection, local app store policy, or app unavailability.
The feature may be subject to change without prior notice and may have a different form depending on where you are located.
Using LG ThinQ to Diagnose Issues
If you experience a problem with your Wi-Fi equipped appliance, it can transmit troubleshooting data to a smartphone using the LG ThinQ application.
- Launch the LG ThinQ application and select the Smart Diagnosis feature in the menu. Follow the instructions provided in the LG ThinQ application.
Using Audible Diagnosis to Diagnose Issues
Follow the instructions below to use the audible diagnosis method.
- Launch the LG ThinQ application and select the Smart Diagnosis feature in the menu. Follow the instructions for audible diagnosis provided in the LG ThinQ application.
1 Press SETTINGS, located at the center bottom of the main display screen. Swipe to the third settings screen and select Smart DiagnosisTM. Follow the instructions in the display.
- Do not press any other buttons or icons on the display screen.

2 Press START.
3 Keep the phone in place until the tone transmission has finished. The display will count down the time. Once the countdown is over and the tones have stopped, the diagnosis will be displayed in the application.
NOTE
- For best results, do not move the phone while the tones are being transmitted.


76 MAINTENANCE
MAINTENANCE
Cleaning
Interior
Do not use oven cleaners to clean the oven cavity. Use the product's SpeedClean function regularly to clean light soil. For stubborn soil, use the Self Clean function (on some models) or clean manually using the following tips.
- A plastic spatula can be used as a scraper to scrape off any chunks or debris before and during oven cleaning.
- Using the rough side of a non-scratch scouring pad may help to take off burnt-on stains better than a soft sponge or towel.
- Certain non-scratch scrubbing sponges, such as those made of melamine foam, available at local stores, can also help improve cleaning.
CAUTION
- Do not use oven cleaners, harsh chemical cleaners, bleach, vinegar, steel scouring pads, or abrasive pads or cleansers to clean the oven, as they can permanently damage the oven surface.
- Do not clean the gasket.
Exterior
Painted and Decorative Trim
For general cleaning, use a cloth with hot soapy water. For more difficult soils and built-up grease, apply a liquid detergent directly onto the soil. Leave it on for 30 to 60 minutes. Rinse with a damp cloth and dry. Do not use abrasive cleaners.
Stainless Steel Surfaces
To avoid scratches, do not use steel wool pads.
1 Place a small amount of stainless steel appliance cleaner or polish on a damp cloth or paper towel.
2 Clean a small area, rubbing with the grain of the stainless steel if applicable.
3 Dry and buff with a clean, dry paper towel or soft cloth.
4 Repeat as necessary.
NOTE
- To clean the stainless steel surface, use warm sudsy water or a stainless steel cleaner or polish.
Always wipe in the direction of the metal surface finish. - Stainless steel appliance cleaner or polish can be purchased online or from most retailers of appliances or home goods.
Oven Cavity
DO NOT use oven cleaners.
NEVER wipe a warm or hot porcelain surface with a damp sponge; it may cause chipping or crazing (tiny hairlike cracks). Food spills should be cleaned after the oven cools. At high temperature, foods react with porcelain and a permanent dull spot can result. When cleaning a spot, use only non-abrasive cleaners or scrubbers.
Oven Door
CAUTION
- Do not remove oven doors. Doing so can damage the camera and cause it to malfunction.
- Do not use harsh cleaners or harsh abrasive cleaning materials on the outside of the oven door. Doing so can cause damage.
-
When cleaning the oven door, don't allow water or any liquid to enter the cover. It can cause damage to the camera.
-
Use soapy water to thoroughly clean the oven door. Rinse well. Do not immerse the door in water.
- You may use a glass cleaner on the outside glass of the oven door. Do not spray water or glass cleaner on the door vents.
- Do not use oven cleaners, cleaning powders, or harsh abrasive cleaning materials on the outside of the oven door.
- Do not clean the oven door gasket. The oven door gasket is made of a woven material that is
essential for a good seal. Care should be taken not to rub, damage, or remove this gasket.
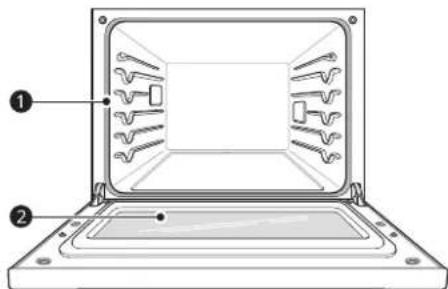
Don't hand clean oven door gasket
2Do hand clean door
Broiler Pan and Grid
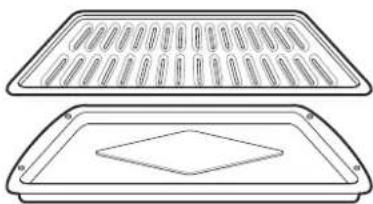
- Do not store a soiled broiler pan or grid anywhere in the appliance.
- Do not clean the broiler pan or grid in a self cleaning mode. (Available on some models)
- Remove the grid from the pan. Carefully pour out the grease from the pan into a proper container.
- Wash and rinse the broiler pan and grid in hot water with a soap-filled or plastic scouring pad.
- If food has burned on, sprinkle the grid with cleaner while hot and cover with wet paper towels or a dishcloth. Soaking the pan will remove burned-on foods.
Oven Racks
Remove the oven racks before operating the Self Clean cycle and SpeedClean.
1 Clean with a mild, abrasive cleaner.
- Food spilled into the tracks could cause the racks to become stuck.
2 Rinse with clean water and dry.
NOTE
If the racks are cleaned using the Self Clean cycle (not recommended), the color will turn slightly
blue and the finish will become dull. After the Self Clean cycle is complete, and the oven has cooled, rub the sides of the racks with wax paper or a cloth containing a small amount of vegetable oil. This will make the racks glide more easily into the rack tracks.
SpeedClean
SKS's SpeedClean enamel technology provides two cleaning options for the inside of the oven. The SpeedClean feature takes advantage of SKS's new enamel to help lift soils without harsh chemicals, and it runs using ONLY WATER for just 10 minutes in low temperatures to help loosen LIGHT soils before hand cleaning.
While SpeedClean is quick and effective for small and LIGHT soils, the Self Clean feature can be used to remove HEAVY, built up soils. The intensity and high heat of the Self Clean cycle may result in smoke which will require the opening up of windows to provide ventilation. Compared to the more intense Self Clean process, your SKS oven gives you the option of cleaning with LESS HEAT, LESS TIME, and virtually NO SMOKE OR FUMES. You can reduce energy use by cleaning light oven soils with the SpeedClean feature instead of Self Clean.
When needed, the oven still provides the Self Clean option for longer, more thorough oven cleaning for heavier, built up soils.
- For hard to reach areas such as the back surface of the oven, it is better to use the Self Clean cycle.
Benefits of SpeedClean
- Helps loosen light soils before hand-cleaning
- SpeedClean only uses water; no chemical cleaners
-
Makes for a better Self Clean experience.
-
Delays the need for a Self Clean cycle
- Minimizes smoke and odors
- Can allow shorter Self Clean time
78 MAINTENANCE
When to Use SpeedClean
Example of oven soiling
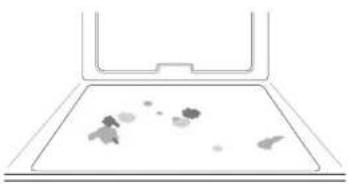
Case 1
- Soil pattern: Small drops or spots
- Types of soils: Cheese or other ingredients
- Common food items that can soil your oven: Pizza
Case 2
- Soil pattern: Light splatter
- Types of soils: Fat/grease
Common food items that can soil your oven: Steaks, broiled / Fish, broiled / Meat roasted at low temperatures
SpeedClean Instruction Guide
NOTE
- Allow the oven to cool to room temperature before using the SpeedClean cycle. If your oven cavity is above 150^ (65°C), the SpeedClean cycle will not be activated until the oven cavity cools down.
- The oven should be level to ensure that the bottom surface of the oven cavity is entirely covered by water at the beginning of the SpeedClean cycle.
- For best results, use distilled or filtered water. Tap water may leave mineral deposits on the oven bottom.
- Soil baked on through several cooking cycles will be more difficult to remove with the SpeedClean cycle.
- Do not open the oven door during the SpeedClean cycle. Water will not get hot enough if the door is opened during the cycle.
1 Remove oven racks and accessories from the oven.
2 Scrape off and remove any burnt-on debris with a plastic scraper.
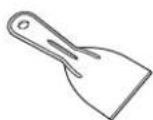
-
Suggested plastic scrapers:
-
Hard plastic spatula
- Plastic pan scraper
- Plastic paint scraper
Old credit card
3 If cleaning the upper oven, fill the steam feeder tank to the maximum fill line with water.
4 Press UPPER OVEN or LOWER OVEN and press CLEANING in the cooking mode screen.
5 Press START. The remaining time appears in the display.
CAUTION
- Some surfaces may be hot after the SpeedClean cycle. Wear rubber gloves while cleaning to prevent burns.
- During the SpeedClean cycle, the oven becomes hot enough to cause burns. Wait until the cycle is over before wiping the inside surface of the oven. Failure to do so may result in burns.
- Avoid leaning or resting on the oven door glass while cleaning the oven cavity.
6 A tone will sound at the end of the 10-minute cycle. Press STOP in the display, and press YES. to clear the display and end the tone.
7 After the cleaning cycle and during handcleaning, enough water should remain on the oven bottom to completely submerge all soils. Add water if necessary. Place a towel on the floor in front of the oven to capture any water that may spill out during hand-cleaning.
- If you are cleaning the upper oven on a double oven, it is also best to cover the holes in the top of the lower oven door with a towel to capture any water that may drip into the door during hand-cleaning.
8 Clean the oven cavity immediately after the SpeedClean cycle by scrubbing with a wet, non-scratch scouring sponge or pad. (The scouring side will not scratch the finish.)
NOTE
- Do not use any steel scouring pads, abrasive pads or cleaners as these materials can permanently damage the oven surface.
9 Once the oven cavity is cleaned, wipe any excess water with a clean dry towel. Replace racks and any other accessories.
10 If some light soils remain, repeat the above steps, making sure to thoroughly soak the soiled areas.
- If stubborn soils remain after multiple SpeedClean cycles, run the Self Clean cycle. Be sure that the oven cavity is empty of oven racks and other accessories, and that the oven cavity surface is dry before running the Self Clean cycle. Consult the Self Clean section of your owner's manual for further details.
NOTE
- If you forget to saturate the inside of the oven with water before starting SpeedClean, press STOP in the display, and press YES. Wait for the oven to cool to room temperature and then spray or pour water into the oven and start another SpeedClean cycle.
The cavity gasket may be wet when the SpeedClean cycle finishes. This is normal. Do not clean the gasket. - If mineral deposits remain on the oven bottom after cleaning, use a cloth or sponge soaked in vinegar to remove them.
- It is normal for the fan to operate during the SpeedClean cycle.
- Using commercial oven cleaners or bleach to clean the oven is not recommended. Instead, use a mild liquid cleanser with a pH value below 12.7 to avoid discoloring the enamel.
Self Clean
The Self Clean cycle uses extremely hot temperatures to clean the oven cavity. While running the Self Clean cycle, you may notice smoking or an odor. This is normal, especially if the oven is heavily soiled. During Self Clean, the kitchen should be well ventilated to minimize the odors from cleaning.
Before Starting Self Clean
- Clean only parts listed in manual. Remove the steam feeder tank, oven racks, broiler pan, broiler grid, all cookware, aluminum foil or any other material from the oven.
- If oven racks are left in the oven cavity during the Self Clean cycle, they will discolor and become difficult to slide in and out.
- If you don't remove the steam feeder tank from the oven, a beep sounds and the Self Clean cycle does not start.

- The kitchen should be well ventilated to minimize the odors from cleaning. Open a window or turn on a ventilation fan or hood before self-cleaning.
- Wipe any heavy spillovers on the bottom of the oven.
- Make sure that the oven light cover is in place and the oven light is off.
- Clean the frame of the oven and door with hot soapy water. Rinse well.

WARNING
- If the oven is heavily soiled with oil, self-clean the oven before using the oven again. The oil could cause a fire.
- If there is a fire in the oven during self-clean, turn the oven off and wait for the fire to go out. Do not force the door open. Introduction of fresh air at self-clean temperatures may lead to a burst of flame from the oven. Failure to follow this instruction may result in severe burns.

CAUTION
- Do not use oven cleaners. Commercial oven cleaner or oven liner protective coating of any kind should not be used in or around any part of the oven.
80 MAINTENANCE

CAUTION
- The oven displays an F error code and sounds three long beeps during the self-cleaning process if it malfunctions in the self-clean mode. Switch off the electrical power to the main fuse or breaker and have the oven serviced by a qualified technician.
- If the self cleaning mode malfunctions, turn the oven off and disconnect the power supply. Have it serviced by a qualified technician.
- It is normal for parts of the oven to become hot during a Self Clean cycle. Avoid touching the door, window or oven vent area during a Self Clean cycle.
- Do not leave small children unattended near the appliance. During the Self Clean cycle, the outside of the oven can become very hot to the touch.
If you have pet birds, move well-ventilated room. The health of some birds is extremely sensitive to the fumes given off during the Self Clean cycle of any oven. - Do not line the oven walls, racks, bottom or any other part of the oven with aluminum foil or any other material. Doing so will destroy heat distribution, produce poor baking results and cause permanent damage to the oven interior (aluminum foil will melt to the interior surface of the oven).
- Do not force the door open. This can damage the automatic door locking system. Use care when opening the oven door after the Self Clean cycle. Stand to the side of the oven when opening the door to allow hot air or steam to escape. The oven may still be VERY HOT.
NOTE
- The oven light cannot be turned on during a Self Clean cycle. The oven light cannot be turned on until the oven temperature has cooled below 500^ (260°C) after a Self Clean cycle is complete.
- Clean the frame of the oven and door with hot soapy water. Rinse well.
- Do not clean the gasket. The fiberglass material of the oven door gasket cannot withstand abrasion. It is essential for the gasket to remain intact. If you notice it becoming worn or frayed, replace it.
-
It is normal for the cooling fan to operate during the Self Clean cycle.
-
As the oven heats, you may hear sounds of metal parts expanding and contracting. This is normal and will not damage the oven.
- You may notice some white ash in the oven. Wipe it off with a damp cloth or a soap-filled steel wool pad after the oven cools. If the oven is not clean after one Self Clean cycle, repeat the cycle.
- If oven racks were left in the oven and do not slide smoothly after a Self Clean cycle, wipe racks and rack supports with a small amount of vegetable oil to make them glide more easily.
After a Self Clean cycle, fine lines may appear in the porcelain because it went through heating and cooling. This is normal and will not affect performance. - The Self Clean cycle cannot be started if the Control Lock feature is active.
Once the Self Clean cycle is set, the oven door must be automatically. You will not be able to open the oven door until the oven is cooled. The lock releases automatically. - Once the door has been locked, the lock indicator light stops flashing and remains on. Allow about 15 seconds for the oven door lock to activate.
- If the clock is set for a 12-hour display (default) the Delayed Self Clean can never be set to start more than 12 hours in advance.
After the oven is turned off, the cooling fan keeps operating until the oven has cooled down.
When to Use Self Clean
Example of oven soiling
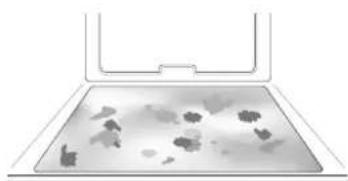
Case 1
- Soil pattern: Medium to heavy splatter
- Types of soils: Fat/grease
- Common food items that can soil your oven: Meat roasted at high temperatures
Case 2
Soil pattern: Drops or spots
- Types of soils: Filling or sugar based soils
Common food items that can soil your oven: Pies
Case 3
Soil pattern: Drops or spots
- Types of soils: Cream or tomato sauce
Common food items that can soil your oven: Casseroles
NOTE
- The Self Clean cycle can be used for soil that has been built up over time.
Setting Self Clean
The Self Clean function has cycle times of 3, 4, or 5 hours.
Self Clean Soil Guide
| Soil Level Cycle Setting | |
| Lightly Soiled Oven Cavity | 3-Hour |
| Moderately Soiled Oven Cavity | 4-Hour |
| Heavily Soiled Oven Cavity | 5-Hour |
1 Remove all racks and accessories from the oven.
2 Press UPPER OVEN or LOWER OVEN and press CLEANING in the cooking mode screen. The oven defaults to the recommended four-hour self clean for a moderately soiled oven.
3 Select the desired cycle time.
4 If desired, scroll to set a delayed start time or press the number pad icon to enter the start time directly.
| Number pad icon |
5 Press START. The remaining time or the delayed start time appears in the display.
6 Once the self-clean cycle is set, the oven door locks automatically and the lock icon displays.
- You will not be able to open the oven door until the oven has cooled. The lock releases automatically when the oven has cooled.

CAUTION
- Do not force the oven door open when the lock icon is displayed. The oven door remains locked until the oven temperature has cooled. Forcing the door open will damage the door.
- It may become necessary to cancel or interrupt a Self Clean cycle due to excessive smoke or fire in the oven. To cancel the Self Clean function, press STOP in the display.
During Self Clean
- The Self Clean cycle uses extremely hot temperatures to clean the oven cavity. While running the Self Clean cycle, you may notice smoking or an odor. This is normal, especially if the oven is heavily soiled.
- As the oven heats, you may hear sounds of metal parts expanding and contracting. This is normal and will not damage the oven.
- Do not force the oven door open when is displayed. The oven door remains locked until the oven temperature has cooled. Forcing the door open will damage the door.
After the Self Clean Cycle
The oven door remains locked until the oven temperature has cooled.
- You may notice some white ash in the oven. Wipe it off with a damp cloth or a soap-filled pad after the oven cools. If the oven is not clean after one self-clean cycle, repeat the cycle.
- If oven racks were left in the oven and do not slide smoothly after a self-clean cycle, wipe racks and rack supports with a small amount of vegetable oil to make them glide more easily.
- Fine lines may appear in the porcelain because it went through heating and cooling. This is normal and will not affect performance.
Cleaning the Steam Feeder Tank
The steam feeder tank is used during the steam cooking functions. Use filtered, softened water if possible.

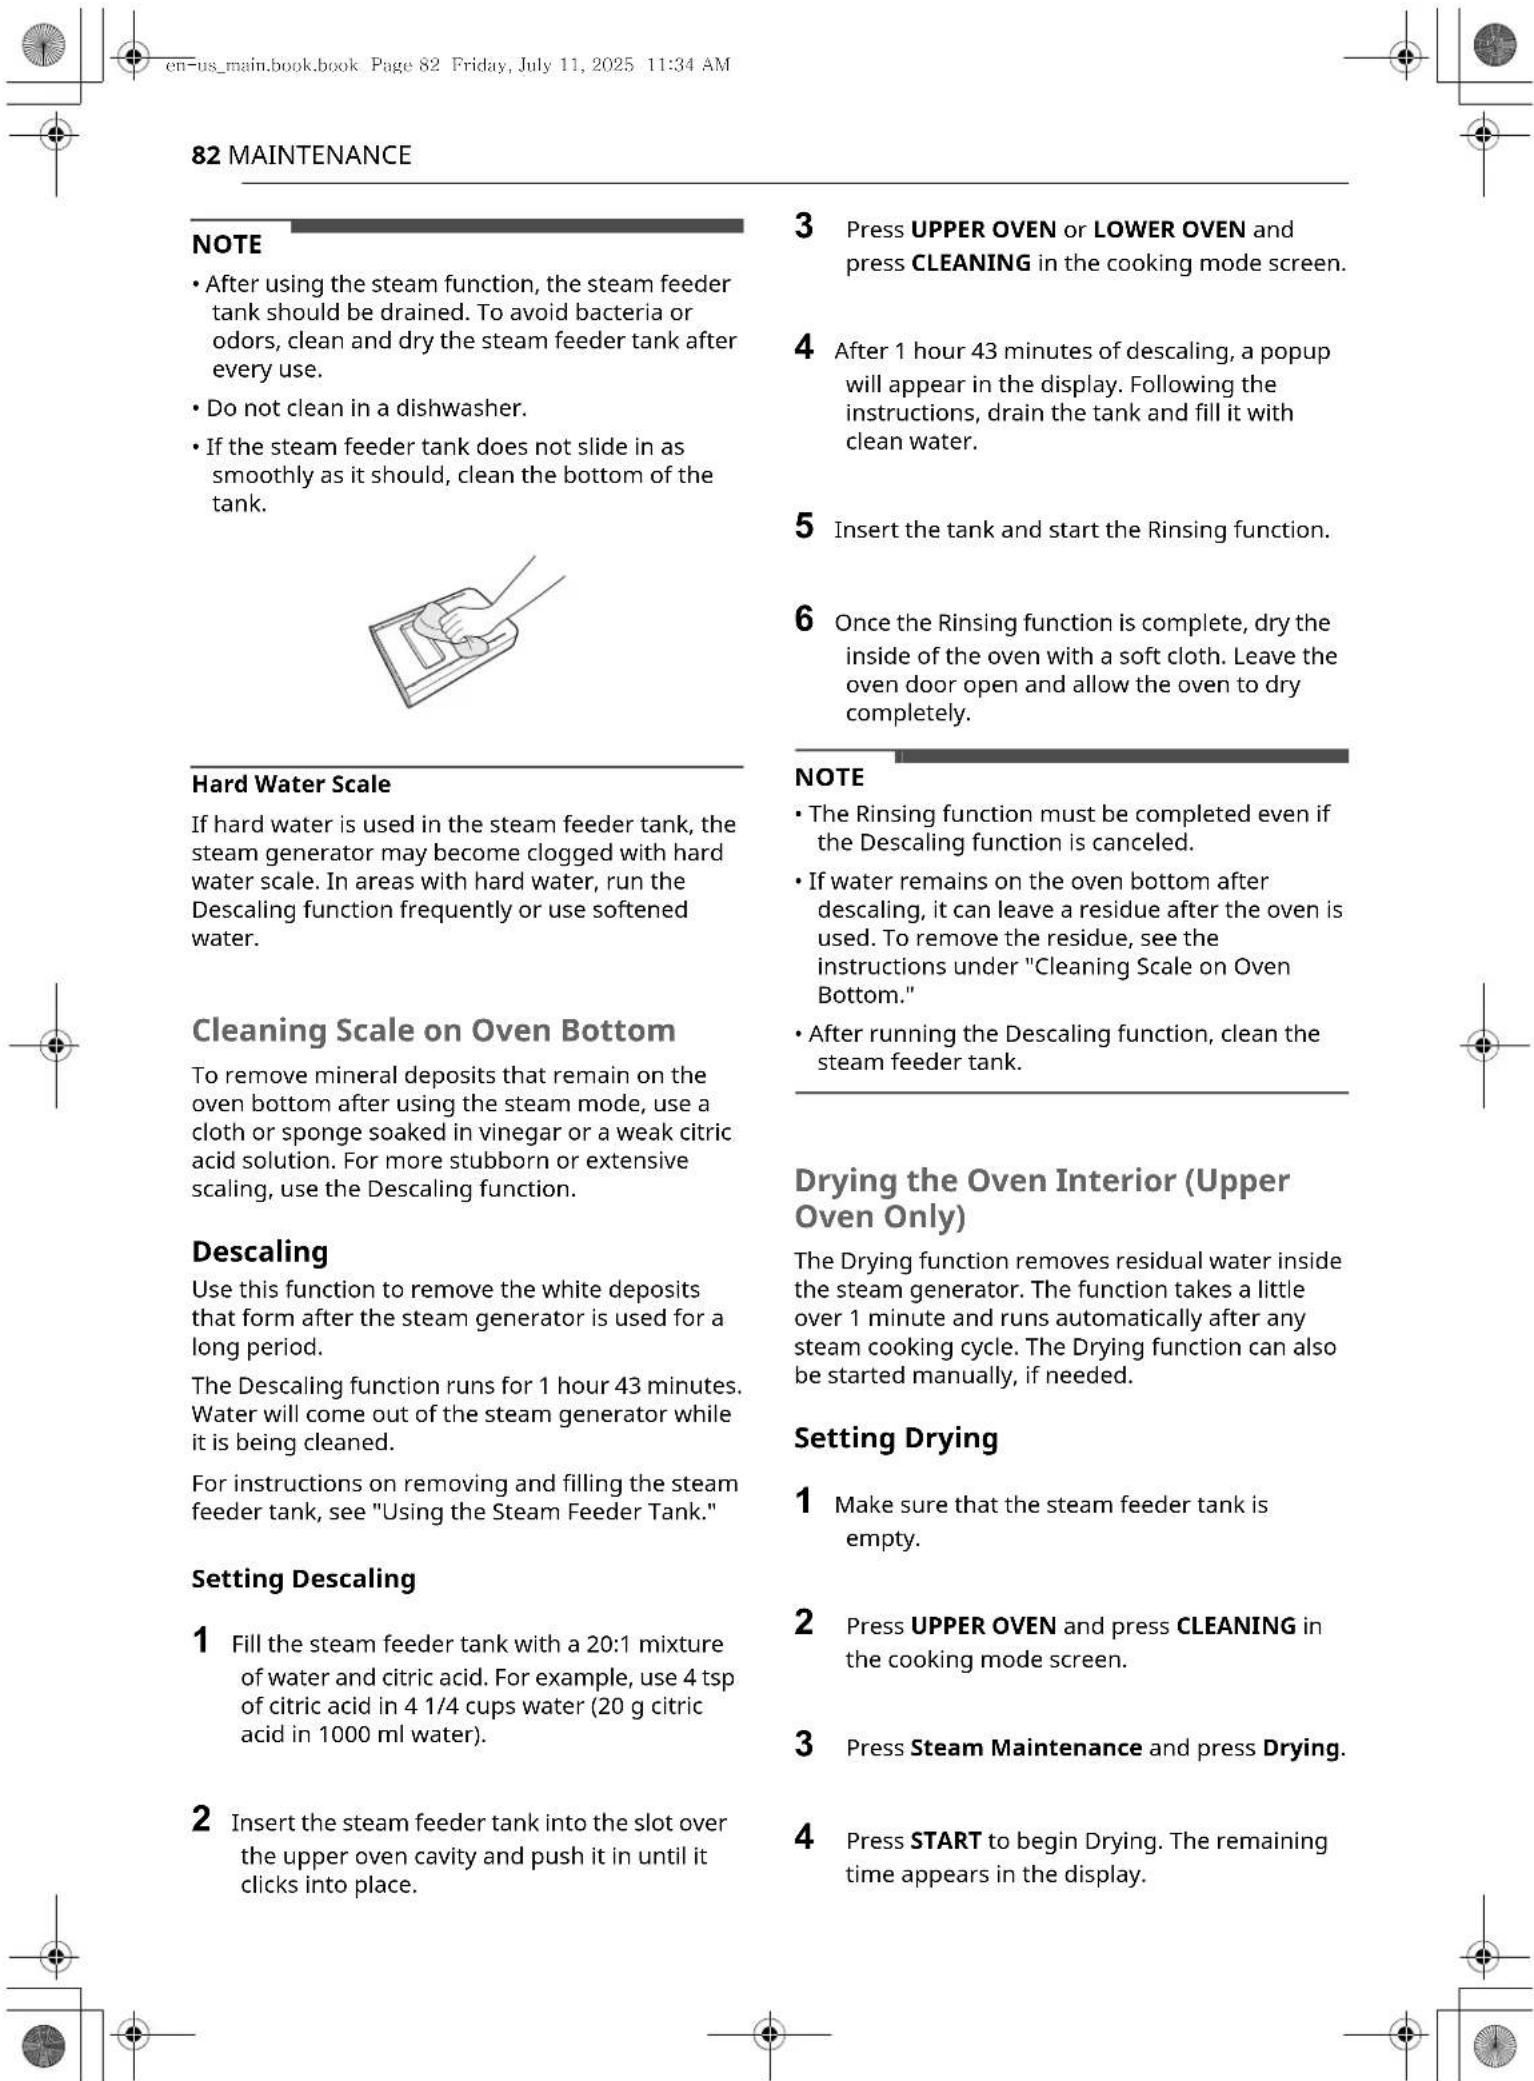
Using Evaporation Function
Use the Evaporation function to dry the oven cavity after a steam cooking cycle. Evaporation runs for 12 minutes.
Setting Evaporation
1 Press UPPER OVEN or LOWER OVEN and press CLEANING in the cooking mode screen.
2 Press Steam Maintenance and press Evaporation.
3 Press START to begin Evaporation. The remaining time appears in the display.
Periodic Maintenance
Changing the Oven Light
The oven light is a standard 25-watt halogen bulb for ovens.

WARNING
- Make sure that the oven and bulb are cool.
- Disconnect the electrical power to the appliance at the main fuse or circuit breaker panel. Failure to do so can result in severe personal injury, death, or electrical shock.
- Wear gloves while changing the oven light. Glass fragments from broken bulbs can cause risk of injury.
Gently twist the screwdriver blade while changing the oven light. If you apply force, the glass or oven may crack.
1 Unplug the oven or disconnect power.
2 Remove the oven racks.
3 Slide a flat blade screwdriver 1 between the housing and the glass light cover 2.
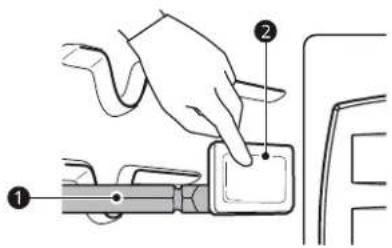
ENGLISH
4 Support the glass light cover with two fingers to prevent the cover from falling to the bottom of the oven.
Gently twist the screwdriver blade to loosen the glass light cover 3.
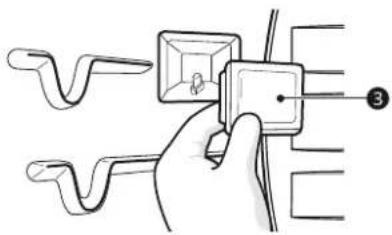
6 Remove the bulb from the socket.
7 Replace the bulb, and reassemble the light cover by snapping it back into place.
8 Plug in the oven or reconnect power.
84 TROUBLESHOOTING
TROUBLESHOOTING
FAQs
Frequently Asked Questions
Q: My new oven doesn't cook like my old one. Is there something wrong with the temperature settings?
A: No. Your oven has been factory tested and calibrated. For the first few uses, follow your recipe times and temperatures carefully. If you still think your new oven is too hot or too cold, you can adjust the oven temperature yourself to meet your specific cooking needs. Refer to the Changing Settings section in this manual for easy instructions on how to adjust your thermostat.
Q: Is it normal to hear a clicking noise coming from the back of my oven when I am using it?
A: Your new appliance is designed to maintain a tighter control over your oven's temperature. You may hear your oven's heating elements click on and off more frequently on your new oven. This is NORMAL.
Q: During convection cooking the fan stops when I open the door. Is that normal?
A: Yes, this is normal. When the door is opened, the convection fan will stop until the door is closed.
Q: Can I use aluminum foil to catch drippings in my oven cavity?
A: Never use aluminum foil to line the bottom or sides of the oven. The foil will melt and stick to the bottom surface of the oven and will not be removable. Use a foil-lined sheet pan placed on a lower oven rack to catch drippings instead. (If foil has already melted onto the bottom of the oven, it will not interfere with the oven's performance.)
Q: Can I use aluminum foil on the racks?
A: Do not cover racks with aluminum foil. Covering entire racks with foil restricts air flow, leading to poor cooking results. Use a sheet pan lined with foil under fruit pies or other acidic or sugary foods to prevent spillovers from damaging the oven finish.
CAUTION
- Foil may be used to wrap food in the oven, but do not allow the foil to come into contact with the exposed heating/broiling elements in the oven. The foil could melt or ignite, causing smoke, fire, or injury.
Q: Can I leave my racks in the oven when running a Self Clean cycle?
A: No. Although it will not damage the racks, it will discolor them and may make them hard to slide in and out during use. Remove all items from the oven before starting a Self Clean cycle.
Q: What should I do if my racks are sticky and have become hard to slide in and out?
A: Over time, the racks may become hard to slide in and out. Apply a small amount of olive oil to the sides of the racks. This will work as a lubricant for easier gliding.
Q: Should I broil with the door open or closed?
A: Your oven isn't designed for open door broiling. If you broil with the oven door open, it can damage the display.
Q: Why aren't the function buttons working?
A: Make sure that the appliance is not in Control Lock mode. The lock will show in the display if Control Lock is activated. To deactivate Control Lock, refer to the Control Lock Feature section. The unlock melody sounds and Loc appears in the display until the controls are unlocked.
Q: My appliance is still dirty after running the SpeedClean cycle. What else should I do?
A: The SpeedClean cycle only helps to loosen light soils in your appliance to assist in hand-cleaning of your oven. It does not automatically remove all soils after the cycle. Some scrubbing of your appliance is required after running the SpeedClean cycle.
Q: I tried scrubbing my oven after running SpeedClean, but some soils still remain. What can I do?
A: The SpeedClean feature works best when the soils are fully soaked and submerged in water before running the cycle and during hand-cleaning. If soils are not sufficiently soaked in water, it can negatively affect the cleaning performance. Repeat the SpeedClean process using sufficient water. Sugar-based and certain greasy soils are especially hard to clean. If some stubborn soils remain, use the Self Clean feature to thoroughly clean your oven.
Q: Soils on my oven walls are not coming off. How can I get the oven walls clean?
A: Soils on the side and rear walls of your appliance may be more difficult to fully soak with water. Try repeating the SpeedClean process with more than the 14 cup (2 oz or 60 ml) of spray recommended.
Q: Will SpeedClean get all of the soils and stains out completely?
A: It depends on the soil type. Sugar-based and certain grease stains are especially hard to clean. Also, if stains are not sufficiently soaked in water, this can negatively affect cleaning performance. If stubborn or built-up stains remain, use the Self Clean feature. Refer to the Self Clean section of your owner's manual.
Q: Are there any tricks to getting some of the stubborn soils out?
A: Scraping the soils with a plastic scraper before and during hand-cleaning is recommended. Fully saturating soils with water is also recommended. However, certain types of soils are harder to clean than others. For these stubborn soils, the Self Clean cycle is recommended. Consult the Self Clean section of your owner's manual for details.
Q: Is it safe for my convection fan or heater element to get wet during SpeedClean?
A: Yes. The convection fan or heater element may get a little wet during cleaning. However, direct spray onto the broil burner and heater elements is not necessary because these are self-cleaning during regular use.
Q: Do I need to use all 1 14 cups (10 oz or 300 ml) of water for SpeedClean?
A: Yes. It is highly recommended that 1 cup (8 oz or 240 ml) of water be sprayed or poured on the bottom and an additional 14 cup (2 oz or 60 ml) of water be sprayed on walls and other soiled areas to fully saturate the soils for better cleaning performance.
Q: I see smoke coming out of my appliance's vents during SpeedClean. Is this normal?
A: This is normal. This is not smoke. It is actually water vapor (steam) from the water in the oven cavity. As the oven heats briefly during SpeedClean, the water in the cavity evaporates and escapes through the oven vents.
Q: How often should I use SpeedClean?
A: SpeedClean can be performed as often as you wish. SpeedClean works best when your oven is LIGHTLY soiled from such things as LIGHT grease splatter and small drops of cheese. Please refer to the SpeedClean section in your owner's manual for more information.
Q: What is required for SpeedClean?
A: A spray bottle filled with 114 cups (10 oz or 300 ml) of water, a plastic scraper, a non-scratch scrubbing pad and a towel. You should not use abrasive scrubbers such as heavy-duty scouring pads or steel wool.
86 TROUBLESHOOTING
Before Calling for Service
Review this section before calling for service; doing so will save you both time and money. For detailed information or videos, visit www.lg.com for the troubleshooting page.
Cooking
| Problem Possible | Cause & Solution |
| Oven will not work Plug | Plug on appliance is not completely inserted in the electrical outlet. • Make sure electrical plug is plugged into a live, properly grounded outlet. |
| A fuse in your home may be blown or the circuit breaker tripped. • Replace the fuse or reset the circuit breaker. | |
| Oven controls improperly set. • See the "Operating the Oven" section in the Operation chapter. | |
| Oven too hot. • Allow the oven to cool to below locking temperature. | |
| Steam is exhausted through the oven vent. | Cooking foods with high moisture produces steam. • This is normal. |
| Appliance does not operate. | Cord is not plugged in correctly. • Make sure cord is plugged correctly into outlet. Check circuit breakers. |
| Service wiring is not complete. • Contact your electrician for assistance. | |
| Power outage. • Check house lights to be sure. Call your local electric company for service. | |
| Oven smokes excessively during broiling. | Control not set properly. • Follow instructions under Setting Oven Controls. |
| Meat too close to the element. • Reposition the rack to provide proper clearance between the meat and the element. Preheat broil element for searing. | |
| Meat not properly prepared. • Remove excess fat from meat. Cut remaining fatty edges to prevent curling. | |
| Insert on broiler pan wrong side up and grease not draining. • Always place the grid on the broiler pan with ribs up and slots down to allow grease to drip into the pan. | |
| Grease has built up on oven surfaces. Old grease or food spatters cause excessive smoking. • Regular cleaning is necessary when broiling frequently. | |
| Food does not bake or roast properly | Oven controls improperly set. • See the "Operating the Oven" section in the Operation chapter. |
| Rack position is incorrect or the rack is not level. • See the "Operating the Oven" section in the Operation chapter. | |
| Incorrect cookware or cookware of improper size being used. • See the "Operating the Oven" section in the Operation chapter. | |
| Oven sensor needs to be adjusted. • See the "Adjusting the Oven Temperature" section in the Operation chapter. | |
| Food does not broil properly | Oven controls improperly set. • Make sure you select the Broil mode properly. |
| Improper rack position being used. • See the Broiling Guide. | |
| Cookware not suited for broiling. • Use broiling pan and grid. | |
| Aluminum foil used on the broiling pan and grid has not been fitted properly and slit as recommended. • See the "Operating the Oven" section in the Operation chapter. | |
| In some areas the power voltage may be low. • Preheat the broil element for 5-7 minutes. See the Broiling Guide. | |
| Oven temperature too hot or too cold | Oven sensor needs to be adjusted. • See the "Temperature Adjustment" section in the Operation chapter. |
| Excessive smoking during a Self Clean cycle | Excessive soil. • Turn off the Self Clean function. Open the windows to rid the room of smoke. Wait until the Self Clean mode is cancelled. Wipe up the excess soil and reset the self clean. |
| Burning or oily odor emitting from the vent | This is normal in a new oven. • This will disappear in time. To speed the process, set a Self Clean cycle for a minimum of 3 hours. See the Self Clean section. (On some models) |
| Moisture collects on oven window or steam comes from oven vent | This happens when cooking foods high in moisture. • This is normal. |
| A very wet cloth was used when cleaning the window. • Do not use too much water when cleaning the window. | |
| Warm air venting into kitchen after oven has been turned off. | Warm air exhaust is needed to maintain and cool down oven temperatures. It turns off automatically when the heat cools to a safe temperature. • This is normal. |
| Oven will not steam cook | Improper assembly • Make sure to slide the tank into the slot until it clicks into place. |
| The drain in the steam feeder tank may be clogged with hard water scale. • If this happens, the descending function must be run before the steam function can be used. | |
| Water pools in the bottom of the oven during or after steam cooking | During steam cooking, the water in the steam feeder tank is transferred to the bottom of the oven. • It is normal for water to fill the bottom of the oven during or after the Steam mode. • If the water leaves mineral deposits on the oven bottom, remove the deposits with a cloth or sponge soaked in vinegar. |
| White residue appears on the oven bottom after steam cooking | Using hard water in the steam feeder tank can result in hard water scale on the oven bottom. • To remove mineral deposits that remain on the oven bottom, use a cloth or sponge soaked in vinegar or a weak citric acid solution. |
| The sous vide module beeps during operation | This alert sounds when the sous vide module is operated without water in the steam feeder tank. • Fill the steam feeder tank to the recommended level before using. |
88 TROUBLESHOOTING
Parts & Features
| Problem Possible | Cause & Solution |
| Oven control beeps and displays any F code error. | Electronic control has detected a fault condition. ·Turn off the oven function you are using to clear the display and stop beeping. Reprogram oven. If fault recurs, record fault number and call for service. - [Case 1] Code: F-9 Cause: Oven not heating (upper oven) - [Case 2] Code: F-19 Cause: Oven not heating (lower oven) |
| is on in the display when you want to cook | The oven door is locked because the temperature inside the oven has not dropped below the locking temperature. ·Press the STOP button. Allow the oven to cool. |
| Oven light does not work. | It is time to replace the bulb or the bulb is loose. ·Replace or tighten bulb. See "Changing the Oven Light" section in this Owner's Manual. |
| Cooling fan continues to run after oven is turned off. | The fan turns off automatically when the electronic components have cooled sufficiently. ·This is normal. |
| Oven will not Self Clean. | The oven temperature is too high to set a Self Clean operation. ·Allow the appliance to cool and reset the controls. |
| Oven controls improperly set. ·See the Self Clean section. | |
| A Self Clean cycle cannot be started if oven door is open. ·Close the oven door. | |
| Oven door does not open after a Self Clean cycle | Oven is too hot. ·Allow the oven to cool below locking temperature. |
| The control and door may be locked. ·Allow about one hour for the oven to cool after the completion of a Self Clean cycle. The door can be opened when the lock is no longer displayed. | |
| The oven is not clean after a Self Clean cycle | Oven controls not properly set. ·See the Self Clean section. |
| Oven was heavily soiled. ·Clean up heavy spillovers before starting the clean cycle. Heavily soiled ovens may need to Self Clean again or for a longer period of time. | |
| Convection fan stops (On some models) | Convection fan stops during a convection bake cycle. This allows for more even heating during the cycle. ·This is not a failure of the range and should be considered normal operation. |
| Displayed time is flashing (On some models) | This means that the product has just been plugged in, or that it has experienced a power interruption. ·Press the Clock key and reset the time, or press any key to stop the flashing. |
| Oven racks are difficult to slide (On some models) | The shiny, silver-colored racks were cleaned in a Self Clean cycle. ·Apply a small amount of vegetable oil to a paper towel and wipe the edges of the oven racks with the paper towel. |
Noises
| Problem Possible | Cause & Solution |
| "Crackling" or "popping" sound | This is the sound of the metal heating and cooling during both the cooking and Self Clean functions. ·This is normal. |
| Fan noise A convection | fan may automatically turn on and off. ·This is normal. |
ENGLISH
Wi-Fi
| Problem Possible | Cause & Solution |
| Trouble connecting appliance and smartphone to Wi-Fi network | The password for the Wi-Fi network was entered incorrectly. • Delete your home Wi-Fi network and begin the connection process again. |
| Mobile data for your smartphone is turned on. • Turn off the Mobile data on your smartphone before connecting the appliance. | |
| The wireless network name (SSID) is set incorrectly. • The wireless network name (SSID) should be a combination of English letters and numbers. (Do not use special characters.) | |
| The router frequency is not 2.4 GHz. • Only a 2.4 GHz router frequency is supported. Set the wireless router to 2.4 GHz and connect the appliance to the wireless router. To check the router frequency, check with your Internet service provider or the router manufacturer. | |
| The appliance and the router are too far apart. • If the appliance is too far from the router, the signal may be weak and the connection may not be configured correctly. Move the router closer to the appliance or purchase and install a Wi-Fi repeater. | |
| During Wi-Fi setup, the app is requesting a password to connect to the product (on certain phones). • Locate the network name which starts with "LG" under Settings > Networks. Note the last part of the network name. • If the network name looks like LGE_Appliance_XX-XX-XX, enter lge12345. • If the network name looks like LGE_Appliance_XXXX, enter XXX twice as your password. For example, if the network name appears as LGE_Appliance_8b92, then you would enter 8b928b92 as your password. In this instance, the password is case sensitive and the last 4 characters are unique to your appliance. |
90 LIMITED WARRANTY
LIMITED WARRANTY
USA
TERMS AND CONDITIONS
ARBITRATION NOTICE: THIS LIMITED WARRANTY CONTAINS AN ARBITRATION PROVISION THAT REQUIRES YOU AND LG ELECTRONICS ("LG") TO RESOLVE DISPUTES BY BINDING ARBITRATION INSTEAD OF IN COURT, UNLESS YOU CHOOSE TO OPT OUT. IN ARBITRATION, CLASS ACTIONS AND JURY TRIALS ARE NOT PERMITTED. PLEASE SEE THE SECTION Titled "PROCEDURE FOR RESOLVING DISPUTES" BELOW.
Should your LG Oven ("Product") fail due to a defect in materials or workmanship under normal and proper use, during the warranty period set forth below, LG will, at its option, repair or replace the Product. This limited warranty is valid only to the original retail purchaser of the Product ("You") and applies only when purchased lawfully and used within the United States including U.S. Territories.
| WARRANTY PERIOD HOW | SERVICE IS HANDLED |
| Three (3) years from the date of original retail purchase, or from the date of delivery as per applicable law | Any part of the oven that fails due to a defect in materials or workmanship. During this full three-years warranty, LG will also provide, free of charge, all labor and in-home service to replace the defective part. |
- Replacement Products and parts are warranted for the remaining portion of the original warranty period or ninety (90) days, whichever is greater.
- Replacement Products and parts may be new, reconditioned, refurbished, or otherwise factory remanufactured.
- Replaced Product or part(s) will be the property of LG.
Proof of original retail purchase specifying the Product model and date of purchase is required to obtain warranty service under this limited warranty.
EXCEPT TO THE EXTENT PROHIBITED BY APPLICABLE LAW, ANY IMPLIED WARRANTY OF MERCHANTABILITY OR FITNESS FOR A PARTICULAR PURPOSE ON THE PRODUCT IS LIMITED IN DURATION TO THE DURATION OF THE ABOVE LIMITED WARRANTY. UNDER NO CIRCUMSTANCES SHALL LG OR ITS U.S. DISTRIBUTORS/DEalers BE LIABLE FOR ANY INDIRECT, INCIDENTAL, CONSEQUENTIAL, SPECIAL, OR PUNITIVE DAMAGES, INCLUDING, WITHOUT LIMITATION, LOST GOODWILL, LOST REVENUES OR PROFITS, WORK STOPPAGE, IMPAIRMENT OF OTHER GOODS, COST OF REMOVAL AND REINSTALLATION OF THE PRODUCT, LOSS OF USE, OR ANY OTHER DAMAGES WHETHER BASED IN CONTRACT, TORT, OR OTHERWISE. LG'S TOTAL LIABILITY, IF ANY, SHALL NOT EXCEED THE PURCHASE PRICE PAID BY YOU FOR THE PRODUCT.
SOME STATES DO NOT ALLOW THE EXCLUSION OR LIMITATION OF INCIDENTAL OR CONSEQUENTIAL DAMAGES OR LIMITATIONS ON HOW LONG AN IMPLIED WARRANTY LASTS, SO THE ABOVE EXCLUSIONS OR LIMITATIONS MAY NOT APPLY TO YOU. THIS LIMITED WARRANTY GIVES YOU SPECIFIC LEGAL RIGHTS AND YOU MAY ALSO HAVE OTHER RIGHTS THAT VARY FROM STATE TO STATE.
THIS LIMITED WARRANTY DOES NOT COVER
- Service trips to deliver, pick up, or install, educate how to operate, correct wiring, or correct unauthorized repairs.
- Damage or failure of the Product to perform during power failures and interrupted or inadequate electrical service.
- Damage or failure of the Product caused by leaky or broken water pipes, frozen water pipes, restricted drain lines, inadequate or interrupted water supply or inadequate supply of air.
- Damage or failure of the Product resulting from operating the Product in a corrosive atmosphere or contrary to the Product owner's manual.
- Damage or failure of the Product caused by accidents, pests and vermin, lightning, wind, fire, floods, acts of nature, or any other causes beyond the control of LG.
- Damage or failure of the Product caused by unauthorized modification or alteration, or if the Product is used for other than the intended purpose, or any water leakage where the Product was not properly installed.
- Damage or failure of the Product caused by incorrect electrical current, voltage, or plumbing codes.
- Damage or failure of the Product caused by transportation, storage, and/or handling, including scratches, dents, chips, and/or other damage to the finish of the Product, unless such damage is reported within one (1) week of delivery.
- Damage or failure of the Product resulting from misuse, abuse, improper installation, repair, or maintenance. Improper repair includes the use of parts not authorized by LG. Improper installation or maintenance includes installation or maintenance contrary to the Product owner's manual.
- Damage or failure of the Product caused by the use of parts, components, accessories, consumable cleaning products, or any other products or services that were not authorized by LG.
- Damage or missing items to any display or open box Product.
Refurbished Product or any Product sold "As Is", "Where Is", "With all Faults", or similar disclaimer. - Products with original serial numbers that have been removed, altered, or cannot be readily determined
Increases in utility costs and additional utility expenses. - Any noises associated with normal operation.
- Products used for other than normal and proper household use (e.g., commercial or industrial use) or contrary to the Product owner's manual.
- Costs associated with removal and reinstallation of the Product for repairs, or the removal and reinstallation of the Product if it is installed in an inaccessible location or not installed in accordance with the Product Owner's manual.
- Accessories, removable components, or consumable parts (e.g. Shelves, door bins, drawers, water/air filters, racks, light bulbs, batteries, etc., as applicable), except for internal/functional parts covered under this limited warranty.
The cost of repair or replacement under these excluded circumstances shall be borne by You.
TO OBTAIN WARRANTY SERVICE AND ADDITIONAL INFORMATION
Call 1-855-790-6655 and select the appropriate option from the menu
Or visit our website at www.sksappliances.com.
Or by mail: LG Customer Service P.O. Box 240007 Huntsville, AL 35813 ATTN: CIC
PROCEDURE FOR RESOLVING DISPUTES
ALL DISPUTES BETWEEN YOU AND LG ARISING OUT OF OR RELATING IN ANY WAY TO THIS LIMITED WARRANTY OR THE PRODUCT SHALL BE RESOLVED EXCLUSIVELY THROUGH BINDING ARBITRATION, AND NOT IN A COURT OF GENERAL JURISDICTION. BINDING ARBITRATION MEANS THAT YOU AND LG ARE EACH WAIVING THE RIGHT TO A JURY TRIAL AND TO BRING OR PARTICIPATE IN A CLASS ACTION.
Definitions. For the purposes of this section, references to "LG" mean LG Electronics U.S.A., Inc., its parents, subsidiaries and affiliates, and each of their officers, directors, employees, agents, beneficiaries, predecessors in interest, successors, assigns and suppliers; references to "dispute" or "claim" shall include any dispute, claim or controversy of any kind whatsoever (whether based in contract, tort, statute, regulation, ordinance, fraud, misrepresentation or any other legal or equitable theory) arising out of or relating in any way to the sale, condition or performance of the product or this Limited Warranty.
Notice of Dispute. In the event you intend to commence an arbitration proceeding, you must first notify LG in writing at least 30 days in advance of initiating the arbitration by sending a letter to LG at LG Electronics, USA, Inc. Attn: Legal Department- Arbitration 111 Sylvan Avenue, Englewood Cliffs, NJ 07632. You and LG agree to engage in good faith discussions in an attempt to amicably resolve your claim. The notice must provide your name, address, and telephone number; identify the product that is the subject of

92 LIMITED WARRANTY
the claim; and describe the nature of the claim and the relief being sought. If you and LG are unable to resolve the dispute within 30 days, either party may proceed to file a claim for arbitration.
Agreement to Binding Arbitration and Class Action Waiver. Upon failure to resolve the dispute during the 30 day period after sending written notice to LG, you and LG agree to resolve any claims between us only by binding arbitration on an individual basis, unless you opt out as provided below. Any dispute between you and LG shall not be combined or consolidated with a dispute involving any other person's or entity's product or claim. More specifically, without limitation of the foregoing, any dispute between you and LG shall not under any circumstances proceed as part of a class or representative action. Instead of arbitration, either party may bring an individual action in small claims court, but that small claims court action may not be brought on a class or representative basis.
Arbitration Rules and Procedures. To begin arbitration of a claim, either you or LG must make a written demand for arbitration. The arbitration will be administered by the American Arbitration Association ("AAA") and will be conducted before a single arbitrator under the AAA's Consumer Arbitration Rules that are in effect at the time the arbitration is initiated (referred to as the "AAA Rules") and under the procedures set forth in this section. The AAA Rules are available online at www.adr.org/consumer. Send a copy of your written demand for arbitration, as well as a copy of this provision, to the AAA in the manner described in the AAA Rules. You must also send a copy of your written demand to LG at LG Electronics, USA, Inc. Attn: Legal Department- Arbitration 111 Sylvan Avenue, Englewood Cliffs, NJ 07632. If there is a conflict between the AAA Rules and the rules set forth in this section, the rules set forth in this section will govern. This arbitration provision is governed by the Federal Arbitration Act. Judgment may be entered on the arbitrator's award in any court of competent jurisdiction. All issues are for the arbitrator to decide, except that issues relating to the scope and enforceability of the arbitration provision and to the arbitrability of the dispute are for the court to decide. The arbitrator is bound by the terms of this provision.
Governing Law. The law of the state of your residence shall govern this Limited Warranty and any disputes between us except to the extent that such law is preempted by or inconsistent with applicable federal law.
Fees/Costs. You do not need to pay any fee to begin an arbitration. Upon receipt of your written demand for arbitration, LG will promptly pay all arbitration filing fees to the AAA unless you seek more than $25,000 in damages, in which case the payment of these fees will be governed by the AAA Rules. Except as otherwise provided for herein, LG will pay all AAA filing, administration and arbitrator fees for any arbitration initiated in accordance with the AAA Rules and this arbitration provision. If you prevail in the arbitration, LG will pay your attorneys' fees and expenses as long as they are reasonable, by considering factors including, but not limited to, the purchase amount and claim amount. Notwithstanding the foregoing, if applicable law allows for an award of reasonable attorneys' fees and expenses, an arbitrator can award them to the same extent that a court would. If the arbitrator finds either the substance of your claim or the relief sought in the demand is frivolous or brought for an improper purpose (as measured by the standards set forth in Federal Rule of Civil Procedure 11(b)), then the payment of all arbitration fees will be governed by the AAA Rules. In such a situation, you agree to reimburse LG for all monies previously disbursed by it that are otherwise your obligation to pay under the AAA Rules. Except as otherwise provided for, LG waives any rights it may have to seek attorneys' fees and expenses from you if LG prevails in the arbitration.
Hearings and Location. If your claim is for 25,000 or less, you may choose to have the arbitration conducted solely on the basis of (1) documents submitted to the arbitrator, (2) through a telephonic hearing, or (3) by an in-person hearing as established by the AAA Rules. If your claim exceeds 25,000, the right to a hearing will be determined by the AAA Rules. Any in-person arbitration hearings will be held at a location within the federal judicial district in which you reside unless we both agree to another location or we agree to a telephonic arbitration.
Opt Out. You may opt out of this dispute resolution procedure. If you opt out, neither you nor LG can require the other to participate in an arbitration proceeding. To opt out, you must send notice to LG no later than 30 calendar days from the date of the first consumer purchaser's purchase of the product by either: (i) sending an e-mail to optout@lge.com, with the subject line: "Arbitration Opt Out" or (ii) calling 1-800-980-2973. You must include in the opt out e-mail or provide by telephone: (a) your name and address; (b) the date on which the product was purchased; (c) the product model name or model number; and (d) the serial number (the serial number can be found (i) on the product; or (ii) online by accessing https://www/lg.com/us/support and clicking on "How do I find my model number?").
You may only opt out of the dispute resolution procedure in the manner described above (that is, by e-mail or telephone); no other form of notice will be effective to opt out of this dispute resolution procedure. Opting out of this dispute resolution procedure will not affect the coverage of the Limited Warranty in any way, and you will continue to enjoy the full benefits of the Limited Warranty. If you keep this product and do not opt out, then you accept all terms and conditions of the arbitration provision described above.
CUSTOMER ASSISTANCE INFORMATION
| To Prove Warranty Coverage Retain your Sales Receipt | to prove date of purchase. A copy of your Sales Receipt must be submitted at the time warranty service is provided. |
| To Obtain the Nearest Authorized Service Center or Sales Dealer, or to Obtain Product, Customer, or Service Assistance | Call 1-855-790-6655 (Phone answered 24 hours - 365 days a year) and choose the appropriate prompt from the menu; or visit our website at: http://www.sksappliances.com or by mail: LG Customer Service P.O. Box 240007 Huntsville, AL 35813 ATTN: CIC |
CANADA
TERMS AND CONDITIONS
ARBITRATION NOTICE: THIS LIMITED WARRANTY CONTAINS AN ARBITRATION PROVISION THAT REQUIRES YOU AND LG TO RESOLVE DISPUTES BY BINDING ARBITRATION INSTEAD OF IN COURT, UNLESS THE LAWS OF YOUR PROVINCE OR TERRITORY DO NOT PERMIT THAT, OR, IN OTHER JURISDICTIONS, IF YOU CHOOSE TO OPT OUT. FOR FURTHER CLARITY, THIS ARBITRATION PROVISION IS NOT APPLICABLE TO CONSUMERS RESIDING IN ONTARIO AND QUEBEC. IN ARBITRATION, CLASS ACTIONS AND JURY TRIALS ARE NOT PERMITTED. PLEASE SEE THE SECTION Titled "PROCEDURE FOR RESOLVING DISPUTES" BELOW.
Should your LG Oven ("Product") fail due to a defect in materials or workmanship under normal and proper use, during the warranty period set forth below, LG will, at its option, repair, replace or pro rate the Product upon receipt of proof of the original retail purchase. This limited warranty is valid only to the original retail purchaser of the Product and applies only to a Product distributed, purchased from an authorized retailer and used within Canada, as determined at the sole discretion of LG.
| WARRANTY PERIOD HOW SERVICE IS HANDLED | |
| Three (3) years from the date of original retail purchase. | Any part of the oven that fails due to a defect in materials or workmanship. During this full three-years warranty, LG will also provide, free of charge, all labor and in-home service to replace the defective part. |
- Replacement products and parts are warranted for the remaining portion of the original warranty period or ninety (90) days, whichever is greater.
- Replacement products and parts may be new, reconditioned, refurbished, or otherwise factory remanufactured, all at the sole discretion of LG.
Proof of original retail purchase specifying the Product model and date of purchase is required to obtain warranty service under this Limited Warranty.
DISCLAIMER:
IF YOU ARE A CONSUMER SUBJECT TO QUEBEC AND ONTARIO'S CONSUMER PROTECTION ACT, THE EXCLUSION OF WARRANTY CONTAINED IN THIS SECTION DO NOT EXCLUDE OR LIMIT THE RIGHTS AND
94 LIMITED WARRANTY
REMEDIES THAT YOU MAY HAVE UNDER SUCH ACT, INCLUDING THE RIGHT TO MAKE A CLAIM UNDER ANY OF THE STATUTORY WARRANTYES PROVIDED THEREUNDER.
LG'S SOLE LIABILITY IS LIMITED TO THE LIMITED WARRANTY SET OUT ABOVE, UNLESS SUCH LIMITATION IS PROHIBITED BY THE LAWS OF THE PROVINCE IN WHICH YOU RESIDE. EXCEPT AS EXPRESSLY PROVIDED ABOVE, OR IF OTHERWISE PROHIBITED BY THE LAW OF THE PROVINCE IN WHICH YOU RESIDE, LG DOES NOT MAKE ANY OTHER WARRANTYES OR CONDITIONS RESPECTING THE PRODUCT, AND HEREBY DISCLAIMS, ALL OTHER WARRANTYES AND CONDITIONS RESPECTING THE PRODUCT, WHETHER EXPRESS OR IMPLIED, INCLUDING BUT NOT LIMITED TO, ANY IMPLIED WARRANTY OR CONDITION OF MERCHANTABILITY OR FITNESS FOR A PARTICULAR PURPOSE, AND NO REPRESENTATIONS SHALL BE BINDING ON LG. LG DOES NOT AUTHORIZE ANY PERSON TO CREATE OR ASSUME FOR IT ANY OTHER WARRANTY OBLIGATION OR LIABILITY IN CONNECTION WITH THE PRODUCT. TO THE EXTENT THAT ANY WARRANTY OR CONDITION IS IMPLIED BY LAW, IT IS LIMITED TO THE WARRANTY PERIOD SET OUT ABOVE. UNDER NO CIRCUMSTANCES SHALL LG, THE MANUFACTURER OR DISTRIBUTOR OF THE PRODUCT, BE LIABLE FOR ANY INCIDENTAL, CONSEQUENTIAL, SPECIAL, DIRECT, INDIRECT, PUNITIVE OR EXEMPLARY DAMAGES, INCLUDING, WITHOUT LIMITATION, LOSS OF GOODWILL, LOST PROFITS, LOSS OF ANTICIPATED PROFITS, LOST REVENUE, LOSS OF USE, OR ANY OTHER DAMAGE, WHETHER ARISING DIRECTLY OR INDIRECTLY FROM ANY CONTRACTUAL BREACH, FUNDAMENTAL BREACH, TORT OR OTHERWISE, OR FROM ANY ACTS OR OMISSIONS. LG'S TOTAL LIABILITY, IF ANY, SHALL NOT EXCEED THE PURCHASE PRICE PAID BY YOU FOR THE PRODUCT.
This Limited Warranty gives you specific legal rights. You may also have other rights that vary from province to province depending on applicable provincial laws. Any term of this Limited Warranty that negates or varies any implied condition or warranty under provincial law is severable where it conflicts with such provincial law without affecting the remainder of this warranty's terms.
THIS LIMITED WARRANTY DOES NOT COVER
- Service trips to i) deliver, pick up, or install or; educate on how to operate the Product; ii) correct wiring or plumbing; or iii) correct unauthorized repairs or installations of the Product;
- Damage or failure of the Product to perform during power failures and interrupted or inadequate electrical service;
- Damage or failure resulting from operating the Product in a corrosive atmosphere or contrary to the instructions outlined in the Product's owner's manual;
- Damage or failure to the Product caused by accidents, pests and vermin, lightning, wind, fire, floods, acts of God, or any other causes beyond the control of LG or the manufacturer;
- Damage or failure resulting from misuse, abuse, improper installation, repair, or maintenance of the Product. Improper repair includes use of parts not authorized or specified by LG. Improper installation or maintenance includes installation or maintenance contrary to the Product's owner's manual;
- Damage or failure caused by unauthorized modification or alteration of the Product, or if used for other than the intended household purpose/use of the Product, or damage or failure resulting from any water leakage due to improper installation of the Product;
- Damage or failure caused by incorrect electrical current, voltage or plumbing codes;
- Damage or failure caused by use that is other than normal household use, including, without limitation, commercial or industrial use, including use in commercial offices or recreational facilities, or as otherwise outlined in the Product's owner's manual;
- Damage or failure caused by transportation and handling, including scratches, dents, chips and/or other damage to the finish of the Product, unless such damage results from defects in materials or workmanship and is reported to LG within one (1) week of delivery of the Products;
- Damage or missing items to any display, open box, refurbished or discounted Product;
- Refurbished Product or any Product sold "As Is", "Where Is", "With all Faults", or any similar disclaimer;
- Products with original serial numbers that have been removed, altered or cannot be readily determined at the discretion of LG;
-
Increases in utility costs and additional utility expenses in any way associated with the Product;
-
Any noises associated with normal operation of the Product;
- Replacement of light bulbs, filters, fuses or any other consumable parts;
- Replacement of any part that was not originally included with the Product;
- Costs associated with removal and/or reinstallation of the Product for repairs; and
- Shelves, drawers, handle and accessories to the Product, except for internal/functional parts covered under this Limited Warranty.
The cost of repair or replacement under the above excluded circumstances shall be borne by the consumer.
TO OBTAIN WARRANTY SERVICE AND ADDITIONAL INFORMATION, PLEASE CALL OR VISIT OUR WEBSITE:
- Call 1-888-289-2802 and select the appropriate option from the menu.
- Visit our website at www.sksappliances.com.
- By mail: 20 Norelco Drive, North York, ON, M9L 2X6
PROCEDURE FOR RESOLVING DISPUTES
EXCEPT WHERE PROHIBITED AT LAW (INCLUDING WITH RESPECT TO QUEBEC AND ONTARIO CONSUMERS), ALL DISPUTES BETWEEN YOU AND LG ASISING OUT OF OR RELATING IN ANY WAY TO THIS LIMITED WARRANTY OR THE PRODUCT SHALL BE RESOLVED EXCLUSIVELY THROUGH BINDING ARBITRATION, AND NOT IN A COURT OF GENERAL JURISDICTION. EXCEPT WHERE PROHIBITED AT LAW (INCLUDING WITH RESPECT TO QUEBEC AND ONTARIO CONSUMERS), YOU AND LG BOTH IRREVOCABLY AGREE TO WAIVE THE RIGHT TO A JURY TRIAL AND TO BRING OR PARTICIPATE IN A CLASS ACTION.
Definitions. For the purposes of this section, references to "LG" mean LG Electronics Canada, Inc., its parents, subsidiaries and affiliates, and each of their officers, directors, employees, agents, beneficiaries, predecessors in interest, successors, assigns and suppliers; references to "dispute" or "claim" shall include any dispute, claim or controversy of any kind whatsoever (whether based in contract, tort, statute, regulation, ordinance, fraud, misrepresentation or any other legal or equitable theory) arising out of or relating in any way to the sale, condition or performance of the product or this Limited Warranty.
Notice of Dispute. In the event you intend to commence an arbitration proceeding, you must first notify LG in writing at least 30 days in advance of initiating the arbitration by sending a letter to LGECI Legal Team at 20 Norelco Drive, North York, Ontario, Canada M9L 2X6 (the "Notice of Dispute"). You and LG agree to engage in good faith discussions in an attempt to amicably resolve your claim. The notice must provide your name, address, and telephone number; identify the product that is the subject of the claim; and describe the nature of the claim and the relief being sought. If you and LG are unable to resolve the dispute within 30 days of LG's receipt of the Notice of Dispute, the dispute shall be resolved by binding arbitration in accordance with the procedure set out herein. You and LG both agree that, during the arbitration proceeding, the terms (including any amount) of any settlement offer made by either you or LG will not be disclosed to the arbitrator until the arbitrator determines the dispute.
Agreement to Binding Arbitration and Class Action Waiver. Upon failure to resolve the dispute during the 30 day period after LG's receipt of the Notice of Dispute, you and LG agree to resolve any claims between you and LG only by binding arbitration on an individual basis, unless you opt out as provided below, or you reside in a jurisdiction that prevents full application of this clause in the circumstances of the claims at issue (in which case if you are a consumer, this clause will only apply if you expressly agree to the arbitration). To the extent permitted by applicable law, any dispute between you and LG shall not be combined or consolidated with a dispute involving any other person's or entity's product or claim. More specifically, without limitation of the foregoing, except to the extent such a prohibition is not permitted at law, any dispute between you and LG shall not under any circumstances proceed as part of a class or representative action. Instead of arbitration, either party may bring an individual action in small claims court, but that small claims court action may not be brought on a class or representative basis except to the extent this prohibition is not permitted at law in your province or territory of jurisdiction as it relates to the claims at issue between you and LG. This does not apply to consumers in Ontario and Quebec. In accordance with provincial legislation, the consumer and LG may agree to resolve the dispute using any procedure available, including commencing the action before the competent courts of those provinces.
Arbitration Rules and Procedures. To begin arbitration of a claim, either you or LG must make a written demand for arbitration. The arbitration will be private and confidential, and conducted on a simplified and

96 LIMITED WARRANTY
expedited basis before a single arbitrator chosen by the parties under the provincial or territorial commercial arbitration law and rules of the province or territory of your residence. You must also send a copy of your written demand to LG at LG Electronics, Canada, Inc., Attn: Legal Department- Arbitration, 20 Norelco Drive, North York, Ontario M9L 2X6. This arbitration provision is governed by your applicable provincial or territorial commercial arbitration legislation. For consumers in Ontario and Quebec, the applicable arbitration legislation only applies if consumers agree to submit the dispute to arbitration. Judgment may be entered on the arbitrator's award in any court of competent jurisdiction. All issues are for the arbitrator to decide, except that, issues relating to the scope and enforceability of the arbitration provision and to the arbitrability of the dispute are for the court to decide. The arbitrator is bound by the terms of this provision.
Governing Law. The law of the province or territory of your purchase shall govern this Limited Warranty and any disputes between you and LG except to the extent that such law is preempted by or inconsistent with applicable federal or provincial/territorial law. Should arbitration not be permitted for any claim, action, dispute or controversy between you and LG, you and LG attend to the exclusive jurisdiction of the courts of the province or territory of your purchase for the resolution of the claim, action, dispute or controversy between you and LG.
Fees/Costs. You do not need to pay any fee to begin an arbitration. Upon receipt of your written demand for arbitration, LG will promptly pay all arbitration filing fees unless you seek more than $25,000 in damages, in which case the payment of these fees will be governed by the applicable arbitration rules. Except as otherwise provided for herein, LG will pay all filing, administration and arbitrator fees for any arbitration initiated in accordance with the applicable arbitration rules and this arbitration provision. If you prevail in the arbitration, LG will pay your attorneys' fees and expenses as long as they are reasonable, by considering factors including, but not limited to, the purchase amount and claim amount. Notwithstanding the foregoing, if applicable law allows for an award of reasonable attorneys' fees and expenses, an arbitrator can award them to the same extent that a court would. If the arbitrator finds either the substance of your claim or the relief sought in the demand is frivolous or brought for an improper purpose (as measured by the applicable laws), then the payment of all arbitration fees will be governed by the applicable arbitration rules. In such a situation, you agree to reimburse LG for all monies previously disbursed by it that are otherwise your obligation to pay under the applicable arbitration rules. Except as otherwise provided for, LG waives any rights it may have to seek attorneys' fees and expenses from you if LG prevails in the arbitration.
Hearings and Location. If your claim is for 25,000 or less, you may choose to have the arbitration conducted solely (1) on the basis of documents submitted to the arbitrator, (2) through a telephonic hearing, or (3) by an in-person hearing as established by the applicable arbitration rules. If your claim exceeds 25,000, the right to a hearing will be determined by the applicable arbitration rules. Any in-person arbitration hearings will be held at the nearest, most mutually-convenient arbitration location available within the province or territory in which you reside unless you and LG both agree to another location or agree to a telephonic arbitration.
Severability and Waiver. If any portion of this Limited Warranty (including these arbitration procedures) is unenforceable, the remaining provisions will continue in full force and effect to the maximum extent permitted by applicable law. Should LG fail to enforce strict performance of any provision of this Limited Warranty (including these arbitration procedures), it does not mean that LG intends to waive or has waived any provision or part of this Limited Warranty.
Opt Out. The arbitration provision requires you and LG to resolve disputes by binding arbitration instead of court, unless the laws of your province or territory do not permit that, or, in other jurisdictions, if you choose to opt out. The arbitration provision does not apply to consumers in Ontario and Quebec.
For individuals that fall within the binding arbitration provisions, you may opt out of this dispute resolution procedure. If you opt out, neither you nor LG can require the other to participate in an arbitration proceeding. To opt out, you must send notice to LG no later than 30 calendar days from the date of the first consumer purchaser's purchase of the product by either (i) sending an e-mail to optout@lge.com, with the subject line: "Arbitration Opt Out;" or (ii) calling 1-800-980-2973. You must include in the opt out e-mail or provide by telephone: (a) your name and address; (b) the date on which the product was purchased; (c) the product model name or model number; and (d) the serial number (the serial number can be found (i) on the product; or (ii) online by accessing https://www.lg.com/ca_en/findmodelserial/).
In the event that you "Opt Out", the law of the province or territory of your residence shall govern this Limited Warranty and any disputes between you and LG except to the extent that such law is preempted by or inconsistent with applicable federal or provincial/territorial law. Should arbitration not be permitted
for any claim, action, dispute or controversy between you and LG, you and LG agree to attend to the exclusive jurisdiction of the courts of the province or territory of your residence for the resolution of the claim, action, dispute or controversy between you and LG.
You may only opt out of the dispute resolution procedure in the manner described above (that is, by e-mail or telephone); no other form of notice will be effective to opt out of this dispute resolution procedure. Opting out of this dispute resolution procedure will not affect the coverage of the Limited Warranty in any way, and you will continue to enjoy the full benefits of the Limited Warranty. If you keep this product and do not opt out, then you accept all terms and conditions of the arbitration provision described above.
Conflict of Terms. In the event of a conflict or inconsistency between the terms of this Limited Warranty and the End User License Agreement ("EULA") in regards to dispute resolution, the terms of this Limited Warranty shall control and govern the rights and obligations of the parties and shall take precedence over the EULA.


SKS
MANUAL DEL PROPIETARIO
HORNO DE PARED
10 APERCU DU PRODUIT
10 APERCU DU PRODUIT
APERCU DU PRODUIT
Application LG ThinQ
Customer Information Center
For inquiries or comments, call;
1-855-790-6655 USA, Consumer User
1-888-289-2802 CANADA, Consumer User
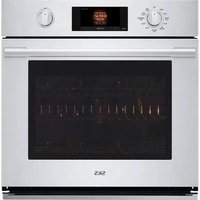


- Smart Diagnosis TM Feature
- MAINTENANCE
- Cleaning
- Periodic Maintenance
- TROUBLESHOOTING
- FAQs
- Before Calling for Service
- LIMITED WARRANTY
- USA
- CANADA
- IMPORTANT SAFETY INSTRUCTIONS
- IMPORTANT SAFETY INSTRUCTIONS
- READ ALL INSTRUCTIONS BEFORE USE
- Safety Messages
- WARNING
- CAUTION
- Installation
- Operation
- Maintenance
- IMPORTANT SAFETY INSTRUCTIONS
- Risk of Fire and Flammable Materials
- Safety Standard for Button Cell or Coin Batteries
- PRODUCT OVERVIEW
- PRODUCT OVERVIEW
- Product Features
- Exterior/Interior
- NOTE
- Accessories
- Accessories for Cooking
- Accessories for Installation
- Manuals
- OPERATION
- Operating Control Panel
- Control Panel Features
- LCD Display On/Off
- LCD Touchscreen for Oven
- Display Icons
- Energy Saving Tips
- Changing Settings
- Getting Started
- OPERATION
- Settings
- Location of Settings
- Control Lock
- Lock
- Unlock
- Date & Time
- Setting Date
- Setting Time of Day
- Clock Themes
- Setting Clock Themes
- Camera
- Setting Camera
- Setting Menu Recommendation
- Wi-Fi
- Setting Up Wi-Fi
- OPERATION
- Remote Start
- Setting Remote Start
- Sabbath Mode
- Setting Sabbath Mode
- Brightness
- Setting Display Brightness
- Instaview
- Setting Instaview
- Display
- Setting Display Option
- Convection Auto Conversion
- Turning Convection Auto Conversion On/Off
- Temperature Units
- Setting Temperature Units
- Smart Diagnosis™
- Factory Data Reset
- Open Source License
- Oven Cooling
- Timer
- Setting the Timer
- Adjusting or Cancelling the Timer
- Operating the Oven
- Before Using the Oven
- Oven Vent
- Using Heavy Duty Racks and Offset Rack
- Removing Racks
- Replacing Racks
- Using Gliding Oven Racks
- Installing Gliding Racks
- Removing Gliding Racks
- Camera (Upper Oven Only)
- Before Using Camera
- OPERATION
- Menu Recommendation
- Using Menu Recommendation
- Press START.
- RealTime View
- Using RealTime View
- Cook Record
- Using Cook Record
- Bake Mode
- Setting the Bake Function
- Changing the Cook Settings
- To Stop Cooking
- Baking Tips
- OPERATION
- Recommended Baking Guide
- Rack and Pan Placement
- Multiple Rack Position
- Single Rack Position
- Baking Rack Guide
- Convection Bake and Roast Mode
- Using Convection
- Tips for Convection Baking
- OPERATION
- Tips for Convection Roasting
- Air Fry (Upper Oven Only)
- Setting the Air Fry Mode
- Tips for Air Fry
- Recommendations When Air Frying High-Fat Foods
- Recommended Air Frying Guide
- OPERATION
- RapidHeat Roast (+) Mode (Upper Oven Only)
- Setting the RapidHeat Roast (+) Function
- OPERATION
- RapidHeat Roast Mode (Lower Oven Only)
- Setting the RapidHeat Roast Mode
- Press START.
- Broil Mode
- Setting the Oven to Broil
- To Stop Broiling
- Tips for Reducing Smoke
- Changing the Broil Settings
- Recommended Broiling Guide
- Tips for Broiling
- Beef
- Seafood
- Vegetables
- Warm Mode
- Setting the Warm Mode
- Changing the Warm Settings
- To Stop the Warming Mode
- Proof Mode
- Setting the Proof Mode
- To Stop the Proof Mode
- Probe Mode (Upper Oven Only)
- Using the Meat Probe Feature
- OPERATION
- Changing the Probe Temperature while Cooking
- Recommended Probe Guide
- Recommended Probe Placement Chart
- Recommended Probe Temperature Chart
- Steam Function (Upper Oven Only)
- Using the Steam Feeder Tank
- OPERATION
- Sous Vide (Upper Oven Only)
- Benefits of Sous Vide
- Healthier
- - Safe and Convenient
- Crisp and Moist Results
- Setting Sous Vide Mode
- Changing the Sous Vide Settings
- To Stop Sous Vide Cooking
- Sous Vide Cooking Guide
- Steam Combi (Upper Oven Only)
- Setting Steam Combi
- OPERATION
- Setting Auto Cook Mode
- Changing the Steam Cook Settings
- To Stop Steam Cooking
- Auto Cook Mode
- Auto Cook Guide
- OPERATION
- OPERATION
- My Recipe Mode
- Creating My Recipe
- SMART FUNCTIONS
- SMART FUNCTIONS
- LG ThinQ Application
- LG ThinQ Application Features
- - SpeedClean™
- - Smart Diagnosis™
- - Settings
- - Remote Start
- Monitoring
- Product Notifications
- - Timer
- Installing LG ThinQ Application and Connecting an LG Appliance
- Models with QR Code
- Models without QR Code
- FCC Notice
- FCC RF Radiation Exposure Statement
- Supplier's Declaration of Conformity
- SMART FUNCTIONS
- Industry Canada Statement
- IC Radiation Exposure Statement
- Open Source Software Notice Information
- Smart Diagnosis™ Feature
- Using LG ThinQ to Diagnose Issues
- Using Audible Diagnosis to Diagnose Issues
- Press START.
- Cleaning
- Interior
- Exterior
- Painted and Decorative Trim
- Stainless Steel Surfaces
- Repeat as necessary.
- Oven Cavity
- Oven Door
- Broiler Pan and Grid
- Oven Racks
- SpeedClean
- Benefits of SpeedClean
- MAINTENANCE
- When to Use SpeedClean
- Case 1
- Case 2
- SpeedClean Instruction Guide
- Self Clean
- Before Starting Self Clean
- MAINTENANCE
- When to Use Self Clean
- Case 3
- Setting Self Clean
- Self Clean Soil Guide
- During Self Clean
- After the Self Clean Cycle
- Cleaning the Steam Feeder Tank
- Using Evaporation Function
- Setting Evaporation
- Periodic Maintenance
- Changing the Oven Light
- TROUBLESHOOTING
- FAQs
- Frequently Asked Questions
- TROUBLESHOOTING
- Before Calling for Service
- Cooking
- TROUBLESHOOTING
- Parts & Features
- Noises
- LIMITED WARRANTY
- USA
- TERMS AND CONDITIONS
- THIS LIMITED WARRANTY DOES NOT COVER
- The cost of repair or replacement under these excluded circumstances shall be borne by You.
- PROCEDURE FOR RESOLVING DISPUTES
- LIMITED WARRANTY
- CUSTOMER ASSISTANCE INFORMATION
- CANADA
- DISCLAIMER:
- LIMITED WARRANTY
- The cost of repair or replacement under the above excluded circumstances shall be borne by the consumer.
- LIMITED WARRANTY
- SKS
- MANUAL DEL PROPIETARIO
- HORNO DE PARED
- APERCU DU PRODUIT
- APERCU DU PRODUIT
- Application LG ThinQ
Brand : SKS
Model : SKSDV3012MT
Category : Oven