
Compit+/Power - Accessoires téléphone SKS - Free user manual and instructions
Find the device manual for free Compit+/Power SKS in PDF.


| Product Type | Smartphone holder with integrated power bank |
| Model | Compit+/Power |
| Brand | SKS |
| Compatible Handlebar Diameters | 22.2 mm, 25.4 mm, 31.8 mm, 35 mm |
| Max Stem Width | 80 mm |
| Power Bank Capacity | 10000 mAh / 37 Wh |
| Power Bank Dimensions | 140 x 72 x 23 mm |
| USB-C Input | DC 5V 3.1A / 9V 2A / 12V 1.5A |
| USB-C Output | DC 5V 3.1A / 9V 2A / 12V 1.7A |
| USB-A Output | DC 5V 4.5A / 9V 2A / 12V 1.5A |
| Wireless Charging | Qi-compatible, efficiency >70% |
| Operating Temperature | -10 to 60°C |
| Charging Temperature | 0 to 45°C |
| Protection Rating | IP54 |
| Battery Type | Lithium polymer |
| Mounting Options | Handlebar clamp, stem mount (COMPIT STEM), with spacers for wide stems |
| Compatible Smartphone Covers | Various SKS covers for iPhone, Samsung, Huawei; universal cover adapter |
| Orientation | Vertical or horizontal by 45° twist |
| Tilt Adjustment | Yes, via levelling screw |
| LED Indicators | Battery level and charging status (blue/red) |
| Warranty | 2 years (excluding battery: 6 months) |
| Maintenance | Clean exterior with damp cloth |
Frequently Asked Questions - Compit+/Power SKS
User questions about Compit+/Power SKS
0 question about this device. Answer the ones you know or ask your own.
Ask a new question about this device
Download the instructions for your Accessoires téléphone in PDF format for free! Find your manual Compit+/Power - SKS and take your electronic device back in hand. On this page are published all the documents necessary for the use of your device. Compit+/Power by SKS.
USER MANUAL Compit+/Power SKS
COMPIT · COMPIT ^+ /POWER · COMPIT/STEM
+COM/CHARGER · COM/PAD
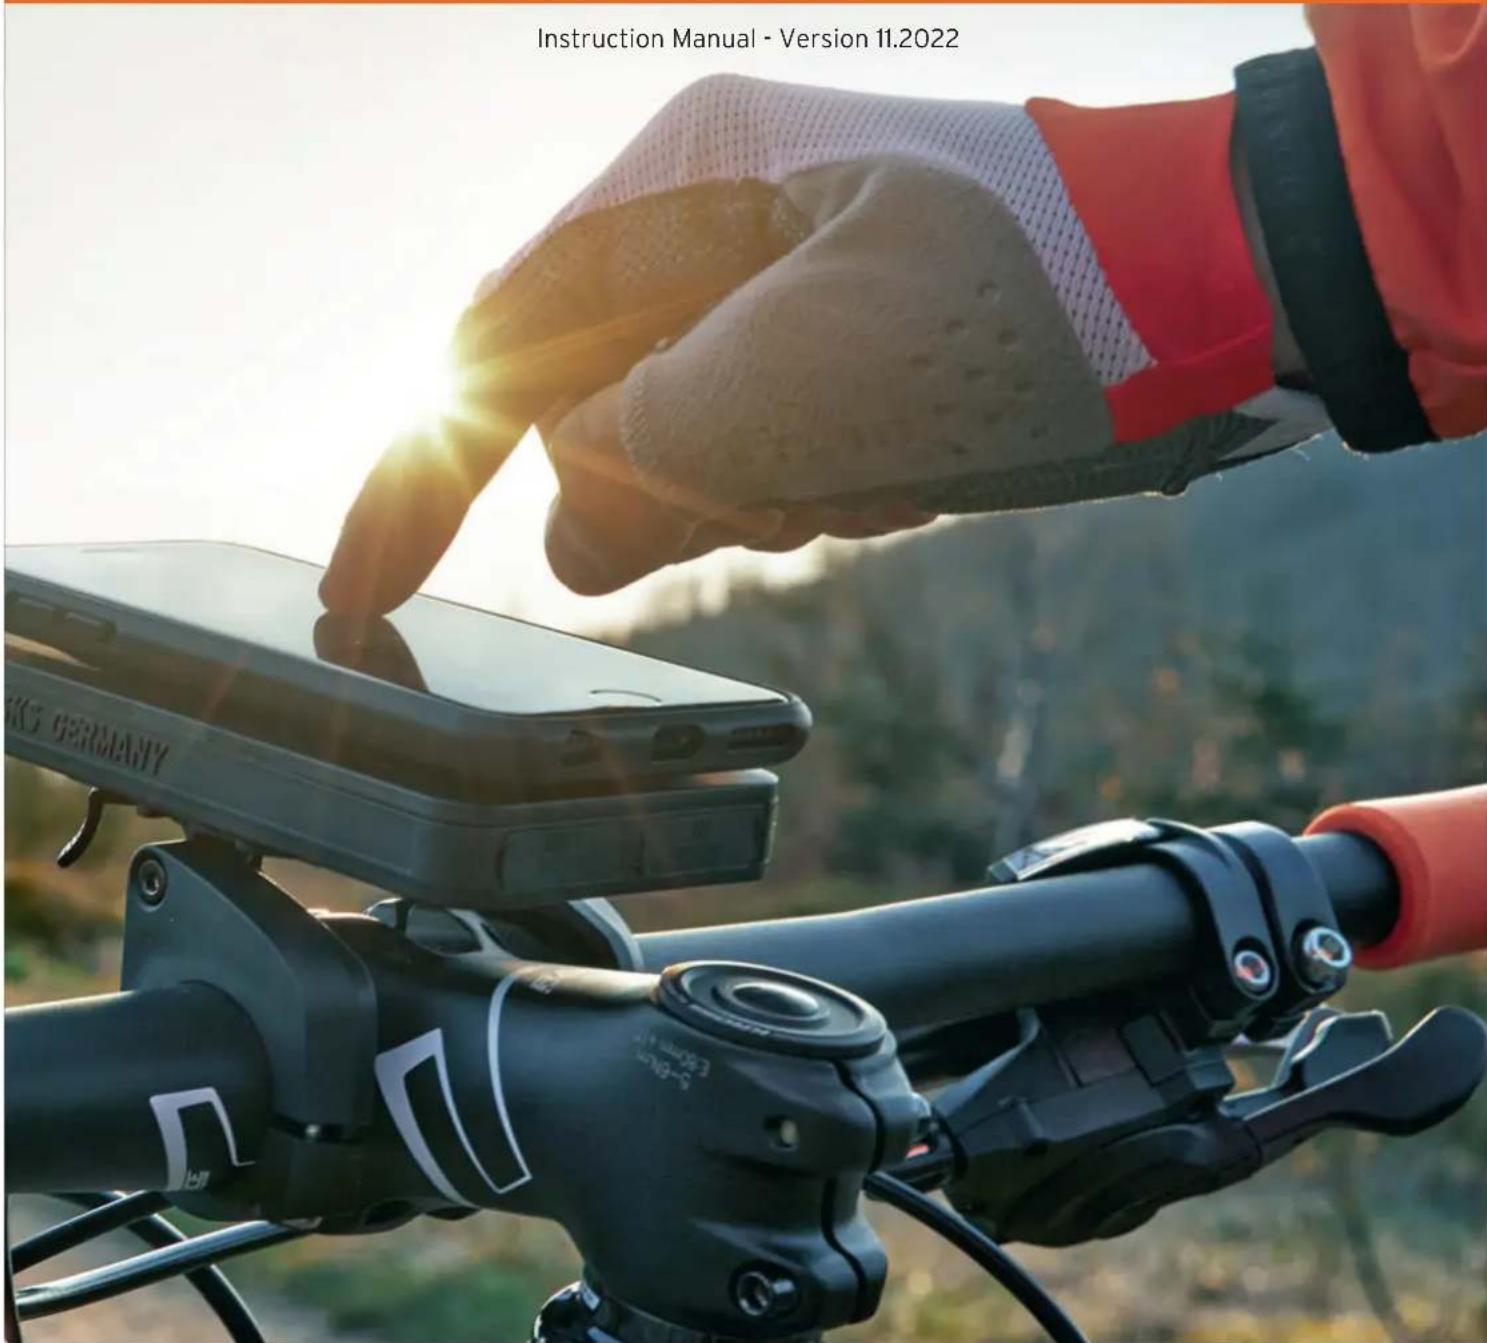
Table of Contents
| Table of contents | 3 |
| Notes on the manual and the manufacturer 4 | |
| Keeping this manual available | 4 |
| Design features of this manual 4 | |
| Copyright | 5 |
| Manufacturer's address 5 | |
| Safety instructions | 6 |
| Basic safety instructions 7 | |
| Design Features of Warnings | 8 |
| Design Features of Property Damage 8 | |
| Design features of tips | 8 |
| Scope of delivery 9 | |
| COMPIT | 9 |
| COMPIT+/POWER | 11 |
| COMPIT STEM | 13 |
| +COM/CHARGER | 13 |
| Mounting options | 14 |
| Assembly | 16 |
| COMPIT & COMPIT+/POWER | 17 |
| COMPIT 35mm | 20 |
| COMPIT Widening | 21 |
| COMPIT STEM | 23 |
| COMPIT COVER | 24 |
| COMPIT ADAPTER | 25 |
| Task and function | 26 |
| COMPIT | 26 |
| COMPIT+ & +COM/CHARGER | 26 |
| COMPIT STEM | 26 |
| COMPIT SPACER | 27 |
| Technical data +COM/CHARGER | 27 |
| LED status display | 28 |
| Unpacking and checking the scope of delivery | 28 |
| Attaching and removing COMPIT to bike handlebars | 29 |
| Attaching and removing smartphone to COMPIT | 29 |
| Adjusting the inclination | 31 |
| COM/PAD | 32 |
| Maintaining the product | 36 |
| Accessories | 36 |
| Disposing of the product | 37 |
| Warranty Statement | 38 |
| Returning the product to customer service | 39 |
Information about the manual and the manufacturer
This manual will help you to safely use the COMPIT and COMPIT ^+ /POWER as well as the COMPIT STEM and COMPIT STEM ^+ product family. The COMPIT is a smartphone holder for smartphones. The COMPIT ^+ /POWER consists of a COMPIT and +COM/CHARGER. The ^+ COM/UNIT is a power bank for smartphones. The COMPIT and the +COM/CHARGER are all referred to hereinafter as the “product” for short, unless a distinction needs to be made between the different functions of the products. The ^+ COMPIT/STEM smartphone holder mounts the smartphone under the ahead cap on the handlebar stem.
Keep the manual to hand
This manual is part of the product.
▶ Always retain this manual.
▶ Hand over this manual if you sell the product or pass it on in any other way.
Features of this manual
Various elements of this manual have defined features.
This allows you to easily distinguish between the following elements:
Normal text
Lists
Action steps
Copyright
This manual contains information that is subject to copyright. This manual may not be copied, printed, filmed, processed, reproduced or distributed in any form, in whole or in part, without the prior written consent of SKS metaplast Scheffer-Klute GmbH.
©2019 SKS metaplast Scheffer-Klute GmbH All rights reserved.
Manufacturer's address
59846 Sundern / Germany
Tel.: +49-2933-8310
Website: sks-germany.com
Safety
Intended use
The product is designed for private use.
The COMPIT is used for mounting a smartphone on the handlebar of a bike.
It is intended for a handlebar with the following diameters.
22.2 mm
25.4 mm
31.8 mm
35 mm
The stem width is a maximum of 80 mm (see page 21).
The ^+ COM/CHARGER is additionally included in the scope of delivery for the COMPIT ^+ /POWER.
The ^+ COM/CHARGER is intended for charging a smartphone and can be mounted on the COMPIT. The smartphone can only be used on the COMPIT and the ^+ COM/CHARGER with a COVER, COVER ADAPTER or special bag not included in the scope of delivery. Please refer to the Accessories section, page 32. Intended use also includes observing and following all the information contained in this manual, particularly the safety instructions. Any other use is expressly considered improper use.
COMPIT STEM
There may be an overhang in the knee area depending on the mounting option.
Attention: risk of falling!
The product should only be mounted by a technically adept person.
If necessary, contact your bicycle dealer or the SKS GERMANY customer service team.
Basic safety instructions
Avoid fire, explosion or electric shock
Severe or fatal injuries caused by explosion, fire or electric shock may be caused if the product is used improperly.
▶ Check whether the voltage indicated on the power adapter is the same as the local mains voltage before connecting the adapter to the power supply.
▶ Only use authorised power adapters.
Do not use the power adapter, COMPIT or ^+ COM/CHARGER if they are damaged.
▶ Never open the housing of the ^+ COM/CHARGER. Always have repair work carried out by qualified specialists.
Do not stick metal labels or other objects onto the ^+ COM/CHARGER.
Do not use the ^+ COM/CHARGER in the vicinity of heated surfaces.
Do not use extension cables or overloaded multi-way sockets.
▶ Ensure that children and persons with reduced mental capabilities only use the ^+ COM/CHARGER when supervised.
Avoid failure of a pacemaker or another implant
The use of the ^+ COM/CHARGER can lead to the failure of a pacemaker or another implant.
If you have a pacemaker or another implant, consult your doctor or the implant manufacturer before using the ^+ COM/CHARGER.
Warnings
| CAUTION | |
 | Warning with the word CAUTION warn of a situation that may result in minor or moderate injuries. |
Property damage
| ATTENTION | |
| This information warns of a situation that will result in property damage and reduced functionality. | |
Tips
①Tips contain additional information.
natural_image
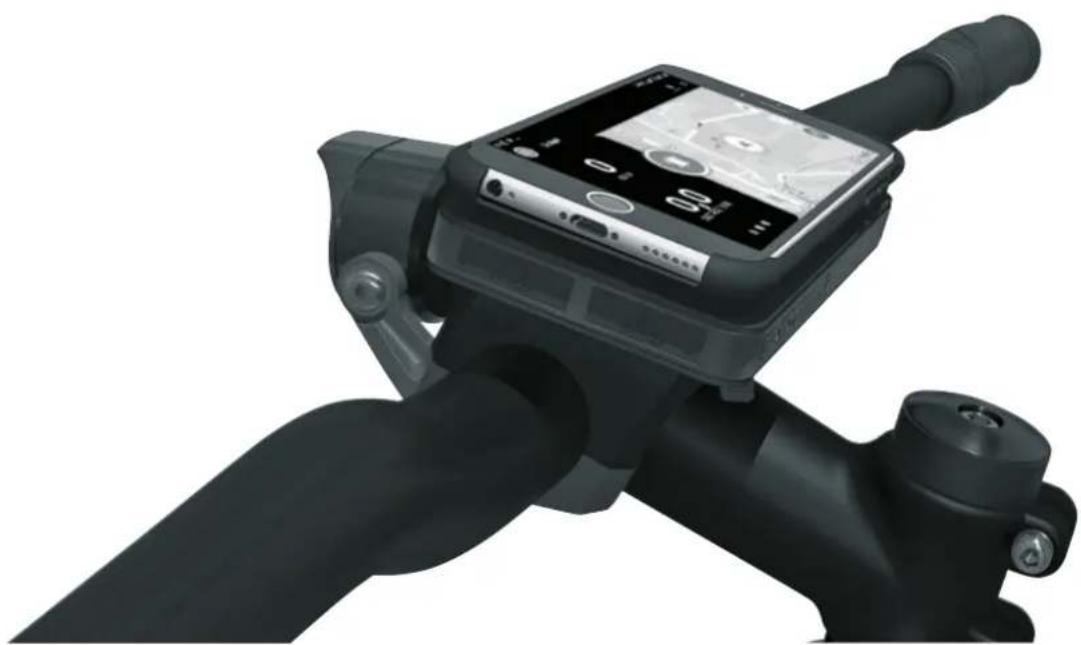
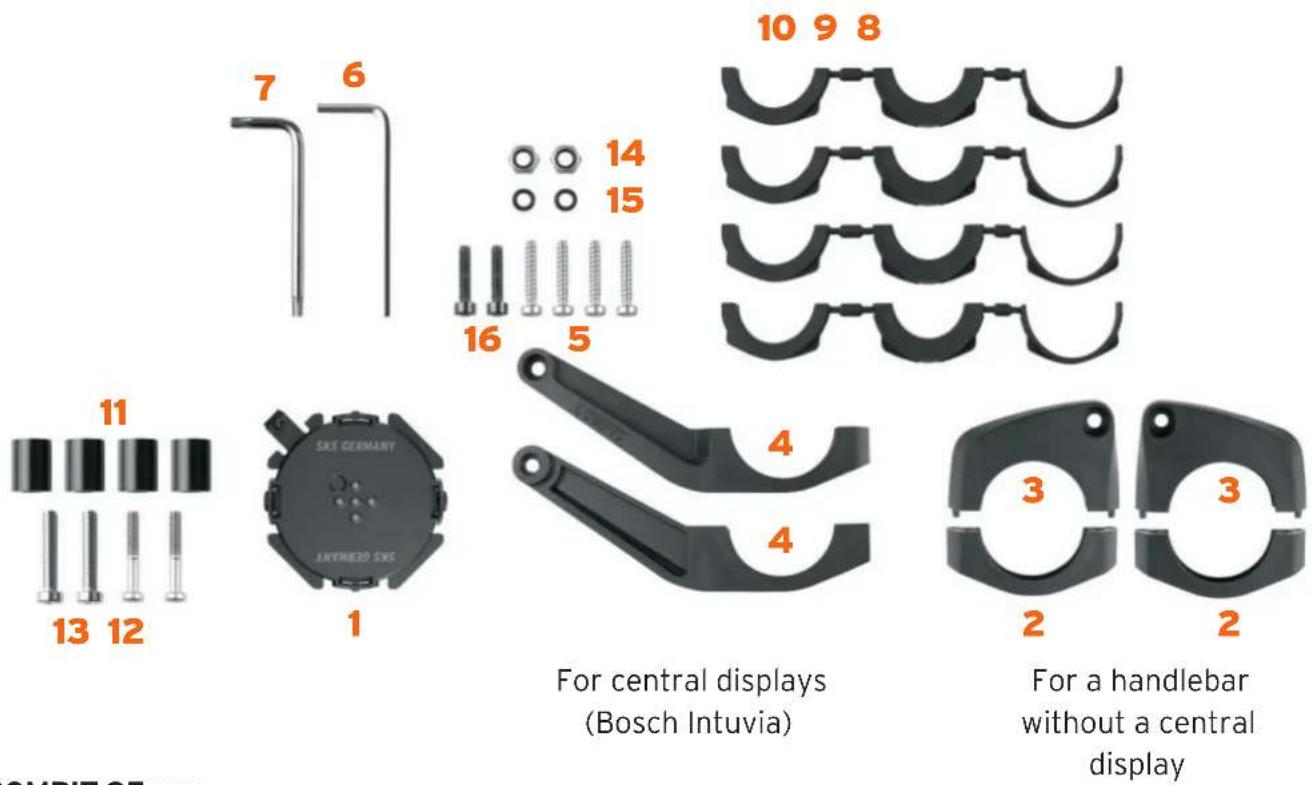
Black and white photo of a smart bicycle steering wheel with a digital display showing navigation map (no visible text or symbols)Overview of the scope of delivery for the COMPIT
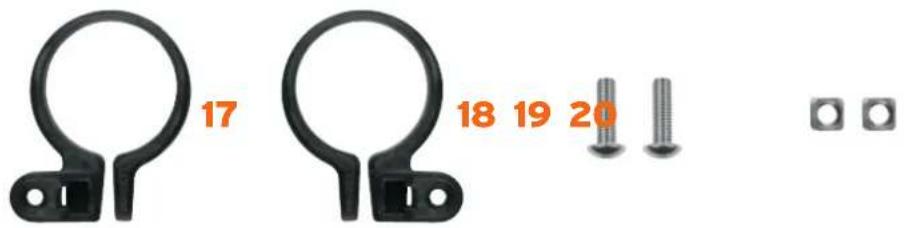
COMPIT 35 mm
| DESIGNATIONNo. | |
| 1 | s |
| 2 | Side panels for the docking station 2x |
| 3 | Clamping arms for the COMPIT without an adapter 2x |
| 4 | Clamping arms for the COMPIT with an adapter for the Bosch Intuvia (R: right, L: left) 2x |
| 5 | Screws for mounting the COMPIT with clamping arms on the handlebar of the bicycle (4x20), 4x |
| 6 | 3 mm Allen key |
| 7 | Torx® key Tx20 |
| 8 | Rubber adapters for a handlebar with a diameter of 31.8 mm, 4x |
| 9 | Rubber adapters for a handlebar with a diameter of 22.2 mm, 4x |
| 10 | Rubber adapters for a handlebar with a diameter of 25.4 mm, 4x |
| 11 | PVC spacers, 4x |
| 12 | Screws for the COMPIT spacers for the docking station; (4x25), 2x |
| 13 | Screws for the COMPIT spacers for the COM/LIGHT; (5x25), 2x |
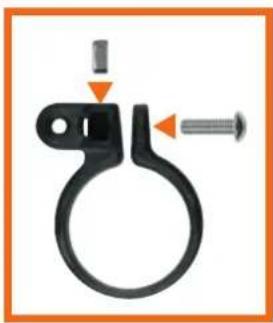
| 14 | Self locking nuts M4, 2x for the COMPIT adapter |
| 15 | O-rings for the docking station, 2x |
| 16 | Screws for the docking station; (4x18), 2x |
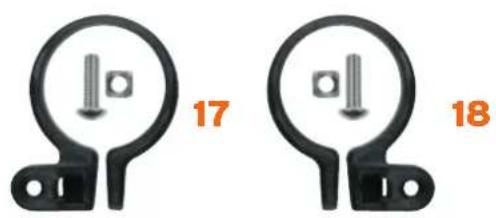
| 17 | Clamping arms COMPIT 35 mm left |
| 18 | Clamping arms COMPIT 35 mm right |
| 19 | Screw M5, 2x |
| 20 | Square nut M5, 2x |
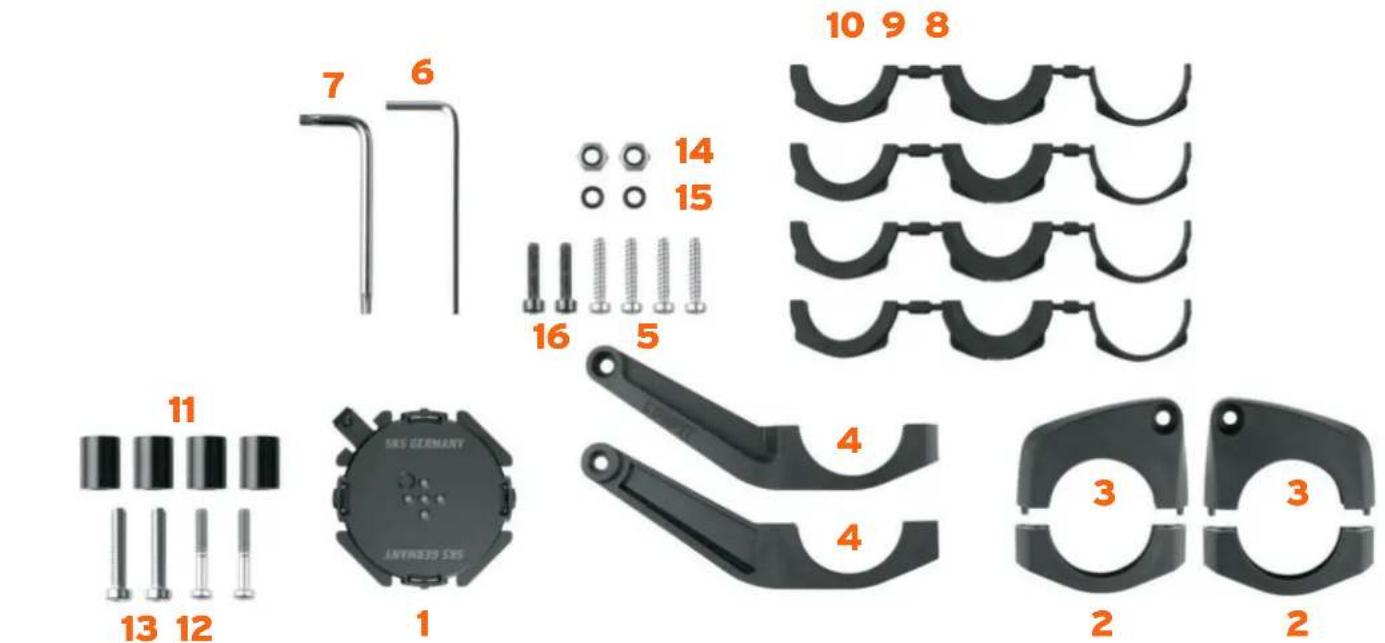
Overview of the scope of delivery for the COMPIT ^+ /POWER
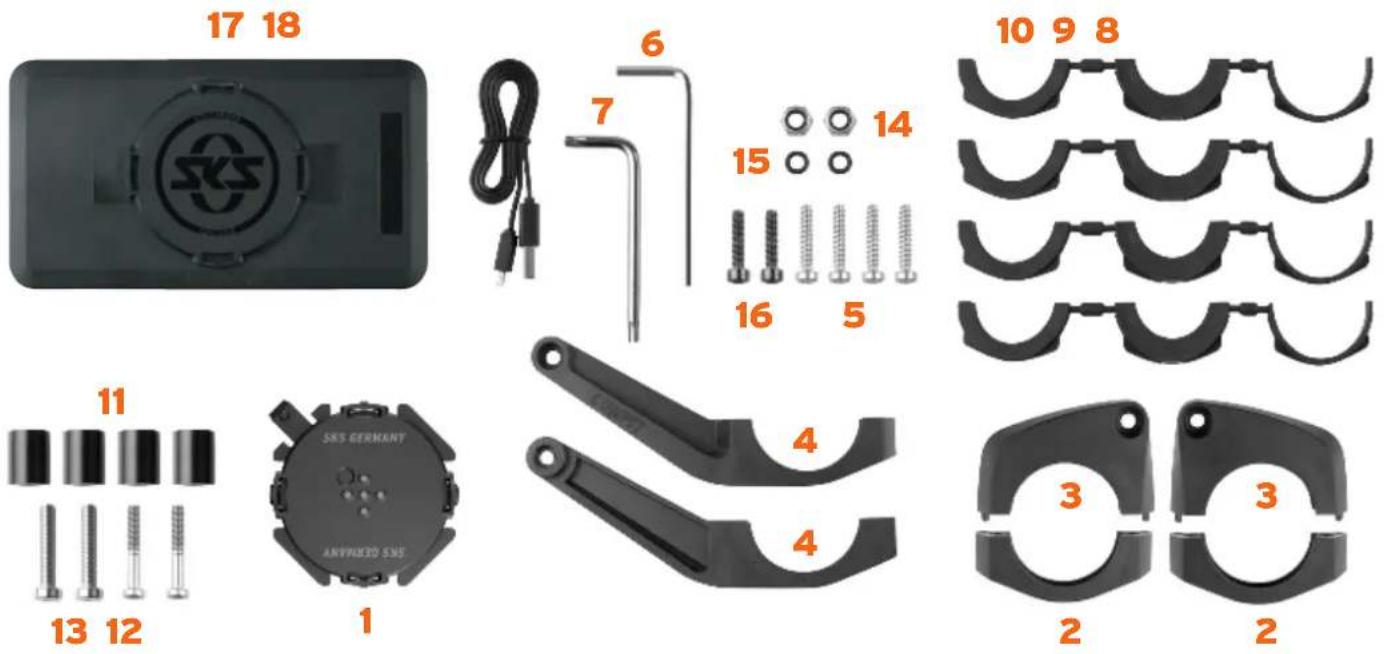
COMPIT 35 mm
natural_image
Close-up of a black metal bracket with a hole and a small inset showing the number 19 (no text or symbols on the bracket itself)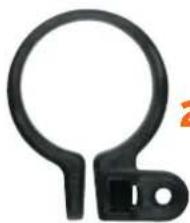
natural_image
Close-up of a black metal bracket with a hole and a small inset detail (no text or symbols visible)20
21
[NO TEXT]
[NO TEXT]
| DESIGNATIONNo. | |
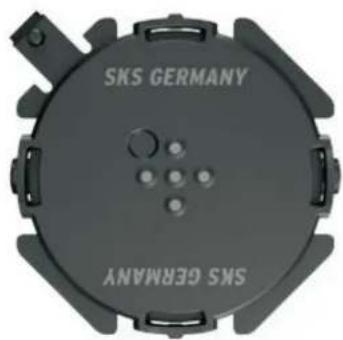
| 1 | Docking station for mounting the smartphone with a cover or the +COM/CHARGER |
| 2 | Side panels for the docking station 2x |
| 3 | Clamping arms for the COMPIT without an adapter 2x |
| 4 | Clamping arms for the COMPIT with an adapter for the Bosch Intuvia (R: right, L: left) 2x |
| 5 | Screws for mounting the COMPIT with clamping arms on the handlebar of the bicycle (4x20), 4x |
| 6 | 3 mm Allen key |
| 7 | Torx®key Tx20 |
| DESIGNATIONNo. | |
| 8 | Rubber adapters for a handlebar with a diameter of 31.8 mm, 4x |
| 9 | Rubber adapters for a handlebar with a diameter of 22.2 mm, 4x |
| 10 | Rubber adapters for a handlebar with a diameter of 25.4 mm, 4x |
| 11 | PVC spacers, 4x |
| 12 | Screws for the COMPIT spacers for the docking station; (4x25), 2x |
| 13 | Screws for the COMPIT spacers for the COM/LIGHT; (5x25), 2x |
| 14 | Self locking nuts M4, 2x for the COMPIT adapter |
| 15 | O-rings for the docking station, 2x |
| 16 | Screws for the docking station; (4x18), 2x |
| 17 | +COM/CHARGER |
| 18 | +COM/CHARGER charging cable |
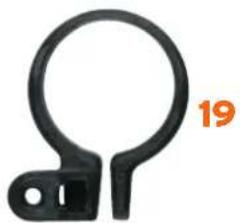
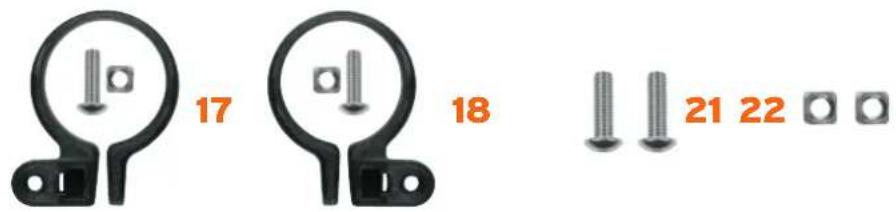
| 19 | Clamping arms COMPIT 35 mm left |
| 20 | Clamping arms COMPIT 35 mm right |
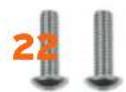
| 21 | Screw M5, 2x |
| 22 | Square nut M5, 2x |
Overview of the COMPIT/STEM
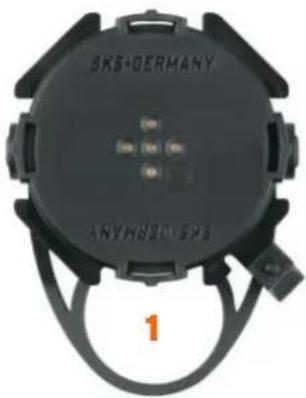
natural_image
Close-up of a black mechanical component with no visible text or symbols on the body, labeled 'SKS+DERMANY' and 'ANYH2015N3', and number '1' at bottom left (no readable text beyond labels)| DESIGNATIONNo. | |
| 1 | COMPIT/STEM |
Overview of the COM/CHARGER 1
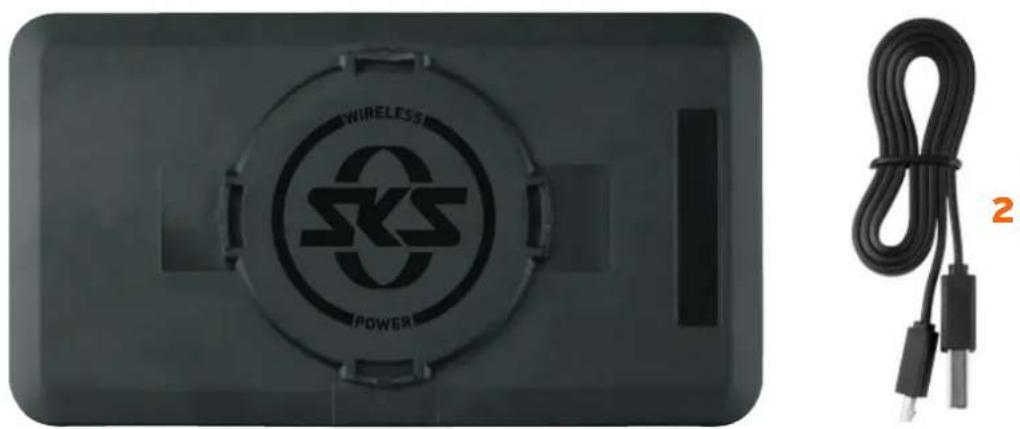
natural_image
Top-down view of a black wireless power connector with a circular logo and cable, no visible text or symbols on the device itself.| DESIGNATIONNo. | |
| 1 | +COM/CHARGER |
| 2 | +COM/CHARGER charging cable |
Mounting options for the COMPIT and COMPIT ^+ /POWER
COMPIT 35 mm
Requirements
You can mount the COMPIT on a bicycle if your bike meets the following requirements:
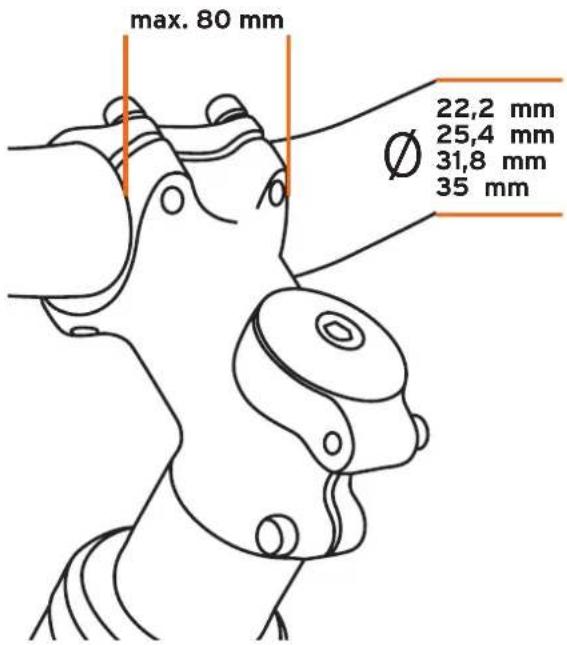
| Designation Explanation | |
| B | A maximum stem width of 80 mm. If the stem width is >49mm, please use the COMPIT spacers (see page 14) |
| ∅ | Handlebar diameter:22.2 mm · 25.4 mm · 31.8 mm · 35 mm |
Mounting the adapter plate to handlebar 35 mm
Required:
1 Docking station for mounting the smartphone with a cover or the ^+ COM/CHARGER 1x
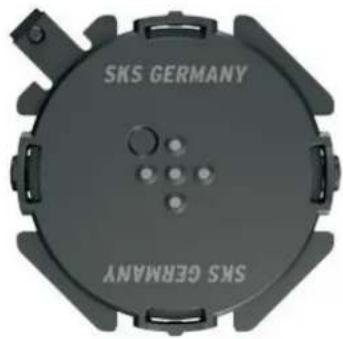
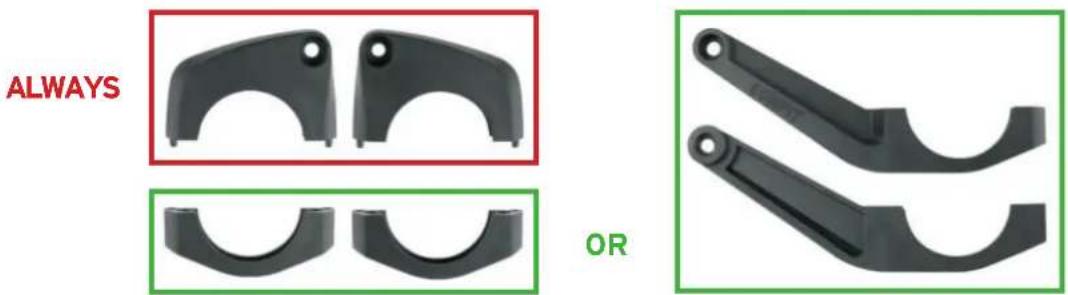
2 Side panels for the docking station and 3 clamping arms for the COMPIT without an adapter or 4 clamping arms for the COMPIT with an adapter (Bosch Intuvia) (2x each)
natural_image
Two black plastic mechanical parts with curved cutouts, one labeled 'ALWAYS' and the other 'OR', shown without any text or symbols.14 Self-locking nuts M4, 2x
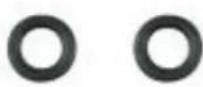
15 O-rings for the docking station
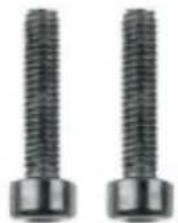
16 Screws for the docking station
natural_image
Two identical metallic screw fasteners with threaded shafts and mounting base (no text or symbols visible)6 Allen key, 3 mm
Mounting the COMPIT
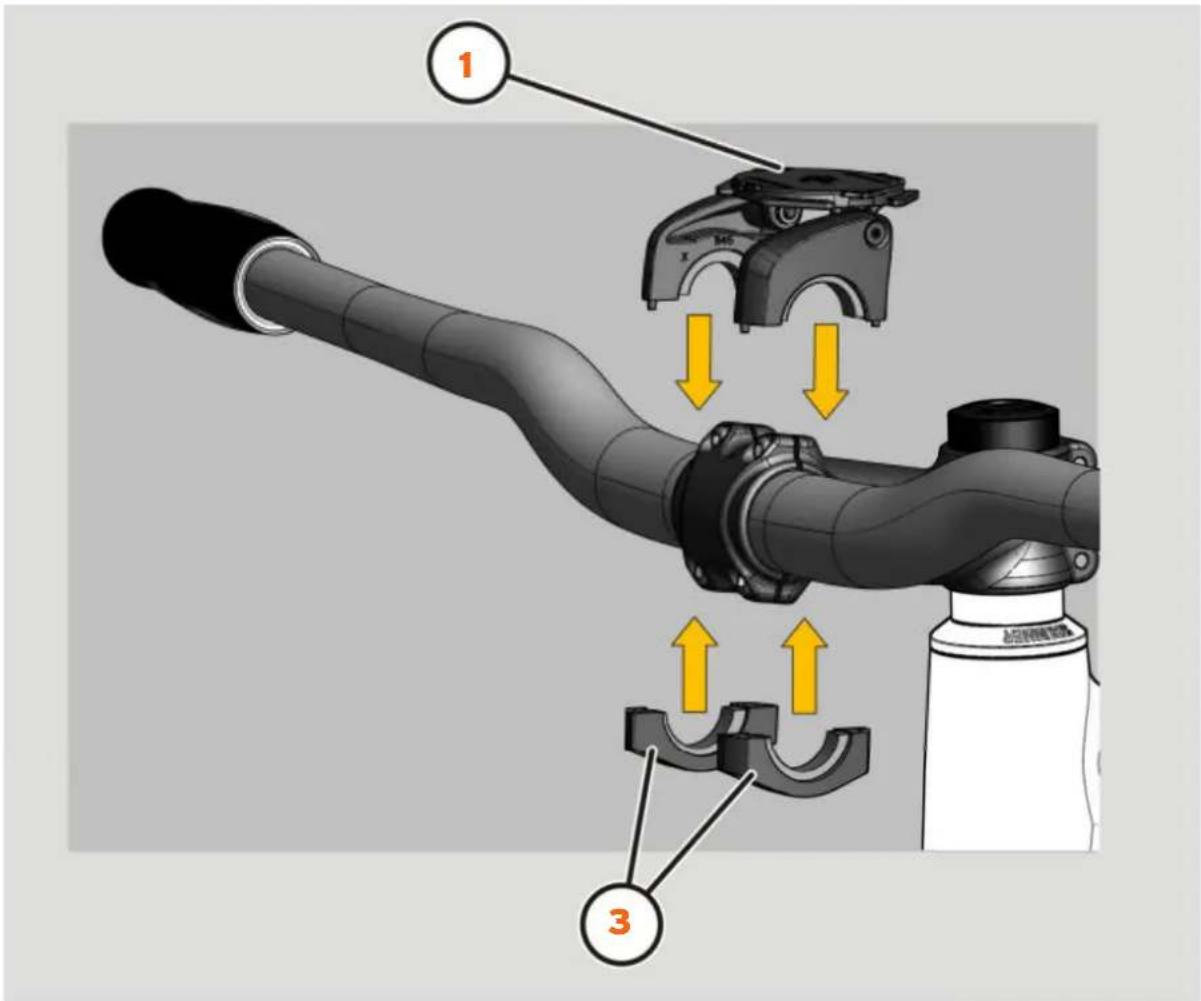
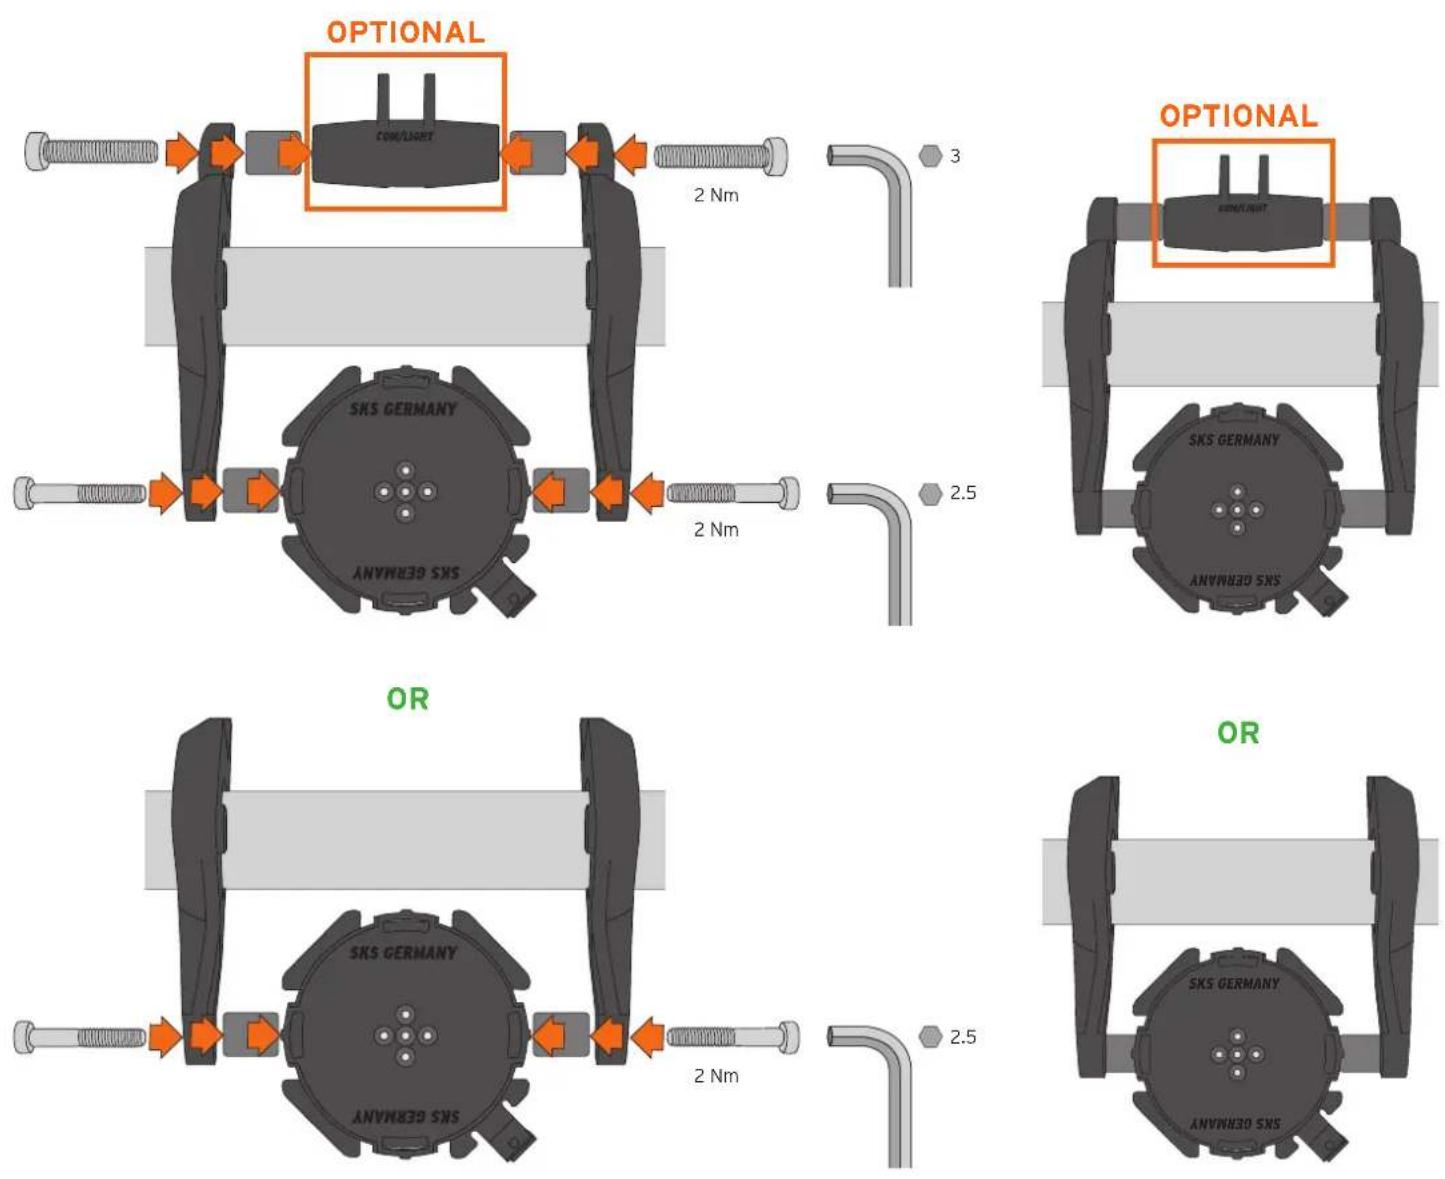
Proceed as follows to mount the COMPIT on the handlebar of your bike:
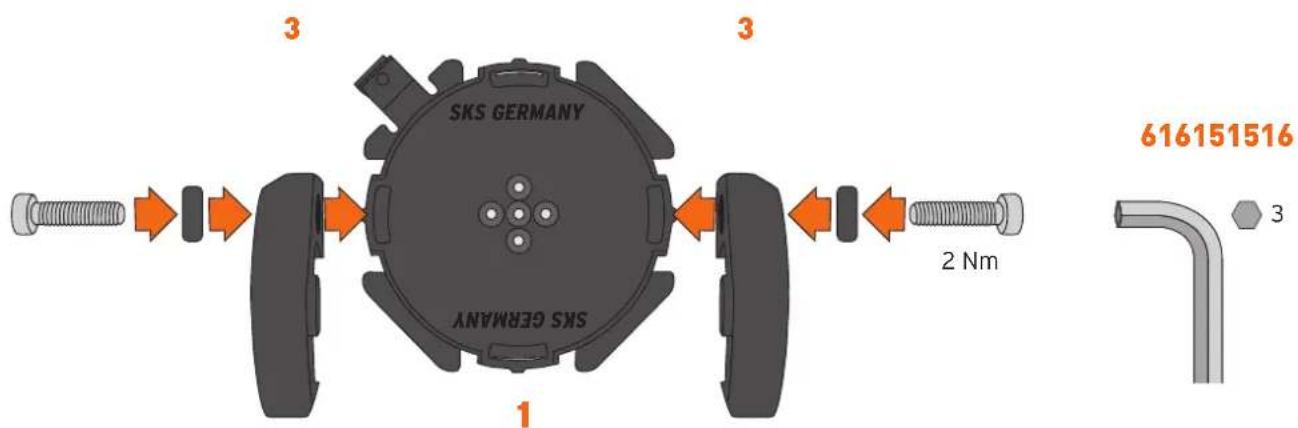
Choose the rubber adapters that are suitable for the handlebar of your bike.
Insert the appropriate rubber adapters (1) into the clamping arms in the direction of the arrows as shown below.
Mount the COMPIT 1 with the clamping arms 3 on the handlebar of the bike.

CAUTION

If the screws are not tightened evenly when mounting the COMPIT on the bike, the COMPIT may come loose from the bike and cause injuries.
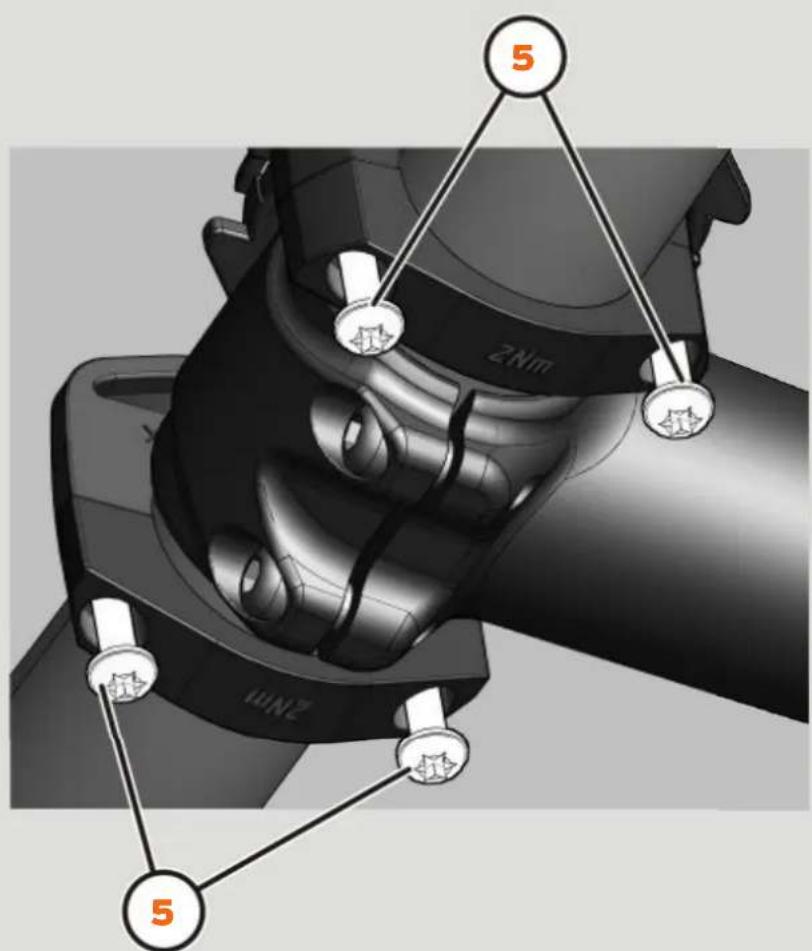
When mounting the COMPIT, tighten the screws evenly, alternating between them.
Mount the COMPIT on the handlebar of the bike with a torque wrench. Tighten the screws 5 evenly (alternating between them) using the torque (2 Nm) indicated on the clamping arms. ATTENTION! Bosch Intuvia only 1 Nm!
Proceed as follows to remove the COMPIT from the handlebar of the bike:
Loosen the screws.
Remove the COMPIT with the clamping arms from the handlebar of the bicycle.
COMPIT 35 mm Mounting
natural_image
Mechanical component with a black ring and two screws, no visible text or symbolsPre-assembly
Mounting options COMPIT 35 mm
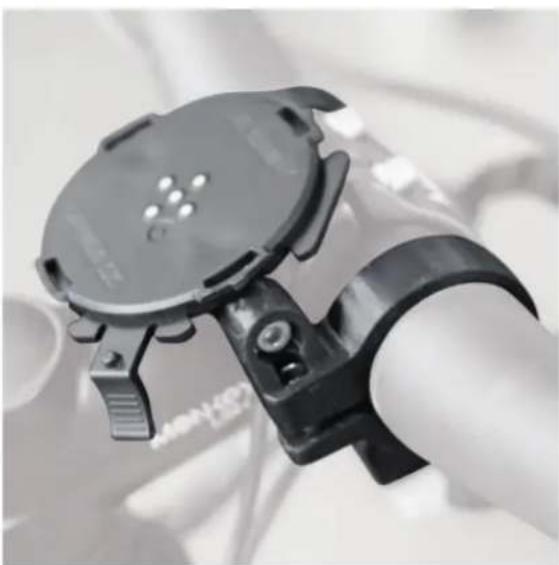
natural_image
Close-up of a black smartwatch with a strap and control knob, no visible text or symbols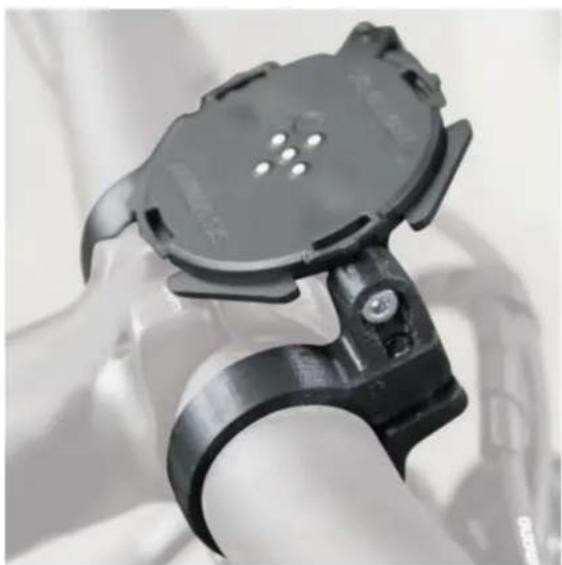
natural_image
Close-up of a black smartwatch with a strap, held in hand (no visible text or symbols)Mounting the COMPIT spacers
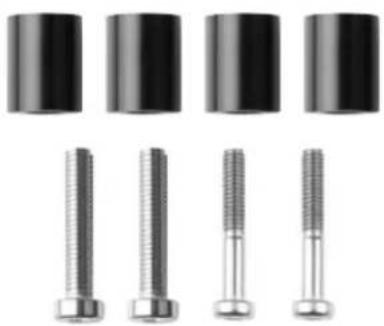
Required:
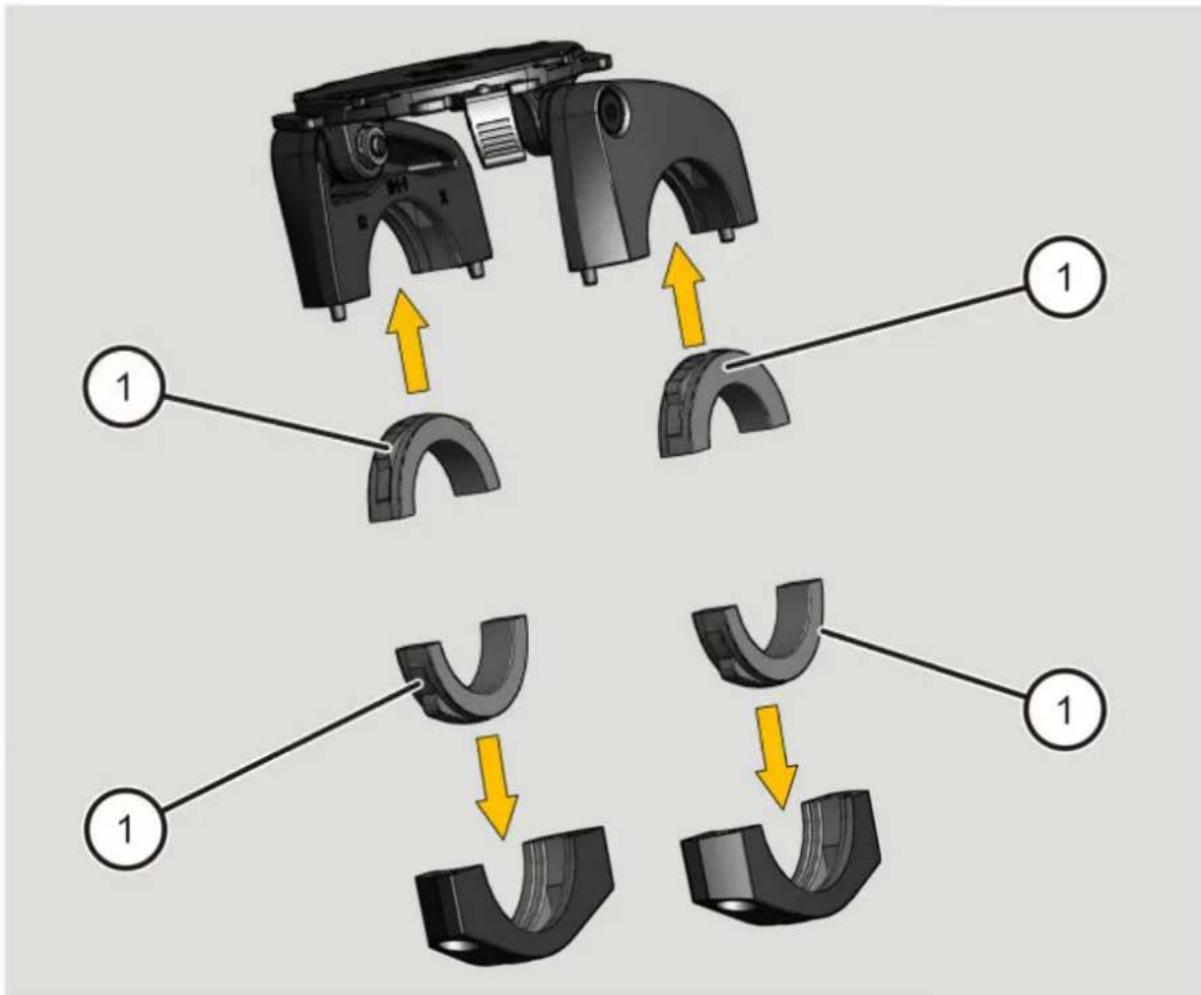
11 PVC spacers, 4x
12 Screws for the COMPIT spacers for the docking station; (4x25), 2x
natural_image
Five different types of mechanical fasteners shown from different angles (no text or symbols visible)For on-board computers and ahead stems with a maximum width of 80 mm.
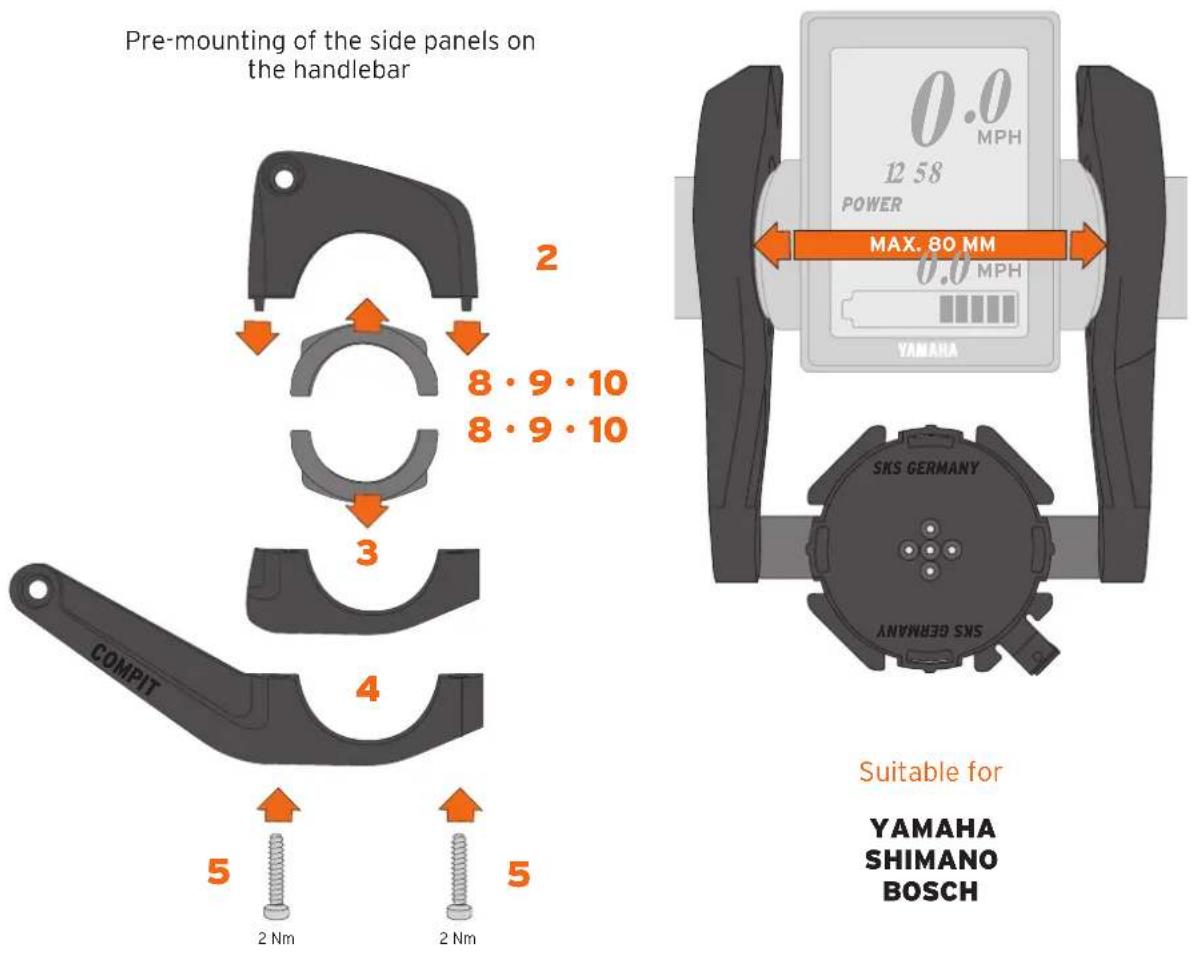
Mounting the COMPIT spacers
▶ Also compatible with COMPIT 35 mm clamp.
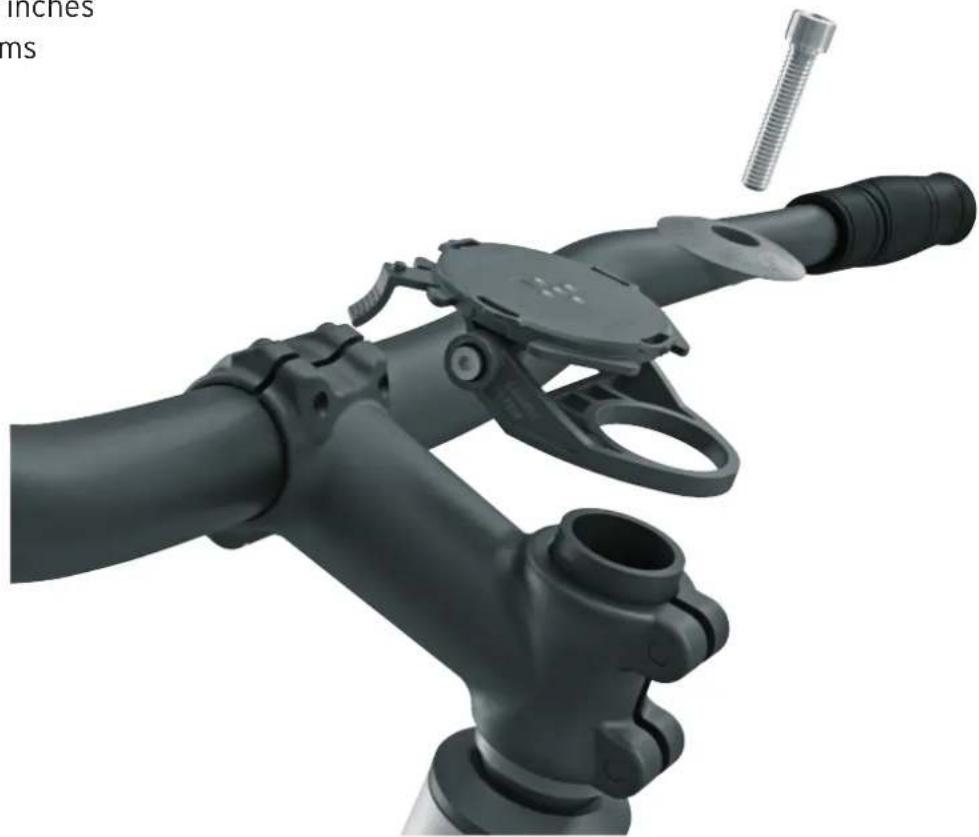
COMPIT/STEM
Required:
Requirement
Headset 1 ^1/8 inches
For ahead stems
natural_image
3D rendering of a robotic arm with a screw inserted, showing no text or symbols on the device itself.Remove the headset cap
If necessary, replace a spacer with the COMPIT/STEM
Screw the headset cap back in place. Observe the specified torque valves.
COMPIT COVER
INSTALLATION
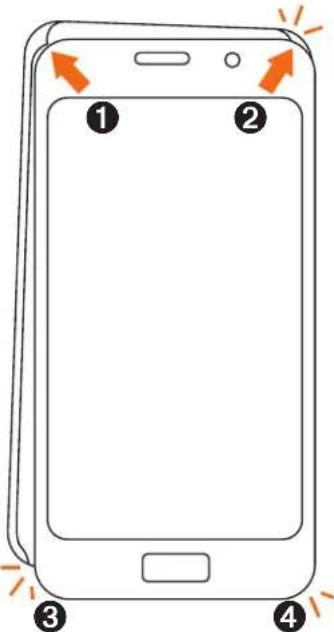
REMOVAL
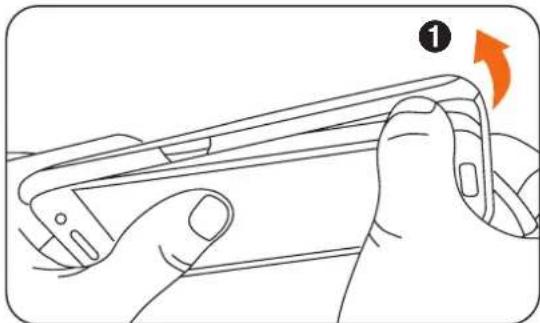
natural_image
Illustration of a hand holding a smartphone with a finger, showing the blade and handle (no text or symbols)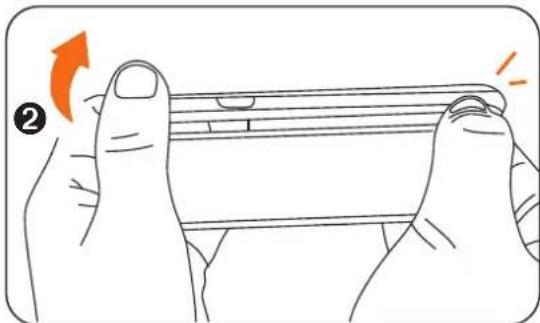
natural_image
Illustration of two hands holding a smartphone with an orange arrow indicating rotation (no text or symbols)COMPIT UNIVERSAL COVER
INSTALLATION
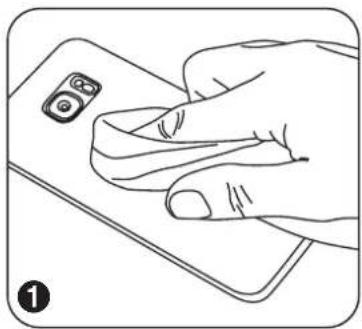
natural_image
Line drawing of a hand holding a smartphone with a camera module (no text or symbols)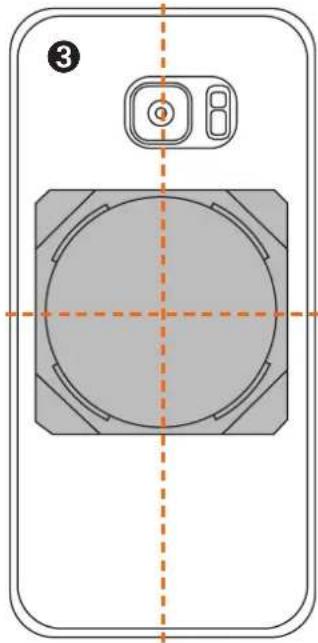
natural_image
Diagram of a smartphone front view showing the screen, camera, and circular component with alignment lines (no text or symbols)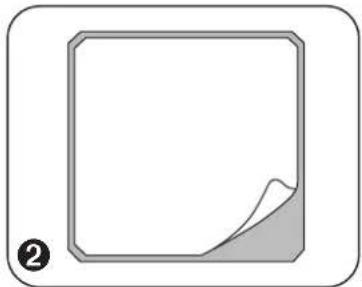
natural_image
Simple geometric shape with a corner and a shaded corner, no text or symbols present.NO
SILICONE, TPU COVER
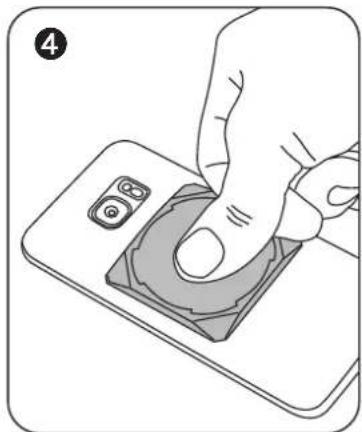
natural_image
Illustration of a hand pressing down on a smartphone screen (no text or symbols visible)Task and function
COMPIT
The COMPIT is used for mounting a smartphone on the handlebar of a bike. To do this, the mobile phone must be equipped with a special COMPIT COVER. The docking station allows the smartphone to be mounted horizontally and vertically with a single twist. The tilt adjustment allows the mobile phone to be moved to the desired position. The COM/LIGHT adapter for mounting the front lamp (lamp not included) and the COM/CAM adapter (not included) for mounting a camera can also be affixed to the COMPIT.
COMPIT ^+ and ^+ COM/CHARGER
The ^+ COM/CHARGER is additionally included in the scope of delivery for the COMPIT ^+ /POWER. The ^+ COM/CHARGER is used to charge and connect the smartphone while cycling. This can be affixed to the COMPIT. Smartphones that have a wireless charging function are charged by affixing the smartphone to the Qi docking station. Smartphones without a Qi charging function can be charged with an optional USB cable. It is affixed using a cover not included in the scope of delivery. The tilt adjustment allows the ^+ COM/CHARGER to be moved to the desired position. The ^+ COM/CHARGER can be charged with the USB cable included in the scope of delivery.
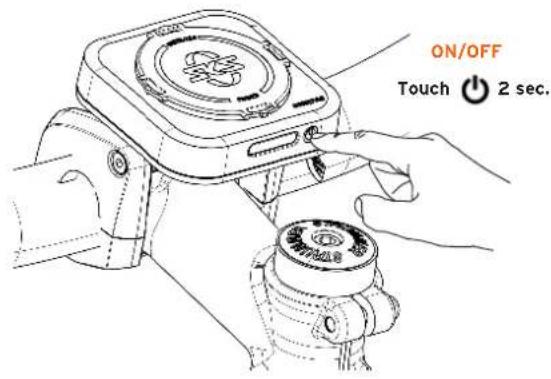
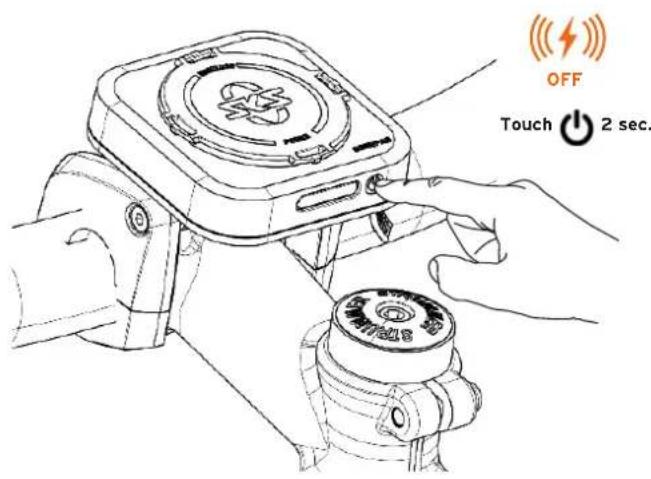
1x ⏻ Device on
2x ⏻ ➤ Device off
stanby after 10 minutes
COMPIT/STEM
The COMPIT/STEM mobile phone holder consists of a bayonet mount and the stem mounting. The phone holder is mounted below the ahead cap on the handlebar stem. The holder can be mounted in two directions, so that the mobile phone does not touch your knees even when riding out of the saddle.
COMPIT SPACER
The COMPIT SPACER accessories allow for stem widths or on-board computers up to a maximum width of 80 mm to be covered. These include on-board computers from Bosch, Yamaha and Shimano.
Technical data
| +COM/CHARGER | |
| Dimensions 140 x 72 x 23 mm | |
| Operating temperature | -10 ~ 60°C |
| Charging temperature | 0~45°C |
| USB C input DC 5V-3,1A / 9V-2A / 12V-1,5A | |
| USB C output DC 5V-3,1A / 9V-2A / 12V-1,7A | |
| Output power USB A | DC 5V-4,5A / 9V-2A / 12V-1,5A |
| Wireless efficiency | >70% |
| Operating frequency | 110KHz-205KHz |
| Maximum transmittable power | -7.26dBuA/m |
| Battery type | Lithium polymer battery |
| Capacity | 10000mAh / 37Wh |
| Protection rating | IP54 |
LED status display
| +COM/CHARGER | LED STATUS DISPLAY | ||
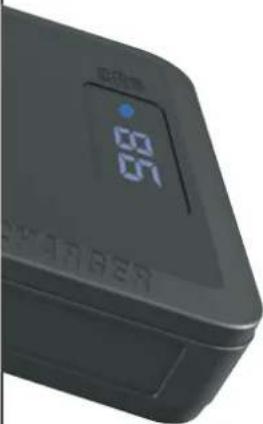 | Battery display Percentage displays | +COM/CHARGER is charged | |
| 0%-100%Batteriekapazität | |||
| Indicator for wireless charging | Blue | Standby or charging process complete | |
| Blue, flashing (~1Hz) | Charging process | ||
| Red | Charging error | ||
Unpacking and checking the scope of delivery
Remove the product from the packaging.
Keep the original packaging in case you need to return the product to customer services.
▶ Check the scope of delivery to ensure it is correct and complete (refer to page 9 onwards).
▶ Check all parts to ensure that they are undamaged.
If there are any deviations, please contact the manufacturer or dealer immediately.
Mounting and removing the COMPIT from the handlebar of the bicycle
Mounting and removing the smartphone from the COMPIT
It is possible to use the product with the COVERS, COVER ADAPTER and COM/SMARTBAG. Proceed as follows to mount your smartphone on the COMPIT:
Insert your smartphone into the corresponding cover according to the relevant instructions.
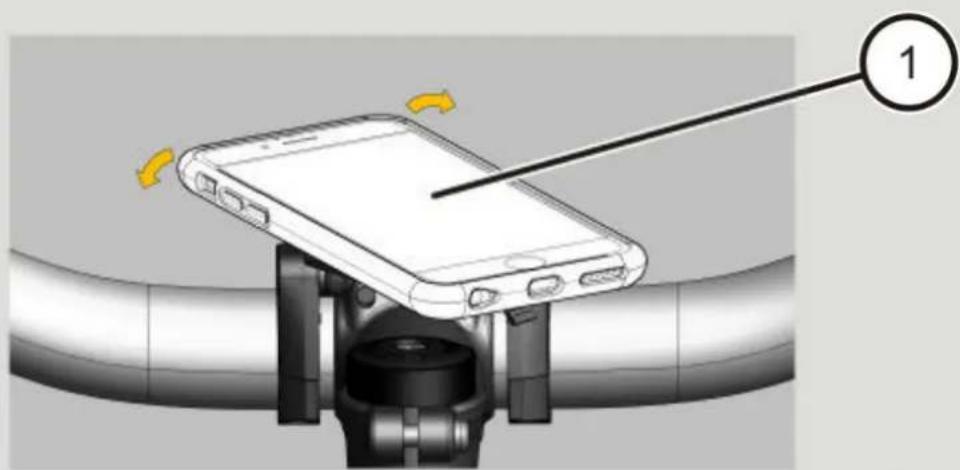
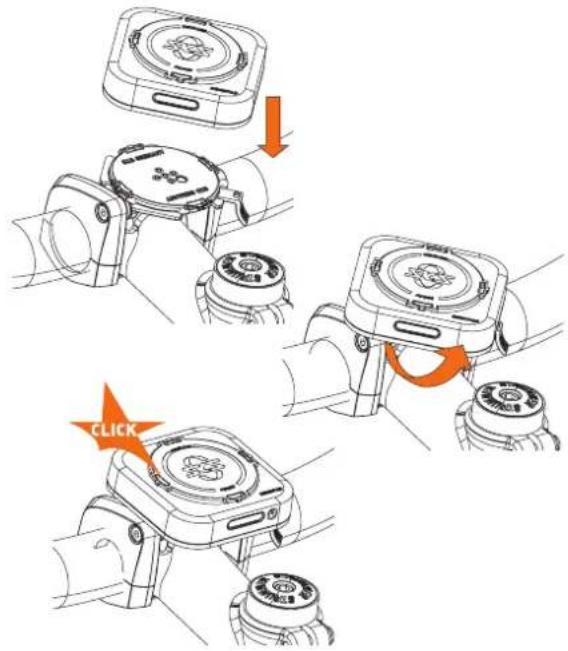
Place your smartphone on the COMPIT (as shown in 1 or 2) and turn it (about 45°) either to the right or left above the docking station until you hear it click into place.
natural_image
Illustration of a smartphone mounted on a bicycle, showing the blade and scroll (no text or symbols)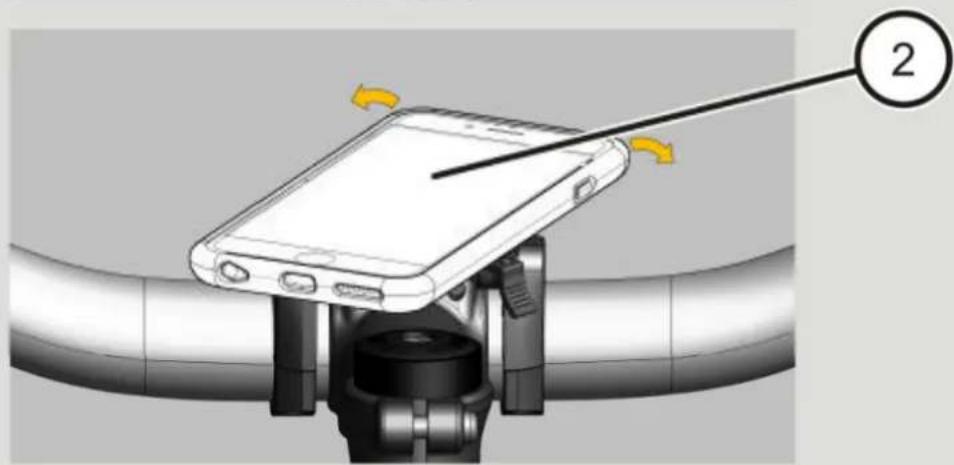
natural_image
Illustration of a smartphone mounted on a bicycle, showing the blade and handle (no text or symbols)Your smartphone is mounted vertically (3) or horizontally (4) depending on how you turn it. The safety lever (5) is locked.
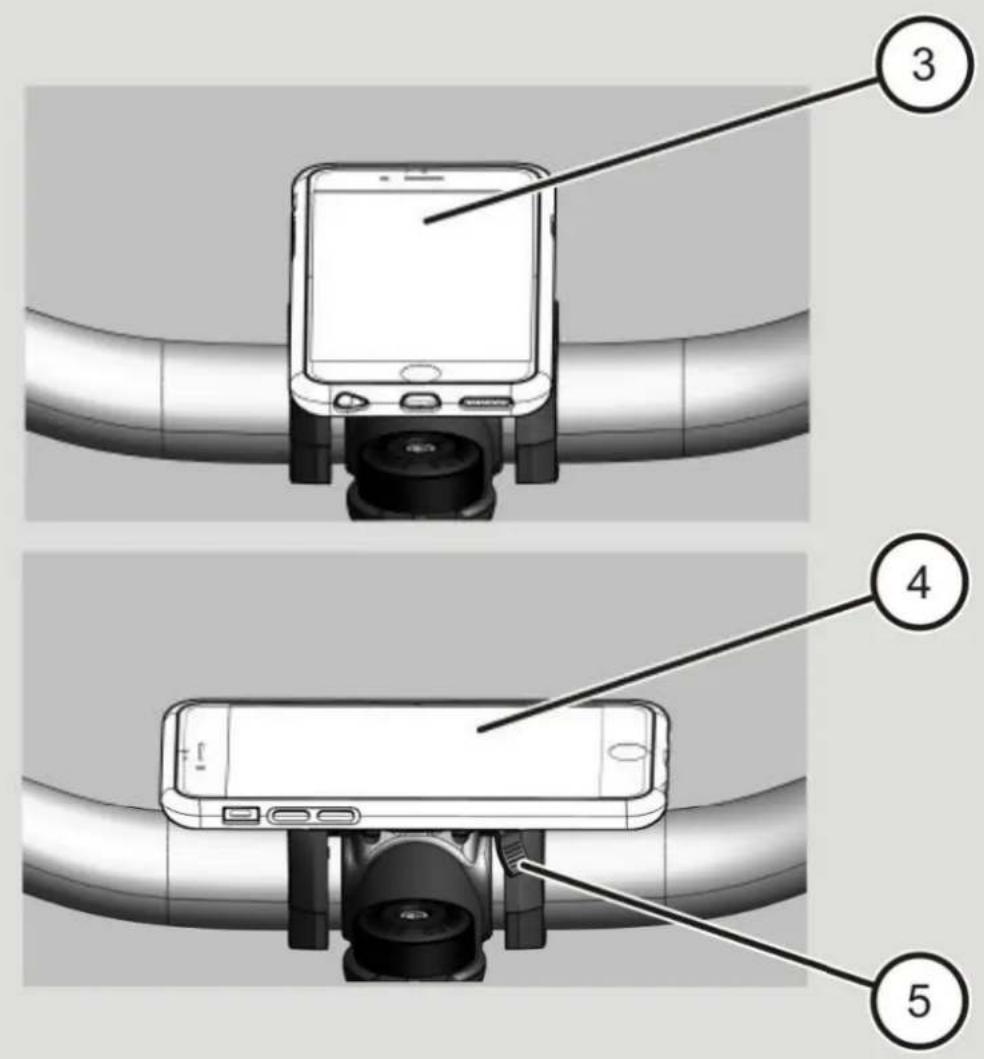
Proceed as follows to remove your smartphone from the COMPIT:
▶ Push the safety lever (5) downwards.
Remove your smartphone from the COMPIT by turning it (about 45°) away from the docking station.
Adjusting the tilt
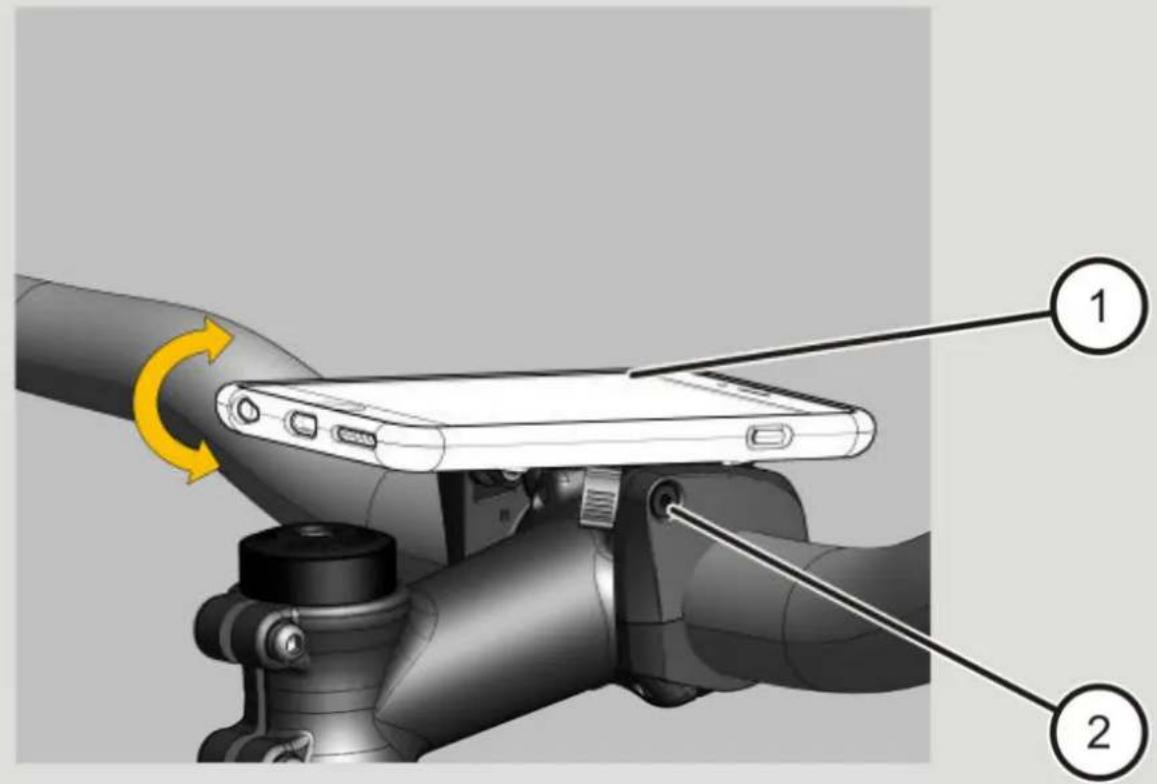
You can move your smartphone to the desired position by adjusting the tilt on the COMPIT.
Proceed as follows to adjust the tilt:
Press the smartphone (1) on the COMPIT downwards or upwards until you have reached the desired position.
▶ Tighten the levelling screw (2) to fix the desired tilt adjustment.
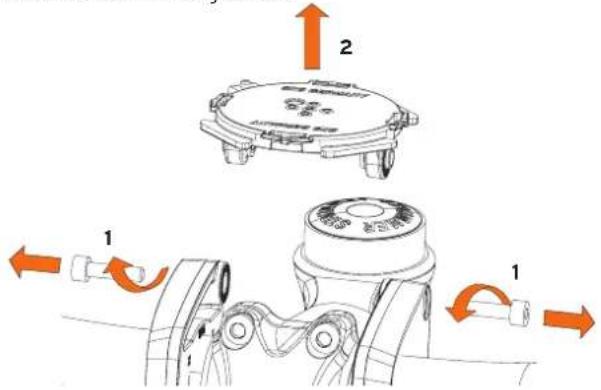
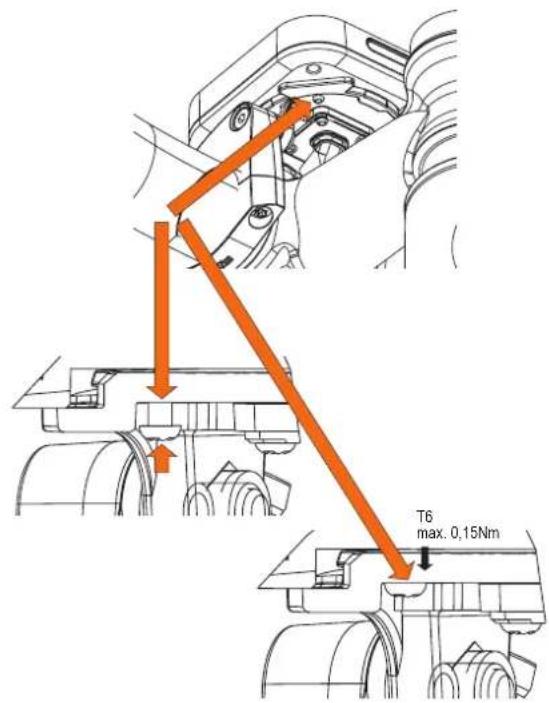
- Prepare the COMPIT for the COM/PAD All COMPIT versions (except COMPIT/ANYWHERE)
- Loosen and remove the levelling screws on both sides
- Remove the docking station
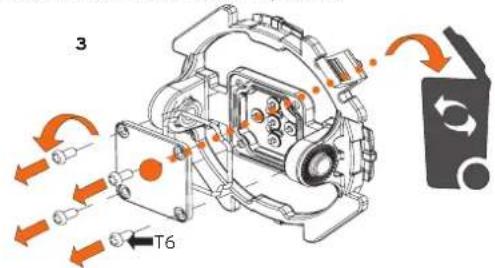
3.-4. Loosen and remove the screws (T6). Remove and discard the dummy cover.
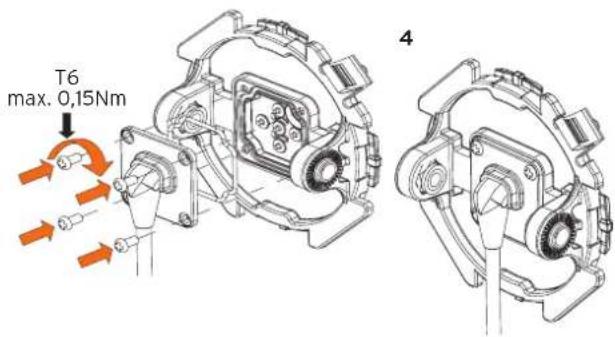
- Insert the sealing ring again. Attach the connection plate with the cable and secure it with screws. Do not exceed the 0.15 Nm tightening torque of the screws.
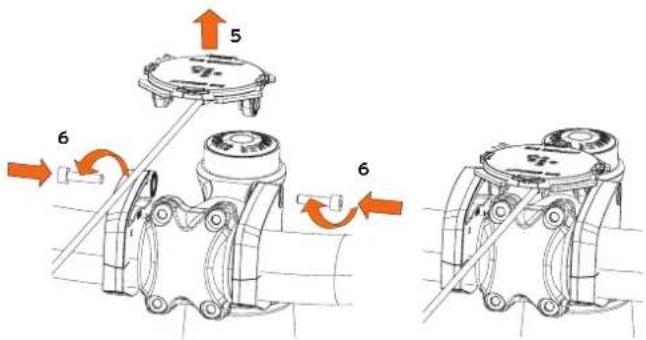
- Insert the docking station between the retaining clamps.
- Insert the levelling screws and tighten them slightly. Adjust the angle of the docking station. Tighten the levelling screws.
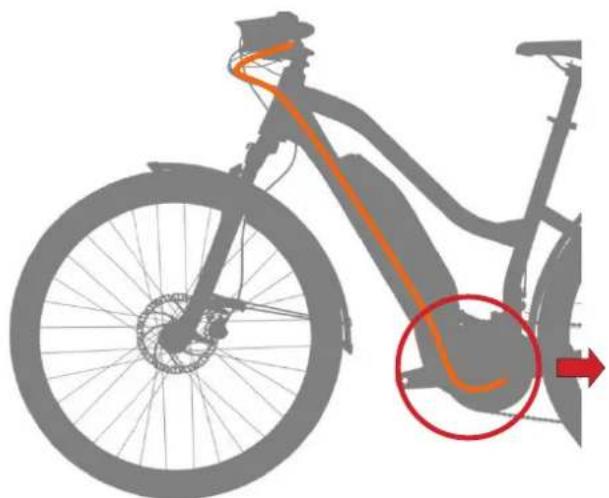
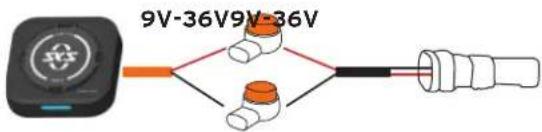
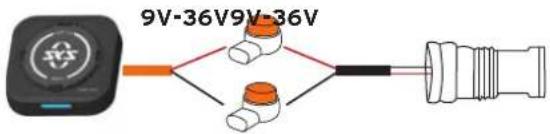
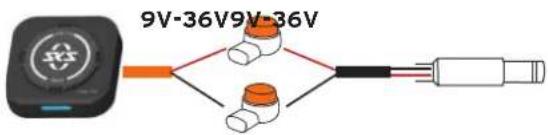
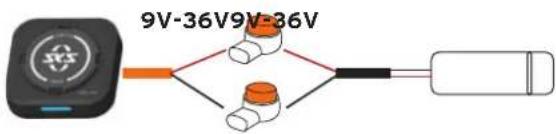
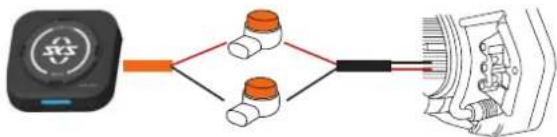
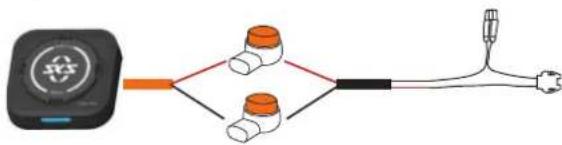
- Connect the COMPIT to the e-bike For e-bikes with a 12 V-36 V lighting system or power supply
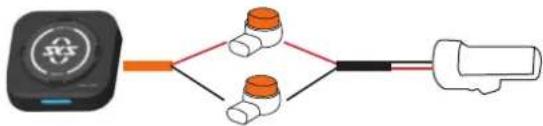
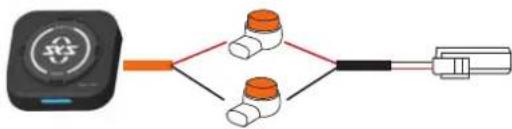
Route the COMPIT connection cable to the motor, ensuring that the cable is routed cleanly along the cable routing specific to the bicycle model. Connect the COMPIT connection cable to the cable of the lighting system with waterproof terminals at a suitable point. Alternatively, solder connections can also be used. Motor. (connection cable is not supplied)
natural_image
Side profile of a bicycle with visible wheel, spine, and head (no text or symbols)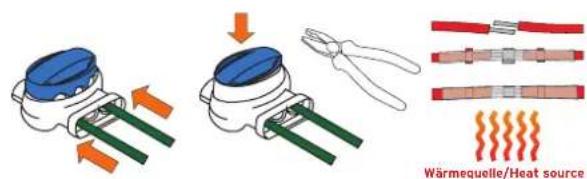
Active Line/Performance Line/CX
Front light connection
BOSCH Gen. 4
Light connection or 12 V aux.
Fazua
JST VSLE 03R connector / 12 V
Brose S
Front light connection 12 V
3. Attach the COM/PAD
Place the COM/PAD on the COMPIT and turn it (about 45°) either to the right or left above the docking station until you hear it click into place.
Yamaha PB-X
Front ligaht connection 12 V
flowchart
graph LR
    A["Sensor"] --> B{Module 1}
    B --> C["Device 1"]
    B --> D["Device 2"]
    C --> E["Device 3"]
    D --> E
    E --> F["Output"]
BAFANG M620
7015-BS-2 12V / 12W
flowchart
graph LR
    A["Device with antenna icon"] --> B{Connection}
    B --> C["Two pipe joints"]
    B --> D["Two pipe joints"]
    C --> E["Connector"]
    D --> E
Shimano / screw terminals
Light connection 12 V
flowchart
graph LR
    A["Sensor"] --> B["Pump 1"]
    A --> C["Pump 2"]
    B --> D["Engine"]
    C --> D
    D --> E["Output"]
Panasonic
Light connection max. 36 V
flowchart
graph LR
    A["Power Source"] --> B{Branching}
    B --> C["Two pipe junctions"]
    B --> D["Three pipe junctions"]
    C --> E["Terminal Plug"]
    D --> E
OPTIONAL!
Screw in the anti-theft lock screw as far as it will go.
- Activate the COM/PAD
Switch on the e-bike
natural_image
Silhouette of a modern electric bicycle with visible wheels and front wheel (no text or symbols)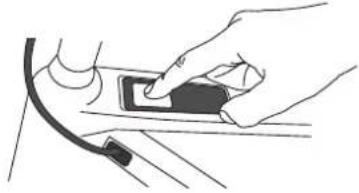
natural_image
Line drawing of a hand inserting a small object into a device (no text or symbols)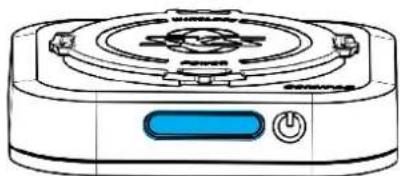
natural_image
Line drawing of a portable electric stove with a blue control panel (no text or symbols)(ON
USB C-PD OFF
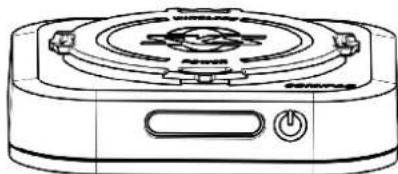
natural_image
Line drawing of a portable electric stove with a rotary top and control buttons (no text or symbols)(<<) OFF
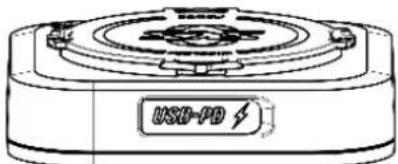
USB C-PD ON
5. Charge the mobile device wirelessly
- Switch on the COM/PAD. LED indicator lights up blue
- Attach the mobile device and lock it by turning it
- Mobile device is charged and LED indicator flashes blue.
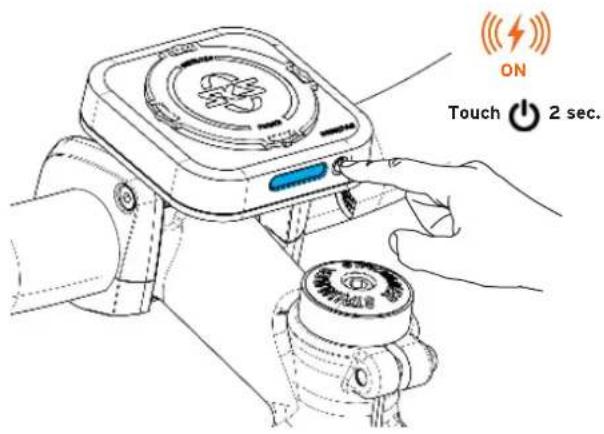
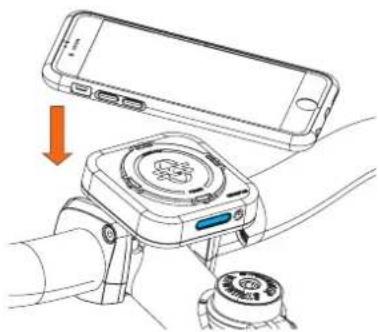
natural_image
Diagram showing a smartphone mounted on a device with a hand valve and cable, no text or symbols present.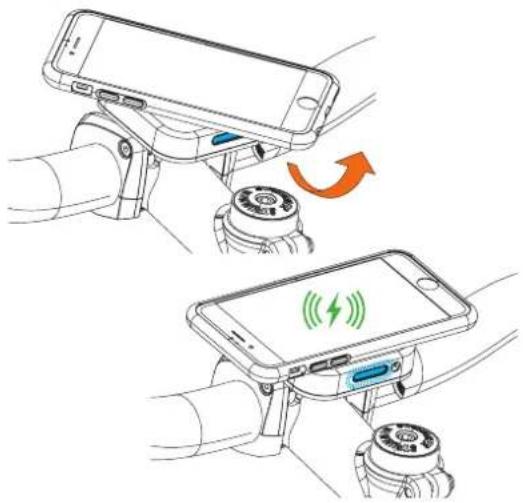
natural_image
Illustration of a smartphone being held in a device, showing the lever shift and battery adjustment (no text or symbols present)-
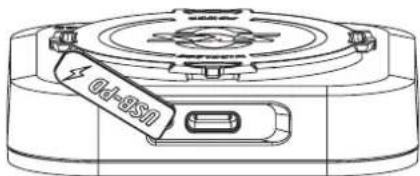
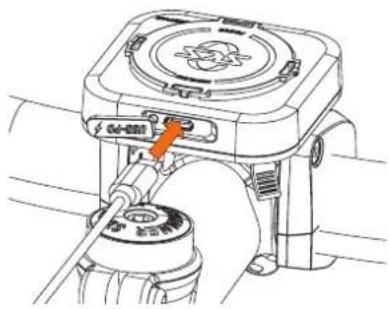
Charge the mobile device with cable
-
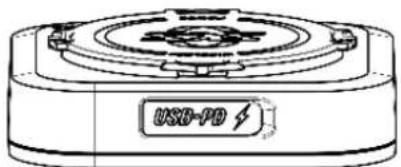
Switch on the COM/PAD USB C PD output. LED indicator is off!
- Connect the cable (not supplied) to the COM/PAD.
- Attach the mobile device and lock it by turning it
- Connect the cable (not supplied) to the mobile device.
The mobile device is charging.
natural_image
Technical line drawing of a mechanical component with no visible text or symbolsUSB C-PD ON
natural_image
Technical line drawing of a mechanical device with a lever and adjustment knob (no text or symbols)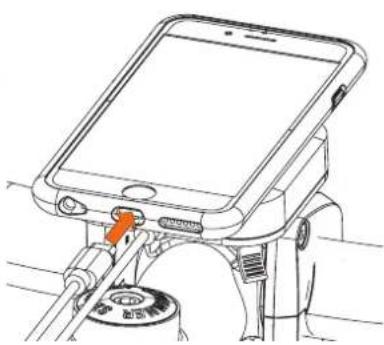
natural_image
Line drawing of a tablet device with attached cable and switch (no text or symbols)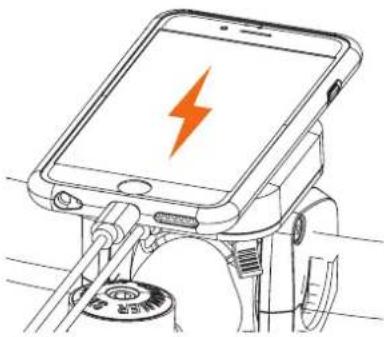
natural_image
Line drawing of a smartphone mounted on a tripod stand with a lightning bolt symbol (no text or labels)Product maintenance
Proceed as follows to maintain the product:
If necessary, clean the exterior of the product with a damp cloth.
Accessories
| Designation | Order number |
| Cover iPhone 6/7/8 11538 | |
| Cover iPhone 6+/7+/8+ 11539 | |
| Cover iPhone X/ XS 11540 | |
| Cover iPhone XR/11 11633 | |
| Cover iPhone 11 Pro 11634 | |
| Cover iPhone 12 Mini 11638 | |
| Cover iPhone 12 Max/iPhone 12 Pro 11639 | |
| Cover iPhone 12 Pro Max 11640 | |
| Cover iPhone 13 mini | 11644 |
| Cover iPhone 13/13 Pro | 11645 |
| Cover iPhone 13 Pro Max | 11646 |
| Cover iPhone 14/14 Pro | 11951 |
| Cover iPhone 14Max/14 ProMax | 11952 |
| Cover SAMSUNG S7 | 11576 |
| Cover SAMSUNG S8 | 11577 |
| Cover SAMSUNG S9 | 11578 |
| Cover SAMSUNG S10 | 11632 |
| Cover SAMSUNG S20 | 11635 |
| Cover SAMSUNG S20 + | 11636 |
| Cover SAMSUNG S20 ULTRA 5G | 11637 |
| Cover SAMSUNG S21 5G | 11641 |
| Cover SAMSUNG S21+ 5G | 11642 |
| Cover SAMSUNG S21 ultra 5G | 11643 |
| Cover SAMSUNG S22 | 11647 |
| Cover SAMSUNG S22+ | 11648 |
| Cover SAMSUNG S22 ultra | 11649 |
| Cover HUAWEI P20 PRO+ | 11579 |
| Designation Order number | |
| Cover adapterDimensions: 60 x 60 x 4 mm | 11541 |
| Designation Order number | |
| COM/SMARTBAG 11671 | |
| Designation Order number | |
| COM/CAM adapter | 11545 |
| COM/CAGE VELO | 11608 |
| COM/LIGHT | 11582 |
| COM/ADD bottle holder | 11555 |
Disposal of the product
In Germany
▶ Dispose of the packaging according to its type.
Use local paper, cardboard and lightweight packaging collection facilities.
▶ Dispose of the product and accessories separately from household waste. You can obtain information about collection points that accept used products free of charge from your local and municipal authorities.

natural_image
Symbol of a trash bin crossed with two diagonal lines, representing no waste or discharge (no text or labels)Outside Germany
▶ Dispose of the product and the packaging according to the regulations applicable at the place of use.
Warranty declaration
SKS metaplast Scheffer-Klute GmbH GERMANY grants a manufacturer's warranty of 2 years from the date of purchase (proof of purchase) for all parts included in the scope of delivery in accordance with the statutory regulations. This excludes wear parts - in particular the +COM/CHARGER battery unit. SKS GERMANY provides a 6-month warranty for these parts. Improper handling or incorrect use are excluded from the liability for defects.
Product returns to customer services
Proceed as follows as soon as you notice damage to the product:
▶ Send the product in its original packaging and with a precise description of the damage to the following address for repair:
59846 Sundern / Germany
Tel.: +49-2933-8310
SKS GERMANY
SKS-GERMANY.COM




- Information about the manual and the manufacturer
- Keep the manual to hand
- Features of this manual
- Copyright
- Manufacturer's address
- Safety
- Intended use
- COMPIT STEM
- Basic safety instructions
- Avoid fire, explosion or electric shock
- Avoid failure of a pacemaker or another implant
- Warnings
- Property damage
- Tips
- Overview of the scope of delivery for the COMPIT + /POWER
- Overview of the COMPIT/STEM
- Requirements
- Mounting the adapter plate to handlebar 35 mm
- Required:
- Mounting the COMPIT
- CAUTION
- COMPIT 35 mm Mounting
- Mounting options COMPIT 35 mm
- Mounting the COMPIT spacers
- COMPIT/STEM
- Requirement
- COMPIT COVER
- COMPIT UNIVERSAL COVER
- NO
- Task and function
- COMPIT
- COMPIT + and + COM/CHARGER
- COMPIT SPACER
- Technical data
- LED status display
- Unpacking and checking the scope of delivery
- Mounting and removing the COMPIT from the handlebar of the bicycle
- Mounting and removing the smartphone from the COMPIT
- Adjusting the tilt
- Attach the COM/PAD
- OPTIONAL!
- Charge the mobile device wirelessly
- Product maintenance
- Disposal of the product
- In Germany
- Outside Germany
- Warranty declaration
- Product returns to customer services
- SKS GERMANY
Brand : SKS
Model : Compit+/Power
Category : Accessoires téléphone