USER MANUAL CI6060PY23WH SABA
natural_image
Exterior view of a white oven with black door and digital display (no visible text or symbols)
CONFORAMA France SA
natural_image
Technical line drawing of a mechanical device casing with internal components and mounting holes (no text or symbols)
natural_image
Technical line drawing of a mechanical assembly with a hanging chain and directional arrow (no text or symbols)
natural_image
Warning symbol depicting a person pulling a large flag inside a triangle (no text or numbers)
natural_image
Simple black-and-white diagram of a vertical structure with an arrow pointing outward, enclosed in a circle (no text or symbols)
natural_image
Pure geometric diagram of a rectangular plate with diagonal lines, no text or symbols present
Étagère Grillagée
natural_image
Technical line drawing of a rectangular tray or enclosure with internal grid lines (no text or symbols)
Plaque de Cuisson
natural_image
Two identical chain link diagrams with no text or symbols
natural_image
Line drawing of a rectangular oven with a rack inside, showing internal structure and arrows indicating direction (no text or symbols)
natural_image
Simple line drawing of a cooking pot with a checkmark inside, placed on a surface (no text or symbols)
natural_image
Simple line drawing of a cooking pot with crossed x marks (no text or symbols)
natural_image
Simple line drawing of a cylindrical container with two 'X' marks crossed out, placed on a flat surface (no text or symbols)
natural_image
Simple line drawing of a cooking pot with crossed x marks on a base (no text or symbols)
natural_image
Simple line drawing of a container with a circular arrow indicating rotation (no text or symbols)
Thank you for choosing SABA quality. This product has been developed by our team of professional and according to European regulations. In order to get the most out of your new appliance, we recommend that you read this instruction manual carefully and keep it for future reference.
TABLE OF CONTENTS
Safety warning 2....
Installation....9
Precautions before use .13....
Product introduction .16....
Accessories ..16....
Points for attention in use .18....
Oven operation explain 20....
Induction cooker ..26....
Clean and maintenance 31
Technical specifications 34
Trouble shooting 36
Correct disposal of this product....38
Safety warning
THESE WARNINGS ARE PROVIDED IN THE INTEREST OF SAFETY. PLEASE READ THEM CAREFULLY BEFORE INSTALLING OR USING THE APPLIANCE. To maintain the EFFICIENCY and SAFETY of this appliance, we recommend:
- Call only the Service Centers authorized by store where you buy the cooker.
• Always use original Spare Parts.
- This appliance is intended for non-professional use within the home.
- Before using the appliance, read the instructions in this owner's manual carefully since you should find all the instruction you require to ensure safe installation, use and maintenance. Always keep this owner's manual close to hand since you may need to refer to it in the future.
• After remove the packing, check that the appliance is not damaged. If you have any doubts, do not use the appliance, contact your nearest Service Centre of the store where you buy the appliance Never leave the packing components (plastic bags, foamed polystyrene, nails, etc.) within the reach of children since they are a source of potential danger.
- The appliance must be installed only by a qualified person in compliance with the instructions provided. The manufacturer
declines all responsibility for improper installation which may harm persons and animals and damage property.
- Check that the electrical capacity of the system and sockets will support the maximum power of the hob, as indicated on the rating label. If you have any doubts, call in a qualified technician.
- This appliance can be used by children aged from 8 years and above and persons with reduced physical, sensory or mental capabilities or lack of experience and knowledge if they have been given supervision or instruction concerning use of the appliance in a safe way and understand the hazards involved. Children shall not play with the appliance. Cleaning and user maintenance shall not be made by children without supervision.
- The electrical safety of this appliance can only be guaranteed if the cooker is correctly and efficiently earthed, in compliance with current regulations on electrical safety. Always ensure that the earthing is efficient; if you have any doubts call in a qualified electrician to check the system. The manufacturer declines all responsibility for damage resulting from a system which has not been earthed.
- When the cooker is first used an odour may be emitted, this will cease after a period of use. When first using the cooker, ensures that the room is well ventilated (e.g. open a window or use an extractor fan) and that persons who may be sensitive to the odour avoid any fumes. It is suggested that
any pets be removed from the room until the smell has ceased. This odour is due to temporary finish on oven liners and elements and also any moisture absorbed by the insulation.
- Ensure that the appliance is switched off before maintenance, by switching off the main switches and turning all knobs to "OFF" position.
- The openings and slota used for ventilation and dispersion of heat on the rear and below the control panel must never be covered.
- The user must not replace the supply cable of this appliance. Always call an after-sales servicing centre authorized by the seller in the case of cable damage or replacement.
- Always switch off the electrical supply to the cooker and allow it to cool down before carrying out any cleaning operations etc.
- WARNING Ensure that the appliance is switched off before replacing the lamp to avoid the possibility of electric shock.
- This appliance must be used for the purpose for which it was expressly designed. Any other use is considered to be improper and consequently dangerous. The manufacturer declines all responsibility for damage resulting from improper and irresponsible use.
-
A number of fundamental rules must be followed when using instructions. The followings are of particular importance:
-
Do not touch the appliance when your hands or feet are wet.
- Do not use the appliance barefooted.
- Never allow the Mains Cable to be stretched, pulled or damaged if the cooker is moved for cleaning etc.
- Do not use the cooker if the Mains Cable is damaged, consults a qualified electrician.
- Do not allow the cooker to be used unsupervised by children or persons unfamiliar with it.
-
Do not grill to open the door.
-
To avoid accidental spillage do not use cookware with h uneven or deformed bottoms on the burners or on the electrical plates.
- Use the pan to be extra careful, especially when heating oil, to someone to watch, to avoid fire accidents.
- Parts of this appliance, cooking surfaces, retain heat for considerable periods after switching off. Care should, therefore, be taken when touching these areas before they have completely cooled down.
- Never use flammable liquids such as alcohol or gasoline, etc. near the appliance when it is in use.
- When using small electric appliances near the hob, keep the supply cord away from the hot parts.
- Make sure the knobs are in its “OFF” position when the appliance is not in use. Also make all potentially dangerous
parts of the appliance, safe, above all for children who could play with the appliance.
- When the appliance is in use, the heating elements and some parts of the oven door become extremely hot. Make sure you don't touch them and keep children well away.
- If you use the power code for single phase, the minimum cross-sectional area is 6mm^2 .
- The appliance that you have bought may be slightly different from the one illustrated in this manual. Please refer to the information related to the model you have.
- Do not use harsh abrasive cleaner or sharp metal scrapers to clean the oven door glass since they can scratch the surface, which may result in shattering of the glass.
- Any spillage should be removed from the lid before opening and the hob surface should be allowed to cool before closing the lid.
- If the surface is cracked, switch off the appliance to avoid the possibility of electric shock. (If the hob surface is of glass-ceramic or similar material and protects live parts.)
- A steam cleaner is not to be used.
- WARNING: Accessible parts may become hot during use. Young children should be kept away.
- The appliance is not intended to be operated by means of an external timer or separate remote-control system.
- WARNING: Unattended cooking on a hob with fat or oil can be
dangerous and may result in fire. Never try to extinguish a fire with water, but switch off the appliance and then cover flame e.g. with a lid or a fire blanket.
• CAUTION: The cooking process has to be supervised. A short term cooking process has to be supervised continuously.
WARNING: Danger of fire: do not store items on the cooking surfaces.
- WARNING: Use only hob guards designed by the manufacturer of the cooking appliance or indicated by the manufacturer of the appliance in the instructions for use as use of inappropriate guards can cause accidents.suitable or hob guards incorporated in the appliance. The use of inappropriate guards can cause accidents. Prevention against possible fire risk!
- WARNING: The appliance and its accessible parts become hot during use.
Care should be taken to avoid touching heating elements.
Children less than 8 years of age shall be kept away unless continuously supervised.
- Metallic objects such as knives, forks, spoons and lids should not be placed on the hob surface since they can get hot.
• After use, switch off the hob element by its control and do not rely on the pan detector.
- The appliance must not be installed behind a decorative door in order to avoid overheating.
- Means for disconnection must be incorporated in the fixed wiring in accordance with the wiring rules.
- Cleaning and user maintenance shall not be made by children without supervision.
- For details indicating the correct installation of the shelves please refer to chapter ‘Accessories’.
- If the range is placed on a base, measures have to be taken to prevent the appliance slipping from the base.
- WARNING: Unattended cooking on a hob with fat or oil can be dangerous and may result in fire.
NEVER try to extinguish a fire with water, but switch off the appliance and then cover flame e.g. with a lid or a fire blanket.
- CAUTION: The cooking process has to be supervised. A short term cooking process has to be supervised continuously.
- WARNING: Danger of fire: do not store items on the cooking surfaces.
- WARNING: Use only hob guards designed by the manufacturer of the cooking appliance or indicated by the manufacturer of the appliance in the instructions for use as suitable or hob guards incorporated in the appliance. The use of inappropriate guards can cause accidents.
Installation
The following instructions should be read by a qualified technician to ensure that the appliance is installed, regulated and technically serviced correctly in compliance with current regulations.
Important: remember to disconnect the appliance from electricity by turn off the mains before regulating the appliance or carrying out any maintenance work.
Unpacking
- Be careful when unpacking and installing the appliance. Sharp edges might cause accidents.
- The oven is heavy and care must be taken when moving it. Ensure that all packing, both inside and outside the cooker, has been removed before the oven is used.
- Unpack the oven from the carton, check and make sure it has not been damaged in any way. If you have any doubts, do not use it, contact the service center or where you buy the oven.
Installation position
Important: The hob should never be installed in proximity of a door access. People opening and closing the door could come into contact with pots or pans cooking on the hob.
This unit may be installed and used only in permanently ventilated rooms
Installation steps
The cooker is designed to fit between kitchen cabinets. The space either side need only be sufficient to allow withdrawal of the cooker for servicing. It can be used with cabinet one side or both as well as in a corner setting. It can also be used free-standing.
The appliances can be installed next to furniture units which are no taller than the top of the cooker hobs. If the cooker is placed touching walls or sides of neighboring cabinets, these must be capable of withstanding a temperature rise of 50 °C above room temperature. For a correct installation of the cooker the following precautions must be followed:
- The cooker may be located in a kitchen, a diner or bed sitting room, but not in a bathroom or shower room.
- Kitchen cabinets installed next to the cooker that are taller than the top of the cooker hobs must be situated at least 20cm from the edge of the hobs.
- Hoods must be installed according to the requirements in the installation manual for the hoods themselves and in any case
at a minimum distance of 65cm.
- Place the wall cabinets adjacent to the hood at a minimum height of 42cm from the hobs as indicated in figure 1.
- The hoods must be installed according to the requirements in the hood handbook.
- Should the cooker be installed beneath a wall cabinet, the latter should be situated at least 70cm away from the hobs as indicated in figure 1.
- The cut-out for the cooker cabinet should have the dimensions indicated in the figure 1.
- The wall in contact with the back of the cooker must be of flameproof material.
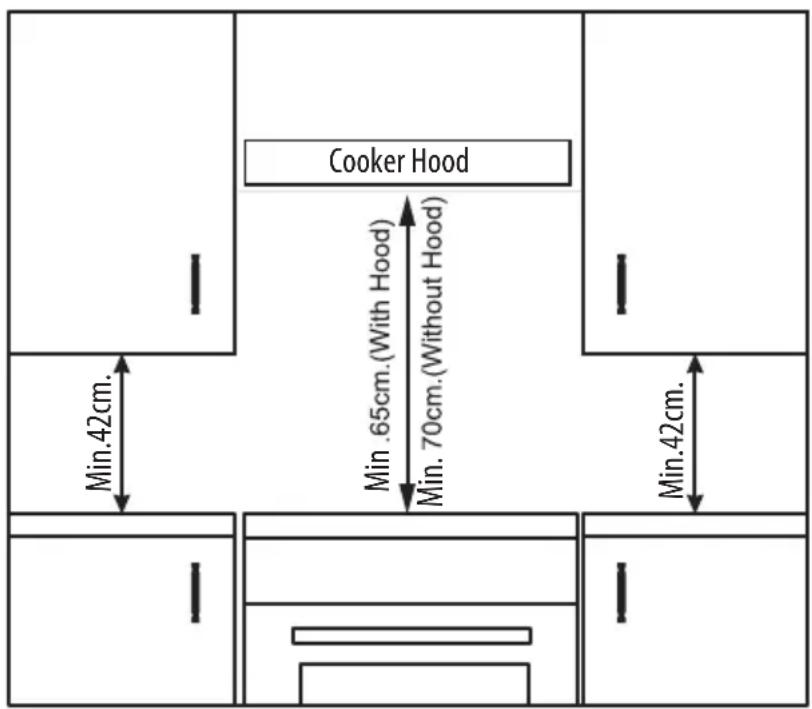
Figure 1
Leveling Your Appliance
Take out of the 4 cooker feet from oven cavity, which be packed together with backing rack, and then screw them into the 4 plinth in lower part of cooker. These feet level off the oven when necessary. The height of the cooker can be adjusted by means of adjustable feet in the plinth. Adjust the feet by tilting the cooker from the side. Then install the product into position. It is essential that the cooker be standing level before installation.
GB
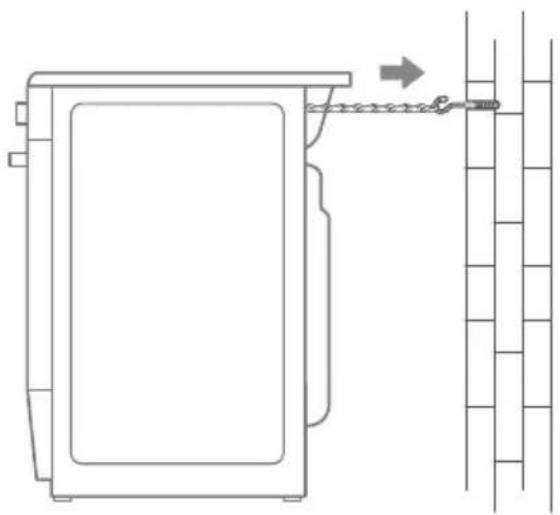
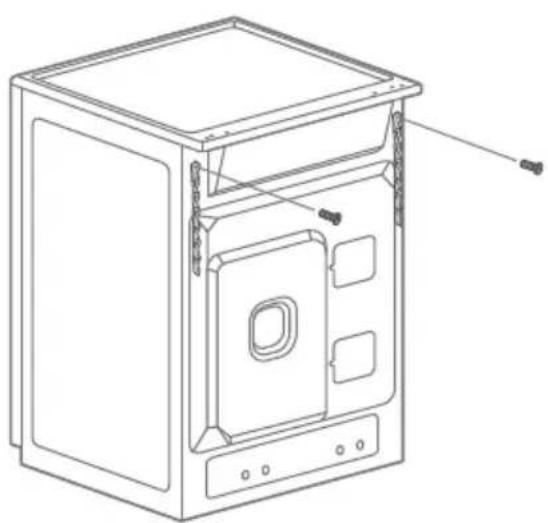
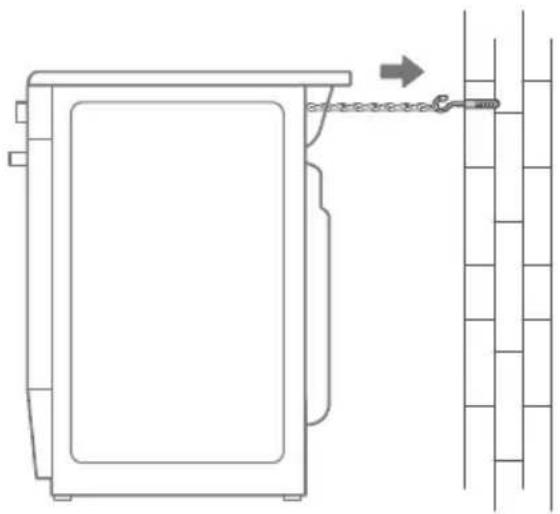
Fitting the safety chain and hook
- Scranchalhole for type appropriate location on the wall behind the unit and drive the pin into the hole.
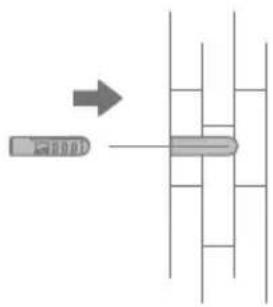
- the pin.
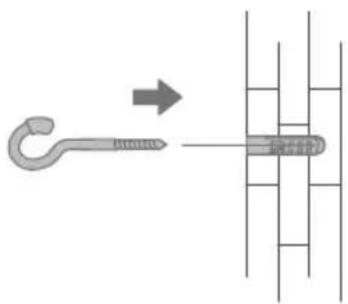
-
Hangutet berchain do the bahl of the appliance.
-
on the hook screw.
natural_image
Technical line drawing of a mechanical device casing with internal components and mounting holes (no text or symbols)
natural_image
Technical line drawing of a door frame with a chain attached to a wall, showing structural details (no text or symbols)
Precautions before use
When use properly your appliance is completely safe but as with any electrical product there are certain precautions that must be observed.
Please read the precautions below before using your appliance.
- Turn controls OFF when you have finished cooking and when not in use.
- Stand back when opening an oven door to allow any build up of steam or heat to disperse.
- Use dry good quality oven gloves when removing items from the oven/grill.
- Place pans centrally over the hotplate making sure handles are kept away from the edge of the hob and cannot become heate- d by other hot plate/pans.
- Take care to avoid heat/steam burns when operating the con-trols.
- Turn off the electricity supply before cleaning and allow the appliance to cool.
- Take care when removing items from the grill when the lower oven is on as the contents will be hot.
- Take care when removing items form the grill when the lower oven is on as the contents will be hot.
-
Keep the appliance clean, as a build up of grease or fat from-cooking can cause a fire.
-
Follow the basic principles of food handling and hygiene to prevent the possibility of bacterial growth.
- Keep ventilation slots clear of obstructions.
- Refer servicing to a qualified appliance service engineer.
- During use the appliance becomes hot. Care should be taken to avoid touching heating elements inside the oven.
- Never line the interior of the oven with foil as this may cause the appliance to overheat.
- Never leave children unsupervised where a cooking appliance is installed as all surfaces will be hot during and after its use.
- Do not allow children or persons who are not familiar with the appliance to use it, without supervision.
- Do not allow anyone to sit or stand on any part of the appliance.
- Do not place items on electrical appliances that children are trying to reach.
- Do not leave anything on the surface of the hob when unat-tended or not in use.
20.Do not remove shelves while the oven is still hot.
- Do not heat unopened food containers as pressure can build up and cause them to break
- Do not store chemicals/foods or pressurized containers in or on appliances, or in cabinets above or next to appliances.
-
Do not place flammable or plastic items on or near the hob.
-
Don't put more than a third of the oil in the frying pan, and don't use LIDS.
- Never use the appliance as a room heater.
- Never use the grill to warm plates.
- Never dry any items on either the hob or oven doors.
- Never install the appliance next to curtains or other soft fur-nishings. Never use steam cleaners.
-
Safety advice in case of a chip-pan fire In the event of a chip pan fire or any other pan fire:
-
Turn OFF the cooker appliance at the wall switch.
- Cover the pan with a fire blanket or damp cloth, this will smother the flames and extinguish the fire.
-
Leave the pan to cool for at least 60 minutes before moving it. Injuries are often caused by picking up a hot pan and rushing outside with it.
-
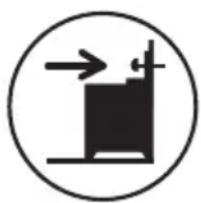
Safety reminding:
natural_image
Warning symbol depicting a person pulling a large block inside a triangle (no text or numbers)
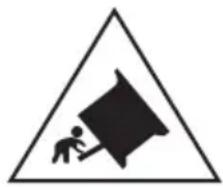
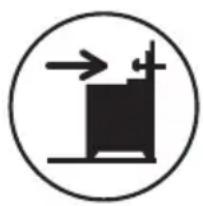
Caution, possibility of tilting
natural_image
Simple black-and-white icon of a vertical structure with arrows, enclosed in a circle (no text or symbols)
Anti-tip restraints
WARNING: In order to prevent tipping of the appliance, this stabilising means must be installed. Refer to instructions for installation.
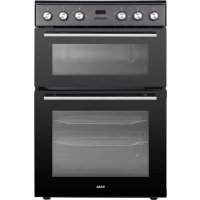
Product introduction
Product components
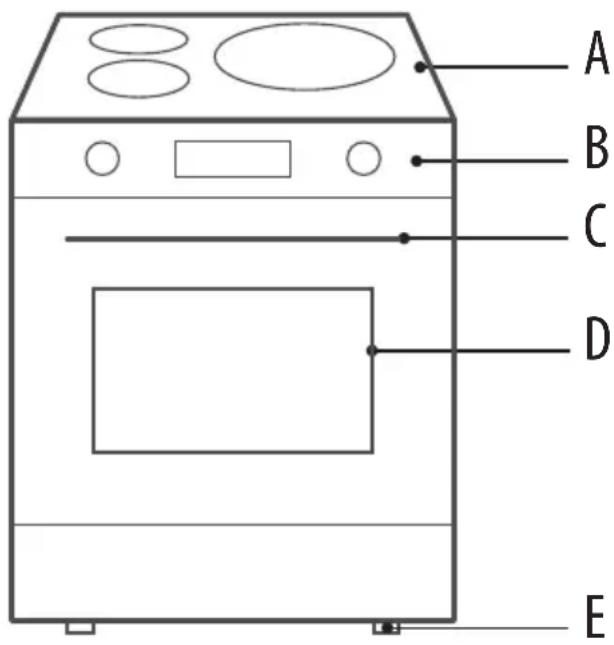
D.Oven Door
B. Control Panel
E. Adjustable Feet
C.Oven Door HandleA: Induct
Accessories
As the products and accessories are constantly upgraded, if there is any difference between the real object and the picture below, please refer to the real object.
Your appliance is accompanied by a range of accessories. Here, you can find an overview of the accessories included and information on how to use them correctly.
Accessories included
Your appliance is equipped with the following accessories:
natural_image
Pure geometric diagram of a rectangular plate with diagonal lines, no text or symbols present
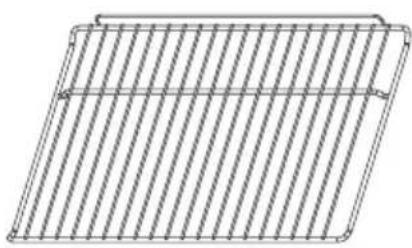
Wire Rack
For ovenware, cake tins and ovenproof dishes. For roasts and grilled food.
natural_image
Technical line drawing of a rectangular frame with internal grid pattern (no text or symbols)
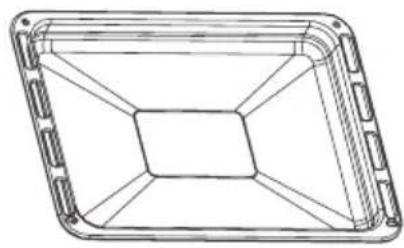
Baking Tray
For tray bakes and small baked products.
natural_image
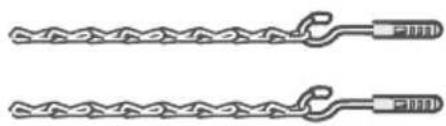
Two identical chain linkages with a handle, no text or symbols present
For Anti-tilting chain installation
You can use the tray to place liquid or cooking food with juice. Only use original accessories. They are specially adapted for your appliance.
You can buy accessories from the after-sales service, from specialist retailers or online.
NOTE:
- The accessories may deform when they become hot. This does not affect their function.
- Once they have cooled down again, they regain their original shape.

natural_image
Line drawing of a rectangular oven with a rack inside, showing internal structure and arrows indicating direction (no text or symbols)
Put the shelves into the oven in the direction of the arrow. And horizontally insert until it is fixed.
GB
Points for attention in use
Instructions for the oven
- When you're done, wear heat-proof gloves and remove food and accessories.
- If food is cooking too fast, place it at the bottom of the baking pan.
- Do not place cookware with rough bases on the oven door.
- Ensure that there is at least 25mm space at top of oven when grilling larger foods or using tall cookware.
- When baking the thicker bottom, turn the food over during cooking to make sure both sides are cooked.
- Please preheat the oven before cooking.
-
Put big or medium-sized portions in correct rack position under the grill heater for grilling.
-
For foods that only need to be baked on top, place the food on a wire grill on a tray or on a grill.
- When the main oven is in use, food and dishes placed on the grill will be heated. Please do not touch attachments or food.
- Do not place the food too far in the back of the grill. This is the hottest area and fatty food may catch fire.
Tips for baking
- Use non-sticky coated appropriate meta plates or aluminum vessels or heat-resistant silicone moulds.
- Make best use of the space on the rack.
- Place the baking mould in the middle of the shelf.
- Select the correct rack position before turning the oven or grill on. Do not change the rack position when the oven is hot.
- Keep the oven door closed(Main oven).
- Neve touch the hot burner, inner sections of the oven, heaters and etc. Keep children away. Always use heat resistant oven gloves when putting in or removing dishes into/from the hot oven.
- Be careful when opening the oven door, as escaping steam could burn your hands, face, and eyes.
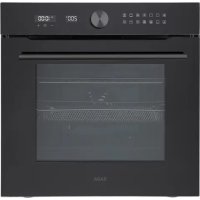
Oven operation explain
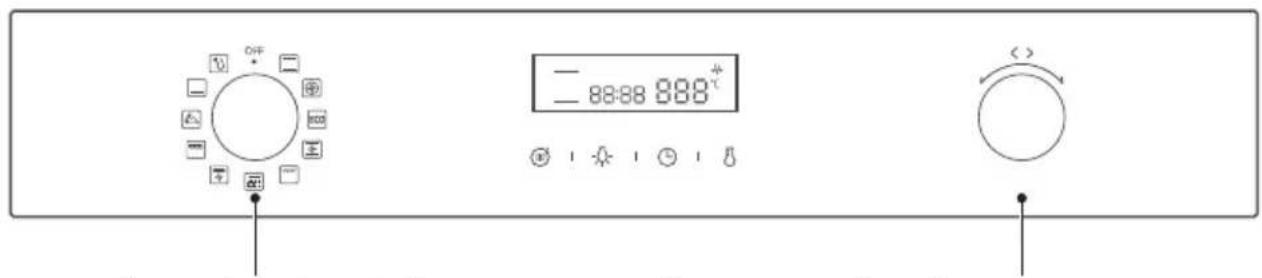
Function knob Parameter adjustment knob
operation steps:
GB
1 Choose function
② Adjust the time or temperature
3 Automatically start cooking after 4 seconds
operation sample:
- Rotate the function knob to select "☐" function.
- Press " 🔊 key to rotate the parameter adjustment knob to adjust time, press " 🔊 " key to adjust temperature, and rotate the parameter adjustment knob to adjust temperature.
- Automatically start cooking after 4 seconds.
Icon parsing:

Preheating
Except ECO, thawing and pyrolysis functions, all other functions can be superlaid with preheating function. After rotating the function knob to select the function and setting the corresponding parameters, press the Ⓦ key to directly start the work.
Lamp
Press " -☐" key to light or extinguish the furnace lamp.
When the furnace lamp is lit, the function knob is turned to the "OFF" position, and the furnace lamp will also go out.
The oven lamp will be on for all functions. Except ECO function and Pyrolytic cleaning function.
Time adjustment key
After selecting the function mode, press " ℓ " key and rotate the parameter adjustment knob to adjust the cooking time.
Temperature adjusting key
After selecting the function mode, press " 🔊" to rotate the parameter adjustment knob to adjust the temperature.
The cooking function
| icon Function description |
| Conventional: The top and bottom work together to provide convectional cooking. The temperature setting range is 50-250°C. |
 | Convection:An element around the convection fan provides an additional source of heat for convection style cooking. In convection mode the fan automatically-ly comes on to improve air circulation within the oven and creates an even heat for cooking. The temperature setting range is 50-240°C. |
 | ECO: Cooking the selected ingredients in a gentle manner, and the heat comes from the top and the bottom. |
 | Conventional+fan: Combination of the fan and both heating element provides more even heat penetration,saving up to30-40% of energy.Note:This function is suitable for grilling or roasting big pieces of meat at a higher temperature.The temperature setting range is 50-250°C. |
 | Radiant heat: The inner grill element switches on and off to maintain temperature. The temperature setting range is 180-240°C. |
 | Pyrolytic function: This function is used to clean the furnace chamber. When starting the pyrolysis function, the LED displays "pyr".The default temperature is 450°C and the default time is 2 hours. |
 | Double grill + fan: The inner heating element and the outer heating element in the top of the oven are working with fan. It is suitable for grilling large amount of meat.The temperature setting range is 180-240°C. |
 | Double grill: The inner heating element and the outer heating element in the top of the oven are working.Suitable for grilling largerQuantities.The temperature setting range is 180-240°C. |
 | Pizza: This feature is used to bake pizza. The temperature setting range is 60-250°C. |
 | Bottom heat: A concealed element in the bottom of the oven provides a more concentrative heat to the base of food without browning. This is ideal for slow cooking dishes such as casseroles, stews, pastries and pizzas where a crispy base is desired. The temperature setting range is 30-220°C. |
 | Defrost: The circulation of air at room temperature enables quicker thawing of frozen food,(without the use of any heat). It's a gentle but quick way to speed up the defrosting time and thawing of ready-made dishes and cream filled produce etc. |
| OFF | Cancel (return to standby) : In the setting process, set the function knob selection to the "OFF" position, and the standby state will be returned. |
Set up the clock
Before cooking, follow these steps to set the clock!
- In the standby state, press " 🔊 key to enter the clock setting state, and set the hour of the clock through the parameter adjustment knob, press " 🔊" key to confirm.
- Set the minute bit of the clock by the parameter adjusting knob, press "☐" key to complete the clock setting.
NOTE:
- Press " ☐ key to modify the clock. The setting method is the same as steps 1 and 2.
Pyrolytic Function
- In the standby or clock running state, select the icon " through the function knob, and the LED screen will display "pyr".
- Press "L" to start the pyrolysis function.
NOTE:
- When the oven door was not closed, pressing start button will
be invalid. The LED will display "door" and "pyr".
- When finished pyrolytic cleaning, don't interrupt the power in an hour.
- After starting the pyrolytic function, the surface of the oven may be hotter than usual and children should be kept away.
- Pyrolysis function and induction cooker cannot be started at the same time.
Fan delay protection function
- The exhaust generator will work for 1 minute when the function is cancelled, paused or finished during the function operation.
- In standby state, if the temperature is higher than or equal to 150 degrees, the high-row motor starts to work, and the temperature is lower than 150 degrees, the high-row motor shuts down.
- In addition to the defrosting function and ECO function, the exhaust motor is always on during the operation of other functions.
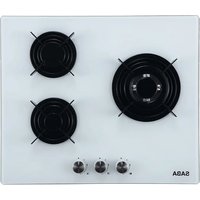
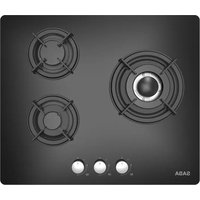
Induction cooker

① Select the heating area
③ Adjust the heating time
② Select the heating gear
4 Start cooking
Icon parsing:
Cooking Zone B
Size: 160mm
Power: 1500W
☐ Cooking Zone A
Size: 180mm
Power: 1800W
○ Cooking Zone C
Size: 280mm
Power: 2500W
① ON/OFF
In the standby state, press the "①" key, the buzzer beeps, induction cooker into the boot state.
In the boot state, 1 minutes without operation, buzzing, and then into the standby state. During the working process, press the "①" key to close the heating area of the induction cooker. Press the "①" button again, the induction cooker into the boot state again.
B BOOST
During the cooking process, press " Ⓑ" key, after 5 minutes, the heating gear will change to 9.
In the working process, when the Boost function is selected, the corresponding burners will achieve rapid heating effect, with the power of burner A reaching 2200W. burner B reaching 1800W and burner C reaching 3000W, in which burner A and burner B cannot select function B at the same time, only one of them can choose function B; After 5 minutes, the gear will be set to 9.
- +Parameter adjustment -Time adjustment key
After pressing "Heating Area", press "+" or "-" key to adjust the heating gear.
Press " ☉ to adjust the heating time by pressing " ⊕ " or " ⊖ " key.
Child lock
In standby or working state, press "🔒" key, digital tube display "Lo", enter the child lock mode.
Long press the "💡" key for 3 seconds to exit the child lock mode in the child lock state.
Start/Pause
Start or suspend the program.
Induction cooker state
- After entering the startup state, press the "Heating Zone Selection" button, the gear position of the selected heating zone "0" flashes for 5 seconds, and the induction cooker returns to the startup state without any operation within 5 seconds. Press "+" or "-" button within 5 seconds, and the fan will start running at the same time, and the digital tube will display "5". "5" represents the heating gear.
- After the setting is completed, there will be no shifting operation within 5 seconds, and the heating area will start to work according to the set gear.
Heating gear adjustment
- Under normal working condition, the gear position of each heating area can be adjusted. Press "Heating Area Selection" button, and then press "+" or "-" key to change the current gear position. After the adjustment, the gear position flashes for 5 seconds, and the heating area starts to work.
- The gear adjustment is 0\~9, the higher the number, the greater the power.
Timing function
- Under normal working condition, press " ⏻ button after selecting the heating area that needs to be timed.
- Press "⊕" or "⊖" to adjust the timing.Units digit can be adjusted between 0 and 9.
- Long press "⊕" or "⊖" key, ten digit value can be adjusted between 0 and 9.
- After the time is set for 5 seconds, the gear of the corresponding heating area flashes, indicating that the timing setting of the heating area is successful.
If the timing time is not set for the heating area, the default timing time is set (see the table below).
| Heating gear | 1 | 2 | 3 | 4 | 5 6 7 | 8 | | | 9 |
| Default timing (hours) | 8 8 8 | | | 4 4 4 | | | 2 2 2 | | |
NOTE:
- When the heating zone is 0, the setting timing is invalid.
- When the cooking time countdown ends, "End" will be displayed and 5 beeps will sound.
Automatic adjustment of heating gear
- 10 minutes after all heating areas are started simultaneously, the heating gear is changed to 8, after 15 minutes to 7, after 20 minutes to 6.
On the hob anywhere
- Glass ceramic surface is heatproof and is not affected by big temperature differences.
- Do not use the glass ceramic surface as a place of storage or as a cutting board.
- Use only the saucepans and pans with machined bottoms. Sharp edges create scratches on the surface.
- Do not use aluminum vessels and saucepans. Aluminum damages the glass ceramic surface
natural_image
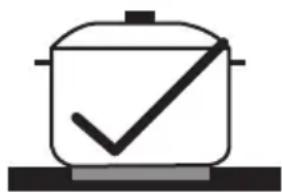
Simple line drawing of a cooking pot with a checkmark inside, placed on a surface (no text or symbols)
Use only the saucepans and pans with flat bottoms. They ensure easier heat transfer.
natural_image
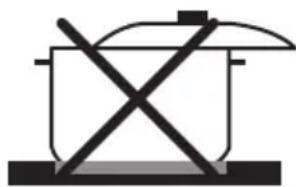
Simple line drawing of a cooking pot with crossed x-axes (no text or symbols)
Spills may damage the glass ceramic surface and cause fire
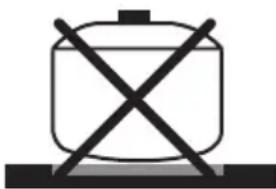
natural_image
Simple line drawing of a cylindrical object with two crossed X marks on a base (no text or symbols)
Do not use vessels with concave or convex bottoms.
natural_image
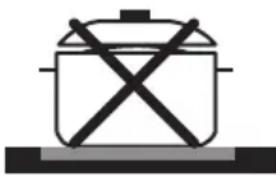
Simple line drawing of a cooking pot with crossed x marks on a base (no text or symbols)
If the pot's diameter is too small or the lid doesn't fit, energy is wasted
Safety requirements for deep fat frying
- Use a deep pan, large enough to completely cover the appropriate heating area.
- Never fill the pan more than one-third full of oil.
- Never leave oil or fat unattended during the heating or cooking period.
- Never try to fry too much food at a time, especially frozen food. This only lowers the temperature of the oil or fat too much, resulting in greasy food.
- Always dry food thoroughly before frying, and lower it slowly into the hot oil or fat. Frozen foods, in particular, will cause frothing and spitting, if added to quickly.
- Never heat fat, or fry, with a lid on the pan.
- Keep the outside of the pan clean and free from streaks of oil or fat.
Clean and maintenance
whole machine clean
Disconnect the power supply before cleaning and maintenance. In order to ensure the life of the machine, it should be thoroughly cleaned frequently. Cleaning steps are as follows:
- Once the oven has cooled, clean up the crumbs.
-
Remove oven accessories, rinse with warm water and dry.
-
Wipe the oven and induction cooker with a soft cloth stained with detergent, then dry with a dry soft cloth.
NOTE:
- Do not use sharp cleaning tools, hard brush and corrosive cleaning products, so as not to damage the machine and its accessories.
- Do not use rough scrubbing agent or sharp metal spatula to clean the door glass.
Oven Lamp Replacement
- Switch off and disconnect the power from the oven. Ensure that the internal parts are cool before touching internal parts.
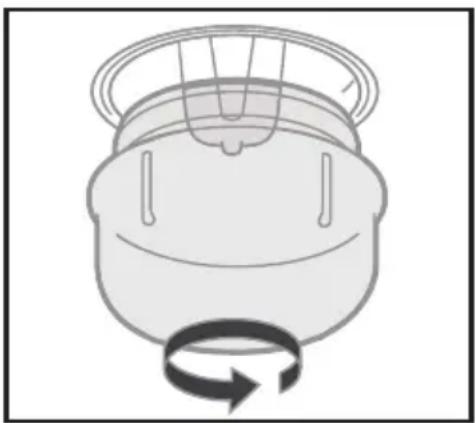
- Remove the lamp cover by turning it counter-clockwise (note, it may be stiff), replace the bulb with a new one of the same type.
- Insert the new bulb, which should be resistant to 300^ C. For replacement bulbs contact your local service centre.
- Re-fit the cover.
- If in any doubt, consult a qualified electrician for help.
- Only use 25 W/230V\~ type G9, T300°C halogen lamps.
natural_image
Simple line drawing of a mechanical component with a rotating arrow (no text or symbols)
WARNING: To avoid electric shocks-please ensure that the electricity supply to the appliance is switched off and the appli-ance is fully cold. before removing the lamp lens.
Removing the door for easier cleaning
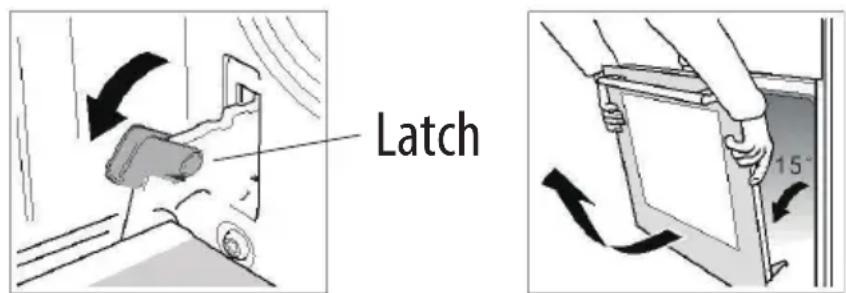
We recommend you have someone to assist you during removal of the door.
- Open the door completely.
- The door hinge has a small latch. Lift the latch on both hinges.
-
Lift the door slightly as if closing, and then with both hands supporting the door, pull it away from the oven.
-
To replace the door, hold the door in an open position and insert the latches on both hinges back into place. Open and close the door to make sure that it has been fitted correctly.
TECHNICAL SPECIFICATIONS
| Model | CI6060PY23WH |
| GENERAL |
| External dimensions (Length width x height) | 605x600x818mm |
| Voltage frequency 220-240V~ | 50Hz |
| 9.0 kWTop power consumption |
| Cable type / section | H07RN-F 3X6mm^2 or equivalent |
| Cable length max.1.5m | |
| INDUCTION COOKER |
| Size/power of zone A | 180mm / 1800W |
| Size/power of zone B | 160mm / 1500W |
| Size/power of zone C | 280mm / 2500W |
| OVEN / GRILL |
| 3.2 kWMaximum power of over |
| 25WInner lamp |
| Timer Digital timer | |
| 65LCavity volume |
Information for domestic electric hobs
| Symbol Value Unit | |
| Model identification | | CI6060PY23WH | |
| Type of hob | | Electric | |
| Number of cooking zones and/or areas | | 3 | |
| Heating technology (induction cooking zones and cooking areas, radiant cooking zones, solid plates) | | Induction cooking zones | |
| For circular cooking zones or area: diameter of useful surface area per electric heated cooking zone, rounded to the nearest 5 mm | ø cm | Left front: 18Left rear: 16Right zone: 28 | |
| Energy consumption per cooking zone or area calculated per kg | ECelectric cooking | Left front: 183,6Left rear: 199,9Right zone: 190,9 | Wh/kg |
| Energy consumption for the hob calculated per kg | ECelectric hob | 191,5 | Wh/kg |
Information for domestic ovens
| Symbol Value Unit | |
| Model identification | | CI6060PY23WH | |
| Type of oven | | Electric oven | |
| Number of cavities | | 1 | |
| Volume per cavity V 1 | | 65 | |
| Heat source per cavity (electricity or gas) | | Electricity | |
| Energy consumption (electricity) required to heat a standardised load in a cavity of an electric heated oven during a cycle in conventional mode per cavity (electric final energy) | EC electric cavity | 0,87 | kWh/cycle |
| Energy consumption required to heat a standardised load in a cavity of an electric heated oven during a cycle in fan-forced mode per cavity (electric final energy) | EC electric cavity | 0,68 | kWh/cycle |
| Energy Efficiency Index per cavity EEI | cavity | 83,0 | kWh/cycle |
TROUBLE SHOOTING
Trouble shooting
When you encounter the following conditions, your machine may not have a problem! If there is any other exception or code, please contact the after-sale service center.
GB
| Problem |
| Slight odour or small amount of smoke when using the cooker for the first time | This is normal and should cease after a short period. |
| Nothing Works | Is the main cooker wall switch turned on? There may be no electricity supply. |
| Oven does not cook evenly | Check that the containers being used in the oven allow sufficient air flow around them. Check that the cooker is level. |
| Hotplates are slow to boil or will not simmer | The hob surround can be cleaned with warm soapy water and a cream cleaner, such as Cif. The sealed hot-plates should be cleaned regularly. |
| Grill keeps turning on and off | When the grill control is operated at a setting less than maximum, this is normal regulator operation, not a fault. |
| Condensation on the wall at the rear of the cooker | Steam and/or condensation may appear from the vent at the rear of the appliance when using an oven particularly for foods with a high water content e.g. frozen chips, roast chicken etc. This is normal and any excess should be wiped off. |
| Steam / Condensation in the oven after use | Steam is a by-product of cooking any food with high water content. This is normal and could be clean when regular cleaning of cooker. |
Correct disposal of this product
European directive 2012/19/EU on Waste from Electrical and Electronic Equipment (WEEE), requires that used household appliances are not thrown into the normal municipal waste stream. Used appliances must be collected separately in order to optimize the rate of recovery and recycling of materials that compose them, and to reduce the impact on human health and on the environment. The crossed bin symbol is affixed to all the products to remind you of the obligations of separated collection.

This instruction book is also available on our website: www.conforama.fr
If you have a problem with your product, before going to your Conforama store, please get in touch with our aftersales services for electrical household appliances:
https://sav-client.conforama.fr
09 69 32 05 05

SABA is a German brand born in 1923 in the heart of the black forest.
Pioneers in electrical equipment, it continues its search for quality by offering smart products that will accompany you on a daily life.
This product has been manufactured and sold under the responsibility of CONFORAMA FRANCE S.A..
SABA, and the SABA logo are trademarks used under license by CONFORAMA FRANCE S.A. – further information at www.saba-brand.com.
All other products, services, companies, trademarks, trade or product names and logos referenced herein are the property of their respective owners.