
DFV606023BK - Cooker SABA - Free user manual and instructions
Find the device manual for free DFV606023BK SABA in PDF.

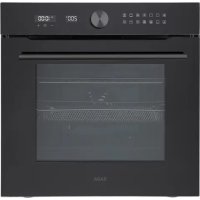
| Product type | Electric double oven cooker |
| Brand | SABA |
| Model | DFV606023BK |
| Dimensions (H/W/D) | 900 x 600 x 600 mm |
| Weight | 59 kg |
| Power supply | 220-240 V~ 50/60 Hz, 10.0 kW |
| Recommended fuse | 32 A minimum |
| Power cable | H07RN-F 3G 4.0 mm² or 3G 6.0 mm², max length 2 m |
| Hob | 4 radiant zones: 2 x ø165 mm (1200 W) and 2 x ø200 mm (1800 W) |
| Upper oven | Conventional oven / Grill, 2.2 kW, volume 38 L |
| Main oven | Fan-assisted oven, volume 69 L |
| Oven light | Halogen lamp G9, 25 W / 230 V~, withstands 300 °C |
| Timer | Digital, with duration and end of cooking programming |
| Supplied accessories | Metal grid, drip tray |
| Cleaning | Interior: soapy water, avoid abrasives. Glass: no metal scraper. Removable door for cleaning. |
| Safety | Anti-tilt chains, automatic grill shut-off when door closed, child lock not specified |
| Repairability | Oven lamp replaceable by user, removable door |
| Energy class | Upper oven: class A, Main oven: class A |
Frequently Asked Questions - DFV606023BK SABA
User questions about DFV606023BK SABA
0 question about this device. Answer the ones you know or ask your own.
Ask a new question about this device
Download the instructions for your Cooker in PDF format for free! Find your manual DFV606023BK - SABA and take your electronic device back in hand. On this page are published all the documents necessary for the use of your device. DFV606023BK by SABA.
USER MANUAL DFV606023BK SABA
natural_image
Diagram of a bolt with a curved arrow indicating rotation, no text or symbols presentnatural_image
Technical diagram showing a mechanical assembly with an inset close-up of a tool interacting with a component (no text or symbols visible)natural_image
Warning symbol depicting a person pushing a large block inside a triangle (no text or numbers)
natural_image
Simple black-and-white diagram of a container with an arrow indicating flow or movement, enclosed in a circle (no text or symbols)natural_image
Line drawing of a rectangular tray or container with horizontal lines and rounded edges (no text or symbols)Étagère Grillagée
natural_image
Simple line drawing of a rectangular baking tray with scalloped edges (no text or symbols)Plaque de Cuisson
natural_image
Black plastic screw and chain components laid out on a white surface, no text or symbols visiblenatural_image
Technical line drawings of an oven with internal components and a grater base (no text or symbols)natural_image
Simple line drawing of a cooking pot with a checkmark inside (no text or symbols)natural_image
Simple line drawing of a cooking pot with crossed x marks (no text or symbols)natural_image
Simple line drawing of a cylindrical container with two crossed X marks on a base (no text or symbols)natural_image
Simple line drawing of a cooking pot with crossed x marks on a base (no text or symbols)natural_image
Simple line drawing of a mechanical component with a rotating arrow (no text or symbols)Thank you for choosing SABA quality. This product has been developed by our team of professional and according to European regulations. In order to get the most out of your new appliance, we recommend that you read this instruction manual carefully and keep it for future reference.
TABLE OF CONTENTS
Safety warning 2....
Installation....8
Precautio ns before use.... 16
Product introduction.... 19
Accessories....20....
Points for attention in use.... 21
Function is introduced.... 23
Clean and mainte nance 32
Technical specifications 36
Trouble shooting 38
Correct disposal of this product....40
Safety warning
THESE WARNINGS ARE PROVIDED IN THE INTEREST OF SAFETY. PLEASE READ THEM CAREFULLY BEFORE INSTALLING OR USING THE APPLIANCE.
To maintain the EFFICIENCY and SAFETY of this appliance, we recommend:
- Call only the Service Centers authorized by store where you buy the cooker
• Always use original Spare Parts - This appliance is intended for non-professional use within the home.
- Before using the appliance, read the instructions in this owner's manual carefully since you should find all the instruction you require to ensure safe installation, use and maintenance. Always keep this owner's manual close to hand since you may need to refer to it in the future.
• After remove the packing, check that the appliance is not damaged. If you have any doubts, do not use the appliance, contact your nearest Service Centre of the store where you buy the appliance Never leave the packing components (plastic bags, foamed polystyrene, nails, etc.) within the reach of children since they are a source of potential danger. - The appliance must be installed only by a qualified person in compliance with the instructions provided. The manufacturer
declines all responsibility for improper installation which may harm persons and animals and damage property.
- Check that the electrical capacity of the system and sockets will support the maximum power of the hob, as indicated on the rating label. If you have any doubts, call in a qualified technician.
- This appliance can be used by children aged from 8 years and above and persons with reduced physical, sensory or mental capabilities or lack of experience and knowledge if they have been given supervision or instruction concerning use of the appliance in a safe way and understand the hazards involved. Children shall not play with the appliance. Cleaning and user maintenance shall not be made by children without supervision.
- The electrical safety of this appliance can only be guaranteed if the cooker is correctly and efficiently earthed, in compliance with current regulations on electrical safety. Always ensure that the earthing is efficient; if you have any doubts call in a qualified electrician to check the system. The manufacturer declines all responsibility for damage resulting from a system which has not been earthed.
- When the cooker is first used an odour may be emitted, this will cease after a period of use. When first using the cooker, ensures that the room is well ventilated (e.g. open a window or use an extractor fan) and that persons who may be sensitive to the odour avoid any fumes. It is suggested that any
pets be removed from the room until the smell has ceased. This odour is due to temporary finish on oven liners and elements and also any moisture absorbed by the insulation.
- Ensure that the appliance is switched off before maintenance, by switching off the main switches and turning all knobs to "OFF" position.
- The openings and slota used for ventilation and dispersion of heat on the rear and below the control panel must never be covered.
- The user must not replace the supply cable of this appliance. Always call an after-sales servicing centre authorized by the seller in the case of cable damage or replacement.
- Always switch off the electrical supply to the cooker and allow it to cool down before carrying out any cleaning operations etc.
- WARNING Ensure that the appliance is switched off before replacing the lamp to avoid the possibility of electric shock.
- This appliance must be used for the purpose for which it was expressly designed. Any other use is considered to be improper and consequently dangerous. The manufacturer declines all responsibility for damage resulting from improper and irresponsible use.
-
A number of fundamental rules must be followed when using instructions. The followings are of particular importance:
-
Do not touch the appliance when your hands or feet are wet.
- Do not use the appliance barefooted.
- Never allow the Mains Cable to be stretched, pulled or damaged if the cooker is moved for cleaning etc.
- Do not use the cooker if the Mains Cable is damaged, consults a qualified electrician.
- Do not allow the cooker to be used unsupervised by children or persons unfamiliar with it.
-
Do not grill to open the door.
-
To avoid accidental spillage do not use cookware with h uneven or deformed bottoms on the burners or on the electrical plates.
- Special care should be taken when using chip pans etc. should not be used unattended since overheated oil may in order to avoid splashing or spillage of hot oil. They boil over and could also ignite.
- Parts of this appliance, cooking surfaces, retain heat for considerable periods after switching off. Care should, therefore, be taken when touching these areas before they have completely cooled down.
- Never use flammable liquids such as alcohol or gasoline, etc. near the appliance when it is in use.
- When using small electric appliances near the hob, keep the supply cord away from the hot parts.
-
Make sure the knobs are in its “OFF” position when the appliance is not in use. Also make all potentially dangerous parts of the appliance, safe, above all for children who could play with the appliance.
-
When the appliance is in use, the heating elements and some parts of the oven door become extremely hot. Make sure you don't touch them and keep children well away.
- If you use the power code for single phase, the minimum cross-sectional area is 4mm^2 . For three phases, the minimum cross-sectional area is 2.5mm^2 .
- The appliance that you have bought may be slightly different from the one illustrated in this manual. Please refer to the information related to the model you have.
- Do not use harsh abrasive cleaner or sharp metal scrapers to clean the oven door glass since they can scratch the surface, which may result in shattering of the glass.
- Any spillage should be removed from the lid before opening and the hob surface should be allowed to cool before closing the lid.
- If the surface is cracked, switch off the appliance to avoid the possibility of electric shock. (If the hob surface is of glass-ceramic or similar material and protects live parts.)
- A steam cleaner is not to be used.
- WARNING: Accessible parts may become hot during use. Young children should be kept away.
- The appliance is not intended to be operated by means of an external timer or separate remote-control system.
- WARNING: Unattended cooking on a hob with fat or oil can be dangerous and may result in fire. Never try to extinguish a fire with water, but switch off the appliance and then cover flame 6 e.g. with alid or a fire blanket.
CAUTION: The cooking process has to be supervised. A short term cooking process has to be supervised continuously.
WARNING: Danger of fire: do not store items on the cooking surfaces.
- WARNING: Use only hob guards designed by the manufacturer of the cooking appliance or indicated by the manufacturer of the appliance in the instructions for use as use of inappropriate guards can cause accidents. suitable or hob guards incorporated in the appliance. The use of inappropriate guards can cause accidents. Prevention against possible fire risk!
- WARNING: The appliance and its accessible parts become hot during use.
Care should be taken to avoid touching heating elements. Children less than 8 years of age shall be kept away unless continuously supervised.
- For details indicating the correct installation of the shelves please refer to chapter ‘Accessories’.
- The appliance must not be installed behind a decorative door in order to avoid overheating.
-
This appliance is intended to be used in household and similar applications such as:
-
staff kitchen areas in shops, offices and other working environments
- farm houses and by clients in hotels, motels and other residential type environments
- bed and breakfast type environments
- catering and similar non-retail applications.
Installation
The following instructions should be read by a qualified technician to ensure that the appliance is installed, regulated and technically serviced correctly in compliance with current regulations.
Important: remember to disconnect the appliance from electricity by turn off the mains before regulating the appliance or carrying out any maintenance work.
GB
Unpacking
- Be careful when unpacking and installing the appliance. Sharp edges might cause accidents.
- The oven is heavy and care must be taken when moving it. Ensure that all packing, both inside and outside the cooker, has been removed before the oven is used.
- Unpack the oven from the carton, check and make sure it has not been damaged in any way. If you have any doubts, do not use it, contact the service center or where you buy the oven.
IMPORTANT:
Do not install the product next to refrigerators or freezers. The heat emitted by the product will increase the energy consumption of cooling appliances.
Carry the product with at least two persons. Product must be placed directly on the floor. It must not be placed onto a base or a pedestal.
Do not use the door and/or handle to carry or move the product. The door, handle or hinges get damaged.
The hob should never be installed in proximity of a door access.
People opening and closing the door could come into contact with pots or pans cooking on the hob.
This unit may be installed and used only in permanently ventilated rooms.
WARNING: THIS APPLICANCE MUST BE EARTHED.
Installation steps
The cooker is designed to fit between kitchen cabinets. The space either side need only be sufficient to allow withdrawal of the cooker for servicing. It can be used with cabinet one side or both as well as in a corner setting. It can also be used free-standing.
The appliances can be installed next to furniture units which are no taller than the top of the cooker hobs. If the cooker is placed touching walls or sides of neighboring cabinets, these must be capable of withstanding a temperature rise of 50 °C above room temperature. For a correct installation of the cooker the following precautions must be followed:
-
The cooker may be located in a kitchen, a diner or bed sitting room, but not in a bathroom or shower room.
-
Kitchen cabinets installed next to the cooker that are taller than the top of the cooker hobs must be situated at least 20cm from the edge of the hobs.
- Hoods must be installed according to the requirements in the installation manual for the hoods themselves and in any case at a minimum distance of 65cm.
- Place the wall cabinets adjacent to the hood at a minimum height of 42cm from the hobs as indicated in figure 1.
- The hoods must be installed according to the requirements in the hood handbook. Should the cooker be installed beneath a wall cabinet, the latter should be situated at least 70cm away from the hobs as indicated in figure 1.
- The cut-out for the cooker cabinet should have the dimensions indicated in the figure 1. The wall in contact with the back of the cooker must be of flameproof material.
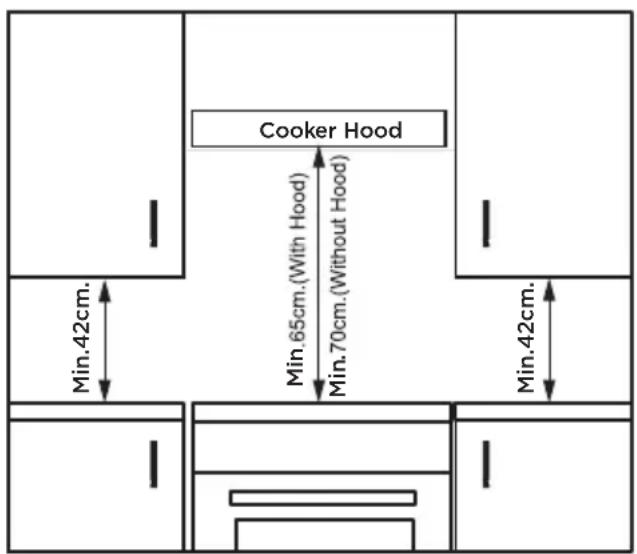
Figure 1
natural_image
Diagram of a bolt with a curved arrow indicating rotation, no text or symbols presentFigure 2
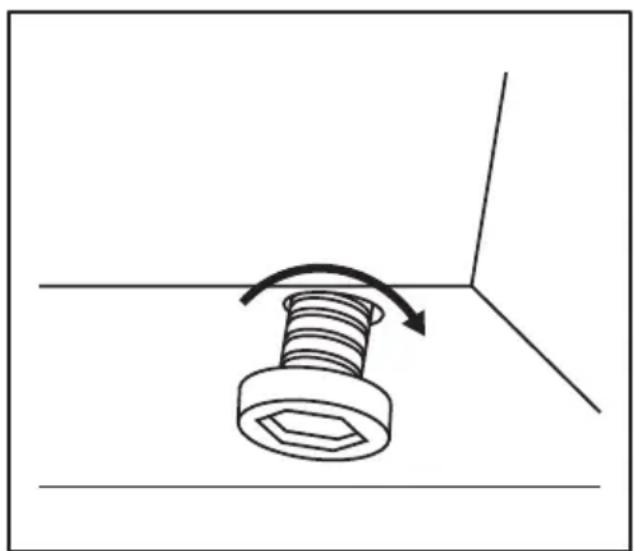
Leveling Your Appliance
Take out of the 4 cooker feet from oven cavity, which be packed together with backing rack, and then screw them into the 4 plinth in lower part of cooker. These feet level off the oven when necessary. The height of the cooker can be adjusted by means of adjustable feet in the plinth. Adjust the feet by tilting the cooker from the side. Then install the product into position. It is essential that the cooker be standing level before installation. (Figure 2)
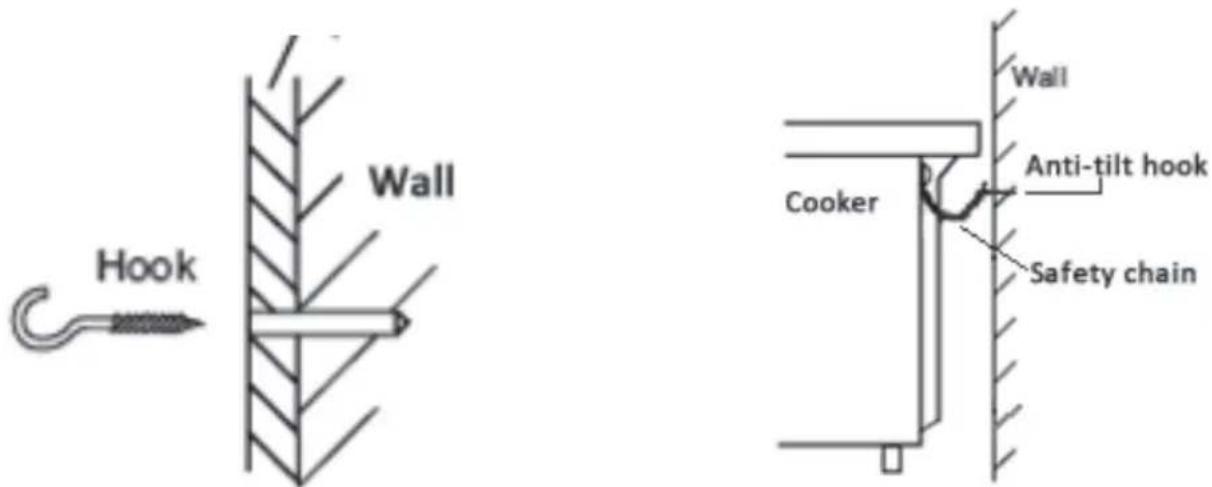
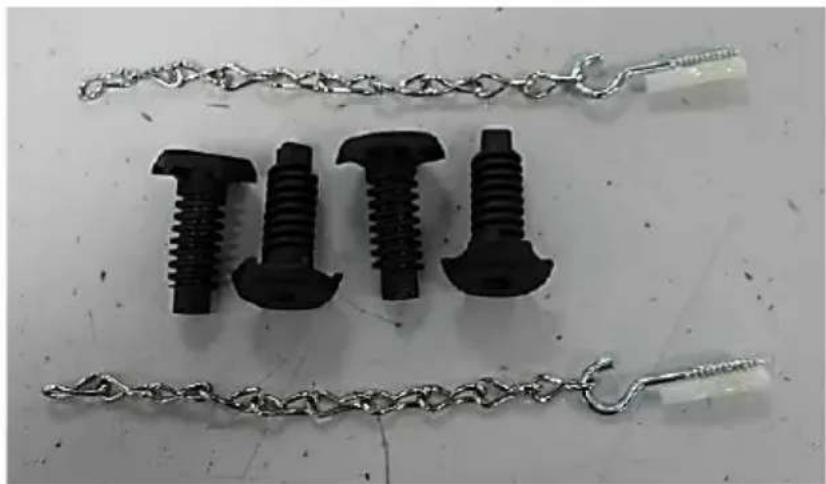
Fitting the safety chain and hook
To prevent the cooker from tipping forward, two lengths of chain MUST BE fixed to the back of the cooker, which should be secured to the hooks provided at all times.
The hooks should be secured to the wall at the rear of the cooker.
The chains should always be attached to the hooks when the cooker is in position against the wall.
Fix the hooks into the wall immediately behind the cooker on both sides.
Secure the chain to the hook before using or cleaning the oven.
Electrical connection
Connect the product to a grounded outlet/line protected by a fuse of suitable capacity as stated in the “Technical specifications” table. Have the grounding installation made by a qualified electrician while using the product with or without a transformer. Our company shall not be liable for any damages that will arise due to using the product without a grounding installation in accordance with the local regulations.
GB
DANGER:
The product must be connected to the mains supply only by an authorised and qualified person. The product's warranty period starts only after correct installation. Manufacturer shall not be held responsible for damages arising from procedures carried out by unauthorized persons.
The power cable must not be clamped, bent or trapped or come into contact with hot parts of the product. A damaged power cable must be replaced by a qualified electrician. Otherwise, there is risk of electric shock, short circuit or fire!
The mains supply data must correspond to the date specified on the type label of the product. The rating plate is either seen when the door or the lower cover is open or it is located at the rear wall of the unit depending on the unit type.
Power cable of your product must comply with valves in "Technical specifications" table.
Before starting any work on the electrical installation, disconnect the product from the mains supply. There is the risk of electric shock!
Connecting the power cable
- If a power cable is not supplied together with your product, a power cable that you would select from the table in accordance with the electrical installation at your home must be connect to your product by following the instructions in cable diagram.
This product must only be installed / connected by a qualified electrician such as a technician from the local electricity company or NICEIC registered contractor to a suitable double-pole control unit with a minimum contact clearance of 3 mm in all poles and with a minimum rating please consider technical data table, Technical specifications, which should be fitted adjacent to (but not above) the cooker in accordance with IEE regulations. Failure to observe this instruction may result in operational problems and invalidation of the product warranty.
IMPORTANT:
Additional protection by a residual current circuit breaker is recommended.
Install an approved circuit breaker with a minimum contact opening of 3 mm, between the appliance and the mains fuse box. (the earth wire should not be interrupted by the circuit breaker)
Power cable must not be longer than 2 m because of safety reasons.
- The cable must have conductors of sufficiently high cross sectional area to prevent overheating and deterioration. The mains cable must pass through the cable clamp. The mains cable should be routed away from the appliance and in particular ventilation slots, the vent outlet and should not be obstructed when pushed in to position between the appliance and the wall and/or cabinets.
NOTE:
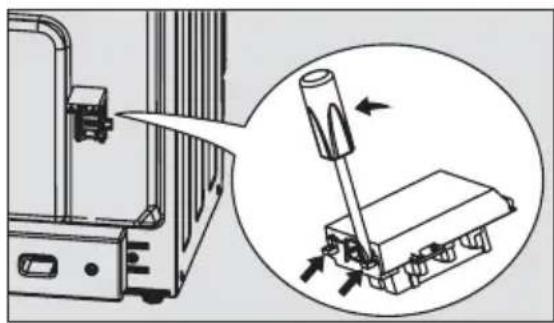
The following installation procedure must be carried out by a qualified electrician. For the installation of the feeding cable carry out the following operations:
-
Open the terminal board by inserting a screwdriver into the side tabs of the power code cover. Use the screwdriver as a lever by pushing it down to open the cover as below.
-
Connect the electricity follows the diagram as printed in the surface of power code cover.
-
Fasten the supply cable in place with the clamp and close the cover of the terminal board.
natural_image
Technical illustration of a mechanical assembly with an inset showing a tool interacting with a component (no text or symbols present)For equipment with a cooling fan
While open door grilling, in order to protect control panel, knobs and related oven parts; a fan automatically starts working.
IMPORTANT: Fan continues working until the product cools down.
Final check
- Reconnect the product to the mains.
- Check electrical functions.
Remark: The appliance is supplied by a set of terminals for permanently fixed wiring or fitted with supply cord.
The 3 alternative connection ways are as below:
220-240V\~: power cord requirements: wire diameter 3G 4.0 mm ^2 or 3G 6.0 mm ^2 at least cord type: H07RN-F. The conductive sheet connection method as below:
Conductive sheet
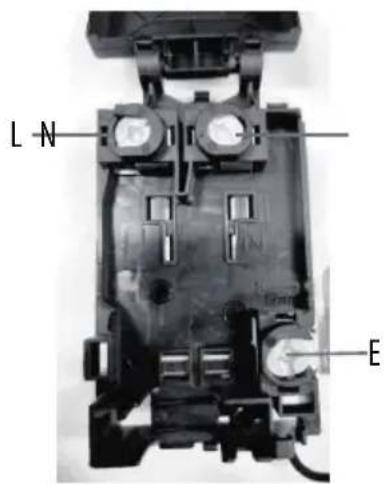
| voltage wiring cable type | ||
| 220-240V~ | 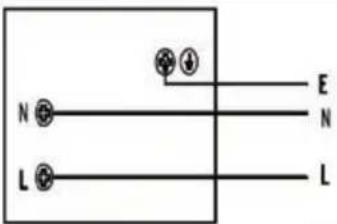 | 3G 4.0 mm2 or 3G 6.0 mm2 H07RN-F |
| L=Phase, N=Neutral, E=Earth | ||
Important: The power cable must be positioned so that no point reaches a temperature above 50^ C.
Precautions before use
GB
When use properly your appliance is completely safe but as with any electrical product there are certain precautions that must be observed.
Please read the precautions below before using your appliance.
- Turn controls OFF when you have finished cooking and when not in use.
- Stand back when opening an oven door to allow any build up of steam or heat to disperse.
- Use dry good quality oven gloves when removing items from the oven/grill.
- Place pans centrally over the hotplate making sure handles are kept away from the edge of the hob and cannot become heated by other hot plate/pans.
- Take care to avoid heat/steam burns when operating the controls.
-
Turn off the electricity supply before cleaning and allow the appliance to cool.
-
Take care when removing items from the grill when the lower oven is on as the contents will be hot.
- Take care when removing items form the grill when the lower oven is on as the contents will be hot.
- Keep the appliance clean, as a build up of grease or fat from cooking can cause a fire.
- Follow the basic principles of food handling and hygiene to prevent the possibility of bacterial growth.
- Keep ventilation slots clear of obstructions.
- Refer servicing to a qualified appliance service engineer.
- During use the appliance becomes hot. Care should be taken to avoid touching heating elements inside the oven.
- Never line the interior of the oven with foil as this may cause the appliance to overheat.
- Never leave children unsupervised where a cooking appliance is installed as all surfaces will be hot during and after its use.
- Do not allow children or persons who are not familiar with the appliance to use it, without supervision.
- Do not allow anyone to sit or stand on any part of the appliance.
- Do not place items on electrical appliances that children are trying to reach.
- Do not leave anything on the surface of the hob when unattended or not in use.
- Do not remove shelves while the oven is still hot.
-
Do not heat unopened food containers as pressure can build up and cause them to break
-
Do not store chemicals/foods or pressurized containers in or on appliances, or in cabinets above or next to appliances.
- Do not place flammable or plastic items on or near the hob.
- Don't put more than a third of the oil in the frying pan, and don't use LIDS.
- Never use the appliance as a room heater.
- Never use the grill to warm plates.
- Never dry any items on either the hob or oven doors.
- Never install the appliance next to curtains or other soft furnishings. Never use steam cleaners.
-
Safety advice in case of a chip-pan fire In the event of a chip pan fire or any other pan fire:
-
Turn OFF the cooker appliance at the wall switch.
- Cover the pan with a fire blanket or damp cloth, this will smother the flames and extinguish the fire.
-
Leave the pan to cool for at least 60 minutes before moving it. Injuries are often caused by picking up a hot pan and rushing outside with it.
-
Safety reminding:
natural_image
Warning symbol depicting a person pushing a large object inside a triangle (no text or numbers)Caution, possibility of tilting
natural_image
Simple black-and-white diagram of a container with arrows indicating flow or movement (no text or symbols)Anti-tip restraints
WARNING: In order to prevent tipping of the appliance, this stabilising means must be installed. Refer to instructions for installation.
Product introduction
Product components (Please select the icon according to the configuration)
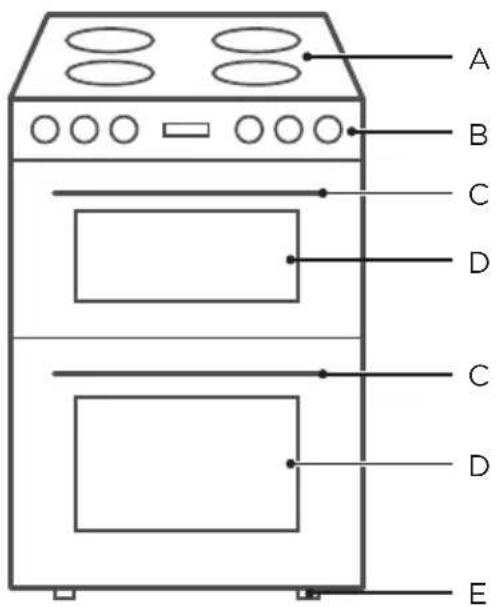
D.Oven Door
B. Control Panel
E. Adjustable Feet
C. Oven Door HandleA: Cooktop
control panel (Please select the icon according to the configuration)
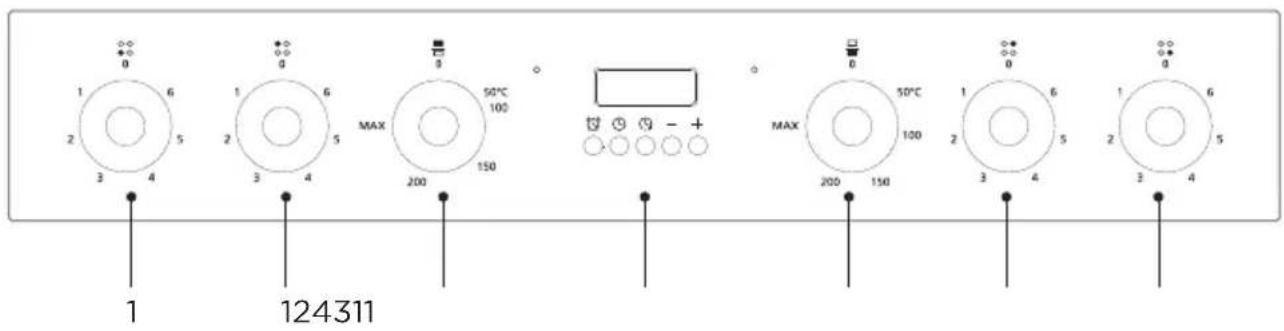
- Hob control knob 2. Top oven control knob
- Timer for main oven 4. Main oven control knob
Accessories
Your appliance is accompanied by a range of accessories. Here, you can find an overview of the accessories included and information on how to use them correctly.
Accessories included
Your appliance is equipped with the following accessories:
GB
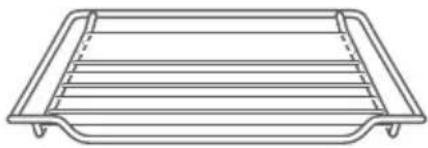
natural_image
Line drawing of a rectangular tray with horizontal slats (no text or symbols)Wire Rack
cooking food or placing heat-resistant cookware
natural_image
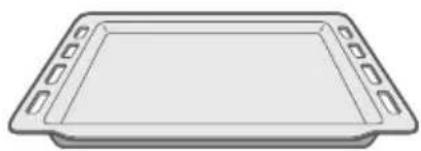
Simple line drawing of a rectangular tray with side handles (no text or symbols)Baking Tray
Cooking food or taking over food scraps
natural_image
Black plastic screw and chain components laid out on a white surface, no text or symbols visibleYou can use the tray to place liquid or cooking food with juice. Only use original accessories. They are specially adapted for your appliance.
You can buy accessories from the after-sales service, from specialist retailers or online.
NOTE:
- The accessories may deform when they become hot. This does not affect their function.
- Once they have cooled down again, they regain their original shape.
natural_image
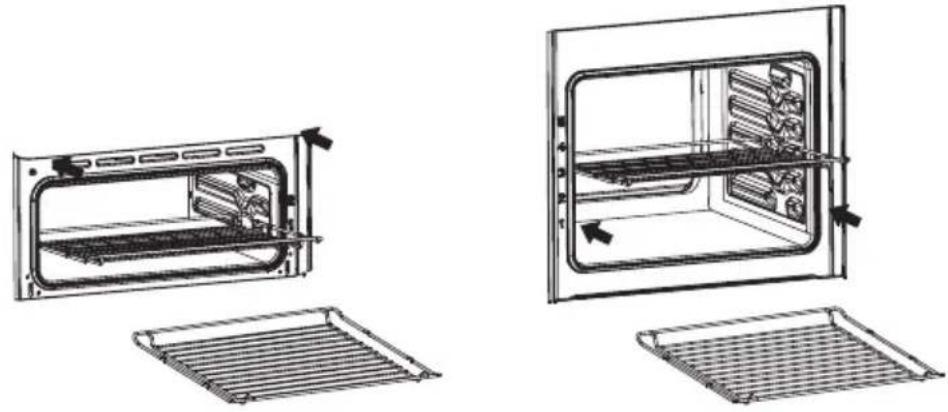
Technical line drawings of an oven with internal components and ventilation grilles (no text or symbols)Put the shelves into the oven in the direction of the arrow. And horizontally insert until it is fixed.
Points for attention in use
Instructions for the oven
- When you're done, wear heat-proof gloves and remove food and accessories.
- If food is cooking too fast, place it at the bottom of the baking pan.
-
Do not place cookware with rough bases on the oven door.
-
Ensure that there is at least 25mm space at top of oven when grilling larger foods or using tall cookware.
- Always grill with the door open.
- When baking the thicker bottom, turn the food over during cooking to make sure both sides are cooked.
- Please preheat the oven before cooking.
- Put big or medium-sized portions in correct rack position under the grill heater for grilling.
- For foods that only need to be baked on top, place the food on a wire grill on a tray or on a grill.
- When the main oven is in use, food and dishes placed on the grill will be heated. Please do not touch attachments or food.
- Do not place the food too far in the back of the grill. This is the hottest area and fatty food may catch fire.
Tips for baking
- Use non-sticky coated appropriate meta plates or aluminum vessels or heat-resistant silicone moulds.
- Make best use of the space on the rack.
- Place the baking mould in the middle of the shelf.
- Select the correct rack position before turning the oven or grill on. Do not change the rack position when the oven is hot.
-
Keep the oven door closed(Main oven).
-
Neve touch the hot burners, inner sections of the oven, heaters and etc. Keep children away. Always use heat resistant oven gloves when putting in or removing dishes into/from the hot oven.
- Be careful when opening the oven door 'as steam may escape. Exiting steam can scald your hands, face and/or eves.
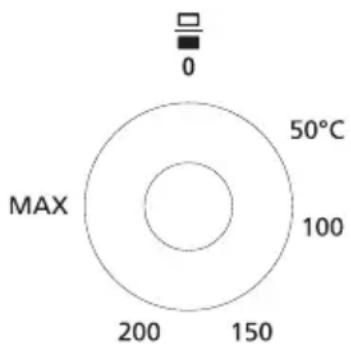
Function is introduced
How to operate the top oven
Turning on the oven
Oven is operated with Function knob. Oven is turned off when the Function knob is in Off (upper) position.
- Close the oven door.
- Set the oven temperature.
★ Temperature light will turn off when the set temperature is attained.
Turning off the grill oven
- Turn the Function knob to Off (upper) position.
Top oven
WARNING:
This product is designed for OPEN DOOR GRILLING.
WARNING:
Hot surfaces may cause burns! Keep children away from the product. Oven door remains slightly inclined when opened full and thus, possible splashes to not reach you.
There is a switch on the door. As a safety precaution, this switch prevents operation of the grill when the door is CLOSED.
Grill oven can be used both as a grill and a baking oven. Switch on the top oven operates the oven when the oven door is closed, and the grill when the oven door is opened.
The door switch functions as a selector between the grill and electric oven feature, i.e. when the door is closed while grilling, top oven automatically switches to electric oven and continues working.
Switching on the grill oven
Grill is operated with Function knob. Grill is turned Off when the
Function knob is in Off (upper) position.
- Open the oven / grill door.
-
Set the grill temperature to 150 °C and if required, perform a preheating for about 5 minutes.
-
Then, select the desired grilling temperature.
★ Thermostat (temperature) light turns on.

Turning off the grill oven
- Turn the Function knob to Off (upper) position.
Cooking guide for top oven
- Timings may vary due to temperature of food, thickness, type and your own preference of cooking. Cook on the bottom Shelf level 1 only. Do not cook on the base of oven.
- Do not place cookware with rough bases on the oven door.
- Ensure that there is at least 25mm space between the top of oven when cooking larger foods or using taller cookware.
- Preheat oven first.
- When removing tray from top oven, pull and hold with two hands from two sides.
How to operate the main oven
IMPORTANT: Before you can use the main oven, the time must be set. If the time is not set, oven will not be operate. (For models with the timer.)
Product is equipped with two ovens. Overview section indicates the relevant knobs for each oven.
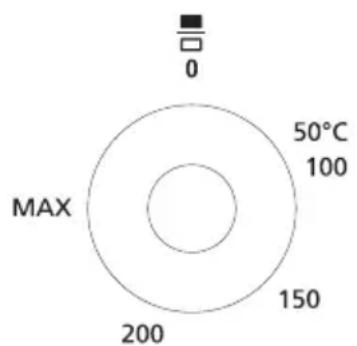
Select temperature and operating mode
- Set the Function knob to the desired temperature.
★ Oven heats up to the adjusted temperature and maintains it. During heating, temperature lamp stays on.
Switching off the main oven
Turn the Function knob to Off (upper) position.
Baking Tips
- Treating whole chicken, turkey and large piece of meat with dressings such as lemon juice and black pepper before cooking will increase the cooking performance.
- It takes about 15 to 30 minutes longer to roast meat with bones when compared to roasting the same size of meat without bones.
- Each centimeter of meat thickness requires approximately 4 to 5 minutes of cooking time.
- Let meat rest in the oven for about 10 minutes after the cooking time is over The juice is better distributed all over the roast and does not run out when the meat is cut.
- Fish should be placed on the middle or over rack in a heat-resistant plate.
Display screen use
Cooking timer is just for main oven. After set cooking time finish, timer buzzer would sounds.
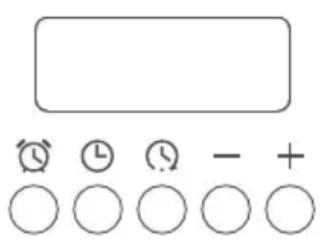
Reminder setting
Cooking duration setting
Cooking end time setting
– Value decrease key
+ Value increase key
Setting the clock
On the first use, or after a power failure, “0:00” and the symbol A will flash on the appliance's display. Return all the knobs to the 0 setting, then press the ⏻ and ⏻ keys together, and at the same time press the value adjustment keys — or + : this will increase or decrease the setting by one minute for each pressure. If long press, time will change faster.
NOTES:
- Manual cooking: If you have pressed the ⏻ and ⏱ keys together, activated the required function and temperature, then the oven will work continuously. To switch off the oven, return all knobs to the 0 setting.
- In the working time setting and running state, press ⏻ and ⏱ keys at the same time to adjust the clock, the working time setting and running program will be cancelled and the reminder function will not be affected.
Cooking duration setting
This mode sets the operating time of the oven and automatically switches off the oven heating when the set time has elapsed.
Press the Ⓛ key to enter the cooking time setting, the "A" icon flashes and can be adjusted by pressing the — and + keys. The "A" icon is always on when the setting is completed.
Press the Ⓤ key to inquire the remaining time of the current cooking.
Cooking end time setting
Press the ⏻ key to enter the end of cooking time setting, the "A" icon flashes and can be adjusted by pressing the — and + keys. The "A" icon is always on when the setting is completed.
For example: the current time is 2:00, you want the oven to work for 3 hours and the end time is set to 5:00.
Press the Ⓛ key to inquire the remaining time of the current cooking.
GB
NOTES:
When the prompt sound up, you can press any key to cancel.
Only one of the cooking working time and end time can be set.
The time setting range is 0-9 hours.
Runs automatically 5 seconds after the set time. Cooking time can be increased or decreased during the cooking process.
Reminder setting
The programmer can also be used as an ordinary timer.
Press the 🔒 key and the display will show the figures "0:00", and the symbol 🔔 will flash, press the value modification keys — or +. 5 seconds after setting the time of timer the count will start and the display will show the current time and the symbol 🔔.
NOTES:
After the setting, to display the time left press the key.
In timer mode, the oven operation will not be cut out at the end of the set time.
Adjusting the buzzer volume
The buzzer volume can be varied (3 settings) while it is in operation by pressing—.
Stopping the buzzer
The buzzer stops automatically after about seven minutes. It can be deactivated manually by pressing any keys as follows: ☎, ⏰ or ⏱.
Canceling cooking
Having programmed a manual, semi-automatic or automatic cooking operation, to switch off the appliance, return all knobs to the 0 setting + or — press the keys or together.
Hob introduce
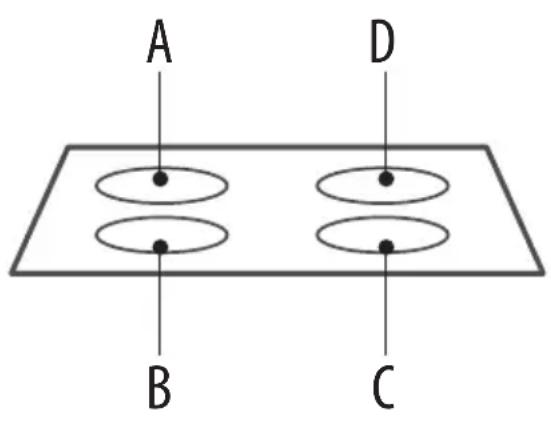
A/C: Single cycle cooking plate Size: 165mm Power: 1200W
B/D: Single cycle cooking plate Size: 200mm Power: 1800W
| Hob knob Fire size | |
| 1 | warming |
| 2-5 | stewing simmering |
| 6 | boiling |
GB
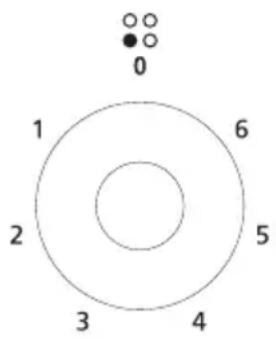
Location of cooking area
0 OFF
1 Lowest setting (Keep food warm)
6 Highest setting (quick heating up quick cooking, roasting)
- When cooking is complete, turn the knob back to the off position.
After the heating is completed, the hob indicator light is still on, and when the hob temperature drops to the touchable temp the indicator light goes out. When the hob needs to be c adjust the corresponding control knob to the "0" po
On the hob anywhere
- Glass ceramic surface is heatproof and is not affected by big temperature differences.
- Do not use the glass ceramic surface as a place of storage or as a cutting board.
- Use only the saucepans and pans with machined bottoms. Sharp edges create scratches on the surface.
- Do not use aluminum vessels and saucepans. Aluminum damages the glass ceramic surface
natural_image
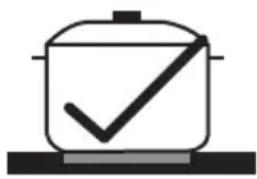
Simple line drawing of a cooking pot with a checkmark inside, placed on a base (no text or symbols)Use only the saucepans and pans with flat bottoms. They ensure easier heat transfer.
natural_image
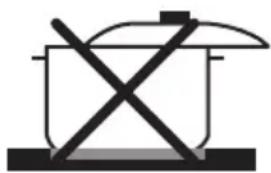
Simple line drawing of a cooking pot with crossed x marks (no text or symbols)Spills may damage the glass ceramic surface and cause fire
natural_image
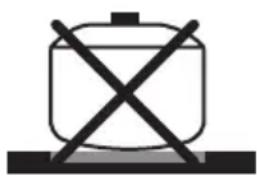
Simple line drawing of a cooking pot with crossed x marks on a base (no text or symbols)Do not use vessels with concave or convex bottoms.
natural_image
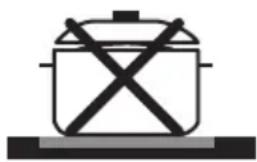
Simple line drawing of a cooking pot with crossed x marks on a base (no text or symbols)If the pot's diameter is too small or the lid doesn't fit, energy is wasted
Safety requirements for deep fat frying
- Use a deep pan, large enough to completely cover the appropriate heating area.
- Never fill the pan more than one-third full of oil.
- Never leave oil or fat unattended during the heating or cooking period.
- Never try to fry too much food at a time, especially frozen food. This only lowers the temperature of the oil or fat too much, resulting in greasy food.
- Always dry food thoroughly before frying, and lower it slowly into the hot oil or fat. Frozen foods, in particular, will cause frothing and spitting, if added to quickly.
- Never heat fat, or fry, with a lid on the pan.
- Keep the outside of the pan clean and free from streaks of oil or fat.
Clean and maintenance
Before each operation, disconnect the cooker from the electricity. To assure the long life of the cooker, it shall be thoroughly cleaned frequently, keeping in mind that:
-
Wait until the oven has cooled before removing the wire shelves, wash them separately in warm soapy water and dry thoroughly.
-
Wash the interior of the oven with hot soapy water and wipe down with a damp cloth.
- Leave the door open until the interior has dried, before replacing the wire shelves.
- Clean the oven after each use, especially after roasting or grilling, this will prevent spilt or splattered food debris burning and becoming difficult to remove.
- Do not use abrasive pads to clean the interior of the oven as this may remove the enamel, which will affect the efficiency of your oven.
- Do Not use harsh, abrasive cleaners or sharp metal scrapers to clean the oven door glass since they can scratch the surface, which may result shattering of the glass.
Cleaning the outside of the oven
- You should regularly wipe over the control panel, oven door and sides using a soft cloth and mild liquid detergent as spilt liquids may damage the enamel.
- Wash enameled or chrome plated parts of the oven with warm soapy water or with non-abrasive detergents.
- Never use abrasive pads to clean enameled, chromed or stainless steel surfaces.
- When using commercially available stainless steed cleaning products, avoid cleaning any lettering or symbols, as they can become damaged.
Removing the door for easier cleaning
We recommend you have someone to assist you during removal of the door.
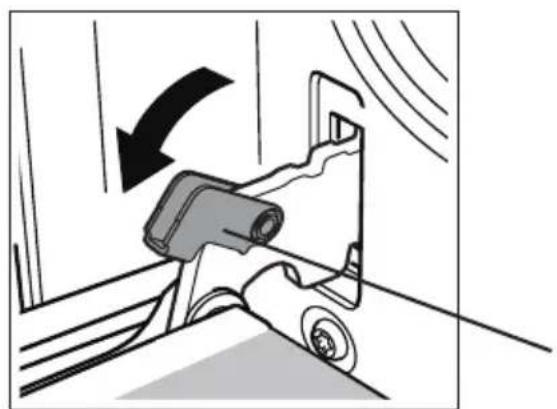
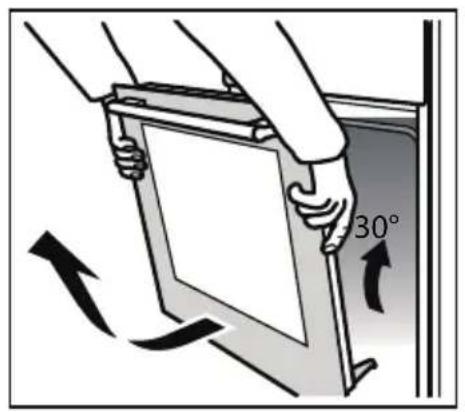
- To remove the door, open the door to the maximum angle. Then pull the buckle at the door hinge backward.
- Close the door to an angle approximately 30^ . Hold the door with one hand on each side. Lift up and slowly pull the door out from the oven.
- Always make sure that the glass is pushed fully into the Stop position.
- To remove the glass panel, open the door wide, push the clips on the left and right sides of door bracket. Then remove the plastic top cover. Hold the glass and slide it out along the door bracket.
natural_image
Diagram of a vehicle steering wheel with a black arrow indicating clockwise motion (no text or symbols)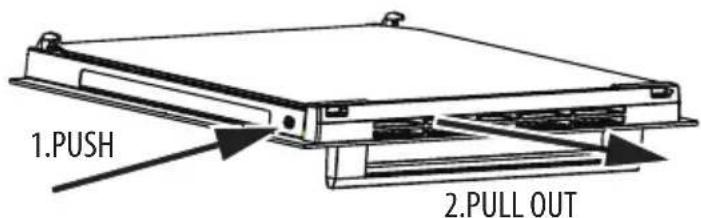

Oven Lamp Replacement
- Switch off and disconnect the power from the oven. Ensure that the internal parts are cool before touching internal parts.
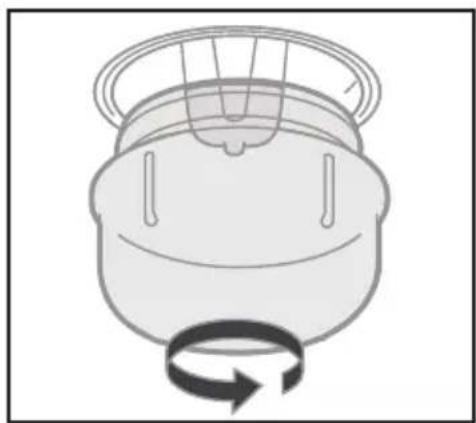
- Remove the lamp cover by turning it counter-clockwise (note, it may be stiff), replace the bulb with a new one of the same type.
- Insert the new bulb, which should be resistant to 300^ C. For replacement bulbs contact your local service centre.
- Re-fit the cover.
- If in any doubt, consult a qualified electrician for help.
- Only use 25 W/230V\~ type G9, T300 ℃ halogen lamps.
natural_image
Simple line drawing of a mechanical component with a rotating arrow (no text or symbols)WARNING: To avoid electric shocks-please ensure that the electricity supply to the appliance is switched off and the appliance is fully cold. before removing the lamp lens.
Technical specifications
| Model | DFV606023BK |
| Double Oven | |
| GENERAL | |
| External dimensions (height/width/depth) | 900/600/600mm |
| Voltage frequency | 220-240V~50Hz-60 Hz |
| Top power consumption | 10.0 kW |
| Fuse | min.32A |
| Cable type / section | When the user owns wiring, it can be equipped with H07RN-F 3G 4,0 mm^2 or 3G 6,0 mm^2 or equivalent |
| Cable length | max.2m |
| HOB | |
| Rear left burner dimension / Power | 165mm / 1200W |
| Front left burner dimension / Power | 200mm / 1800W |
| Front right burner dimension / Power | 165mm / 1200W |
| Rear right burner dimension / Power | 200mm / 1800W |
| OVEN / GRILL | |
| Top oven | Conventional oven |
| Grill power consumption | 2.2 kW |
| Main oven | Fan oven |
| Inner lamp | 25W |
| Timer | Digital timer |
| Cavity volume | 38L / 69 L |
Trouble shooting
Trouble shooting
Before contacting the authorized service center in case of problems while using your cooker, check the problem quite below; there may be nothing wrong with your cooker.
| Problem | |
| Slight odour or small amount of smoke when using the cooker for the first time | This is normal and should cease after a short period. |
| Nothing Works | Is the main cooker wall switch turned on? There may be no electricity supply. |
| Oven does not cook evenly | Check that the containers being used in the oven allow sufficient air flow around them. Check that the cooker is level. |
| Hotplates are slow to boil or will not simmer | The hob surround can be cleaned with warm soapy water and a cream cleaner, such as Cif. The sealed hot-plates should be cleaned regularly. |
| Grill keeps turning on and off | When the grill control is operated at a setting less than maximum, this is normal regulator operation, not a fault. |
| Condensation on the wall at the rear of the cooker | Steam and/or condensation may appear from the vent at the rear of the appliance when using an oven particularly for foods with a high water content e.g. frozen chips, roast chicken etc. This is normal and any excess should be wiped off. |
| Steam / Condensation in the oven after use | Steam is a by-product of cooking any food with high water content. This is normal and could be clean when regular cleaning of cooker. |
Correct disposal of this product
European directive 2012/19/EU on Waste from Electrical and Electronic Equipment (WEEE), requires that used household appliances are not thrown into the normal municipal waste stream. Used appliances must be collected separately in order to optimize the rate of recovery and recycling of materials that compose them, and to reduce the impact on human health and on the environment. The crossed bin symbol is affixed to all the products to remind you of the obligations of separated collection.
natural_image
Symbol of a trash bin crossed with no text or labels, accompanied by a black rectangular block below (no readable text or symbols)
This instruction book is also available on our website: www.conforama.fr
If you have a problem with your product, before going to your Conforama store, please get in touch with our aftersales services for electrical household appliances: https://sav-client.conforama.fr 09 69 32 05 05
Information for domestic ovens
| Symbol Value Unit | |||
| Model identification | DFV606023BK | ||
| Type of oven | Electric Cooker | ||
| Mass of the appliance kg | 59 | ||
| Number of cavities | 2 | ||
| Heat source per cavity (electricity or gas) electricity | |||
| Volume per cavity VI | 38 or o Ovenor Lo er Oven | ||
| Energy consumption (electricity) required to heat a standardised load in a cavity of an electric heated oven during a cycle in conventional mode per cavity (electric final energy) | EC electricity | 0 or o Oven | kWh/cycle |
| Energy consumption required to heat standardised load in a cavity of an electric heated oven during a cycle in fan-forced mode per cavity (electric final energy) | a EC electricity | 0.70 or Lo er Oven | kWh/cycle |
| Energy consumption required to heat standardised load in a gas-fired cavity of an oven during a cycle in conventional mode per cavity (gas final energy) | a EC electricity | kWh/cycle | |
| Energy Efficiency Index per cavity | EEI cavity | or o Oven83 3 or Lo er Oven | |
| Energy Efficiency Class | Class A for Top OvenClass A for Lower Oven | ||
| Standby/off power Standby model 0.86 W | |||
| (1) 1 kWh/cycle = 3.6 MJ/cycle. | |||
Information for domestic electric hobs
| Symbol Value Unit | |||
| Model identification | DFV606023BK | ||
| Type of hob | Electric hob | ||
| Number of cooking zones and/or areas | Four cooking zones | ||
| Heating technology (induction cooking zones and cooking areas, radiant cooking zones, solid plates) | Radiant cooking zones | ||
| For circular cooking zones or area: diameter of useful surface area per electric heated cooking zone, rounded to the nearest 5 mm | ∅ | Left front zone: 19.5 cmLeft rear zone: 16Right rear zone: 19.5Right front zone: 16 | |
| For non-circular cooking zones or area: Length and width of useful surface area per electric heated cooking zone or area, rounded to the nearest 5 mm | L W | — | cm |
| Energy consumption per cooking zone or area calculated per kg | EC electric cooking | Left front zone: 186.9Wh/kgLeft rear zone: 178.0Right rear zone: 185.1Right front zone: 191.7 | |
| Energy consumption for the hob calculated per kg | EC electric hob | 185.4 | Wh/kg |
| Standby/off power | Standby model | 0.86 | W |

SABA is a German brand born in 1923 in the heart of the black forest.
Pioneers in electrical equipment, it continues its search for quality by offering smart products that will accompany you on a daily life.
This product has been manufactured and sold under the responsibility of CONFORAMA FRANCE S.A..
SABA, and the SABA logo are trademarks used under license by CONFORAMA FRANCE S.A. – further information at www.saba-brand.com.
All other products, services, companies, trademarks, trade or product names and logos referenced herein are the property of their respective owners.

- TABLE OF CONTENTS
- Safety warning
- Installation
- Unpacking
- IMPORTANT:
- WARNING: THIS APPLICANCE MUST BE EARTHED.
- Installation steps
- Leveling Your Appliance
- Fitting the safety chain and hook
- Electrical connection
- DANGER:
- Connecting the power cable
- NOTE:
- For equipment with a cooling fan
- Final check
- Precautions before use
- Product introduction
- Accessories
- Accessories included
- Points for attention in use
- Instructions for the oven
- Tips for baking
- Function is introduced
- How to operate the top oven
- Turning on the oven
- Turning off the grill oven
- WARNING:
- Switching on the grill oven
- Cooking guide for top oven
- How to operate the main oven
- Switching off the main oven
- Baking Tips
- Display screen use
- Setting the clock
- NOTES:
- Cooking duration setting
- Cooking end time setting
- Reminder setting
- Adjusting the buzzer volume
- Stopping the buzzer
- Canceling cooking
- Hob introduce
- On the hob anywhere
- Safety requirements for deep fat frying
- Clean and maintenance
- Cleaning the outside of the oven
- Removing the door for easier cleaning
- Oven Lamp Replacement
- Trouble shooting
- Correct disposal of this product
Brand : SABA
Model : DFV606023BK
Category : Cooker