
Vinsider 79 Duo - Wine cellar Klarstein - Free user manual and instructions
Find the device manual for free Vinsider 79 Duo Klarstein in PDF.

| Product type | Wine cooler |
| Brand | Klarstein |
| Model | Vinsider 79 Duo |
| Capacity | 79 bottles (75 cl standard) |
| Dimensions (H x W x D) | 1230 x 592 x 557 mm |
| Power supply | 220-240 V ~ 50/60 Hz |
| Energy class | G |
| Annual energy consumption | 156 kWh/year |
| Adjustable temperature | 5 °C to 22 °C (40-72 °F) |
| Temperature zones | 2 independent zones |
| Door type | Glass, reversible (right or left opening) |
| Interior lighting | LED, switchable |
| Defrost | Automatic |
| Door alarm | Yes, after 60 seconds |
| Anti-vibration system | Yes (silent blocks) |
| UV protection | Yes (treated glass) |
| Refrigerant | R600a (isobutane) |
| Noise level | 38 dB(A) |
| Climate class | SN, N, ST, T |
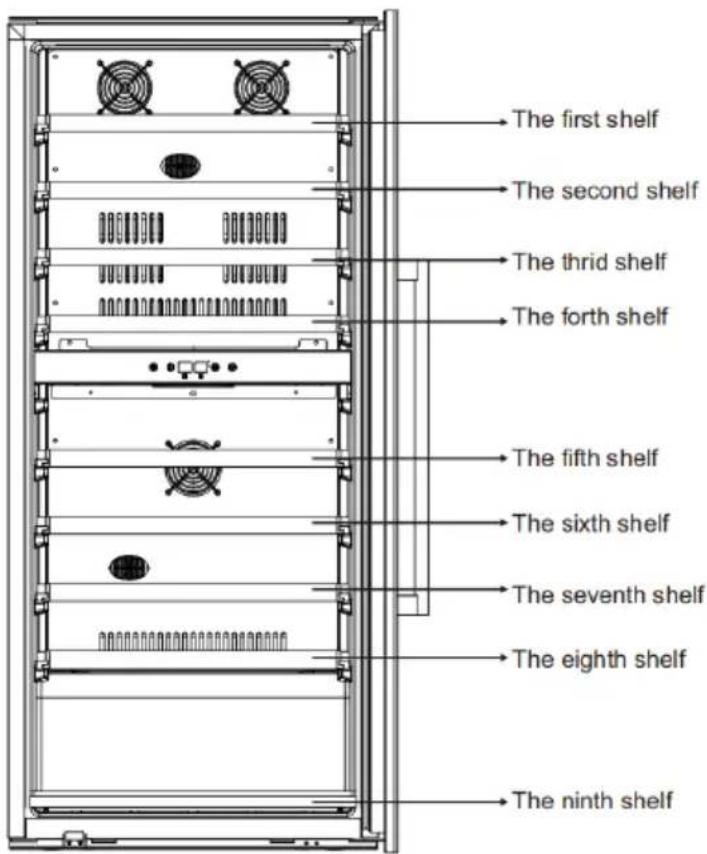
| Number of shelves | 8 shelves + 1 bottom shelf |
| Adjustable feet | Yes |
| Installation | Built-in (integrated kitchen) |
| Handle | Stainless steel, installation required |
Frequently Asked Questions - Vinsider 79 Duo Klarstein
User questions about Vinsider 79 Duo Klarstein
0 question about this device. Answer the ones you know or ask your own.
Ask a new question about this device
Download the instructions for your Wine cellar in PDF format for free! Find your manual Vinsider 79 Duo - Klarstein and take your electronic device back in hand. On this page are published all the documents necessary for the use of your device. Vinsider 79 Duo by Klarstein.
USER MANUAL Vinsider 79 Duo Klarstein
KLARSTEIN
www.klarstein.com

area
| Category | Value | | -------- | ----- | | 1 | 100 | | 2 | 100 | | 3 | 100 | | 4 | 100 | | 5 | 100 | | 6 | 100 | | 7 | 100 | | 8 | 100 | | 9 | 100 | | 10 | 100 | | 11 | 100 | | 12 | 100 | | 13 | 100 | | 14 | 100 | | 15 | 100 | | 16 | 100 | | 17 | 100 | | 18 | 100 | | 19 | 100 | | 20 | 100 | | 21 | 100 | | 22 | 100 | | 23 | 100 | | 24 | 100 | | 25 | 100 | | 26 | 100 | | 27 | 100 | | 28 | 100 | | 29 | 100 | | 30 | 100 | | 31 | 100 | | 32 | 100 | | 33 | 100 | | 34 | 100 | | 35 | 100 | | 36 | 100 | | 37 | 100 | | 38 | 100 | | 39 | 100 | | 40 | 100 | | 41 | 100 | | 42 | 100 | | 43 | 100 | | 44 | 100 | | 45 | 100 | | 46 | 100 | | 47 | 100 | | 48 | 100 | | 49 | 100 | | 50 | 100 | | 51 | 100 | | 52 | 100 | | 53 | 100 | | 54 | 100 | | 55 | 100 | | 56 | 100 | | 57 | 100 | | 58 | 100 | | 59 | 100 | | 60 | 100 | | 61 | 100 | | 62 | 100 | | 63 | 100 | | 64 | 100 | | 65 | 100 | | 66 | 100 | | 67 | 100 | | 68 | 100 | | 69 | 100 | | 70 | 100 | | 71 | 100 | | 72 | 100 | | 73 | 100 | | 74 | 100 | | 75 | 100 | | 76 | 100 | | 77 | 100 | | 78 | 100 | | 79 | 100 | | 80 | 100 | | Note: The actual values are not provided in the code. I have used the label 'Value' as a placeholder for the value detection. You would need to run the code to get the actual values from the code list. Please note that the actual values would be the result of this example. You would need to run the code to get the actual values from the code list. You would need to run the code to get the actual values from the code list. You would need to run the code to get the actual values from the code list. You would need to run the code to get the actual values from the code list. You would need to run the code to get the actual values from the code list. You would need to run the code to get the actual values from the code list. You would need to run the code to get the actual values from you would need to run the code.INHALTSVERZEICHNIS
natural_image
Isometric line drawing of a multi-tiered storage unit with internal flow arrows (no text or symbols)natural_image
Diagram of a door frame with a wall-mounted bracket and a curved glass panel (no text or symbols)natural_image
Line drawing of two rectangular metal supports with mounting holes (no text or symbols)BEFÜLLUNG
natural_image
Illustration of multiple wine bottles with green and white labels, arranged in a grid (no text or symbols)natural_image
Two green plastic bottles with red caps, connected by a white rectangular block (no text or symbols)natural_image
Three green wine bottles with red caps, arranged in a staggered layout (no text or symbols visible)Model placed on the Union market from 01/05/2024.

EPREL registration number: 2012068
https://eprel.ec.europa.eu/qr/2012068
Supplier: Chal-Tec GmbH (Authorised representative)
Website:
Customer care service:
Name: Customer service
Website: https://www.elektronik-star.de/lnfo/Impressum/
Email: info@electronic-star.de
Phone: +49303001385500
Address:
Wallstraße 16
10179 berlin
Deutschland
Seite 2/2
natural_image
Symbol of a trash bin crossed with a diagonal line, no text or labels presentBerlin Brands Group UK Limited
PO Box 42
272 Kensington High Street
London, W8 6ND
United Kingdom
Dear Customer,
Congratulations on purchasing this device. Please read the following instructions carefully and follow them to prevent possible damages. We assume no liability for damage caused by disregard of the instructions and improper use. Scan the QR code to get access to the latest user manual and more product information.

CONTENTS
Safety Instructions 24
Installation 27
Product Description 30
Operation 31
Loading 33
Troubleshooting 36
Disposal Considerations 40
Manufacturer & Importer (UK) 40
TECHNICAL DATA
| Item number 10046279, | 10046280 |
| Power supply 220-240 V | ~ 50/60 Hz |
SAFETY INSTRUCTIONS
- This appliance is not intended for use by persons (including children) with reduced physical, sensory or mental capabilities, or lack of experience and knowledge, unless they have been given supervision or instruction concerning use of the appliance by a person responsible for their safety.
- Children should be supervised to ensure that they do not play with the appliance.
- This appliance can be used by children aged from 8 years and above and persons with reduced physical, sensory or mental capabilities or lack of experience and knowledge if they have been given supervision or instruction concerning use of the appliance in a safe way and understand the hazards involved. Children shall not play with the appliance. Cleaning and user maintenance shall not be made by children without supervision.
- If the supply cord is damaged, it must be replaced by the manufacturer, its service agent or similarly qualified persons in order to avoid a hazard.
- To avoid a hazard due to instability of the appliance, it must be fixed in accordance with the instructions.
- When positioning the appliance, ensure the supply cord is not trapped or damaged.
- Do not locate multiple portable socket-outlets or portable power supplies at the rear of the appliance.
- Keep ventilation openings, in the appliance enclosure or in the built-in structure, clear of obstruction.
- Do not use mechanical devices or other means to accelerate the defrosting process, other than those recommended by the manufacturer.
- Do not damage the refrigerant circuit.
- Do not use electrical appliances inside the drink storage compartments of the appliance, unless they are of the type recommended by the manufacturer.
- Do not store explosive substances such as aerosol cans with a flammable propellant in this appliance.
- This appliance is intended to be used in household and similar applications such as
- staff kitchen areas in shops, offices and other working environments;
- farm houses and by clients in hotels, motels and other residential type environments;
- bed and breakfast type environments;
- catering and similar non-retail applications.
To avoid contamination of drinks, please respect the following instructions:
- Opening the door for long periods can cause a significant increase of the temperature in the compartments of the appliance.
- Clean regularly surfaces that can come in contact with drink and accessible drainage systems.
- Clean water tanks if they have not been used for 48 h; flush the water system connected to a water supply if water has not been drawn for 5 days.
- If the refrigerating appliance is left empty for long periods, switch off, defrost, clean, dry, and leave the door open to prevent mould developing within the appliance.
Note: This unit contains the refrigerant Isobutane (R600a), a natural gas that has high environmental compatibility, but is flammable. Although it is flammable, it does not damage the ozone layer or increase the greenhouse effect. The use of this refrigerant results in a slightly higher noise level of the unit. In addition to the compressor noise, you can hear the flow of refrigerant. This is unavoidable and has no negative effect on the performance of the device. Be careful during transport to avoid damage to the refrigerant circuit. Refrigerant leaks can irritate the eyes.
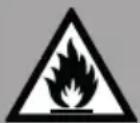
WARNING
When using, during maintenance and when disposing of the appliance, pay attention to the left symbol located on the back or on the compressor of the appliance. This symbol warns you of possible fires. There are flammable substances in the refrigerant lines and in the compressor. Keep the appliance away from sources of fire during use, maintenance and disposal.
Special notes on correct use
- This device is intended exclusively for the storage of wine.
- This appliance is not intended for use as a built-in appliance unless explicitly stated in the instructions.
• This appliance is not suitable for freezing food. - The racks were pre-set to allow the most efficient use of energy.
Note: It is recommended to set the temperature to 12 °C . If the temperature is set too high, the wine may spoil. If the temperature is set too low, the power consumption could increase.
Special notes on the shelves
- The shelves have been pre-set to allow the most efficient use of energy.
- Only use the shelves provided by the manufacturer.
- Never block the holes in the shelves or use any other types of shelves that have not been approved by the manufacturer, which may cause poor cooling or increase energy consumption.
- We recommend that you use the shelves as shown so that the energy is used as efficiently as possible.
Notes on ambient temperature
Install this unit in a location where the ambient temperature corresponds to the climate class indicated on the unit's rating plate.
| SN | Extended temperate | This cooling unit is intended for use at ambient temperatures of 10-32 °C. |
| N | Temperate | This cooling unit is intended for use at ambient temperatures of 16-32 °C. |
| ST | Subtropical | This cooling unit is intended for use at ambient temperatures of 16-38 °C. |
| T | Tropical | This cooling unit is intended for use at ambient temperatures of 16-43 °C. |
The ambient temperature influences the internal temperature of the wine refrigerator. For optimal operation of the wine refrigerator, we recommend an ambient temperature of 10 °C to 23 °C .
Before Installation (Built-in)
- Remove all exterior and interior packing.
- Before connecting the Wine Cooler to the power source, let it stand upright for approximately 2 hours. This will reduce the possibility of a malfunction in the cooling system caused by handling during transportation.
- Clean the interior surface with lukewarm water using a soft cloth.
- The door on this appliance can be opened from either the left or the right side. The unit is delivered with the door opening on the left side.
Installation
- This device is only designed to be incorporated into fitted kitchen units.
- The appliance should be positioned in a well-ventilated, dry room.
- Place your Wine Cooler on a position that is strong enough to support it when it is fully loaded. To level your Wine Cooler, adjust the front leveling legs at the bottom of the Wine Cooler.
- Locate the Wine Cooler away from direct sunlight and sources of heat (stove, heater, radiator, etc.). Direct sunlight may affect the acrylic coating and heat sources may increase electrical consumption. Extreme cold ambient temperatures may also cause the unit not to perform properly.
- Plug the Wine Cooler into an exclusive, easily accessible plug socket. Any questions concerning power and/ or earthing should be directed towards a qualified electrician or an authorized products service centre.
- To prevent the appliance from heating up, ensure that an adequate ventilation gap is retained and install a suitable thermal insulation panel. An adequate flow of air to and from the cooling system must be ensured.
- The appliance must be installed to all electrical, plumbing, water and drain connections in
natural_image
Isometric line drawing of a multi-tiered storage unit with internal flow arrows (no text or symbols)Built-in Cabinet Instructions
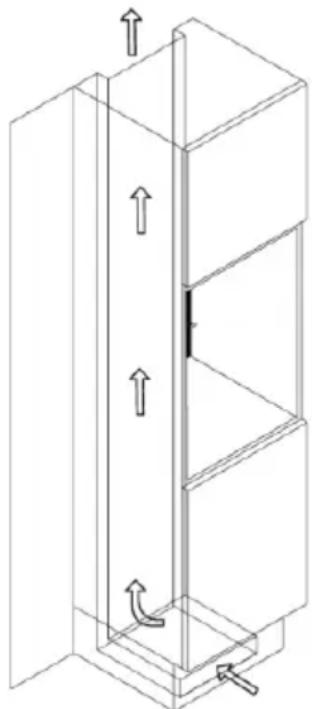
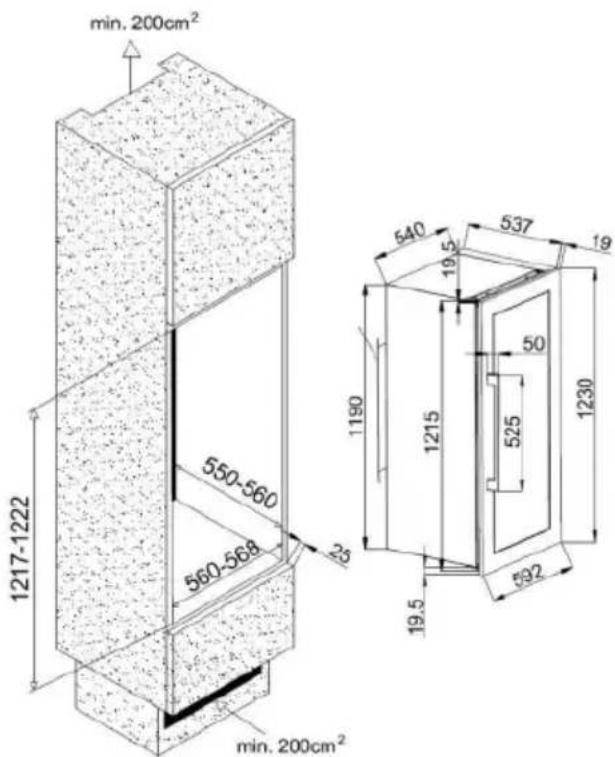
The wine cooler door seals the installed unit almost completely, so an air vent must be provided in the base of the housing. Warmed air must be conducted via the ventilation shaft to the rear wall of the housing and then expelled upwards. The ventilation channels should measure at least 200 square centimetres in cross-section.
Handle installation
Your appliance is equipped with a stainless steel handle. To install it, simply screw it onto the door with the screws provided, following the diagram below. Please be noted that you need to remove the magnetic seal before screwing the handle. Once the handle is properly tightened, please reposition the gasket gently. Make sure the seal allows the cellar to be completely sealed.
Attention: Do not overtighten the screws.
natural_image
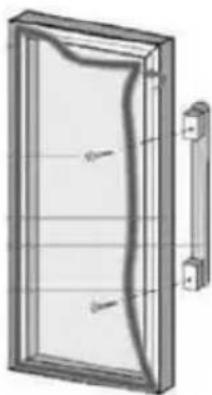
Diagram of a door frame with a curved internal structure and a wall-mounted bracket (no text or symbols)Reversing the door
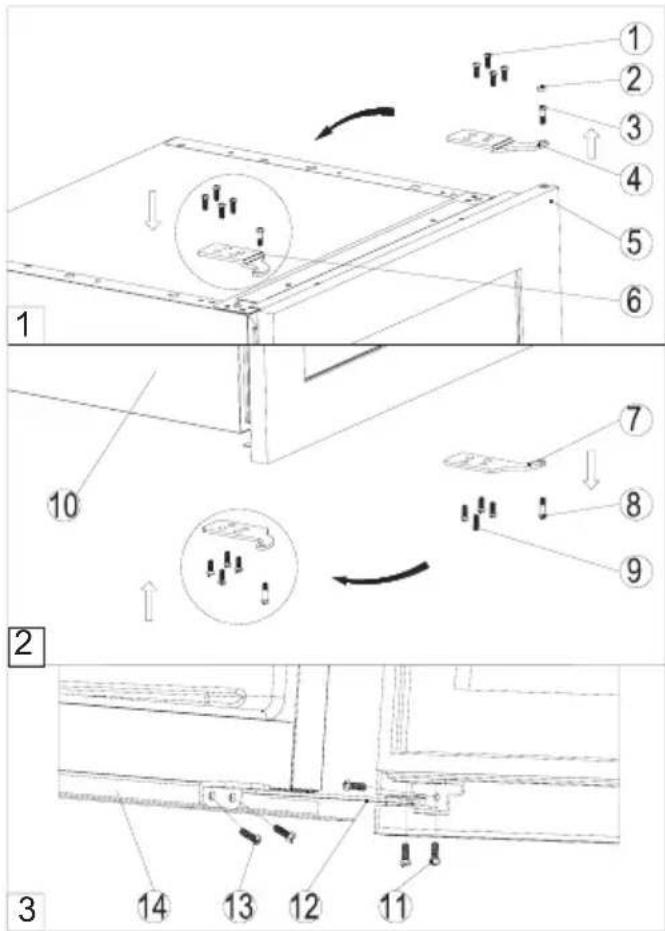
1 Screws
2 Decoration plug
3 Top hinge pin
4 Right top hinge plate
5 Glass door
6 Left top hinge plate
7 Lower hinge plate
8 Lower hinge pin
9 Screws
10 Cabinet
11 Screws
12 Lower hinge plate
13 Screws
14 Lower part of the cabinet
IMPORTANT: all parts removed must be saved to do the reinstallation of door
- Close the glass door, and remove the deco- ration plug 2. Unscrew the top hinge pin 3 and lower hinge pin 8. Be careful to support the glass door with hands to prevent it drop- ping after removing the pins. (Figure 1&2).
- Pull down to remove the glass door and place it on a padded surface to prevent scratching it.
- Remove the right top hinge plate 4 by un-screwing the four screws 1 and get the left top hinge plate 6 from the plastic bag that includes the instruction manual then install it at the designated position on the opposite side. (Figure 1)
- Remove the lower hinge plate 7 by unscrewing the four screws 9. Then turn it around and refit it on the opposite side. (Figure 2)
- Turn around the glass door 180° and refit the hinge pin 3&8 through the top hinge plate 6 and lower hinge plate 7 into the door. Make sure that the spacers which the hinge pins sit on are correctly positioned.
- Leveling the door by adjusting the screws that are used to fix the top hinge plate and lower hinge plate.
PRODUCT DESCRIPTION
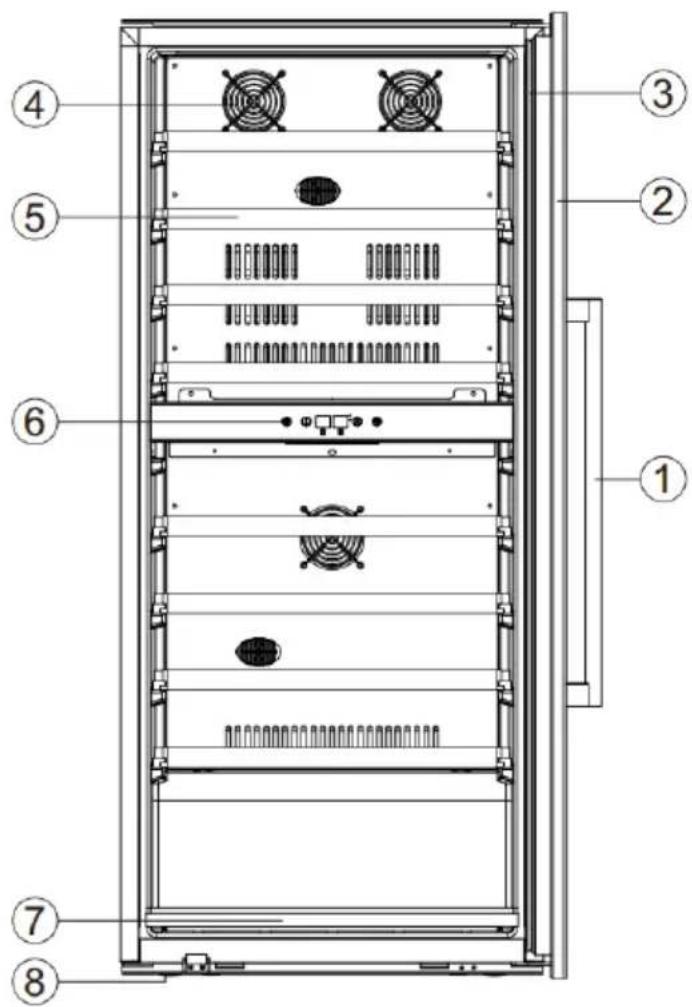
1 Handle
2 Glass door
3 Gasket
4 Fan mask
5 Shelf
6 Control panel
7 Bottom shelf
8 Feet
OPERATION
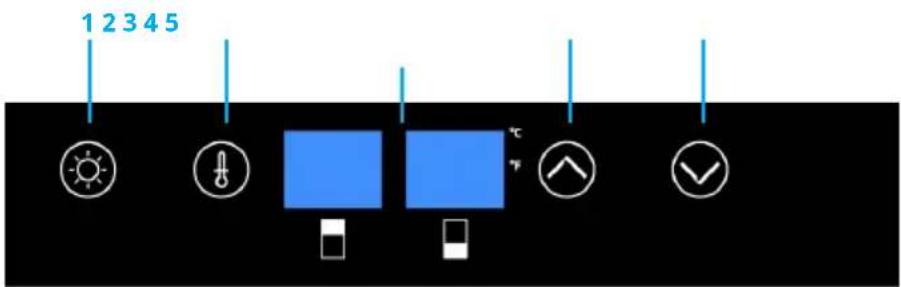
- Light button
- Compartment selection button
- Temperature displays
- Button to increase temperature
- Button to decrease temperature
To switch the wine cellar on or off, press buttons and simultaneously. To change the temperature reading unit, press the light button for 5 seconds. The display will show the selected temperature unit (°C or °F).
It is possible to adjust the temperature degree by degree. The temperature can be adjusted with the keys or to the right of the temperature display.
The first step is to select the desired compartment by pressing the Ⓐ button. The temperature range of this cellar is between 5 °C and 22 °C (40-72 °F) in each zone. To turn on or off the indoor light, press the Ⓐ button. The light (LED) is suitable for storing wine. However, it is advisable to turn off the light in normal use.
IMPORTANT: The temperature selected for the upper compartment must always be lower than the temperature selected for lower compartment (2-compartment model).
When the surrounding temperature is 25 °C and the wine cooler has no bottle loaded, it will take around 30 minutes to increase the wine cooler's temperature from 5 °C to 12 °C. Under the same circumstance, it will take around one hour to decrease the wine cooler's temperature from 12 °C to 5 °C. The less the temperature span is, the less time it will take. The set temperature of the upper zone should be lower than the set temperature of the lower zone.
Door alarm
An audible alarm will sound and the display screens will start flashing if the door is closed incorrectly for more than 60 seconds. To switch off the alarm, close the door or press any button on the control panel.
The anti-vibration system
The refrigeration compressor is equipped with special dampers (silent-blocks) and the inner space is insulated from the body by a thick layer of polyurethane foam. These characteristics prevent the transmission of vibration to your wines.
The anti-UV system
Light accelerates the ageing of wine. In our solid door cellars, your wines are naturally protected, on condition, of course, that the door is not opened too often. This glass-door model has been specially treated and filters out harmful ultraviolet rays, thus ensuring your wines are perfectly shielded.
Defrosting
Your appliance is equipped with an automatic defrost cycle. When a cooling cycle finishes, the appliance's refrigerated surfaces are defrosted automatically. The defrost water is channeled into a condensates evaporation tray which is located in the back of the appliance near the compressor. The heat produced by the compressor then evaporates the condensates collected in the tray.
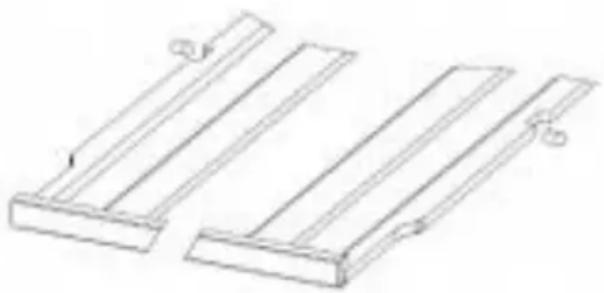
Shelves
- To prevent damage to the door seal, ensure that the door is fully open before pulling out the shelves to add or remove bottles.
- For easier access to the contents of the shelves, slide the shelf out approximately one third of the way. The shelves are, however, fitted with a stop to prevent the bottles falling out.
- To remove or reposition the shelves, move the shelf to the position where the notch of wooden shelf is exactly under the plastic post and lift the wooden shelf. Please ensure these are replaced when the shelf is put back.
natural_image
Line drawing of two rectangular metal supports with mounting holes (no text or symbols)LOADING
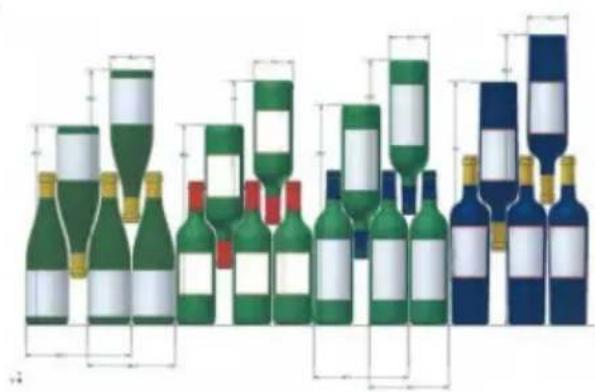
The maximum recommended loading quantities for bottles are given as guidelines and are indicative only; they provide a quick estimate of the size of the appliance (similar to the capacity of a refrigerator expressed in liters).
They correspond to tests conducted with a standard bottle: the standard "75 cl light Bordeaux" bottle - standards apply the geographical origin of each bottle shape (Bordeaux, Burgundy, Provence, etc.) and a type (traditional, heavy, light, flute, etc.), each with its own diameter and height.
In reality and in extreme cases, you could store more bottles by stacking the same type of bottle without using shelves, but a varied cellar comprises a wide variety of bottles and the practical aspect of everyday cellar management limits its capacity. You will therefore probably load the appliance a little less than the recommended maximum.
The following combination of shelves is recommended for energy to be used as efficiently as possible by the refrigeration unit. There are eight shelves and one bottom shelf in total.
Bottletypes
natural_image
Illustration of multiple wine bottles with green and white labels, no text or symbols presentWe see here 4 kinds of 75 cl wine bottles: Burgundy and Bordeaux wine bottles of different dimensions. There are many others of all shapes and sizes. You will note the storage differences depending on bottle heights, diameters and alternating position method.
For example, if a wine cellar is loaded only with Burgundy wine bottles, there will be approximately 30% fewer bottles than the initial quantity calculated for Bordeaux bottles.
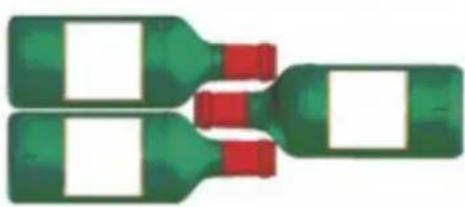
Cris-crossing types
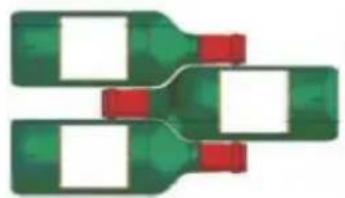
Top-to-bottom neck-to-neck.
natural_image
Two green plastic bottles with red caps, connected by a line (no text or symbols visible)Note the difference in depth!
Top-to-bottom neck between the bottles.
natural_image
Illustration of three green wine bottles with red caps, arranged in a staggered layout (no text or symbols)- Verify that you can shut the door without touching a bottle before closing.
- When loading several bottles at once, it will take more time for the unit to reach the desired temperature.
Announced capacity
The announced capacity is the maximum capacity calculated with a defined number of shelves, which varies according to the model. This standard is calculated with 75cl bottles of the traditional Bordeaux type. Any other type of bottle size and the addition of shelves will considerably reduce the storage
capacity.
For the reference Klarstein Vinsider 79, the maximum capacity has been calculated with 9 shelves. The capacity of your wine cellar is measured according to the EN62552 standard.
The appliance's thermostat is electronic and allows you to set the temperature between 5-22 °C(40-72 °F).
For wine storage, it is recommended that you set your appliance to 12 degrees.
This temperature can be adapted according to the type of wine stored. Setting the temperature above 12 degrees will reduce the energy consumption of the appliance.
Setting the temperature below 12 degrees will increase the energy consumption of the appliance. Some models allow you to set different temperature levels in the same cellar. The appliance ensures that the temperature is maintained as long as it is in operation and used under normal conditions.
The temperature inside the appliance can be influenced by many factors: room temperature, exposure to the sun, number of door openings and the number of bottles stored. Slight changes in temperature are perfectly normal.
Recommended Storage Temperatures
| Vintage Bordeaux - Reds 16-17 °C | |
| Vintage Burgundy - Reds 15-16 °C | |
| Vintage dry white wines 14-16 °C | |
| Light, fruity, young reds 11-12 °C | |
| Rosés de Provence, early wines 10-12 °C | |
| Dry whites and regional red wines 10-12 °C | |
| Regional white wines 8-10 °C | |
| Champagnes 7-8 °C | |
| Sweet wines 6 °C |
TROUBLESHOOTING
| Problem Possible Cause and Suggested Solution | |
| Wine cellar does not operate. | Not plugged in. |
| The appliance is turned off. | |
| The circuit breaker tripped or the fuse is broken. | |
| Wine cellar is not cold enough. | Check the temperature control setting. |
| External environment may require a higher setting. | |
| The door is opened too often. | |
| The door is not closed completely. | |
| The door gasket does not seal properly. | |
| Turns on and off frequently. | The room temperature is hotter than normal. |
| A large amount of contents has been added to the Wine cellar. | |
| The door is opened too often. | |
| The door is not closed completely. | |
| The temperature control is not set correctly. | |
| The door gasket does not seal properly. | |
| The light does not work. | Not plugged in. |
| The circuit breaker tripped or a blown fuse. | |
| The bulb is out of order. | |
| The light button is “OFF”. | |
| Vibrations. Check to | assure that the Wine cellar is level. |
| The Wine cellar seems to make too much noise. | The rattling noise may come from the flow of the refrigerant, which is normal. |
| As each cycle ends, you may hear gurgling sounds caused by the flow of refrigerant in your Wine cellar. | |
| Contraction and expansion of the inside walls may cause popping and crackling noises. | |
| The Wine cellar is not level. | |
| The door will not close properly. | The Wine cellar is not level. |
| The door was reversed and not properly installed. | |
| The gasket is faulty (magnet or rubber is spoiled). | |
| The shelves are out of position. | |
| Fans do not work anymore | Contact your after-sales service |
| « E1 » to « E9 », «EA» error codes | Temperature probe is failingContact your after-sales service |
| « Lo », « HI » error codes | Cold system error. |
| « EU » error code Co | mmunication error between the display board and power board.Contact your after-sales service. |
| « ET » error code Co | ld system error |
| «EO » error code Yo | ur appliance door is open |
Replacing light
This appliance consists of light-emitting diodes (LEDs). This type of diode cannot be changed by the consumer. The lifetime of these LEDs is normally sufficient for no change to be made. If however, and despite all the care taken during the manufacture of your wine cellar, the LEDs were defective, please contact your after-sales service for any intervention.
Product Information Sheet
COMMISSION DELEGATED REGULATION (EU) 2019/2016 with regard to energy labelling of refrigerating appliances
Supplier's name or trade mark: Klarstein
Supplier's address: Customer service, Wallstraße 16, 10179 berlin, DE
Model identifier: 10046279, 100146280
Type of refrigerating appliance:
| Low-noise appliance: No Design type: built-in | ||
| Wine storage appliance: Yes | Other refrigerating appli-ance: | No |
General product parameters:
| Parameter Value Parameter Value | ||||
| Overall dimensions (millimetre) | Height | 1 230 | Total volume (dm^3 or l) 204 | |
| Width | 592 | |||
| Depth | 557 | |||
| EEI | 171 | Energy efficiency class | G | |
| Airborne acoustical noise emissions (dB(A) re 1 pW) | 38 | Airborne acoustical noise emission class | C | |
| Annual energy consumption (kWh/a) | 156 | Climate class: | extended temperate, temperate | |
| Minimum ambient temperature (°C), for which the refrigerating appliance is suitable | 10 | Maximum ambient temperature (°C), for which the refrigerating appliance is suitable | 32 | |
| Winter setting | No | |||
Compartment Parameters:
| Compartment type | Compartment parameters and values | ||||
| Compartment Volume (dm3 or l) | Recommended temperature setting for optimised food storage (oC) These settings shall not contradict the storage conditions set out in Annex IV, Table 3 | Freezing capacity (kg/24h) | Defrosting type (auto-defrost=A, manual defrost=M) | ||
| Pantry No | - | - | - | - | |
| Wine storage Yes 204,012 - M | |||||
| Cellar No - - - - | |||||
| Fresh food No - - - - | |||||
| Chill No - - - - | |||||
| 0-star or ice-making No - - - - | |||||
| 1-star No - - - - | |||||
| 2-star No - - - - | |||||
| 3-star No - - - - | |||||
| 4-star No - - - - | |||||
| 2-star section No - - - - | |||||
| Variable temperature compartment - - - - | |||||
| For wine storage appliances | |||||
| Number of standard wine bottles | 79 | ||||
| Light source parameters: | |||||
| Type of light source | - | ||||
| Energy efficiency class | - | ||||
| Minimum duration of the guarantee offered by the manufacturer: 24 months | |||||
| Additional information: | |||||
| Weblink to the supplier's website, where the information in point 4 of Annex II of Commission Regulation (EU) 2019/2019 is found: https://www.electronic-star.com/ | |||||
Model placed on the Union market from 01/05/2024.

EPREL registration number: 2012068
Supplier: Chal-Tec GmbH (Authorised representative)
Customer care service:
Name: Customer service
Email: info@electronic-star.de
Address:
Wallstraße 16
10179 berlin
Germany
https://eprel.ec.europa.eu/qr/2012068
Website:
Website: https://www.elektronik-star.de/Info/Impressum/
Phone: +49303001385500
DISPOSAL CONSIDERATIONS
natural_image
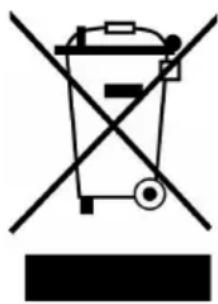
Symbol of a trash bin crossed out by a diagonal line, with no text or labels present.If there is a legal regulation for the disposal of electrical and electronic devices in your country, this symbol on the product or on the packaging indicates that this product must not be disposed of with household waste. Instead, it must be taken to a collection point for the recycling of electrical and electronic equipment. By disposing of it in accordance with the rules, you are protecting the environment and the health of your fellow human beings from negative consequences. For information about the recycling and disposal of this product, please contact your local authority or your household waste disposal service.
MANUFACTURER & IMPORTER (UK)
Manufacturer:
Chal-Tec GmbH, Wallstrasse 16, 10179 Berlin, Germany.
Importer for Great Britain:
Berlin Brands Group UK Limited
PO Box 42
272 Kensington High Street
London, W8 6ND
United Kingdom
Cher client, chère cliente,
SOMMAIRE
natural_image
Diagram of a door frame with a wall-mounted bracket and a curved glass panel (no text or symbols)natural_image
Line drawing of two rectangular metal supports with mounting holes (no text or symbols)REMLISSAGE
natural_image
Illustration of multiple wine bottles with green and white labels, arranged in a grid (no text or symbols)natural_image
Two green plastic bottles with red caps, connected by a white rectangular box (no text or symbols visible)natural_image
Three green wine bottles with red caps, arranged in a staggered pattern (no text or symbols visible)natural_image
Symbol of a trash bin with crossed x and y lines, no text or numbers presentBerlin Brands Group UK Limited
PO Box 42
272 Kensington High Street
London, W8 6ND
United Kingdom
Gentile cliente,
INDICE
natural_image
Isometric line drawing of a multi-tiered storage unit with internal flow arrows (no text or symbols)natural_image
Diagram of a door frame with a wall-mounted bracket and a curved glass panel (no text or symbols)natural_image
Line drawing of two rectangular metal supports with mounting holes (no text or symbols)RIEMPIMENTO
natural_image
Illustration of multiple wine bottles with green and white labels, arranged in a grid (no text or symbols)natural_image
Three green plastic bottles with red caps, arranged in a row (no text or symbols visible)natural_image
Three green wine bottles with red caps, arranged in a staggered pattern (no text or symbols visible)natural_image
Symbol of a trash bin crossed with a diagonal line, no text or labels presentPRODUTTORE E IMPORTATORE (UK)
Produttore:
Chal-Tec GmbH, Wallstraße 16, 10179 Berlino, Germania.
Berlin Brands Group UK Limited
PO Box 42
272 Kensington High Street
London, W8 6ND
United Kingdom
Estimado cliente:
ÍNDICE
natural_image
Isometric line drawing of a multi-tiered storage unit with internal flow arrows (no text or symbols)natural_image
Diagram of a door frame with a wall-mounted bracket and internal structure (no text or symbols)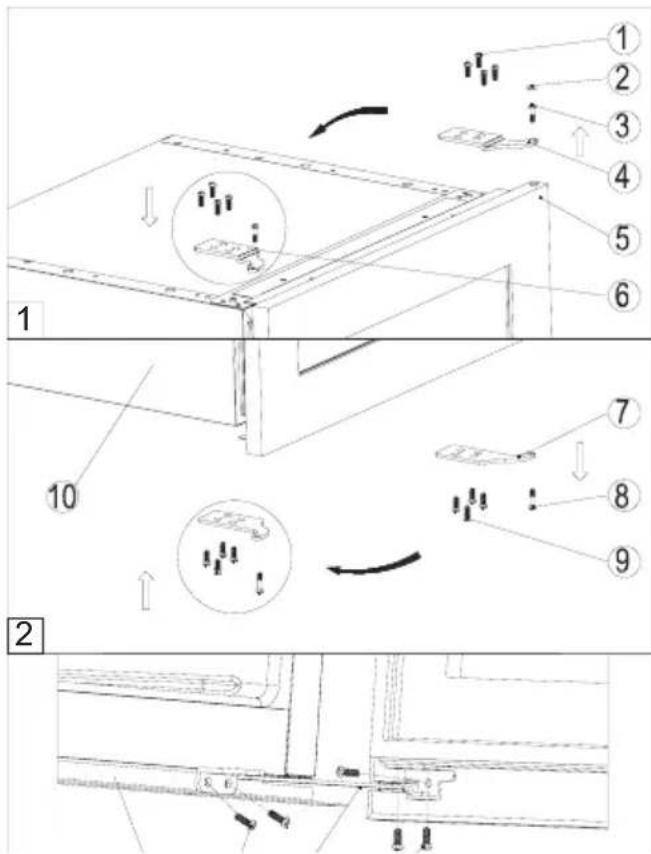
natural_image
Line drawing of two rectangular metal supports with mounting holes (no text or symbols)LLENADO
natural_image
Illustration of multiple wine bottles with green and white labels, arranged in a grid (no text or symbols)natural_image
Three green plastic bottles with red caps, arranged in a row (no text or symbols visible)natural_image
Three green wine bottles with red caps, arranged in a cluster (no text or symbols visible)natural_image
Symbol of a trash bin crossed with a diagonal line, no text or labels presentBerlin Brands Group UK Limited
PO Box 42
272 Kensington High Street
London, W8 6ND
Reino Unido

area
| Category | Value | | -------- | ----- | | 1 | 100 | | 2 | 100 | | 3 | 100 | | 4 | 100 | | 5 | 100 | | 6 | 100 | | 7 | 100 | | 8 | 100 | | 9 | 100 | | 10 | 100 | | 11 | 100 | | 12 | 100 | | 13 | 100 | | 14 | 100 | | 15 | 100 | | 16 | 100 | | 17 | 100 | | 18 | 100 | | 19 | 100 | | 20 | 100 | | 21 | 100 | | 22 | 100 | | 23 | 100 | | 24 | 100 | | 25 | 100 | | 26 | 100 | | 27 | 100 | | 28 | 100 | | 29 | 100 | | 30 | 100 | | 31 | 100 | | 32 | 100 | | 33 | 100 | | 34 | 100 | | 35 | 100 | | 36 | 100 | | 37 | 100 | | 38 | 100 | | 39 | 100 | | 40 | 100 | | 41 | 100 | | 42 | 100 | | 43 | 100 | | 44 | 100 | | 45 | 100 | | 46 | 100 | | 47 | 100 | | 48 | 100 | | 49 | 100 | | 50 | 100 | | 51 | 100 | | 52 | 100 | | 53 | 100 | | 54 | 100 | | 55 | 100 | | 56 | 100 | | 57 | 100 | | 58 | 100 | | 59 | 100 | | 60 | 100 | | 61 | 100 | | 62 | 100 | | 63 | 100 | | 64 | 100 | | 65 | 100 | | 66 | 100 | | 67 | 100 | | 68 | 100 | | 69 | 100 | | 70 | 100 | | 71 | 100 | | 72 | 100 | | 73 | 100 | | 74 | 100 | | 75 | 100 | | 76 | 100 | | 77 | 100 | | 78 | 100 | | 79 | 100 | | 80 | 100 | | Note: The actual values are not provided in the code. I have used the label 'Value' as a placeholder for the value detection. You would need to run the code to get the actual values from the code list. Please note that the actual values would be the result of this example. You would need to run the code to get the actual values from the code list. You would need to run the code to get the actual values from the code list. You would need to run the code to get the actual values from the code list. You would need to run the code to get the actual values from the code list. You would need to run the code to get the actual values from the code list. You would need to run the code to get the actual values from the code list. You would need to run the code to get the actual values from you would need to run the code. You would need to run the code to get the actual values from you would need to run the code.
KLARSTEIN

- INHALTSVERZEICHNIS
- BEFÜLLUNG
- Dear Customer,
- CONTENTS
- SAFETY INSTRUCTIONS
- WARNING
- Special notes on correct use
- Special notes on the shelves
- Notes on ambient temperature
- Before Installation (Built-in)
- Installation
- Built-in Cabinet Instructions
- Handle installation
- Reversing the door
- IMPORTANT: all parts removed must be saved to do the reinstallation of door
- PRODUCT DESCRIPTION
- OPERATION
- Door alarm
- The anti-vibration system
- The anti-UV system
- Defrosting
- Shelves
- LOADING
- Bottletypes
- Cris-crossing types
- Announced capacity
- TROUBLESHOOTING
- Replacing light
- DISPOSAL CONSIDERATIONS
- MANUFACTURER & IMPORTER (UK)
- Manufacturer:
- Importer for Great Britain:
- SOMMAIRE
- REMLISSAGE
- Gentile cliente,
- INDICE
- RIEMPIMENTO
- PRODUTTORE E IMPORTATORE (UK)
- Produttore:
- Estimado cliente:
- ÍNDICE
- LLENADO
- KLARSTEIN
Brand : Klarstein
Model : Vinsider 79 Duo
Category : Wine cellar