Marcia Touch - Food Processor Klarstein - Free user manual and instructions
Find the device manual for free Marcia Touch Klarstein in PDF.

User questions about Marcia Touch Klarstein
0 question about this device. Answer the ones you know or ask your own.
Ask a new question about this device
Download the instructions for your Food Processor in PDF format for free! Find your manual Marcia Touch - Klarstein and take your electronic device back in hand. On this page are published all the documents necessary for the use of your device. Marcia Touch by Klarstein.
USER MANUAL Marcia Touch Klarstein

KLARSTEIN
www.klarstein.com

area
| Category | Value | | -------- | ----- | | 1 | 100 | | 2 | 100 | | 3 | 100 | | 4 | 100 | | 5 | 100 | | 6 | 100 | | 7 | 100 | | 8 | 100 | | 9 | 100 | | 10 | 100 | | 11 | 100 | | 12 | 100 | | 13 | 100 | | 14 | 100 | | 15 | 100 | | 16 | 100 | | 17 | 100 | | 18 | 100 | | 19 | 100 | | 20 | 100 | | 21 | 100 | | 22 | 100 | | 23 | 100 | | 24 | 100 | | 25 | 100 | | 26 | 100 | | 27 | 100 | | 28 | 100 | | 29 | 100 | | 30 | 100 | | 31 | 100 | | 32 | 100 | | 33 | 100 | | 34 | 100 | | 35 | 100 | | 36 | 100 | | 37 | 100 | | 38 | 100 | | 39 | 100 | | 40 | 100 | | 41 | 100 | | 42 | 100 | | 43 | 100 | | 44 | 100 | | 45 | 100 | | 46 | 100 | | 47 | 100 | | 48 | 100 | | 49 | 100 | | 50 | 100 | | 51 | 100 | | 52 | 100 | | 53 | 100 | | 54 | 100 | | 55 | 100 | | 56 | 100 | | 57 | 100 | | 58 | 100 | | 59 | 100 | | 60 | 100 | | 61 | 100 | | 62 | 100 | | 63 | 100 | | 64 | 100 | | 65 | 100 | | 66 | 100 | | 67 | 100 | | 68 | 100 | | 69 | 100 | | 70 | 100 | | 71 | 100 | | 72 | 100 | | 73 | 100 | | 74 | 100 | | 75 | 100 | | 76 | 100 | | 77 | 100 | | 78 | 100 | | 79 | 100 | | 80 | 100 | | Note: The actual values are not provided in the code. I have used the label 'Value' as a placeholder for the value detection. You would need to run the code to get the actual values from the code list. Please note that the actual values would be the result of this example. You would need to run the code to get the actual values from the code list. You would need to run the code to get the actual values from the code list. You would need to run the code to get the actual values from the code list. You would need to run the code to get the actual values from the code list. You would need to run the code to get the actual values from the code list. You would need to run the code to get the actual values from the code list. You would need to run the code to get the actual values from you would need to run the code.Lieber Kunde, liebe Kundin,
INHALT
natural_image
Line drawings of eight household appliances and objects, including a cup, kettle, refrigerator, and kitchenware (no text or symbols)7. BENUTZUNG
natural_image
Symbol of a trash bin with crossed lines indicating no waste, and a solid black rectangle below (no text or labels)Congratulations on the purchase of your appliance. Please read the following instructions carefully and follow them to prevent potential damage. We accept no liability for damage caused by disregarding the instructions and improper use. Please scan the QR code to access the latest operating instructions and further information about the product.

CONTENTS
- Technical information 27
- Safety instructions 28
- Scope of delivery 30
- Appliance overview 31
- Spare part jug 10047621 35
- Installation 37
- Use 38
- Basic recipes 40
- Cleaning and maintenance 43
- Troubleshooting 44
- Error codes 46
- Disposal Considerations 48
- Manufacturer & Importer (UK) 48
1. TECHNICAL INFORMATION
| Product code 10047620 10047621 | ||
| Name Marcia Touch Black Marcia Touch Jug | ||
| Power supply 220-240 V ~ 50-60 Hz - | ||
| Motor output 400 W - | ||
| Heating output 1200 W - | ||
| Capacity 300-1200 ml 300-1200 ml | ||
| Weight 5.9 kg 421 g | ||
| Dimensions 436x164x365 mm | 215x162x110 mm |
2. SAFETY INSTRUCTIONS
To prevent personal injury or property damage, please adhere strictly to the following safety precautions.
2.1 Electrical Safety
- Ensure the power plug is fully inserted. Incomplete insertion may lead to electric shock or overheating, resulting in a fire hazard.
- Use a proper socket and ensure reliable grounding.
- Do not damage the power cord, plug, or socket. Never:
- Modify, bend, stretch, place in high temperatures, put heavy objects on top, or bundle it.
- Do not insert or unplug the power cord with wet hands to avoid electric shock. To disconnect power, grasp the plug and pull it out without tugging the cord.
- Do not allow the power cord to touch sharp edges or corners.
- If the power cord is damaged, to avoid hazard, it must be replaced by the manufacturer, its service agent, or a similarly qualified person.
- Disconnect the power when not in use to prevent short-circuiting.
2.2 Usage Restrictions
- This product is not designed for use by individuals with physical, sensory, or mental disabilities, or lack of experience and knowledge (including children), unless supervised or instructed.
• Children should be supervised to ensure they do not play with the product. - Do not use the product for purposes other than those described in the manual.
- This product is intended for home use only and should not be used for other purposes.
- Do not attempt to modify, disassemble, or repair the product yourself.
- Do not try to reach in the appliance with your fingers, especially when the appliance is in operation.

CAUTION
Risk of injury! Do not try to clean the blades by hand as the blades are very sharp. Please contact the customer service, if the blades need to be switched!
2.3 Operating environment
- When using this product, place it on a stable surface. Do not operate it on sloped or unstable surfaces or flammable materials (e.g., carpets, towels).
- Keep the product away from the edge of the counter to prevent accidents.
- The product should be kept more than 30 cm away from heat sources.
- This product is only for use at altitudes below 2000 meters.
- This product is only for use in environments with temperatures between 4°C and 40°C.
2.4 During operation
- Do not open the lid during the pulping process.
- Do not move the machine during operation.
- Do not touch the blender jar lid or ventilation valve during operation.
- Do not touch moving parts like blades or motors when the product is powered.
- Do not forcibly remove the pulp collection cup during pulping.
- Do not disconnect the power during automatic cleaning.
- Do not use the product empty or overloaded.

CAUTION
Risk of burns! After pulping or when using the hot air-drying function, do not touch the pulp collection cup, pulp outlet, blender jar, or blender jar lid directly with your hands as they will be hot.
2.5 Safe cleaning practices
- Before disassembling, assembling, replacing parts, or cleaning, disconnect the power.
- When manually cleaning the blender jar, be careful not to cut your hands on the blades.
- Do not immerse the product in water or expose it to water jets.
- Before starting automatic cleaning, ensure the residual water tray is properly placed.
• After cleaning, open the blender jar lid and allow the water to dry out.
2.6 Ingredients and recipe guidelines
- Do not use ingredients with excessive fibers (e.g., mangoes or licorice) as they may clog the pulp spout and damage the machine.
- Remove pits from ingredients before pulping.
- Do not add water to the blender jar when making beverages.
- When making beverages, strictly follow the recipe for adding ingredients.
• After adding ingredients, clean around the blender jar to ensure a proper seal. - When expelling uncrushed ingredients, use the cleaning function from the main interface.
2.7 Component specific precautions
- Do not use non-original pulp collection cups in the base groove.
- It is strictly forbidden to place the pulp collection cup on an open flame or induction cooker.
- Applying external force to the pulp spout is prohibited.
- Do not touch the pulp spout during operation.
2.8 Scheduling and timed operations
- When the room temperature exceeds 30^ , do not set the reservation time for more than 12 hours.
- A slight deviation between the actual alarm time and the scheduled time is normal.
- If power is lost for more than 5 minutes, do not consume the beverage.
2.9 Product disposal and notes on materials
- All parts that come into contact with food are made of food-grade materials, ensuring hygiene and safety.
- When disposing of the product or packaging, hand it over to a qualified recycling department and cut the power cord beforehand.
- Pulping colored ingredients may cause staining.
- Slight sticking of rice inside the blender jar when making rice beverages is normal.
- Operating speeds of all settings have been optimized and do not require user adjustment.
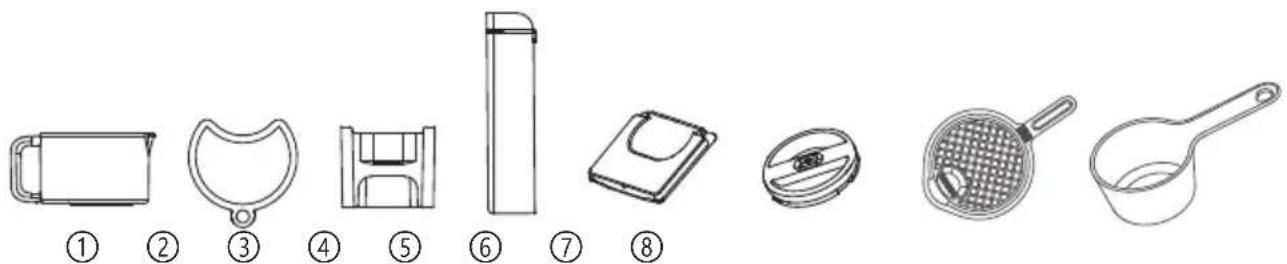
3. SCOPE OF DELIVERY
natural_image
Line drawings of eight household appliances and objects, including a refrigerator, sink, and kitchenware (no text or symbols)| 1 | Milk receiver cup | 5 | Cover plate unit |
| 2 | Milk receiver cup lid | 6 | Blender cup lid |
| 3 | Residual water box | 7 | Mesh filter |
| 4 | Water tank | 8 | Measuring cup |
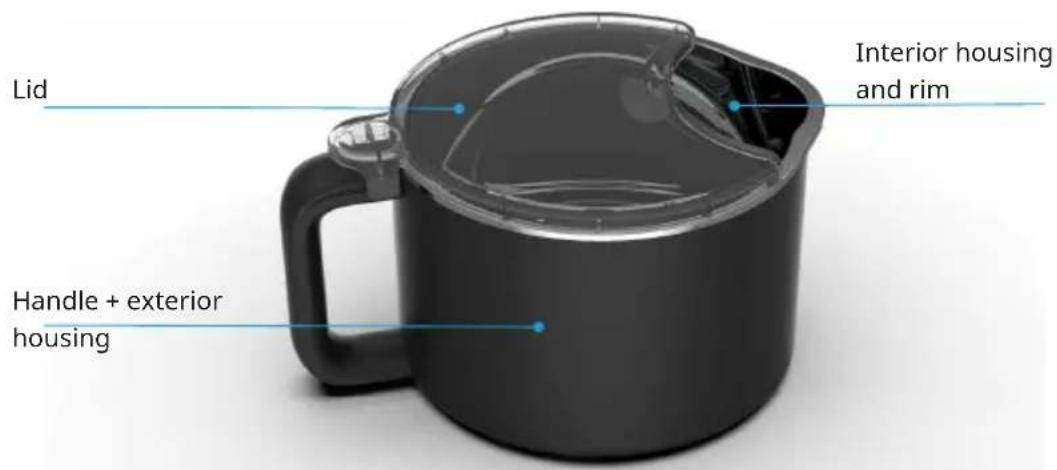
4. APPLIANCE OVERVIEW
4.1 Appliance (10047620)
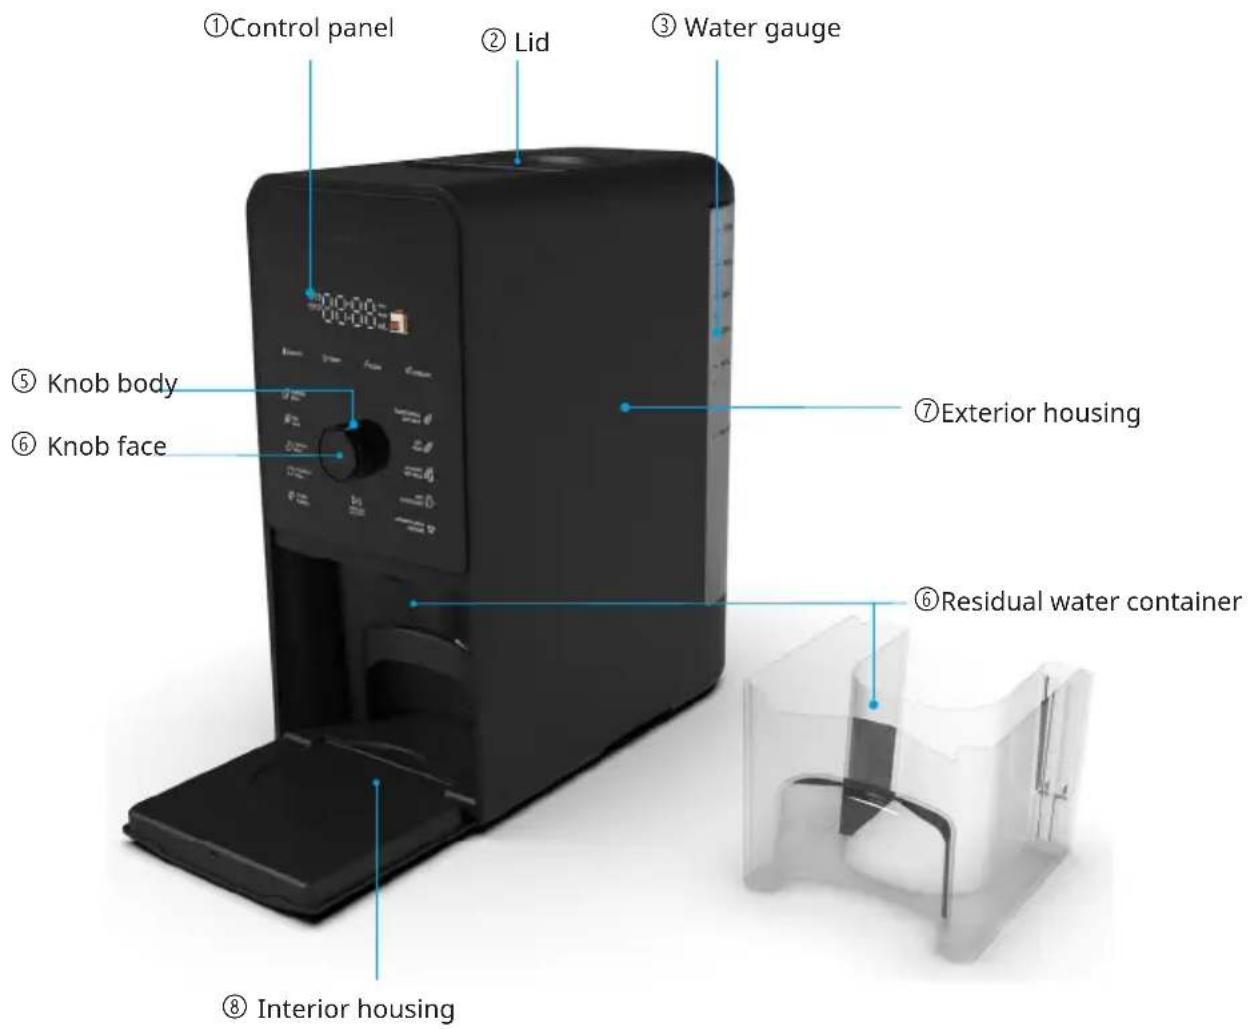
4.2 Control panel

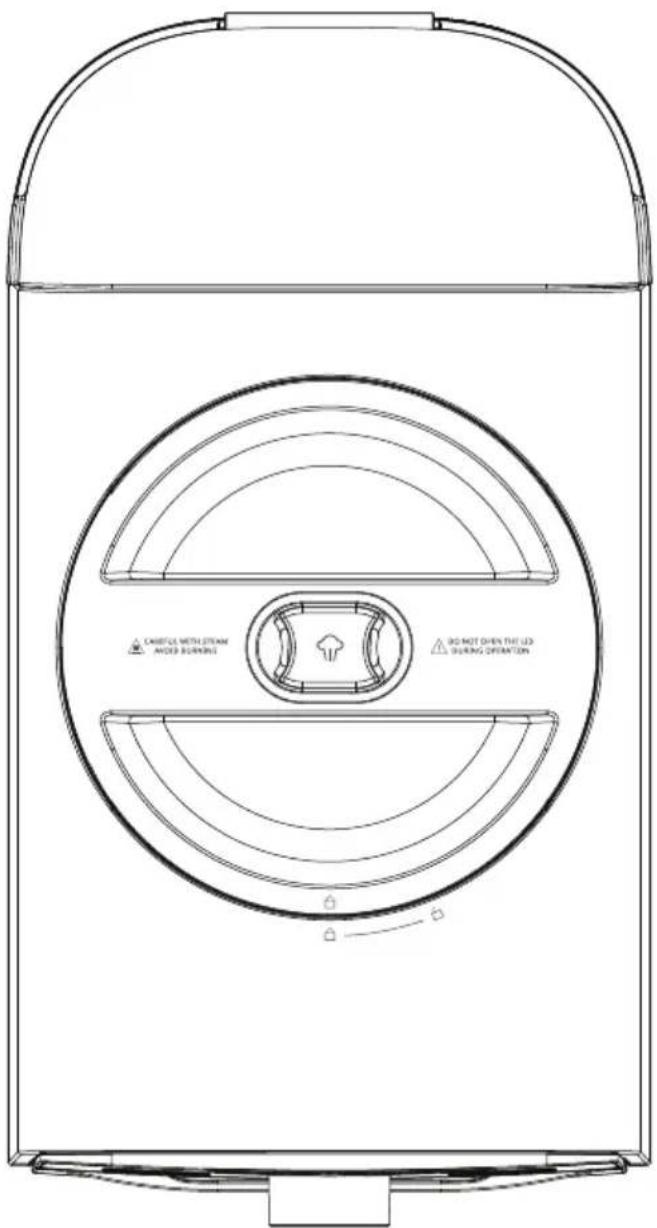
4.3 Steam-valve on backside of the appliance
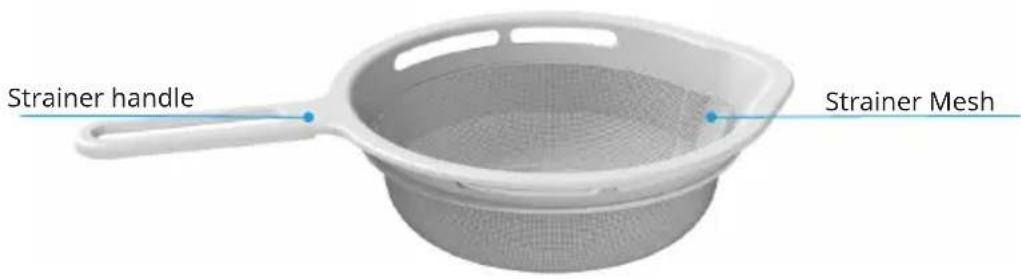
4.4 Strainer (included in the scope of delivery of the main unit)
5. SPARE PART JUG 10047621

215 x 162 x 110 mm
5.1 Material
The body-material is SUS304 Stainless Steel [Food-grade I with heat resistance: 0^ C- 100^ C. The lid consists of food-grade AS Plastic, while the handle consists of PP plastic and can become hot during prolonged exposure.
5.2 Usage
Check for cracks and damages before each use. Position container directly beneath the dispensing nozzle of the soy milk maker. Ensure the handle faces outward for easy access. Beverage will flow automatically into the container. Do not move the container during operation and clean directly after use.
5.3 Cleaning
- Rinse within 30 minutes using water, 1 drop of neutral detergent, and a soft brush or sponge, then rinse 3 times to remove residue.
- Use only food-grade brushes or non-abrasive sponges (no dishwasher, steel wool, or harsh cleaners). For stubborn residue, gently rub with damp melamine foam or use baking soda with a damp sponge, then rinse well.
• Air-dry upside down and store upright with the lid on to prevent dust.
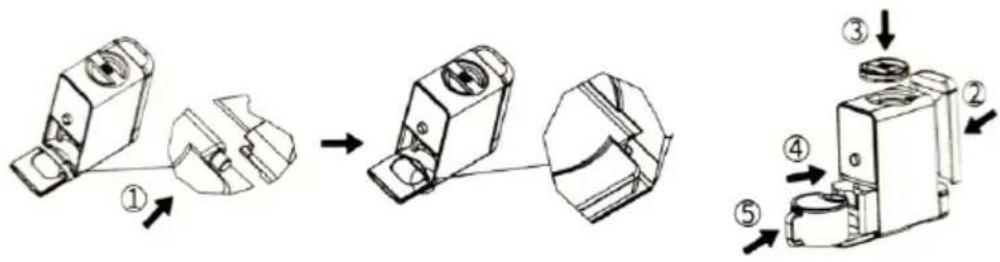
6. INSTALLATION
- Insert the cover plate unit by aligning its two rotating shafts with the openings on the base. Turn the cover plate unit until it locks into the installation position.
- Pour water into the water tank until the level is above the minimum mark (400ml). Replace the water tank lid and secure it properly. Note: Cleaning mark on water tank means the water capacity for self-cleaning; 400 ml mark on water tank means the capacity from "cleaning" mark to "400 ml" mark.
- Install the blender cup lid in the specified order as indicated (turn clockwise until it aligns completely).
- Place the residual water box onto the machine.
- After that, place the milk receiver cup and the lid on the machine.
- For the first time use, please press the "Clean" once for a 20 minutes deep cleaning, press the rotary button then will start the cleaning process.
- During the deep cleaning process, some water may be discharged from the steam outlet. This is normal.
7. USE
7.1 Add ingredients and water
Open the blender cup lid, add the ingredients into the blender cup (you can add ingredients according to the quantities specified in the User manual or according to your preference but do not add too much); open the water tank lid and add water to the water tank, ensuring it is above the required water level line for the desired milk volume. Close the blender cup lid and water tank lid, place the residual water box properly, and the milk collection cup with its lid in place.
7.2 Program selection
Turn the rotary button to select the desired program. Once selected, the chosen program will blink. Each time you turn the button, the program changes according to the direction of rotation.
7.3 Capacity selection
After selecting the program, you can choose the capacity. Press the "Capacity" button to increase the capacity by 100ml, with options ranging from 300ml to 1200ml. Long press for faster selection.
Note: The capacity selection is not available for "hot chocolate". For hot chocolate please pour the liquids directly into the blender jar and make sure everything less than 600ml.
7.4 Timer selection
If you want to schedule your milk preparation for later, you can press the "Timer" button. Each press increases the time by 15 minutes. Long press for faster selection. You can schedule between 1 to 24 hours. The displayed time indicates the remaining time until the preparation is complete.
Note: In the "Hot chocolate" program the time setting cannot be changed.
7.5 Start milk-making process
- Press the center of the rotary button to start the milk-making process.
- If you wish to cancel, please long press and hold for 2 seconds the rotary button. The process can be cancelled before water enters the blender cup after the machine starts.
Once water enters the blender cup:
- For hot programs, cancelling the program will trigger the cleaning process, during which the ingredients in the blender cup will continue to be blended and discharged. Do not use the liquid discharged at this stage, as the ingredients may not be fully cooked and could be harmful to health.
- For warm and cold programs, after cancelling the program you need to long press the button for 5 seconds to discharge the liquid manually.
7.6 Auto cleaning
After the milk-making process is complete, the machine will automatically enter the cleaning program. At this time, do not remove the residual water box and the water tank, while the milk receiver cup can be removed freely. After cleaning is finished, please dispose of the wastewater in a timely manner.
Note: After completing the milk-making program normally, simply open the lid and let it air dry. There is no need to use the sterilize function every time.
7.7 Steam valve
The valve is pre-installed on the top lid when the machine leaves the factory. It is a necessary component for releasing internal pressure during especially hot programs.

CAUTION
Risk of burns! During the use of the appliance hot steam might be coming out of the steam-valve located at the back of the appliance. Do not touch the steam-valve and do not try to open the back of the appliance when it is in use.
7.8 Tips
- For the menu, please add ingredients according to the quantities specified in the User manual. Or adjust the amount as needed but do not add too much to avoid overflow, blockage of the milk outlet, or poor blending.
- Do not add sweeteners into blender jar to make cleaning easier.
- Do not use wet beans for the traditional soy milk function.
- Do not add overly hard ingredients (such as ice cubes) to prevent damage to the machine.
• After pulping is complete, please consume as soon as possible to maintain freshness. -
Infants, individuals with renal failure, or those with weak gastrointestinal functions should opt for soy milk of lower concentration or reduce consumption accordingly.
-
BASIC RECIPES
| Function Recipe | Volume Ingredients | Optional | ||
| Almond milk Almond milk | 300 ml | 3/4 Cup of raw/roasted/flaked almonds (about 19g) | After making the milk: maple syrup, sugar, other sweeteners, vanilla extract | |
| 600 ml | 1 and 3/4 Cups of almonds in any form (about 42g) | |||
| 900 ml | 2 and 3/4 Cups of almonds in any form (about 69g) | |||
| 1200 ml | 4 Cups of raw/roasted/flaked almonds (about 95g) | |||
| Oat milk Oat milk | 300 ml 3/4 | Cup of oats (about 14g) | After making the milk: Any sweeteners, vanilla extract | |
| 600 ml 1 and 3/4 Cup of oat (about 35g) | ||||
| 900 ml 2 and 1/4 Cup of oat (about 50g) | ||||
| 1200 ml 3 | Cups of oats (about 68g) | |||
| Cashew milk Cashew milk | 300 ml | 3/4 Cup of raw/roasted cashews (about 20g) | After making the milk: maple syrup, honey, sugar, vanilla extract, salt | |
| 600 ml | 1 and 1/2 Cups of raw/roasted cashews (about 40g) | |||
| 900 ml | 2 and 1/4 Cups of raw/roasted cashews (about 60g) | |||
| 1200 ml | 3 Cups of raw/roasted cashews (about 80g) | |||
| Coconut milk Coconut milk | 300 ml | 2 Cups of flakes/fresh coconut (about 22g) | After making the milk: maple syrup, honey, sugar, vanilla extract | |
| 600 ml | 4 Cups of flakes/fresh coconut (about 44g) | |||
| 900 ml | 6 Cups of flakes/fresh coconut (about 66g) | |||
| 1200 ml | 8 Cups of flakes/fresh coconut (about 88g) | |||
| Traditional soy milk | 300 ml 1/2 | Cup of dry soy (about 15g) | After making the milk: Any sweeteners, vanilla extract | |
| 600 ml 1 Cup of dry soy (about 30g) | ||||
| 900 ml 1 and 1/2 Cup of soy (about 47g) | ||||
| 1200 ml 2 and 1/2 Cup of soy (about 73g) | ||||
| Soy milk Soy milk | 300 ml 3/4 | Cup of dry soy (about 20g) | After making the milk: Any sweeteners, vanilla extract | |
| 600 ml 1 and 1/2 Cup of soy (about 47g) | ||||
| 900 ml 2 and 1/4 Cup of soy (about 69g) | ||||
| 1200 ml 3 | Cups of dry soy (about 87g) | |||
| Almond-Soy milk | Almond-Soy milk | 300 ml | 1/2 Cup of dry soy (about 16g) and 1/4 Cup of almonds (about 6 almonds=4g) | After making the milk: maple syrup, honey, sugar, vanilla extract |
| 600 ml | 1 Cup of dry soy (about 32g) and 1/4 Cup of almonds (about 12g) | |||
| 900 ml | 1 and 1/2 Cup of dry soy (about 47g) and 1/2 Cup of almonds (about 19g) | |||
| 1200 ml | 2 Cup of dry soy (about 64g) and 1/2 Cup of almonds (about 25g) | |||
| Hot chocolate | Hot chocolate 500 ml | 500ml of milk, 12g of unsweetened chocolate powder (2tbsp/càs), 10g of cornstarch (1tbsp/càs), 60g of 70% dark chocolate, after the milk is done: 2 tbsp/càs of maple syrup | cinnamon, fleur de sel (flower of salt), vanilla extract | |
| Light chocolate milk | 300 ml | 300ml of milk, 20g of 70% dark chocolate, 12g of unsweetened chocolate powder (2tbsp/càs) | cinnamon, fleur de sel After: any sweeteners, vanilla | |
| Peanut butter chocolate milk | 500 ml | 500ml of milk, 24g of unsweetened chocolate powder (4tbsp/càs), 3 tbsp of peanut butter, 1tbsp of cinnamon or vanilla extract, after the milk is done: 3 tbsp of maple syrup | fleur de sel (flower of salt) | |
| Function Recipe | Volume Ingredients | Optional | ||
| Other plant based milk | Walnut milk | 300 ml 3/4 | Cup of walnuts | After making the milk: Any sweeteners, vanilla extract |
| 600 ml 1 and 1/2 Cups of walnuts | ||||
| 900 ml 2 and 3/4 Cups of walnuts | ||||
| 1200 ml 4 Cups of walnuts | ||||
| Hazelnut milk | 300 ml 3/4 | Cup of raw/roasted hazelnut | After making the milk: Any sweeteners, vanilla extract | |
| 600 ml 1 and 1/2 Cups of hazelnuts | ||||
| 900 ml 2 and 3/4 Cups of hazelnuts | ||||
| 1200 ml 4 Cups of raw/roasted hazelnuts | ||||
| Other plant-sesame milk | Almond-Sesame milk | 300 ml | 3/4 Cup of raw/roasted/flaked almonds (about 16g) and 1/4 Cup of black sesame (about 5g) | After making the milk: maple syrup, honey, sugar, vanilla extract |
| 600 ml | 1 and 1/2 Cups of almonds in any form (about 32g) and 1/2 Cup of black sesame (about 13g) | |||
| 900 ml | 2 and 1/2 Cups of almonds in any form (about 55g) and 3/4 Cup of black sesame (about 25g) | |||
| 1200 ml | 3 Cups of almonds (about 70g) and 1 Cup of sesame (about 38g) | |||
Note: Download the Klarstein app for more recipes:
| iOSAndroid | |
 |  |
9. CLEANING AND MAINTENANCE
9.1 Cleaning accessories
- The 8 accessories (see chapter 3. Scope of delivery) can be removed from the machine and rinsed under a tap. However, do not soak the blender cup lid,
- milk receiver cup, or cover plate unit in water.
- If too much residues cause the nozzle to become clogged, first remove the thick residues from the blender cup and then press the “Clean” program to clean.
- After multiple uses, if you notice that there are residues stuck to the blender cup lid, please use small and soft brush to clean it. We advise do not use too much ingredients to avoid this problem easily.
• After cleaning the machine parts, it is recommended to dry or air dry them before reassembling the machine and storing it in a dry, well-ventilated place.
9.2 Blender cup cleaning
- Press the "Clean" program, touch once for a 20 minutes cleaning; touch twice for 5 minutes cleaning. Press the rotary button to start the cleaning process. Press and hold the rotary button 2 seconds if you want to cancel the current program.
- To sterilize, press the "Sterilize" program and press the rotary button. Keep the lid tightly closed. During the program, press and hold the rotary button for more than 2 seconds to stop it. Do not touch the blender cup to avoid burns.
9.3 Steam valve cleaning
The valve can be removed from the top lid and does not need to be cleaned after every use. However, it is highly recommended cleaning it once a week to prevent any residual liquid from remaining in the crevices for too long, which could cause unpleasant odors.
10. TROUBLESHOOTING
| Problem Potential cause | Solution | |
| The indicator light is off | The power cord has not been plugged in | Plug in the power cord |
| The display board is defective | Contact the customer service | |
| The indicator light is on but the appliance is not working | No funtion program has not been selected | Select the corresponding function program |
| The water tank has not been filled with water or is not attached to the appliance | Fill the water tank with water up to the mark and attach it to the appliance | |
| The temperature or water level sensor is defective | Contact the customer service | |
| The water does not flow into the blender cup | Defective water pump Contact a dealer for repair and maintenance | |
| The filter at the bottom of the water tank is clogged | Remove the filter screen from the bootom of the water tank, clean it and then reinsert it into the water tank | |
| The motor runs without stopping | Water has entered the machine | Contact the customer service |
| Continuos heating The tem | temperature sensor is not working normal | Contact the customer service |
| The buttons are unresponsive | The power interruption is too short for the system to reset | Power of 2 minutes before reusing |
| The display board button is faulty | Contact the customer service | |
| The ingredients are not blending | Too many or too few ingredients | Add ingredients according to the amounts specified in the manual's recipes |
| Appliance malfunction Contact the customer service | ||
| Incorrect function program selected | Correctly select the function program | |
| Overflow Incorrect function | program selected | Correctly select the function program |
| Too many ingredients or ingredients too large | Add ingredients according to the amounts specified in the manual's recipes | |
| Appliance malfunction Contact the customer service | ||
| Pot burnt The blender cup | was not cleaned properly | Clean the blender cup properly before use |
| Too many ingredients added Add ingredients according to the amounts specified in the manual's recipes | ||
| Beverage processing time is too long, everything else is normal | Water temperature too low Use room temperature water | |
| Incorrect function program selected | Correctly select the function program | |
| Wastewater is not draining into the residual water tray | Residual water box or milk receiver cup are not properly positioned | Position the residual water box or milk receiver cup correctly |
| Nozzle malfunction Contact the customer service | ||
| Unusual whistling sound | Machine breaking ingredients Occasional whistling sounds are normal | |
| Unexpected power cut Power cut less than 2 minutes Upon re-powering, milk production can automatically resume | ||
11. ERROR CODES
| Code Description | Potential solution | |
| E00 Overflow | signal anomaly Dry the area around the blender cup mouth and the lid | |
| E01 Zero-cross signal anomaly | Contact the customer service | |
| OPEN Blender | cup lid not tightened properly | Tighten the blender cup lid |
| CUP Milk receiver | cup not positioned correctly | Position the Milk receiver cup correctly as per the instructions |
| Residual water box not positioned correctly or the residual water box is full | Position the residual water box correctly as per the instructions or empty the residual water from the box | |
| E03 Input voltage | too high (greater than 264V) | Check if the voltage exceeds 264V/use a voltage stabilizer |
| E04 Input voltage | too low (less than 176V) | Check if the voltage is below 176V/use a voltage stabilizer |
| E05 NTC short circuit | contact the customer service | |
| E06 NTC open circuit | contact the customer service | |
| E07 Serial port communication failure | Contact the customer service | |
| E08 Motor signal anomaly | too many ingredients, add ingredients according to the recipe in the manua, if problem persists, contact the customer service | |
| E10 No current during heating | too many ingredients, add ingredients according to the recipe in the manua, if problem persists, contact the customer service | |
| E12 Standby | current anomaly Contact the customer service | |
| E13 Heating | timeout Contact the customer service | |
| E25 Nozzle signal anomaly Power off and clean the nozzle, or contact the customer service | ||
| E28 The water tank is empty Add water to the water tank until it reaches the water level line/clean the bottom filter screen of the water tank | ||
| E38 Too many ingredients Too many ingredients, add ingredients according to the recipe guide in the manual | ||
Note: If the problem cannot be solved, do not disassemble the machine yourself, please contact customer service. I If the content above does not match the actual product due to model or parts changes, please refer to the actual product. We apologize for not notifying separately and appreciate your understanding.
12. DISPOSAL CONSIDERATIONS

natural_image
Symbol of a trash bin with crossed lines indicating no waste, and a solid black rectangle below (no text or labels)If there is a legal regulation for the disposal of electrical and electronic devices in your country, this symbol on the product or on the packaging indicates that this product must not be disposed of with household waste. Instead, it must be taken to a collection point for the recycling of electrical and electronic equipment. By disposing of it in accordance with the rules, you are protecting the environment and the health of your fellow human beings from negative consequences. For information about the recycling and disposal of this product, please contact your local authority or your household waste disposal service.
13. MANUFACTURER & IMPORTER (UK)
Chal-Tec GmbH, Mühlenstrasse 25, 10243 Berlin, Germany.
Contact: info@electronic-star.de
For authorized service and spare parts, please visit: https://www.klarstein.co.uk/Original-Spare-Parts-Repair-Hub/ or contact:
info@go-bbg.com
Chal-Tec GmbH
Mühlenstraße 25
10243 Berlin
Deutschland
Estimado cliente:
ÍNDICE
natural_image
Line drawings of eight household appliances and objects, including a refrigerator, kettle, sink, and kitchenware (no text or symbols)7. USO
natural_image
Symbol of a trash bin with crossed lines indicating no waste or restriction, and a solid black rectangle below (no text or labels)SOMMAIRE
natural_image
Line drawings of eight household appliances and objects, including a kettle, cup, refrigerator, and kitchenware (no text or symbols)7. UTILISATION
natural_image
Symbol of a trash bin with crossed lines indicating no waste, and a solid black rectangle below (no text or labels)INDICE
7. UTILIZZO
natural_image
Symbol of a trash bin with crossed lines indicating no waste, and a solid rectangle below (no text or labels)area
| Category | Value | | -------- | ----- | | 1 | 100 | | 2 | 100 | | 3 | 100 | | 4 | 100 | | 5 | 100 | | 6 | 100 | | 7 | 100 | | 8 | 100 | | 9 | 100 | | 10 | 100 | | 11 | 100 | | 12 | 100 | | 13 | 100 | | 14 | 100 | | 15 | 100 | | 16 | 100 | | 17 | 100 | | 18 | 100 | | 19 | 100 | | 20 | 100 | | 21 | 100 | | 22 | 100 | | 23 | 100 | | 24 | 100 | | 25 | 100 | | 26 | 100 | | 27 | 100 | | 28 | 100 | | 29 | 100 | | 30 | 100 | | 31 | 100 | | 32 | 100 | | 33 | 100 | | 34 | 100 | | 35 | 100 | | 36 | 100 | | 37 | 100 | | 38 | 100 | | 39 | 100 | | 40 | 100 | | 41 | 100 | | 42 | 100 | | 43 | 100 | | 44 | 100 | | 45 | 100 | | 46 | 100 | | 47 | 100 | | 48 | 100 | | 49 | 100 | | 50 | 100 | | 51 | 100 | | 52 | 100 | | 53 | 100 | | 54 | 100 | | 55 | 100 | | 56 | 100 | | 57 | 100 | | 58 | 100 | | 59 | 100 | | 60 | 100 | | 61 | 100 | | 62 | 100 | | 63 | 100 | | 64 | 100 | | 65 | 100 | | 66 | 100 | | 67 | 100 | | 68 | 100 | | 69 | 100 | | 70 | 100 | | 71 | 100 | | 72 | 100 | | 73 | 100 | | 74 | 100 | | 75 | 100 | | 76 | 100 | | 77 | 100 | | 78 | 100 | | 79 | 100 | | 80 | 100 | | Note: The actual values are not provided in the code. I have used the label 'Value' as a placeholder for the value detection. You would need to run the code to get the actual values from the code list. Please note that the actual values would be the result of this example. You would need to run the code to get the actual values from the code list. You would need to run the code to get the actual values from the code list. You would need to run the code to get the actual values from the code list. You would need to run the code to get the actual values from the code list. You would need to run the code to get the actual values from the code list. You would need to run the code to get the actual values from the code list. You would need to run the code to get the actual values from you would need to run the code.