
TW900 - Rolling stool SCHEPPACH - Free user manual and instructions
Find the device manual for free TW900 SCHEPPACH in PDF.

User questions about TW900 SCHEPPACH
0 question about this device. Answer the ones you know or ask your own.
Ask a new question about this device
Download the instructions for your Rolling stool in PDF format for free! Find your manual TW900 - SCHEPPACH and take your electronic device back in hand. On this page are published all the documents necessary for the use of your device. TW900 by SCHEPPACH.
USER MANUAL TW900 SCHEPPACH
natural_image
Line drawing of a multi-wheeled cart with wheels and compartments (no text or symbols)
TW900
| DE | Montage-RollhockerOriginalbedienungsanleitung | 5 |
| GB | Assembly roller stoolTranslation of original instruction manual | 14 |
| FR | Tabouret de montage sur roulettesTraduction des instructions d'origine | 20 |
1
2
Günzburger Straße 69
D-89335 Ichenhausen
Verehrter Kunde,
Homepage: https://www.scheppach.com/de/service
Explanation of the symbols on the device
Symbols are used in this manual to draw your attention to potential hazards. The safety symbols and the accompanying explanations must be fully understood. The warnings themselves will not rectify a hazard and cannot replace proper accident prevention measures.
 | Warning - read the instruction manual to reduce the risk of injury. |
 | ATTENTION: Danger of injury. Do not reach between the castors! |
| ⚠ Attention! | We have marked points in this operating manual that impact your safety with this symbol. |
Table of contents: Page:
- Introduction.... 16
- Device description (Fig. 1 & 7) 16
- Scope of delivery (fig. 2)....16
- Proper use 16
- General safety instructions.... 17
- Residual risks 17
- Technical data.... 17
- Unpacking....18
- Assembly 18
- Start up 18
- Cleaning.... 18
- Storage 19
- Maintenance 19
- Disposal and recycling.... 19
- Troubleshooting 19
1. Introduction
Manufacturer:
Scheppach GmbH
Günzburger Straße 69
D-89335 Ichenhausen
Dear Customer,
We hope your new product brings you much enjoyment and success.
Note:
In accordance with the applicable product liability laws, the manufacturer of this product assumes no liability for damage to the product or caused by the product arising from:
- Improper handling
• Non-compliance with the operating manual,
• Repairs carried out by third parties, unauthorised specialists.
• Installing and replacing non-original spare parts
• Application other than specified.
Note:
Read through the complete text in the operating manual before installing and commissioning the device.
This operating manual should help you to familiarise yourself with your device and to use it for its intended purpose.
The operating manual includes important instructions for safe, proper and economic operation of the device, for avoiding danger, for minimising repair costs and downtimes, and for increasing the reliability and extending the service life of the device.
In addition to the safety instructions in this operating manual, you must also observe the regulations applicable to the operation of the device in your country.
Keep the operating manual at the device, in a plastic sleeve, protected from dirt and moisture. They must be read and carefully observed by all operating personnel before starting the work.
The device may only be used by personnel who have been trained to use it and who have been instructed with respect to the associated hazards.
The required minimum age must be observed.
In addition to the safety instructions in this operating manual and the separate regulations of your country, the generally recognised technical rules relating to the operation of such machines must also be observed.
We accept no liability for accidents or damage that occur due to a failure to observe this manual and the safety instructions.
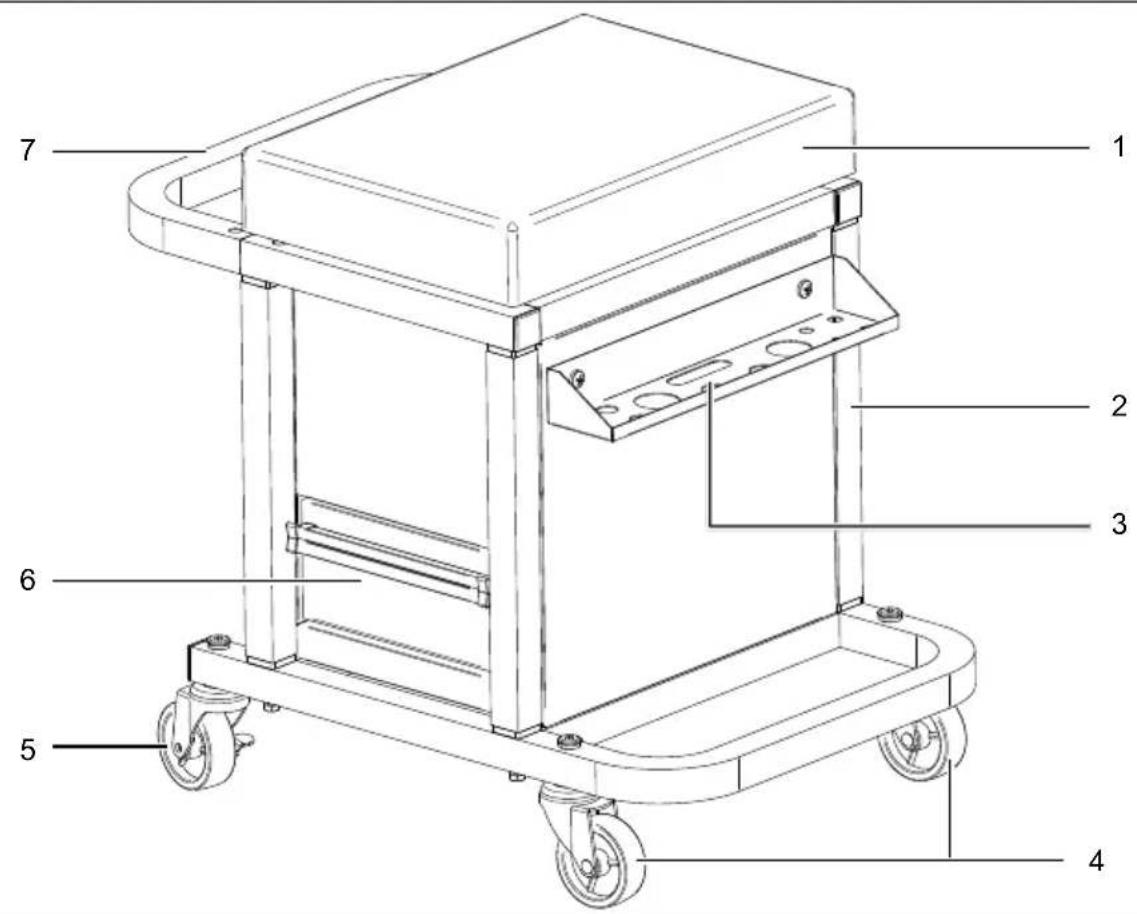
2. Device description (Fig. 1 & 7)
- Seat cushion
- Bodywork
- Tool tray
- Castor
- Castor with brake
- Drawer
- Handle
- Brake
- Storage compartment
- Perforated wall
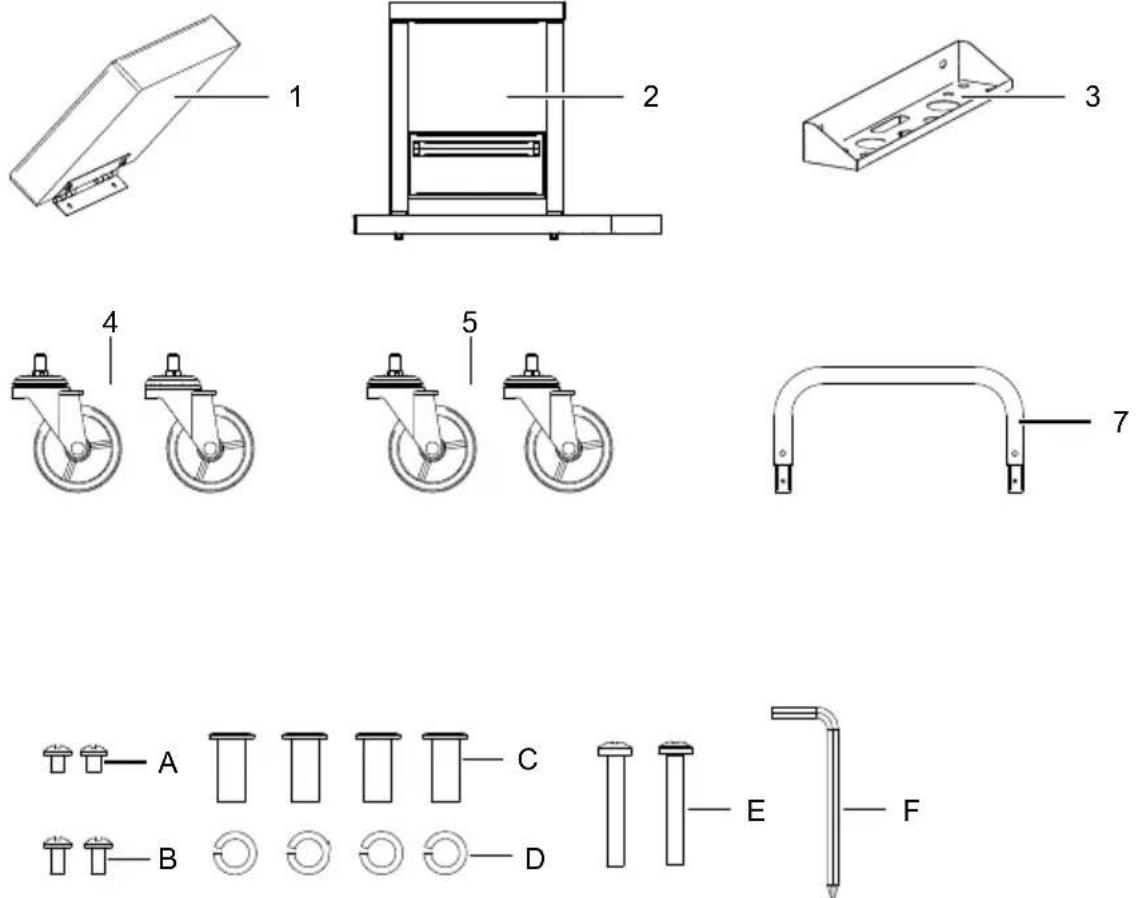
3. Scope of delivery (fig. 2)
| Seat cushion (1) | 1x | ||
| Bodywork (2) | 1x | ||
| Tool tray (3) | 1x | ||
| Castor (4) | |||
| Castor with brake (5) | 2x | ||
| Handle (7) | |||
| Screw M5x8 (A) | 2x | ||
| Screw M6x12 (B) | 2x | ||
| Sleeve nut (C) | 4x | ||
| Spring washer (D) | 4x | ||
| Screw M6x40 (E) | 2x | ||
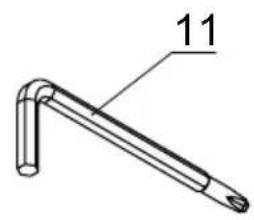
| Allen key (F) | 1x | ||
| Operating manual |
4. Proper use
The assembly roller stool is designed exclusively for working in a seated position at a low working height, and for storing tools with a maximum load of 136 kg (tool + person). Never use the product as a climbing aid or for transporting people.
The product may only be used in the intended manner. Any use beyond this is improper. The user/operator, not the manufacturer, is responsible for damages or injuries of any type resulting from this.
An element of the intended use is also the observance of the safety instructions, as well as the assembly instructions and operating information in the operating manual.
Persons who operate and maintain the product must be familiar with the manual and must be informed about potential dangers.
In addition, the applicable accident prevention regulations must be strictly observed.
Other general occupational health and safety-related rules and regulations must be observed.
The liability of the manufacturer and resulting damages are excluded in the event of modifications of the product.
The product may only be operated with original parts and original accessories from the manufacturer.
The safety, operating and maintenance specifications of the manufacturer, as well as the dimensions specified in the technical data, must be observed.
Please note that our equipment was not designed with the intention of use for commercial or industrial purposes. We assume no guarantee if the device is used in commercial or industrial applications, or for equivalent work.
The manufacturer is not liable for damage caused by an improper use or incorrect operation of this device.
5. General safety instructions
⚠ WARNING - Read all safety information, instructions, illustrations and technical data for this electric tool.
Failure to observe the following instructions can result in serious injuries.
Save all warnings and instructions for future reference.
- Check the product for perfect condition before each use. If damage is found, the product must no longer be used.
- If the product does not function properly or is damaged, have it inspected and repaired immediately by the after-sales service.
- This product is not designed to be operated by persons (including children) with impaired physical, sensory or mental capabilities, or who have a lack of experience and/or knowledge unless they are being supervised by a person who is responsible for their safety or they are receiving instruction about how this product is to be used.
• Children must not be left unattended, to ensure they do not play with the product.
6. Residual risks
The product has been built according to state-of-the-art and the recognised technical safety rules. However, individual residual risks can arise during operation.
• Furthermore, despite all precautions having been met, some non-obvious residual risks may still remain.
- Residual risks can be minimised if the "Safety information" and the "Proper use" together with the operating manual as a whole are observed.
- Do not use the product if it has been overloaded. This may have caused damage that was not immediately visible.
- Never use the product as a climbing aid or for transporting people.
• Work on the product may only be carried out under areas that are secured against falling!
- Only use the product on hard, level surfaces, not on stairs or sloping terrain. Do not roll over objects.
- Do not reach under the product when sitting on it. There is a danger of crushing if you touch the castors when rolling.
- The product is flammable. Keep the product away from open flames (e.g. candles or smouldering cigarettes).
- Be careful when opening/closing the drawers and the seat cushion. Do not jam your hands or fingers.
- Check each screw connection for strength at regular intervals.
- Do not misuse the product for purposes other than those described in these instructions.
- Do not overload the drawers.
- Once the product has been moved to the desired location, use the locking brake to prevent it from rolling away.
7. Technical data
Dimensions assembly roller stool (LxWxH) 530 x 360 x 500 mm
| Dimensions | |
| Drawer (LxWxH) 240 x 170 x 70 mm | |
| max. load assembly roller stool | 136 kg |
| max. load per drawer | 6.5 kg |
| Castors ∅ 62 mm | |
| Weight 10.8 kg | |
Technical changes reserved!
8. Unpacking
- Open the packaging and carefully remove the product.
- Remove the packaging material, as well as the packaging and transport safety devices (if present).
- Check whether the scope of delivery is complete.
- Check the product and accessory parts for transport damage. In the event of complaints the carrier must be informed immediately. Later claims will not be recognised.
- If possible, keep the packaging until the expiry of the warranty period.
- Familiarise yourself with the product by means of the operating manual before using for the first time.
- With accessories as well as wearing parts and spare parts use only original parts. Spare parts can be obtained from your specialist dealer.
- When ordering please provide our article number as well as type and year of manufacture for your product.
⚠ WARNING!
The device and the packaging material are not children's toys! Do not let children play with plastic bags, films or small parts! There is a danger of choking or suffocating!
9. Assembly
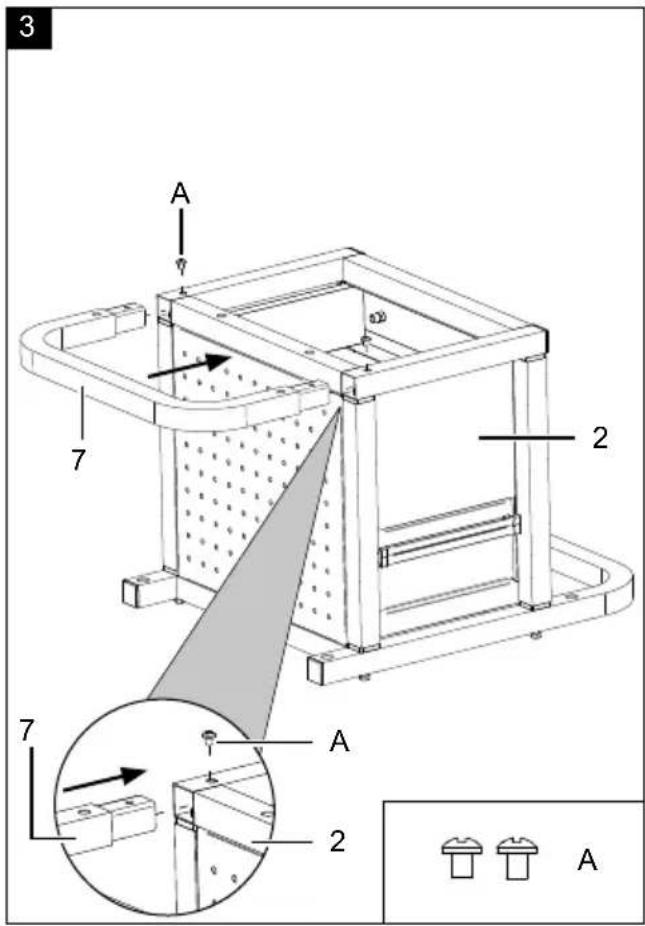
9.1 Fitting the handle (fig. 3)
- Place the bodywork (2) with the underside on the floor.
- Take the handle (7) and insert it with the holes into the recesses provided in the body (2) until the mounting holes line up.
- Fix the handle (7) using the supplied allen key (F) and the M5x8 screws (A).
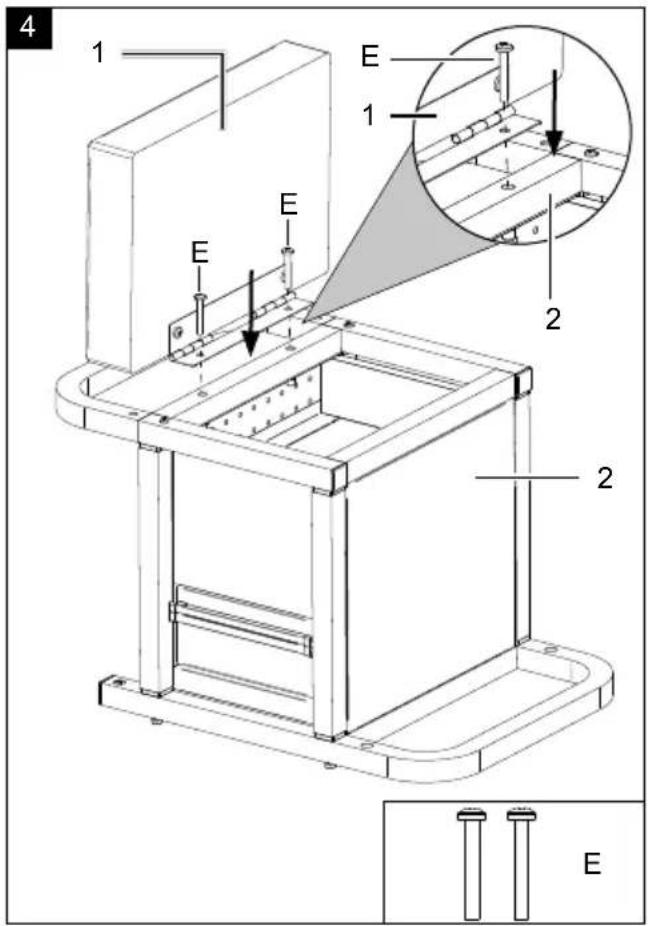
9.2 Fitting the seat cushion (fig. 4)
- Fit the seat cushion (1) by aligning the mounting holes of the seat cushion (1) with the threads on the bodywork (2).
- Fix the seat cushion (1) using the supplied allen key (F) and the M6x40 screws (E).
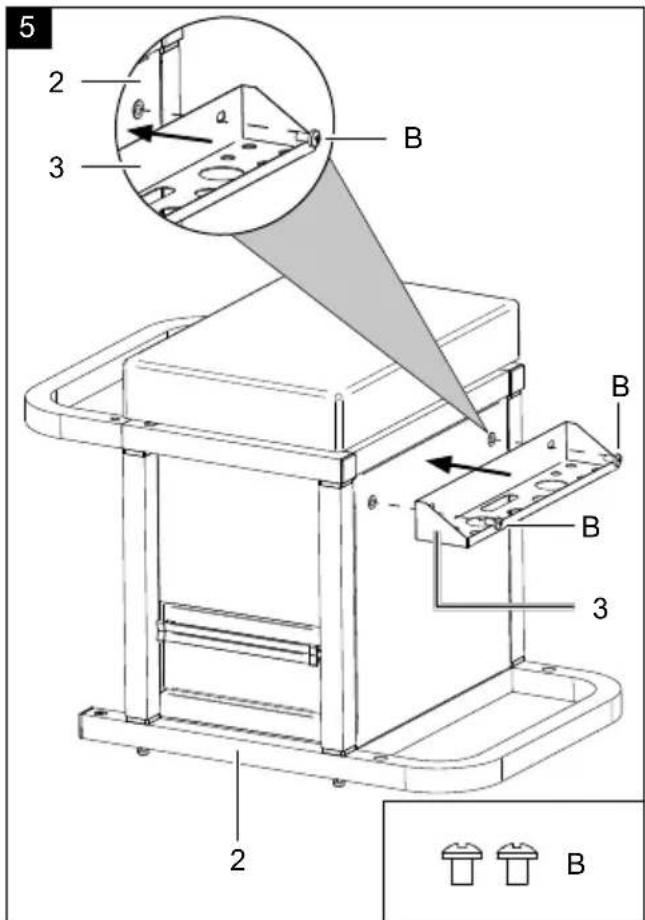
9.3 Fitting the tool tray (fig. 5)
- Fit the tool tray (3) by aligning the mounting holes of the tool tray (3) with the threads on the bodywork (2).
- Fix the tool tray (3) using the supplied allen key (F) and the M6x12 screws (B).
9.4 Fitting the castors (Fig. 6)
- Place the bodywork (2) with the underside of the seat cushion (1) on the floor.
- Insert the castors with brake (5) into the mounting holes on the side where the handle (7) is located.
- On the opposite side, insert the castors (4) into the mounting holes.
Attention!
The castors (4 & 5) have a hexagonal shaft. This must engage in the mounting hole of the bodywork (2).
- Screw the castors (4 & 5) from above using the supplied Allen key (F), the spring washers (C) and the sleeve nuts (D).
- Then put the assembly roller stool on its castors.
- The product is now ready for use.
10. Start up
Attention!
Always make sure the device is fully assembled before commissioning!
Make sure that the product is installed completely and properly.
Check before operation
- Look for signs of damage.
- Check that all protective covers are in place and all screws and nuts are tightened.
10.1 Brake function of the castors (fig. 7)
The castors with brake (5) can be blocked against unintentional rolling away.
• To engage the castors with brake (5), press the brake (8) down with your foot.
• To release the brake, press down the brake (8) on the opposite side with your foot.
11. Cleaning
- Keep the product as free of dust and dirt as possible. Rub the product clean with a clean cloth or blow it off with compressed air at low pressure.
• We recommend that you clean the product directly after every use. - Clean the product at regular intervals using a damp cloth and a little soft soap. Do not use any cleaning products or solvents; they could attack the plastic parts of the product. Make sure that no water can penetrate the device interior. Water ingress can cause rust on the product.
12. Storage
Store the product and its accessories in a dark, dry and frost-free place that is inaccessible to children.
Cover the product to protect it from dust or moisture. Store the operating manual with the product.
13. Maintenance
- Check at regular intervals that all screw connections are sufficiently tight.
- If necessary, tighten all screw connections.
- Have damaged screw connections replaced by an authorised specialist.
Service information
With this product, it is necessary to note that the following parts are subject to natural or usage-related wear, or that the following parts are required as consumables.
Wearing parts*: Castors, castors with brake, seat cushion
* may not be included in the scope of delivery!
Spare parts and accessories can be obtained from our service centre. To do this, scan the QR code on the cover page.
14. Disposal and recycling
Notes for packaging


The packaging materials are recyclable. Please dispose of packaging in an environmentally friendly manner.
15. Troubleshooting
The following table shows fault symptoms and describes remedial measures in the event of your product failing to work properly. If you cannot localise and rectify the problem with this, please contact your service workshop.
| Fault Possible cause Remedy | ||
| Product won't move Castor with brake blocked Release | brake | |
| Castors difficult to move | Castors dirty Clean the castors | |
| Castors defective Replace castors | ||
| Drawers sluggish Drawers overloaded | Observe the maximum load of the drawers | |
Günzburger Straße 69
D-89335 Ichenhausen
Cher client,
Garantie DE
Apparent defects must be notified within 8 days from the receipt of the goods. Otherwise, the buyer's rights of claim due to such defects are invalidated. We guarantee for our machines in case of proper treatment for the time of the statutory warranty period from delivery in such a way that we replace any machine part free of charge which provably becomes unusable due to faulty material or defects of fabrication within such period of time. With respect to parts not manufactured by us we only warrant insofar as we are entitled to warranty claims against the upstream suppliers. The costs for the installation of the new parts shall be borne by the buyer. The cancellation of sale or the reduction of purchase price as well as any other claims for damages shall be excluded.