
GTH800E - Lawn mower SCHEPPACH - Free user manual and instructions
Find the device manual for free GTH800E SCHEPPACH in PDF.


User questions about GTH800E SCHEPPACH
0 question about this device. Answer the ones you know or ask your own.
Ask a new question about this device
Download the instructions for your Lawn mower in PDF format for free! Find your manual GTH800E - SCHEPPACH and take your electronic device back in hand. On this page are published all the documents necessary for the use of your device. GTH800E by SCHEPPACH.
USER MANUAL GTH800E SCHEPPACH
natural_image
White manual tool with black handle and black base, isolated on white background (no text or symbols visible)| DE | RASENTRIMMEROriginalbetriebsanleitung | 5-11 |
| GB | GRASS TRIMMERTranslation from the original instruction manual | 12-18 |
| FR | TONDEUSE Á GAZONTraduction du manuel d'origine | 19-25 |
DE

Nur für EU-Länder.
Only for EU countries.
Do not dispose of electric tools together with household waste material! In observance of European directive 2012/19/EC on wasted electrical and electronic equipment and its implementation in accordance with national law, electric tools that have reached the end of their life must be collected separately and returned to an environmentally compatible recycling facility
FR

natural_image
Close-up of a black metal strip with two directional arrows indicating crack or damage (no text or symbols)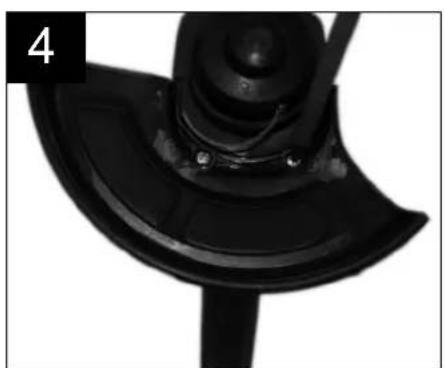
natural_image
Close-up of a black mechanical component with a curved base and mounting bracket (no visible text or symbols)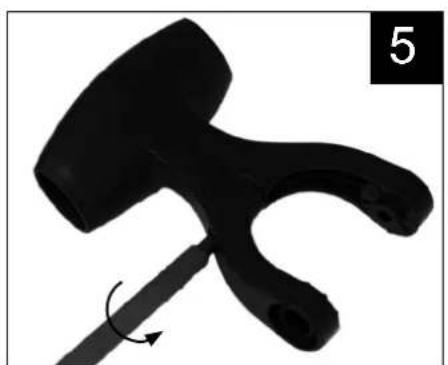
natural_image
Black hand tool with curved handle and arrow indicating rotation (no text or symbols)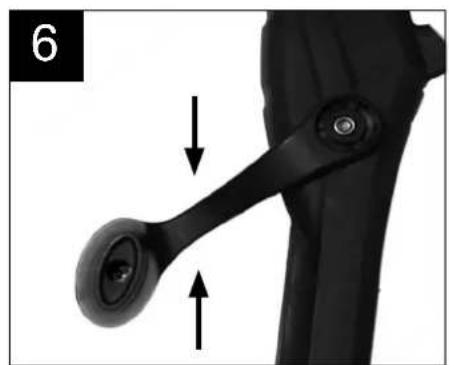
natural_image
Mechanical component with two circular parts and a lever mechanism, shown with arrows indicating motion (no text or symbols)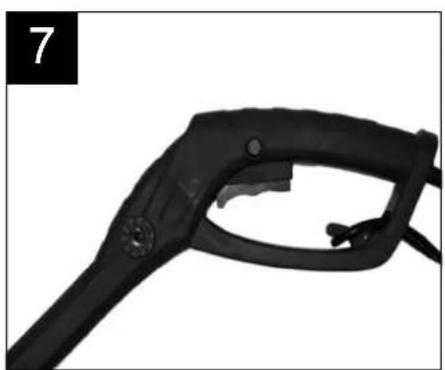
natural_image
Close-up of a black mechanical tool or clamp component (no visible text or symbols)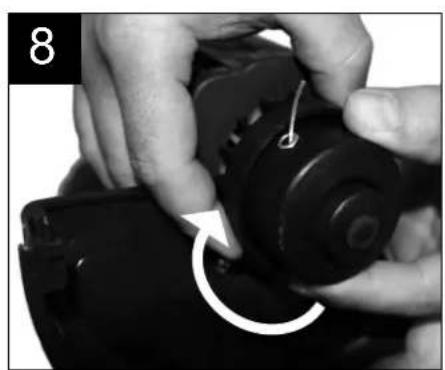
natural_image
Close-up of hands assembling a mechanical component with a circular arrow indicating rotation (no text or symbols visible)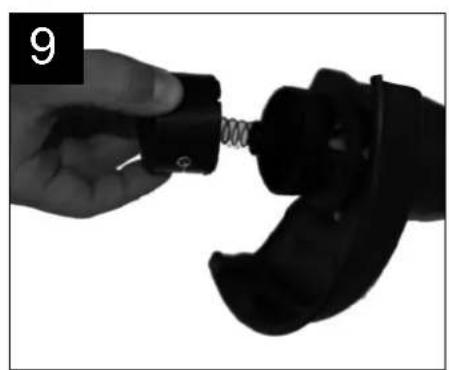
natural_image
Close-up of a hand holding a black mechanical component with a spring attached, next to a black clamped device (no text or symbols visible)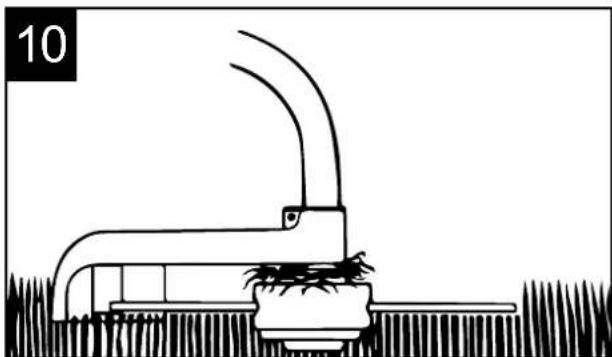
natural_image
Simple line drawing of a mechanical device with curved blades and a base, resting on grass (no text or symbols)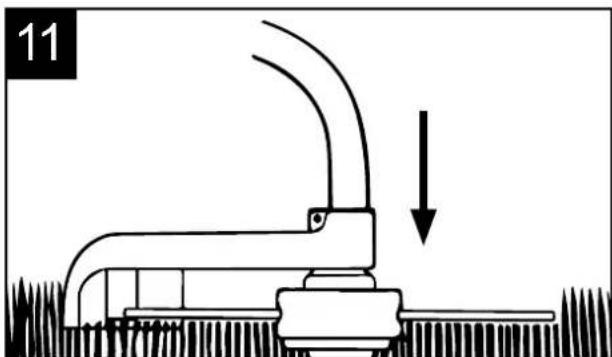
natural_image
Diagram of a mechanical device with a downward arrow indicating motion or force, no text or symbols present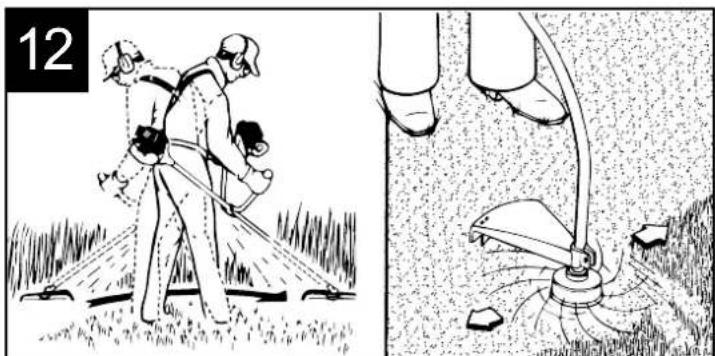
natural_image
Illustration showing two scenes: one of a person spraying water on grass, the other of a person using a spray can to spray or spray over a surface (no text or symbols)Inhaltsverzeichnis:
Seite:
Günzburger Straße 69
D-89335 Ichenhausen
VEREHRTER KUNDE,
- Introduction 14
- Device description 14
- Scope of delivery 14
- Intended use 14
- Safety information 15 - 16
- Technical data 16
- Attachment and operation 16
- Initial operation 17
- Working instructions 17
-
Maintenance 17
-
Storage 17 - 18
- Disposal and recycling 18
- Troubleshooting 18
- Declaration of conformity 27
- Warranty certificate 28
Page:
Explanation of the symbols on the equipment


Caution - Read the operating instructions to reduce the risk of inquiry


Wear safety goggles!


Warning! Denotes risk of personal injury, loss of life, or damage to the tool in case of non-observance.


Protect the tool from getting wet.
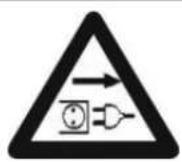

Remove plug from the mains immediately if the cable is damaged or cut.
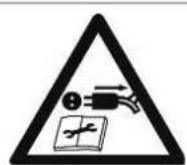

Switch off and unplug the device before cleaning or performing maintenance on it.

Keep bystanders away
1. Introduction
MANUFACTURER:
scheppach
Günzburger Straße 69
D-89335 Ichenhausen
DEAR CUSTOMER,
We hope your new tool brings you much enjoyment and success.
NOTE:
According to the applicable product liability laws, the manufacturer of the device does not assume liability for damages to the product or damages caused by the product that occurs due to:
- Improper handling,
• Non-compliance of the operating instructions, - Repairs by third parties, not by authorized service technicians,
- Installation and replacement of non-original spare parts,
• Application other than specified, - A breakdown of the electrical system that occurs due to the non-compliance of the electric regulations and VDE regulations 0100, DIN 57113 / VDE0113.
WE RECOMMEND:
Read through the complete text in the operating instructions before installing and commissioning the device. The operating instructions are intended to help the user to become familiar with the machine and take advantage of its application possibilities in accordance with the recommendations. The operating instructions contain important information on how to operate the machine safely, professionally and economically, how to avoid danger, costly repairs, reduce downtimes and how to increase reliability and service life of the machine.
In addition to the safety regulations in the operating instructions, you have to meet the applicable regulations that apply for the operation of the machine in your country. Keep the operating instructions package with the machine at all times and store it in a plastic cover to protect it from dirt and moisture. Read the instruction manual each time before operating the machine and carefully follow its information. The machine can only be operated by persons who were instructed concerning the operation of the machine and who are informed about the associated dangers. The minimum age requirement must be complied with.
2. Layout (Fig.1)
- Fixture
- Handle
- Feeder cable
- Feeder cable/cable strain relief lock
- Hand throttle
- Bayonet cap
- Spool of string cover
- Spool of string
- String cut-off knife
3. Scope of delivery
- Open the packaging and remove the device carefully.
- Remove the packaging material as well as the packaging and transport bracing (if available).
- Check that the delivery is complete.
- Check the device and accessory parts for transport damage.
- If possible, store the packaging until the warranty period has expired.
ATTENTION
The device and packaging materials are not toys! Children must not be allowed to play with plastic bags, film and small parts! There is a risk of swallowing and suffocation!
Fig.2
- Part with handle (D)
• Part with engine and pre-fitted spool (E) - Handle (F)
- Spool cover (G)
• Fixing material (3 bolts + 2 nuts)
4. Intended use
- String trimmer for fast and comfortable lawn treatment.
- For easy removal of grass and weed under bushes, banks and on edges.
- The appliance cannot be used for other works than those for which it has been designed and which are specified in the Operating Instructions.
- Any other use will be considered a use in conflict with the designation. The manufacturer will not be liable for any consequential damage and injuries. Please be sure to know that the appliance has not been designed for industrial purposes.
- The device must not be used for commercial, technical or industrial applications.
5. Safety information
Read the complete operating manual with due care.
This appliance is not intended for use by persons (including children) with reduced physical, sensory or mental capabilities, or lack of experience and knowledge, unless they have been given supervision or instruction concerning use of the appliance by a person responsible for their safety. Children should be supervised to ensure that they do not play with the appliance.
Important!
For safety reasons the grass trimmer is not to be used by children, young people under 16 years of age, or any other persons who are not acquainted with these directions for use.
- Examine the grass trimmer each time before you use it. Do not use the trimmer if any safety devices are damaged or worn. Never put safety devices out of operation.
- Do not use the grass trimmer if the cables are damaged or worn.
- Stop using the equipment when there are people – particularly children – or pets nearby.
- Use the grass trimmer only for the purpose specified in these instructions.
- You are responsible for safety in your work area.
- Inspect the items you want to cut before starting to work. Remove any foreign objects you find. Watch out for foreign objects while you work. If you still hit upon an obstacle while cutting, turn off the grass trimmer and remove the obstacle.
• Work only in good visibility.
• Always make sure of your footing while working. Be careful when stepping backwards. Risk of stumbling! - Never leave the grass trimmer unattended at your work place. Store the trimmer in a safe place during interruptions.
- If you interrupt your work to move to a different position it is imperative to switch off the grass trimmer while you are moving there.
- Never use the grass trimmer in the rain or in moist or wet conditions.
- Protect the grass trimmer from the damp and rain.
- Before you switch on the grass trimmer, make sure that there are no stones or other objects touching the nylon line.
- Always wear suitable clothing to protect your head, hands and feet from injury. Wear a helmet, goggles or visor, high boots or strong shoes, long trousers made of tough material, and work gloves.
- Be sure to hold the grass trimmer away from your body when it is switched on!
- If the grass trimmer is turned over or if it is not in working position, do not switch it on.
- Switch off the motor and pull out the power plug when you are not using the grass trimmer, when you leave the trimmer unattended, when you are check-
ing the trimmer, if the power cable is damaged, when you want to remove and replace the spool, and when you are moving the trimmer to another location.
- Keep the grass trimmer away from other persons, particularly children and pets. There may be stones and other objects in the flying cut grass.
- Keep at least 5 m away from other persons and animals when you are working with the grass trimmer.
- To prevent injury to yourself and damage to the grass trimmer, never cut against hard objects.
- Use the edge of the guard to keep the grass trimmer away from walls, changes of surface and fragile objects.
- Never use the grass trimmer without a guard.
CAUTION! The guard is vital for your safety and for the safety of others, and it is also essential for the grass trimmer to work correctly. Failure to observe this instruction will not only create a potential hazard, it will also result in the loss of your rights under the warranty.
- Never try to stop the cutter (nylon line) with your hands. Wait until it stops by itself.
- It is imperative to use only the original nylon line. Never use metal wire instead of the nylon line.
- Beware of injuring yourself on the line cutting device.
- Keep the air vents clear of dirt.
- After use, unplug the machine and check it for damage.
- Never attempt to cut grass that is not growing on the ground. For example, do not try to cut grass growing on walls, rocks, etc.
- Within the working radius of the grass trimmer the user is responsible for any damage caused to third persons by use of the trimmer.
- Never cross roads or pebble paths with the grass trimmer switched on. When you are not using the grass trimmer, keep it in a dry place out of the reach of children.
- Use the grass trimmer only as described in these directions for use and always hold it vertical to the ground. All other positions are dangerous.
- Check the screws regularly to see that they are properly tightened.
- The mains voltage must be the same as the voltage specified on the rating plate.
- Check the power cable regularly for signs of damage or aging.
- Never use the grass trimmer if the power cable is in less than perfect condition.
- Power cables used with the trimmer must not be of a lighter duty class than HO7RN-F rubberinsulated flexible cables according to DIN 57282 / VDE 0282 with a minimum diameter of 1.5 ~mm^2 .
- Plug connectors must be equipped with earthing contacts and the coupling must be rain-waterprotected.
- If the cable is damaged during operation, disconnect it immediately from the power supply.
DO NOT TOUCH THE CABLE BEFORE IT IS DISCONNECTED FROM THE POWER SUPPLY.
- To prevent danger, damaged power cables must be replaced by the manufacturer or by a service company authorized by the manufacturer to carry out the work.
- The equipment may only be powered via an earth-leakage circuit breaker (RCD) with a maximum operating current of 30 mA.
- Keep cables and other objects out of the area you want to cut.
- If you have to lift the grass trimmer to move it, switch off the motor and wait for the rotating tool to stop. Before you leave the trimmer, switch off the motor and pull out the power plug.
- Before you connect the grass trimmer to the power supply, make sure that none of its moving parts are damaged and that the line spool is correctly inserted and fastened.
- Never cut against hard objects when using the grass trimmer. This is imperative to avoid causing injury to the user and damage to the trimmer.
- Use only original replacement parts for repair and maintenance purposes.
- Have repairs carried out only by a qualified electrician.
- Examine the grass trimmer for signs of wear or damage each time before you use it and after any collisions. Have essential repairs carried out without delay.
- Always keep your hands and feet away from the cutting mechanism, particularly when you switch on the trimmer.
- After pulling out new line, always return the trimmer to normal working position before you switch it on again.
- Never use replacement parts or accessories which are not foreseen or recommended by the manufacturer.
- Pull out the power plug before carrying out any inspection, cleaning or other work on the trimmer and whenever it is not being used.
- Use the equipment only in broad daylight or in well-lit conditions.
- Keep the extension cable away from cutting tools at all times.
Important: The nylon line continues to rotate for a few seconds after the motor is switched off.
The equipment does not start.
6. Technical data
| GTH800E | |
| Technical data | |
| Cutting data hedge trimme | |
| Cutting width mm | 200 |
| Engine speed max. min-1 | 14000 |
| cutting string length m | 4,8 |
| spool of string mm | 1,2 |
| Operating handle height mm | 780 |
| Power unit | |
| Engine V / Hz | 230 / 50 |
| Engine output W | 250 |
| Weight kg | 1,1 |
Subject to technical changes!
Information concerning noise emission measured according to relevant standards:
$$ \text { Sound pressure } L _ {\mathrm{pA}} = 8 0, 1 \mathrm{dB(A)} $$
$$ \text { Sound power } L _ {\mathrm{WA}} = 9 6 \mathrm{dB(A)} $$
$$ \text { Uncertainty } K _ {\mathrm{PA}} = 3 \mathrm{dB(A)} $$
Wear ear-muffs.
The impact of noise can cause damage to hearing.
$$ \text { Vibration } A _ {\mathrm{hv}} (\text { Griff }) = 2, 8 4 6 \mathrm{m} / \mathrm{s} ^ {2} $$
$$ \text { Vibration } A _ {\mathrm{hv}} (\text { Halteknauf }) = 2, 9 8 7 \mathrm{m} / \mathrm{s} ^ {2} $$
$$ \text { Uncertainty } K _ {\mathrm{PA}} = 1, 5 \mathrm{m} / \mathrm{s} ^ {2} $$
7. Attachment and operation
Assembly
- Screw the part with handle (Fig. 2/D) and part with engine (Fig. 2/E) to each other.
• Fix both parts with a bolt and nut (Fig. 2/B; Fig.3). - Fix the spool cover (Fig. 2/G) to the appliance head (Fig. 4) with a bolt (Fig. 2/C).
- Mount the fixture (Fig. 2/F) to the handle using a bolt and nut (Fig. 2/F; Fig. 5-6).
Please make sure the assembled parts are firmly tightened.
Before putting the appliance into operation, check it for the following:
- Cable not damaged
- Perfect state of the protection and cutting equipment
- Firm tightening of all the screwing
8. Initial operation
Please follow the statutory regulations regarding the protection against noise provisions that may differ in individual locations.
Caution!
- The automatic string cut-off knife (Fig. 1/9) is located underneath the spool of string cover.
- The cutting tool starts rotating when the engine is started.
Adjustment to be only performed when the appliance is switched off and unplugged.
If necessary, the nylon string must be pulled out to the protection cover edge before starting the engine. When the cutting head is initially run, the string is cut to the appropriate length by the knife on the protection cover.
- Connect the string trimmer feeder cable to the extension cable and hang it to the cable lock.
- Hold the appliance by both hands and take the operating posture.
- To start the string trimmer, press the hand throttle (Fig. 1/5).
- Hold the appliance at an angle of app. 30° and move it from the right to the left in half-circle (Fig. 12).
- Best results are achieved with max. grass length of 15 cm.
- More cuttings are recommended when the grass is higher.
CAUTION!
Do not put the cutting head on the ground when the appliance is running.
Spool of string adjustment:
-
Keep the running appliance above the grass plot. Tap slightly the cutting head by the ground. By this, the string will be extended (Fig. 11).
-
The knife in the protection cover (Fig. 1/9) will cut the string to the required length.
Switch-off order:
The appliance gets stopped after a few seconds when the hand throttle is released. Now disconnect the appliance from the extension or feeder cable.
9. Working instructions
⚠️ Important:
- Remove all grass and weed remnants at regular intervals to prevent the shaft tube overheating. Lawn, grass and weed remnants become trapped under the safety shield and prevent the shaft tube from receiving adequate ventilation. Remove the remnants carefully using a screwdriver or the like.
- Swing the trimmer from side to side in a scything motion. Always keep the line spool parallel to the ground. Check the site and decide which cutting height you require. Guide and hold the line spool at the required height to obtain an even cut.
- The line trimmer may only be used for cutting grass and weeds underneath bushes, on edges, corners and slopes which cannot be reached by a lawn-mower. Alternative use not specified in these instructions can damage the device or severely injure the user. Therefore, it is explicitly excluded from the list of possible applications.
10. Maintenance
The appliance must always be switched off before any servicing and cleaning. Wait until it fully stops. Unplug it.
Servicing works not specified in these Operating Instructions must be performed by authorised staff as there may be dangerous situations the operator is unable to handle. Spare parts may only be replaced by authorised staff.
Cleaning
- Every time the appliance has been used, it should be cleaned by a clean cloth, brush or blown with compressed air under low pressure.
- Do not use cleaning agents and solvents as they may damage the plastic parts of the appliance.
- Do not spray on the string trimmer.
Spool of string change
CAUTION! The appliance must necessarily be unplugged before changing the spool of string!
- Switch the string trimmer off and wait until the nylon string fully stops and disconnect the appliance from the feeder cable.
- Now grasp the spool and turn it to the left in the "open lock symbol" direction.
- Remove the empty spool and replace it with a new one. Fit the spool on the spring and turn it to the right in the "closed lock symbol" direction until it snaps in.
- If necessary, when the cutting head is initially run, the string is cut to the appropriate length by the knife on the protection cover.
- The appliance may now be plugged and started now.
11. Storage
- Disconnect the grass trimmer from the electricity supply when it is not being used.
- Store the device in a dry place beyond the reach of children.
- When the device is not being used, store it so it cannot be started by unauthorised persons.
WARNING!
Do not store the device without protection outside or in a damp environment.
Winterising
- Clean the appliance thoroughly.
- Keep the appliance in a dry room.
- Provide overall servicing as described in the Servicing section.
- Let the appliance cool down.
- Clean the appliance external surface.
12. Disposal and recycling
The disposal instructions are based on icons placed on the appliance or its package. The description of the meanings can be found in the "Marking" section. Transport package disposal
The package protects the appliance against damage during transport. Packing materials are usually chosen depending on their environmental friendliness and disposal method and can therefore be recycled. Returning the package to material circulation saves raw materials and reduces waste disposal costs. Parts of packages (e.g. foils, styropor®) can be dangerous to children. Risk of suffocation!
Keep parts of packages away from children and dispose them as soon as possible.
13. Troubleshooting
The table shows potential failures, their possible cause and removal options. However, if you are unable to remove the problem, contact a professional to assist you.
Switch off and unplug the appliance before any servicing and cleaning.
| Symptom Possible cause Remedy | ||
| Appliance not cutting | Spool of string is too shortSpool is empty | Adjust the spool of stringChange the spool |
| Appliance not starting | Power supply is interrupted | Check the plug, feeder and extension cable. |
Table des matières:
Günzburger Straße 69
D-89335 Ichenhausen
CHER CLIENT,
text_image
Exploded view diagram of a spray gun with numbered parts for identificationSubject to change without notice
Documents registar: Thomas Kaufmann
Günzburger Str. 69, D-89335 Ichenhausen
Garantie DE
Apparent defects must be notified within 8 days from the receipt of the goods. Otherwise, the buyeris rights of claim due to such defects are invalidated. We guarantee for our machines in case of proper treatment for the time of the statutory warranty period from delivery in such a way that we replace any machine part free of charge which provably becomes unusable due to faulty material or defects of fabrication within such period of time. With respect to parts not manufac-
tured by us we only warrant insofar as we are entitled to warranty claims against the upstream suppliers. The costs for the installation of the new parts shall be borne by the buyer. The cancellation of sale or the reduction of purchase price as well as any other claims for damages shall be excluded. The saw blade is a consumable item and explicitly excluded from any warranty.