38173 - Lighting Kichler - Free user manual and instructions
Find the device manual for free 38173 Kichler in PDF.


User questions about 38173 Kichler
0 question about this device. Answer the ones you know or ask your own.
Ask a new question about this device
Download the instructions for your Lighting in PDF format for free! Find your manual 38173 - Kichler and take your electronic device back in hand. On this page are published all the documents necessary for the use of your device. 38173 by Kichler.
USER MANUAL 38173 Kichler
natural_image
Pure technical line drawing of a mechanical component with symmetrical leaf-like patterns and a central shaft (no text or symbols)ATTACH YOUR RECEIPT HERE
Serial Number ____ Purchase Date ____


Questions, problems, missing parts? Before returning to your retailer, call our customer service department at 1-800-554-6504, 8 a.m. - 4:30 p.m, EST, Monday - Friday.
text_image
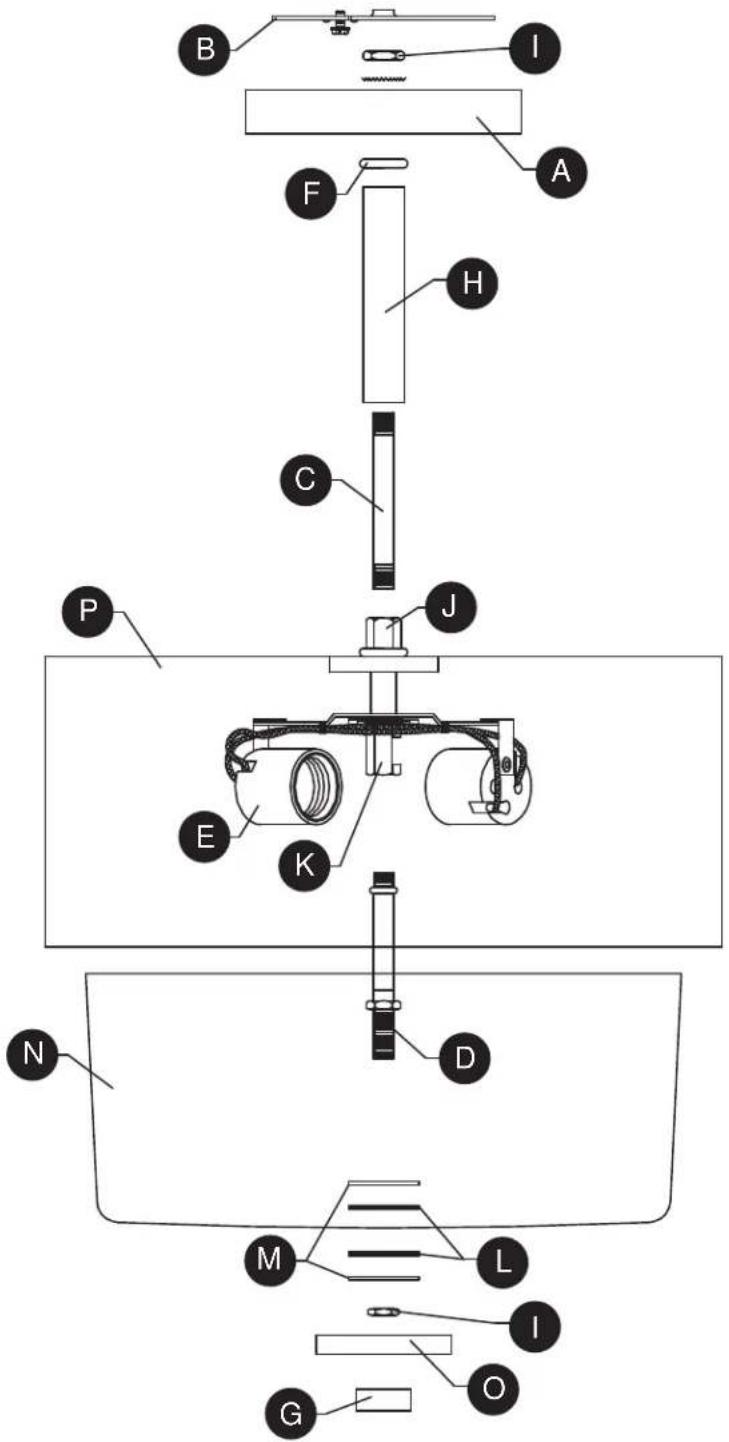
B I A F H C P J E K N D M L I G O| PART | DESCRIPTION | QTY |
| A | Canopy | 1 |
| B | Mounting Bracket | 1 |
| C | Long Threaded Pipe | 1 |
| D | Short Threaded Pipe | 1 |
| E | Socket | 2 |
| F | Tube Ring | 1 |
| G | Finial | 1 |
| H | Decorative Tube | 1 |
| PART | DESCRIPTION | QTY |
| I | Hex Nut | 3 |
| J | Upper Coupling | 1 |
| K | Lower Coupling | 1 |
| L | Nylon Washer | 2 |
| M | Metal Washer | 2 |
| N | Shade | 1 |
| O | Decorative Cap | 1 |
| P | Shade Housing | 1 |
text_image
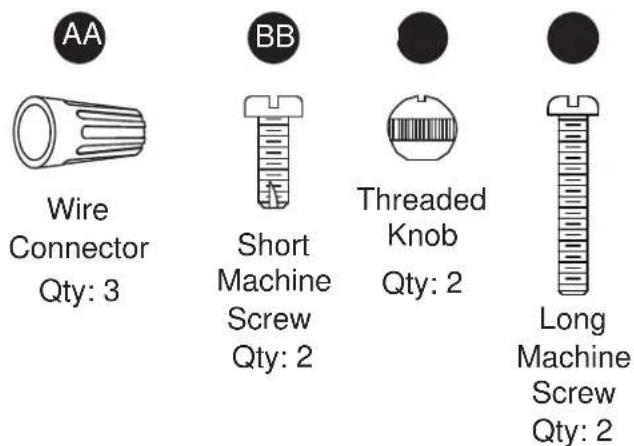
AA Wire Connector Qty: 3 BB Short Machine Screw Qty: 2 Threaded Knob Qty: 2 Long Machine Screw Qty: 2
SAFETY INFORMATION
Please read and understand this entire manual before attempting to assemble, operate or install the product.

WARNING
- IMPORTANT: NEVER attempt any work without shutting off the electricity.
- Place the main power switch in the "OFF" position and unscrew the fuse(s), or switch "OFF" the circuit breaker switch(es), that control the power to the fixture or room you are working in.
- Place the wall switch in the "OFF" position. If the fixture to be replaced has a switch or pull chain, place it in the "OFF" position.
- Do not use bulbs with wattage greater than specified on this fixture.
- California Prop. 65: This lighting fixture contains chemicals known to the state of California to cause cancer, birth defects, and/or other reproductive harm. Wash hands after use.
CAUTION
- If you have any doubts about how to install this lighting fixture, or if the fixture fails to operate completely, please contact a licensed electrical contractor.
- All parts must be used as indicated in these instructions. Do not substitute any parts, leave parts out, or use any parts that are worn out or broken. Failure to obey this instruction could invalidate ETL listing and/or C.S.A. certification of this fixture.
PREPARATION
Before beginning assembly of product, make sure all parts are present. Compare parts with package contents list and hardware contents list. If any part is missing or damaged, do not attempt to assemble the product.
Estimated assembly time: 30 minutes to 1 hour
Tools Required for Assembly (not included): Phillips screwdriver, flathead screwdriver, wire strippers, electrical tape, ladder, safety glasses.
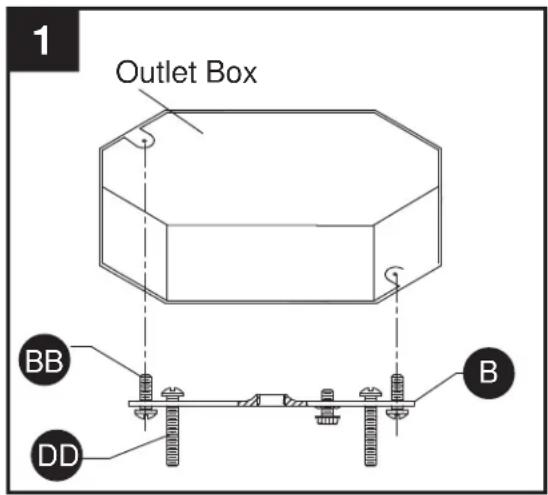
- Orient the mounting bracket (B) so the raised center portion protrudes into the outlet box (not included). Insert long machine screws (DD) through mounting bracket (B) so the long machine screws (DD) protrude outward. Connect the mounting bracket (B) to the outlet box with short machine screws (BB).
Hardware Used
| BB | Short Machine Screw | x 2 |
| DD | Mounting Bracket | x 2 |
-
Screw the long threaded pipe (C) onto the upper coupling (J). Pass the decorative tube (H) over the long threaded pipe (C).
-
Pass the long threaded tube (C) through the tube ring (F) and canopy (A) before securing using a hex nut (I).
text_image
1 Outlet Box BB DD B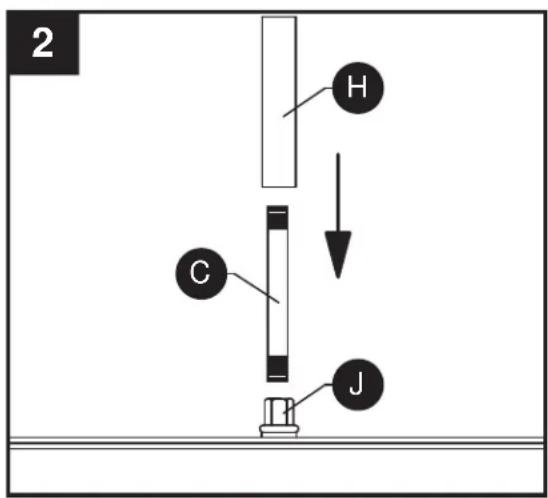
text_image
2 H C J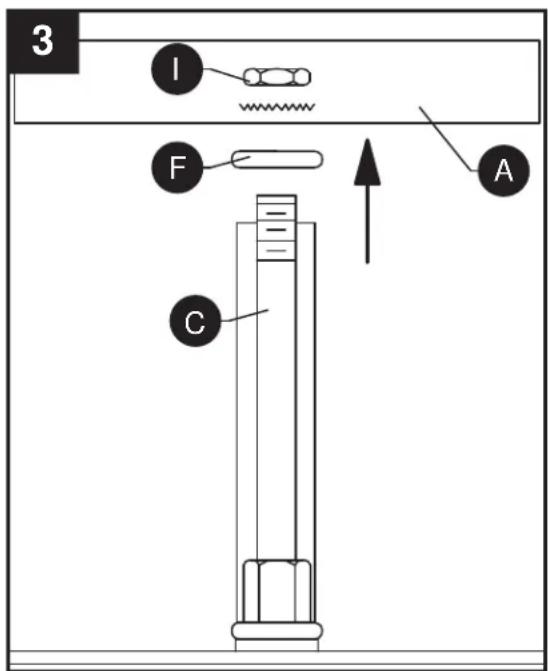
text_image
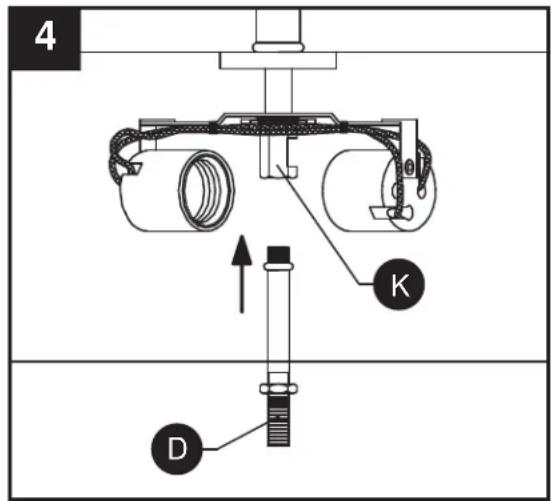
3 I F A C- Screw the short threaded pipe (D) onto the lower coupling (K).
text_image
4 K D- Wire connection guide:
Ground wire:
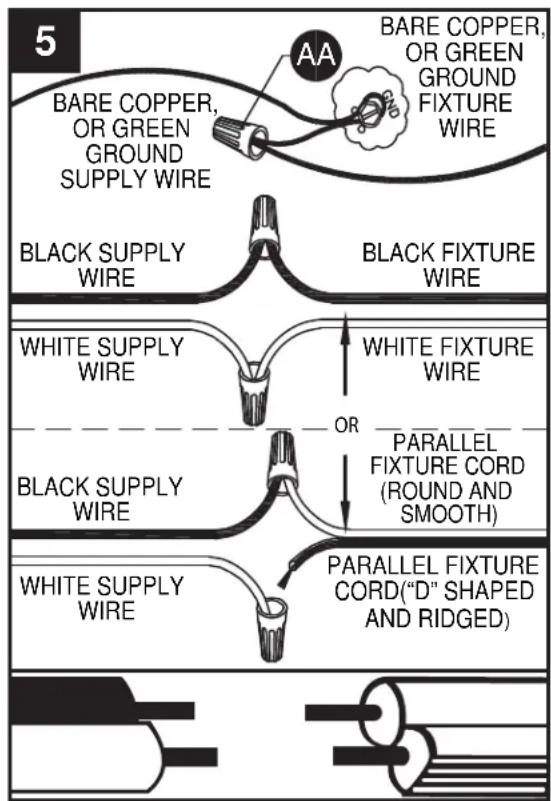
- For installation in the United States: Wrap ground wire from outlet box around ground screw on mounting bracket (B) no less than 2 in. from wire end. Tighten ground screw. If fixture is supplied with a ground wire, connect to outlet ground wire with a wire connector (AA).
- For installation in Canada: If fixture is supplied with ground wire, wrap ground wire around ground screw on mounting bracket (B). Tighten ground screw.
Supply wires:
- Connect the Neutral (White) supply wire from the outlet box to the Neutral fixture wire (White or Parallel Cord “D” shaped and ribbed).
- Connect the Hot (Black) supply wire from the outlet box to the Hot fixture wire (Black or Parallel Cord round and smooth).
NOTE:
Fixture will have 2 wires either Black and White or Parallel Cord SPT-1 lamp wire with one round smooth wire and one "D" shaped ribbed wire.
flowchart
graph TD
    A["Black Supply Wire"] --> B["BARE COPPER, OR GREEN GROUND SUPPLY WIRE"]
    B --> C["Black FIXTURE WIRE"]
    D["WHITE SUPPLY WIRE"] --> E["OR PARALLEL FIXTURE CORD (ROUND AND SMOOTH)"]
    E --> F["PARALLEL FIXTURE CORD("D" SHAPED AND RIDGED)"]
    G["WHITE SUPPLY WIRE"] --> H["OR PARALLEL FIXTURE CORD (ROUND AND SMOOTH)"]
    H --> I["PARALLEL FIXTURE CORD("D" SHAPED AND RIDGED)"]
Hardware Used

x 3Wire Connector
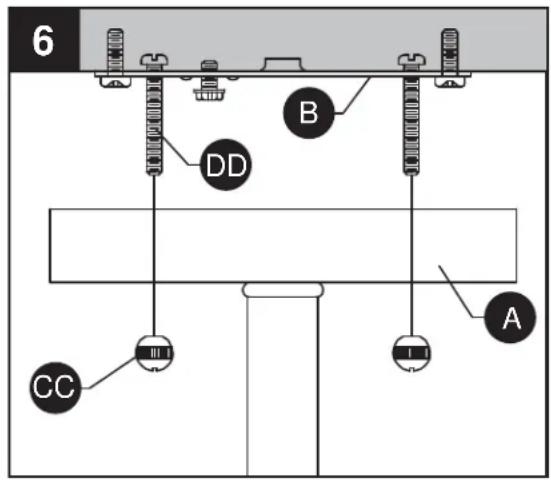
- Pass canopy (A) over long machine screws (DD) protruding from mounting bracket (B) and secure using threaded knobs (CC).
Hardware Used

Threaded Knob

x 2
- Insert 60-watt max. medium-base bulb (not included) into socket (E).
Repeat for remaining sockets.
- Raise one metal washer (M) and nylon washer (L) over the short threaded pipe. Next raise shade (N), the second nylon washer (L) and the second metal washer (M) over the short threaded pipe (D) and secure in place using a hex nut (I).
text_image
6 B DD A CC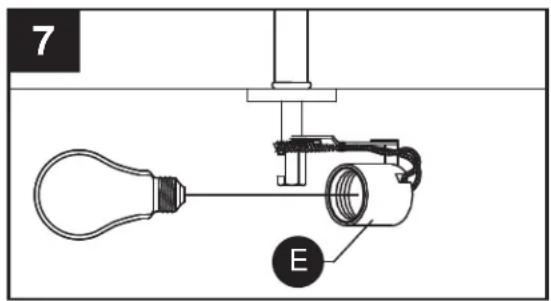
text_image
7 E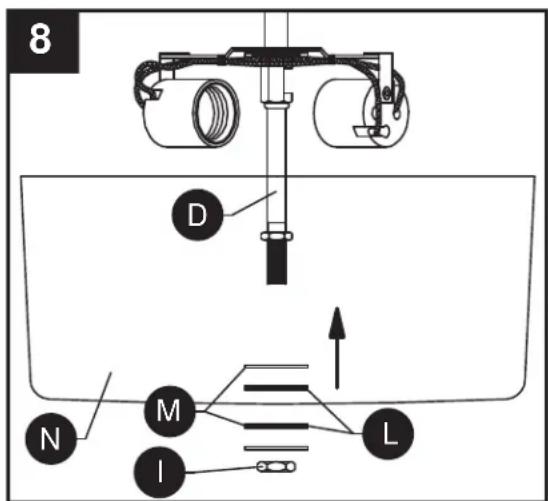
text_image
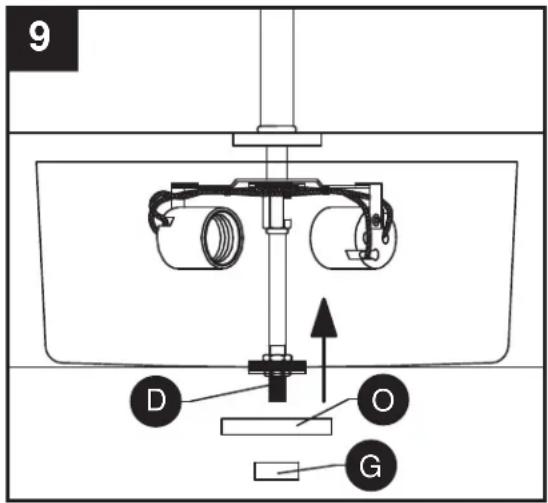
8 D M L N I- Raise decorative cap (O) over short threaded pipe (D) and secure in place with finial (G).
text_image
9 D O GCARE AND MAINTENANCE
• Always be certain that electric current is turned off before cleaning this item.
- Use a soft, moist cloth with mild non-abrasive soap to clean fixture. Never use glass cleaner on fixture, as it will damage the metal finish.
- All glass shades may be washed in a towel-lined sink with warm water and mild soap. Do not wash shades in an automatic dishwasher.
TROUBLESHOOTING
| PROBLEM | POSSIBLE | CAUSE | CORRECTIVE |
| Fixture does not light. | 1. Fixture may be wired incorrectly.2. Worn or broken bulb. 2. Replace bulb. | 1. Check wiring. | |
Kichler Lighting warrants that its products will be free from defects in material and workmanship for one (1) year from the date of purchase by the Original Purchaser.
To replace a product that has a warranted defect, the Original Purchaser shall return any allegedly defective parts or products to the authorized Kichler distributor that the product was purchased from with PROOF OF PURCHASE, Original Purchaser's name and return address and a description of the claimed product defect.
If any of the warranted products are found by Kichler, in its sole discretion, to be defective, such products will, at Kichler's sole option and cost, be replaced, repaired or refunded less an amount directly attributable to Original Purchaser's prior use of the product. Kichler will return the repaired or replaced product prepaid freight. This warranty does not cover labor or other costs or expenses to remove or install any defective, repaired or replaced product.
The parties hereto expressly agree that Original Purchaser's sole and exclusive remedy against Kichler shall be for the repair, replacement or refund of defective products as provided herein. This warranty extends only to product ownership by the Original Purchaser; is not transferable whether to heirs, subsequent owners, or otherwise; and is void if the Original Purchaser ceases to own the product.
This warranty does not apply to any products that have been subjected to misuse, mishandling, misapplication, connected to voltage at more than 5% above standard North American voltage, unusual use (including but not limited to use in an environment where the annual average ambient operating temperature is below 27 or above 95 degrees Fahrenheit), neglect (including but not limited to improper maintenance), accident, acts of god such as high winds, improper installation or care, failure to follow the Product's written instructions for normal use and care, improper packaging of products returned to Kichler, modification (including but not limited to use of unauthorized parts or attachments), or adjustment or repair. Significant product exposure to chemicals, harsh cleaners, salt water or salt air will void any and all warranties on exterior finishes. This warranty only applies when all components, including transformers, have been provided by Kichler. Substituting another manufacturer's product and/or components will render the warranty completely void.
THIS WARRANTY GIVES YOU SPECIFIC LEGAL RIGHTS. YOU MAY ALSO HAVE OTHER RIGHTS, WHICH VARY FROM STATE TO STATE. SOME STATES DO NOT ALLOW LIMITATIONS ON HOW LONG AN IMPLIED WARRANTY LASTS OR THE EXCLUSION OR LIMITATION OF INCIDENTAL OR CONSEQUENTIAL DAMAGES SO THE ABOVE LIMITATIONS OR EXCLUSIONS MAY NOT APPLY TO YOU.
THE FOREGOING WARRANTY IS IN LIEU OF ALL OTHER WARRANTIES, EXPRESS OR IMPLIED, INCLUDING THOSE OF MERCHANTABILITY, FITNESS FOR ANY PARTICULAR PURPOSE OR INFRINGEMENT. ORIGINAL PURCHASER SHALL IN NO EVENT BE ENTITLED TO, AND KICHLER LIGHTING SHALL NOT BE LIABLE FOR, INDIRECT, SPECIAL, INCIDENTAL OR CONSEQUENTIAL DAMAGES OF ANY NATURE, INCLUDING, BUT NOT LIMITED TO LOSS OF PROFIT, PROMOTIONAL AND/OR MANUFACTURING EXPENSES, OVERHEAD, INJURY TO REPUTATION AND/OR LOSS OF CUSTOMERS.
For replacement parts, call our customer service department at 1-800-554-6504, 8 a.m. - 4:30 p.m., EST, Monday - Friday.
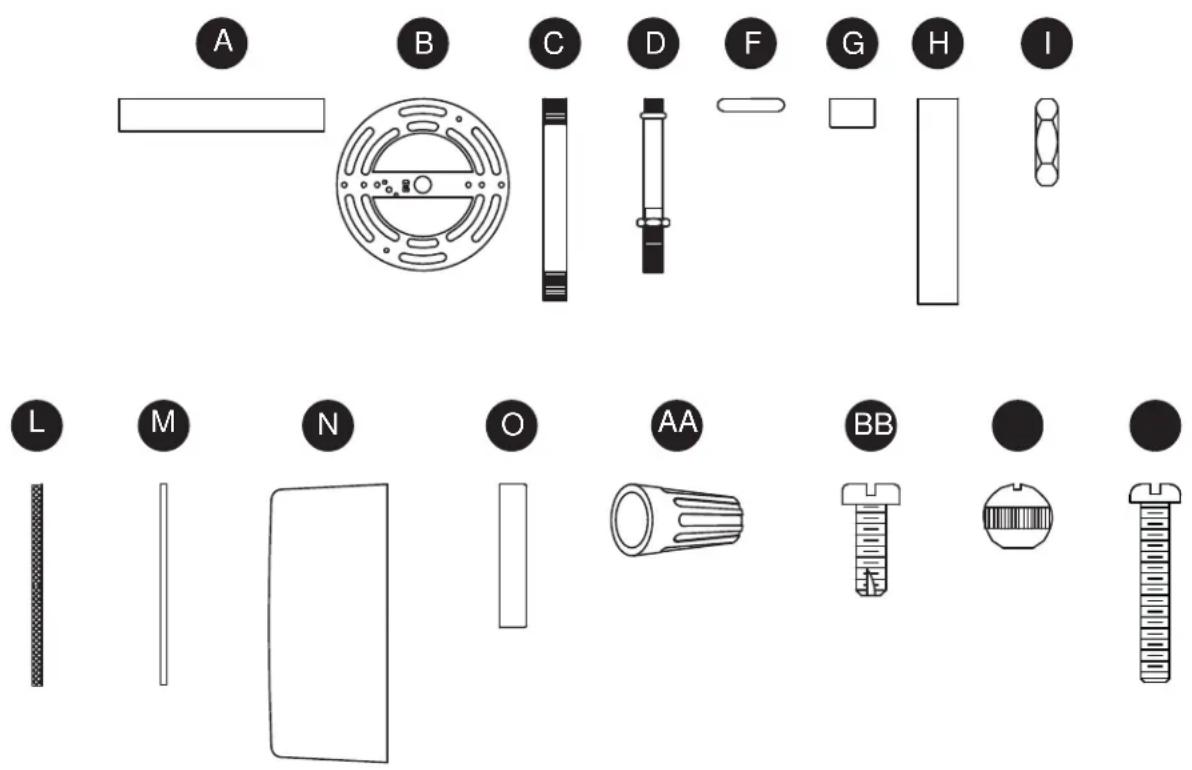
| PART | DESCRIPTION | PART # | |
| A | Canopy | C38173 | |
| B | Mounting | Bracket | XBAR05 |
| C | Long | Threaded | Pipe TN18400 |
| D | Short | Threaded | Pipe STP38173 |
| F | Tube | Ring | |
| G | Finial | F38173 | |
| H | Decorative | Tube | DT38173 |
| I | Hex | Nut | |
| L | Nylon Washer | WN18125 | |
| M | Metal Washer | WM18125 | |
| N | Shade | S38173 | |
| O | Decorative Cap | DC38173 | |
| AA | Wire Connector | WC003 | |
| BB | Short Machine Screw | SCR832X050 | |
| CC | Threaded Knob | TK2X832-CH | |
| DD | Long Machine Screw | SCR832X150 | |
text_image
A B C D F G H I L M N O AA BB ●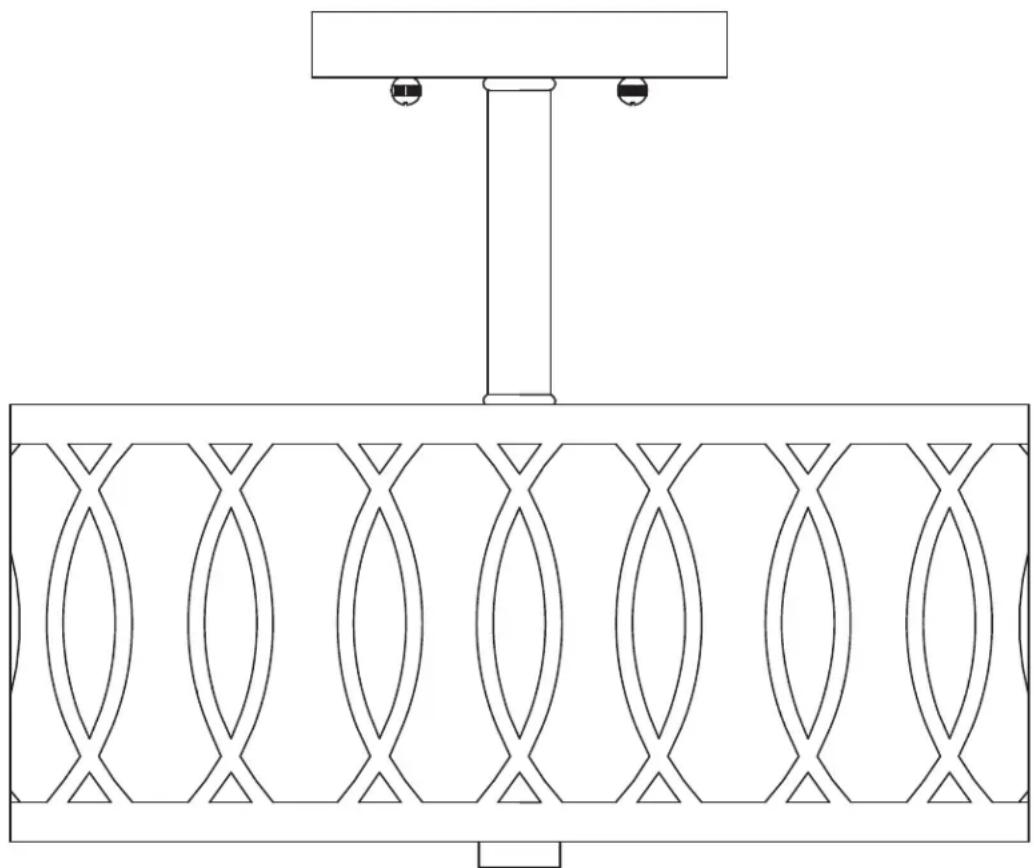
natural_image
Pure technical line drawing of a mechanical component with symmetrical leaf-like patterns and a central shaft (no text or symbols)
text_image
B I A F H C P J E K N D M L I G Otext_image
3 I F A Ctext_image
8 D M L N Itext_image
A B C D F G H I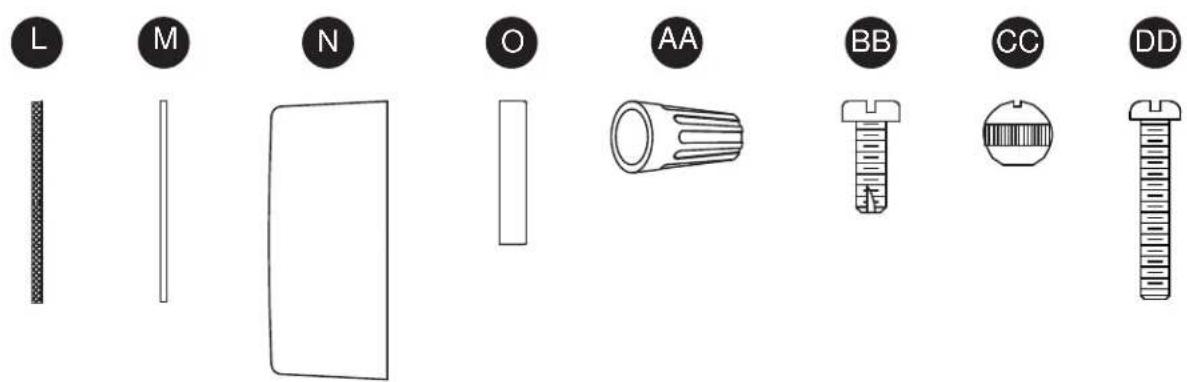
text_image
L M N O AA BB CC DD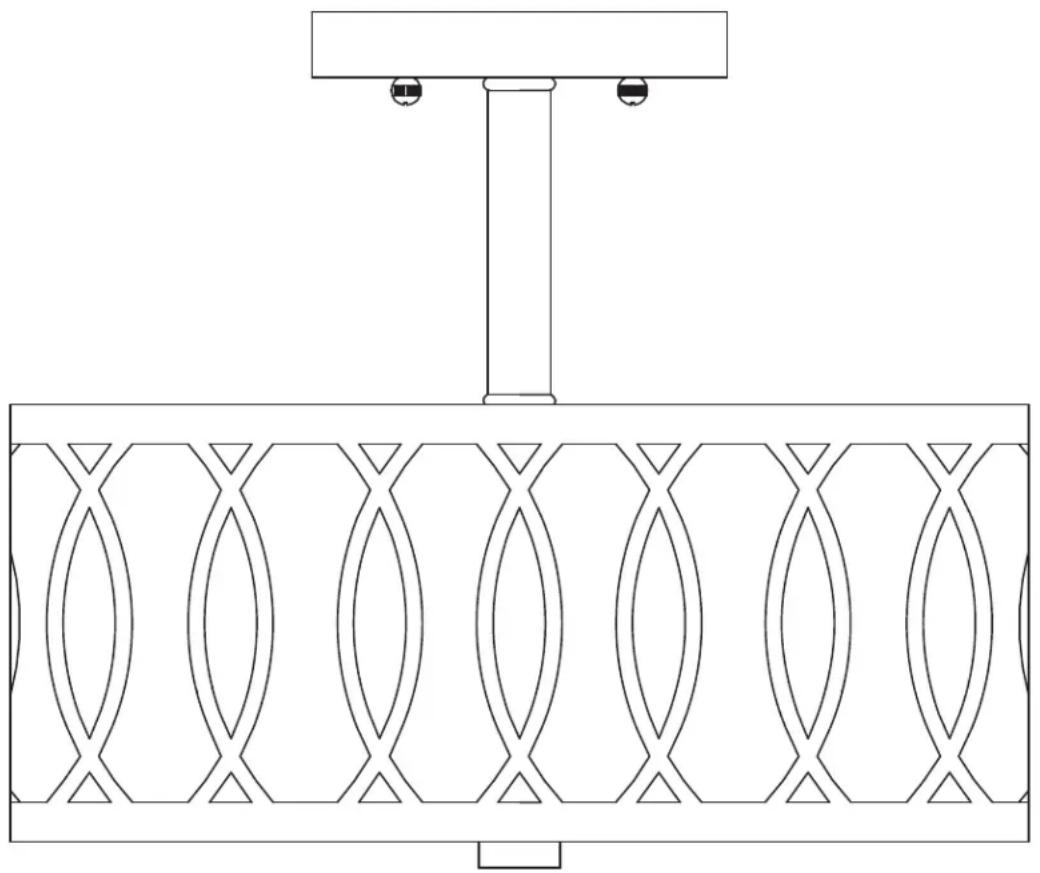
natural_image
Pure technical line drawing of a mechanical component with symmetrical leaf-like patterns and a central shaft (no text or symbols)ADJUNTE SU RECIBO AQUÍ