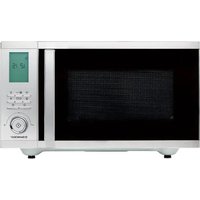
SMWEDS 900 A2 - Microwave SILVERCREST - Free user manual and instructions
Find the device manual for free SMWEDS 900 A2 SILVERCREST in PDF.


| Product Type | Microwave oven |
| Brand | SilverCrest |
| Model | SMWEDS 900 A2 |
| Useful Volume | 25 L |
| Microwave Power | 900 W |
| Grill Power | 1750 W |
| Hot Air Power | 2150 W |
| Microwave Consumption | 1600 W |
| Power Supply | 220-240 V ~ 50 Hz |
| Microwave Frequency | 2450 MHz |
| Dimensions (approx) | 45 x 35 x 30 cm (W x D x H) |
| Weight (approx) | 12 kg |
| Functions | Microwave, Grill, Hot Air, Combi, Defrost (time/weight), Auto Cook (12 programs), Timer, Clock, Quick Start |
| Safety | Child safety lock, Auto shut-off, secure door |
| Included accessories | Turntable, Grill rack, Quick start guide |
| Cleaning and maintenance | Turntable and grill rack are dishwasher safe; Clean cavity with a damp cloth; Do not use steam cleaners |
| Warranty | 3 years |
| Customer service France | 0800 904 879 |
| Customer service Belgium | 0800 71 011 |
| Protection class | I |
Frequently Asked Questions - SMWEDS 900 A2 SILVERCREST
User questions about SMWEDS 900 A2 SILVERCREST
0 question about this device. Answer the ones you know or ask your own.
Ask a new question about this device
Download the instructions for your Microwave in PDF format for free! Find your manual SMWEDS 900 A2 - SILVERCREST and take your electronic device back in hand. On this page are published all the documents necessary for the use of your device. SMWEDS 900 A2 by SILVERCREST.
USER MANUAL SMWEDS 900 A2 SILVERCREST
145 on 145 on 26 on 148 on
SILVERCREST

MIKROWELLE/MICROWAVE/FOUR À MICRO-ONDES 5MWEDS 900 AI
MIKROWELIE
Lichterungskreis:
(1)
MICROWAVE
User total
① ②
FOUR
MICRO-ONDES
A
(No text)
MAGNETRON
(1) 2017年1月1日
①
KUCHENKA
MUKKOPALC Investigation
(25)
MIKROVINI
TROUBA
N=00 00 ob tuh
(2)
MIKROVLNNA RURA
Neston obvih
OK
MICROONDAS
Mavon da trahaz preu.
※
MIKROB∅LGEOVN
-120
(五)
MICKDONDE
2.2017
WIKKOUHILIWI
sütö
davonlal, comel
B7/Al2CF Indirngurking Tels 5
02/E New Year 2021
145 on 145 on 40 on 141 on
2-ΦC/T 3011811P 4011 P=7 12/12 Brownell 31
C. 1784
Warnings and symbols used Page 38
Introduction Page 39
Intended use.... Page 39
Scope of delivery Page 39
Description of parts ...... Page 39
Technical data Page 39
Safety instructions.... Page 40
Basic principles of microwave cookery ...... Page 44
Using suitable cookware....Page 45
Before first use.... Page 45
Positioning the product. Page 45
Assembly Page 46
Operation.... Page 46
Standby mode Page 46
Setting the clock.... Page 46
Setting the kitchen timer Page 47
Quick start function 1 Page 47
Quick start function 2.... Page 47
Microwave mode.... Page 47
Microwave mode - Examples of use. Page 47
Grill mode Page 48
Combination mode "Grill" Page 48
Convection mode.... Page 49
Combination mode "Convection" Page 49
Defrosting by time Page 50
Defrosting by weight Page 50
Child-proof lock Page 51
Automatic cooking modes Page 51
Microwave cooking table Page 53
Heating frozen food. Page 54
Recipes Page 54
Chocolate mug cake Page 54
Caramel corn Page 55
Salmon. Page 55
Potato gratin. Page 56
Courgette soup Page 56
Grilled chicken Page 57
Salami pizza Page 57
Mac and cheese Page 58
Potato chips Page 58
Garlic chicken wings Page 59
Cleaning and care Page 59
Troubleshooting Page 60
Disposal Page 60
Warranty Page 61
Warranty claim procedure.... Page 61
Service Page 61
37GB/IE
| Warnings and symbols usedThe following warnings are used in the user manual, the short manual, the quick start guide and on the packaging: | |||
 | DANGER! This symbol in combination with the signal word "Danger" marks a high-risk hazard that if not prevented will result in death or serious injury. | 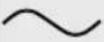 | Alternating current/voltage |
 | Hertz (supply frequency) | ||
 | Watts | ||
| WARNING! This symbol in combination with the signal word "Warning" marks a medium-risk hazard that if not prevented could result in death or serious injury. |  | Symbol for protective earth | |
 | Use the product in dry indoor spaces only. | ||
| CAUTION! This symbol in combination with the signal word "Caution" marks a low-risk hazard that if not prevented could result in minor or moderate injury. |  | Danger - risk of electric shock! | |
 | Caution - hot surface! | ||
| ATTENTION! This symbol with the signal word "Attention" indicates a possible property damage. |  | Food safeThis product has no adverse effect on taste or smell. | |
| NOTE: This symbol in combination with "Note" provides additional useful information. |  | Suitable for dishwashers (only turntable 3 and grill stand 4) | |
| CE | CE mark indicates conformity with relevant EU directives applicable for this product. |  | Scan to get the online manual. |
| Safety informationInstructions for use | |||
MICROWAVE
Introduction
We congratulate you on the purchase of your new product. You have chosen a high quality product. The instructions for use are part of the product. They contain important information concerning safety, use and disposal. Before using the product, please familiarise yourself with all of the safety information and instructions for use. Only use the product as described and for the specified applications. If you pass the product on to anyone else, please ensure that you also pass on all the documentation with it.
Intended use
This product is intended for heating and preparing food. Do not use the product for any other purpose.
The product is designed only for use in private household and must not be used in medicinal or commercial areas.
The manufacturer is not liable to damage caused by improper use.
- Scope of delivery
After unpacking the product, check if the delivery is complete and if all parts are in good condition. Remove all packing materials before use.
1 Microwave
1 Turntable
1 Grill stand
1 Programme overview label
1 User manual
1 Quick start guide
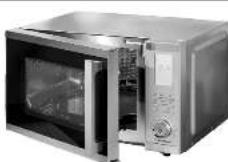
● Description of parts
(Fig. A)
1 Mains cord with mains plug (not illustrated)
2 Ventilation slots (rear side)
3 Turntable
4 Grill stand
5 Door assembly (door seal)
6 Door frame
7 Handle
8 Catch
9 Cooking chamber
10 Program overview
11 Display
12 Comb. button (grill/combination)
13 📞 button (convection)
14 ✱ button (defrost)
15 button (stop)
16 📊/💡 button (clock/timer)
17 Rotary knob (time/weight) with button (start/quick start)
18 ➕ button (child-proof lock)
19 button (automatic cooking)
20 button (microwave)
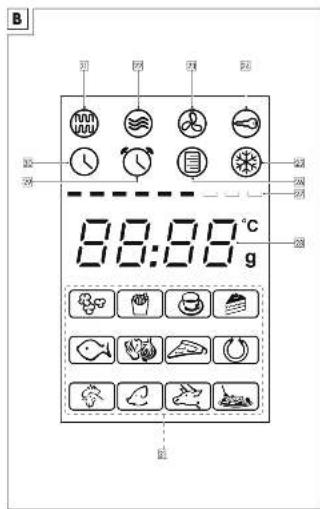
(Fig. B)
21 indicator (grill)
22 indicator (microwave)
23 📋 indicator (convection)
24 indicator (child-proof lock)
25 indicator (defrost)
26 ① indicator (automatic cooking)
27 Operation display
28 Value display
29 (timer)
30 (clock)
31 Menu display (automatic cooking)
- Technical data
| Nominal voltage: | 220-240 V~, 50 Hz |
| Power consumption:- Microwave:- Grill:- Convection: | 1,600 W1,750 W2,150 W |
| Standby power consumption: | 0.7 W |
| Protection class: | I |
| Microwave power output: | 900 W |
| Microwave frequency: | 2,450 MHz |
| Cooking chamber volume: | approx. 25 litres |
This product fulfils the requirement of the European standard EN 55011.
In conformity with this standard, this product is classified as Group 2 Class B equipment.
■ Group 2 = The product intentionally generates radio-frequency energy in the form of electromagnetic radiation for the heat treatment of food.
■ Class B equipment = The product is suitable to be used in domestic establishments.

Safety instructions
BEFORE USING THE PRODUCT, FAMILIARISE YOURSELF WITH ALL OF THE SAFETY INFORMATION AND INSTRUCTIONS FOR USE! WHEN PASSING THIS PRODUCT ON TO OTHERS, ALSO INCLUDE ALL THE DOCUMENTS!
In the case of damage resulting from non-compliance with these operating instructions the warranty claim becomes invalid! No liability is accepted for consequential damage! In the case of material damage or personal injury caused by incorrect handling or non-compliance with the safety instructions, no liability is accepted!
IMPORTANT SAFETY INSTRUCTIONS READ CAREFULLY AND KEEP FOR FUTURE REFERENCE
This product can be used by children aged from 8 years and above and persons with reduced physical, sensory or mental capabilities or lack of experience and knowledge if they have been given supervision or instruction concerning use of the product in a safe way and understand the hazards involved.
Children shall not play with the product.
Cleaning and user maintenance shall not be made by children without supervision.
Keep the product and its cord out of reach of children less than 8 years.
⚠ WARNING! When operating the product in combination mode, we recommend that children only use the product under adult supervision due to the temperatures generated.
⚠ WARNING! If the door or door seals are damaged, the product must not be operated until it has been repaired by a competent person.
⚠ WARNING! It is hazardous for anyone other than a competent person to carry out any service or repair operation that involves the removal of a cover which gives protection against exposure to microwave energy.
⚠ WARNING! Liquids and other foods must not be heated in sealed containers since they are liable to explode.
If the supply cord is damaged, it must be replaced by the manufacturer, its service agent or similarly qualified persons in order to avoid a hazard.
■ The product is intended to be used in household and similar applications such as:
- staff kitchen areas in shops, offices and other working environments; - farm houses; - by clients in hotels, motels and other residential environments; - bed and breakfast type environments.
A minimum of 20 cm of free space must remain above the top surface of the product.
■ Only use utensils that are suitable for use in microwave ovens.
■ Never use the grill stand or other metallic objects in microwave and combination mode. Metals reflect the microwave radiation and this leads to the generation of sparks. This can cause a fire and irreparably damage the product!
■ When heating food in plastic or paper containers, keep an eye on the product due to the possibility of ignition.
The product is intended for heating food and beverages. Drying of food or clothing and heating of warming pads, slippers, sponges, damp cloth and similar may lead to risk of injury, ignition or fire.
If smoke is emitted, switch off or unplug the product and keep the door closed in order to stifle any flames.
■ Microwave heating of beverages can result in delayed eruptive boiling, therefore care must be taken when handling the container.
■ The contents of feeding bottles and baby food jars shall be stirred or shaken and the temperature checked before consumption, in order to avoid burns.
■ Eggs in their shell and whole hard-boiled eggs should not be heated in microwave ovens since they may explode, even after microwave heating has ended.
■ The product should be cleaned regularly and any food deposits removed.
■ Failure to maintain the product in a clean condition could lead to deterioration of the surface that could adversely affect the life of the product and possibly result in a hazardous situation.
■ The product shall not be cleaned with a steam cleaner.
■ The product is intended to be used freestanding. It must not be placed in a cabinet or in a similar environment.
ADDITIONAL SAFETY ADVICE
■ People fitted with a heart pacemaker should consult their doctor about the possible risks of using his product before taking it into use.
⚠️ DANGER! Risk of burns!
During use the product gets hot. Do not touch the product while in use nor immediately after use.
⚠️ DANGER! Risk of electric shock! Do not immerse the product in water or other liquids. Never hold the product under running water.
⚠️ DANGER! Risk of electric
shock! Never use a damaged product. Disconnect the product from the power supply and contact your retailer if it is damaged.
■ The product is not to be used if it has been dropped, if there are visible signs of damage.
Before connecting the product to the power supply, check that the voltage and current rating corresponds with the power supply details shown on the product's rating label.
■ Protect the power cord against damages. Do not let it hang over sharp edges, do not squeeze or bend it. Keep the power cord away from hot surfaces and open flames.
Positioning the product
⚠️ ATTENTION! Do not install the product above a cooker or any other heat-generating device. Installation in such a location could cause damage to the product.
Operation
⚠️ DANGER! Risk of fire!
Remove all metallic closures from the packaging of the food that you intend to heat.
- Do not move the product while it is in operation.
■ Never operate the product when it is empty. - Do not place the product on hot plates (gas, electric, coal cooking range etc.). Operate the product on a level, stable, clean, heat-resistant and dry surface.
■ Do not place flammable materials close to the product.
■ The product is not intended to be operated by means of an external timer or separate remote control system.
If the non-stick coating on the turntable starts peeling off: Stop using the turntable.
Cleaning and care
⚠ WARNING! Risk of
injury! Disconnect the product from the power supply before cleaning work and when not in use.
- Do not pull the power plug out of the electrical outlet by the power cord.
■ Protect the product, its power cord and power plug against dust, direct sunlight, dripping and splashing water.

Do not remove the light grey mica cover plate, which is mounted inside the cooking chamber to protect the magnetron.
If the mica cover plate is scorched or damaged: Stop using the product. Have the product repaired by a qualified specialist.
If the luminary inside the product needs replacing, have this done by a qualified specialist.
■ Clean the following components regularly using a damp cloth:
-Door seal and adjacent components
-Door frame (both sides)
-Handle
-Catch
-Viewing window (both sides)
- Clean the product and its accessories as described in the "Cleaning and care" chapter.
RADIO INTERFERENCE WITH OTHER DEVICES
The operation of the product may cause interference on your radio, television or similar devices.
If such interference occurs, it can be reduced or corrected by the following remedial measures:
■ Clean the door and the door seals of the product.
■ Realign the aerial of your radio or television.
Keep the product and the receiver spatially separated.
■ Move the product away from the receiver.
- Plug the product into another wall socket. The product and the receiver should be connected to different circuits.
SAFETY PRECAUTIONS FOR THE PREVENTION OF EXCESSIVE EXPOSURE TO MICROWAVE ENERGY
- Do not try to operate the product while the door is open.
This can lead to you being exposed to a potentially harmful dose of microwave radiation.
It is also important not to break or manipulate the safety locks.
- Do not jam anything between the door. Make sure that there is no food or cleaning agent residue left on the seals.
● Basic principles of microwave cookery
☐ Cooking time: Pay attention to the cooking time. Select the shortest possible stated cooking time and increase as required. Food that is cooked too long can begin to smoke or catch fire.
Food: Arrange the pieces of food evenly in the product. Cut the food into pieces of approximately the same size. Place the thickest pieces near the edges.
☐ Covering food: Cover the food during cooking with a lid suitable for microwave cookery. The lid prevents splashing and helps in the even cooking of the food.
Turning food: While cooking, turn the food in the product once so that items such as chicken or hamburgers are cooked more quickly. Large pieces of food, such as joints of meat, must be turned at least once.
Completely rearrange small food items, such as meatballs, after half the cooking time. Turn the meatballs and move them from the middle of the plate to the edge.
☐ Food with skins: Puncture the skins of potatoes, sausages and similar food before cooking. Otherwise, they could explode.
☐ Food with thick skins: Prick whole pumpkins, apples, chestnuts and similar food before cooking.
☐ Fat or oil: Do not thaw frozen fat or oil in the product. Do not fry foods in the product. The fat or oil could ignite.
☐ Beverages: When heating drinks with the product, bubbling may be delayed when the drink boils. Be careful when handling the container. To avoid sudden bubbling up:
If possible, place a suitable glass rod in the fluid for as long as it is being heated.
To avoid an unexpected bubbling up, leave the liquid to stand in the cooking chamber 9 for about 20 seconds after heating.
□ Popcorn: Only use microwaveable popcorn.
- Using suitable cookware
⚠ WARNING! Risk of fire! Never use the grill stand or other metallic objects in microwave and combination mode. Metals reflect the microwave radiation and this leads to the generation of sparks. This can cause a fire and irreparably damage the product!
The ideal material for use in a microwave oven is microwave-permeable, allowing the energy to penetrate the container to heat the food. Microwaves cannot penetrate metal. For this reason, metal containers and cookware should not be used.
When using the product for heating, products made of recycled paper should not be used. These can contain minute fragments of metal, which can generate sparks and/or fires.
We recommend the use of round/oval cookware instead of square or oblong containers, as food in corner areas tends to overcook. The following list provides general hints to assist you in selecting the correct cookware.
| Cookware Microwave Grill/convection Combination | |||
| Heatproof glass Yes Yes Yes | |||
| Non-heatproof glass | No | No | No |
| Heatproof ceramic | Yes Yes Yes | ||
| Microwave-suitable plastic dishes | Yes | No | No |
| Kitchen roll | Yes | No | No |
| Metal tray/plate, grill stand 4 | No | Yes | No |
| Aluminium foil and foil containers | No | Yes | No |
Before first use
⚠ WARNING! Risk of fire! Never operate the product when it is empty.
i NOTES:
☐ There may be a faint odour the first time the product is used. Make sure there is sufficient ventilation in the area.
☐ When you open the door 5 you can see a sticker with the program overview 10 on the frame. If no sticker is affixed at this position, you can find the sticker inside the cooking chamber 9. Select the sticker with your preferred language and stick it in the place for the program overview. The key symbols and the automatic cooking modes are described on the stickers.
- Remove the packaging material (including polybag, all tapes and protection boards inside the cooking chamber 9). Check if all parts are complete.
- Clean the product and its accessories (see "Cleaning and care").
- Clean the surface with a dry cloth to remove water or dust.
- Positioning the product
⚠ WARNING! Risk of fire! This product is not suitable for installation in a kitchen cabinet. In closed cabinets, the ventilation of the product is not sufficiently guaranteed. The product could then be damaged and there is a risk of fire!
☐ Place the product on a flat surface that leaves enough space for ventilation:
- A minimum of 10 cm of free space must remain between the product and the adjacent walls (including side and back wall). It must remain possible to fully open the door.
- A minimum of 20 cm of free space must remain above the top surface of the product.
Assembly
-
Insert the turntable 3 on the turntable drive (inside the cooking chamber 9).
-
Grill mode only: Place the grill stand 4 on the turntable 3.
-
Connect the mains plug 1 with a mains outlet.
Operation
i NOTES:
After cooking has ended, the value display 28 shows "End" and "Hot" alternately and 5 beeps sound. 4 beeps sound every 2 minutes until you press 15 or open the door by its handle 7.
If you press a button that has no available function, the buzzer rings twice.
☐ During cooking, you can stop the operation by opening the door by its handle 7 or by pressing 15. If you press once, the program will be paused. Press the rotary knob 17 to resume the program. If you press twice, the program will be cancelled.
☐ The product has an energy saving mode. In standby mode the backlight of the display 11 will be dimmed, if you do not press any button or rotate the rotary knob 17 within 5 seconds. Press any button or rotate the rotary knob to brighten the backlight.
☐ After a cooking programme with a cooking time >2 minutes has ended, the fan keeps operating for 3 minutes to cool down the cooking chamber 9. The value display 28 shows "End" and "Hot" alternately.
During the cooling down phase: Press 15 to stop the fan. We suggest to wait until the fan has come to a complete stop before you continue to use the product. This will prolong the product's lifetime.
☐ The maximum cooking time for all manual programs is 95 minutes. Rotate the rotary knob 17 clockwise to set the time from 10 seconds to 95 minutes.
| Time range | Interval |
| <5 minutes | 10 seconds |
| 5–10 minutes | 30 seconds |
| 10–30 minutes | 1 minute |
| >30 minutes | 5 minutes |
The operation display 27 indicates the different operational states:
| Operation display 27 | Meaning |
| Lights up fully | Operation finished |
| Running | Operation in progress |
| Off | No operation (during standby mode and program selection) |
Standby mode
When the product is first plugged in, a beep sounds. After 5 seconds without any action the display 11 becomes dimmed. The product enters the standby mode. The value display 28 shows "1:01" (or the current time after setting the clock). ⏰30 lights up.
If no button is pressed for 30 seconds in program selection mode, the product switches to standby mode.
☐ During cooking, press ☑ 15 twice to stop cooking and enter standby mode.
Setting the clock
-
When the product is first plugged in: The value display 28 shows "1:01". ⏰30 lights up.
-
Press and hold ⏻/16 for 3 seconds. The 12 hour format is selected. The value display 28 shows "Hr12".
-
Rotate the rotary knob 17 to select 12 or 24 hour format.
Hr12: 12 hour format
Hr24: 24 hour format
- Press the rotary knob 17 to confirm.
- Rotate the rotary knob 17 to set the hours.
- Press the rotary knob 17 to confirm.
- Rotate the rotary knob 17 to set the minutes.
- Press the rotary knob 17 to confirm.
The clock is now set.
Setting the kitchen timer
NOTE: You can use the kitchen timer independently of the microwave operation.
- When the product is in standby mode: Press 16. The value display 28 shows "0:00". 29 lights up.
- Rotate the rotary knob 17 clockwise to set the time from 10 seconds to 95 minutes.
- Press the rotary knob 17 to confirm. A beep sounds. The time starts counting down. After approx. 5 seconds the value display 28 shows the time of day again. The kitchen timer continues to run in the background.
- Checking the progress of the kitchen timer: Press ☐☐☐ 16. The value display 28 briefly shows the kitchen timer.
- Once the set time has elapsed: A long beep sounds.
Quick start function 1
- In standby mode, rotate the rotary knob 17 to set the cooking time.
- Press the rotary knob 17 to start cooking at 900 W.
Quick start function 2
NOTE: With this function, you can start cooking immediately for 30 seconds (or longer, up to 95 minutes) at 900 W.
- Microwave mode – Examples of use
| Display | Output power | Application |
| P900 | 900 W | Heating up quickly, chicken |
| P800 | 800 W | Pork, ground meat, meat loaf, frozen food |
- Press the rotary knob 17. The value display 28 shows "0:30". 🕒 22 lights up. The cooking process starts with a cooking time of 30 seconds. The time starts counting down.
- If you wish to increase the cooking time: Press the rotary knob 17 repeatedly until the desired cooking time is reached. Each press increases the cooking time by the interval shown in the following table:
| Cooking time Interval | |
| 30 seconds to 5 minutes 30 seconds | |
| 5 minutes to 95 minutes | 1 minute |
- Microwave mode
Accessory used:
Turntable 3
⚠ WARNING! Risk of fire! Never use the grill stand or other metallic objects in microwave mode. Metals reflect the microwave radiation and this leads to the generation of sparks. This can cause a fire and irreparably damage the product!
NOTE: During cooking, you can check the power level by pressing ☑20. The value display 28 briefly shows the power level.
- In standby mode, press ☎20. The value display 28 shows "P900". ☎22 lights up.
- In standby mode, press ☎20. The value display 28 shows "P900". ☎22 lights up.
- Press 20 repeatedly to select another power level from "P900" to "P100" (see "Microwave mode - Examples of use").
- Rotate the rotary knob 17 to set the cooking time. The max. cooking time is 95 minutes.
- Press the rotary knob 17 to confirm. The time starts counting down.
| Display Output power Application | |
| P700 700 W Fish, potatoes, popcorn, cake, pasta | |
| P600 600 W Beverages, heating up milk, reheating, rice | |
| P500 500 W Vegetables, stew, custard | |
| P400 400 W Soup, reheating bread | |
| P300 300 W Defrosting meat, melting butter/chocolate/cheese | |
| P200 200 W Defrosting vegetables, keeping warm | |
| P100 100 W Softening ice cream, warming up | |
Grill mode
Accessory used:
Turntable 3 + grill stand 4

WARNING! Risk of fire! Do not use any lid or cookware that is not heat-resistant in grill mode, as these could melt or catch fire.

NOTE: Always place the grill stand 4 on the turntable 3 in grill mode. In this way you achieve optimal grilling results.
■ The following 3 grill modes are available:
| Mode Description | |
| Gr-121 | Only the upper grill is activated.This mode is suitable for gratinated sandwiches and gratins. |
| Gr-221 | Only the lower grill is activated.This mode is suitable for dishes or food that need to be cooked/grilled from below. |
| Gr-321 | Upper and lower grill are activated.This mode is suitable for thin slices of meat, steaks, rissoles, sausages or chicken pieces. |
- In standby mode, press 📄/Comb. 12. The value display 28 shows "Gr-1". 📄 21 lights up.
- Press 🐎/Comb. 12 repeatedly to select the grill mode from "Gr-1" to "Gr-3" (see above table).
- Rotate the rotary knob 17 to set the grilling time. The max. grilling time is 95 minutes.
-
Press the rotary knob 17 to start the grilling process. The time starts counting down.
-
Once the set time has elapsed: The value display 28 shows "End" and "Hot" alternately. A few beeps sound.
Combination mode "Grill"
Accessory used:
Turntable 3

WARNING! Risk of fire! Never use the grill stand or other metallic objects in combination mode "Grill". Metals reflect the microwave radiation and this leads to the generation of sparks. This can cause a fire and irreparably damage the product! Do not use any lid or cookware that is not heat-resistant in combination mode "grill", as these could melt or catch fire.

NOTE: The combination mode "Grill" combines the grill function with the normal microwave operation. First the product operates in microwave mode for a certain amount of time. Immediately afterwards the product automatically switches to grill mode for a certain amount of time. The product operates in both modes in a repeating cycle until the set time has elapsed.
■ The following 4 combinations are available:
| Mode(value display 28) | Microwave mode(P900) | Grill mode Suitable for | |
| Co-1 + 30:70 | 30 % | 70 % (Top heat) | ■ Pasta■ Pizza |
| Co-2 + 45:55 | 45 % | 55 % (Top heat) | ■ Gratin■ Fish |
| Co-3 + 30:70 | 30 % | 70 % (Top and bottom heat) | ■ Potatoes■ Steak |
| Co-4 + 55:45 | 55 % | 45 % (Top and bottom heat) | ■ Poultry■ Cake |
-
In standby mode, press Comb. 12 repeatedly to select the mode from "Co-1" to "Co-4". If you select the mode "Co-1", the value display 28 shows "Co-1" and "30:70" (30 % microwave, 70 % grill) alternately. 22 and 21 light up.
-
Rotate the rotary knob 17 to set the cooking time. The max. cooking time is 95 minutes.
-
Press the rotary knob 17 to start the cooking process. The time starts counting down.
-
Once the set time has elapsed: The value display 28 shows "End" and "Hot" alternately. A few beeps sound.
- Convection mode
Accessory used:
Turntable 3
NOTE: In convection mode, hot air circulates in the cooking chamber 9. Convection mode is especially recommended for cooking gratins or crispy dishes.
- In standby mode, press ⚙13. The value display 28 shows "200 °C". ⚙23 lights up.
- Press ⚙13 repeatedly to set the temperature from 200 °C to 110 °C.
- Preheating: Press the rotary knob 17 after setting the temperature. The product starts to preheat for 30 minutes. Once the product reaches the set temperature, a few beeps sound.
Open the door by its handle 7 to stop preheating. Place the food in the product.
If no action was made, the product continues preheating for 30 minutes.
- Rotate the rotary knob 17 to set the cooking time. The max. cooking time is 95 minutes.
- Press the rotary knob 17 to start the cooking process. The time starts counting down.
- Once the set time has elapsed: The value display 28 shows "End" and "Hot" alternately. A few beeps sound.
- Combination mode "Convection"
Accessory used:
Turntable 3
⚠ WARNING! Risk of fire! Never use the grill stand or other metallic objects in combination mode "Convection". Metals reflect the microwave radiation and this leads to the generation of sparks. This can cause a fire and irreparably damage the product!
NOTE: The combination mode "Convection" combines the convection function with the normal microwave operation. For example, you can use this mode to cook meat so that it becomes juicy and tender, but still crisp.
■ The following 4 combinations are available:
| Mode(value display 28) | Microwave mode Convection mode Suitable for | ||
| 110 °C + 70:30 | 70 % | 30 % | ■ Meat■ Fish |
| 140 °C + 60:40 | 60 % | 40 % | ■ Vegetables■ Cakes |
| 170 °C + 45:55 | 45 % | 55 % | ■ Shrimps■ Drumsticks |
| 200 °C + 30:70 | 30 % | 70 % | ■ Home-made fries |
- In standby mode, press Comb. 12 repeatedly until the value display 28 shows "110 °C" and "70:30" alternately. 23 and 22 light up.
- Keep pressing 12 repeatedly to select a temperature of 110 °C, 140 °C, 170 °C, or 200 °C.
- Rotate the rotary knob 17 to set the cooking time. The max. cooking time is 95 minutes.
- Press the rotary knob 17 to start the cooking process. The time starts counting down.
- Once the set time has elapsed: The value display 28 shows "End" and "Hot" alternately. A few beeps sound.
Defrosting by time
i NOTES:
During defrosting, the value display 28 shows "turn" after half of the time has passed and 2 beeps sound. This is a reminder to turn the food over. If you do not turn the food over, the process will continue until the time has elapsed.
To defrost 500 g of minced meat, a defrosting time of 10 minutes is recommended.
- In standby mode, press ✦ 14. The value display 28 shows "0:00". ✦ 25 lights up.
- Rotate the rotary knob 17 to set the defrosting time. The max. defrosting time is 95 minutes.
- Press the rotary knob 17 to start the process. The time starts counting down.
- During defrosting, the value display 28 shows "turn" after half of the time has passed and 2 beeps sound.
Open the door by its handle 7. The time on the value display 28 is stopped.
- Turn the food over. Always use oven gloves or pot holders because the food becomes hot.
- Close the door by its handle 7.
- Press the rotary knob 17 to continue the process.
- Once the set time has elapsed: The value display 28 shows "End" and "Hot". A few beeps sound.
- Defrosting by weight
i NOTES:
The time and the defrosting power are adjusted automatically once you entered the weight of the food to be defrosted.
During defrosting, the value display 28 shows "turn" after 2/5 of the time has passed and 2 beeps sound. This is a reminder to turn the food over. If you do not turn the food over, the process will continue until the time has elapsed.
- In standby mode, press ✦ 14 twice. The value display 28 shows "100 g". ✦ 25 lights up.
- Rotate the rotary knob 17 to set the weight of the food to be defrosted within a range of 100 to 1,800 g.
- Press the rotary knob 17 to start the process. The time starts counting down.
- During defrosting, the value display 28 shows "turn" after 2/5 of the time has passed and 2 beeps sound.
Open the door by its handle 7. The time on the value display 28 is stopped.
- Turn the food over. Always use oven gloves or pot holders because the food becomes hot.
- Close the door by its handle 7.
- Press the rotary knob 17 to continue the process.
- Once the set time has elapsed: The value display 28 shows "End" and "Hot". A few beeps sound.
| Defrost weight Defrost time | |
| 100 g 9 min | |
| 200 g 13 min | |
| 300 g 17 min | |
| 400 g 21 min | |
| 500 g 25 min | |
| 600 g 29 min | |
| 700 g 33 min | |
| 800 g 37 min | |
| 900 g 41 min | |
| 1,000 g 45 min | |
| 1,100 g 49 min | |
| 1,200 g 53 min | |
| 1,300 g 57 min | |
| 1,400 g 61 min | |
| 1,500 g 65 min | |
| 1,600 g 69 min | |
| 1,700 g 73 min | |
| 1,800 g 77 min | |
Child-proof lock
i NOTES:
This feature only can be activated when the product is in standby mode.
☐ Use this feature to prevent unsupervised operation of the product by children or other persons who are not familiar with the operation of the product. When you activate this feature, all buttons and the rotary knob 17 are deactivated.
□ Activating: Press and hold 18 until a beep sounds and 24 lights up.
☐ Deactivating: Press and hold ⏻ 18 until a beep sounds and ⏻ 24 goes off.
● Automatic cooking modes
NOTE: The result of automatic cooking depends on factors such as the shape and size of food, the desired degree of doneness of certain foods and how you place the food in the product.
- In standby mode, press ☐ 19 to select the menu (see following table). The value display 28 shows "A-01". ☐ 26 lights up. The corresponding menu display 31 flashes.
- Press 19 repeatedly to select the required setting from "A-01" to "A-12".
- Only for code A-07 (Pizza):
- Rotate the rotary knob 17 to select the temperature of the pizza.
| Display | Suitable for |
| -20 °C | Deep-frozen pizza |
| 03 °C | Refrigerated pizza |
| 20 °C | Fresh pizza |
- Press ☐ 19 to confirm.
- Rotate the rotary knob 17 to set the weight of the food or the number of servings.
- Press the rotary knob 17 to start the process. The time starts counting down.
- Once the set time has elapsed: The value display 28 shows "End" and "Hot". A few beeps sound.
| Code | Food Weight/ | servings | Cooking time | Mode |
| A-01 | Popcorn* 100 g | 1:50 min Microwave (P900) | ||
| A-02 | French fries (-18 °C) | 200 g 25:00 min | Convection (200 °C) | |
| A-03 | Liquids 1 cup 1:30 | 0 min Microwave | (P900) | |
| 2 cups 2:40 min | ||||
| 3 cups 3:50 min | ||||
| A-04 | Cake 475 g 45:00 | 0 min Convection | (160 °C) | |
| A-05 | Fish 200 g 12:00 | min** Combination of microwave | and convection mode in a repeating cycle:■ Microwave (P900) for 10 s■ Convection (200 °C) for 23 s | |
| 300 g 15:00 min* | ||||
| 400 g 18:00 min* | ||||
| 500 g 21:00 min* | ||||
| 600 g 24:00 min* | ||||
| A-06 | Vegetables | 200 g | 3:00 min | Microwave (P900) |
| 300 g 4:00 min | ||||
| 400 g 5:00 min | ||||
| 500 g 6:00 min | ||||
| 600 g 7:00 min | ||||
| A-07 | Frozen pizza (-20 °C) | 200 g | 17:00 min | ■ Microwave + lower grill for 3:00 min■ Upper and lower grill for 4:00 min■ Upper grill for 10:00 min |
| 300 g | 18:00 min | ■ Microwave + lower grill for 3:00 min■ Upper and lower grill for 5:00 min■ Upper grill for 10:00 min | ||
| 400 g | 19:00 min | ■ Microwave + lower grill for 3:00 min■ Upper and lower grill for 6:00 min■ Upper grill for 10:00 min | ||
| 500 g | 22:00 min | ■ Microwave + lower grill for 3:30 min■ Upper and lower grill for 10:00 min■ Upper grill for 8:30 min | ||
| Refrigerated pizza (03 °C) | 200 g 9:00 min | Combination mode | 3 (Co-3) | |
| 300 g 11:00 min | ||||
| 400 g 13:00 min | ||||
| 500 g 15:00 min | ||||
| Fresh pizza (20 °C) | 200 g 8:00 min | Combination mode | 3 (Co-3) | |
| 300 g 9:00 min | ||||
| 400 g 10:00 min | ||||
| 500 g 11:00 min | ||||
* Only use popcorn which is suitable for microwave. Place a dish on the turntable 3. Place a bag of popcorn on the dish. In this way you will achieve a better result.
** Turn the food over after 2/3 of the time has passed.
52 GB/IE
| Code | Food Weight/ | servings | Cooking time | Mode |
| A-08 | Sausages 100 g | 5:00 min* Combination of microwave | ave and convection mode in a repeating cycle: ■ Microwave (P900) for 10 s ■ Convection (200 °C) for 23 s | |
| 200 g 6:00 min* | ||||
| 300 g 7:00 min* | ||||
| 400 g 8:00 min* | ||||
| 500 g 9:00 min* | ||||
| A-09 | Chicken 800 g | 31:00 min* Combination mode "Convection" (170 °C) | ||
| 1,000 g 34:00 min* | ||||
| 1,200 g | 37:00 min* | |||
| 1,400 g 40:00 min* | ||||
| A-10 | Meat 200 g 12:00 | 0 min* Combination of microwave | and convection mode in a repeating cycle: ■ Microwave (P900) for 10 s ■ Convection (200 °C) for 23 s | |
| 300 g 15:00 min* | ||||
| 400 g 18:00 min* | ||||
| 500 g 21:00 min* | ||||
| 600 g 24:00 min* | ||||
| A-11 | Beef | 200 g | 12:00 min* | Combination of microwave and convection mode in a repeating cycle: ■ Microwave (P900) for 10 s ■ Convection (200 °C) for 23 s |
| 300 g 15:00 min* | ||||
| 400 g 18:00 min* | ||||
| 500 g 21:00 min* | ||||
| 6Og 24:00 min* | ||||
| A-12 | Pasta | 100 g | 20:00 min | Microwave (P700) i NOTES: □ Use water at room temperature. □ Multiply the weight of the pasta (unit: g) by a factor of 8 to calculate the required amount of water (unit: ml). |
| 200 g 25:00 min | ||||
| 300 g 30:00 min | ||||
- Microwave cooking table
| Food | Amount | Power | Time | Information |
| Fish fillet | 400 g | 700 W | 10-15 min | Add a little water and lemon juice. |
| Vegetables | 250 g | 600 W | 5-10 min | Cut the vegetables in pieces. Add a little water. Stir occasionally. |
| Potatoes | 500 g | 800 W | 8-10 min | Cut the potatoes in pieces. Add a little water. Stir occasionally. |
* Turn the food over after 2/3 of the time has passed.
| Food Amount Power | Time Information | |||
| Dessert (e.g. pudding, cupcake) | 100-300 g | 600 W | 1-5 min | Follow the instructions on the packaging of the dessert. |
| Rice 100 g rice | 250 ml water | 700 W 15 min | rinse the rice before cooking. | |
| Custard | 750 g | 500 W | 10-15 min | Put the custard on a large plate. |
| Biscuits | 400 g | 600 W | 8-10 min | Put the biscuits on a large plate. |
| Meat loaf | 500 g | 600 W | 23-28 min | Put the seasoned meat loaf on a plate. Cover the plate with a lid. |
| Gratin | 500-1,000 g | 900 W | 5-10 min | Prepare the gratin in a bowl. Cover the bowl with a lid. |
● Heating frozen food
| Food | Amount | Power | Time |
| Soup | 400 ml | 600 W | 8-10 min |
| Stew | 500 g | 600 W | 10-13 min |
| Side dishes (e.g. pasta) | 500 g | 700 W | 8-10 min |
| Vegetables | 300 g | 500 W | 8-10 min |
- Recipes
● Chocolate mug cake
8 min

| Preparation time: | 5 min |
| Cooking time: 3 min |
Ingredients
| 4 tbsp | Flour |
| 1/4 tbsp Baking powder | |
| 4 tbsp | Caster sugar |
| 2 tbsp | Cocoa powder |
| 1 | Egg |
| 3 tbsp | Milk |
| 3 tbsp | Vegetable oil |
| A few drops | Vanilla extract or another extract (optional) |
| 2 tbsp | Chocolate chips, nuts, or raisins (optional) |
Preparation
- Add flour, baking powder, caster sugar, and cocoa powder in a large, microwave-safe mug. Mix all ingredients.
- Add an egg and mix all ingredients.
- Add milk and vegetable oil. Add vanilla extract or another extract, if desired. Mix all ingredients until the mixture is smooth.
- If desired, add chocolate chips, nuts, or raisins. Mix all ingredients.
54 GB/IE
- Place the mug on the centre of the turntable 3. Cook the cake at 600 W for 3 minutes or until the cake stops rising and becomes firm.
- Wear oven mitts to remove the hot mug. Enjoy the tasty cake!

Caramel corn

approx. 27 min

× 8
| Preparation time: 20 min | |
| Cooking time: approx. 7 min |
Ingredients
| 60 g Corn kernel |
| 240 g Brown sugar |
| 60 ml Corn syrup |
| 3 tbsp Unsalted butter |
| 1/2 tsp Salt |
| 1 tsp Vanilla extract |
| 1/4 tsp Baking soda |
| A few drops Vegetable oil (optional) |
Preparation
- Add the corn kernels in a paper bag. Add a few drops of vegetable oil, if desired. Crimp the top of the bag a few times to close it.
- Place the bag on the centre of the turntable 3. Press 19 to select auto menu A-01 for popcorn. Press the rotary knob 17 to start cooking. If you do not hear the "pop" sound anymore, you can also stop the cooking process before the programme has finished.
-
Preparing caramel: Add sugar, corn syrup, butter, and salt in a large, microwave-safe bowl. Cook the mixture at 700 W for 2 minutes. Stir the mixture and cook it at 700 W for another 2 minutes until it forms many bubbles.
-
Add vanilla extract and baking soda to the caramel mixture and stir it well. Immediately add a third of the hot caramel over the popcorn in the bag. Close the bag and shake it to coat the popcorn. Add another third of the caramel over the popcorn. Close the bag and shake it. Add the remaining caramel over the popcorn and shake the bag one last time.
- Place the bag on the centre of the turntable 3. Cook the popcorn at 700 W for 1 minute. Wear oven mitts to remove and shake the hot bag.
- Pour the hot caramel corn into a container. Let the caramel corn cool down completely for approx. 20 minutes. Break the caramel corn apart and enjoy!

Salmon

11-23 min

× 1
| Preparation time: 5 min | |
| Cooking time: 6–18 min |
Ingredients
| 400 g Salmon | |
| 1/2 tsp Pepper | |
| 1/2 tsp Salt | |
| 2 tsp Water | |
| 1/4 | Lemon |
Preparation
- If necessary, defrost the salmon (see "Defrosting by weight").
- Season the salmon with pepper and salt.
- Place the salmon on a dish. Add water. Cover the dish with a lid.
- Place the dish on the centre of the turntable 3. Cook the salmon at 700 W for 6 minutes. Alternatively, select code A-05 (see "Automatic cooking modes").
- Add a little lemon juice before serving the salmon.

Potato gratin

27-45 min × 3

| Preparation time: 15 min | |
| Cooking time: 12-30 min |
Ingredients
| 750 g Waxy potatoes (peeled) |
| 300 g Cream |
| 100 g Cheese (grated) with a fat content of 25 % to 30 % in dry measure |
| To taste Salt and pepper |
Recommended cookware
Round, microwave-safe casserole dish with lid
Height: 5-6 cm
■ Diameter: approx. 22 cm
Preparation

NOTES:
■ Preheating is not required.
☐ You will get the best result if you use the microwave and convection modes alternately. Wait until each set cooking process is finished. Then set the next cooking process.
- Cut the potatoes into slices with a thickness of approx. 3-4 mm.
- Lay half of the potato slices in the casserole dish in the style of roof tiles.
- Sprinkle the potato slices with half of the cheese.
- Season the potato slices with salt and pepper.
- Add half of the cream.
- Lay the remaining potato slices in the casserole dish in the style of roof tiles.
- Sprinkle the potato slices with the remaining cheese.
- Add the remaining cream.
- Season the gratin with salt and pepper.
- Cover the casserole dish with a lid.
- Place the casserole dish on the centre of the turntable 3.
- We recommend the following cooking modes to prepare the gratin as desired:
| Purpose | Mode Time | |
| Fast cooking | Microwave mode at 900 W | 12 min |
| Gratin with a crispy surface | Combination mode “Convection” at 170 °C | 25 min |
| Gratin with a golden surface | Combination mode “Grill” with combination 2 (Co-2) | 30 min |
- Wear oven mitts to remove the hot casserole dish. Enjoy the tasty gratin!

Courgette soup

31 min

| Preparation time: 15 min | |
| Cooking time: 16 min |
Ingredients
| 1 | Courgette (finely diced, approx. 250 g) |
| 500 ml | Water |
| 2 tsp | Powdered vegetable stock |
| 150 g Processed cheese (with herbs) | |
| 100 ml | Cream |
Preparation
NOTE: You can purée the soup with a hand blender before serving. This gives the soup a creamy texture.
- Add courgette dice, water and powdered vegetable stock in a microwave-safe bowl.
- Place the bowl on the centre of the turntable 3. Cook the soup at 900 W for 6 minutes.
- Add the processed cheese and cream.
- Cook the soup at 600 W for 10 minutes.
- Wear oven mitts to remove the hot bowl. Enjoy the tasty soup!

Grilled chicken

135 min × 2-3

| Preparation time: 75 min | |
| Cooking time: 60 min |
Ingredients
| 1 Whole chicken (800-1,400 g) |
| 60 ml Olive oil |
| 30 ml Lemon juice |
| 4 Garlic cloves (minced) |
| 1 tbsp Fresh rosemary (chopped) |
| 1 tbsp Fresh thyme (chopped) |
| 1 tsp Paprika |
| To taste Salt and pepper |
Preparation
- Prepare the chicken: Rinse the chicken under cold water and pat it dry with paper towels. Remove any giblets if necessary.
- Marinate the chicken: In a small bowl, mix the olive oil, lemon juice, garlic, rosemary, thyme, paprika, salt, and pepper. Rub this mixture all over the chicken, including under the skin and inside the cavity. Let the chicken marinate for at least 1 hour, or overnight in the refrigerator for best results.
- Grill the chicken: Place the chicken on a microwave-safe dish. Place the dish on the centre of the turntable 3. Press 19 repeatedly to select auto menu A-09 for chicken. Select the corresponding weight of the chicken. Press the rotary knob 17 to start cooking.
- Turn the chicken: After 2/3 of the time has passed and few beeps sound, open the door 5 and turn the chicken over. Close the door and press rotary knob 17 to continue the cooking process.
- Allow to rest and serve: Remove the chicken from the product. Let the chicken rest for 10–15 minutes before carving. This allows the juices to redistribute, making the chicken more tender and flavourful.

Salami pizza

30 min

× 2 - 3
| Preparation time: 15 min | |
| Cooking time: 15 min |
Ingredients
| 1 | Pizza dough (store-bought or homemade) |
| 120 ml | Pizza sauce |
| 120 g | Mozzarella cheese (shredded) |
| 60 g | Salami (sliced) |
| 30 g | Black olives (sliced) (optional) |
| 30 g | Red onions (sliced) (optional) |
| 1 tsp | Dried oregano |
| For garnish | Fresh basil leaves (optional) |
Preparation
- Prepare the dough: Roll out the pizza dough on a lightly floured surface to your desired thickness.
- Add the sauce: Spread the pizza sauce evenly over the dough, leaving a small border around the edges.
- Add toppings: Sprinkle the shredded mozzarella cheese over the sauce. Arrange the salami slices evenly on top of the cheese. Add the black olives and red onions if desired. Sprinkle the dried oregano over the top.
- Grill the pizza: 2 programmes are suggested depending on the desired grilling result.
- For a crispy and golden brown pizza: Carefully transfer the pizza to the grill stand 4. Place the grill stand on the centre of the turntable 3. Press 🎨/Comb. 12 to select Gr-3 in grill mode. Set a cooking time of 15 minutes or cook until the surface of the pizza becomes golden brown.
- For fast grilling the pizza: Place the pizza on a microwave-safe dish. Place the dish on the centre of the turntable 3. Press 19 repeatedly to select auto menu A-07 for pizza. Rotate the rotary knob 17
57GB/IE
to select 20 °C for fresh pizza. Press ☐ confirm. Select the corresponding weight of the pizza. Press the rotary knob to start cooking.
- Garnish and serve: Remove the pizza and let it cool for a couple of minutes. Garnish the pizza with fresh basil leaves if desired. Slice the pizza and serve it warm.

Mac and cheese

50 min

| Preparation time: 10 min | |
| Cooking time: 40 min |
Ingredients
| 300 g Elbow macaroni | |
| 60 g Butter | |
| 60 g All-purpose flour | |
| 480 ml Milk | |
| 200 g Cheddar cheese (shredded) | |
| 1/2 tsp Salt | |
| 1/4 tsp Black pepper | |
| 1/4 tsp Paprika (optional) | |
| 30 g Parmesan cheese (grated)(optional) | |
Preparation
-
Cook the pasta: Add the elbow macaroni in a large microwave-safe pot filled with salted water. Place the pot on the centre of the turntable 3. Press 19 repeatedly to select auto menu A-12 for pasta. Select 300 g and press the rotary knob 17 to start cooking. Once the pasta is cooked, drain the water and set the pot aside.
-
Prepare the cheese sauce: In a medium-sized saucepan, melt the butter over medium heat. Stir in the flour and cook for about 1 minute, until it forms a smooth paste. Gradually whisk in the milk, continuing to whisk until the mixture is smooth and thickened.
-
Add the cheese: Remove the saucepan from the stove and stir in the shredded cheddar cheese until melted and smooth. Season with salt, pepper, and paprika if desired.
-
Combine pasta and sauce: Add the cooked macaroni to the cheese sauce and stir until the pasta is evenly coated.
-
Create the golden top: Transfer the mac and cheese to a microwave-safe baking dish. Sprinkle the mac and cheese with grated Parmesan cheese. Place the baking dish on the centre of the turntable 3. Press Comb. 12 to select Gr-1 in grill mode. Set a cooking time of 10 minutes or grill until the top is golden and bubbly.
-
Serve and enjoy the tasty mac and cheese!

Potato chips

40 min

| Preparation time: 20 min | |
| Cooking time: 20 min |
Ingredients
| 1 tbsp Vegetable oil | |
| 1 | Sweet potato (peeled and sliced into strips) |
| 1 | Potato (peeled and sliced into strips) |
| To taste | Salt, pepper, paprika, garlic powder, or any other preferred seasoning (optional) |
Preparation
- Prepare the potatoes: Wash and peel the potatoes. Cut the potatoes into thin strips, about 0.5-1 cm thick.
- Season the potatoes: Place the cut potatoes into a medium-sized bowl. Add oil and seasoning and mix everything well.
- Bake the potato chips: Arrange the potatoes evenly in one layer on a microwave-safe and heat-proof dish. Place the dish on the centre of the turntable 3. Press Comb. 12 repeatedly to select combination mode
"Convection" until the value display 28 shows "200 °C" and "30:70" alternately. Bake the potato chips for 20 minutes.
- Turn the potato chips: After 12 minutes, open the door 5 and turn the potato chips.
- Serve and enjoy: When time is up, take out the dish. Season the potato chips as desired (or if needed) and enjoy.
Garlic chicken wings

90 min

| Preparation time: 60 min | |
| Cooking time: 30 min |
Ingredients
| 8 Chicken wings | |
| 1 tsp Salt, black pepper, garlic powder, onion powder for seasoning | |
| 1 tbsp Baking powder | |
| 4 Garlic cloves (minced) | |
| 2 tbsp Olive oil |
Preparation
NOTE: If the chicken wings are frozen, defrost them by following the instructions in "Defrosting by weight" or "Defrosting by time" first.
- Season the chicken wings: In a large bowl, mix salt, black pepper, garlic powder, onion powder, and baking powder. Toss the chicken wings in the seasoning mixture and let them marinate for at least 1 hour, or overnight in the refrigerator for best results.
- Prepare the garlic oil: In a small bowl, mix the minced garlic with the olive oil.
-
Cook the chicken wings: Place the chicken wings on the turntable 3. Keep some distance between the chicken wings. Press 13 repeatedly to select 180 °C in convection mode. Set a cooking time of 30 minutes and start cooking.
-
Turn the chicken wings: Turn the chicken wings over halfway through the cooking time. Continue to cook the chicken wings until they are golden brown and crispy.
- Add garlic flavour: In the last 5 minutes of cooking, brush the chicken wings with the garlic oil mixture to infuse them with a rich garlic flavour.
- Serve the chicken wings: Remove the chicken wings and let them rest for a few minutes. Serve the chicken wings with your favourite dipping sauce.
● Cleaning and care
⚠️ DANGER! Risk of electric shock! Before cleaning: Always disconnect the product from the wall outlet.
DANGER! Risk of burns! Do not clean the product right after operation. Let the product cool first.
⚠ WARNING! Do not immerse the product's electrical components in water or other liquids. Never hold the product under running water.
i NOTES:
□ Clean the product immediately after it has cooled. Once the food residues have dried, they are not easy to remove.
☐ Do not use cleaning sprays and other aggressive cleaning agents, as they can cause stains, smears or clouding on the surfaces.
☐ Do not use abrasive cleaning agents.
□ Housing: Clean the product's housing with a damp cloth.
☐ Cooking chamber: Always keep the cooking chamber 9 clean. If splashes of food or spilt liquids stick to the walls of the product, wipe them off with a damp cloth.
If required, use a mild washing-up liquid on the cloth. Afterwards, wipe with a cloth moistened only with clear water to remove any detergent residue.
☐ Turntable and grill stand: Clean the turntable 3 and the grill stand 4 regularly with warm, soapy water. The turntable and the grill stand are suitable for dishwashers.
☐ Splashes and soiling: Use a damp cloth regularly to remove splashes and soiling from the following components:
- Door seal 5 and adjacent components
- Door frame 6 (both sides)
- Handle 7
- Catch 8
- Viewing window (both sides)
☐ Condensation: If condensation accumulates on or around the outside of the door, wipe it off with a soft cloth. This can happen if the product is operated in extremely humid conditions.
☐ Odours: Remove odours regularly. Put a deep microwave bowl – filled with a cup of water, plus the juice and peel of a lemon – into the cooking chamber 9. Heat the mixture for 5 minutes. Wipe the cooking chamber thoroughly and rub dry with a soft cloth.
● Troubleshooting
| Problem Possible cause Possible solution | ||
| The product does not start cooking. | The door is not properly closed. | Close the door. |
| The turntable 3 makes a loud noise when turning. | The turntable 3 is not correctly positioned on the turntable drive. | Place the turntable 3 correctly in the cooking chamber 9. |
| The turntable drive and/or the floor of the cooking chamber 9 are unclean. | Clean the turntable drive and the floor of the cooking chamber 9. | |
| The light inside the product is not working. | The luminary is defective. Contact | the customer service department. |
● Disposal
The packaging is made entirely of recyclable materials, which you may dispose of at local recycling facilities.

The marking of the packaging materials for waste separation, which are marked with abbreviations (a) and numbers (b) with following meaning: 1–7: plastics/20–22: paper and fibreboard/80–98: composite materials.
Product:

The product and packaging materials are recyclable and are subject to extended producer responsibility.
Dispose them separately, following the illustrated Info-tri (sorting information), for better waste treatment.
The Triman logo is valid in France only.
Contact your local refuse disposal authority for more details of how to dispose of your worn-out product.

protect the environment, please dispose of the product properly when it has reached the end of its useful life and not in the household waste. Information on collection points and their opening hours can be obtained from your local authority.
60 GB/IE
Warranty
The product has been manufactured to strict quality guidelines and meticulously examined before delivery. In the event of material or manufacturing defects you have legal rights against the retailer of this product. Your legal rights are not limited in any way by our warranty detailed below.
The warranty for this product is 3 years from the date of purchase. The warranty period begins on the date of purchase. Keep the original sales receipt in a safe location as this document is required as proof of purchase.
Any damage or defects already present at the time of purchase must be reported without delay after unpacking the product.
Should the product show any fault in materials or manufacture within 3 years from the date of purchase, we will repair or replace it – at our choice – free of charge to you. The warranty period is not extended as a result of a claim being granted. This also applies to replaced and repaired parts.
This warranty becomes void if the product has been damaged, or used or maintained improperly.
The warranty covers material or manufacturing defects. This warranty does not cover product parts subject to normal wear and tear, thus considered consumables (e.g. batteries, rechargeable batteries, tubes, cartridges), nor damage to fragile parts, e.g. switches or glass parts.
● Warranty claim procedure
To ensure quick processing of your claim, observe the following instructions:
Make sure to have the original sales receipt and the item number (IAN 486719_2501) available as proof of purchase.
You can find the item number on the rating plate, an engraving on the product, on the front page of the instruction manual (bottom left), or as a sticker on the rear or bottom of the product.
If functional or other defects occur, contact the service department listed below either by telephone or by e-mail.
Once the product has been recorded as defective you can return it free of charge to the service address that will be provided to you. Ensure to enclose the proof of purchase (sales receipt) and a short, written description outlining the details of the defect and when it occurred.
Service
GB Service Great Britain
Tel.: 0800 0569216
E-Mail: owim@lidl.co.uk
IE Service Ireland
Tel.: 1800 200736
E-Mail: owim@lidl.ie
CE
⚠ WAARSCHUWING! Risico
INTERFERENTIE MET ANDERE APPARATEN
⚠ WAARSCHUWING! Brandgevaar!
⚠ WAARSCHUWING! Brandgevaar!
⚠ WAARSCHUWING! Brandgevaar!
⚠ WAARSCHUWING! Brandgevaar!
⚠ WAARSCHUWING! Brandgevaar!
⚠ WAARSCHUWING! Brandgevaar!
⚠ WAARSCHUWING! Brandgevaar!
● Magnetron-garingstabel
⚠️ ADVARSEL! Fare for


- MIKROWELLE/MICROWAVE/FOUR À MICRO-ONDES 5MWEDS 900 AI
- WARNINGS AND SYMBOLS USED PAGE 38
- INTRODUCTION PAGE 39
- SAFETY INSTRUCTIONS.... PAGE 40
- BASIC PRINCIPLES OF MICROWAVE COOKERY ...... PAGE 44
- BEFORE FIRST USE.... PAGE 45
- OPERATION.... PAGE 46
- RECIPES PAGE 54
- CLEANING AND CARE PAGE 59
- TROUBLESHOOTING PAGE 60
- DISPOSAL PAGE 60
- WARRANTY PAGE 61
- SERVICE PAGE 61
- MICROWAVE
- INTRODUCTION
- INTENDED USE
- SCOPE OF DELIVERY
- ● DESCRIPTION OF PARTS
- SAFETY INSTRUCTIONS
- IMPORTANT SAFETY INSTRUCTIONS READ CAREFULLY AND KEEP FOR FUTURE REFERENCE
- ADDITIONAL SAFETY ADVICE
- ⚠️ DANGER! RISK OF BURNS
- ⚠️ DANGER! RISK OF ELECTRIC
- POSITIONING THE PRODUCT
- OPERATION
- ⚠️ DANGER! RISK OF FIRE
- CLEANING AND CARE
- ⚠ WARNING! RISK OF
- RADIO INTERFERENCE WITH OTHER DEVICES
- SAFETY PRECAUTIONS FOR THE PREVENTION OF EXCESSIVE EXPOSURE TO MICROWAVE ENERGY
- ● BASIC PRINCIPLES OF MICROWAVE COOKERY
- USING SUITABLE COOKWARE
- BEFORE FIRST USE
- ASSEMBLY
- I NOTES
- STANDBY MODE
- SETTING THE CLOCK
- SETTING THE KITCHEN TIMER
- QUICK START FUNCTION 1
- QUICK START FUNCTION 2
- MICROWAVE MODE – EXAMPLES OF USE
- MICROWAVE MODE
- ACCESSORY USED
- TURNTABLE 3
- GRILL MODE
- COMBINATION MODE "GRILL
- CONVECTION MODE
- COMBINATION MODE "CONVECTION
- DEFROSTING BY TIME
- DEFROSTING BY WEIGHT
- CHILD-PROOF LOCK
- ● AUTOMATIC COOKING MODES
- ● HEATING FROZEN FOOD
- RECIPES
- ● CHOCOLATE MUG CAKE
- PREPARATION
- CARAMEL CORN
- SALMON
- POTATO GRATIN
- RECOMMENDED COOKWARE
- NOTES
- COURGETTE SOUP
- GRILLED CHICKEN
- SALAMI PIZZA
- MAC AND CHEESE
- POTATO CHIPS
- GARLIC CHICKEN WINGS
- INGREDIENTS
- ● CLEANING AND CARE
- ● TROUBLESHOOTING
- ● DISPOSAL
- PRODUCT
- WARRANTY
- ● WARRANTY CLAIM PROCEDURE
- SERVICE
- ⚠ WAARSCHUWING! RISICO
- INTERFERENTIE MET ANDERE APPARATEN
- ⚠ WAARSCHUWING! BRANDGEVAAR
Brand : SILVERCREST
Model : SMWEDS 900 A2
Category : Microwave