RRVP-200 - Alarm clock radio Essentiel B - Free user manual and instructions
Find the device manual for free RRVP-200 Essentiel B in PDF.

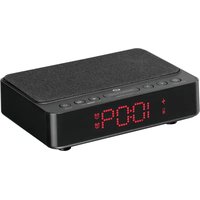
| Product type | Radio alarm clock with projector |
| Brand | Essentiel B |
| Model | RRVP-200 |
| Power supply | Mains 230 V ~ 50 Hz, 5 W |
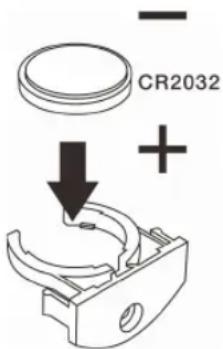
| Backup battery | 1 lithium button cell CR2032 3 V (supplied) |
| Display | LED screen |
| Time projection | Yes, distance 90-270 cm, sharpness adjustment and 180° rotation |
| FM radio | FM 87.5 - 108 MHz, 10 presettable stations |
| Alarms | 2 independent alarms, wake-up by buzzer or radio |
| Snooze function | Yes, repeat after 9 minutes |
| Sleep function | Radio auto-off timer from 10 to 90 minutes |
| Brightness adjustment | 3 levels: low, medium, high |
| Speaker power | 250 mW RMS |
| Standby consumption | 0.6 W with display |
| Protection class | Class II (reinforced insulation) |
| Usage | Indoor only |
| Operating temperature | -10 °C to 35 °C |
| Maintenance | Clean with a dry cloth; do not use solvents |
| Safety | Do not open the device; entrust repairs to a professional |
| Environment | Device and batteries to be recycled according to WEEE regulations |
Frequently Asked Questions - RRVP-200 Essentiel B
User questions about RRVP-200 Essentiel B
0 question about this device. Answer the ones you know or ask your own.
Ask a new question about this device
Download the instructions for your Alarm clock radio in PDF format for free! Find your manual RRVP-200 - Essentiel B and take your electronic device back in hand. On this page are published all the documents necessary for the use of your device. RRVP-200 by Essentiel B.
USER MANUAL RRVP-200 Essentiel B
• Alarm clock by radio or buzzer
- Two adjustable alarms
- LED screen
• Time projection on the ceiling with sharpness adjustment
• Projection distance: approx. 90 to 270 cm
• Screen brightness adjustment
- Snooze function
- Mains operated
- AC 230V \~ 50Hz, 5W
• FM waveband: FM 87.5 – 108 MHz
• Time and alarm stored in 1 x 3 V CR2032 lithium button cell included
• Speaker output power: 250mW RMS
- Standby mode with display: 0.6W
- This equipment's power management function is inappropriate as for the intended use.
- The power consumption management function is not compatible with the intended use of the equipment.

Warning - please read the operator's manual carefully before using the device and keep it for future reference.

For indoor use only.

This symbol means that the device has reinforced insulation with no accessible metal parts. For class 2 devices, plugs do not have earthing prongs.
Do not expose the device to direct sunlight, extreme temperatures (very cold or very hot), humidity, vibration or dust.
During use, storage or transport of the device, the battery can withstand the following temperatures:
- -10°C to 35°C in operation
- -20°C to 60°C during storage
- -20°C to 60°C during transport
use
Place the appliance on a flat, stable and dry surface.
Plugging the device into the mains socket.
- Insert the mains plug into a power outlet, making sure the voltage in your home is compatible with that indicated on the device's nameplate.
- When the device is plugged into the power outlet, the screen lights up and displays "0:00" (clock display).
Inserting the backup battery
This radio alarm clock has a backup battery system that requires a lithium button cell (included). In the event of a temporary power outage, the device automatically switches to battery power mode to retain the clock and alarm settings.
- When replacing the battery, the mains adapter can remain plugged into the mains socket to avoid losing user settings.
- To open the battery compartment cover, loosen the screw on the battery compartment cover with a screwdriver.
- Insert the new battery (1 x 3 V CR2032 lithium button cell) into the battery compartment, observing the polarity indicated on the cover.
- Put the cover back in place and tighten the screw.
- Dispose of the battery in accordance with applicable environmental regulations.
DANGER! KEEP OUT OF REACH OF BABIES AND CHILDREN.

Switching on/off
- Once the device has been plugged in, it will go into standby mode. Press the on/off button to exit standby mode and activate it.
- Press the on/off button ⏻ again to switch it to standby mode.

Setting the time
- To set the time on your radio alarm clock, press and hold the time/memory setting button Ⓗ until the time digits start flashing.
- Press the << button to increase the HOURS digit. You can hold it down to scroll through the digits.
- Press the >> button to increase the MINUTES digit. You can hold it down to scroll through the digits.
- Once the time has been set, to save the setting, press the time/memory setting button once.
Setting the alarm
You can set two different alarms. To do this, follow the instructions below, making sure the radio is switched off.

Alarm 1
- To set alarm 1, press and hold the Volume - / alarm setting 1 button ■ The hour digits for alarm 1 start flashing.
- Press the << button to increase the HOURS digit. You can hold it down to scroll through the digits.
- Press the >> button to increase the MINUTES digit. You can hold it down to scroll through the digits.
- Press the Volume - / alarm 1 setting button once or twice to select the type of alarm: buzzer or radio. The corresponding indicator light (▲ or ♪) is activated on screen.


Alarm 2
- To set alarm 2, press and hold the Volume + / alarm setting 2 button ■ The hour digits for alarm 2 start flashing.
- Press the << button to increase the HOURS digit. You can hold it down to scroll through the digits.
- Press the >> button to increase the MINUTES digit. You can hold it down to scroll through the digits.
- Press the Volume+ / alarm 2 setting button ☐ once or twice to select the type of alarm: buzzer or radio. The corresponding indicator light (▲ or ♪) is activated on screen.

Stopping the alarm
When the alarm sounds, press the alarm on/off button Ⓥ stop the buzzer or radio and automatically reactivate it the next day. The alarm activation indicator light on the display stays on.
To deactivate the alarm permanently, press the Volume - / alarm setting 1 or Volume + / alarm setting 2 button until the alarm indicator light goes out.
Snooze
When the alarm sounds, you can interrupt the ringing or the radio so that it reactivates 9 minutes later. This is the SNOOZE function. To do this, follow the instructions below.
- Press the Snooze button. The alarm will reactivate 9 minutes later. The corresponding alarm indicator light flashes.
- To cancel the SNOOZE function, press the alarm on/off button ⏻.
Listening to radio
You can use your radio alarm clock as a radio. Make sure the antenna wire is fully unwound first to optimise FM radio reception.
- Press the alarm on/off button (↓) once to activate the radio.
- Press the Volume - / alarm setting 1 button to lower the volume.
- Press the Volume + / alarm setting 2 button to increase the volume.
- Press the << and >> buttons to scan the frequency band and reach the one of your choice.
- Press the alarm on/off button again ⏻ to switch off the radio.
Storing preset stations
The radio can store up to 10 preset FM stations for quick access to your favourite stations.
- Press the alarm on/off button ⏻ once to activate the radio.
- Choose an FM station.
-
Hold down the time/memory setting button Ⓤ: P01 flashes on screen.
-
Press the time/memory setting button ⏻ once to confirm that the station has been saved in position P01.
- Do the same for positions P02, P03, P04, etc.
- When listening to the radio, press the time/memory setting button once or several times to switch from one preset station to another.
Listening to the radio in Sleep mode
This radio alarm clock has a delayed sleep function, known as SLEEP mode. The radio automatically switches off after an activation time of 10 to 90 minutes.
- While the radio is on, press the Sleep mode button once and the screen will show 90 MINUTES. This means that the radio will switch off 90 minutes later.
- To change the amount of time the radio is on before it switches off, press the Sleep mode button repeatedly, and the screen will display the selected time, between 90 and 10 minutes.
- To cancel the SLEEP mode, press the Sleep mode button repeatedly until the screen shows OFF.
Projecting the time on the ceiling
This radio alarm clock projects the time on a ceiling or wall. This should be done in a dark room.
- Press the projection on/off button to activate or deactivate the projection.
- Use the adjustment wheel to set the projection angle and sharpness.
- Press the 180^ projection rotation button to flip the projected image.
Adjusting the screen brightness
This radio alarm clock adjusts the brightness of the screen.
- With the radio off, press the Dimmer button once to choose between low, medium or high intensity.
- Note that the higher the intensity, the more energy the radio alarm clock uses.
troubleshooting guide
| SYMPTOMS | POSSIBLE CAUSES | SOLUTIONS |
| The radio alarm clock will not switch on. | The device is not plugged in. | Plug the device adapter into the mains socket. |
| There is no power in the mains socket. | Plug another device into the same socket to test it. | |
| There is no sound. | The volume is set to minimum level. | Adjust the volume by pressing the 🔔 or 🔊 button. |
| The radio is not switched on or tuned to any station. | Switch on the radio and choose a station. | |
| The device malfunctions. | The radio alarm clock is not working properly or is making an unusual noise. | Unplug the device for 30 minutes. After 30 minutes, switch the radio back on. |
| FM reception is poor. | The antenna is not fully deployed. | Deploy the antenna. |
| There is interference from other electrical devices, such as microwaves, ovens, televisions, etc. | Move the radio alarm clock away from any potential source of interference. |
simplified declaration of conformity
Sourcing & Creation hereby declares that the radio alarm clock with projector Essential b RRVP-200 electric device complies with Directive 2014/53/EU.
The full text of the EU Declaration of Conformity is available on the following website:
https://www.boulanger.com/info/assistance


WARNING: TO REDUCE THE RISK OF FIRE OR ELECTRIC SHOCK, DO NOT OPEN THE LID.
- Users should not attempt to repair or replace any part of this device. Repairs and maintenance must be carried out by qualified personnel only. Any disassembly of the device will void the warranty.

A lightning symbol inside an equilateral triangle warns users about the presence of uninsulated high voltages inside the device with a sufficiently high current to present an
electrical discharge risk to individuals.

An exclamation mark inside an equilateral triangle informs users of important operational or maintenance safety instructions (routine maintenance) in the
instructions for use provided with the product.
Technische Merkmale
Keep out of reach of children.
All information, designs, drawings and pictures in this document are the property of SOURCING & CREATION. SOURCING & CREATION reserves all rights to its brands, designs and information. Any copy and reproduction through any means shall be deemed and considered as counterfeiting.
Protection of the environment
This symbol attached to the product means that it is an appliance whose disposal is subject to the directive on waste from electrical and electronic equipment (WEEE). This appliance may not in any way be treated as
household waste and must be subject to a specific type of removal for this type of waste. Recycling and recovery systems are available in your area (waste removal) and by distributors. By taking your appliance at its end of life to a recycling facility, you will contribute to environmental conservation and prevent any harm to your health.

Umweltschutz

Tested in our laboratories
Warranty valid from the date of purchase (receipt as proof of purchase). This warranty does not cover defects or damage caused by improper set up, incorrect use, or normal wear and tear of this product.
In unseren Labors getestet
Customer Relations Department /
Kundenservice / Klantenafdeling
Avenue de la Motte
CS 80137
59811 Lesquin cedex
Réf. RRVP-200
Art. 8011784
FABRIQUÉ EN R.P.C. / MADE IN