
KA-5216 - Electric heating TRISTAR - Free user manual and instructions
Find the device manual for free KA-5216 TRISTAR in PDF.

| Product type | Ceramic heater |
| Brand | TriStar |
| Model | KA-5216 |
| Power supply | 220-240 V~, 50-60 Hz |
| Power | 2000 W |
| Operating modes | Fan only, low heat, high heat |
| Adjustable temperature | 10 °C to 35 °C |
| Timer (delayed shutdown) | 0 to 24 hours |
| Weekly timer | Yes, up to 2 programs per day |
| Remote control | Yes, with CR2025 battery included |
| Oscillation | Yes |
| Open window detection | Yes, automatic shutdown if temperature drops by 5 °C |
| Insulation class | Class II (double insulation) |
| Overheat protection | Yes |
| Mounting | Floor or wall mounting (center distance 480 mm, drilling diameter 6 mm) |
| Digital display | Yes |
| Remote control battery | CR2025 |
| Care and cleaning | Wipe with a soft, damp cloth; clean air inlets with a vacuum cleaner |
| Child safety | Hot surface, do not leave unattended |
| General information | Indoor household use; do not cover |
Frequently Asked Questions - KA-5216 TRISTAR
User questions about KA-5216 TRISTAR
0 question about this device. Answer the ones you know or ask your own.
Ask a new question about this device
Download the instructions for your Electric heating in PDF format for free! Find your manual KA-5216 - TRISTAR and take your electronic device back in hand. On this page are published all the documents necessary for the use of your device. KA-5216 by TRISTAR.
USER MANUAL KA-5216 TRISTAR
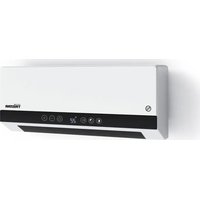
natural_image
Exterior view of a white TRISTAR air conditioner unit with control buttons (no text or symbols on main body)Ceramic Heater KA-5216
EN User manual 4
NL Gebruiksaanwijzing 11
FR Manuel de l'utilisateur 18
DE Benutzerhandbuch 26
ES Manual del usuario 35
IT Manuale dell'utente 42
PT Manual do utilizador 50
C

B
D
flowchart
graph TD
    A["Front Panel"] --> B["Arrow to Top Panel"]
    B --> C["Arrow to Bottom Panel"]
    C --> D["Sensor + Sensor"]
    D --> E["Arrow to Left Panel"]
    E --> F["Sensor - Sensor"]
    F --> G["CR2025"]
EN User manual
Ceramic Heater
FOREWORD
About this document
This user manual contains all the information for correct, safe, and efficient use of the appliance. Ensure you have fully read and understood the instructions in this user manual before you use the appliance.
Always store this user manual in a safe place near the appliance for future reference.
Original instructions
This manual is originally written in English. All other languages are translated documents.
Support
For spare parts and more information about the appliance, please visit www.tristar.eu.
General symbols
| Symbol Description | |
| Signal word used to indicate a potentially hazardous situation which, if not avoided, could result in death or serious injury. | |
| Signal word used to indicate a potentially hazardous situation which, if not avoided, could result in minor or moderate injury. | |
| NOTICE | Signal word used to address practices not related to physical injury. |
| Indicates additional information or emphasis on an instruction. | |
| Applicable in France:The product or packaging can be recycled and components must be disposed of separately. Follow the local regulations. | |
| Applicable in Italy:The product or packaging can be recycled and components must be disposed of separately. Follow the local regulations. | |
| CE | This product complies with conformity requirements of the applicable European regulations or directives. |
| The universal recycling symbol, logo, or icon is an internationally recognized symbol used to designate recyclable materials. The recycling symbol is in the public domain and is not a trademark. |
| In a double-insulated appliance, two insulation systems are provided instead of an earth wire. No earthing means is provided on a double-insulated appliance, nor should a means for earthing be added to the appliance. Servicing a double-insulated appliance requires extreme care and knowledge of the system. and should only be done by qualified service personnel. The replacement parts for a double-insulated appliance must be identical to the parts they replace. A double-insulated appliance is labelled with the words 'CLASS II' or "DOUBLE INSULATED". It can also be identified with the double insulation symbol. | |
| The Green Dot is the registered trademark of Der Grüne Punkt - Duales System Deutschland GmbH and is protected as a trademark worldwide. The logo may only be used by customers of DSD GmbH holding a valid trademark usage contract or by engaged waste management companies within the Federal Republic of Germany. This also applies to reproduction of the logo by third parties in a dictionary, an encyclopaedia or an electronic database containing a reference manual. | |
| This product contains a coin/button cell. Keep out of reach of children. Store spare batteries securely. Dispose of used batteries immediately and safely. If you think batteries might have been swallowed or placed inside any part of the body, seek immediate medical attention. |
APPLIANCE DESCRIPTION
Intended use
This appliance is intended for indoor use only.
This appliance is intended exclusively for domestic, non-commercial use.
This appliance is intended to be used in household and similar applications such as:
- staff kitchen areas in shops, offices and other working environments;
- farm houses;
- by clients in hotels, motels, and other residential type environments;
- bed and breakfast type environments.
This appliance is not intended for use by persons (including children) with reduced physical, sensory or mental capabilities, or lack of experience and knowledge. unless they have been given supervision or instruction concerning use of the appliance by a person responsible for their safety.
Any use of the appliance other than described in this user manual is regarded as misuse and may cause injury or damage to the appliance and void the warranty.
Technical specifications
| Appliance name Ceramic Heater | |
| Article number KA-5216 | |
| Power supply 220 – 240 V– 50-60Hz |
Power 2000 W
Main parts (see image A)
1 Heater unit
2 Control panel
3 Remote control
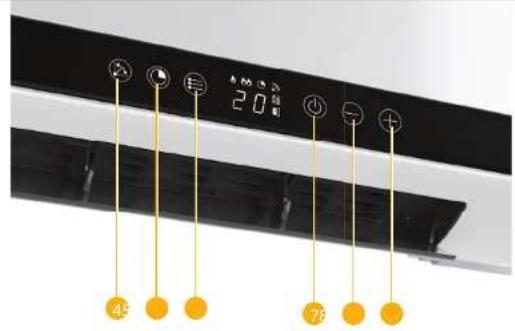
Control panel (see image B)
4 Swing button
5 Timer button
6 Mode button
7 On/off button
- button
9 + button
Remote control (see image C)
White buttons
10 On/off button
11 Timer button
12 Setup button
- Mode button
14 - button
15 OK button
16 + button
17 Open Window detection on/
off button
18 Swing button
Black buttons (Used for programming weekly timer)
19 Working day of weekly timer
20 Weekly timer
21 Start working time
22 Preprogrammed programs
2.5 Stop working time
SAFETY
Symbol Description
Warning: Do not cover
Safety precautions
- By ignoring the safety instructions the manufacturer cannot be held responsible for the damage.
- If the supply cord is damaged, it must be replaced by the manufacturer, its service agent or similarly qualified persons in order to avoid a hazard.
- Never move the appliance by pulling the cord and make sure the cord cannot become entangled.
- The user must not leave the appliance unattended while it is connected to the supply.
- This appliance is only to be used for household purposes and only for the purpose it is made for.
- This appliance shall not be used by children aged less than 8 years. This appliance can be used by children aged from 8 years and above and persons with reduced physical, sensory or mental capabilities or lack of experience and knowledge if they have been given supervision or instruction concerning
use of the appliance in a safe way and understand the hazards involved. Children shall not play with the appliance. Keep the appliance and its cord out of reach of children aged less than 8 years. Cleaning and user maintenance shall not be made by children unless older than 8 and supervised.
- To protect yourself against an electric shock, do not immerse the cord, plug or appliance in the water or any other liquid.
- For the first operation, it is advisable to read the manual carefully before hand and keep it properly for future use.
- If abnormal noise, smell, smoke or any other failure or breakage is found during the operation, you should turn off the switch and unplug it. Then contact with your service center for repair. Do not repair by yourself.
- This appliance is only suitable for well insulated spaces or occasional use.
WARNING
Safety hazard due to unintended use:
- Only use the appliance as described in this user manual.
- Never use the appliance if there are visible signs of damage or defects. Always replace a damaged or defective appliance immediately.
- Never make any adjustments to the appliance. Adjustments may affect safety, warranty and proper operation.
Electric shock hazard due to short-circuiting:
- Never immerse the motor unit in water or any other liquid. Only clean the motor unit with a soft, damp cloth.
- Never open the appliance. The appliance may only be opened for maintenance by an authorised technician.
- Never lift the appliance by the power cable. Lifting the appliance by the power cable may damage the power cable. Only lift the appliance by holding the base.
- Never replace the power cable yourself. Always let the manufacturer, its service agent or a similarly qualified person replace the power cable.
- Always unplug the power cable when the appliance is not in use or unattended, and before cleaning.
- Always check if the voltage stated on the type plate of your appliance matches your mains voltage before use.
Safety hazard for children:
- Children of less than 3 years should be kept away unless continuously supervised.
- Children should be supervised to ensure that they do not play with the appliance.
- Do not use this appliance in small rooms when they are occupied by persons not capable of leaving the room on their own, unless constant supervision is provided.
Fire hazard due to overheating:
- Always place the appliance on a stable, flat, heat, and moisture resistant surface.
- Never leave the appliance unattended when in use. Only use the appliance under supervision. Switch off the appliance and remove the power cable from the power outlet when you leave the room.
Fire hazard due to short-circuiting:
- Never use the appliance in the immediate surroundings of a bath, a shower or a swimming pool.
- Never drop the appliance and avoid bumping. Excessive vibrations can lead to loosened connections and can influence proper functioning of the appliance. Stop using the appliance if the appliance has been dropped.
- Never use the appliance with a programmer, timer, separate remote-control system or any other device that switches the appliance on automatically, since a fire risk exists if the appliance is covered or positioned incorrectly.
- Please do not install the appliance close to curtains and other combustible materials. This could cause a fire.
Snagging hazard due to moving parts:
- Always keep your hair and clothing away from moving parts. Loose clothes, jewellery or long hair can be caught in moving parts.
CAUTION
- Some parts of this product can become very hot and cause burns. Particular attention has to be given where children and vulnerable people are present
- The appliance must not be located immediately below a socket-outlet.
NOTICE
Risk of damaging the appliance:
- Never use aggressive chemical cleaning agents that can damage the appliance when cleaning the appliance.
- Never place the appliance near a heat source.
BEFORE FIRST USE
- Take the appliance and accessories out the box. Remove the stickers, protective foil or plastic from the device.
- When the device is turned on for the first time, a slight odour will occur. This is normal, ensure adequate ventilation. This fragrance is only temporary and will disappear soon.
Installation
- Drill two holes in the wall 1.8 meters above the floor, with a diameter of 6 mm.
- The distance between the drill holes is 480 mm.
- Insert the plastic plugs into the holes, and insert the screws into the plastic plugs. Do not put the screws all the way into the pipes as you need to leave some space to hang the heater onto.
USE
- Press the on/off button B ⑦ to turn the appliance on and off.
- Press the setup button C 📋, then use the "-" or "+" buttons to adjust the hour (00-23). Press the setup button, adjust the minutes (00-59) using "-" or "+" . Press setup again to set the day from d1 to d7 (Monday to Sunday).
- Wait for the digital display to stop flashing (typically flashes 3 times), or press "OK" to confirm.
- To start the timer, press the Timer button C 11 and press the -C13 or +C16 button to set the timer off from 0 to 24 hours.
-
Press the mode button C 13 to set the working power. There are three settings:
-
Fan only
-
Low power heating
- Full power heating
- You can use the + C 16 and - C 24 buttons to set the temperature from 10°C to 35°C. These + and - buttons can also be used in combination with the timer button C 11 or the setup button C 12.
- Press the OK button C 15 to confirm the setting.
- Press the weekly timer button C 20 to start the weekly timer setting.
- Press the swing function C 18 to turn on the swing.
- Press the window open detection button C ⑰ to start or stop the window open detection. This mode will detect any sudden changes of the room temperature and react to it. If the difference between the set working temperature and room temperature drops by 5 degrees, the device will automatically shut down to save power
- Press the 'working day of weekly timer' button C 19 to set the working day from d1 to d7 (Monday to Sunday).
- With the 'start working time' button C ② you can set the start working time of the weekly timer from 00 to 24.
- With the 'stop working time' button C 23, you can set when the working time of the weekly timer shuts off.
Weekly timer
- Before you set the weekly timer, you should set the local time and day in advance. (See explanation of the button 'setup' C ^12 under USE)
-
Press the weekly timer button C 20 to start the weekly timer setting.
-
Press the 'working day of weekly timer' button C 🔑 to set the working day from d1 to d7 (Monday to Sunday).
- Press the preset programs button C to select the first program (P1)
- Press the 'working start time' button C to set the P1 working start time (from 00 to 24).
- Press the 'working off time' button C to set the P1 working off time (from 00 to 24).
- Press the OK button C to confirm the setting.
Repeat the step 1 and 2. Select P2 on step 3, and repeat 4 to 6 to set 2nd program.
Using the remote control
Before you use the remote control, please pull out the transparent insulation film on the bottom of the remote control, and keep it together with the original package. When you do not use the remote control for a long time insert the film back.
You can start using the remote control A3 after switching on the appliance. When using the remote control, make sure:
-
You are less than 3 meters away from the appliance.
-
You point the remote control at the appliance.
-
There is a clear line of sight between the appliance and the remote control.
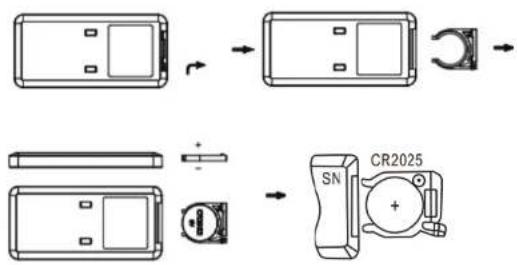
The remote control is powered by a CR2025 battery. See image D and follow the steps below to insert or replace it:
- Tum the remote control over so that you can see the back.
- Pull the battery compartment out of the remote control.
- If you are replacing the battery, remove the dead battery from the battery compartment.
- Insert the supplied or a new CR2025 battery into the battery compartment, making sure that the positive(+) side of the battery faces upwards.
CLEANING AND MAINTENANCE
- Unplug the appliance and allow it to cool down. Use a soft, slightly damp cloth to wipe appliance surfaces. Do not allow water or any other liquid to get into the unit.
- Clean the air suction opening from time to time with a fine brush.
- DO NOT use soap or chemicals which may damage the housing of the heater.
- Allow sufficient drying time before operating again.
- Clean the air inlets and outlets regularly with a vacuum cleaner(with a regular use, at least twice a year).
- When the unit is not in use, we recommend that the heater is re-packed in its original packaging and stored in a cool dry place.
DISPOSAL

This appliance should not be put into the domestic garbage at the end of its durability, but must be offered at a central point for the recycling of electric and electronic domestic appliances. This symbol on the appliance, instruction manual and packaging puts your attention to this important issue. The materials used in this appliance can be recycled. By recycling of used domestic appliances you contribute an important push to the protection of our environment. Ask your local authorities for information regarding the point of recollection.
Support
You can find all available information and spare parts at www.tristar.eu!
BESCHRIJVING APPARAAT
Beoogd gebruik
- pensionaty Bed and Breakfast.
4 Keinupainike
5 Ajastinpainike
6 Tilapainike
7 Päälle/pois-painike
8 - painike
9 + painike
14 - painike
15 OK-painike
16 + painike
- Bed and breakfast-miljøer.
Sikkerhetsfare for barn:

- Ceramic Heater KA-5216
- EN User manual
- Ceramic Heater
- FOREWORD
- Original instructions
- Support
- APPLIANCE DESCRIPTION
- Intended use
- Main parts (see image A)
- Control panel (see image B)
- Remote control (see image C)
- White buttons
- Black buttons (Used for programming weekly timer)
- SAFETY
- Symbol Description
- Safety precautions
- WARNING
- Fire hazard due to overheating:
- Fire hazard due to short-circuiting:
- Snagging hazard due to moving parts:
- CAUTION
- NOTICE
- Risk of damaging the appliance:
- BEFORE FIRST USE
- Installation
- USE
- Weekly timer
- Using the remote control
- CLEANING AND MAINTENANCE
- DISPOSAL
- BESCHRIJVING APPARAAT
- Beoogd gebruik
Brand : TRISTAR
Model : KA-5216
Category : Electric heating