RADIANT-1505 - Pan Soler & Palau - Free user manual and instructions
Find the device manual for free RADIANT-1505 Soler & Palau in PDF.


User questions about RADIANT-1505 Soler & Palau
0 question about this device. Answer the ones you know or ask your own.
Ask a new question about this device
Download the instructions for your Pan in PDF format for free! Find your manual RADIANT-1505 - Soler & Palau and take your electronic device back in hand. On this page are published all the documents necessary for the use of your device. RADIANT-1505 by Soler & Palau.
USER MANUAL RADIANT-1505 Soler & Palau
natural_image
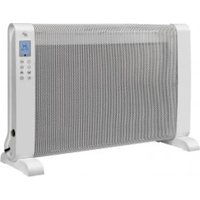
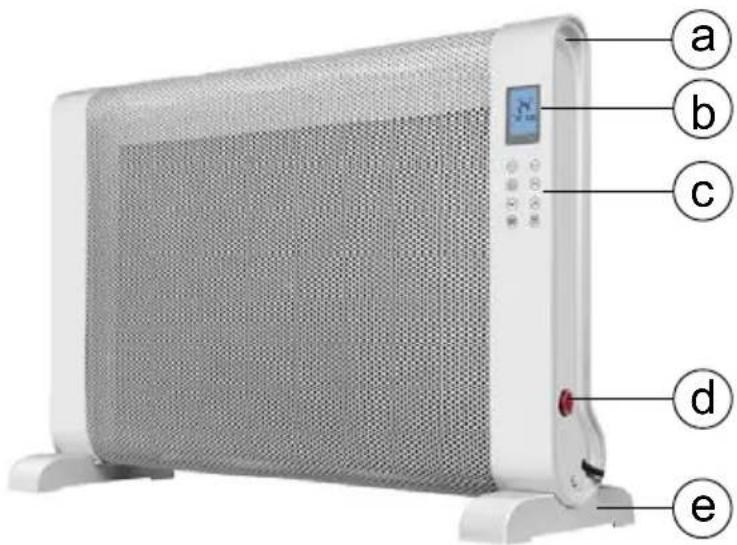
Exterior view of a modern electric heater with a digital display and control buttons (no visible text or symbols)FIG. 1
text_image
a b c d e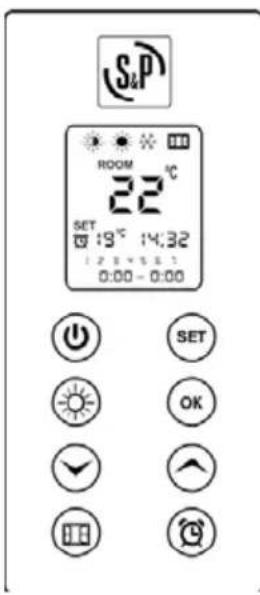
text_image
S&P ROOM 22°C SET 19°C 14:32 1 2 3 4 5 6 7 0:00 - 0:00 SET OK ✓ ↑ □□ ○FIG. 2
text_image
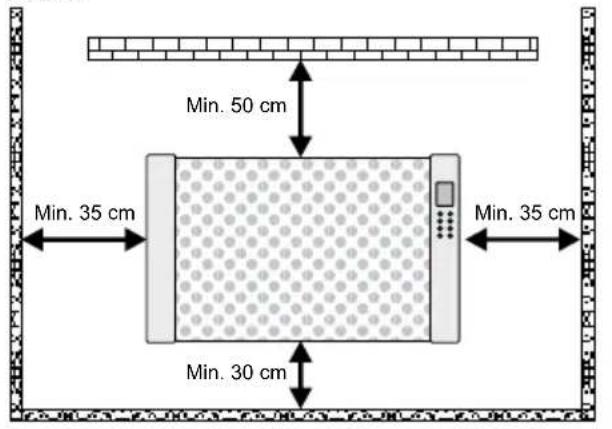
Min. 50 cm Min. 35 cm Min. 30 cm Min. 35 cmFIG. 3
text_image
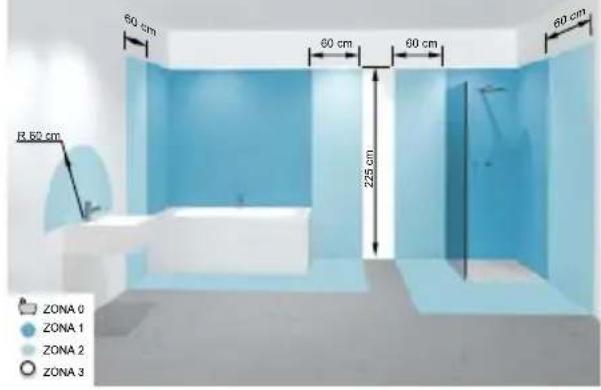
60 cm 60 cm 60 cm 60 cm R 52 cm 225 cm ZONA 0 ZONA 1 ZONA 2 ZONA 3FIG. 4
text_image
572 mm 369 mm 286 mm 286 mmFIG. 5
text_image
G. 5 4 X 10 (4 pcs)ESPAÑOL
Please read these instructions carefully before using and installing this RADIATION HEATER, to avoid damage and hazards. Any use of this device other than that indicated in this manual may cause a fire, short-circuit or injury, and will render the warranty null and void.
The warranty does not cover any defect, deterioration, loss, injury or damage caused by improper use of this product. All legal rights are guaranteed in this respect. No condition of the warranty excludes or changes the warranty conditions governed by State laws, which cannot be excluded or modified for any reason whatsoever.
Before starting it up, carefully remove all the device's packaging and check its condition. If you find any defect or damage, do not install or try to repair the device, please contact your dealer.
Do not leave the packaging within reach of children and dispose of it in adherence to recycling regulations.
1. SAFETY WARNINGS
1.1. This appliance has been designed as a radiation heater for wall installation or as a mobile radiation heater. It should be used as a source of heat and only for this purpose.
1.2. The device should must not be positioned to operate in rooms or stores where a hazard can arise due to the presence of gases originating from paints, chemical products, detergents, thinners, varnishes, etc., or other highly infl ammable materials.
1.3. If you want to install the appliance, it should be mounted on a vertical and solid wall, ensuring that it is completely level, both vertically and horizontally.
1.4. The device must not be mounted on a wall with an infl am- mable surface, such as: wood, plastic, carpet, fi bre, etc.
1.5. Make sure that the minimum safety distances are adhered to once installed. (See FIGURE 2).
1.6. WARNING; Once installed, no infl ammable objects or objects affected by heat should be within 1 metre of the device (cur-tains, furniture, towels, plants, pets... etc).
1.7. This device must not be installed in an enclosed place where air cannot circulate freely, both at the entrance and the exit.
1.8. Do not install the device immediately underneath a power socket.
1.9. For fixed electrical installation, disconnection means should be included in accordance with installation regulations, with contact separation at all poles that provides total disconnection under Category III overvoltage conditions.
1.10. This heater is Class II (double-insulated □) and therefore does not require an earth connection.
1.11. The safety zones required by the local electrical installation standards or safety regulations applicable in your country must be strictly observed. In any case, if it is going to be installed in a bathroom, NEVER install it in the area indicated as AREA 0, AREA 1 or AREA 2. As it is an IP21 rated device, it can be installed in AREA 3, provided it is placed so that it is NOT in reach of anybody who is in the bathtub or shower, this including the device's power cord. (See FIGURE 3).
1.12. For mobile use, it can't be used near a bathtub, a shower or a pool.
1.13. The power outlet where the appliance's power cord is connected should be placed so that it is visible and easily accessible to the user.
1.14. CAUTION: Some parts of this device may get very hot and cause severe burns. Special care must be taken when children and vulnerable persons are present.
1.15. Before plugging in the device, make sure the mains voltage matches that indicated on the data plate.
1.16. Before plugging in / unplugging the power cable, make sure the device's on/off switch (on the rear) is turned off.
1.17. Do not pull on the power cord to unplug it from the mains.
1.18. If the power cord is damaged, it must be replaced with a cable with the same plug.
1.19. ☑ To avoid overheating, DO NOT COVER the device.
1.20. Do not insert any rigid body through the bars, this could damage the device, start a fire or cause electric shock.
1.21. In humid rooms, the power cord must be at least 25 cm above the ground. Make sure the cord doesn't touch the ground.
1.22. Make sure the power cord doesn't touch the hottest parts of the device.
1.23. Whenever used as a mobile radiation heater, the appliance should be attached to the standard base supplied and placed on a fl at surface.
1.24. Children under 3 years old should be kept out of the reach of the appliance unless they are continuously supervised.
1.25. Children under 8 years old may NOT operate the appliance.
1.26. This device can be used by children from 8 years up and persons with reduced physical, sensory or mental capacities or lack of experience and knowledge if they have been given the appropriate supervision and training on using the device in a safe way and understand the dangers involved.
1.27. Children should not play with the appliance.
1.28. Before carrying out any cleaning or maintenance operation, make sure the device is unplugged from the mains.
1.29. The cleaning and maintenance to be done by the user must not be done by children.
1.30. Do not clean the device while it is working and do not immer-se it in water.
1.31. Do not handle the appliance with wet hands.
1.32. Device designed for internal use.
2. DESCRIPTION OF THE DEVICE / CONTROL PANEL (Figure 1)
a) Transport handle (for use as mobile radiation heater).
b) LCD control screen.
c) Touch control panel.
d) Main switch (ON / OFF).
e) Base (for use as mobile radiation heater).
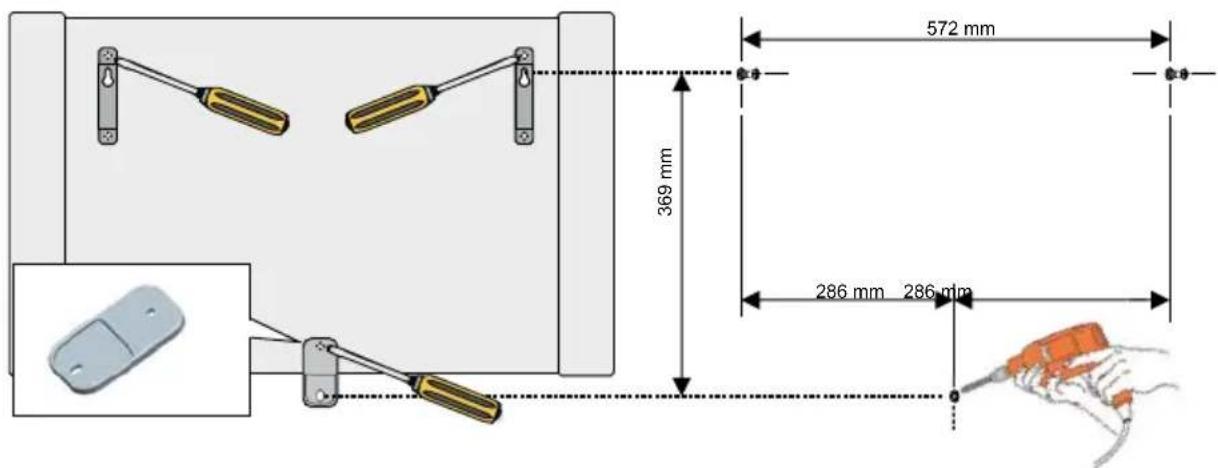
3. INSTALLATION FOR FIXED USE (Figure 4)
CAUTION: Before installing the device, read all the Safety Warnings in the relevant section of this manual carefully.
As far as possible, you should install this appliance under a window, but never in a draughty area.
3.1. Using the four screws provided, fi x the two brackets on the upper rear part of the device. Then fi x the piece of plastic on the lower rear centre part.
3.2. With a 6 mm diameter drill, make 3 fixing holes in the wall. Insert the supplied screw anchors. In the two top holes, insert the screws without tightening them; a millimetre apart is enough.
3.3. Hang the device on the two upper screws. To prevent the device from unhooking or separating from the wall on its lower part, screw the piece of plastic you previously fixed to the device to the wall.
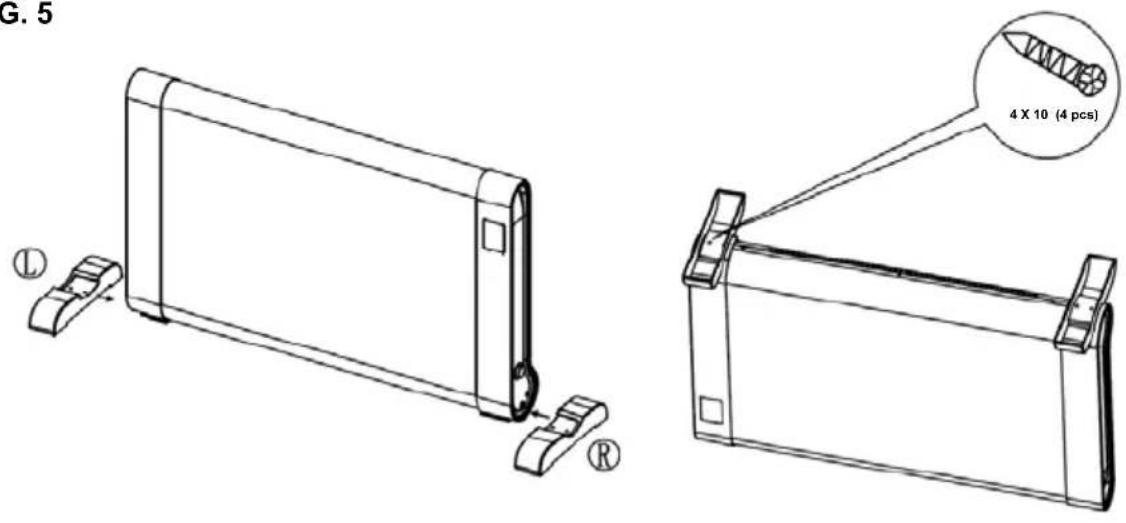
4. FIXING THE BASE FOR MOBILE USE (Figure 5)
4.1. Place the device on a suitable work surface. Insert both bases into the bottom of the device. Caution, the bases have specific positions (L / R).
4.2. Fix the bases with the provided screws.
5. CONNECTION AND INSTRUCTIONS FOR USE
CAUTION: Before connecting the device, check the supply voltage of the electricity network matches the one stated on the type label of the device.
CAUTION: Before proceeding with the device's instructions of use, read all the Safety Warnings in the relevant section of this manual carefully.
5.1. Connect the power cord of the device to the power outlet.
5.2. Press the main switch located on the side of the device (ON / OFF).
NOTE: If the device is not going to be used for a long period of time (summer), we recommend disconnecting the device using this main switch.
5.3. DAY / TIME programming
- Press (SET) for 3 seconds to access the DAY and TIME programming.
- DAY OF THE WEEK: When DAY is flashing, you can use the buttons (▼▲) to set the date (1 Monday / 2 / 3 / 4 / 5 / 6 / 7 Sunday). Then confirm by pressing (OK).
- HOUR / MINUTES: When HOUR is flashing, you can use the buttons (▼▲) to adjust it. Confirm by pressing (OK), then adjust the minutes and confirm again by pressing (OK).
- Press ⏻ to activate the appliance. Then press ⏱ to determine the desired operating power:
| Screen icon Heating power | |
 | 1.500 W |
 | 750 W |
- To adjust the temperature of the thermostat, press (SET) and using [▼ ▲] you can set the desired temperature in the room.
- The screen always shows the real temperature in the room (ROOM). If the programmed temperature on the thermostat (SET) is lower than the actual room temperature (ROOM), the device will remain in standby mode or turn off.
- When the actual room temperature (ROOM) is below the temperature set on the thermostat (SET), the device will always automatically turn on at the previously defined power.
NOTE: If it is a day room (dining room / living room) we recommend setting the thermostat at 22-23°C. If it is a night room, we recommend setting it at 18-19°C.
5.5. AUTOMATIC OPERATION mode
- Press ⏻ until NONE of these icons ( ) are on the screen.
- Then press ^① for 3 seconds to enter the weekly programming.
- The icon (G) will flash on the screen, to indicate you're in the weekly programming mode.
- You can programme only one operating cycle per day, that is, a connection time and a disconnection time of each day of the week (1-2-3-4-5-6-7). You can also programme the desired temperature in the room (SET).
- By pressing (▼▲) and (OK) to confirm, you can enter the desired weekly programme. The icons on the screen you are programming will flash at all times.
- If there is any day of the week you want the device to NOT turn on (Example: offices on weekends), press (SET) for these specific days. The display will show (OFF - OFF) to indicate the appliance will not turn on during those days. To cancel the OFF days, press (SET) again.
- When (G) appears on the screen without flashing, the appliance will carry out the weekly programme you entered. You can also use the appliance on manual mode outside the programmed times.
- The screen always shows the real temperature in the room (ROOM). If the programmed temperature on the thermostat (SET) is lower than the actual room temperature (ROOM), the appliance will remain in standby mode or turn off.
- When the actual room temperature (ROOM) is below the temperature set on the thermostat (SET), the appliance will always automatically turn on at maximum power (1,500 W).
NOTE: If it is a day room (dining room / living room) we recommend setting the thermostat at 22-23°C. If it is a night room, we recommend setting it at 18-19°C.
5.6. ANTI-ICE mode

- This operating mode is extremely useful for when you're away from home (Example: holiday homes) and you don't want the temperature of the room to drop below + 5°C.
- Press ⏻ to activate the appliance. Then press until ( ) comes up on the screen. You'll notice that the thermostat has been automatically adjusted to a temperature (SET) of +5°C.
- When the temperature in the room drops below +5°C, the appliance will automatically turn on at the maximum power (1,500 W) to avoid the water pipes from freezing, for example.
NOTE: The actual room temperature (ROOM) is indicated on the screen at all times.
5.7. OPEN WINDOW detection

- To avoid the heater working with the window open, the heater incorporates an energy saving control function. This function can only be activated when the heater is working in MANUAL mode.
- Press ☐ to activate this function. On the screen the corresponding icon will appear, to indicate that we have this control function activated.
- If the room temperature falls 5°C in 10 minutes, the heater detects that we have a window/door open and the heater will stop working for 60 minutes. On screen the open window icon will flash to inform us that this function is active.
- If after the 60 minutes the temperature still hasn't risen at least 1^ , the heater will stay off for another 60 minutes, as it understands that the window / door is still open.
- If the room temperature has increased one degree with respect to the temperature at the time of the stop, the heater will keep working in MANUAL MODE.
- This option is very useful for public places such as libraries, hotels, etc., where you don't want anyone to be able to manipulate the appliance. By activating this feature, the heater will work in MANUAL mode or AUTOMATIC mode and nobody will be able to manipulate the controls.
Press (▼▲) simultaneously for 5 seconds to activate/deactivate the heater's locking system. When it's locked, 🙏️ will appear on the screen.
- Even if the heater is switched off by pressing the main switch or by unplugging the heater from the electricity network, the locking system stays in place.
5.9. ERROR message
If the error message (E1) appears on the screen, please contact the After Sale Services Network if in Spain or your usual dealer in the rest of the world. To find out where this is, you can go to the WEBSITE: www.solerpalau.com
6. MAINTENANCE
Before starting any maintenance operation don't forget to let the device cool down for a few minutes and unplug it from the mains.
- This product requires regular cleaning (at least once a year) to avoid dust build-up at the rear (air inlet), as this could cause overheating.
- Unhook the device from the wall and clean the dust built up at the air inlet with a vacuum cleaner.
- Clean the body of the device with a wet cloth. Do not use detergents or other abrasive product that could damage the fi nish / colour of the plastic.
- Do not immerse the device or spray water onto it.
7. TAKING IT OUT OF SERVICE / RECYCLING END OF SERVICE LIFE/ RECYCLING
EEC law and the duty we have to future generations oblige us to recycle; please do not forget to dispose of all the excess packaging in the corresponding recycling bins and to take replaced devices to the nearest Waste management centre.
8. DISMANTLING, RECYCLING OR DISPOSAL OF THE PRODUCT AT THE END OF ITS SERVICE LIFE
If scrapping the device, you must adhere to regulations on the disposal or recycling of the materials and components.
List of the heater's main materials:
- PP plastic sides and base.
- Iron panel.
• Electronic tin plates.
• Electrical copper cables. - Mica resistor.
9. TECHNICAL SUPPORT
The extensive Official S&P Services Network provides any technical support you may require. If you observe any anomaly in the device's operation, please contact any of the mentioned
services, where your request will be duly dealt with. Any handling not strictly necessary for the installation of the device, carried out by persons other than staff of Official S&P Services will force us to cancel your warranty. For any queries regarding S&P products, please contact the After Sale Services Network if in Spain or your usual dealer in the rest of the world. To find out where this is, you can go to the WEBSITE: www.solerpalau.com