
VS-130802 - Vacuum packaging machines Emerio - Free user manual and instructions
Find the device manual for free VS-130802 Emerio in PDF.

| Brand | Emerio |
| Model | VS-130802 |
| Product type | Vacuum packaging machine |
| Power supply | 220-240 V ~ 50/60 Hz, 120 W |
| Power | 120 W |
| Maximum film width | Less than 300 mm |
| Recommended film thickness | 0.1-0.2 mm with embossing |
| Main functions | Vacuum sealing and sealing; sealing only; gentle, normal, and moist suction; vacuum sealing with hose (not included) |
| Suction modes | Gentle suction (soft foods), normal (dry), moist (wet foods) |
| Liquid collection tray | Removable, easy to clean |
| Integrated cutting bar | Yes, with sliding blade button |
| Film roll holder | Yes, adjustable |
| Number of consecutive cycles | Up to 10 cycles, then 10-minute cooling break |
| Waiting time between cycles | Approximately 15 seconds |
| Cleaning | Soft cloth and dish soap; seals and removable tray washable with water |
| Safety | Lockable lid, automatic stop, stop button, overheat protection, do not immerse |
| Material | Plastic, rubber seals |
| Warranty | 2 years |
| Usage | Household only |
| Dimensions (approx.) | Approximately 40 x 20 x 10 cm |
| Weight (approx.) | Approximately 1.5 kg |
Frequently Asked Questions - VS-130802 Emerio
User questions about VS-130802 Emerio
0 question about this device. Answer the ones you know or ask your own.
Ask a new question about this device
Download the instructions for your Vacuum packaging machines in PDF format for free! Find your manual VS-130802 - Emerio and take your electronic device back in hand. On this page are published all the documents necessary for the use of your device. VS-130802 by Emerio.
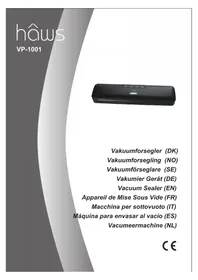
USER MANUAL VS-130802 Emerio
natural_image
Exterior view of a black rectangular electronic device with ventilation slots and warning symbols (no readable text or labels)Vacuum Sealer (EN)
Vakumier Gerät (DE)
Instruction manual – English ...... - 2 -
Instruction manual – English
SAFETY INSTRUCTIONS
Before use make sure to read all of the below instructions in order to avoid injury or damage, and to get the best results from the appliance. Make sure to keep this manual in a safe place. If you give or transfer this appliance to someone else make sure to also include this manual.
In case of damage caused by user failing to follow the instructions in this manual the warranty will be void. The manufacturer/importer accepts no liability for damages caused by failure to follow the manual, a negligent use or use not in accordance with the requirements of this manual.
- This appliance can be used by children aged from 8 years and above and persons with reduced physical, sensory or mental capabilities or lack of experience and knowledge if they have been given supervision or instruction concerning use of the appliance in a safe way and understand the hazards involved. Children shall not play with the appliance. Cleaning and user maintenance shall not be made by children without supervision.
- If the supply cord is damaged, it must be replaced by the manufacturer, its service agent or similarly qualified persons in order to avoid a hazard.
- Before inserting the plug into the mains socket, please check that the voltage and frequency comply with the specifications on the rating label.
- If an extension cord is used it must be suited to the power consumption of the appliance, otherwise overheating of the extension cord and/or plug may occur. There is a potential risk of injuries from tripping over the extension cord. Be careful to avoid dangerous situations.
- Disconnect the mains plug from the socket when the appliance is not in use and before cleaning.
- Ensure that the mains cable is not hung over sharp edges and keep it away from hot objects and open flames.
- Do not immerse the appliance or the mains plug in water or other liquids. There is danger to life due to electric shock!
- To remove the plug from the plug socket, pull the plug. Do not pull the power cord.
- Do not touch the appliance if it falls into water. Remove the plug from its socket, turn off the appliance and send it to an authorized service center for repair.
- Do not plug or unplug the appliance from the electrical outlet with a wet hand.
- Never attempt to open the housing of the appliance, or to repair the appliance yourself. This could cause electric shock.
- Children are unable to recognize the hazards associated with incorrect handling of electrical appliances. Therefore, children should never use electric household appliances unsupervised.
- Never leave the appliance unattended during use.
- This appliance is not designed for commercial use.
- Do not use the appliance for other than intended use.
- Do not place the appliance in wet, dusty or easily wet place.
- Do not shake or drop the appliance, and prevent the appliance from being impacted.
- Please do not place the appliance near the gas furnace or heat dissipation items.
- Never try to reach the inside with metal items.
- Operate the device on a sturdy, even and heatproof surface.
- Never cover up the connected device. Risk of overheating.
- Do not operate the device in the vicinity of flammable liquids or combustible gases.
- Please pay particular attention to good hygiene conditions. Wash your hands before vacuum-sealing.
- Keep all work equipment and the appliance absolutely clean.
- After use, clean thoroughly, particularly the collection tray.
-
In general, perishable foods should be frozen immediately after vacuum-sealing, or must be consumed immediately, if they are heated up afterwards. Do not store these at room temperature.
-
Never reuse bags, particularly with raw meat, fish or oily foods.
- Do not reuse the bags, if they have been heated up in a water bath or in the microwave.
- Liquids (e.g. soup, sauce, meat juice) should not be vacuum-sealed into the bag. Liquids will be sucked in the device. If this should nevertheless happen, stop the process by pressing the stop button (each button has a stop function).

- Caution, hot surface
WARNING!! Please do not touch surface while in use. The temperature of accessible surfaces may be high when the appliance is operating.
- Do not touch the heating element during and immediately after operation, as it becomes very hot.
- Let the device cool down before cleaning it.
INTENDED USE
- This product is specifically suited for vacuum packing food or items that will not be damaged by the pressure generated by the sealed bags.
• Only operate the device with the appropriate film rolls for film sealing devices. - The device is not intended for commercial use, it is exclusively intended for private household use. Any other use or modification of the device is inappropriate and generally prohibited. No liability can be accepted for damage, which has been caused by inappropriate use or incorrect operation.
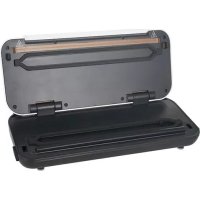
PARTS DESCRIPTION
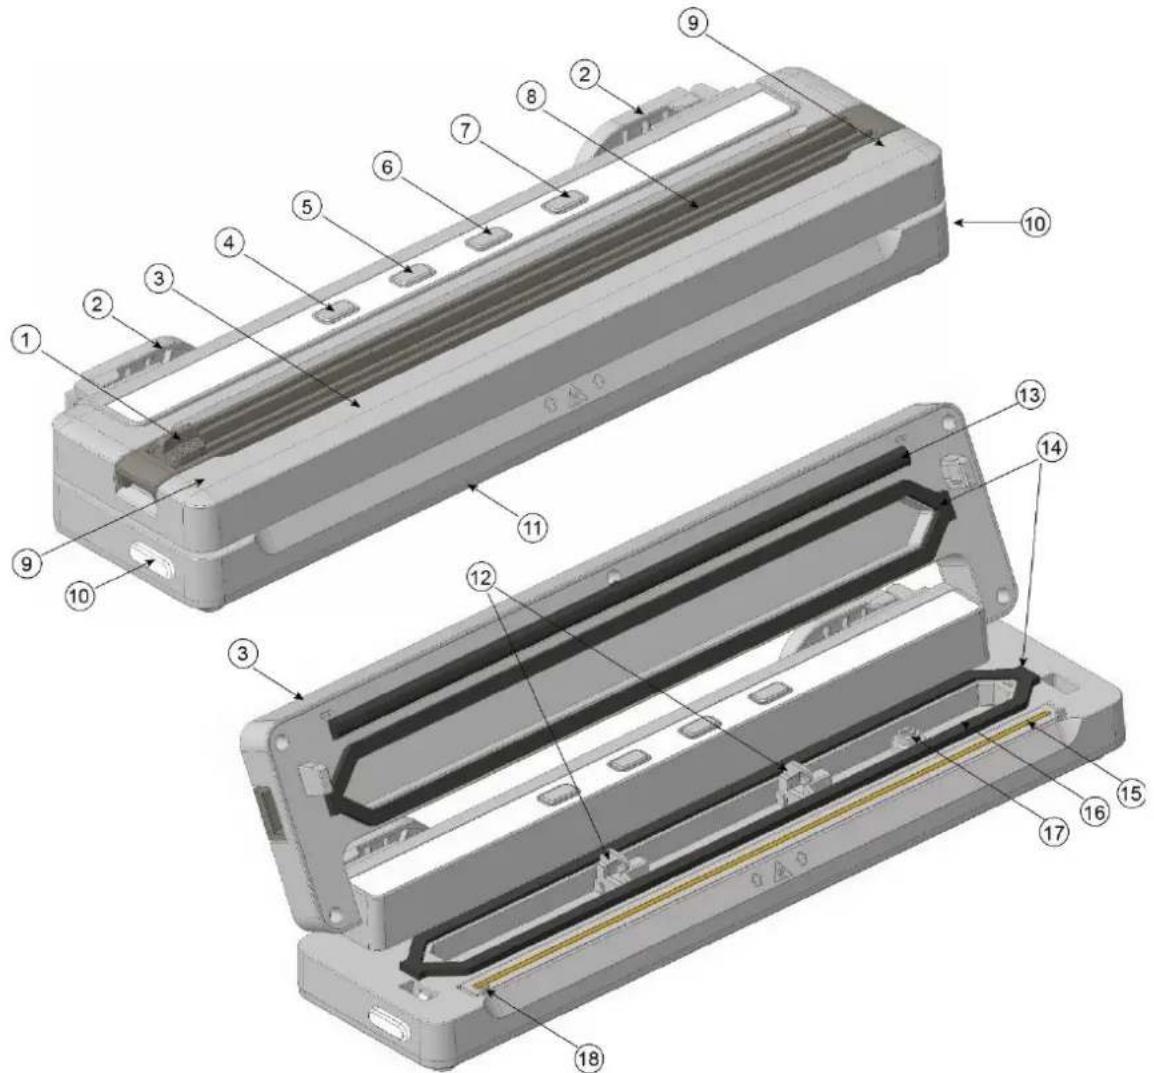
- Blade button
- Film roll rack
- Lid
- Seal / stop button (red light)
- Soft vacuum / stop button (blue light)
- Normal vacuum / stop button (blue light)
- Moist vacuum / stop button (blue light)
- Cutting bar
- "Press here" symbol
- Release buttons
- Cable compartment
- Film limit stops
- Pressing bar
- Seals
- Heating element
- Collection tray for liquid (removable)
- Suction opening
- Limit stop (for maximum film width)
BEFORE USE
Prepare vacuum bags or bag roll with emboss (0.1-0.2mm thickness and less than 300mm width) for vacuum seal. If the plastic bag is too thin, the air may penetrate the bag.
- Remove all packaging material. Keep the packaging material out of children's reach. Dispose of it immediately.
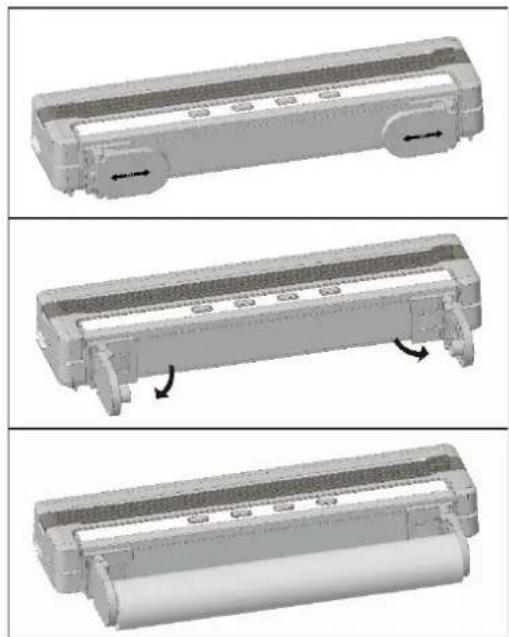
• If applicable, press the release buttons on both sides at the same time, in order to release the lid. - Wipe the collection tray of the device with a slightly damp cloth prior to initial use.
- Completely unwind the power cable and press the cable into the small opening leading out of the cable compartment at the bottom of the appliance. This way, you will prevent the appliance from "wobbling".
- Place the appliance on a level and stable surface. The rubber feet provide a secure grip.
- Open the lid and check the seals for correct fit. These must be completely and evenly pressed into the mounting. Otherwise, no vacuum can be generated.
- After use, open the lid; never come into contact with the heating element and the pressing bar, to avoid burns.
- Prior to initial use, please perform 1 to 2 sealing cycles. Slight odours and slight smoke development are normal and will disappear after a short time. Nevertheless, ensure that there is sufficient ventilation (e.g. by opening a window).
- Consecutive vacuuming/sealing processes are only possible after a programmed pause of approx. 15 seconds. After 10 consecutive processes, a 10-minute cool-down break is programmed. During this time, the device cannot be started.
- The roll of sealing bags can be supported on the two film roll racks. Adjust the position of these two racks to match film roll of different lengths.
- However, ready-made bags can also be used. Bags that have ridges or dots on one side are appropriate. Smooth bags are not suitable for sealing.
Prepare film
- Before sealing, make sure the edges of the open side of the bags to be sealed are cut flat with no wrinkles.
- If use a film roll, adjust the position of the two racks to match the length of the film roll. The film roll racks can only move when they are flipped close. When the position is suitable, flip open the racks to fix the roll.
natural_image
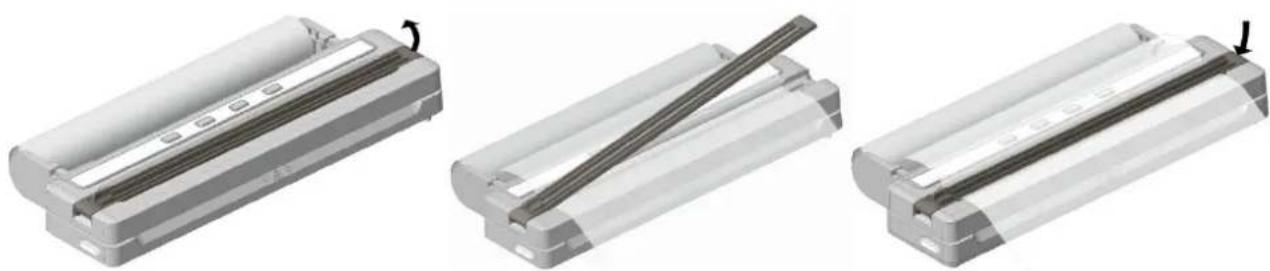
Three-step diagram showing a mechanical component with directional arrows indicating movement, no text or symbols present.- Prepare bags. For this, unroll a piece of film from the film roll and cut it with appropriate scissors or cutting bar to the required length.
Due to the sealing, the usable length of the bag will be slightly shorter than the piece that you have cut off from the film roll.
- To use the cutting bar, flip it open. Position the film over the appliance. Press down the cutting bar to lock it back in position. Slide the blade button to the left or right to cut the film. Remember to press the blade button slightly downwards onto the film while sliding.
natural_image
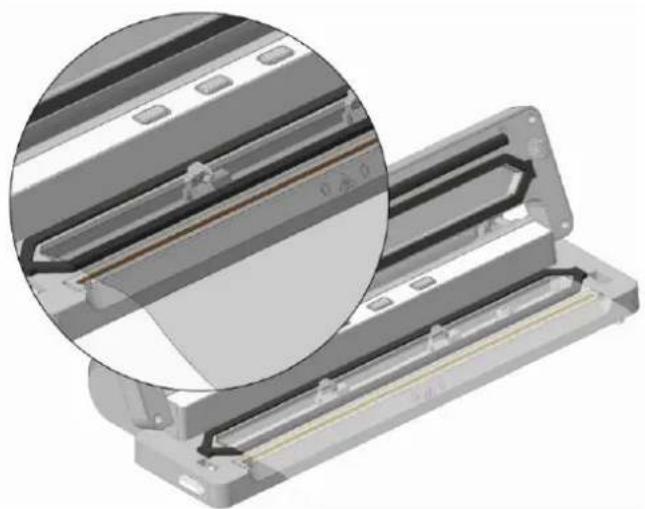
Three views of a battery pack assembly showing internal structure and mounting mechanism (no text or symbols)- It is recommended that place the film with the embossed side down.
When sealing, make sure to position the film above the heating element, clamped by the film limit stops.
natural_image
3D mechanical assembly diagram showing internal components with a magnified inset (no text or symbols visible)OPERATION
1. Seal function
1) Unroll the bag roll and cut the bag to an appropriate size you desired (at least 6cm longer than the food). Be sure to cut straight and flat.
2) Open the lid and put one end of the bag into the vacuum chamber.
3) Press the lid down firmly on both sides at the same time until you hear a click, which indicates the lid is completely locked.
4) Plug in the appliance and press the seal / stop button. The corresponding indicator light will illuminate. Once the sealing process is completed, all the indicator lights of buttons will flash 3 times and then turn off. You can also press any button manually during operation to stop the process in advance.
5) Press the two release buttons to open the lid. Now you have a custom-sized bag.
6) Wait about 15 seconds before using the appliance again.
CAUTION! Burn hazard! Hot surface! The heating element and the pressing bar are very hot after the sealing process.
2. Vacuum seal function
1) Fill the vacuum bag with the food to be vacuum-sealed, and leave enough space for vacuum seal. Liquids (e.g. soup, sauce, meat juice) should not be vacuum-sealed into the bag. Liquids will be sucked in the device. If this should happen, disconnect the power plug and do not use the device.
2) Open the lid of the appliance, and place the open side of bag into the vacuum chamber.
3) Press the lid down firmly on both sides at the same time until you hear a click, which indicates the lid is completely locked.
4) Plug in the appliance and press the soft vacuum / stop button, normal vacuum / stop button or moist vacuum / stop button. The corresponding indicator light will illuminate as well as the indicator light of seal / stop button. Once the vacuum sealing process is completed, all the indicator lights of buttons will flash 3 times and then turn off.
You can also press any button manually during operation to stop the process in advance.
- Soft vacuum: suitable for sealing soft foods, like: vegetables, fruit, e. g. grape, tomato, etc.
- Normal vacuum: suitable for sealing dry food, like: soybean, seasonings, nuts (no sharp shell), biscuits, etc.
- Moist vacuum: suitable for sealing wet food, like: meat, e.g. fish, beef, etc.
5) Press the two release buttons to open the lid, take out the vacuum-sealed bag.
6) Wait about 15 seconds before using the appliance again. Unplug the appliance after use.
7) If some liquid escapes during the vacuuming process, it will be caught in the collection tray. Check the collection tray after each vacuuming process and remove the tray to clean the moisture residues.
CAUTION! Burn hazard! Hot surface! The heating element and the pressing bar are very hot after the sealing process.
3. Vacuum function without sealing
If necessary, the appliance could also vacuum other sealing bags or jars with a suitable hose (not provided) matching the suction opening in the appliance.
1) Open the lid and remove the liquid collection tray.
2) Connect the hose of the sealing bag to the suction opening.
3) Plug in the appliance and long press the normal vacuum / stop button for more than 3 seconds. The corresponding indicator light will illuminate as well as the indicator light of seal / stop button. Once the vacuuming process is completed, all the indicator lights of buttons will flash 3 times and then turn off. You can also press any button manually during operation to stop the process in advance.
How long does my vacuum sealed food last?
| LENGTH OF TIME | |||
| FOOD ITEM | FREEZER | REFRIGERATOR | ROOM TEMPERATURE |
| Uncut vegetables | 1 -2 years | 1 - 2 weeks | 1 week |
| Uncut fruit | 6 - 9 months | 1 - 2 weeks | 1 week |
| Bread | 1 - 3 years | 7 - 14 days | 5 - 7 days |
| Hard cheeses | 8 months | 2 - 4 months | Not recommended |
| Semi-hard to semi soft cheese | 2 months | 2 - 3 weeks | Not recommended |
| Soft cheese | Not recommended | 1 - 2 weeks | Not recommended |
| Nuts | 2 years | 1 year | 6 - 9 months |
| Flour | Not recommended | Not recommended | 1 - 2 years |
| Large cuts of meat | 1 - 2 years | 3 - 5 days | Not recommended |
| Ground meat | 1 year | 1 - 2 days | Not recommended |
| Lean fish | 1 year | 1 - 2 days | Not recommended |
| Fatty fish | 4 - 6 months | 1 - 2 days | Not recommended |
| Uncooked shrimp | 4 - 6 months | 1 - 2 days | Not recommended |
| Cooked shrimp | 10 - 12 months | 3 - 4 days | Not recommended |
CLEANING AND MAINTENANCE
- Unplug the appliance. Always let the appliance cool off completely before you clean it.
- To clean the surfaces, only use a soft cloth that has been dampened with a small amount of dishwashing liquid. Then, wipe the surfaces dry and allow them to dry completely. Never use scouring agents or scratching brushes and sponges.
- Remove the collection tray, rinse it thoroughly. Wipe the surfaces dry and allow to dry completely before put it back.
- The film limit stops can be pulled out to clean if necessary. Put them back after the surfaces dry completely.
- Never clean the surfaces with alcohol, petrol or similar fluids.
- The bottom and top seals can be removed for easier cleaning. You can clean the seals in warm water with washing-up liquid. After this, rinse thoroughly with clear water and let them dry off completely. Ensure that the seals are completely dry before insertion. Never reuse a seal that is still damp.
STORAGE
- The device should be closed (but not locked) for storage. Keep it clean and dry. This way, damage to the seals is avoided.
- Only store the appliance in a child-safe, clean, dry place.
TECHNICAL DATA
Operating voltage: 220-240V\~50-60Hz
Power consumption: 120W
GUARANTEE AND CUSTOMER SERVICE
Before delivery our devices are subjected to rigorous quality control. If, despite all care, damage has occurred during production or transportation, please return the device to your dealer.
For the purchased device we provide 2 years guarantee, commencing from the day of sale. If you have a defective product, you can directly go back to the point of purchase.
Defects which arise due to improper handling of the device and malfunctions due to interventions and repairs by third parties or the fitting of non-original parts are not covered by this guarantee. Always keep your receipt,
without the receipt you can't claim any form of warranty. Damage caused by not following the instruction manual, will lead to a void of warranty, if this results in consequential damages then we will not be liable. Neither can we hold responsible for material damage or personal injury caused by improper use if the instruction manual is not properly executed. Damage to accessories does not mean free replacement of the whole appliance. In such case please contact our service department. Broken glass or breakage of plastic parts is always subject to a charge. Defects to consumables or parts subjected to wearing, as well as cleaning, maintenance or the replacement of said parts are not covered by the warranty and are to be paid.

The crossed out wheelie bin symbol means that this product shall not be disposed of with normal household waste. Electronic and Electrical Equipment not included in the selective sorting process are potentially dangerous for the environment and human health due to the presence of hazardous substances. Please dispose of responsibly at an approved waste or recycling facility.
Emerio B.V.
Oudeweg 115
2031 CC Haarlem
The Netherlands
Customer service:
T: +31 (0) 23 3034369
www.emerio.eu/service
Kundeninformation:
T: +49 (0) 3222 1097 600
www.emerio.eu/service
Klantenservice:
T: +31 (0) 23 3034369
www.emerio.eu/service
Looking for spare parts? Have a look at https://spareparts.emerio.eu
CUSTOMER SERVICE

SPARE PARTS
natural_image
Three-step diagram showing a mechanical component with directional arrows indicating movement, no text or symbols present.natural_image
Three technical illustrations of a battery pack assembly, showing internal structure and mounting points (no text or symbols)natural_image
3D mechanical assembly diagram showing internal components with a magnified inset (no text or symbols)BETRIEB
- Einschweißfunktion
Looking for spare parts? Have a look at https://spareparts.emerio.eu
KUNDENDIENST

ERSATZTEILE
- Attention, surface chaude
natural_image
Three-step diagram showing a mechanical component with directional arrows indicating movement, no text or symbols present.natural_image
Three views of a battery pack assembly showing internal structure and cable attachment (no text or symbols)natural_image
3D mechanical assembly diagram showing internal components with a magnified inset (no text or symbols)FONCTIONNEMENT
Looking for spare parts? Have a look at https://spareparts.emerio.eu
SERVICE CLIENT

PIÈCES DÉTACHÉES
Bruksanvisning – Swedish
SÄKERHETSANVISNINGAR
natural_image
Three-step diagram showing a mechanical component with directional arrows indicating movement, no text or symbols present.natural_image
Three views of a battery pack assembly showing internal components and a cable being inserted (no text or symbols visible)natural_image
3D mechanical assembly diagram showing internal components with a magnified inset (no text or symbols visible)ANVÄNDNING
1. Försegling
Looking for spare parts? Have a look at https://spareparts.emerio.eu
KUNDTJÄNST

RESERVDELAR
natural_image
Three-step diagram showing a mechanical component with directional arrows indicating movement, no text or symbols present.natural_image
Three technical illustrations of a battery pack assembly, showing internal components and wire connection (no text or symbols)natural_image
3D mechanical assembly diagram showing internal components with a magnified inset (no text or symbols visible)WERKING
1. Functie Sealen
Looking for spare parts? Have a look at https://spareparts.emerio.eu
KLANTENSERVICE

RESERVEONDERDELEN
WSKAZÓWKI DOTYCZĄCE BEZPIECZEŃSTWA
natural_image
Three technical illustrations of a battery pack with internal channels and a cable being inserted (no text or symbols visible)natural_image
3D mechanical assembly diagram showing internal components with a magnified inset (no text or symbols)UŻYTKOWANIE
Looking for spare parts? Have a look at https://spareparts.emerio.eu
OBSŁUGA KLIENTA

CZEŚCI ZAMIENNE
- Instruction manual – English
- SAFETY INSTRUCTIONS
- INTENDED USE
- BEFORE USE
- Prepare film
- OPERATION
- Seal function
- Vacuum seal function
- Vacuum function without sealing
- CLEANING AND MAINTENANCE
- STORAGE
- TECHNICAL DATA
- GUARANTEE AND CUSTOMER SERVICE
- BETRIEB
- FONCTIONNEMENT
- Bruksanvisning – Swedish
- SÄKERHETSANVISNINGAR
- ANVÄNDNING
- Försegling
- WERKING
- Functie Sealen
- WSKAZÓWKI DOTYCZĄCE BEZPIECZEŃSTWA
- UŻYTKOWANIE
Brand : Emerio
Model : VS-130802
Category : Vacuum packaging machines