
Meril - Baby stroller Lionelo - Free user manual and instructions
Find the device manual for free Meril Lionelo in PDF.

| Product Type | Baby stroller with bassinet and car seat (modular set) |
| Brand | Lionelo |
| Model | Meril |
| Maximum child weight (stroller) | 22 kg |
| Maximum recommended age (stroller) | 4 years (whichever comes first) |
| Maximum child weight (bassinet) | 9 kg (until child sits up alone) |
| Maximum basket load | 3 kg |
| Maximum parent bag load | 1 kg |
| Maximum cup holder load | 0.5 kg |
| Maximum side pockets load (bassinet) | 0.2 kg |
| Folding mechanism | Compact folding with folding lever (bassinet removed beforehand) |
| Parking brake | Foot brake on rear wheels |
| Front wheel lock | Yes, rotation lock button |
| Safety harness | Adjustable 5-point harness |
| Backrest adjustment | Lever at back of backrest, multiple positions |
| Footrest adjustment | Side buttons, multiple positions |
| Handle adjustment | Side buttons, adjustable height |
| Canopy | Expandable with zipper, tilt adjustable |
| Car seat compatibility | Adapters for Astrid i-Size (seat sold separately) |
| Seat configuration | Forward facing or rear facing |
| Materials | Steel frame, polyester fabric |
| Cleaning and maintenance | Damp cloth and mild soap; regular inspection of components |
| Spare parts | Manufacturer recommended parts only |
| Warranty | See conditions on manufacturer's website |
Frequently Asked Questions - Meril Lionelo
User questions about Meril Lionelo
0 question about this device. Answer the ones you know or ask your own.
Ask a new question about this device
Download the instructions for your Baby stroller in PDF format for free! Find your manual Meril - Lionelo and take your electronic device back in hand. On this page are published all the documents necessary for the use of your device. Meril by Lionelo.
USER MANUAL Meril Lionelo
natural_image
Line drawing of a stroller with two seats and a matching case, no text or symbols present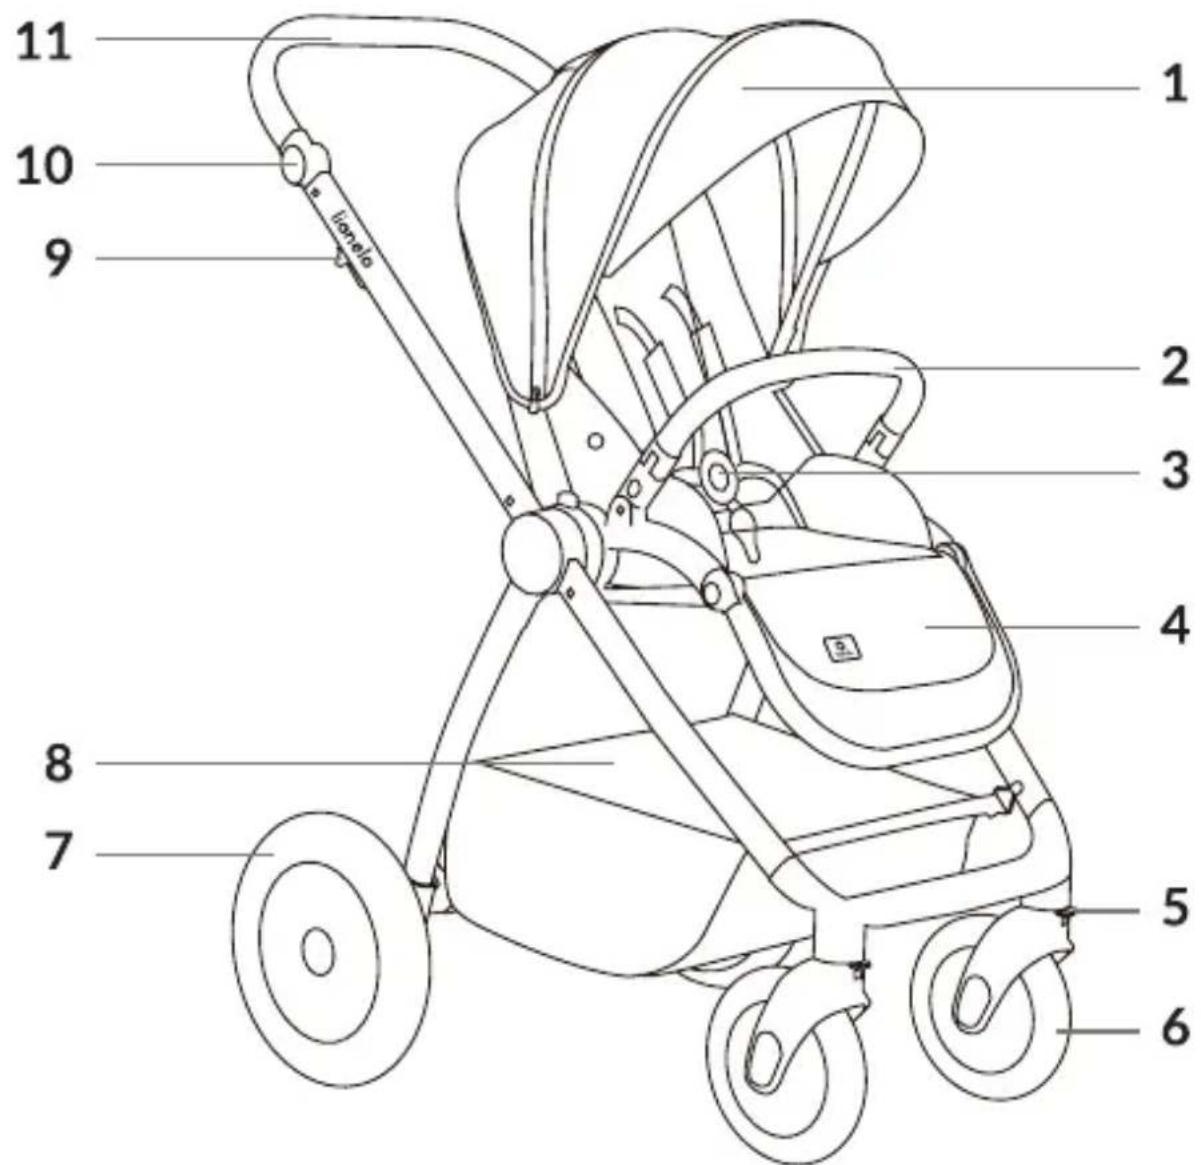

4
natural_image
Mechanical assembly diagram showing a bracket with a highlighted component and directional arrow (no text or symbols)5
natural_image
Diagram of a mechanical device with wheels and a central square component, no text or symbols present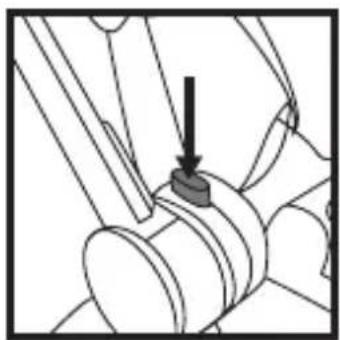
natural_image
Mechanical assembly diagram showing a component with an arrow pointing to a specific part (no text or symbols present)6
natural_image
Diagram of a mechanical or electrical component with directional arrows indicating motion (no text or symbols)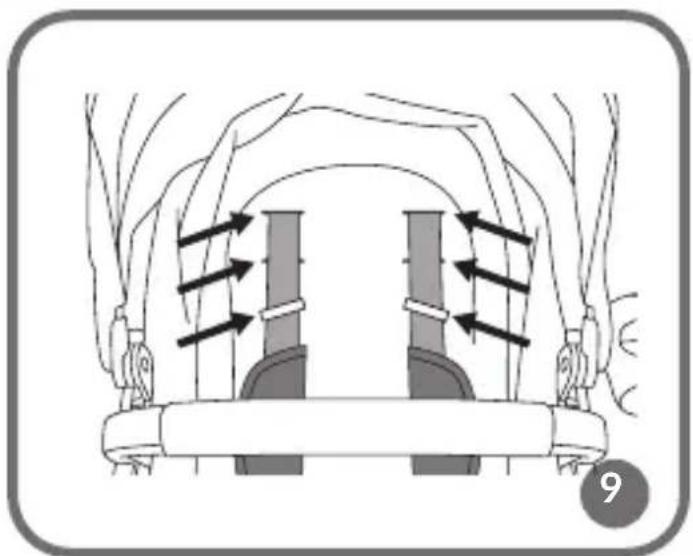
natural_image
Diagram of a car's seat frame with directional arrows indicating movement or force (no text or symbols)
flowchart
graph LR
    A["Start: Stroller with handle"] --> B["Step 1: Rotation of part"]
    B --> C["Step 2: Insert part"]
    C --> D["Step 3: Rotation of part"]
    D --> E["Step 4: Rotation of part"]
natural_image
Line drawing of a person wearing a seatbelt with arrows indicating motion (no text or symbols)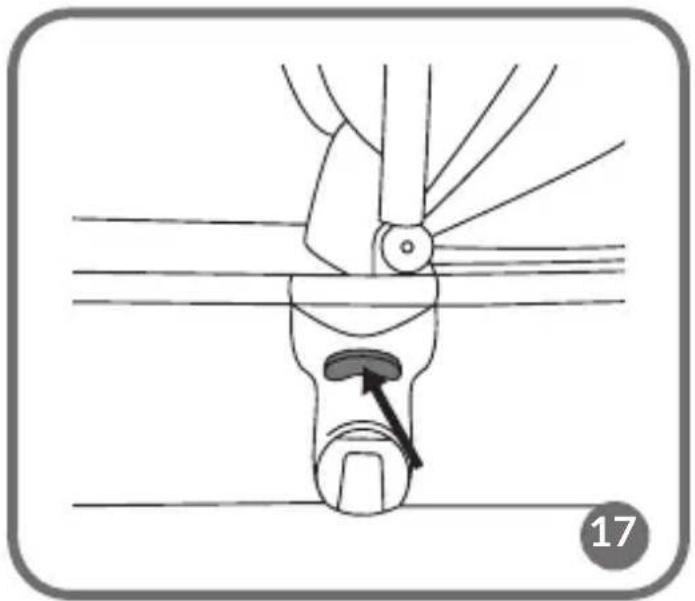
natural_image
Diagram of a mechanical device with a lever and adjustment knob, no text or symbols present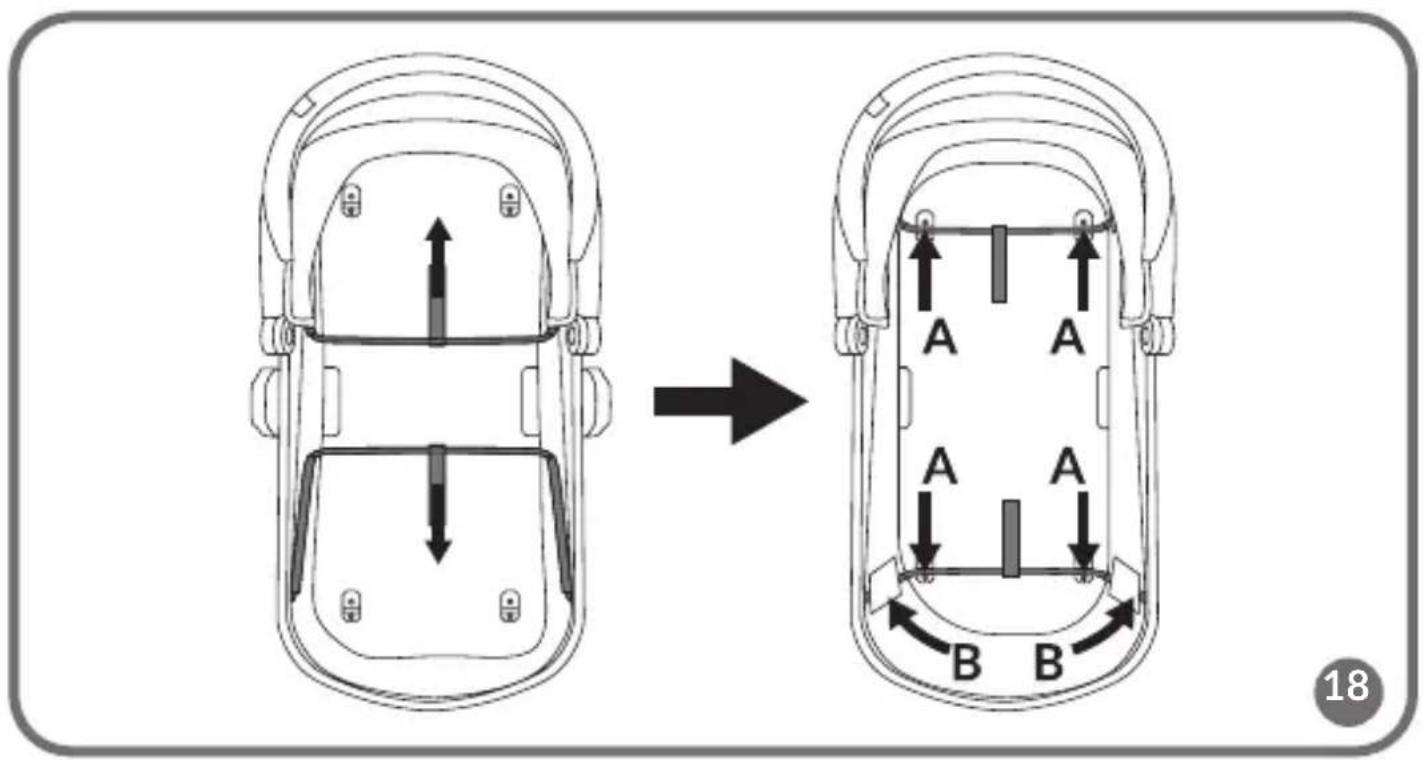
Dear Customer!
In case of any questions or comments on the purchased product, please contact us:
help@lionelo.com
Producer:
BrandLine Group Sp. z o. o.
IMPORTANT - READ CAREFULLY AND KEEP FOR FUTURE REFERENCE WARNING!
FOR STROLLER:
- Never leave the child unattended.
- Ensure that all the locking devices are engaged before use.
- To avoid injury ensure that the child is kept away when unfolding and folding this product.
- Do not let the child play with this product.
- This seat unit is not suitable for children under 6 months.
- Always use the restraint system.
- Check that the pram body or seat unit or car seat attachment devices are correctly engaged before use.
- This product is not suitable for running or skating.
- The product is suitable for a child weighing up to 22 kg or up to 4 years old (whichever comes first).
- If you want to take the baby out of the stroller, or put the baby in it, make sure that the locking mechanism on the wheel is locked.
-
The maximum load of the basket is 3 kg. The maximum load of the parent bag is 1 kg. The maximum load of the side pockets on the bassinet is 0.2 kg. The maximum load of the cup holder is 0.5 kg.
-
Any loads attached to the handle and/or backrest and/or sides of the product will affect the stability of the stroller.
- The product is intended for use by one child.
- Do not use accessories not approved by the manufacturer.
- If you attach a carrier to the set with special adapters, which can also be used as a car seat, remember that it does not replace the crib. If your baby needs to sleep, place him in a carrycot, crib or bed.
- Use only spare parts supplied or recommended by the manufacturer.
- Keep the product away from fire and heat sources.
- Do not use the product on stairs.
IMPORTANT - READ THE INSTRUCTIONS CAREFULLY BEFORE USE AND KEEP FOR FUTURE REFERENCE WARNING!
FOR CARRYCOT:
- This product is only suitable for a child who cannot sit up unaided.
- Only use on a firm, horizontal level and dry surface.
- Do not let other children play unattended near the carry cot.
- Do not use if any part of the carry cot is broken, torn or missing.
- Use only spare parts supplied or recommended by the manufacturer.
- Keep the product away from fire and sources of heat.
- Inspect the bottom and handles of the carrycot regularly for signs of damage or wear.
- Before lifting or moving the carrycot, ensure that the handle is mounted and locked in an upright position.
- The baby can be carried in the carrycot.
-
The baby's head in the carrycot should always be positioned higher than the baby's body.
-
Do not place an additional mattress in the carrycot.
- The product is not suitable for a child who can sit up independently, roll over to the other side, and lift themselves up on their own hands and knees. Maximum weight of the child: 9 kg.
- Never use this product on a stand.
- When using the carrycot, the carrying handles should be positioned outside the carrycot.
- Be mindful of the risk of accidentally hitting the child, for example when placing the carrycot on the floor or passing through doorways.
- Do not leave any items in the carrycot that could pose a suffocation risk, such as soft toys or pillows.
- Do not position the carrycot near any items that may pose a risk of strangulation, such as cords, blinds, curtains, etc.
- Overheating poses a serious risk to your child's life! Take into account the ambient temperature and your child's clothing to ensure they are neither too cold nor too warm.
- Consult your healthcare professional for advice to ensure your baby's safe sleep.
ELEMENTS OF THE STROLLER (FIG. A)
- Canopy
- Safety bar
- Harness
- Footrest
- Front wheel rotation lock
- Front wheel
- Rear wheel
-
Basket
-
Frame folding lever
- Handle adjustment button
- Handle
- Locking mechanism
- Lever for backrest tilt adjustment and seat folding
- Car seat adapters
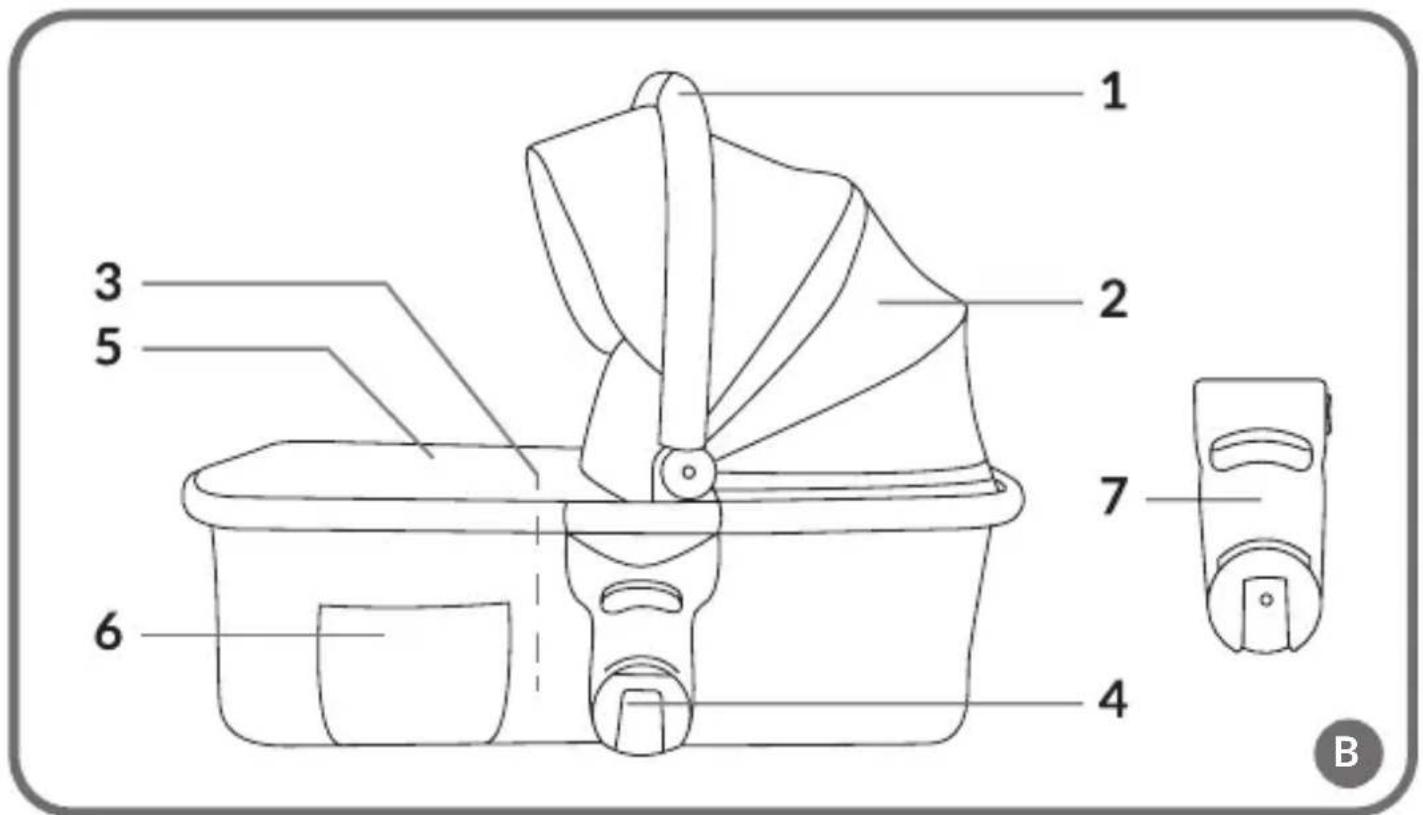
ELEMENTS OF THE CARRYCOT (FIG. B)
- Handle
- Canopy
- Mattress
-
Carrycot connectors
-
Carrycot cover
- Side pocket for keys/phone
- Carrycot adapters
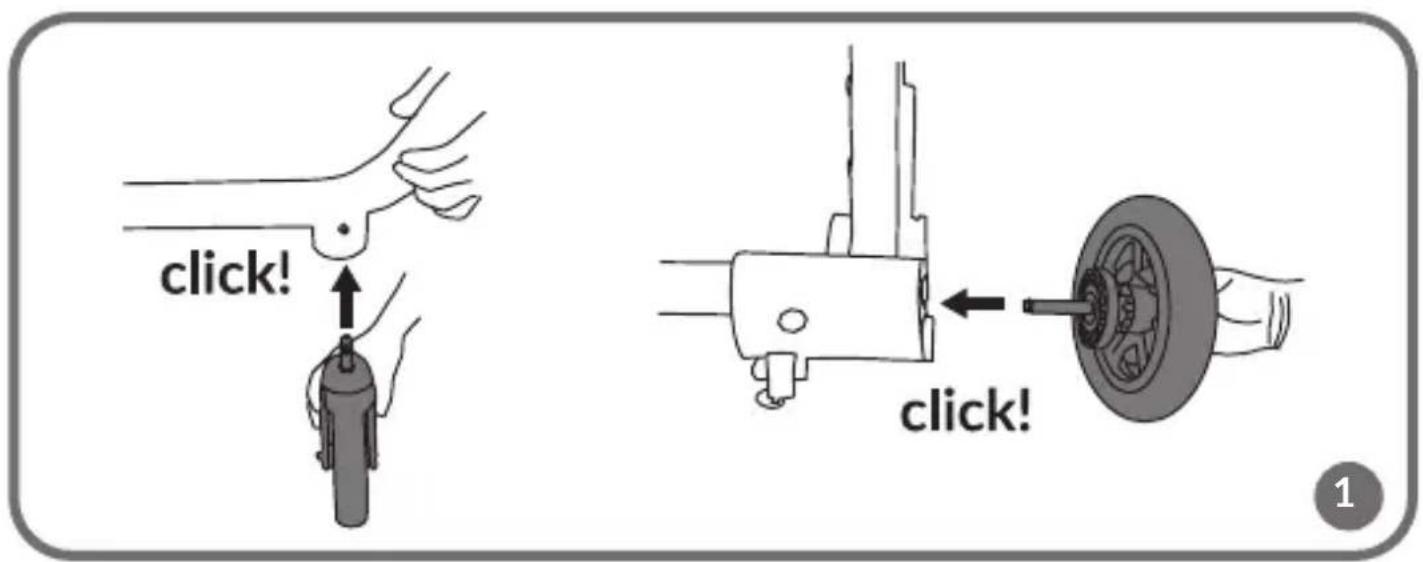
INSTALLATION AND REMOVAL OF THE WHEELS
- Insert the metal pin of the wheel into the appropriate place on the stroller frame. Tighten the wheel until you hear a click (fig. 1). The installation method applies to front and rear wheels.
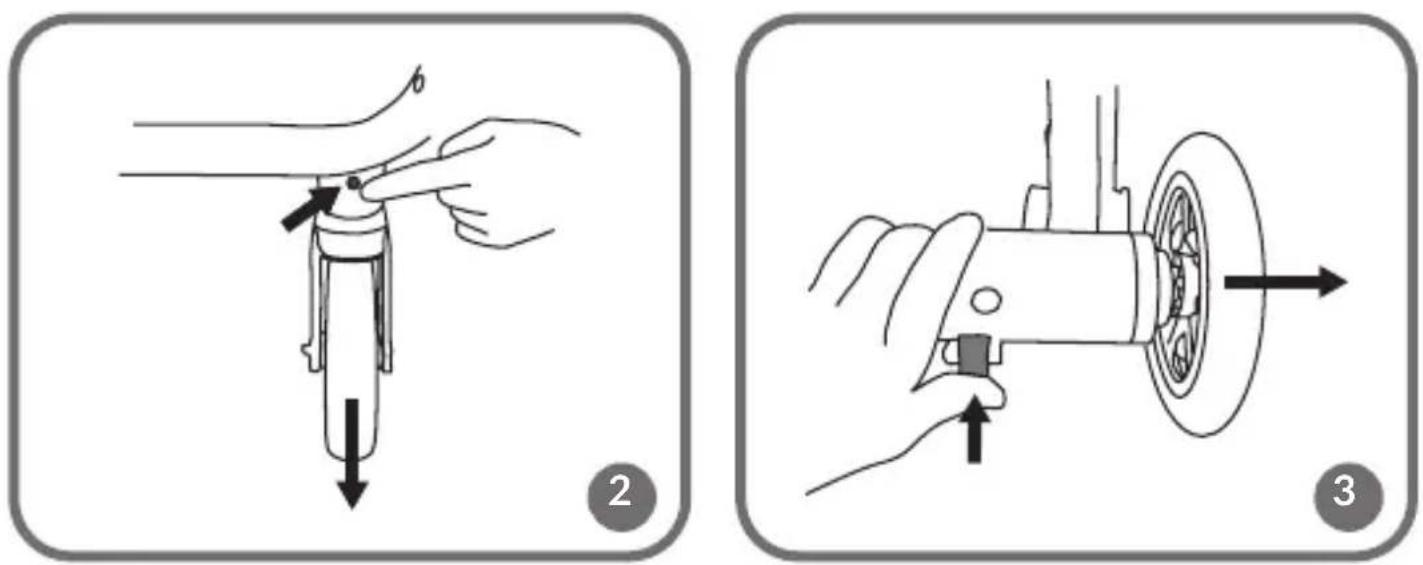
- To remove the front wheels, press the button on the back of the wheel and slide it out (fig. 2).
- To remove the rear wheels, press the button located under the wheel and slide the wheel out of the frame (fig. 3).
Note! To lock the front wheels, put them in the forward direction and then move up the lock buttons (5, fig. A) located above the wheels.
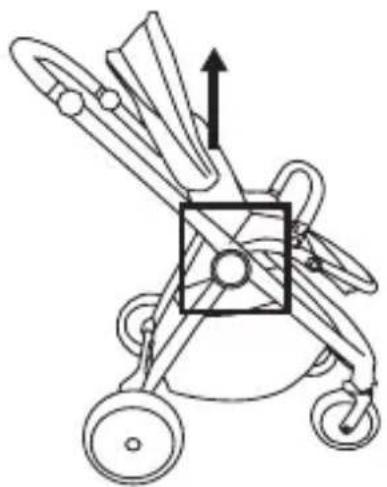
UNFOLDING OF THE STROLLER FRAME
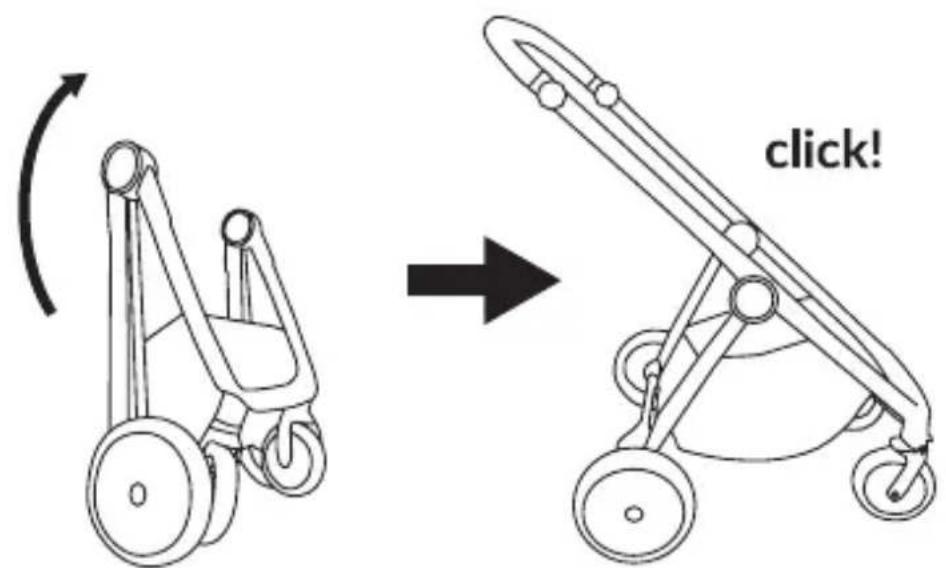
Grab the handle (11, fig. A) and lift the frame of the stroller (fig. 4). Correct unfolding of the frame will signal an audible click.
INSTALLATION AND REMOVAL OF THE SEAT
The seat can be installed either forward or rearward facing.
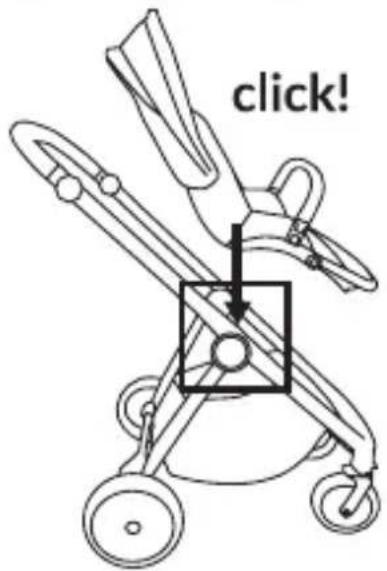
Place the seat in the guides located on the frame of the stroller (fig. 5). Correct installation of the seat on the stroller frame will be signaled by a click. Make sure the seat is properly installed.
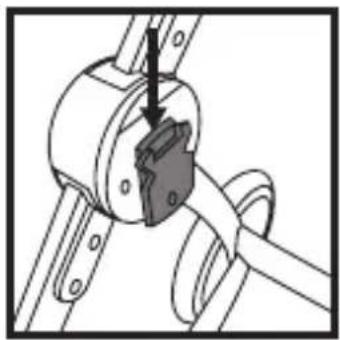
To remove the seat from the stroller frame, press the release buttons (fig. 6), then lift the seat up.
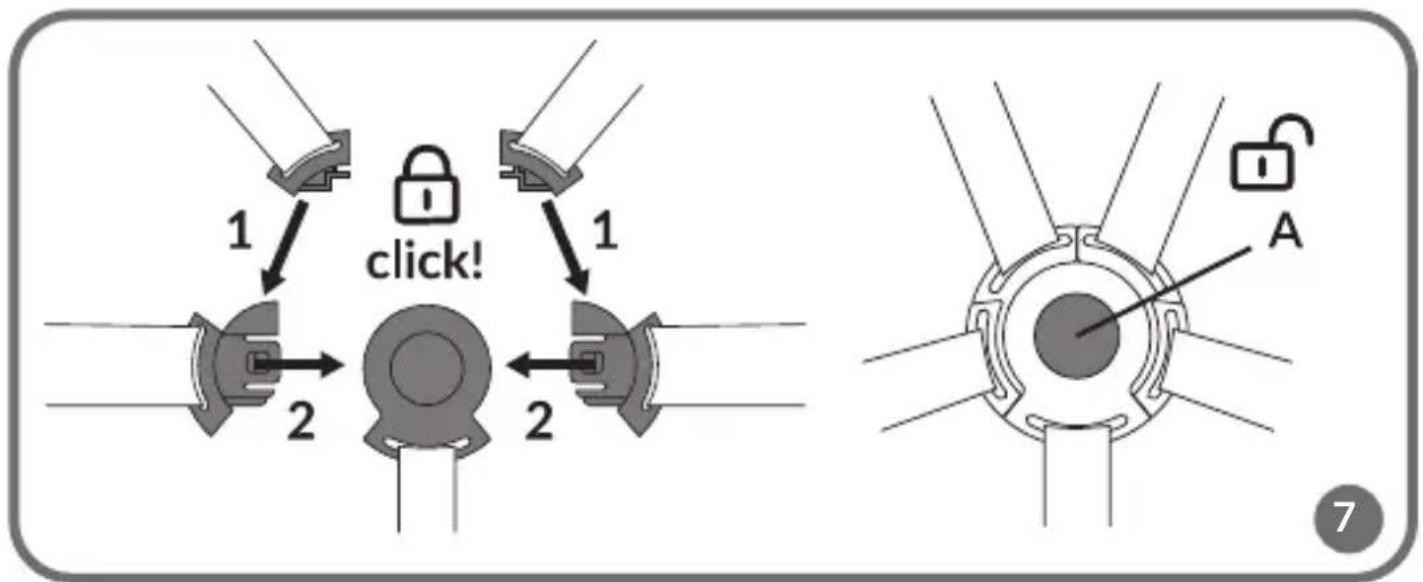
SEAT BELTS
- To fasten the seat belt, slide the buckle components into the center buckle (fig. 7). You will hear a click.
- To unbuckle the seat belts, press the button located in the center buckle (A, fig. 7).
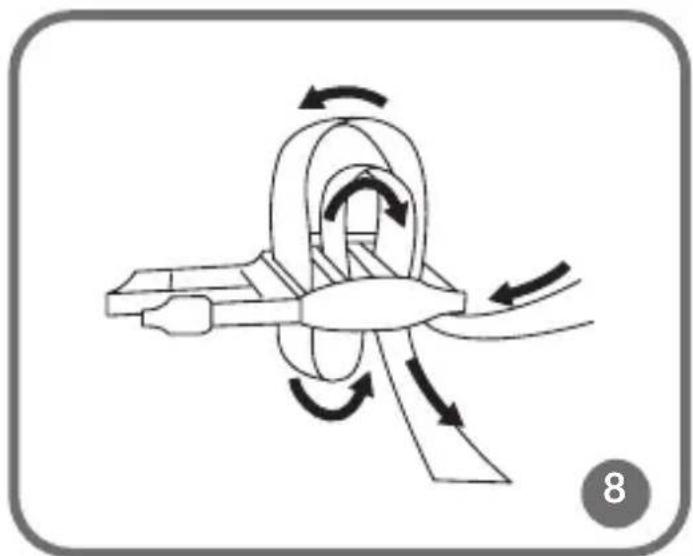
- Adjust the length of the belts using the buckles (fig. 8) or by putting them through the appropriate holes in the seat cover (fig. 9).
LOCKING MECHANISM
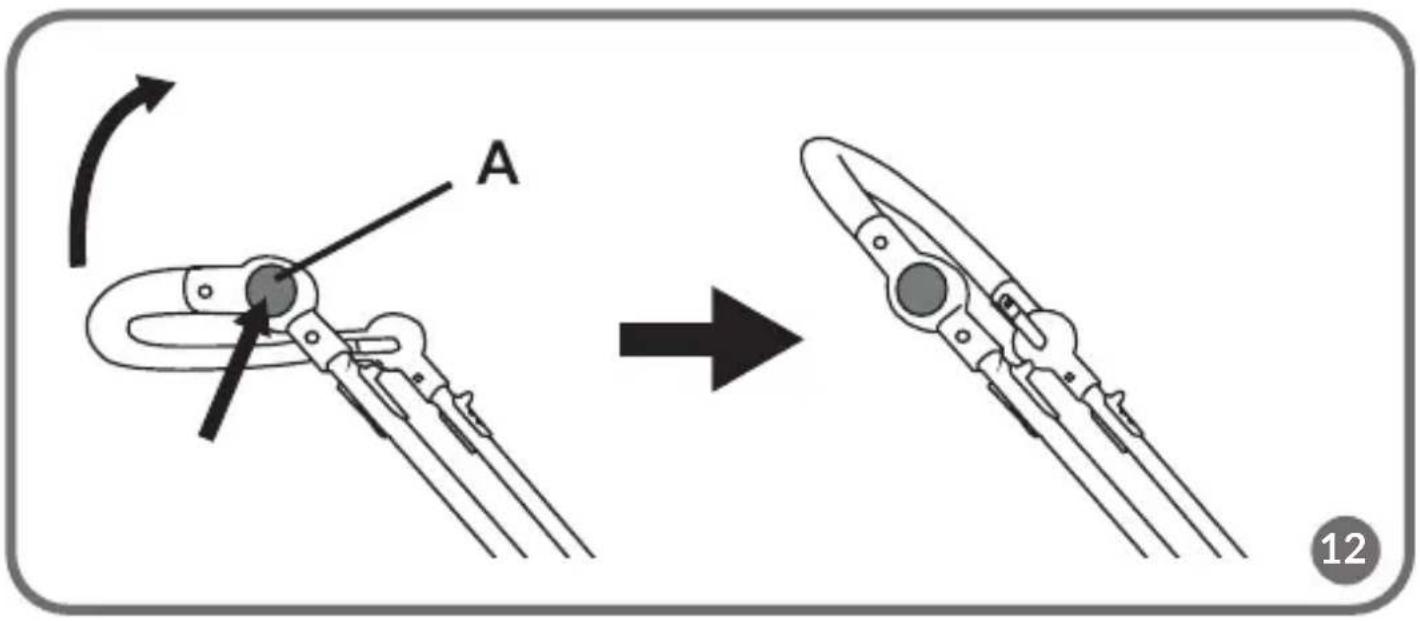
Push to lock the wheels and stop the stroller (A, fig. 10). Lift to unlock (B, fig. 10).
FOOTREST ADJUSTMENT
- To lower the footrest, press the buttons on either side of the footrest (fig. 11), then push the footrest down to the desired position – the correct setting will signal a click.
- To raise the footrest, lift it up until you hear a click.
HANDLE ADJUSTMENT
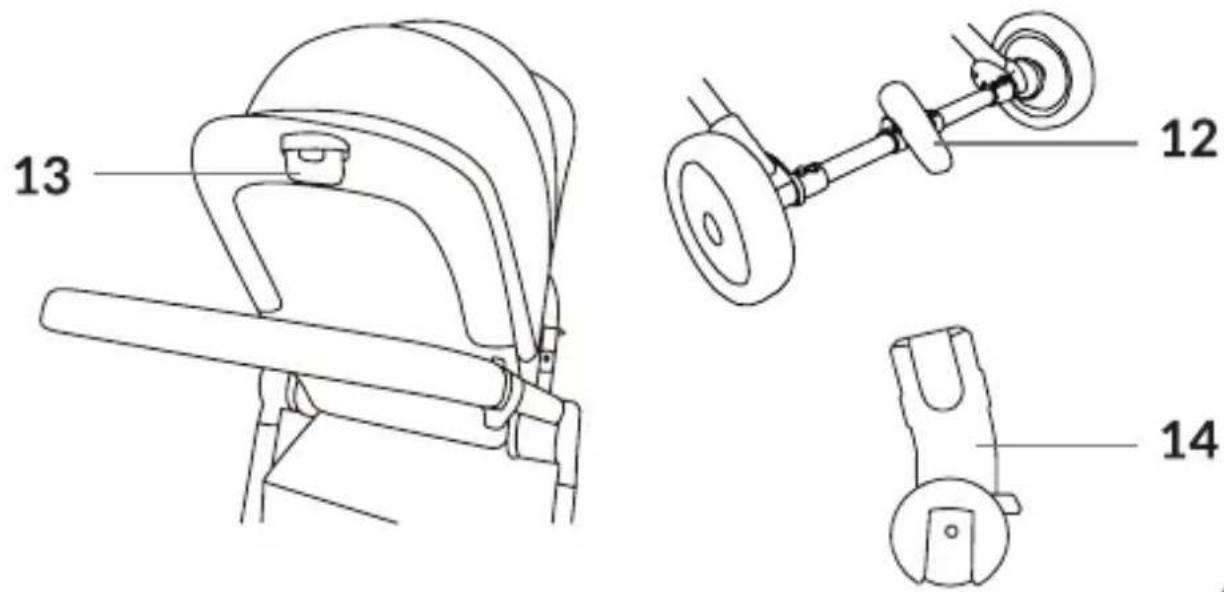
Press the adjustment buttons (10, fig. A) to adjust the position of the handle (fig. 12).
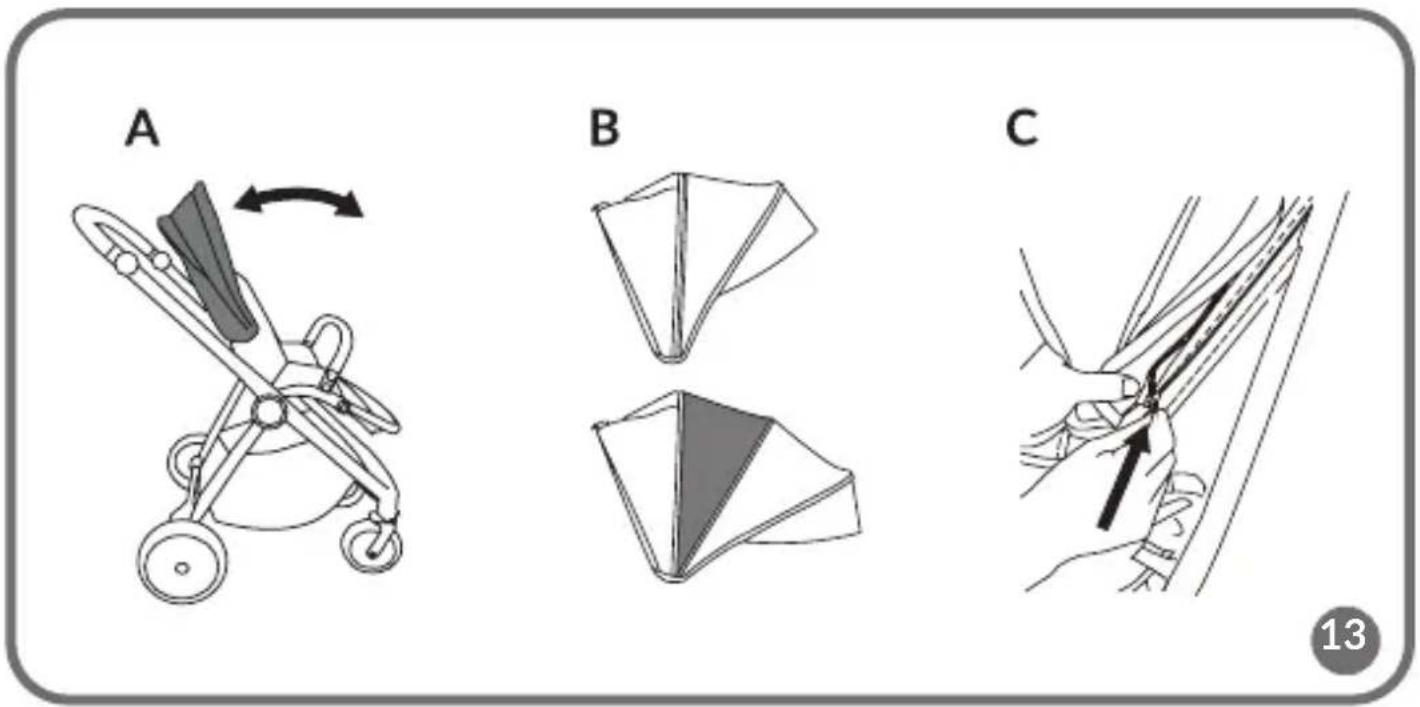
CANOPY ADJUSTMENT
To adjust the canopy, simply slide it forward or backward (A, fig. 13) and adjust it as desired (B, fig. 13). When the canopy is fully extended, fasten the zipper (C, fig. 13).
BACKREST ADJUSTMENT
Adjust the position of the backrest with the lever on the back of the backrest to the desired position – the correct setting will be signaled by a click (13, fig. A).
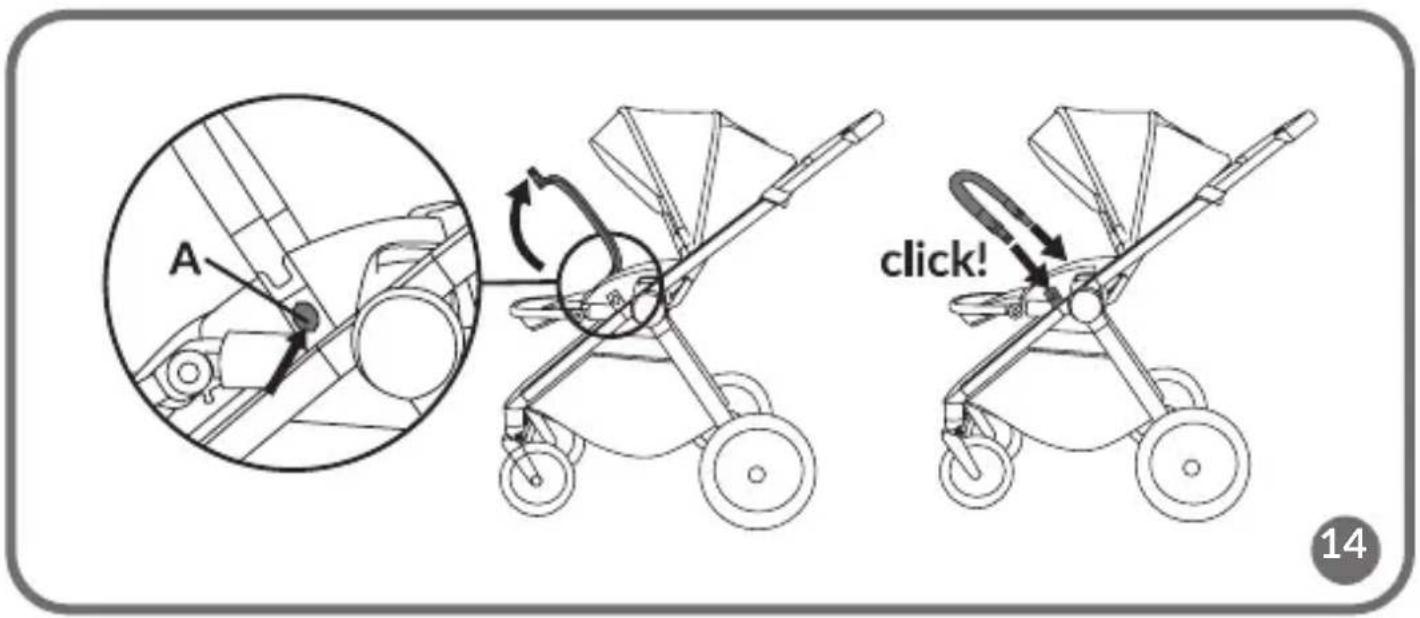
SAFETY BAR
Press the release buttons (A, fig. 14), then pull out the safety bar. Correct reinsertion of the safety bar will signal a click.
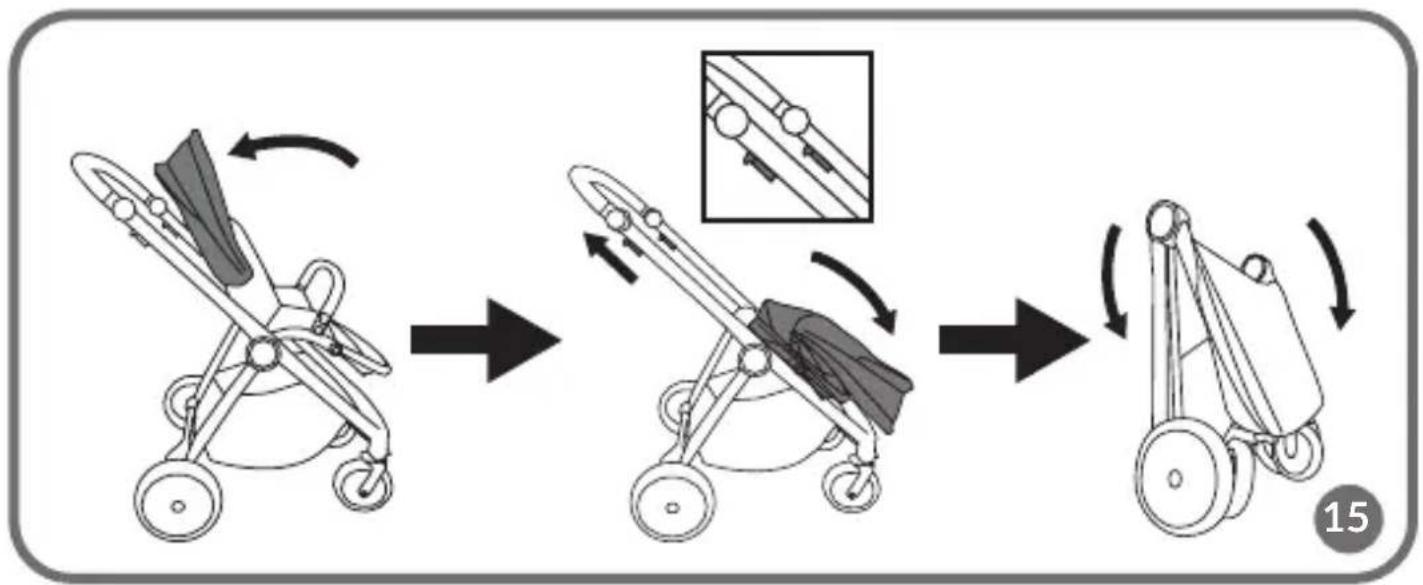
- Fold the canopy of the seat, facing forward or backward.
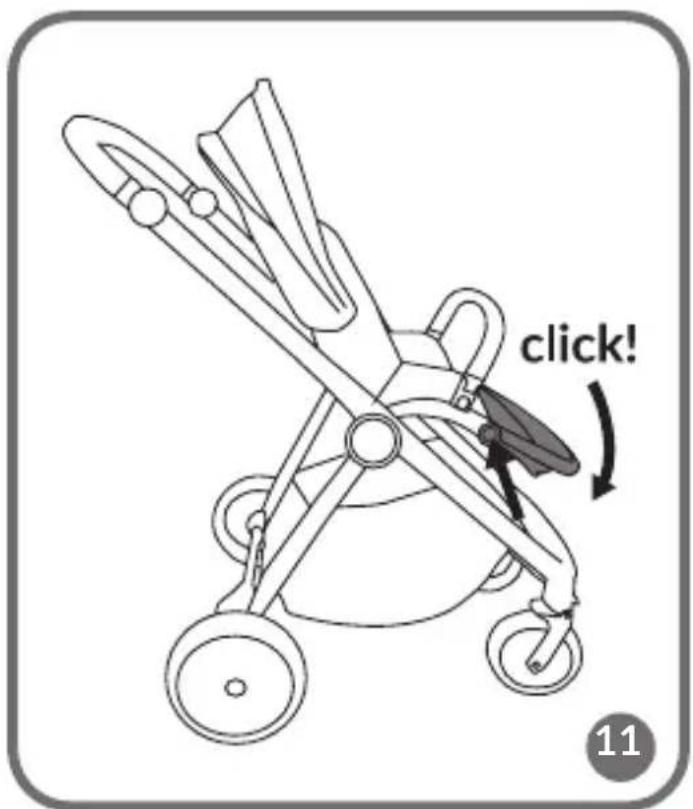
- Push the seat folding lever (13, fig. A) and lower the entire seat as far forward as possible.
- Slide the folding lever (9, fig. A) on both sides of the handle, and push the frame down until the stroller folds (fig. 15).
Note! The stroller cannot be folded with the carrycot installed. It is necessary to remove the carrycot and then fold the stroller frame.
UNFOLDING THE CARRYCOT
-
After unfolding the carrycot, secure the base of the carrycot by sliding the metal bars into the guides (A, fig. 18), then fasten the fabric covers (B, fig. 18).
-
Place the mattress (3, fig. B) inside the carrycot.
- Place the cover (5, fig. B) over the carrycot and fasten the zipper.
INSTALLATION OF THE CARRYCOT ON THE STROLLER FRAME
Note! The carrycot should be mounted facing the person driving the stroller so that the caretaker has eye contact with the child.
- Place a mattress in the carrycot (3, fig. B).
- Slide the carrycot adapters (7, fig. B) into the guides on the stroller frame (fig. 5). Correct installation will signal a click.
Important! The carrycot can also be mounted directly on the frame, without adapters.
-
Position the carrycot on the frame by sliding the guides (4, fig. B) into the adapters on the frame. Correct installation will signal a click.
-
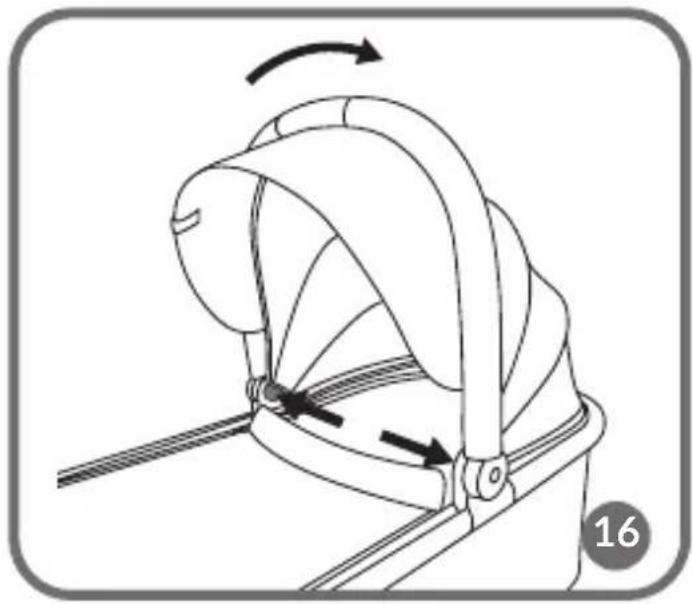
Unfold the canopy as desired (2, fig. B). To unfold or fold the canopy, press the adjustment buttons located on both sides of the carrycot (fig. 16).
-
Make sure the carrycot is properly installed and cannot be freely removed from the stroller frame.
REMOVAL OF THE CARRYCOT
Note! The baby can be carried in the carrycot.
Press the buttons located in the adapters of the carrycot (fig. 17), then lift it upwards and remove it from the frame of the stroller.
CAR SEAT INSTALLATION AND REMOVAL (APPLIES TO 3-IN-1 SET)
The adapters are compatible with the Astrid i-Size product.
- Insert the adapters into the appropriate places on the stroller frame until you hear a click on both sides and the adapters are locked in place.
- The seat on the stroller frame should be installed so that the child in it is positioned facing the person driving the stroller.
- Place the seat on the stroller frame with the adapters. You will hear a characteristic click. Make sure the seat is properly installed on the stroller frame.
- To release the seat if necessary, remove the seat from the adapters.
- To remove the adapter, press the bottom button on it and remove.
CLEANING AND MAINTENANCE
- The wheels and frame of the stroller should be cleaned regularly from dust and sand. These parts can be cleaned with a damp cloth and mild cleaning agents.
- Individual parts of the stroller and carrycot should be regularly inspected for functionality, durability, and possible damage. If defects are detected, contact an authorized service center.
- Use only spare parts recommended by the manufacturer.
- Do not use strong chemical cleaning agents for this product. In case of dirt, wipe the material with a damp cloth.
The photos are for reference only, the actual look of the products may differ from the ones shown in the pictures.
PL
Drogi Kliencie!
BrandLine Group Sp. z o.o.
BrandLine Group Sp. z o.o.
MONTÁŽ A DEMONTÁŽ KOL
MONTÁŽ A DEMONTÁŽ SEDADLA
BrandLine Group Sp. z o.o.
BrandLine Group Sp. z o.o.
BrandLine Group Sp. z o.o.
Detailed warranty conditions are available on the website: