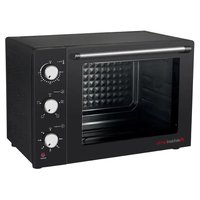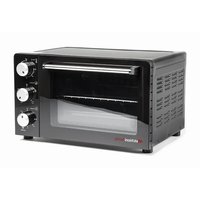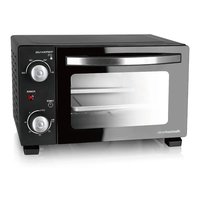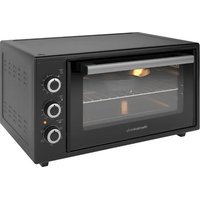
Ardente 45 - Electric oven Melchioni - Free user manual and instructions
Find the device manual for free Ardente 45 Melchioni in PDF.


| Product type | Countertop electric oven |
| Brand | Melchioni |
| Model | Ardente 45 |
| Capacity | 45 liters |
| External dimensions (W x H x D) | 590 x 464.6 x 330 mm |
| Voltage / Frequency | 220-240 V / 50-60 Hz |
| Power consumption | 1650 W |
| Interior lighting | 18 W (tungsten halogen) |
| Temperature range | Up to 250 °C |
| Timer | 1 to 90 minutes + manual position |
| Cooking functions | Lower heat, upper heat, combined, fan forced, defrost, grill, rotisserie (chicken), grill + fan forced, lower + fan forced |
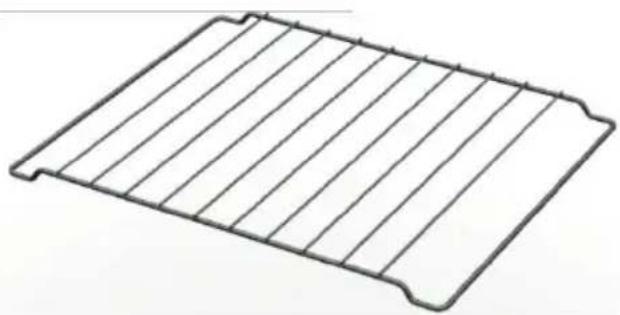
| Included accessories | Metal grid, round tray, square tray, drip tray, removable feet, chicken spit (depending on version) |
| Insulation class | Class I |
| IP rating | IP20 |
| Door material | Tempered glass |
| Cleaning | Exterior: damp cloth and mild detergent. Interior: warm water and non-abrasive sponge. Do not immerse. |
| Safety | Heating indicator light, manual auto-off, hot surface protection |
| Warranty | 2 years (conventional warranty) |
| Country of origin | Italy (Melchioni Spa) |
Frequently Asked Questions - Ardente 45 Melchioni
User questions about Ardente 45 Melchioni
0 question about this device. Answer the ones you know or ask your own.
Ask a new question about this device
Download the instructions for your Electric oven in PDF format for free! Find your manual Ardente 45 - Melchioni and take your electronic device back in hand. On this page are published all the documents necessary for the use of your device. Ardente 45 by Melchioni.
USER MANUAL Ardente 45 Melchioni
natural_image
Black microwave oven with open lid and control knobs (no visible text or symbols)IT Manuale d'uso 1
EN User manual 26
natural_image
Technical illustration of a mechanical component with mounting holes and a small inset view (no text or symbols)FASE 1
natural_image
Diagram of a laptop with a black sensor and red arrow indicating rotation (no text or symbols)FASE 3
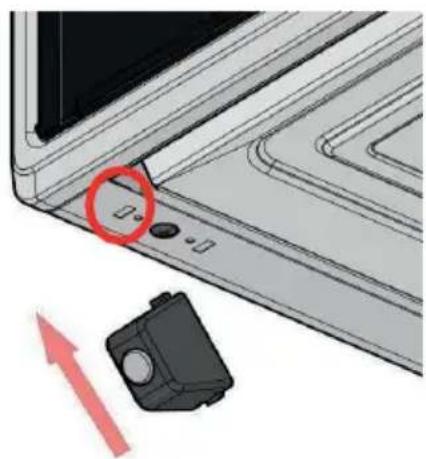
1: Linguetta Fissa
2: Linguetta Mobile
natural_image
Laptop keyboard with a red circular icon highlighting the key area, next to a black device and a red arrow indicating leftward motion (no text or symbols)natural_image
Technical illustration of a mechanical component with a central bolt and flange (no text or symbols)FASE 4
natural_image
Line drawing of a rectangular metal grate or rack structure with evenly spaced vertical lines (no text or symbols)| 45 LT | |
| Voltage/Frequency | 220-240V / 50-60 Hz |
| Total power consumption | 1.650 W |
| External dimensions(width x height x depth) | 590 x 464,6 x 330 |
| Interior Lighting | 18 W |
| Plate Powers | 1500-1000W |
| Insulation class anddegree of protection | CLASS I-IP20 |

Specifications are subject to change without notice to improve product quality.

The illustrations in the manual are schematic and may not exactly match your product.

The values indicated in the labeling on the product or in other printed documents supplied with the product are determined in a laboratory setting in accordance with
the relevant standards. These values may differ depending on the use and ambient conditions.

Use your oven on a grounded plug with a fuse rating of at least 16A.
Symbols and Definitions: The following symbols appear in the user manual.
 | Important information and useful tips for operation |
 | Warning for dangerous situations with regard to life and property. |
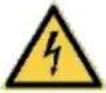 | Warning for electric shock risk |
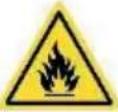 | Warning for fire hazard risk |
 | Protection against hot surfaces |
Dear Customer,
Manufactured in modern facilities and subjected to strict quality control, we want you to get the most out of your product. Therefore, read the entire manual carefully before using the product and keep it as a reference source. If you pass the product on to another person, give them the manual.
-
The product contains a thermostat and only a suitable thermostat should be used.
-
This appliance is NOT intended for use by persons with reduced physical, sensory or mental capabilities, or lack of experience and knowledge, unless they have been given supervision or instruction concerning the use of the appliance by a person responsible for their safety. DO NOT LEAVE unattended near children or pets. No one is authorized to operate or clean this equipment unless they have fully read and understood all operating and safety instructions in this manual.
-
Children 8 years of age and older may use this equipment under supervision or after proper instruction. Children must not tamper with the appliance.
-
Keep the appliance and power cord out of the reach of children under 8 years of age.
-
Your oven is NOT DESIGNED to be operated from an external timer or an independent remote control system.
-
This appliance is intended for normal household and similar use only. It is NOT INTENDED for use in commercial or retail environments. If this oven is used improperly or for professional or semi-professional purposes, or if it is not used in accordance with the instructions in the user manual, the warranty will be void and the manufacturer will not be held liable for any damages.
Caution - Hot Surfaces: This symbol indicates that accessible surfaces may become very hot during operation. The warning label with this symbol must not be removed. Do not touch hot surfaces. Use handles.
-
ALWAYS place the appliance on a flat, heat-resistant surface. Intended for countertop use only. DO NOT operate on unstable surfaces. DO NOT operate the unit in a confined space or under hanging cabinets. To prevent any property damages from fumes released during operation, adequate space and ventilation are required. Never operate the unit near combustible materials such as paper towels, curtains or plastic sheets. Make sure the cord does NOT hang over the edge of a table or countertop or touch hot surfaces.
-
CAUTION - HOT SURFACES: This appliance generates excessive heat and fumes
during use. Proper precautions must be taken to avoid the risk of personal injury, fire and property damage.
-
DO NOT place a mat under the unit. If you must place the appliance on a mat, take precautions to prevent the appliance from sliding off the mat.
-
DO NOT place the appliance against the wall or on top of other appliances while cooking. Allow at least 5 inches or 13 cm of clearance on the top, back, sides and top of the unit. DO NOT place any objects on top of the appliance.
-
DO NOT place the appliance on the tops of the oven.
-
WARNING: To minimize the risk of electric shock, use only the supplied removable utensils, trays, grates, etc. for cooking.
-
Using accessories which are NOT RECOMMENDED by the appliance manufacturer may result in injury.
-
For your safety do not use the oven without mounting leg unit.
-
NEVER use with an extension cord, a short power cord (or detachable power cord) is provided to minimize the risk of tangling or tripping over a longer cord. NEVER use the power outlet under the countertop.
-
DO NOT use the appliance outdoors.
-
DO NOT operate if the cord or plug is damaged. If the appliance malfunctions during use, unplug it immediately. DO NOT USE OR ATTEMPT TO REPAIR A DEFECTIVE UNIT. Contact customer service for assistance.
-
Unplug the appliance when not in use and before cleaning the oven. Allow the oven to cool down before installing or removing parts. NEVER immerse the body in water. If the unit is dropped or accidentally immersed in water, unplug it immediately. Do not immerse or rinse the cord or plug in water or other liquids.
-
The external surfaces of the unit may become hot during use. Wear oven gloves when handling hot surfaces and components.
-
ALWAYS unplug the appliance after use.
-
Use extreme caution when handling an appliance that contains hot oil or other hot liquids.
-
USE EXTREME CAUTION when removing trays or disposing of hot grease.
-
DO NOT clean with a metal scouring pad. Parts may come off the base and come in contact with electrical parts, creating a shock hazard. Use non-metallic scouring pads.
-
DO NOT attach oversized food or metal utensils to the unit as this may cause a fire or electric shock.
-
Use extreme caution when using containers made of a material other than
metal or containers made of a material other than glass.
- Do not store any materials other than the accessories that are recommended by the manufacturer in this unit when not in use.
- Do not place any of the following materials in the unit: Paper, cardboard, plastic.
- Do not cover the spill tray or other parts of the unit with metal foil, as this may cause the unit to overheat.
IMPORTANT
- The spill tray should be operated in place and all food should be removed from the spill tray when it is more than half full. Never place the spill tray (or any other accessory) directly on the oven.
KEEP THESE INSTRUCTIONS - FOR HOME USE ONLY
! WARNING
• NEVER place anything on top of the unit.
• NEVER cover the ventilation openings on the top, back and sides of the cooking unit.
• Always use oven gloves when removing anything hot from the unit.
• Never place anything on the oven door when it is open.
- Do not leave the oven door open for extended periods of time.
• Always make sure nothing can come out of the oven before closing the oven door.
- Always close the oven door slowly and do not slam it. Always hold the oven door handle when opening and closing the door.
• The usage life of this product is 10 (ten) years.
WARNING Attaching the power cord
- Plug the power cord into a designated power outlet. No other devices should be plugged into the same outlet. Plugging other equipment into the outlet will overload the circuit.
- Do not use an extension cord with this product.
• To disconnect, turn off all controls, then unplug from the wall.
Electrical power
If the circuit is overloaded with other equipment, your new device may not work properly. It must be operated on a dedicated circuit.
Fire risk due to food not suitable for the grill
Only grill the food that can be cooked in intense grill fire.
Do not place the food too far back on the grill. This is the hottest location and food containing fat may catch fire.

Before using the product.
The customer is responsible for choosing where to install the device and preparing the electrical installation.

The product must be installed in accordance with local electrical standards.

Inspect the product for any damage before installation. Do not install the product if it is damaged. Damaged products cause a risk for your safety.
Power connection

The product must be used with a grounded line!
The manufacturer is not liable for any damages caused by usage without an earthing line!

The power cord must not be crushed, bended or pinched or come into contact with hot parts of the product. If the power cord is damaged, it must be replaced by a qualified electrician.
- The data of the mains supply must correspond to the data on the unit reference label of the device. The unit reference label is located on the back of the product.
- The product's connection cable must comply with the technical specifications and power consumption; Check. Technical features page 3
- Plug must be in an easily accessible location after installation.
- The warranty for the product starts only after correct installation.

Before initiating any operation on the electrical installation, please unplug the device.
text_image
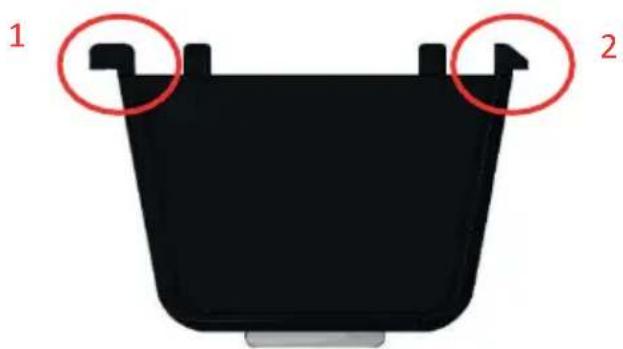
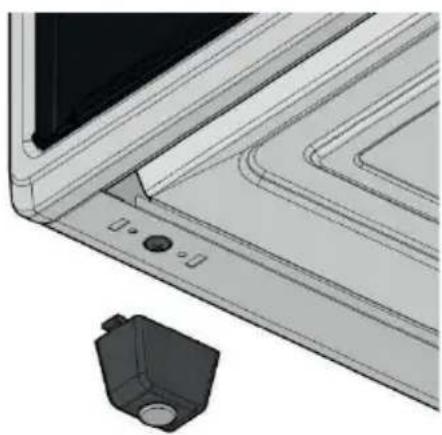
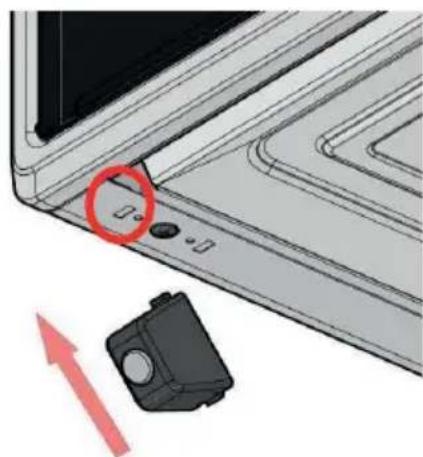
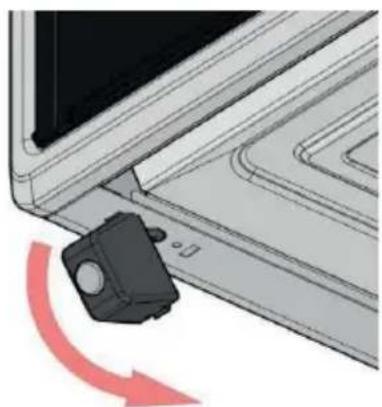
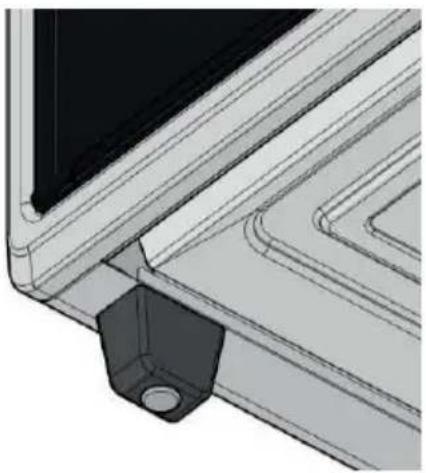
1 21 : Flexible clip
2 : Stable clip
natural_image
Technical illustration of a mechanical component with a small inset view showing a 3D part (no text or symbols)STEP-1
Align the feet as shown above.
natural_image
Laptop keyboard with a red circular button and a black device icon, no visible text or symbolsSTEP-2
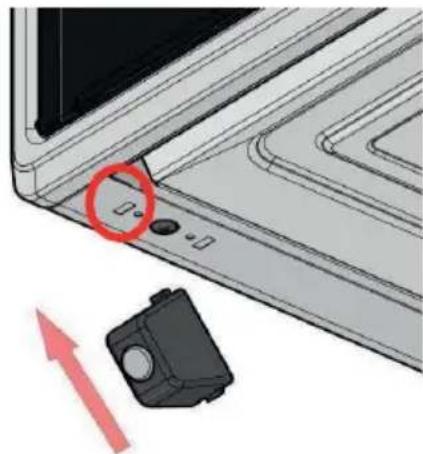
Get the flexible clip close to hole as shown above.
natural_image
Diagram of a laptop with a black sensor module and red circular arrow indicating rotation (no text or symbols)STEP-3
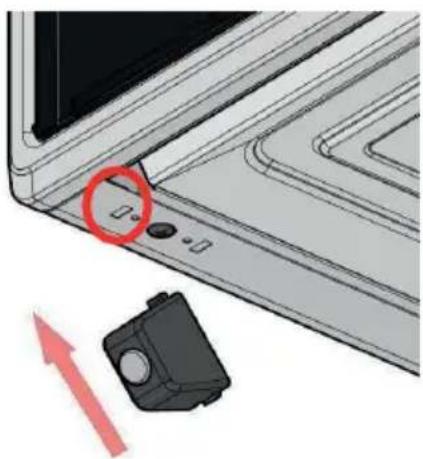
Mount the flexible clip into hole with a gentle push.
STEP-4
Fix the stable clip into hole gently. Please use the feet with rubber inlets.
natural_image
Technical line drawing of a mechanical component with a central mounting bracket (no text or symbols)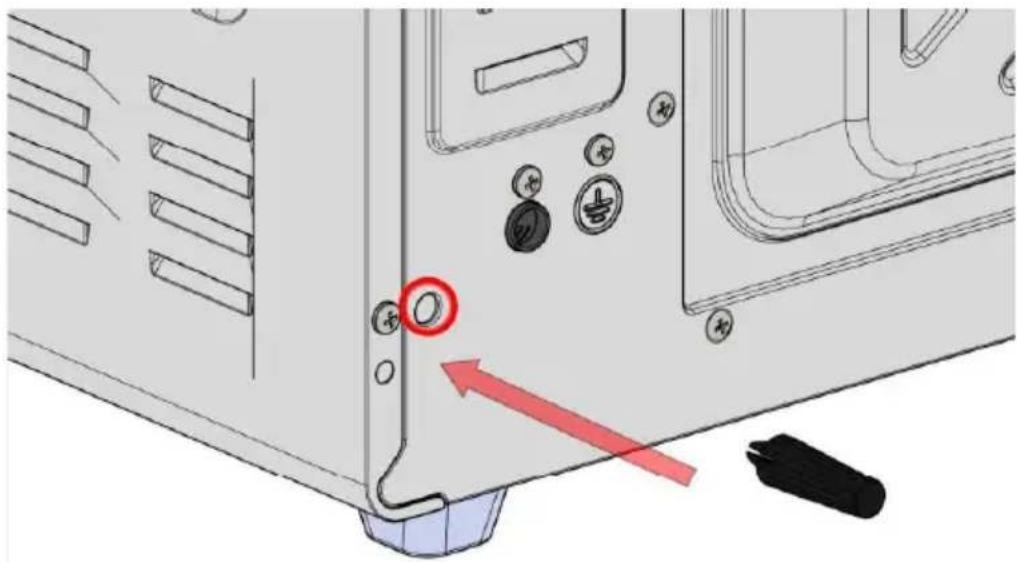
natural_image
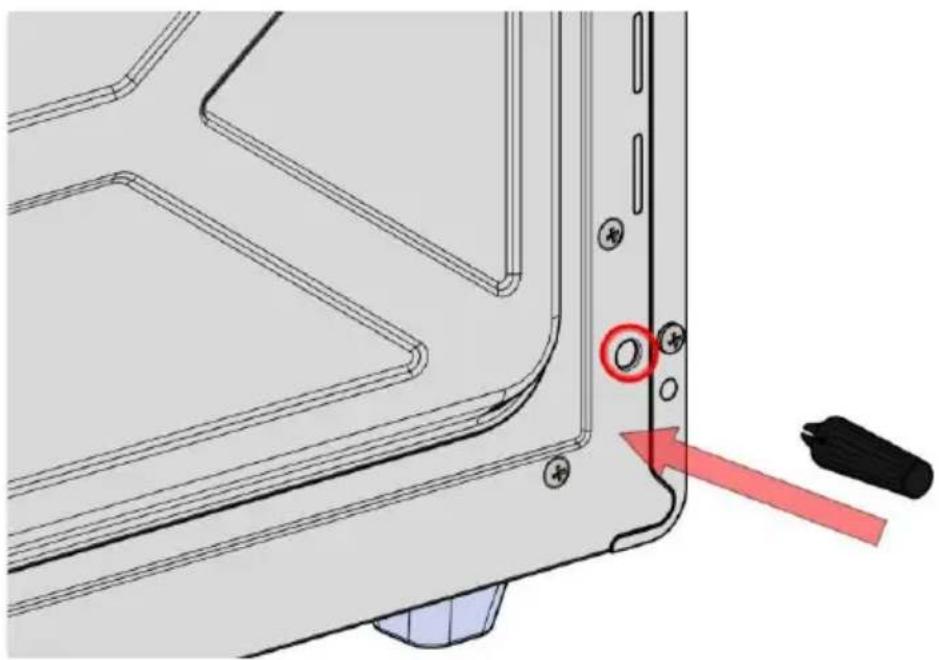
Diagram of a computer tower panel with labeled buttons and a red arrow pointing to the 'O' button (no text or symbols beyond basic labels)Adjust the back wall gap adjusters to left and right holes as shown.
Plug them in with a modrate push.
natural_image
Technical diagram of a mechanical component with a red arrow pointing to a circular feature, no text or symbols presentInitial use
- Remove all the packing material.
- Wash the cooking accessories by hand before using them for the first time. Then wipe the outside and inside of the oven with a warm, damp cloth and mild detergent.
- Then preheat the oven for 10 minutes, while empty and with the door open. CAUTION: When used for the first time, the unit may let out smoke or emit a burning odour due to the oils used to coat and protect the heating elements.
• Finally, wipe the appliance with a damp cloth.
Operating the Oven
- Set the oven function in which you want to cook.
- Set your timer to the desired time or manual position (clock icon).
• After you set the desired temperature, your oven will start to work.
WARNING: Your oven will not work if the thermostat and oven control are on, but the timer is not set or switched to the manual position.
Parts and accessories
text_image
1 2 3 4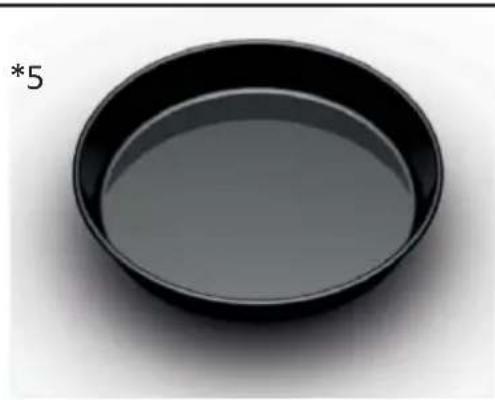
natural_image
Black circular baking pan with a single asterisk symbol on the left side (no text or symbols on the pan itself)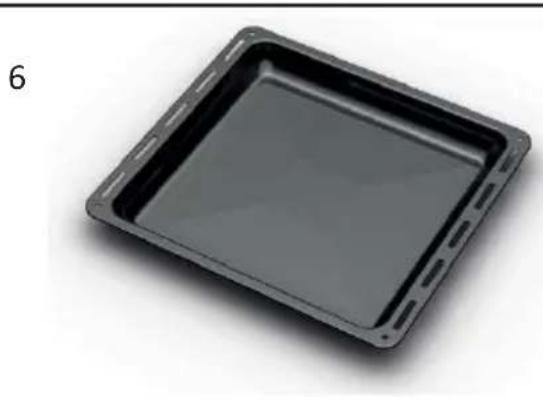
natural_image
Black square baking tray with scalloped edges and a small label '6' in the corner (no other text or symbols)
natural_image
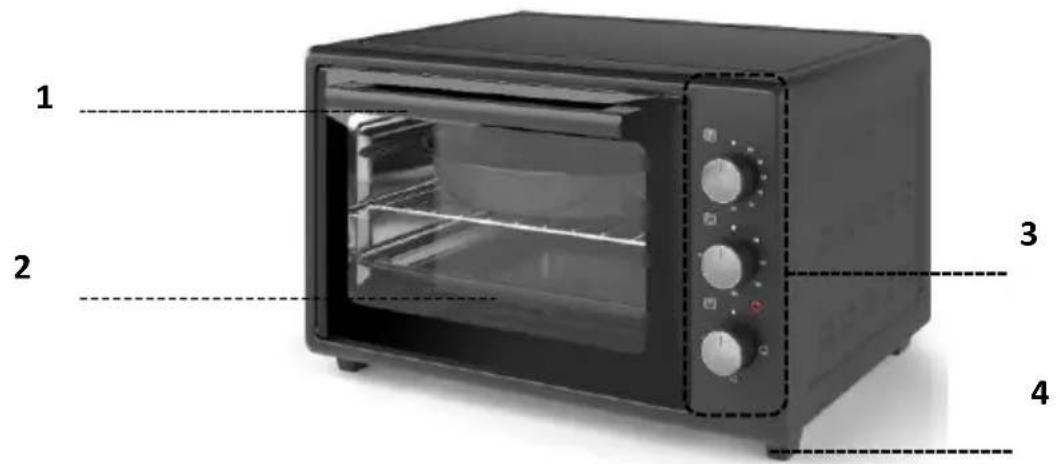
Line drawing of a rectangular metal grate or rack structure with evenly spaced vertical lines (no text or symbols)- Door handle: Always use the handle and avoid touching the glass door. The glass door can become very hot during cooking and cause injury.
- Glass door: Solid, durable tempered glass keeps the heat inside and provides even heat distribution for food products. Never cook with the door open.
- Control panel: Contains control buttons.
- Oven legs: Do not operate the oven without legs.
- Round tray: Use on the grill delivered with the product.
- Square tray: Use it by placing it on the baking tray of your choice.
- Wire grill: For positioning bread, bagels and round trays.
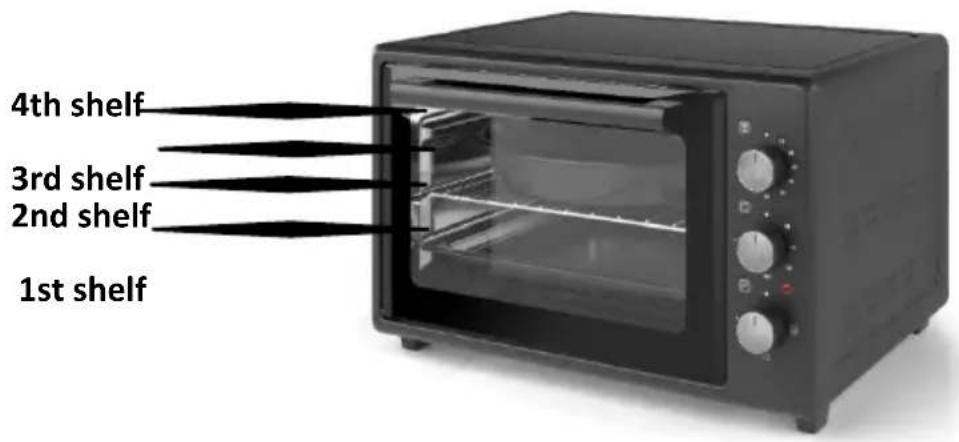
text_image
4th shelf 3rd shelf 2nd shelf 1st shelf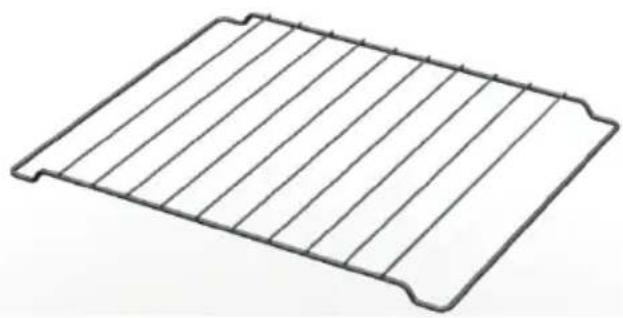
natural_image
Line drawing of a rectangular metal grate or rack structure with evenly spaced vertical slats (no text or symbols)Note: Remove all the contents from the packaging. Remove the clear or blue protective film off all accessories.
The contents will vary depending on the model.
text_image
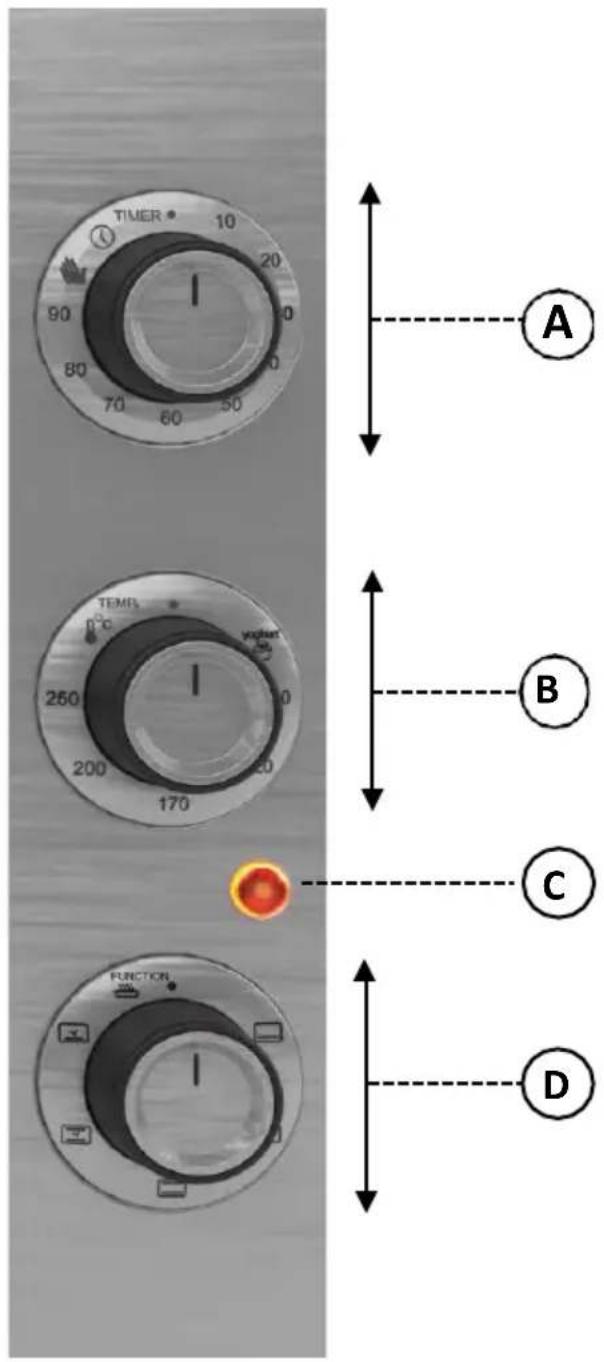
TIMER 10 90 20 80 10 70 50 60 50 A TEMP 260 170 200 100 200 100 B C FUNCTION DA. Timer: Use it to set the desired cooking time. The time control range is 1-90 minutes.
B. Temperature Control Button: Use for setting the desired cooking temperature.
C. Signal Light: When cooking mode and timer are set, the light comes on. It goes off when the inside of the oven reaches the set temperature. Flashing during cooking is normal.
D. Function Button: Use for setting the cooking function.
 | Lower Part HeatingOnly lower heating is available. You can have crispy food on the bottom and soft on the top. It is suitable for pizza or food that needs to be browned from the bottom. |
 | Upper Part HeatingIf you heat only from the top, you can bake cakes with shiny top and cook food that need to be browned on the top. |
 | Upper and Lower HeatingThe food is cooked on the top and at bottom at the same time. You can bake fluffy cakes, soft pastries, crispy pastries or cook delicious casseroles. Use a single tray for cooking. |
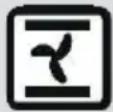 | Top and lower heating with turbo fan(*).The lower and the upper heater work together via the turbo motor. The turbo motor provides more even heating. You can bake soft cakes, pastries or cook delicious casseroles. Use a single tray for cooking. |
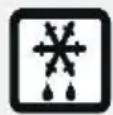 | Defrost(*)It helps to defrost frozen food in a short time and saves time. Place the food to be defrosted on the middle rack over the grill plate Place a baking sheet on the lowest rack to catch the water that accumulates from defrosting. |
 | Top Heating + Rotisserie Chicken(*).By heating from the top, you can cook tender meat. It is recommended to use a drip tray or a regular tray. The maximum weight for rotisserie chicken is 2 kg. |
 | Grill Heating and Rotisserie Chicken(*)Due to the grill function, you can cook tender and roasted meat by heating more from the top. It is recommended to use a drip tray or a regular tray. |
 | Grill Heating(*)The meat is sealed at high heat and remain juicy inside. You can cook food such as meat, chicken and fish. It is recommended to use a drip tray or a regular tray. |
 | Grill Heater and Turbo Fan(*)Allows grilling on multiple surfaces by evenly distributing the temperature inside the oven. |

Lower Heating and Turbo Fan (\*)
Lower heating and turbo fan work together. The even distribution of hot air in the oven ensures that the bottom of food such as lahmacun and pita bread are better cooked and crispy.
(*): Optional
Cleaning
Clean the appliance after each use. Unplug the appliance and make sure it is completely cooled before cleaning.
- Wipe the outside of the unit with a warm, damp cloth and mild detergent.
- To clean the door, gently wipe both sides using warm detergent water and a damp cloth. DO NOT IMMERSE the unit in water or wash it in the dishwasher.
- Clean the inside of the unit with warm water, a mild detergent and a non-abrasive sponge. Do not clean the heating coils as they are fragile and may break. Then rinse the unit thoroughly with a clean, damp cloth. Do not leave water inside the unit.
- Some detergents or cleaning agents may damage the surface. Do not use abrasive cleaners, cleaning powders/creams or sharp objects.
- To easily remove food sticking to the accessories, soak them in warm detergent water.
- It is recommended that acidic substances such as spilled oil, lemon, etc. be cleaned immediately.
- All other maintenance should be performed by an authorized service representative.
Storage
- Unplug the unit and allow it to cool completely.
- Make sure all components are clean and dry.
- Place the unit in a clean and dry location.
Oven Lamp (\*)

WARNING: To avoid electric shock risk, unplug the oven before replacing the lamp and make sure the oven has cooled down.
Remove the glass protector by turning it.
Then remove the lamp and install a new lamp with the same specifications. Finally, install the glass protector in its original position.
The lamp class is tungsten halogen.
NOTE: Do not look too long into the halogen lamp.
Problem Cause Solution
| The device is not Plug in the device. | ||
| Device does not work | Timer and temperature did not turn on. | Adjust the temperature and timer. |
| The device may be plugged into an outlet that is shared with other devices. | Connect the device to a single outlet. | |
| Does not cook | The appliance is overloaded. | Use small batches to ensure even cooking. |
| The temperature is set too low. | Increase the temperature. | |
| Food is not cooked evenly | Some foods need to be flipped during cooking. | Some foods need to be flipped during cooking. |
| Food of different sizes are cooked together. | Cook foods of similar size together. | |
| of the device | If more than one rack is used, the trays must be rotated. | |
| White smoke comes out | Excess oil used. | |
Troubleshooting
| The | Turn the trays from |
| accessorie | top to bottom or vice |
| s have | versa. |
| excess oil | |
| residue | Remove excess oil |
| from | with a cloth. |
| previous cooking. | Clean the components and the inside of the unit after each use. |
In the table below, you will find the information about the foods that we have tested in our laboratories and determined their cooking values. Cooking times may vary as per mains voltage, quality, amount of the ingredients to be cooked, and the temperature. Meals you cook using these values may not appeal to your tastes. You can experiment and set different values to achieve different flavours and results to your taste.
| Meals | Temperature (°C) | Cooking time (min) | Function |
| Cake | 170-190°C | 30 -40 | Bottom-Top |
| Cookie | |||
| Pizza | 200 °C | 15 -20 | Bottom-Top |
| Pie | 200 °C | 30 -40 | Bottom-Top |
| Chicken Broiler | Max | 150 | Top |
| Chicken Broiler | Max | 60 | Grill |
| Veal | Max | 25 -35 | Top-Bottom |
| Fish | |||
| Defrosting | - | - | Defrosting |
WARNING: Pre-heat your oven before baking. Pre-heating time is the time until the indicator light goes off for the first time.
KEY POINTS
When Baking In the Oven, Keep the Following in Mind.
The fact that the top of the food is cooked does not mean that the inside is cooked. Foods cooked at high temperatures in a short time will dry out. Food must be cooked longer at low temperatures for the inside of the food to be properly cooked.
When cakes and pastries are baked pre-heating the oven is necessary. Do not open the oven door during the the bakery rising for at least 20 minutes. To check if the pastry is done, insert a toothpick and test; if the toothpick comes out clean, the pastry is done. This check should be done after 3/4 of the baking time has elapsed.
- Especially when cooking red meat salt is not added beforehand, but halfway through the cooking time. Red meat is cooked at high heat at the beginning and the heat is reduced towards the end.
--For white meat, keep the heat low throughout the cooking process.
- To check if the meat is cooked, press into the meat with a fork. When the fork sinks into the meat, the meat is cooked.
Tips Related to Cooking

Fire risk due to food not suitable for the grill
Only grill the food that can be cooked in intense grill fire.
Do not place the food too far back on the grill. This is the hottest location and f food containing fat may catch fire.
Product compliance
The producer Melchioni Spa declares that the product Electric Oven Mod. ARDENTE 45 (Cod. 118380045) is in compliance with Directive 2014/30/EU of the European Parliament and of the Council, of 26 february 2014, on the harmonisation of the laws of the Member States relating to electromagnetic compatibility.
The producer Melchioni Spa declares that the product Electric Oven Mod. ARDENTE 45 (Cod. 118380045) is in compliance with Directive 2014/35/EU of the European Parliament and of the Council, of 26 february 2014, on the harmonisation of the laws of the Member States relating to the making available on the market of electrical equipment designed for use within certain voltage limits.
The producer Melchioni Spa declares that the product Electric Oven Mod. ARDENTE 45 (Cod. 118380045) is in compliance with Directive 2009/125/EC of the European Parliament and of the Council, of 21 october 2009, establishing a framework for the setting of ecodesign requirements for energy-related products.
The producer Melchioni Spa declares that the product Electric Oven Mod. ARDENTE 45 (Cod. 118380045) is in compliance with Directive 2011/65/EU of the European Parliament and of the Council, of 8 June 2011 and subsequent Commission Delegated Directive 2015/863, on the restriction of the use of certain hazardous substances in electrical and electronic equipment.
According to Directive 2012/19/EU of the European Parliament and of the Council, of 4 July 2012, on waste electrical and electronic equipment (WEEE), the presence of the
crossed-out bin symbol indicates that this appliance is not to be considered as urban waste: its disposal must therefore be carried out by separate
collection. Disposal in a non-separate manner may constitute a potential harm to the environment and health. This product can be returned to the distributor when purchasing a new device. Improper disposal of the appliance constitutes misconduct and is subject to sanctions by the Public Security Authority. For further information, contact the local administration responsible for environmental matters.
Product warranty
Melchioni Spa, based in Milan (Italy), via Colletta 37, recognizes a conventional guarantee on the product for a period of two years from the date of the first purchase by the consumer. This guarantee does not affect the validity of the legislation in force concerning consumer goods (Legislative Decree 6 September 2005 n. 206 art. 128 and following), of which the consumer remains the owner. This guarantee applies to the entire territory of the European Union.
The components or parts that are found to be defective for ascertained manufacturing causes will be repaired or replaced free of charge through the dealer, during the above warranty period. Melchioni Spa reserves the right to make a complete replacement of the device, if repairability is impossible or excessively expensive, with another device of similar characteristics (Legislative Decree 6 September 2005 no. 206 art. 130) during the warranty period. In this case, the validity of the warranty remains that of the original purchase: the service provided under warranty does not extend the warranty period.
In any case, this appliance will not be considered defective in terms of materials or manufacture should it be adapted, changed or adjusted, in order to comply with national or local safety and / or technical standards, in force in a country other than that for which it is was originally designed and manufactured. This appliance has been designed and built for domestic use only: any other use will invalidate the benefits of the guarantee.
The warranty does not cover:
-
parts subject to wear or tear, nor those parts that require periodic replacement and / or maintenance
• professional use of the product -
malfunctions or any defects due to incorrect installation, configuration, software / BIOS / firmware update not performed by authorized Melchioni Spa
• repairs or interventions carried out by persons not authorized by Melchioni Spa - manipulation of assembly components or, where applicable, of the software
- defects caused by fall or transport, lightning, voltage fluctuations, liquid infiltration, opening of the appliance, bad weather, fire, public disturbances, inadequate ventilation or incorrect power supply
- any accessories, for example: boxes, bags, batteries, etc. used with this product
• home interventions for convenience checks or presumed defects
The recognition of the guarantee by Melchioni Spa is subject to the presentation of a tax document that proves the actual date of purchase. The same must not show any tampering or deletions, in the presence of which Melchioni Spa reserves the right to refuse the provision of treatment under warranty.
The warranty will not be recognized if the serial number or model of the appliance is non-existent, abraded or modified.
This warranty does not include any right to compensation for direct or indirect damage, of any nature, to people or things, caused by any inefficiency of the appliance. Any extensions, promises or services in this regard, insured by the retailer, will be borne by the latter.
natural_image
Black plastic container with two red circular annotations pointing to the top two edges (no text or symbols on the container itself)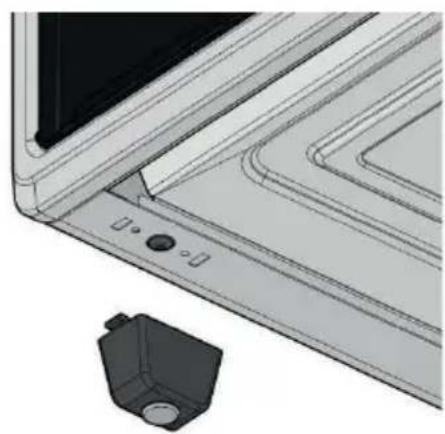
natural_image
Technical illustration of a mechanical component with a small inset view showing a 3D model (no text or symbols)natural_image
Diagram of a device component with a red curved arrow indicating rotation or movement (no text or symbols present)FASE 3
1: Lengüeta Fija
2: Lengüeta Móvil
natural_image
Close-up of a laptop keyboard with a red circle highlighting the key area, next to a black device icon and a red upward arrow (no text or symbols)natural_image
Technical line drawing of a mechanical component with a hexagonal base and internal channels (no text or symbols)FASE 4
natural_image
Line drawing of a rectangular metal grate or rack structure with evenly spaced vertical lines (no text or symbols)natural_image
Black plastic container with two red circular annotations pointing to the top two edges (no text or symbols on the container itself)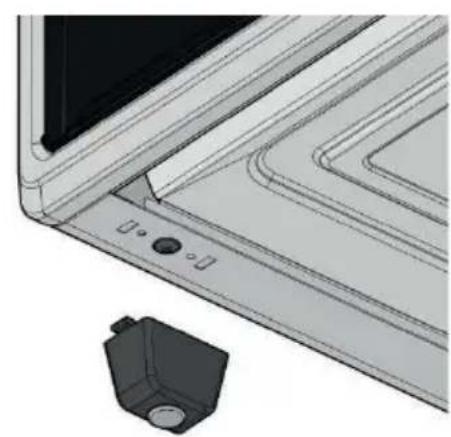
natural_image
Technical illustration of a mechanical component with a small inset view showing a mounting bracket (no text or symbols)natural_image
Diagram of a device component with a red curved arrow indicating rotation or movement (no text or symbols present)natural_image
Laptop keyboard with a red circular button and a black device icon, no visible text or symbolsPHASE 2
natural_image
Technical illustration of a mechanical component with a central mounting bracket (no text or symbols visible)natural_image
Line drawing of a rectangular metal grate or rack structure with evenly spaced vertical lines (no text or symbols)natural_image
Black plastic container with two red circular annotations pointing to the top two edges (no text or symbols on the container itself)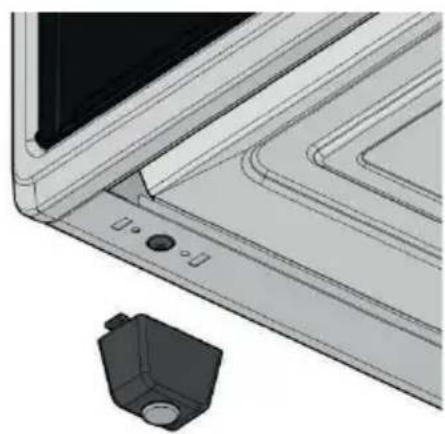
natural_image
Technical illustration of a mechanical component with a small inset view showing a 3D model (no text or symbols)natural_image
Diagram of a device component with a red arrow indicating rotation or movement (no text or symbols present)SCHRITT 3
1: Feste Lasche
2: Bewegliche Lasche
natural_image
Laptop keyboard with a red circular button and a black device icon, no visible text or symbolsnatural_image
Technical line drawing of a mechanical component with a hexagonal base and internal channels (no text or symbols)SCHRITT 4
natural_image
Black square microwave oven with three blades extending into the glass pan (no visible text or labels)