King Rex - Bike trailer Duramaxx - Free user manual and instructions
Find the device manual for free King Rex Duramaxx in PDF.

User questions about King Rex Duramaxx
0 question about this device. Answer the ones you know or ask your own.
Ask a new question about this device
Download the instructions for your Bike trailer in PDF format for free! Find your manual King Rex - Duramaxx and take your electronic device back in hand. On this page are published all the documents necessary for the use of your device. King Rex by Duramaxx.
USER MANUAL King Rex Duramaxx
natural_image
Abstract black-and-white graphic with diagonal stripes and a large upward arrow, no text or symbols present.DURAMAXX
King Rex
Fahrradanhänger
Bicycle Trailer
Remorque de vélo
text_image
QR code image containing encoded data, no visible human-readable textINHALTSVERZEICHNIS
natural_image
Technical line drawing of a mechanical assembly with a bolt and shaft (no text or symbols)natural_image
Line drawing of a car's side profile showing front and rear panels with no text or symbolsnatural_image
Line drawing of a bicycle wheel with attached cable and connector (no text or symbols)Berlin Brands Group UK Limited
PO Box 42
272 Kensington High Street
London, W8 6ND
United Kingdom
Dear customer,
Congratulations on the purchase of your appliance. Please read the following instructions carefully and follow them to prevent potential damage. We accept no liability for damage caused by disregarding the instructions or improper use. Please scan the QR code to access the latest operating instructions and for further information about the product.

text_image
QR code image containing encoded data, no visible human-readable textCONTENTS
Safety instructions 10
Assembly 10
Transport of pets 13
Manufacturer & Importer (UK) 14
TECHNICAL INFORMATION
| Product code 10027855, 10027856 | |
| Product code weight 16 kg | |
| Permissible load 40 kg | |
| Recommended maximum speed 16 km/h | |
| Wheels and dimensions 20" / 86 x 56.5 x 65 cm |
SAFETY INSTRUCTIONS
- The trailer must not be loaded with more than 40 kg.
• The recommended maximum speed is 16 km/h.
- The trailer must not be used to transport people.
- Do not make any technical modifications to the unit. This can lead to dangers in road traffic and the manufacturer's warranty will be voided.
• Always wear a helmet.
- Do not use the trailer on stony, uneven terrain and in dangerous traffic situations.
- The bicycle being towed must be in perfect condition. The brakes should work perfectly. With a trailer (and load) your braking distance will increase.
- Only load the trailer up to the top edge so that things falling out do not endanger road traffic.
- The trailer must not be connected to a machine equipped with a transmission mechanism. The trailer may only be moved by directly applied human power.
- The trailer must not be moved by motorised vehicles. This also applies to bicycles with electric drive or bicycles with auxiliary electric motor drive.
ASSEMBLY
Step 1: Attach the wheels
- Slide the end of the axles into the receptacles on the frame. You can hear and feel them click into place.
- The wheels can be easily detached by pressing the locking pin on the underside into the socket and pulling the wheel and hub out of the socket again.
natural_image
Technical line drawing of a mechanical assembly with a bolt and shaft (no text or symbols)Step 2: Put the drawbar in position
- The trailer is delivered in transport condition. Therefore, the drawbar is on the underside in the stow position.
- Pull the safety pin out of the folding joint and fold the drawbar forward 180° until the joint engages.
- Secure the joint again with the locking pin.
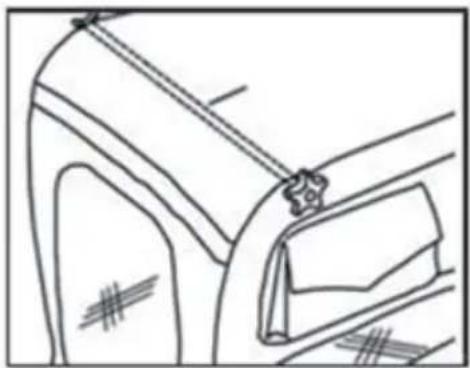
Step 3: Assembling the cabin
- Put the trailer on its wheels and fold up the two sides of the trolley.
- Place the metal rod supplied in the slots provided as shown on the right.
- Screw the ends tight with the large star-shaped nuts.
natural_image
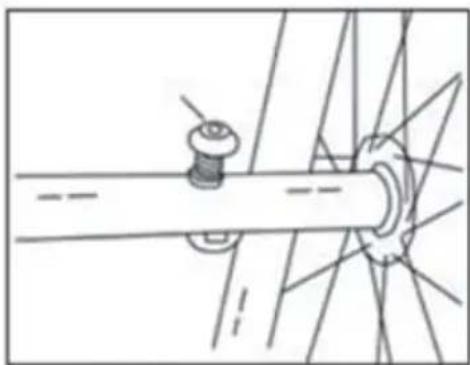
Line drawing of a car's side profile showing front and rear panels with a star-shaped detail (no text or symbols)Step 4: Couple to the bike
- The drawbar can be connected to the bicycle in a simple and quick way: Unscrew the nut of the rear wheel hub and insert the hook between the bicycle frame and the rear wheel hub (like an additional washer).
- Screw the rear wheel of your bicycle back on.
- The hook should be attached with the 'male' part pointing backwards and away from the bicycle, as shown in the illustration.
- Place the hanger behind the bicycle and integrate the 'male' piece into the eyelet provided ('female piece', see illustration).
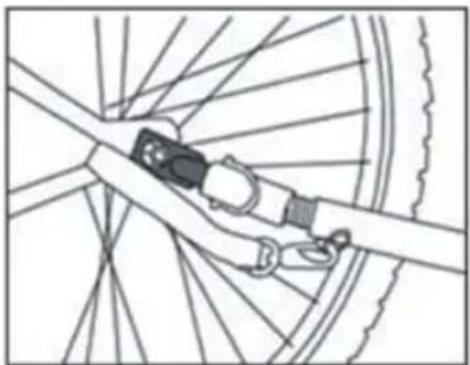
natural_image
Line drawing of a bicycle wheel with attached cable and connector (no text or symbols)- Secure the connection with the safety belt by wrapping it once around the bicycle frame (make sure it does not get caught in the spokes) and attaching it to the hanger part of the drawbar.
Step 5: Secure your pet in the hanger
- Always load your pet into the trailer through the rear door while keeping the front door closed.
- Ask a second person to hold the bicycle in the meantime.
- The safety leash provided should be connected to a dog harness and not to a collar.
- Close the rear door before driving off.
TRANSPORT OF PETS
Loading and unloading of pets
- Only load and unload the pet through the back door when the front door is closed and the trailer is attached to the bicycle.
- Once the pet is in the trailer, attach one end of the safety leash (included) to the pet's collar and the other end to the D-ring in the trailer. Adjust the length of the leash so that the pet cannot escape through the windscreen when the leash is open.
• Always close the rear door while driving.
Getting to know the trailer
Slowly familiarise your pet with the trailer, open and close the doors and let your pet out on command.
On the move
Get your pet used to the movement of the trailer by pushing it slowly. If the pet sits still, drive a short distance. Should it become restless, stop the team and soothe it, then reward it with treats as soon as it is calm.
At full speed
Make sure your pet is calm and adopts to the trailer comfortably, gradually increase the driving distances.
MANUFACTURER & IMPORTER (UK)
Manufacturer:
Chal-Tec GmbH, Wallstrasse 16, 10179 Berlin, Germany.
Importer for Great Britain:
Berlin Brands Group UK Limited
PO Box 42
272 Kensington High Street
London, W8 6ND
United Kingdom
Estimado cliente:
natural_image
Technical line drawing of a mechanical assembly with a bolt and shaft (no text or symbols)natural_image
Line drawing of a car's front and side panels showing hand positioning (no text or symbols)natural_image
Line drawing of a bicycle wheel with attached cable and connector (no text or symbols)Berlin Brands Group UK Limited
PO Box 42
272 Kensington High Street
London, W8 6ND
United Kingdom
Cher client, chère cliente,
natural_image
Technical line drawing of a mechanical assembly with a bolt and shaft (no text or symbols)natural_image
Line drawing of a car's front and side panels with no visible text or symbolsnatural_image
Line drawing of a bicycle wheel with attached cable and connector (no text or symbols)Berlin Brands Group UK Limited
PO Box 42
272 Kensington High Street
London, W8 6ND
United Kingdom
Gentile cliente,
text_image
QR code image containing encoded data, no visible human-readable textINDICE
natural_image
Technical line drawing of a mechanical assembly with a bolt and shaft (no text or symbols)natural_image
Line drawing of a car's side profile showing front, rear, and side panels with no text or symbolsnatural_image
Line drawing of a bicycle wheel with attached cable and connector (no text or symbols)PRODUTTORE E IMPORTATORE (UK)
Produttore:
Chal-Tec GmbH, Wallstraße 16, 10179 Berlino, Germania.
Berlin Brands Group UK Limited
PO Box 42
272 Kensington High Street
London, W8 6ND
United Kingdom