Five - Scooter Fun Pro - Free user manual and instructions
Find the device manual for free Five Fun Pro in PDF.


User questions about Five Fun Pro
0 question about this device. Answer the ones you know or ask your own.
Ask a new question about this device
Download the instructions for your Scooter in PDF format for free! Find your manual Five - Fun Pro and take your electronic device back in hand. On this page are published all the documents necessary for the use of your device. Five by Fun Pro.
USER MANUAL Five Fun Pro
natural_image
Black and white diagonal striped pattern with no text or symbols↑
natural_image
Black background with a pattern of white chevron shapes arranged in rows (no text or symbols)Funpro
FIVE
Kinderroller
Kid's scooter
Patinete para niños
Trottinette enfants
Monopattino bambino
10039586
10039587
10039588
10039589
10039590
10039591
10039592
10039593
text_image
QR code image containing encoded data, no visible human-readable textINHALTSVERZEICHNIS
Berlin Brands Group UK Limited
PO Box 42
272 Kensington High Street
London, W8 6ND
United Kingdom
SICHERHEITSHINWEISE
text_image
Diagram showing a mechanical clamp or connector with rotational and clockwise motion indicators, labeled with number 3.Congratulations on the purchase of your appliance. Please read the following instructions carefully and follow them to prevent potential damage. We accept no liability for damage caused by disregarding the instructions or improper use. Please scan the QR code to access the latest operating instructions and for further information about the product.

text_image
QR code image containing encoded data, no visible human-readable textCONTENTS
Safety Instructions 12
Before use 14
After use 16
MANUFACTURER & IMPORTER (UK)
Manufacturer:
Chal-Tec GmbH, Wallstrasse 16, 10179 Berlin, Germany.
Importer for Great Britain:
Berlin Brands Group UK Limited
PO Box 42
272 Kensington High Street
London, W8 6ND
United Kingdom
SAFETY INSTRUCTIONS
- The assembly of the scooter must be done by an adult.
- Ensure the steering system is correctly adjusted and that all connect components are firmly secured and not broken.
- The scooter may only be used by one person at a time.
- Observe the limitations of use according to applicable road traffic regulations.
- To ensure a long product life, avoid exposing the scooter to moisture, high temperatures and direct sunlight
- Screws and other moving parts should be checked regularly for fit and function. Regularly check that all self-locking nuts and self-locking fixings are properly seated. Stunt scooters are impacted by a lot of shocks and vibrations which can lead to loosening of parts. Regular checks are necessary.
- Always wear suitable shoes when riding the scooter.
- It is advisable to wear safety equipment such as helmets and protectors. Wear safety equipment including a suitable helmet and hand/wrist, elbow, and knee protection - especially at the beginning, if the driving characteristics are not yet so well known.
- Activate the brake by slowly stepping on it with your rear foot. Practise braking at slow speeds in safe environments.
- CAUTION! The brakes can become very hot during use! Allow the brake to cool down before touching it.
- Lead your child at the beginning and let him or her ride alone only when you are sure that he or she has sufficient knowledge of the scooter.
- A fun pro scooter can be fast - but the speed also increases the risk of falling. We therefore recommend that you only drive so fast that you can always safely dismount. Explain to your child that speed also involves risks. Never assume you can travel at speed or perform tricks without practice or without risk of injury.
- The scooter should be ridden on flat, clean and dry surfaces and where possible away from other users. Do not ride in the dark or in conditions with poor visibility.
- Contact with sharp bumps, rocks/sticks, sudden surface changes or drains may cause a pitching motion/wheel entrapment or the scooter to suddenly stop. Avoid surfaces where there is water, sand, gravel, dirt, leaves or other debris.
- In case of wet road surface and rain or other precipitation, the brake does not function as usual and the driving characteristics can change. We therefore recommend that you do not drive in wet conditions.
- Do not make any modifications to the scooter. We can only guarantee the usual Fun Pro quality and safety in the factory state.
- Stunt scooters require regular care and maintenance. Regularly check the condition of the headset, wheels and bearings.
- Dust and dirt can damage ball bearings, regularly clean and grease the ball bearings. Lubricate the bearings with a light oil or special ball bearing lubricant. Seized ball bearings must be replaced before use.
- Headsets should be regularly checked for play or wobbling as this can damage ball bearings leading to stiffness in the steering which can be dangerous and lead to falls. Regularly clean and grease the ball bearings.
Note: Maximum user weight is 100 kg.
To change the wheels
It is expected that wheels will become worn over time and should be replaced when signs of wear appear. We recommend replacing both wheels at the same time as well as the wheel bearings.
- Loosen axle with provided two Allen wrenches and remove wheel.
- Attach bearings and spacer to the new wheel.
- Fasten wheel to the frame with the axle.
- Ensure the axle is securely tightened.
BEFORE USE
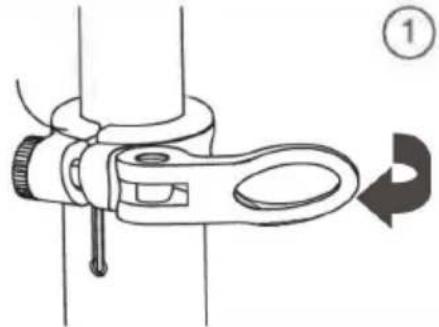
1. Set up the handlebar
 |  |
| Place one foot on the footboard.Move the lever on the 45° connector as shown in the drawing. The locking mechanism opens and the handlebar area can be raised. | Position the handlebar stem until it clicks into place. You can see this on the bolts at the connection between the footboard and the 45° connector. To check, wiggle the handlebar to see if it is securely locked in place. |
2. Adjust the height
You can use the height adjustment to adjust the handlebars to the height of the rider. The handlebars can be continuously adjusted to any height. Ideally, the arms should be bent at the elbows by approx. 135^ .
 | 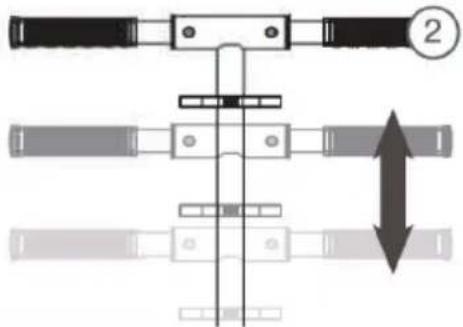 |
| Open the quick release on the handlebar. | Extend the handlebar to the desired height. |
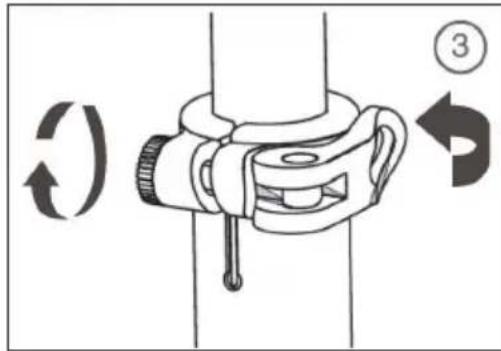
text_image
Diagram illustrating a mechanical or electrical component with labeled parts and directional arrows indicating rotation or movement.Close the quick release. Check the tight fit by wiggling the handlebar.
If the handlebars are not sufficiently tight, you can tighten the counter screw to the quick-release by hand or with an Allen key.
- You can extend the handlebars as far as they will go. Here, the handlebar locks and a pin engages in the safety hole.
- You can also lock the handlebars in any other position. To do this, tighten the Allen screw on the back of the quick-release and close the quick-release.
- As an adult, test with your weight whether the handlebars are securely locked. If you can still move the handlebar, tighten the screw further.
3. Alignment
Your scooter has what is called a headset. The handlebar itself is secured with a collar. You must align and secure the handlebar at the beginning!
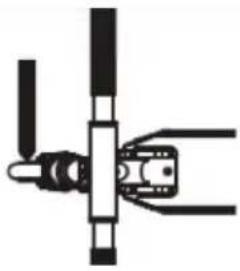 | Initial situation | ||
| The wheel and the handlebar should form a 90° angle. The wheel is supposed to be the direct extension of the footboard. The less accurately this is set, the more likely it is that accidents will occur. | |||
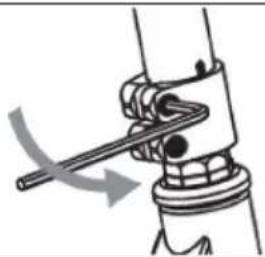 | 1 | To change the orientation, open the screws of the clamp with the enclosed tool. It is usually sufficient to loosen both screws 1.5 turns. The screws should not fall out. | |
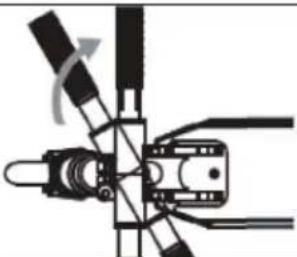 | 2 | You can now turn the handlebars freely. It is best to stand in front of the scooter and align the front wheel as desired. Stand so that the front wheel is held by your feet. Then align the handlebar. | |
 | 3 | As shown above, this is the correct alignment for the front wheel. | |
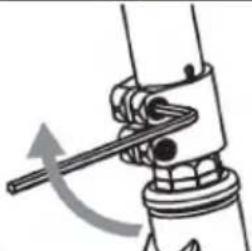 | 4 | Retighten the clamp screws securely. This fixes the handlebars in the selected wheel position. | |
AFTER USE
Insert handlebar ends
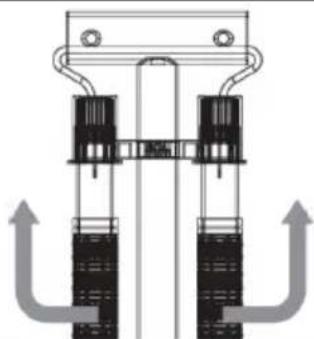 | 1 | To remove the bar ends again, you must press in the safety pins and can then pull out the bar ends. It is best to put them back into the holders at the end of the handlebars |
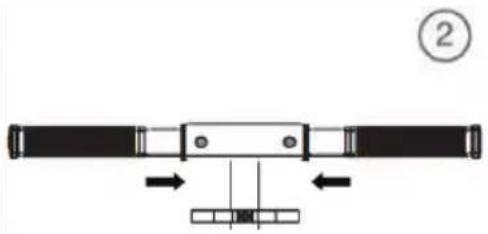 | Insert the handlebar ends into the T-piece of the handlebar. The handlebar ends have a softer plastic material at the end so that there is no rattling and clattering when riding later. You may need to apply gentle pressure to insert the bar ends. |
 | The handlebar ends have a safety pin. This must hook into the recesses of the handlebar. The safety pin must be visible. If you do not see the safety pin, gently rotate the handlebar end back and forth to find the pin. If in doubt, carry out steps 2 and 3 again. |
To remove the bar ends again, you must press in the safety pins and can then pull out the bar ends. It is best to put them back into the holders at the end of the handlebars
Fold in handlebars
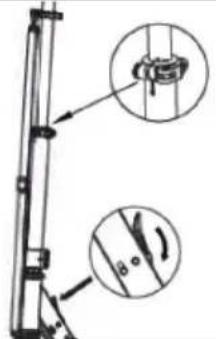 | 1 | 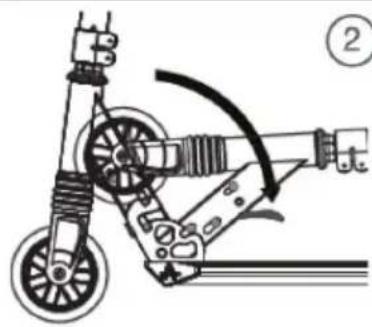 | |
| Place one foot on the footboard and move the lever on the 45° connector. The locking mechanism opens and the handlebar area can be folded in. | Place the handlebar section on the footboard. The locking mechanism hooks back in at the end. | ||
Estimado cliente:
text_image
QR code image containing encoded data, no visible human-readable textÍNDICE
Berlin Brands Group UK Limited
PO Box 42
272 Kensington High Street
London, W8 6ND
United Kingdom
text_image
Diagram illustrating a mechanical or electrical component with labeled parts and directional arrows indicating rotation or movement.natural_image
Pure mechanical diagram showing two vertical components connected by a horizontal bar, with upward arrows indicating flow or force direction (no text or symbols)Cher client, chère cliente,
text_image
QR code image containing encoded data, no visible human-readable textSOMMAIRE
Berlin Brands Group UK Limited
PO Box 42
272 Kensington High Street
London, W8 6ND
United Kingdom
CONSIGNES DE SÉCURITÉ
text_image
Diagram illustrating a mechanical clamp or grip mechanism with labeled parts and directional arrows indicating rotation or movement.text_image
QR code image containing encoded data, no visible human-readable textINDICE
PRODUTTORE E IMPORTATORE (UK)
Produttore:
Chal-Tec GmbH, Wallstraße 16, 10179 Berlino, Germania.
Berlin Brands Group UK Limited
PO Box 42
272 Kensington High Street
London, W8 6ND
United Kingdom