GCL 165-82 CG Professional - Laser level BOSCH - Free user manual and instructions
Find the device manual for free GCL 165-82 CG Professional BOSCH in PDF.

User questions about GCL 165-82 CG Professional BOSCH
0 question about this device. Answer the ones you know or ask your own.
Ask a new question about this device
Download the instructions for your Laser level in PDF format for free! Find your manual GCL 165-82 CG Professional - BOSCH and take your electronic device back in hand. On this page are published all the documents necessary for the use of your device. GCL 165-82 CG Professional by BOSCH.
USER MANUAL GCL 165-82 CG Professional BOSCH
| Safety SymbolsThe definitions below describe the level of severity for each signal word.Please read the manual and pay attention to these symbols. | |
| This is the safety alert symbol. It is used to alert you to potential personal injury hazards. Obey all safety messages that follow this symbol to avoid possible injury or death. | |
| DANGER indicates a hazardous situation which, if not avoided, will result in death or serious injury. | |
| WARNING indicates a hazardous situation which, if not avoided, could result in death or serious injury. | |
| CAUTION indicates a hazardous situation which, if not avoided, could result in minor or moderate injury. | |
Table of Contents
| General Safety Rules | 3 |
| Bluetooth | 5 |
| FCC Caution | 6 |
| ISED Canada | 6 |
| Intended Use | 6 |
| Symbols | 7 |
| Getting to Know Your GCL165-82CGLine Laser | 9 |
| Technical Data | 10 |
| Preparation | 12 |
| Laser Tool Power Supply | 12 |
| Battery Status Indicator | 13 |
| Operation | 14 |
| Initial Operation | 14 |
| Switching On and Off | 14 |
| Operating Modes | 14 |
| Automatic Leveling | 15 |
| Remote Control via the Leveling Remote App | 16 |
| Accuracy Check of the Laser Tool | 17 |
| Working Advice | 20 |
| Use with Attachments | 20 |
| Maintenance and Service | 25 |
| Environment Protection | 25 |
General Safety Rules
WARNING
Read all instructions. Failure to follow all instructions listed below may result in hazardous radiation exposure, electric shock, fire and/or serious
injury.
SAVE ALL WARNINGS AND INSTRUCTIONS FOR FUTURE REFERENCE.
The term “laser tool” in the warnings listed below refers to your battery-operated (cordless) laser tool.
The following label is on your tool for your safety. ALWAYS BE AWARE of its location when using the laser.
text_image
2 IEC 60825-1:2014 Line laser: < 10 mW, 500-540 nm Dot laser: < 1 mW, 500-540 nm Laser Radiation. Do not stare into the beam. Class 2 Laser product. • Radiación láser. No mire al rayo. Producto láser de clase 2. • Rayonnement laser. Ne regardez pas directement dans le faisceau. Produit laser de Classe 2.
DO NOT direct the laser beam at persons or animals and do not stare into the laser beam yourself. This laser tool produces class 2 laser radiation and complies with 21 CFR 1040.10 and 1040.11 except for conformance with IEC 60825-1 Ed. 3., as described in Laser Notice No. 56, dated May 8, 2019. This can lead to persons being blinded.
DO NOT stare directly at the laser beam or project the laser beam directly into the eyes of others. Serious eye injury could result.
DO NOT place the laser tool in a position that may cause anyone to stare into the laser beam intentionally or unintentionally. Serious eye injury could result.
ALWAYS make sure that any bystanders in the vicinity of use are made aware of the dangers of looking directly into the laser tool.
Never aim the beam at a workpiece with a reflective surface. Bright shiny reflective sheet steel or similar reflective surfaces are not recommended for laser use. Reflective surfaces could direct the beam back towards the operator.
Use of controls or adjustments or performance of procedures other than those specified herein may result in hazardous radiation exposure.
DO NOT use any optical tools such as, but not limited to, telescopes or transits to view the laser beam. Serious eye injury could result.
DO NOT leave the laser tool “ON” unattended in any operation mode. ALWAYS turn the laser tool “OFF” when not in use. Leaving the laser tool “ON” increases the risk of someone inadvertently staring into the laser beam.
Do not use the laser viewing glasses as safety goggles. The laser viewing glasses are used for improved visualization of the laser beam, but they do not protect against laser radiation.
Do not use the laser viewing glasses as sun glasses or in traffic. The laser viewing glasses do not afford complete UV protection and reduce color perception.
ALWAYS position the laser tool securely. Damage to the laser tool and/or serious injury to the user could result if the laser tool falls.
DO NOT remove or deface any warning or caution labels. Removing labels increases the risk of exposure to laser radiation.
Battery tool use and care
Recharge only with the charger specified by the manufacturer. A charger that is suitable for one type of battery pack may create
General Safety Rules
a risk of fire when used with another battery pack.
Use tool only with specifically designated battery packs. Use of any other battery packs may create a risk of injury and fire.
When battery pack is not in use, keep it away from other metal objects like paper clips, coins, keys, nails, screws, or other small metal objects that can make a connection from one terminal to another. Shorting the battery terminals together may cause burns or a fire.
Under abusive conditions, liquid may be ejected from the battery; avoid contact. If contact accidentally occurs, flush with water. If liquid contacts eyes, additionally seek medical help. Liquid ejected from the battery may cause irritation or burns.
Do not use a battery pack or tool that is damaged or modified. Damaged or modified batteries may exhibit unpredictable behaviour resulting in fire, explosion or risk of injury.
Do not expose a battery pack or tool to fire or excessive temperature. Exposure to fire or temperature above 265 °F (130 °C) may cause explosion.
Follow all charging instructions and do not charge the battery pack or tool outside the temperature range specified in the instructions. Charging improperly or at temperatures outside the specified range may damage the battery and increase the risk of fire.
Disconnect the battery pack from the tool before making any adjustments, changing accessories, or storing the tool. Such preventive safety measures reduce the risk of starting the tool accidentally.
Do not modify or attempt to repair the tool or the battery pack except as indicated in the instructions for use and care.
Work area safety
Keep work area clean and well lit. Cluttered or dark areas invite accidents.
DO NOT operate the laser tool around children or allow children to operate the laser tool. Serious eye injury could result.
DO NOT use laser tools, attachments and accessories outdoors when lightning conditions are present.
Do not operate the laser tool in explosive environments, such as in the presence of flammable liquids, gases or dusts. Sparks can be created in the laser tool which may ignite the dust or fumes.
Electrical safety
WARNING
Batteries can explode or leak, cause injury or
fire. To reduce this risk, always follow all instructions and warnings on the battery label and package.
DO NOT short any battery terminals.
DO NOT charge alkaline batteries.
DO NOT mix old and new batteries. Replace all of them at the same time with new batteries of the same brand and type.
DO NOT mix battery chemistries.
Dispose of or recycle batteries per local code.
DO NOT dispose of batteries in fire.
Keep batteries out of reach of children.
Remove batteries if the device will not be used for several months.
WARNING
Risk of fire and burns. Do not open, crush or (70°C) or incinerate.
heat above 158^ F ( 70^ C) or incinerate.
Personal safety
If laser radiation strikes your eye, you must deliberately close your eyes and immediately turn your head away from the beam.
Do not make any modifications to the laser equipment.
Stay alert, watch what you are doing and use common sense when operating a tool. Do not use a tool while you are tired or under the influence of drugs, alcohol or medication. A moment of inattention while operating a tool may result in serious personal injury or incorrect measurement results.
Use safety equipment. Safety equipment such as safety glasses, dust mask, non-skid safety shoes, hard hat, or hearing protection
General Safety Rules
used for appropriate conditions will reduce personal injuries.
Use caution when using laser tools in the vicinity of electrical hazards.
Magnets

Keep the magnetic accessories away from implants or other medical devices such as pacemaker or insulin pumps. The magnets generate a field that can impair the function of implants or medical devices, which may lead to serious personal injury.
Keep the tool, positioning device, and laser target plate away from magnetic data medium and magnetically-sensitive equipment. The effect of the magnets of the tool and laser target plate can lead to irreversible data loss.
Use and care
Use the correct tool for your application. The correct tool will do the job better and safer.
Do not use the tool if the switch does not turn it on and off. Any tool that cannot be controlled with the switch is dangerous and must be repaired.
Store idle tool out of the reach of children and do not allow persons unfamiliar with the tool or these instructions to operate
the tool. Tools are dangerous in the hands of untrained users.
Maintain tools. Check for misalignment or binding of moving parts, breakage of parts and any other condition that may affect the operation. If damaged, have the tool repaired before use. Many accidents are caused by poorly maintained tools.
Use the tool, accessories, etc., in accordance with these instructions and in the manner intended for the particular type of tool, taking into account the working conditions and the work to be performed. Use of the tool for operations different from those intended could result in a hazardous situation.
Service
Have your tool serviced by a qualified repair person using only identical replacement parts. This will ensure that the safety of the tool is maintained.
Develop a periodic maintenance schedule for tool. When cleaning a tool be careful not to disassemble any portion of the tool since internal wires may be misplaced or pinched or may be improperly mounted. Certain cleaning agents such as gasoline, carbon tetrachloride, ammonia, etc. may damage plastic parts.
Bluetooth
Do not use the laser tool with Bluetooth® in the vicinity of gas stations, chemical plants, areas where there is danger of explosion and areas subject to blasting. Do not use the laser measure with Bluetooth® in airplanes. Do not use the laser measure with Bluetooth® in the vicinity of medical devices. Avoid operation in the direct vicinity of the human body over longer periods of time. When using the laser measure with Bluetooth®, interference with other devices and systems, airplanes and medical devices (e.g., cardiac pacemakers, hearing aids) may occur.
The Bluetooth® word mark and logos are registered trademarks owned by Bluetooth SIG, Inc. and any use of such marks by Robert Bosch Tool Corporation is under license.
SAVE THESE INSTRUCTIONS
FCC Caution

The manufacturer is not responsible for radio interference caused by unauthorized modifications to this equipment. Such modifications could void the user's authority to operate the equipment. This device complies with Part 15 of the FCC Rules. Operation is subject to the following two conditions:
- This device may not cause harmful interference, and
- This device must accept any interference received, including interference that may cause undesired operation.
NOTE! This equipment has been tested and found to comply with the limits for a Class B digital devices, pursuant to Part 15 of the FCC rules. These limits are designed to provide reasonable protection against harmful interference in a residential installation. This equipment generates, uses and can radiate radio frequency energy and, if not installed and used in accordance with the instructions, may cause harmful interference to radio communications. However, there is no guarantee that interference will not occur in a particular installation. If this equipment does cause harmful interference to radio or television reception, which can be determined by turning the equipment off and on, the user is encouraged to try to correct the interference- by one or more of the following measures:
- Reorient or relocate the receiving antenna.
- Increase the separation between the equipment and receiver.
- Connect the equipment into an outlet on a circuit different from that to which the receiver is connected.
- Consult the dealer or an experienced radio/TV technician for help.
ISED Canada
This device contains license-exempt transmitter(s)/receiver(s) that comply with Innovation, Science and Economic Development Canada's license-exempt RSS(s). Operation is subject to the following two conditions:
- this device may not cause interference, and
- this device must accept any interference, including interference that may cause undesired operation of the device.
Intended Use
The laser tool is intended for determining and checking horizontal and vertical lines and plumb points.
The laser tool is suitable for indoor use.
Symbols
Important: Some of the following symbols may be used on your tool. Please study them and learn their meaning. Proper interpretation of these symbols will allow you to operate the tool better and safer.
| Symbol Designation/Explanation | |
| V Volts (voltage) | |
| A Amperes (current) | |
| Hz Hertz (frequency, cycles per second) | |
| W Watt (power) | |
| ft Feet (length) | |
| in Inches (length) | |
| m Meters (length) | |
| mm Milimeters (length) | |
| lb Pounds (weight) | |
| kg Kilograms (weight) | |
| min Minutes (time) | |
| s Seconds (time) | |
| F Fahrenheit (temperature) | |
| C Celsius (temperature) | |
| --- | Direct current (type or a characteristic of current) |
 | This symbol indicates magnetic field in place. |
 | Alerts user to laser radiation. |
 | Alerts user to read manual. |
 | Alerts user to wear eye protection. |
 | Designates Li-ion battery recycling program. |
Symbols
Important: Some of the following symbols may be used on your tool. Please study them and learn their meaning. Proper interpretation of these symbols will allow you to operate the tool better and safer.
| Symbol Designation/Explanation | |
 | This symbol designates that this tool is listed by the Canadian Standards Association, to United States and Canadian Standards. |
 | This symbol designates that the tool complies with FCC Rules. |
Getting to Know Your GCL165-82CG Line Laser
Fig. 1
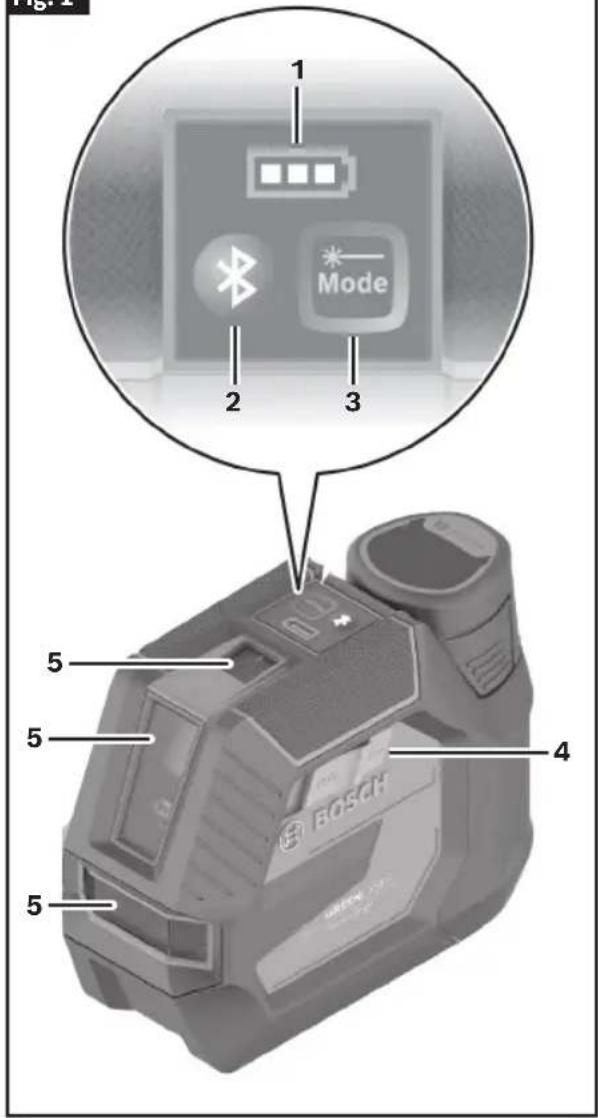
text_image
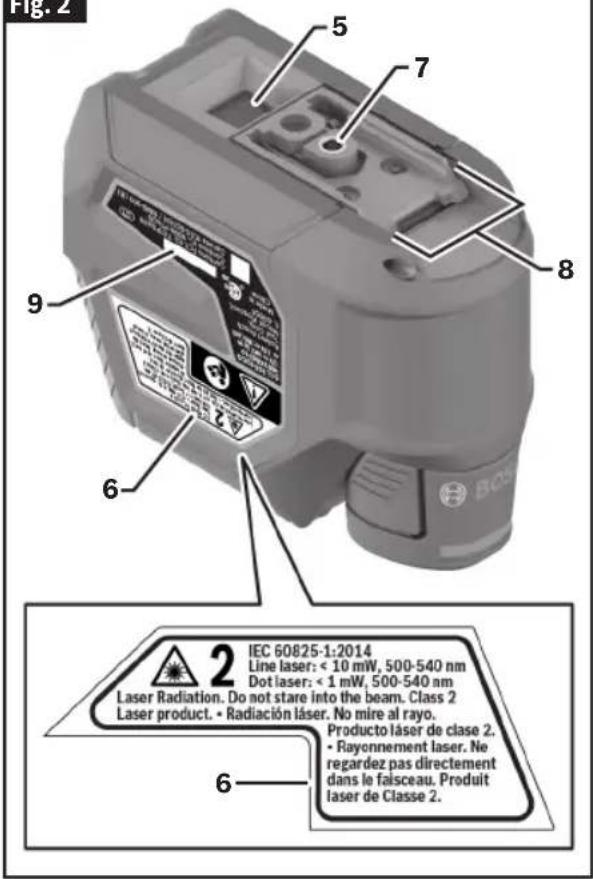
1 2 3 5 5 4 5 BOSCHFig. 2
text_image
Fig. 2 5 7 8 9 6 IEC 60825-1:2014 Line laser: < 10 mW, 500-540 nm Dot laser: < 1 mW, 500-540 nm Laser Radiation. Do not stare into the beam. Class 2 Laser product. • Radiación láser. No mire al rayo. Producto láser de clase 2. • Rayonnement laser. Ne regardez pas directement dans le faisceau. Produit laser de Classe 2. 61 Battery Status Indicator
2 Bluetooth® Button
3 Button for Laser Operating Mode
4 On/Off Switch
5 Exit Opening for Laser Beam
6 Laser Warning Label
7 Tripod Mount 1/4"
8 Guide Groove
9 Serial Number
Technical Data
| Line Laser GCL165-82CG | |
| Article number 3601K66S10 | |
| Working range (typical)1Visible laser lineLaser line with optional laser receiverLaser points | 125 ft (38 m)330 ft (100 m)50 ft (15 m) |
| Leveling accuracy (typical)234Laser linesLaser points | ±1/8 in. at 30 ft (±3 mm at 10 m)±9/32 in. at 30 ft (±7 mm at 10 m) |
| Self-leveling range (typical) ±4° | |
| Leveling duration (typical) < 4 s | |
| Charging temperature | 32°F to 95°F (0°C to +35°C) |
| Operating temperature5 | 14°F to 113°F (-10°C to +45°C) |
| Storage temperature -4°F to 158°F (-20°C to Max. altitude 6,562 ft (2000m)) | +70°C) |
| Relative air humidity, max. 90% | |
| Laser class 2 | |
| Pollution degree according to IEC 61010-16 | 2 |
| Laser linesLaser typeC6Divergence | < 10mW, 500-540nm1050 x 10 mrad (full angle) |
| Laser pointLaser typeC6Divergence | <1mW, 500-540nm10.8 mrad (full angle) |
| Compatible laser receiver LR8 | |
| Tripod mount 1/4" | |
| Laser tool power supplyBattery pack (lithium-ion)Batteries (alkali-manganese) | 10.8 V ≠12 V Max4 x 1.5 V =±R6 (AA)(With battery adapter AA1) |
| Battery/Charger ListBosch rechargeable battery packsBosch battery chargers | BAT414, GBA12V30BC330, BC430, GAL1218V-30, GAL12V-20, GAL12V-40 |
| Bluetooth® laser toolCompatibility Bluetooth® 5.2 (Low Energy) | 7 |
| Bluetooth® smartphoneCompatibilityOperating system | Bluetooth® 5.2 (Low Energy)7Android 4.3 (and above)iOS 7 (and above) |
| Protection rating8 | IP65 |
Technical Data
- The working range can be decreased by unfavorable environmental conditions (e.g. direct sun irradiation).
- Applies to the four horizontal intersection points.
- The values stated presuppose normal to favorable environmental conditions (e.g. no vibration, no fog, no smoke, no direct sunlight). Extreme fluctuations in temperature can cause deviations in accuracy.
- An additional deviation of ±0.004 in/m ( ±0.1 mm/m) must be taken into account when at maximum self-leveling range.
- Limited performance at temperatures < 32°F (0°C).
- Only non-conductive deposits occur, whereby occasional temporary conductivity caused by condensation is expected.
- For Bluetooth ^® low energy devices, establishing a connection may not be possible, depending on model and operating system. Bluetooth ^® devices must support the SPP profile.
- Battery port and battery packs not included.
Technical data determined with battery from delivery scope.
The laser tool can be clearly identified with the Serial Number 9 on the nameplate.
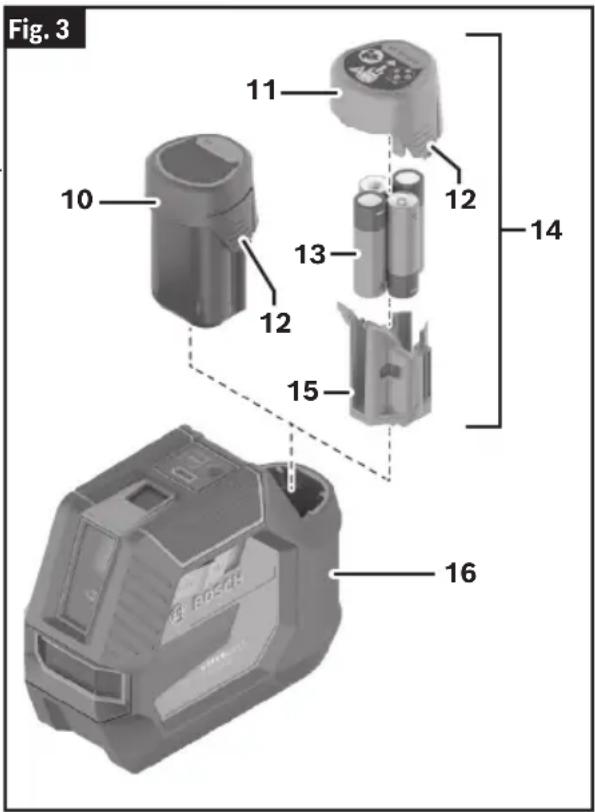
Preparation
Laser Tool Power Supply
The laser tool can either be operated with commercially available LR 6 (AA) batteries or with the Bosch rechargeable lithium-ion battery pack outlined in the technical section of this manual.
Operation with Bosch Rechargeable Lithium-Ion Battery Packs
(Fig. 1, Fig. 3)

Follow all warnings and all instructions in the Bosch rechargeable lithium-ion battery pack manual before using the battery pack. Improper usage and recharge of battery pack may increase the risk of fire, personal injury and property damage.

Use only Bosch rechargeable lithium-ion battery packs listed in the technical data section of this manual. Use of other battery packs may increase the risk of fire, personal injury and property damage.

Remove the batteries from the tool when not using it for extended periods. When storing for extended periods, the batteries can corrode and self-discharge.

Use only Bosch chargers listed in the technical data section of this manual. Use of other chargers may increase the risk of fire, personal injury and property damage.
Note: The Battery Pack 10 is supplied partially charged. To ensure full capacity of the Battery Pack 10, completely charge the Battery Pack 10 in the battery charger before using for the first time.
The Lithium-Ion Battery Pack 10 is protected against deep discharge by the Electronic Cell Protection (ECP). A protective circuit switches the laser level off when the Battery Pack 10 is drained.
Following the automatic shutoff of the tool, do not continue to slide the On/Off Switch 4 to OFF and ON.
To insert the charged Battery Pack 10, align Battery Pack 10 and slide it into the Battery Port 16 until it locks into position. Don't force.
To remove the Battery Pack 10, press the Battery Release Tab 12 and pull the battery pack out of the Battery Port 16. Do not use force to do this.
Operation with LR6 (AA) Batteries (optional)
(Fig. 3)
Alkali-Manganese Batteries 13 are recommended for the laser tool.
The Batteries are inserted into the Battery Adapter (AA1) 14.
The non-rechargeable Battery Adapter (AA1) 14 is intended only for use in designated Bosch laser tools and must not be used with power tools.
To insert the Batteries 13, slide the Battery Adapter Cover 15 into the Battery Port 16. Place the Batteries 13 in the Battery Adapter Cover 15 as shown in the illustration on the Battery Adapter Sealing Cap 11. When inserting, pay attention to the correct polarity according to the representation on the inside of the battery compartment. Slide the Battery Adapter Sealing Cap 11 over the Battery Adapter Cover 15 until you feel it click into place.
text_image
Fig. 3 10 11 12 13 14 15 16 BOSCHPreparation
To remove the Batteries 13, press the Battery Release Tab 12 of the Battery Adapter Sealing Cap 11 and pull off the sealing cap. Make sure that the batteries do not fall out. To do so, hold the laser tool with the Battery Port 16 facing upward. Remove the Batteries 13.
To remove the inside Battery Adapter Cover 15 from the Battery Port 16, reach into the cover and pull it out of the laser tool by applying light pressure to the side wall.
Always replace all Batteries 13 at the same time. Only use Batteries 13 from one brand and with identical capacity.
Remove the Batteries 13 from the laser tool when not using it for extended periods. When storing for extended periods, the Batteries 13 can corrode and discharge themselves.
Battery Status Indicator
(Fig. 1)
The Battery Status Indicator 1 shows the charge condition of the Battery Pack 10 or Batteries 13.
If the Battery Pack 10 or the Batteries 13 are running low, the laser lines will gradually become dimmer.
Immediately replace a faulty Battery Pack 10 or empty Batteries 13.
Operation
Initial Operation
Starting Operation
WARNING Do not leave the switched-on laser measure unattended and switch the laser measure off after use. Other persons could be blinded by the laser beam.
WARNING Do not point the laser beam at persons or animals and do not look into the laser beam yourself, not even from a long distance.
WARNING Protect the laser tool from moisture and direct sunlight.
WARNING Do not expose the laser tool to any extreme temperatures or fluctuations in temperature. The precision of the laser tool may be compromised if exposed to extreme temperatures or fluctuations in temperature. For example, do not leave it in a car for extended periods of time. If it has been subjected to significant fluctuations in temperature, first allow the laser tool to adjust to the ambient temperature and then always carry out an accuracy check before continuing work. (See "Accuracy Check of the Laser Tool" on page 17.)
WARNING Avoid substantial knocks to the laser tool and avoid dropping it. Always carry out an accuracy check before continuing work if the laser tool has been subjected to severe external influences. (See “Accuracy Check of the Laser Tool” on page 17.)
WARNING Switch the laser tool off when transporting it.
The pendulum unit is locked when the tool is switched off, as it can otherwise be damaged by extreme movements.
Switching On and Off
To switch on the laser tool, slide the On/Off Switch 4 to the "On" position. As soon as it is switched on, the laser tool emits laser beams from the Exit Opening for Laser Beam 4.
To switch off the laser tool, slide the On/Off Switch 4 to the Off position. The pendulum unit is locked when the tool is switched off.
If the maximum permitted operating temperature is exceeded, the tool shuts down to protect the laser diode. Once it has cooled down, the laser tool is operational again and can be switched back on.
Automatic Shut-Off
If no button on the laser tool is pressed for approx. 120 min, the laser tool will automatically switch itself off to preserve battery life.
To switch the laser tool back on after it has been automatically switched off, you can either slide the On/Off Switch 4 to the "Off" position first and then switch the laser tool back on, or press the Button for Laser Operating Mode 3.
To deactivate the automatic shut-off function, hold down the Button for Laser Operating Mode 3 for at least 3 s (with the laser tool switched on). If the automatic shut-off function is deactivated, the laser beams will flash briefly as confirmation.
To activate the automatic shut-off function, switch the laser tool off and on again.
Operating Modes
(Fig. 1, Fig. 4)
The laser tool has four operating modes, which you can toggle through with the Button for Laser Operating Mode 3:
- Cross-line and point mode: The laser tool generates a horizontal and a vertical laser line as well as two vertical laser points, one facing up, the other down. The laser lines cross at a 90° angle.
• Horizontal operation: The laser tool generates a horizontal laser line. - Vertical operation: The laser tool generates a vertical laser line. If the laser tool is positioned in a room, the vertical laser line is displayed on the ceiling beyond the upper laser point.
- Point mode: The laser tool generates two vertical laser points – one facing up, the other down.
To change the operating mode, press the Button for Laser Operating Mode 3 as often as required until the laser beams are generated in the required operating mode.
Operation
All operating modes apart from point mode can be used with both automatic leveling and the incline function.
Automatic Leveling
The laser tool monitors the position at all times during operation. It works with automatic leveling during set-up within the self-leveling range of ±4^ . Outside of the self-leveling range, it will automatically switch to the incline function.
Fig. 4
text_image
21 20 19 RM20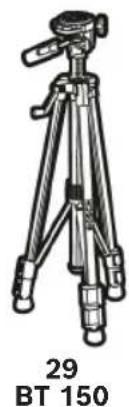
natural_image
Line drawing of a tripod with adjustable legs and a top handle, labeled '29 BT 150' below (no other text or symbols)
natural_image
Technical line drawing of a mechanical component with three views: a cylindrical pin, a mechanical bracket, and a separate cylindrical shaft (no text or symbols)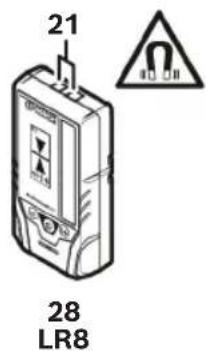
text_image
21 28 LR8
Operation
Working with Automatic Leveling (Fig. 4)
Position the laser tool on a level, firm surface or attach it to the Magnetic Mount 23, Rotating Mount 19, or the Tripod 29.
The automatic leveling function automatically compensates irregularities within the self-leveling range of ±4^ . Once the laser beam is permanently lit, the laser tool has leveled in.
If automatic leveling is not possible, e.g. because the surface on which the laser tool stands deviates by more than 4^ from the horizontal plane, the laser lines will initially flash rapidly for 2 seconds, then flash rapidly every 5 seconds. The laser tool is in the incline function.
In case of ground vibrations or position changes during operation, the laser tool is automatically leveled again. Upon leveling, check the position of the laser beams with regard to the reference points to avoid errors arising from a change in the laser tool's position.
Working with the Incline Function
Place the laser tool on an inclined surface. When working with the incline function, the laser lines will initially flash rapidly for 2 seconds, then flash rapidly every 5 seconds.
In the incline function, the laser lines and plumb point are no longer leveled and no longer necessarily run perpendicular to one another.
Remote Control via the Leveling Remote App
The laser tool is equipped with a Bluetooth® module which uses radio technology to enable remote control via a smartphone with a Bluetooth® interface.
The “Leveling Remote App” application (app) is needed to use this function. You can download this in the app store for your terminal device (Apple App Store, Google Play Store).
For information on the necessary system requirements for a Bluetooth® connection, please refer to the Bosch website at www.bosch-pt.com
When remote controlling by means of Bluetooth ^® , time lags may occur between the mobile terminal/device and laser tool as a result of poor reception conditions.
Switching On Bluetooth®
(Fig. 1)
WARNING Do not turn on laser remotely using the Bosch app without line of sight to the laser tool.
The sudden bright laser beam may increase the risk of personal injury or property damage.
Ensure there are no bystanders in the direct path of the laser beam before turning on the laser remotely.
To switch on Bluetooth ^® for the remote control, press the Bluetooth ^® Button 2. Ensure that the Bluetooth ^® interface is activated on your mobile terminal/device.
After starting the Bosch application, the connection between the mobile terminal/device and the laser tool is established. When several active laser tools are found, select the appropriate laser tool. When only one active laser tool is found, the connection is automatically established.
The connection is established as soon as the Bluetooth® Button 2 lights up. The Bluetooth® connection may be interrupted if there is too much distance or there are obstacles between laser tool and mobile terminal/device and if there are any electromagnetic interference sources. In this case, the Bluetooth® indicator flashes.
Switching Off Bluetooth®
(Fig. 1)
To switch off Bluetooth ^® for the remote control, press the Bluetooth ^® Button 2 or switch off the laser tool.
Working Advice
Always use the center of the laser line for marking. The width of the laser line changes with the distance.
Operation
Accuracy Check of the Laser Tool
Influences on Accuracy
The ambient temperature has the greatest influence. Especially temperature differences occurring from the ground upward can refract the laser beam.
Since the largest difference in temperature layers is close to the ground, you should always mount the laser tool on a Tripod 29 for measuring distances of 65 ft (20 m) or more. In addition, position the laser tool in the center of the work surface, wherever this is possible.
In addition to external influences, device-specific influences (e.g. falls or heavy impacts) can also lead to deviations. For this reason, check the leveling accuracy each time before beginning work.
First check the height accuracy and leveling accuracy of the horizontal laser line, then the leveling accuracy of the vertical laser line.
Should the laser tool exceed the maximum deviation during one of the tests, please have it repaired by a Bosch aftersales service.
Checking the Height Accuracy of the Horizontal Line
(Fig. 5, Fig. 6, Fig. 7, Fig. 8)
For this check, you will need a free measuring distance of 16 ft (5 m) on firm ground between two walls (designated A and B).
-
Mount the laser tool close to wall A on a tripod, or place it on a firm, level surface. Switch on the laser tool and select cross-line operation.
-
Aim the laser at the closer wall A and allow the laser tool to level in. Mark the middle of the point at which the laser lines cross on the wall (point I).
-
Turn the laser tool 180°, allow it to level in and mark the point where the laser lines cross on the opposite wall B (point II).
-
Position the laser tool – without rotating it – close to wall B, switch it on and allow it to level in.
-
Align the height of the laser tool (using the tripod or by placing objects underneath as required) so that the point where the laser lines cross exactly hits the previously marked point II on wall B.
text_image
Fig. 5 A B 16 ft (5 m)
text_image
Fig. 6 A 180° B I II
text_image
Fig. 7 A I B II
text_image
Fig. 8 A III d I 180° B X IIOperation
-
Turn the laser tool 180° without adjusting the height. Aim it at wall A such that the vertical laser line runs through the already marked point I. Allow the laser tool to level in and mark the point where the laser lines cross on wall A (point III).
-
The discrepancy d between the two marked points I and III on wall A reveals the actual height deviation of the laser tool.
The maximum permitted deviation on the measuring distance of 2 × 16 ft = 32 ft ( 2 × 5 m = 10 m) is as follows:
$$ \begin{array}{l} 3 2 \mathrm{ft} \times \pm 0. 0 0 3 6 \mathrm{in/ft} = \pm 1 / 8 (0. 1 1 5 \mathrm{in}) \ (1 0 \mathrm{m} \times \pm 0. 3 \mathrm{mm/m} = \pm 3 \mathrm{mm}) \end{array} $$
The discrepancy d between points I and III must therefore amount to no more than 1/8 in (3 mm).
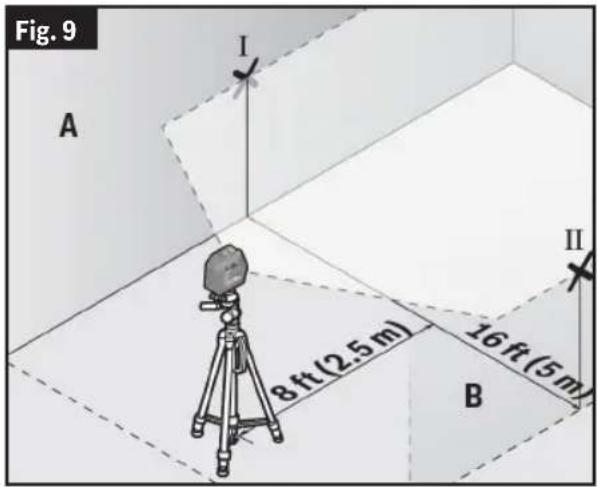
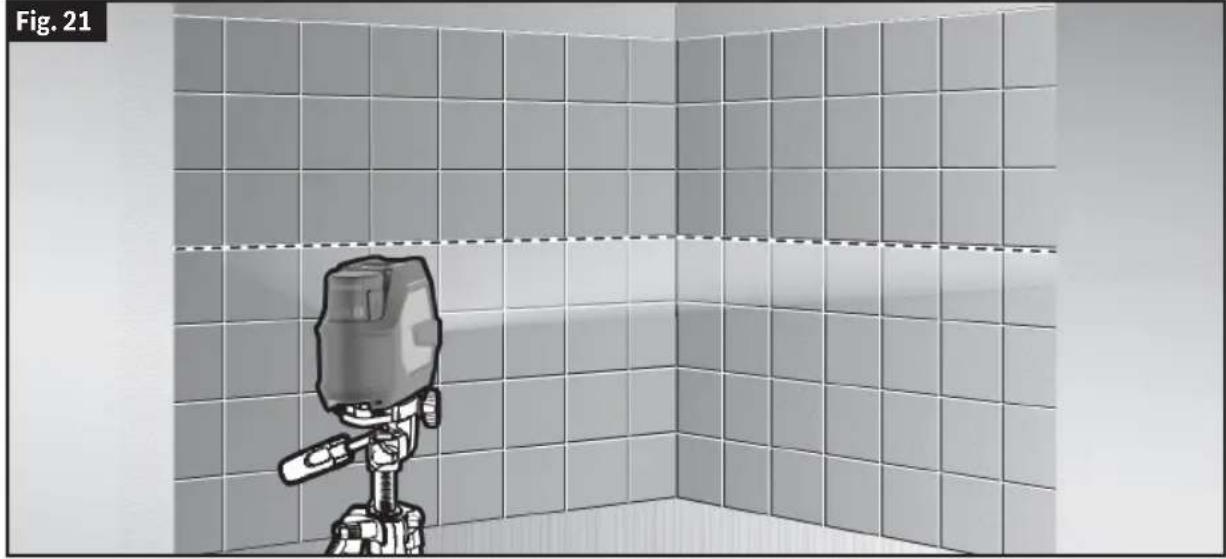
Checking the Level Accuracy of the Horizontal Line
(Fig. 9, Fig. 10)
For this check, you will need a free area of 16 x 16 ft (5 x 5 m).
- Mount the laser tool in the middle between walls A and B on a Tripod 29, or place it on a firm, level surface. Switch on the laser tool and select horizontal operation. Allow the laser tool to level in.
- At a distance of 8 ft (2.5 m) from the laser tool, mark the center of the laser line on both walls (point I on wall A and point II on wall B).
- Set up the laser tool at a 16 ft (5 m) distance, rotate it by 180^ , and allow it to level in.
- Align the height of the laser tool (using the Tripod 29 or by placing objects underneath as required) so that the center of the laser line exactly hits the previously marked point II on wall B.
- Mark the center of the laser line on wall A as point III (vertically above or below point I).
- The discrepancy d between the two marked points I and III on wall A reveals the actual horizontal deviation of the laser tool.
The maximum permitted deviation on the measuring distance of 2 × 16 ft = 32 ft ( 2 × 5 m = 10 m) is as follows:
$$ \begin{array}{l} 3 2 \mathrm{ft} \times \pm 0. 0 0 3 6 \mathrm{in/ft} = 1 / 8 \text { in(0.115in)} \ (1 0 \mathrm{m} \times \pm 0. 3 \mathrm{mm/m} = \pm 3 \mathrm{mm}) \end{array} $$
The discrepancy d between points I and III must therefore amount to no more than 1/8 in (3 mm).
text_image
Fig. 9 A I II 8 ft (2.5 m) 16 ft (5 m) B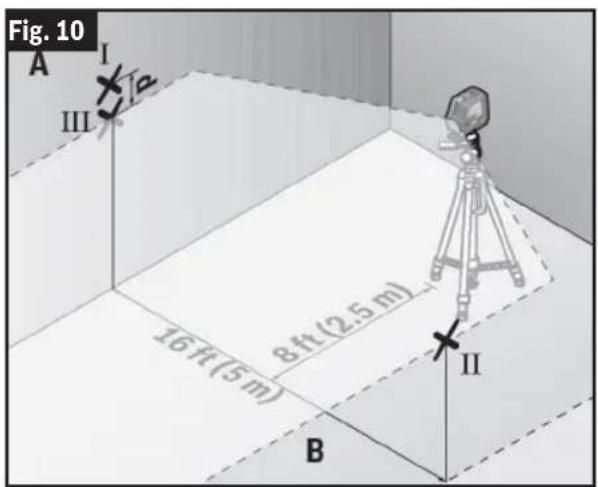
text_image
Fig. 10 A I III 16 ft (5 m) 8 ft (2.5 m) II BChecking the Level Accuracy of the Vertical Line
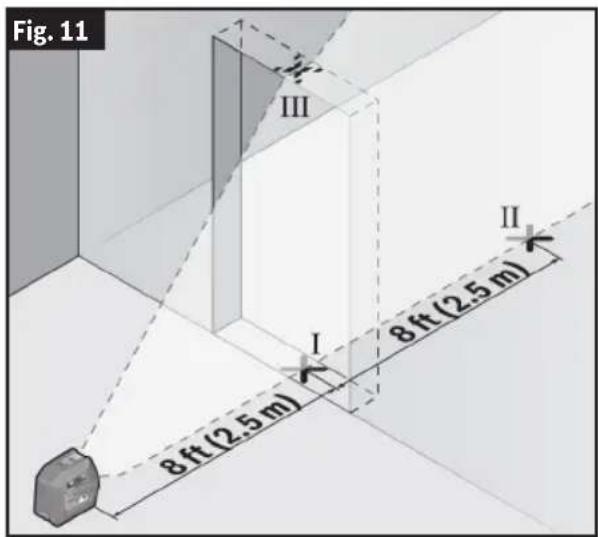
(Fig. 11, Fig. 12)
For this check, you will need a door opening (on solid ground) which has at least 8 ft (2.5 m) of space on either side of the door.
- Place the laser tool 8 ft (2.5 m) away from the door opening on a firm, flat surface (not on a tripod). Switch on the laser tool and select vertical operation. Aim the laser line at the door opening and allow the laser tool to level in.
Operation
-
Mark the center of the vertical laser line on the floor of the door opening (point I), 16 ft (5 m) away on the other side of the door opening (point II), and on the upper edge of the door opening (point III).
-
Rotate the laser tool 180° and position it on the other side of the door opening, directly behind point II. Allow the laser tool to level in and align the vertical laser line in such a way that its center passes through points I and II exactly.
-
Mark the center of the laser line on the upper edge of the door opening as point IV.
The discrepancy d between the two marked points III and IV reveals the actual vertical deviation of the laser tool.
- Measure the height of the door opening.
text_image
Fig. 11 III I II 8 ft (2.5 m) 8 ft (2.5 m)You can calculate the maximum permitted deviation as follows:
Doubled height of the door opening × 0.0036 in/ft (0.3 mm/m)
Example: At a door opening height of 6.5 ft (2 m), the maximum deviation amounts to
$$ 2 \times 6. 5 \mathrm{ft} \times \pm 0. 0 0 3 6 \mathrm{in/ft} = 0. 0 4 7 \text { in } (2 \times $$
$$ 2 \mathrm{m} \times \pm 0. 3 \mathrm{mm/m} = \pm 1. 2 \mathrm{mm}) $$
The points III and IV must therefore be no further than 0.047 in (1.2 mm) from each other.
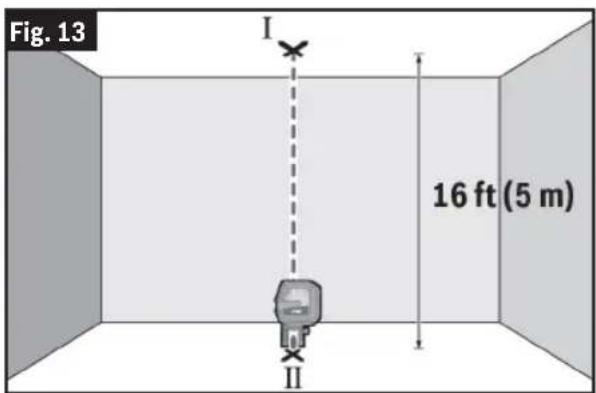
Checking Plumb Accuracy
(Fig. 4, Fig. 13, Fig. 14)
For this check, you will need a clear measuring space on firm ground with a distance of approx. 16 ft (5 m) between the floor and the ceiling.
-
Mount the laser tool onto the Rotating Mount 19 and place it on the floor. Select point mode and allow the laser tool to level in.
-
Mark the center of the top laser point on the ceiling (point I). Also mark the
text_image
Fig. 13 I 16 ft (5 m) II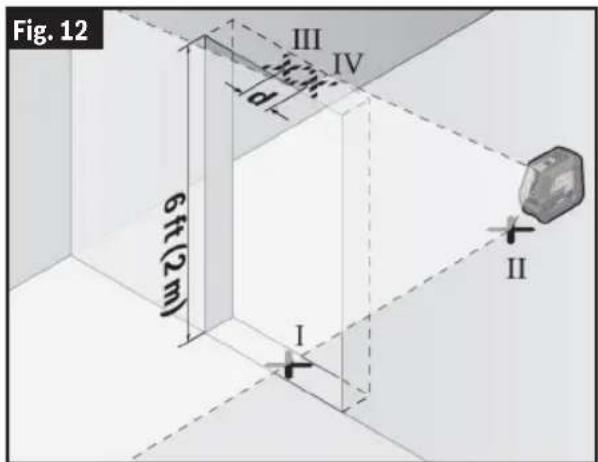
text_image
Fig. 12 III IV d 6ft(2m) I II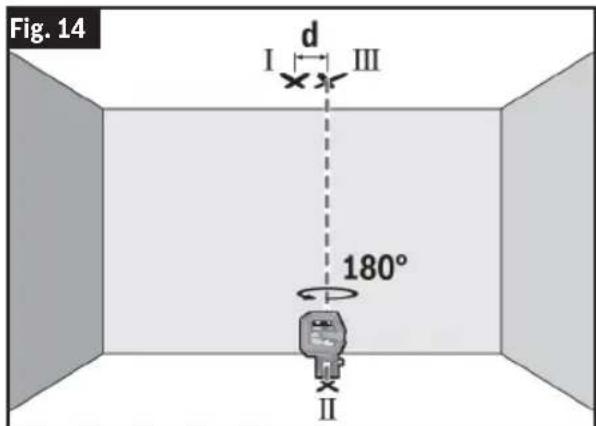
text_image
Fig. 14 I d III 180° IIOperation
center of the bottom laser point on the floor (point II).
-
Turn the laser tool by 180°. Position it so that the center of the bottom laser point falls onto the marked point II. Allow the laser tool to level in. Mark the center of the top laser point (point III).
-
The discrepancy d between the two marked points I and III on the ceiling reveals the actual deviation of the laser tool from the vertical plane.
You can calculate the maximum permitted deviation as follows:
Doubled distance between floor and ceiling × 0.0084 in/ft (0.7 mm/m)
Example: At a floor-to-ceiling distance of 16 ft (5 m), the maximum deviation amounts to 2 × 16 ft x 0.0084 in/ft = 0.27 in. The points I and III must therefore be no further than 0.27 in from each other.
Working Advice
Only the center of the laser point or laser line must be used for marking. The size of the laser point/the width of the laser line changes depending on the distance.
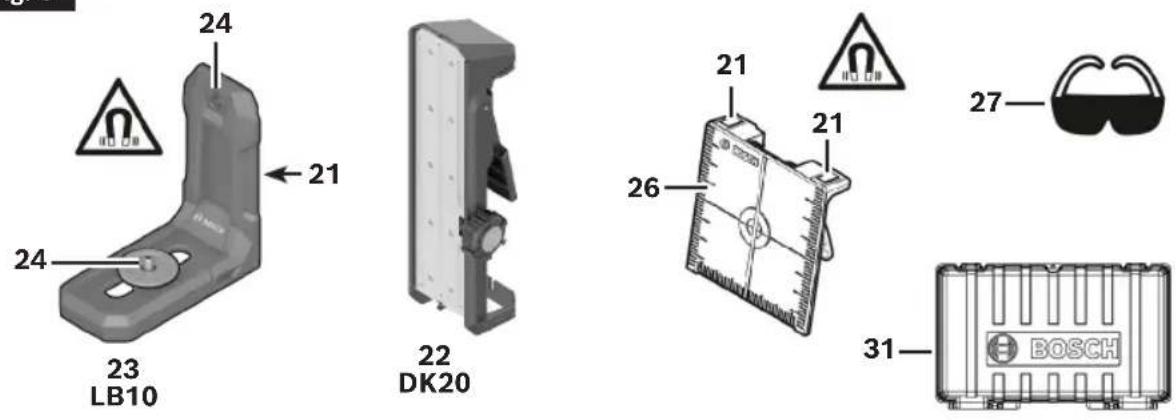
Use with Attachments
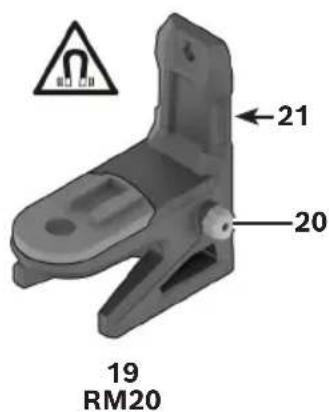
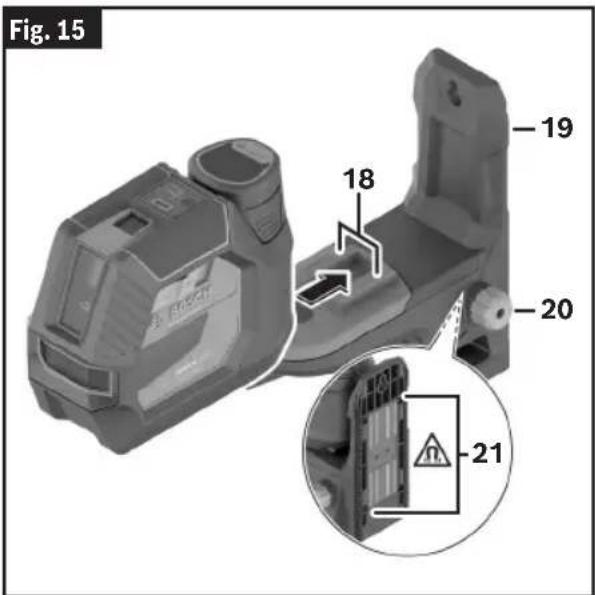
Working with the RM20 Rotating Mount (Optional Accessory)
(Fig. 4, Fig. 15, Fig. 16, Fig. 17)
You can use the Rotating Mount 19 to rotate the laser tool around a central, always visible plumb point. This enables you to set up the laser lines without having to change the position of the laser tool.
You can use the Fine Adjustment Knob 20 to align vertical laser lines precisely with reference points.
Place the laser tool with the Guide Groove 8 on the Guide Rail 18 of the Rotating Mount 19 and slide the laser tool all the way onto the platform.
To disconnect the laser tool, pull it off the rotating mount in the opposite direction.
Positioning possibilities of the rotating mount:
• Standing on a flat surface,
- Screwed to a vertical surface,
- On metallic surfaces using the Magnets 21,
- On ceiling grids using the Ceiling Clip 22.
Keep your fingers away from the rear side of the magnetic accessory while attaching the accessory to surfaces. The strong pulling force of the magnets may jam your fingers.
text_image
Fig. 15 18 19 20 2120

natural_image
3D mechanical assembly diagram showing a clamp device with labeled parts (no readable text or symbols)Operation
Roughly align the Rotating Mount 19 before switching on the laser tool.
Working with the DK20 Ceiling Clip (Optional Accessory)
(Fig. 4, Fig. 18)
WARNING
Make sure that this device and the tool are securely mounted before operation.
The DK20 Ceiling Clip 22 can be attached to ceiling grids for use with a magnetic mount:
-
Slide the magnetic mount into position on the DK20 Ceiling Clip 22. The magnetic mount may require minor adjustments to sit in the track of the DK20 Ceiling Clip 22.
-
Squeeze the handle to open the clip of the DK20 22. Attach the DK20 Ceiling Clip 22 to the ceiling grid.
-
Roughly align the magnetic mount and DK20 Ceiling Clip 22 before switching on the laser tool.
-
Turn on the laser tool.
-
Use the adjustment knob of the DK20 Ceiling Clip 22 to align laser lines precisely with reference points.
Rotate the adjustment knob of the DK20 Ceiling Clip 22 clockwise to move the magnetic mount higher and counterclockwise to lower it.
natural_image
3D rendering of a mechanical device with warning symbol and I symbol, no readable text or labels present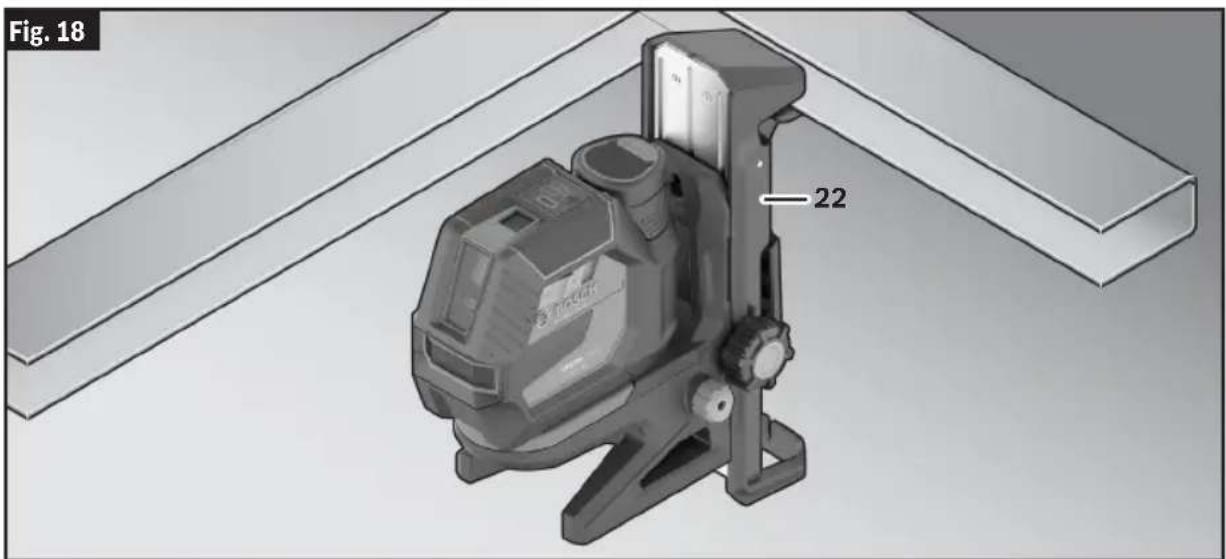
text_image
Fig. 18 22Operation
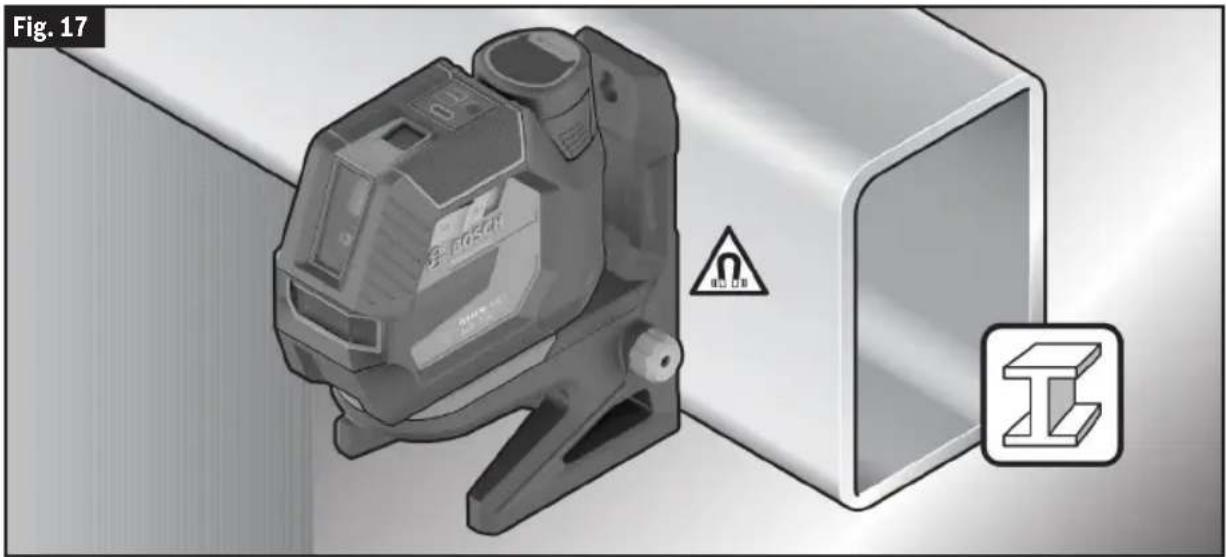
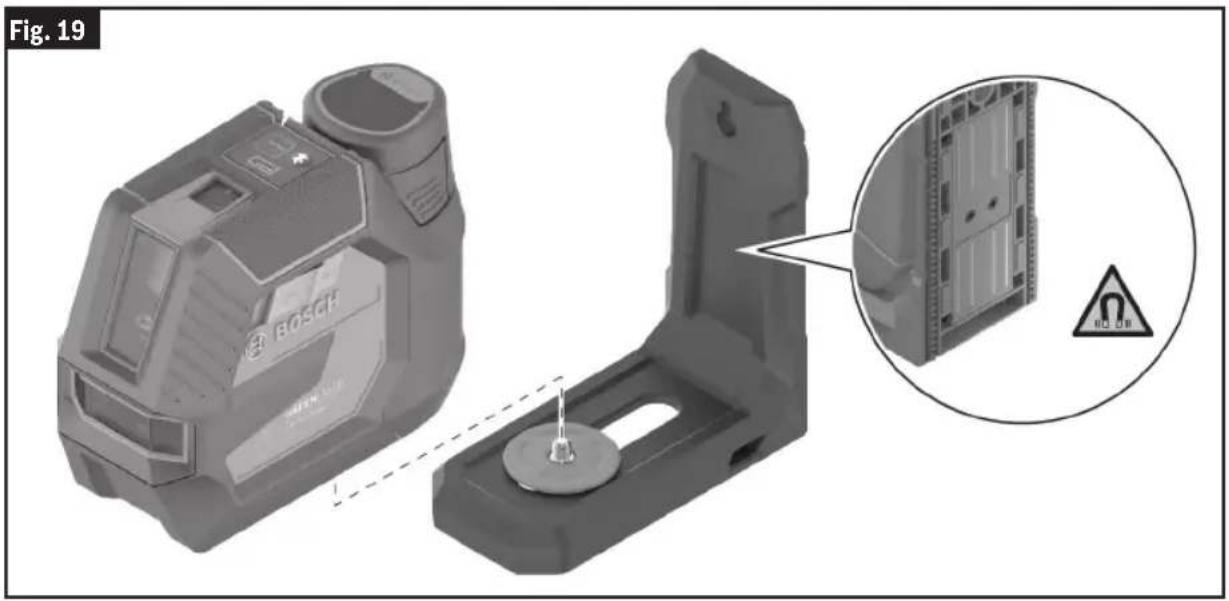
Working with the Magnetic Mount LB10 (Optional Accessory)
(Fig. 4, Fig. 19)
You can secure the laser tool on vertical surfaces or magnetizable materials using the Magnetic Mount 23. In conjunction with the Ceiling Clip 22, the laser tool can also be aligned vertically.
Place the laser tool with the Tripod Mount 1/4" 7 on the Magnetic Mount 1/4" Screw 24 and screw it tight.
Attachment options for the Magnetic Mount 23:
- Using a commercially available fastening screw, it can be attached via the Magnetic Mount Screw Hole 25 to wood.
• Using the Magnets 21, it can be attached to magnetizable materials.
- Using the Ceiling Clip 22, it can be attached to ceiling grids.
Note: Use only DK20. Use of any other ceiling clip will provide insufficient support and may cause the tool to fall.
Keep your fingers away from the rear side of the magnetic accessory while attaching the accessory to surfaces. The strong pulling force of the magnets may jam your fingers.
Roughly align the Magnetic Mount 23 before switching on the laser tool.
natural_image
3D model of a Bosch plastic device with mounting bracket and close-up view showing internal components (no text or symbols)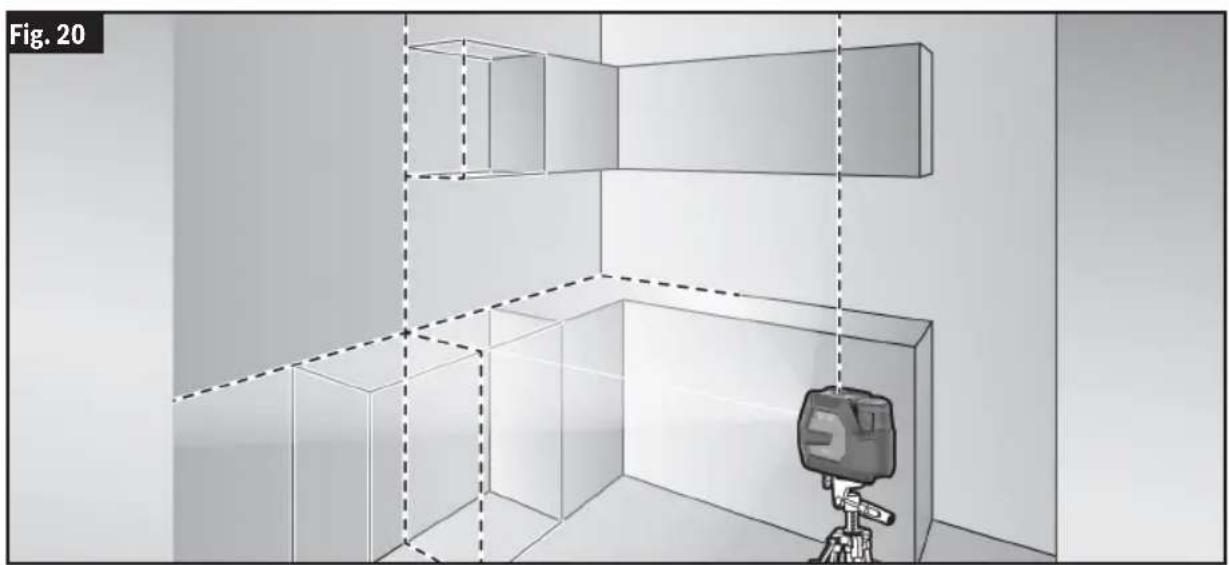
natural_image
3D architectural rendering of a room with two walls, one containing a camera rig and the other showing a monitor (no text or symbols)22
Operation
Working with the Tripod (Optional Accessory)
(Fig. 4, Fig. 20, Fig. 21, Fig. 22)
A Tripod 29 offers a stable, height-adjustable support. Position the tool with the Tripod Mount 1/4" 7 onto the thread of the Tripod 29 or a commercially available camera tripod.
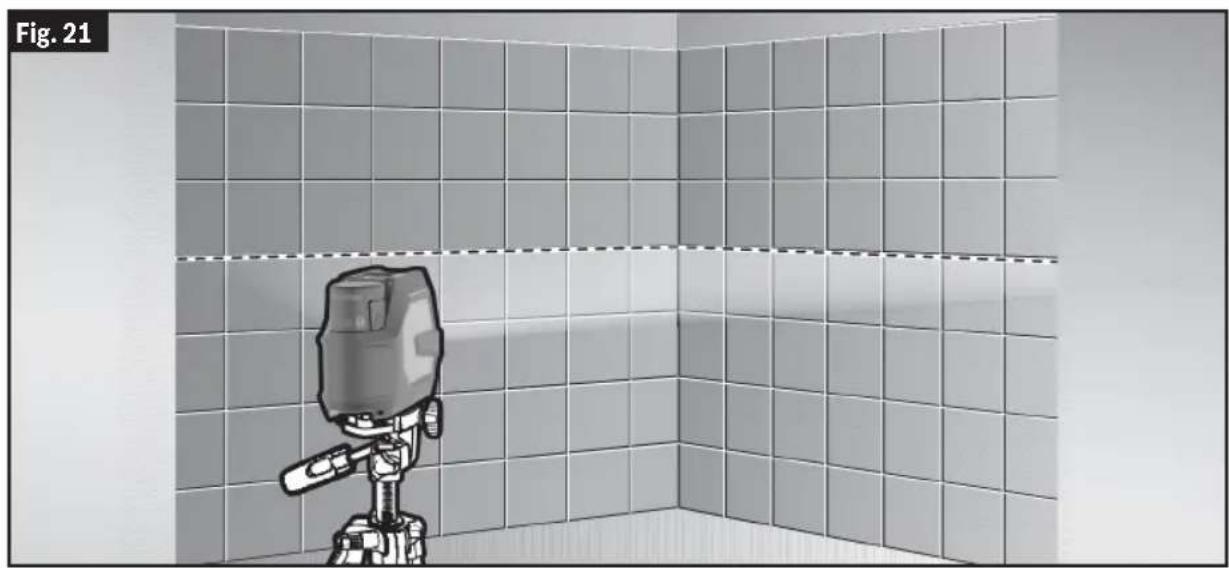
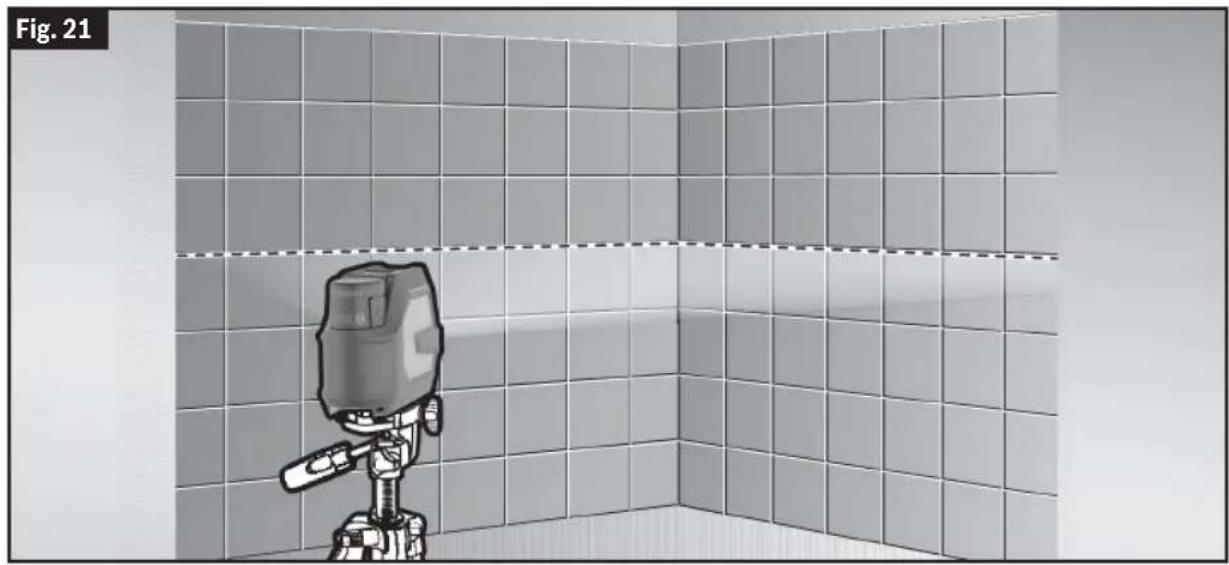
Working with the Laser Target Plate (Optional Accessory)
(Fig. 4)
The Laser Target Plate 26 increases the visibility of the laser beam under unfavorable conditions and at large distances.
The reflective part of the Laser Target Plate 26 improves the visibility of the laser line.
Thanks to the transparent part, the laser line is also visible from the back side of the laser target plate.
natural_image
Cartoon robot standing in a corner room with tiled walls and a dashed line indicating a reference or threshold (no text or symbols)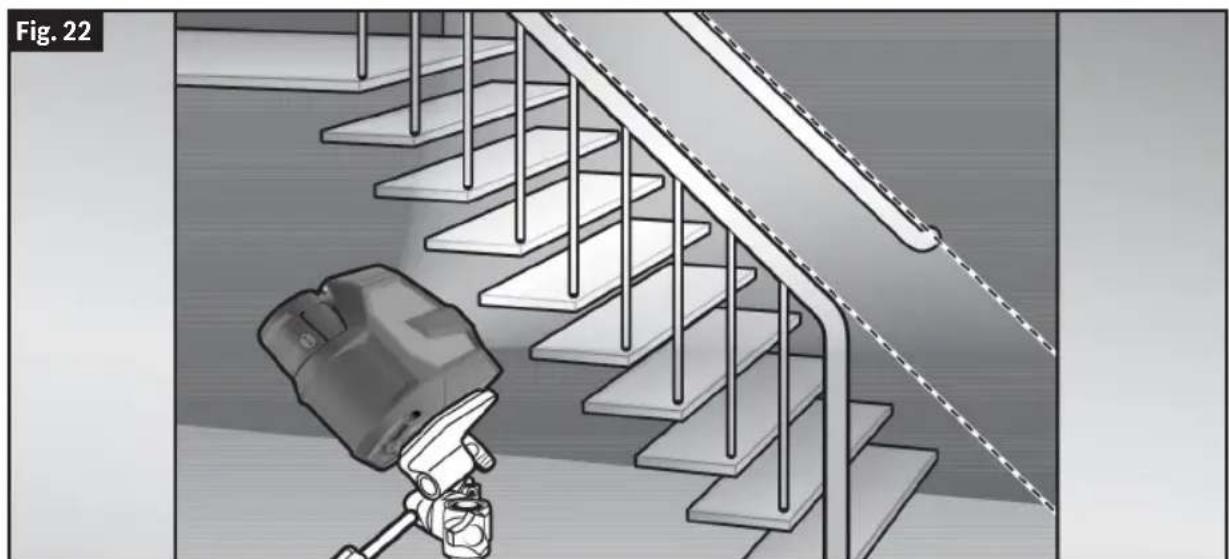
natural_image
Illustration of a robotic arm interacting with stairs, no text or symbols presentOperation
Working with the Laser Receiver (Optional Accessory)
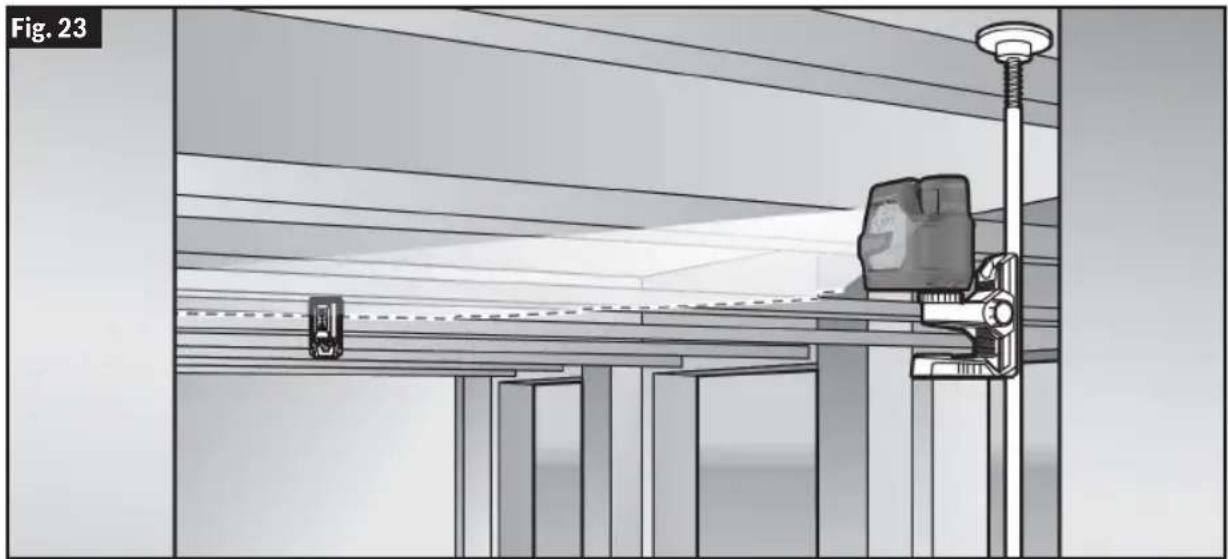
(Fig. 4, Fig. 23)
Use the Laser Receiver (LR8) 28 to improve detection of the laser lines in adverse lighting conditions (bright environment, direct sunlight) and over greater distances.
Laser Viewing Glasses (Optional Accessory)
(Fig. 4)
The Laser Viewing Glasses 27 filter out the ambient light. This makes the light of the laser appear brighter for the eyes.
- Do not use the Laser Viewing Glasses 27 as safety goggles. The laser viewing glasses are used for improved visualiza-
tion of the laser beam, but they do not protect against laser radiation.
- Do not use the Laser Viewing Glasses 27 as sunglasses or in traffic. The laser viewing glasses do not afford complete UV protection and reduce color perception.
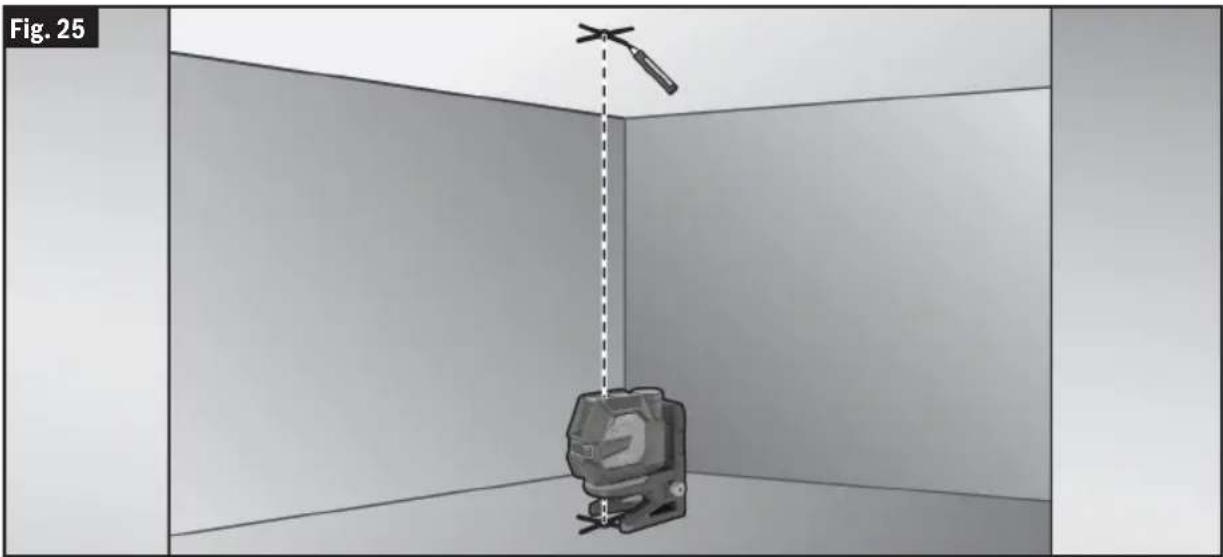
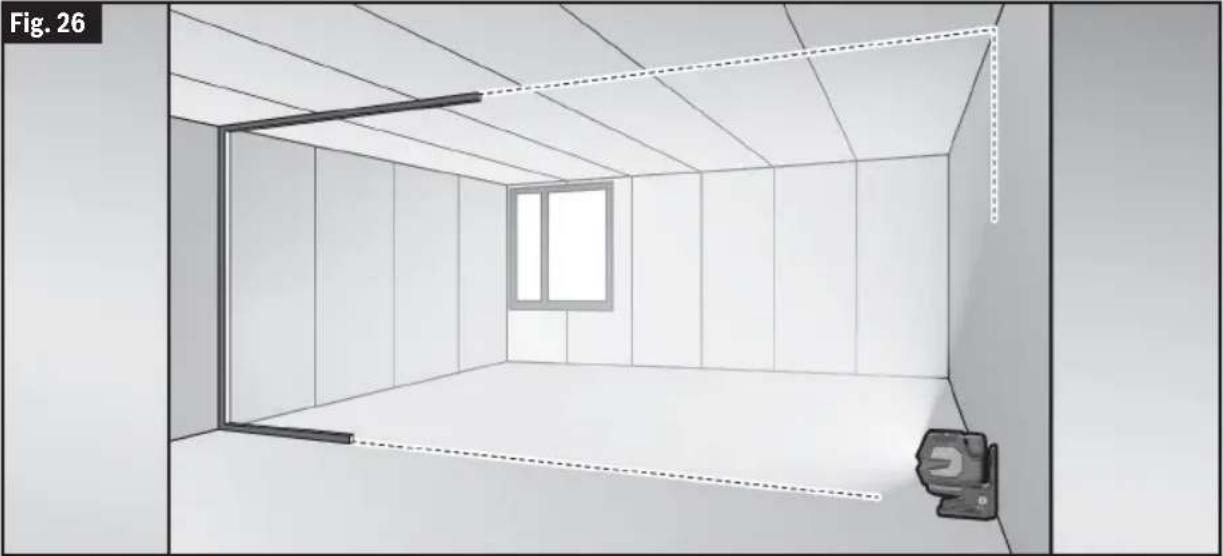
Example Applications
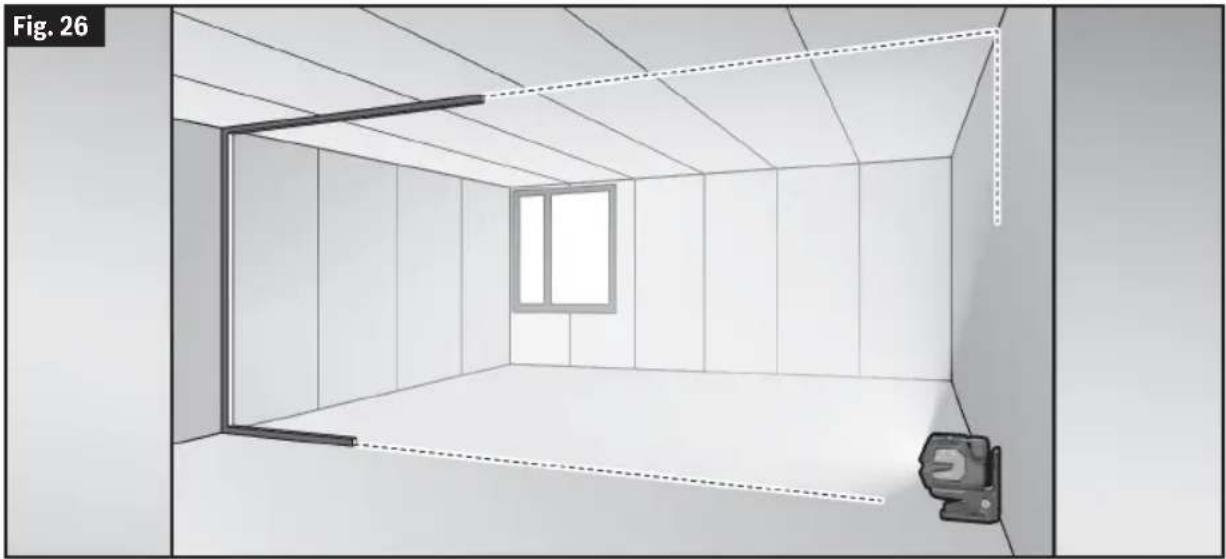
(Fig. 24, Fig. 25, Fig. 26)
Additional examples of possible applications are shown below.
natural_image
Diagram of a mechanical assembly with a mounted device and support structure, labeled Fig. 23 (no text or symbols on the diagram itself)
text_image
Fig. 24 90°24
Operation
natural_image
3D rendering of a mechanical device suspended in a room with a tool, labeled Fig. 25 (no text or symbols on the device itself)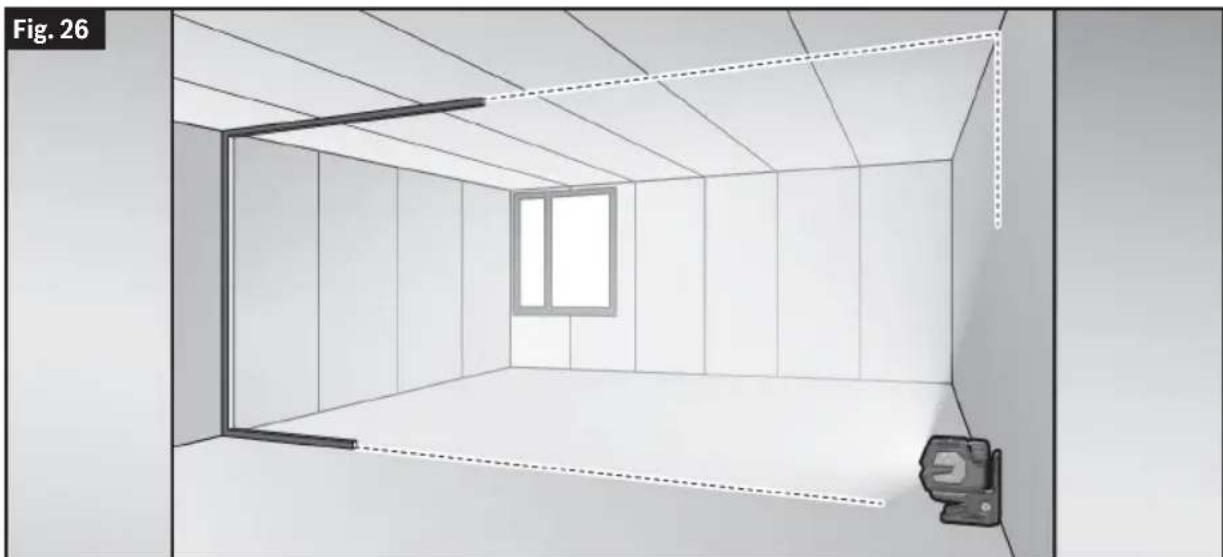
natural_image
Interior view of a room with ceiling grilles, a window, and a small wall-mounted device (no text or symbols)Maintenance and Service
Store and transport the tool only in the supplied protective case.
Keep the tool clean at all times.
Do not immerse the tool into water or other fluids.
Wipe off debris using a moist and soft cloth. Do not use any cleaning agents or solvents.
Regularly clean the surfaces at the exit opening of the laser in particular, and pay attention to any fluff or fibers.
If the tool should fail despite the care taken in manufacturing and testing procedures, repair should be carried out by an authorized after-sales service center for Bosch power tools.
In all correspondence and spare parts orders, please always include the 10-digit article number given on the type plate of the tool.
Environment Protection

natural_image
Simple line drawing of a trash bin with crossed lines indicating no waste or prohibition (no text or symbols)Recycle raw materials and batteries instead of disposing of waste. The unit, accessories, packaging and used batteries should be sorted for environmentally friendly recycling in accor-
dance with the latest regulations.
natural_image
3D mechanical component diagram labeled Fig. 16, showing a clamp and screw assembly (no readable text or symbols)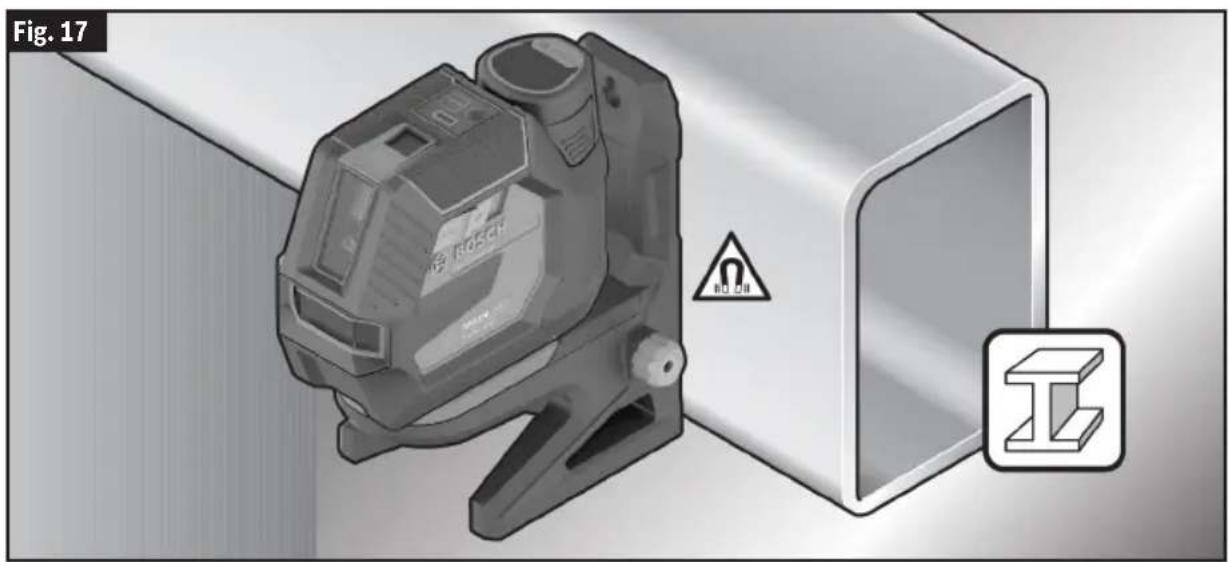
text_image
Fig. 17 HOSCH NO DH44
Fonctionnement
natural_image
3D model of a Bosch plastic device with mounting bracket and close-up view showing internal structure (no text or symbols)Fonctionnement
natural_image
3D architectural rendering of a room with shelves and a camera on a tripod, labeled Fig. 20 (no text or symbols on the diagram itself)46
Fonctionnement
natural_image
Cartoon robot standing in a corner with tiled walls, no text or symbols visible
natural_image
Illustration of a robotic arm interacting with a staircase, no text or symbols present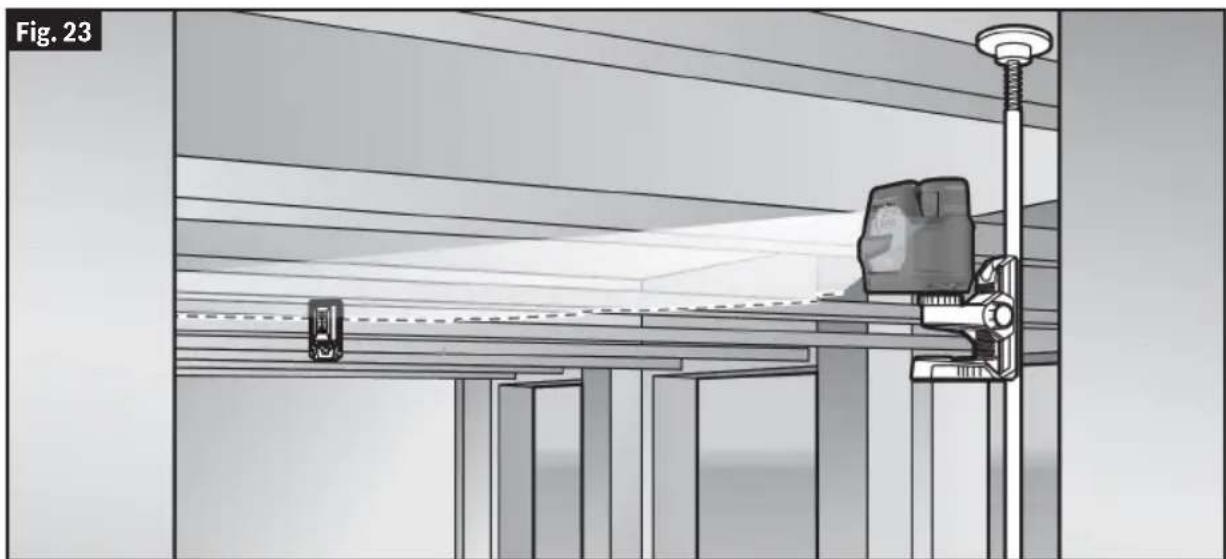
natural_image
Diagram of a mechanical assembly with a mounted device and support structure, labeled Fig. 23 (no text or symbols on the diagram itself)Fonctionnement
natural_image
Diagram showing a camera setup with a ruler and a mounted device, labeled Fig. 25 (no text or symbols on the diagram itself)48
Fonctionnement
natural_image
Interior view of a room with ceiling grilles, a window, and a small wall-mounted device (no text or symbols)natural_image
Simple line drawing of a trash bin with crossed lines indicating no waste or restriction (no text or symbols)Operation with LR6 (AA) Batteries (optional)
(Fig. 3)
text_image
21 20 19 RM20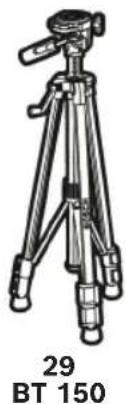
natural_image
Illustration of a tripod-mounted camera with labeled base (29) and top view (BT 150), no other text or symbols present.
natural_image
Technical line drawing of a mechanical component with a cylindrical shaft and two separate views (no text or symbols)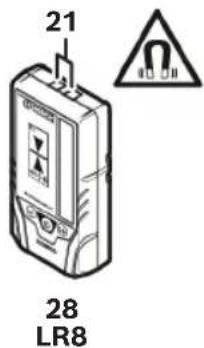
text_image
21 28 LR8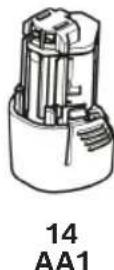
Operación
(10 m x ± 0.3 mm/m = ± 3 mm)
natural_image
3D mechanical assembly diagram showing a component with labeled parts and a screw, no readable text or symbols present.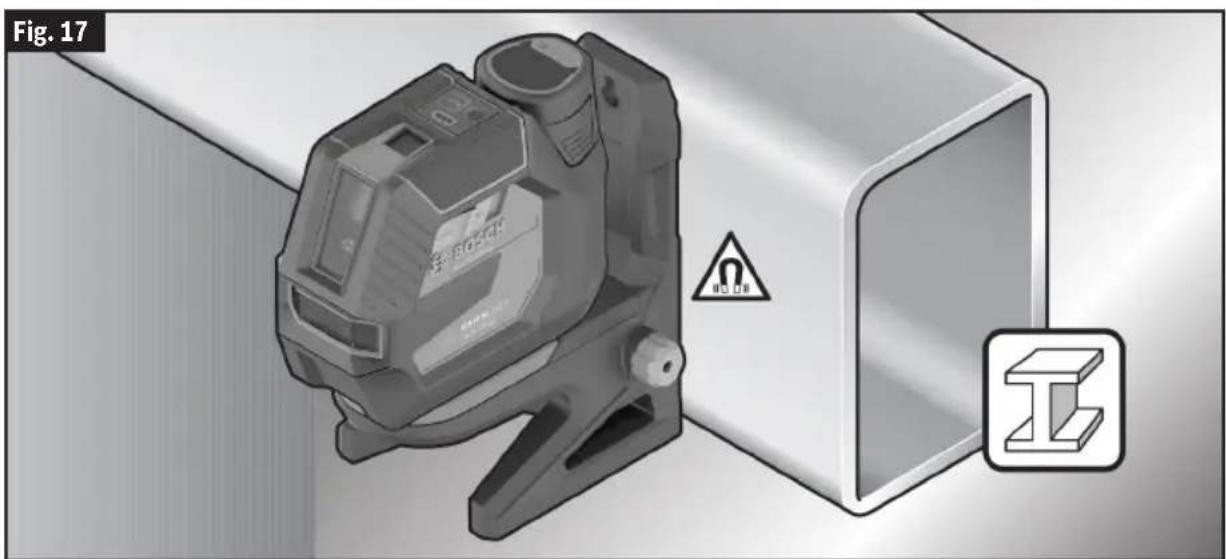
text_image
Fig. 17 ISO 8054H ISO 8054H ISO 8054H ISO 8054H ISO 8054H ISO 8054H ISO 8054H ISO 8054H ISO 8054H ISO 8054H ISO 8054H ISO 8054H ISO 8054H ISO 6054H ISO 6054H ISO 6054H ISO 6054H ISO 6054H ISO 6054H ISO 6054H ISO 6054H ISO 6054H ISO 6054H ISO 6054H ISO 6054H ISO 6054 HOperación
natural_image
3D model of a Bosch plastic device with mounting bracket and close-up view showing internal components (no text or symbols)natural_image
3D architectural rendering of a room with two walls, one containing a camera rig and the other showing a mirror (no text or symbols)70
Operación
natural_image
Illustration of a robot standing in a corner with tiled walls, no text or symbols present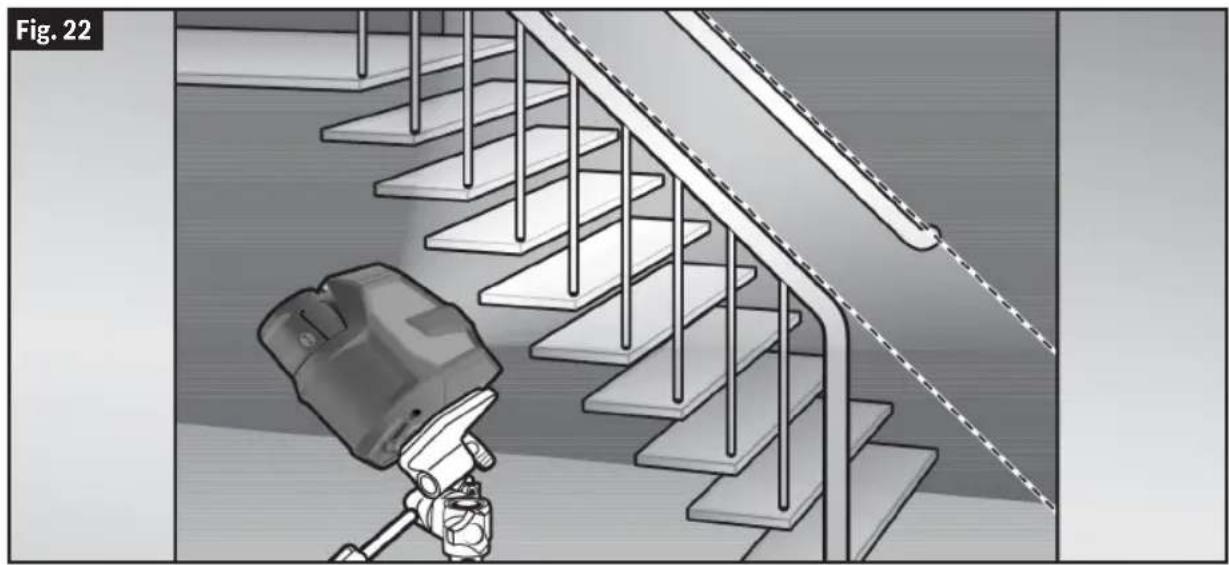
natural_image
Illustration of a robotic arm interacting with a staircase, no text or symbols present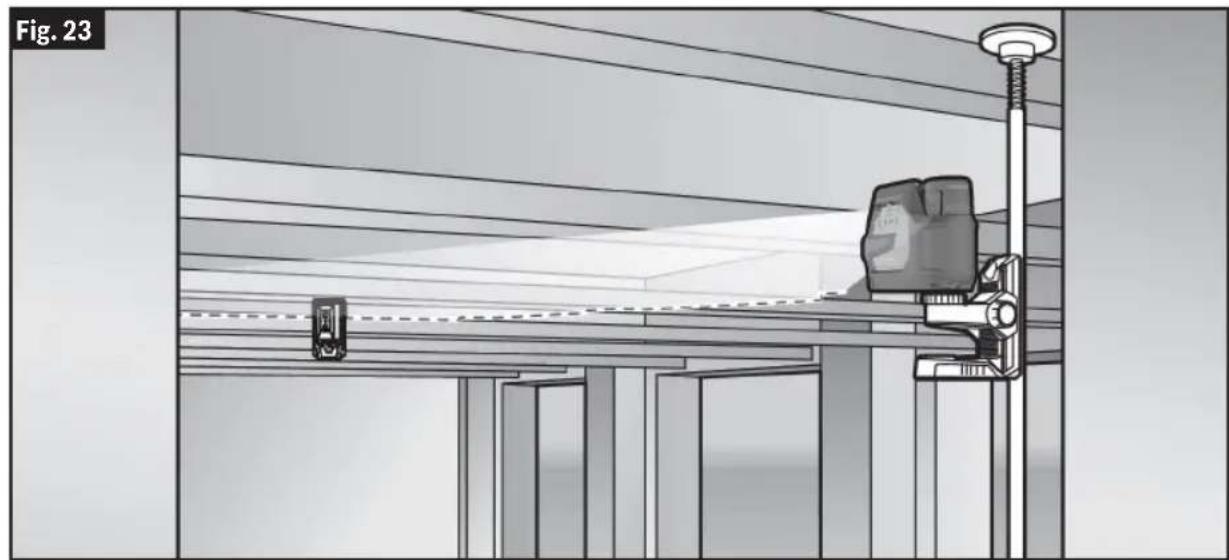
natural_image
Diagram of a mechanical assembly with a lever and clamping device, labeled Fig. 23 (no text or symbols on the diagram itself)Operación
natural_image
3D rendering of a mechanical device suspended in a room with a tool, labeled Fig. 25 (no text or symbols on the device itself)72
Operación
natural_image
Interior view of a room with ceiling grilles, a window, and a wall-mounted device (no text or symbols)natural_image
Symbol of a trash bin crossed with a diagonal line, representing no waste or discharge (no text or labels)This page was intentionally left blank
This page was intentionally left blank
Copyright © 2009-2019 Arm Limited. All rights reserved.
Licensed under the Apache License, Version 2.0 (the "License"); you may not use this file except in compliance with the License.
You may obtain a copy of the License at http://www.apache.org/licenses/LICENSE-2.0
Unless required by applicable law or agreed to in writing, software distributed under the License is distributed on an "AS IS" BASIS, WITHOUT WARRANTIES OR CONDITIONS OF ANY KIND, either express or implied. See the License for the specific language governing permissions and limitations under the License.
STM32CubeG0, v1.5.1
Apache-2.0
Copyright © 2018-2021 STMicroelectronics.
Licensed under the Apache License, Version 2.0 (the "License"); you may not use this file except in compliance with the License.
You may obtain a copy of the License at http://www.apache.org/licenses/LICENSE-2.0
Unless required by applicable law or agreed to in writing, software distributed under the License is distributed on an "AS IS" BASIS, WITHOUT WARRANTIES OR CONDITIONS OF ANY KIND, either express or implied.
See the License for the specific language governing permissions and limitations under the License.
SIMPLELINK-CC13XX-CC26XX-SDK, 6.20.00.29
Copyright © 2015, Texas Instruments Incorporated
All rights reserved not granted herein. Limited License.
Texas Instruments Incorporated grants a world-wide, royalty-free, non-exclusive license under copyrights and patents it now or hereafter owns or controls to make, have made, use, import, offer to sell and sell ("Utilize") this software subject to the terms herein. With respect to the foregoing patent license, such license is granted solely to the extent that any such patent is necessary to Utilize the software alone. The patent license shall not apply to any combinations which include this software, other than combinations with devices manufactured by or for TI ("TI Devices"). No hardware patent is licensed hereunder.
Redistributions must preserve existing copyright notices and reproduce this license (including the above copyright notice and the disclaimer and (if applicable) source code license limitations below) in the documentation and/or other materials provided with the distribution.
Redistribution and use in binary form, without modification, are permitted provided that the following conditions are met:
- No reverse engineering, decompilation, or disassembly of this software is permitted with respect to any software provided in binary form.
— Any redistribution and use are licensed by TI for use only with TI Devices. - Nothing shall obligate TI to provide you with source code for the software licensed and provided to you in object code.
If software source code is provided to you, modification and redistribution of the source code are permitted provided that the following conditions are met:
— Any redistribution and use of the source code, including any resulting derivative works, are licensed by TI for use only with TI Devices.
— Any redistribution and use of any object code compiled from the source code and any resulting derivative works, are licensed by TI for use only with TI Devices.
— Neither the name of Texas Instruments Incorporated nor the names of its suppliers may be used to endorse or promote products derived from this software without specific prior written permission.
DISCLAIMER.
THIS SOFTWARE IS PROVIDED BY TI AND TI'S LICENSORS "AS IS" AND ANY EXPRESS OR IMPLIED WARRANTIES, INCLUDING, BUT NOT LIMITED TO, THE IMPLIED WARRANTIES OF MERCHANTABILITY AND FITNESS FOR A PARTICULAR PURPOSE ARE DISCLAIMED. IN NO EVENT SHALL TI AND TI'S LICENSORS BE LIABLE FOR ANY DIRECT, INDIRECT, INCIDENTAL, SPECIAL, EXEMPLARY, OR CONSEQUENTIAL DAMAGES (INCLUDING, BUT NOT LIMITED TO, PROCUREMENT OF SUBSTITUTE GOODS OR SERVICES; LOSS OF USE, DATA, OR PROFITS; OR BUSINESS INTERRUPTION) HOWEVER CAUSED AND ON ANY THEORY OF LIABILITY, WHETHER IN CONTRACT, STRICT LIABILITY, OR TORT (INCLUDING NEGLIGENCE OR OTHERWISE) ARISING IN ANY WAY OUT OF THE USE OF THIS SOFTWARE, EVEN IF ADVISED OF THE POSSIBILITY OF SUCH DAMAGE.
Licenses
Copyright 2010 - 2015 Texas Instruments Incorporated. All rights reserved.
Copyright © 2016 Texas Instruments Incorporated – http://www.ti.com/
All rights reserved not granted herein. Limited License.
Texas Instruments Incorporated grants a world-wide, royalty-free, non-exclusive license under copyrights and patents it now or hereafter owns or controls to make, have made, use, import, offer to sell and sell ("Utilize") this software subject to the terms herein. With respect to the foregoing patent license, such license is granted solely to the extent that any such patent is necessary to Utilize the software alone. The patent license shall not apply to any combinations which include this software, other than combinations with devices manufactured by or for TI ("TI Devices"). No hardware patent is licensed hereunder.
Redistributions must preserve existing copyright notices and reproduce this license (including the above copyright notice and the disclaimer and (if applicable) source code license limitations below) in the documentation and/or other materials provided with the distribution.
Redistribution and use in binary form, without modification, are permitted provided that the following conditions are met:
- No reverse engineering, decompilation, or disassembly of this software is permitted with respect to any software provided in binary form.
— Any redistribution and use are licensed by TI for use only with TI Devices. - Nothing shall obligate TI to provide you with source code for the software licensed and provided to you in object code.
If software source code is provided to you, modification and redistribution of the source code are permitted provided that the following conditions are met:
— Any redistribution and use of the source code, including any resulting derivative works, are licensed by TI for use only with TI Devices.
- Any redistribution and use of any object code compiled from the source code and any resulting derivative works, are licensed by TI for use only with TI Devices.
— Neither the name of Texas Instruments Incorporated nor the names of its suppliers may be used to endorse or promote products derived from this software without specific prior written permission.
DISCLAIMER.
THIS SOFTWARE IS PROVIDED BY TI AND TI'S LICENSORS "AS IS" AND ANY EXPRESS OR IMPLIED WARRANTIES, INCLUDING, BUT NOT LIMITED TO, THE IMPLIED WARRANTIES OF MERCHANTABILITY AND FITNESS FOR A PARTICULAR PURPOSE ARE DISCLAIMED. IN NO EVENT SHALL TI AND TI'S LICENSORS BE LIABLE FOR ANY DIRECT, INDIRECT, INCIDENTAL, SPECIAL, EXEMPLARY, OR CONSEQUENTIAL DAMAGES (INCLUDING, BUT NOT LIMITED TO, PROCUREMENT OF SUBSTITUTE GOODS OR SERVICES; LOSS OF USE, DATA, OR PROFITS; OR BUSINESS INTERRUPTION) HOWEVER CAUSED AND ON ANY THEORY OF LIABILITY, WHETHER IN CONTRACT, STRICT LIABILITY, OR TORT (INCLUDING NEGLIGENCE OR OTHERWISE) ARISING IN ANY WAY OUT OF THE USE OF THIS SOFTWARE, EVEN IF ADVISED OF THE POSSIBILITY OF SUCH DAMAGE.
Generic License Text
Apache License 2.0
Apache License Version 2.0, January 2004
http://www.apache.org/licenses/
TERMS AND CONDITIONS FOR USE, REPRODUCTION, AND DISTRIBUTION
Definitions.
"License" shall mean the terms and conditions for use, reproduction, and distribution as defined by Sections 1 through 9 of this document.
"Licensor" shall mean the copyright owner or entity authorized by the copyright owner that is granting the License.
"Legal Entity" shall mean the union of the acting entity and all other entities that control, are controlled by, or are under common control with that entity. For the purposes of this definition, "control" means (i) the power, direct or indirect, to cause the direction or management of such entity, whether by contract or otherwise, or (ii) ownership of fifty percent (50%) or more of the outstanding shares, or (iii) beneficial ownership of such entity.
"You" (or "Your") shall mean an individual or Legal Entity exercising permissions granted by this License.
"Source" form shall mean the preferred form for making modifications, including but not limited to software source code, documentation source, and configuration files.
"Object" form shall mean any form resulting from mechanical transformation or translation of a Source form, including but not limited to
Licenses
compiled object code, generated documentation, and conversions to other media types.
"Work" shall mean the work of authorship, whether in Source or Object form, made available under the License, as indicated by a copyright notice that is included in or attached to the work (an example is provided in the Appendix below).
"Derivative Works" shall mean any work, whether in Source or Object form, that is based on (or derived from) the Work and for which the editorial revisions, annotations, elaborations, or other modifications represent, as a whole, an original work of authorship. For the purposes of this License, Derivative Works shall not include works that remain separable from, or merely link (or bind by name) to the interfaces of, the Work and Derivative Works thereof.
"Contribution" shall mean any work of authorship, including the original version of the Work and any modifications or additions to that Work or Derivative Works thereof, that is intentionally submitted to Licensor for inclusion in the Work by the copyright owner or by an individual or Legal Entity authorized to submit on behalf of the copyright owner. For the purposes of this definition, "submitted" means any form of electronic, verbal, or written communication sent to the Licensor or its representatives, including but not limited to communication on electronic mailing lists, source code control systems, and issue tracking systems that are managed by, or on behalf of, the Licensor for the purpose of discussing and improving the Work, but excluding communication that is conspicuously marked or otherwise designated in writing by the copyright owner as "Not a Contribution."
"Contributor" shall mean Licensor and any individual or Legal Entity on behalf of whom a Contribution has been received by Licensor and subsequently incorporated within the Work.
Grant of Copyright License. Subject to the terms and conditions of this License, each Contributor hereby grants to You a perpetual, worldwide, non-exclusive, no-charge, royalty-free, irrevocable copyright license to reproduce, prepare Derivative Works of, publicly display, publicly perform, sublicense, and distribute the Work and such Derivative Works in Source or Object form.
Grant of Patent License. Subject to the terms and conditions of this License, each Contributor hereby grants to You a perpetual, worldwide, non-exclusive, no-charge, royalty-free, irrevocable (except as stated in this section) patent license to make, have made, use, offer to sell, sell, import, and otherwise transfer the Work,
where such license applies only to those patent claims licensable by such Contributor that are necessarily infringed by their Contribution(s) alone or by combination of their Contribution(s) with the Work to which such Contribution(s) was submitted. If You institute patent litigation against any entity (including a cross-claim or counterclaim in a lawsuit) alleging that the Work or a Contribution incorporated within the Work constitutes direct or contributory patent infringement, then any patent licenses granted to You under this License for that Work shall terminate as of the date such litigation is filed.
Redistribution. You may reproduce and distribute copies of the Work or Derivative Works thereof in any medium, with or without modifications, and in Source or Object form, provided that You meet the following conditions:
a. You must give any other recipients of the Work or Derivative Works a copy of this License; and
b. You must cause any modified files to carry prominent notices stating that You changed the files; and
c. You must retain, in the Source form of any Derivative Works that You distribute, all copyright, patent, trademark, and attribution notices from the Source form of the Work, excluding those notices that do not pertain to any part of the Derivative Works; and
d. If the Work includes a "NOTICE" text file as part of its distribution, then any Derivative Works that You distribute must include a readable copy of the attribution notices contained within such NOTICE file, excluding those notices that do not pertain to any part of the Derivative Works, in at least one of the following places: within a NOTICE text file distributed as part of the Derivative Works; within the Source form or documentation, if provided along with the Derivative Works; or, within a display generated by the Derivative Works, if and wherever such third-party notices normally appear. The contents of the NOTICE file are for informational purposes only and do not modify the License. You may add Your own attribution notices within Derivative Works that You distribute, alongside or as an addendum to the NOTICE text from the Work, provided that such additional attribution notices cannot be construed as modifying the License.
You may add Your own copyright statement to Your modifications and may provide additional
Licenses
or different license terms and conditions for use, reproduction, or distribution of Your modifications, or for any such Derivative Works as a whole, provided Your use, reproduction, and distribution of the Work otherwise complies with the conditions stated in this License.
Submission of Contributions. Unless You explicitly state otherwise, any Contribution intentionally submitted for inclusion in the Work by You to the Licensor shall be under the terms and conditions of this License, without any additional terms or conditions. Notwithstanding the above, nothing herein shall supersede or modify the terms of any separate license agreement you may have executed with Licensor regarding such Contributions.
Trademarks. This License does not grant permission to use the trade names, trademarks, service marks, or product names of the Licensor, except as required for reasonable and customary use in describing the origin of the Work and reproducing the content of the NOTICE file.
Disclaimer of Warranty. Unless required by applicable law or agreed to in writing, Licensor provides the Work (and each Contributor provides its Contributions) on an "AS IS" BASIS, WITHOUT WARRANTIES OR CONDITIONS OF ANY KIND, either express or implied, including, without limitation, any warranties or conditions of TITLE, NON-INFRINGEMENT, MERCHANTABILITY, or FITNESS FOR A PARTICULAR PURPOSE. You are solely responsible for determining the appropriateness of using or redistributing the Work and assume any risks associated with Your exercise of permissions under this License.
Limitation of Liability. In no event and under no legal theory, whether in tort (including negligence), contract, or otherwise, unless required by applicable law (such as deliberate and grossly negligent acts) or agreed to in writing, shall any Contributor be liable to You for damages, including any direct, indirect, special, incidental, or consequential damages of any character arising as a result of this License or out of the use or inability to use the Work (including but not limited to damages for loss of goodwill, work stoppage, computer failure or malfunction, or any and all other commercial damages or losses), even if such Contributor has been advised of the possibility of such damages.
Accepting Warranty or Additional Liability. While redistributing the Work or Derivative Works thereof, You may choose to offer, and charge a fee for, acceptance of support, warranty, indemnity, or other liability obligations and/or rights consistent with this License. However, in accepting such obligations, You may act only on Your own behalf and on Your sole responsibility, not on behalf of any other Contributor, and only if You agree to indemnify, defend, and hold each Contributor harmless for any liability incurred by, or claims asserted against, such Contributor by reason of your accepting any such warranty or additional liability.
END OF TERMS AND CONDITIONS
Warranty Disclaimer
This product contains Open Source Software components which underly Open Source Software Licenses. Please note that Open Source Licenses contain disclaimer clauses. The text of the Open Source Licenses that apply are included in this manual under "Licenses".
LIMITED WARRANTY
For details on the terms of the limited warranty for this product, go to https://rb-pt.io/PowerToolWarranty or call 1-877-BOSCH99.
GARANTIE LIMITÉE
© Robert Bosch Tool Corporation
1800 W. Central Road
Mt. Prospect, IL 60056-2230
1605A002T1 08/2024