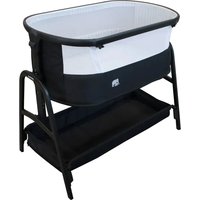
Dreamy - Baby bed Deryan - Free user manual and instructions
Find the device manual for free Dreamy Deryan in PDF.


User questions about Dreamy Deryan
0 question about this device. Answer the ones you know or ask your own.
Ask a new question about this device
Download the instructions for your Baby bed in PDF format for free! Find your manual Dreamy - Deryan and take your electronic device back in hand. On this page are published all the documents necessary for the use of your device. Dreamy by Deryan.
USER MANUAL Dreamy Deryan
natural_image
Line drawing of a portable bathtub with adjustable arms and legs (no text or symbols)Dreamy Co-Sleeper
User manual
Important: Read the following instructions carefully before use and keep them for future reference.
Cleaning & maintenance (EN) 11
Height adjustment 20
Co-sleeper (fixed to bed) 22
Disassembly 25
Detaching crib from adult bed 26
Company info 27
WARNINGS
- IMPORTANT - RETAIN FOR FUTURE REFERENCE - READ CAREFULLY.
- BEFORE USE, REMOVE AND DISPOSE OF ALL PLASTIC BAGS AND PACKAGING MATERIALS AND KEEP THEM OUT OF REACH OF CHILDREN.
- This product is intended for use for babies aged between 0 and 6 months, weighing up to a maximum of 9 kg.
- The crib is not suitable for children who can sit or kneel or pull themselves up.
- The product shall not be used before reading the instructions for use.
- Do not use the product if any part is broken, torn or missing.
- Be aware of the risk of open fires and other sources of strong heat, such as electric bar fires, gas fires etc.
- Before assembly, check that the product and all of its components have not been damaged during transportation. Should any part be damaged do not use and keep out of reach of children.
• Make sure the users of this product are knowledgeable on its proper operation. - The product is ready for use only when all locking mechanisms are engaged. Check carefully that these are engaged before use.
- When the child is left unattended in the product, in "crib mode", always make sure that the side rail is raised and the zips are completely closed.
- All opening, adjusting, anchoring and positioning operations of the product must be carried out exclusively by an adult.
- Before use in "co-sleeping mode" (fixed to bed) make sure the product is properly anchored and positioned.
- When the product is used in "co-sleeping mode" (fixed to bed), before laying the child in it, make sure that the fastening belt is hooked and tensioned properly, the product must be secured to the adult bed and no gaps between the product and the adult bed/mattress must be present.
- The product must always be placed on a horizontal surface. Never leave the product on an inclined surface with the child inside of it.
• Children must not be permitted to play without supervision near the product. - Do not use the product without the frame.
- Keep the fastening belt away from the reach of children.
- Only use the mattress supplied by the manufacturer.
- The thickness of the mattress must be such that the vertical height (upper surface of the mattress until the upper edge of the product's sides) is at least 200mm.
- Do not use more than one mattress in the product.
- The reference mark on the product's interior indicates the maximum thickness of the mattress that shall be used.
- Do not leave any object inside the product that could reduce its depth.
- Do not position the product near walls and obstacles to prevent trapping hazards.
- Do not leave small objects inside the product to prevent choking hazards.
WARNINGS
- Use only spare parts approved by the manufacturer. Do not apply accessories to the product, which are not supplied by the manufacturer.
- Do not adjust the product with the child inside.
- Do not move the product with the child inside.
- Do not use the product for more than one child at a time.
- The product must be kept away from electric cables and cords: do not place the product near windows where cords, curtains or similar objects could pose choking or strangling hazards for the child.
- To avoid strangling hazards, do not give to your child or place near her/him, objects equipped with cords.
- All assembly fittings should be tightened properly and care should be taken to ensure no screws are loose, as a child could trap parts of the body or clothing e.g. strings, necklaces, ribbons etc. which could pose a risk of strangulation.
- A prolonged exposure to the sun may cause changes of tones to the product's colour. After a prolonged exposure of the product to high temperatures, wait a few minutes prior to placing your child in it.
- When not in use, keep the product away from the reach of children. CO-SLEEPING MODE (FIXED TO BED)
- The side support of the crib should always be put close to the adult mattress and the mattress should always be aligned with the height of the side support for restraint of the crib. Furthermore, the crib should be firmly fixed to the structure of the adult bed or to the mattress support.
- WARNING! Check to make sure that the crib in the "co-sleeping mode" does not interfere with the adult bed.
- WARNING! Use the crib with the tube lowered, only in "co-sleeping mode" (fixed to bed).
The non-removable mattress cover may be spot cleaned only. The removable cover can be hand washed only using mild detergent or upholstery shampoo. NEVER use bleach. Air dry in shade thoroughly before reuse and avoid direct heat and sunlight. DO NOT iron. DO NOT dry clean.
Check the resistance of the fabric and the stitching after cleaning.
Wipe the frame using warm water and a mild detergent. NEVER use bleach. Never clean any part of the crib with abrasive, ammonia based, bleach based or spirit type cleaners.
Ensure the product is fully dry before use or storage.
Always ensure the crib is stored in a dry place to prevent mold or mildew developing.
Store away from any heat sources and not in the sun.
MAINTENANCE
Always check parts regularly for tightness of bolts, nuts and other fasteners - tighten or replace if required.
Check the strength of the fabric covers from time to time. Defective or worn parts must be replaced; as should components which are broken, torn, defective or worn out.
Use only parts and accessories approved by the manufacturer.
Specifications:
Age suitability: Birth to approx. 6 months
Weight: 7.5 kgs
Weight limit: 9 kgs (19.8 lbs)
SCHOONMAKEN
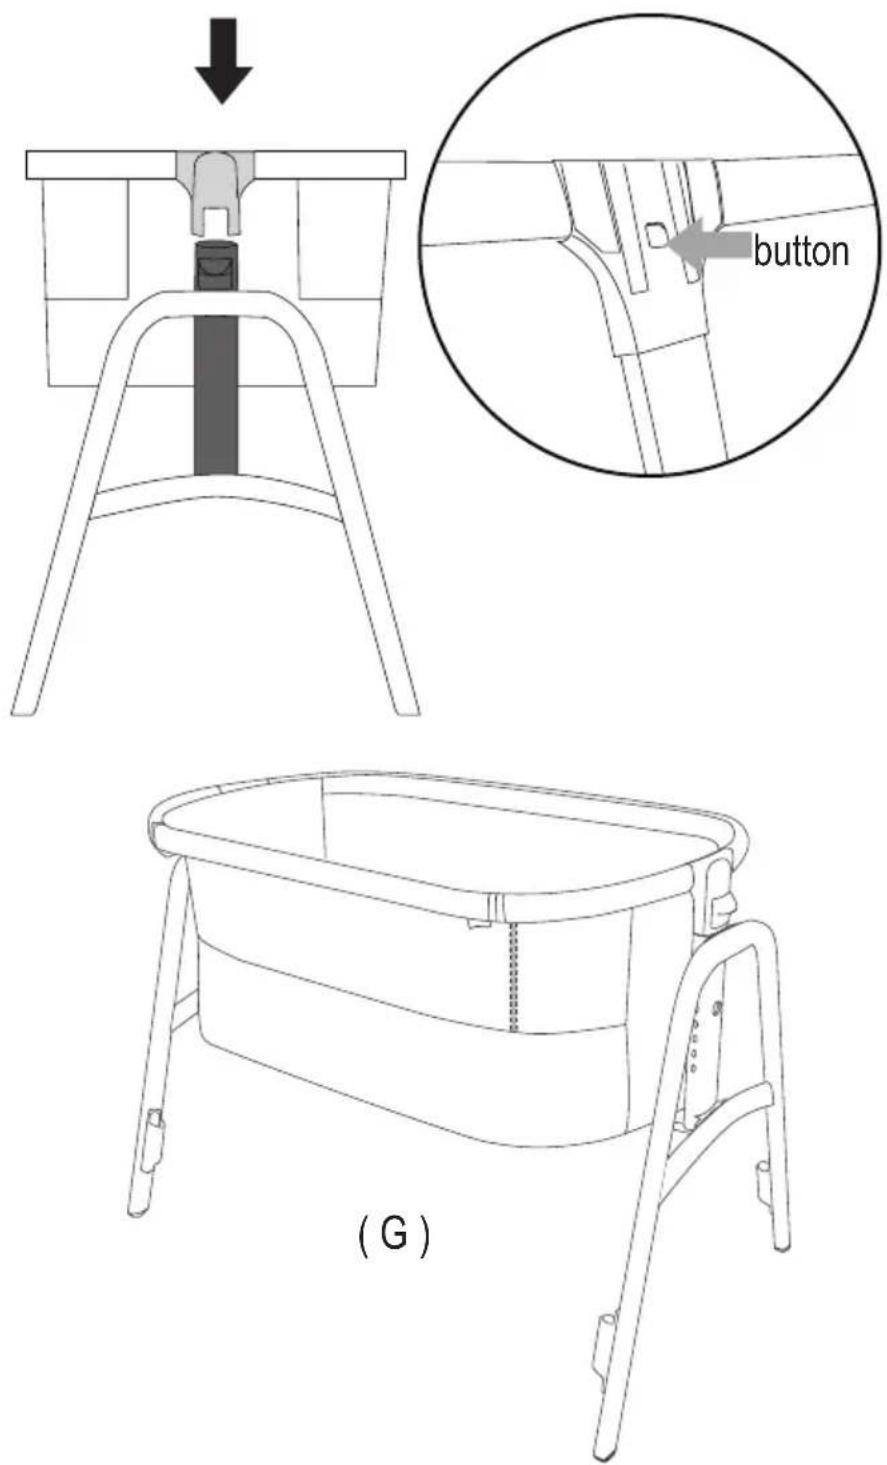
Step 1, Assembly the crib body A to two legs B.
Make sure the button on the inner side of the joint full come out.
WARNING! Check both ends of the crib are attached by pulling the crib body upwards.
ASSEMBLY
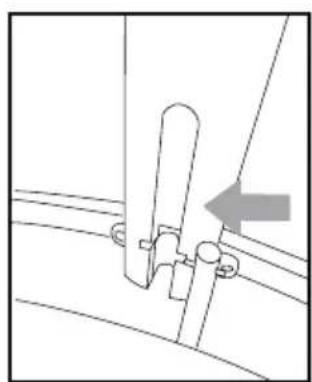
Step 2. Adjust the height to lowest position, assembly crib bottom flake to the legs. Aline the bottom flake with the lege and put the flake inside of the leg. Adn then push down the flake. Aseemby one side and the other side.
natural_image
Pure mechanical assembly diagram showing a lever and bracket without any text or symbols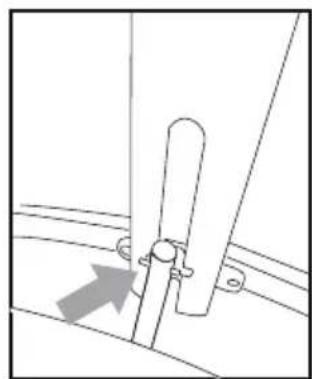
natural_image
Pure mechanical diagram showing a lever and pivot point without any text, numbers, or symbols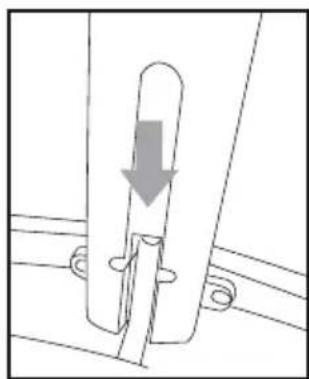
natural_image
Diagram of a mechanical component with a downward arrow indicating force or direction (no text or symbols)ASSEMBLY
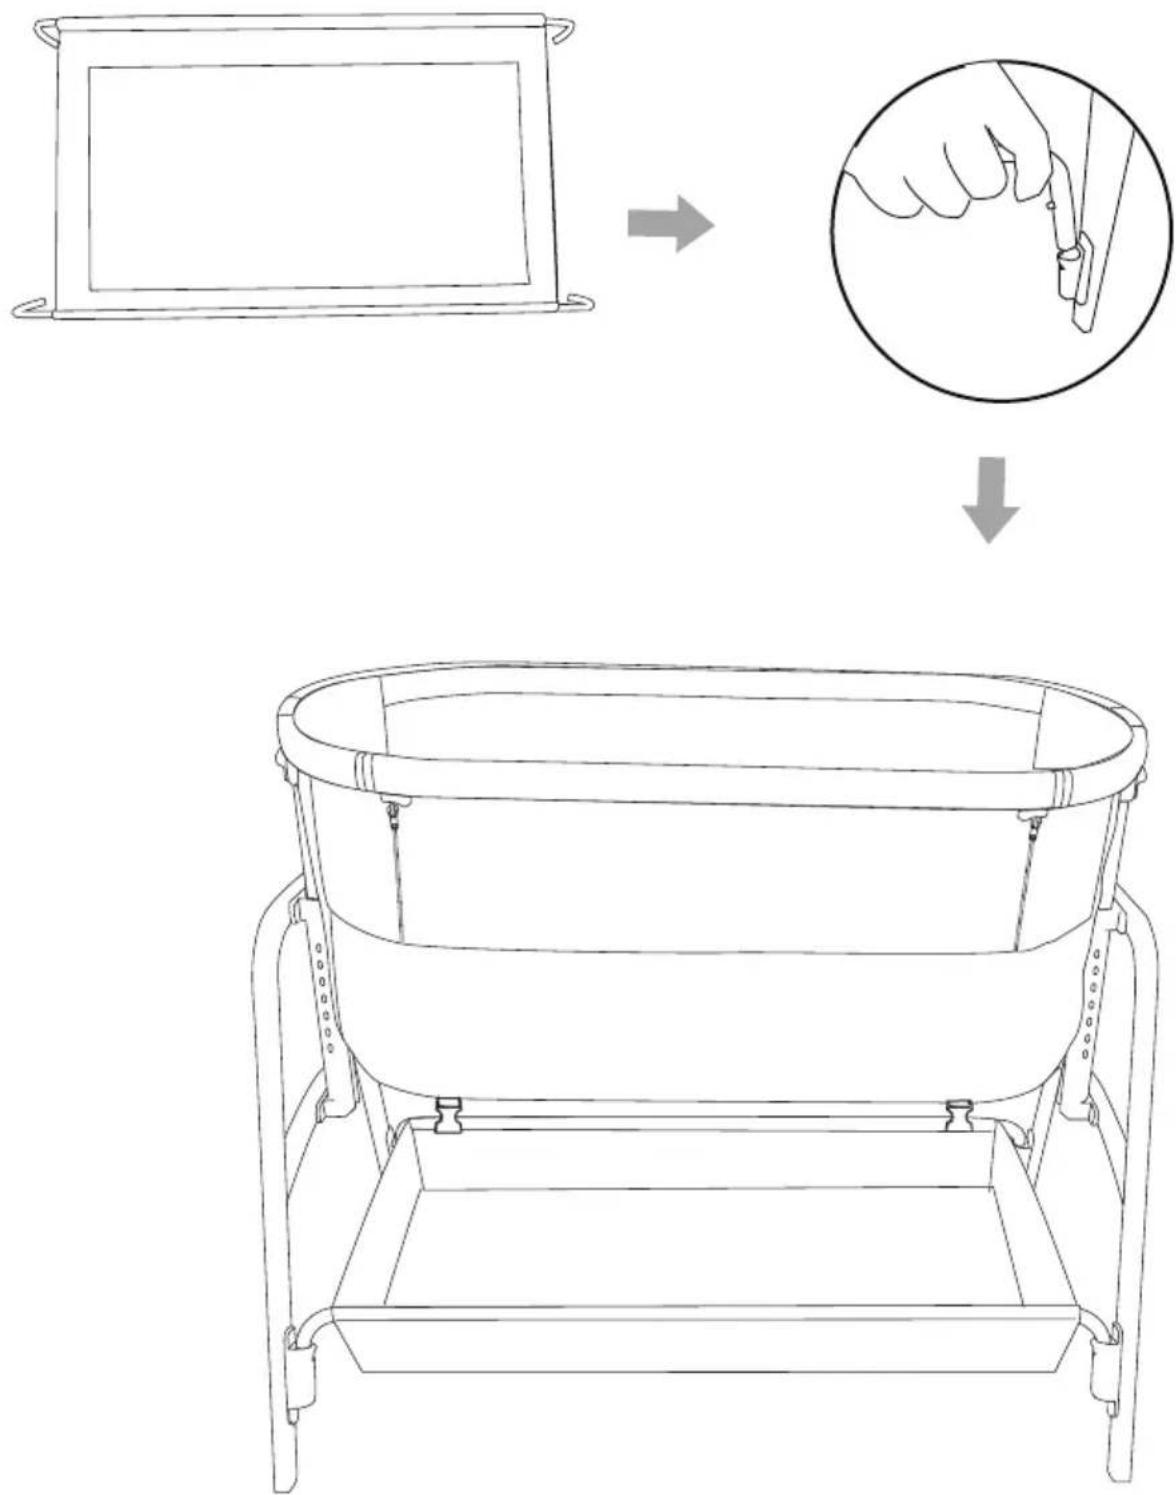
Step 3. Assembly the basket F to the frame G. Put the four ends of basket tubes to the legs, assembly one side, then the other side.
text_image
Diagram illustrating a step-by-step procedure for handling a basin, with an inset showing hand tool application.MOVING THE CRIB
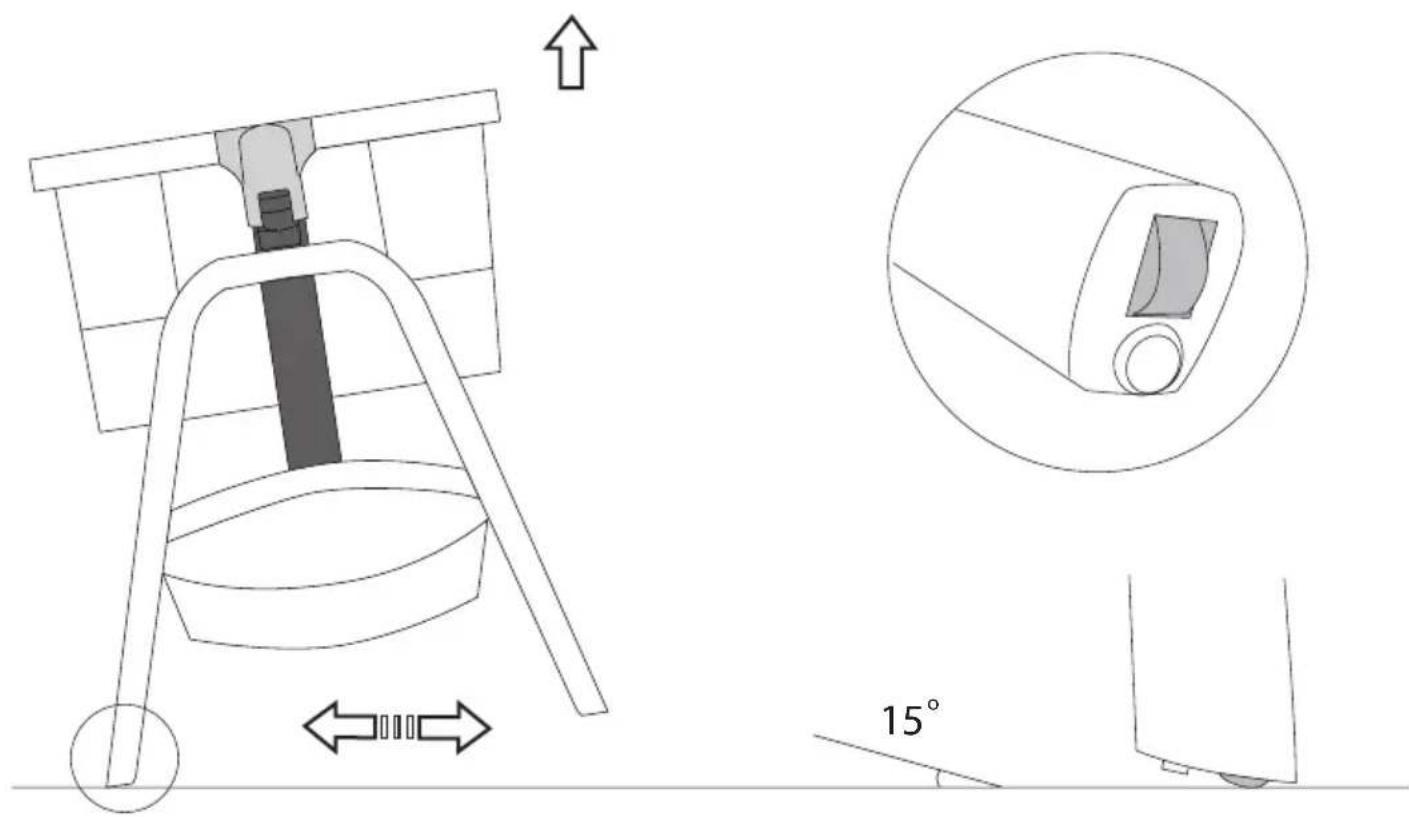
WARNING! NEVER move the crib whilst the child is in it.
Lift one end of the crib by about 15^ and move the crib as desired.
text_image
Technical diagram showing a mechanical device with directional arrows and a 15° angle标注, including a close-up of the component.Step 1. Squeeze the height adjustment buttons at each end of the crib body and raise the crib to one of the seven height settings.
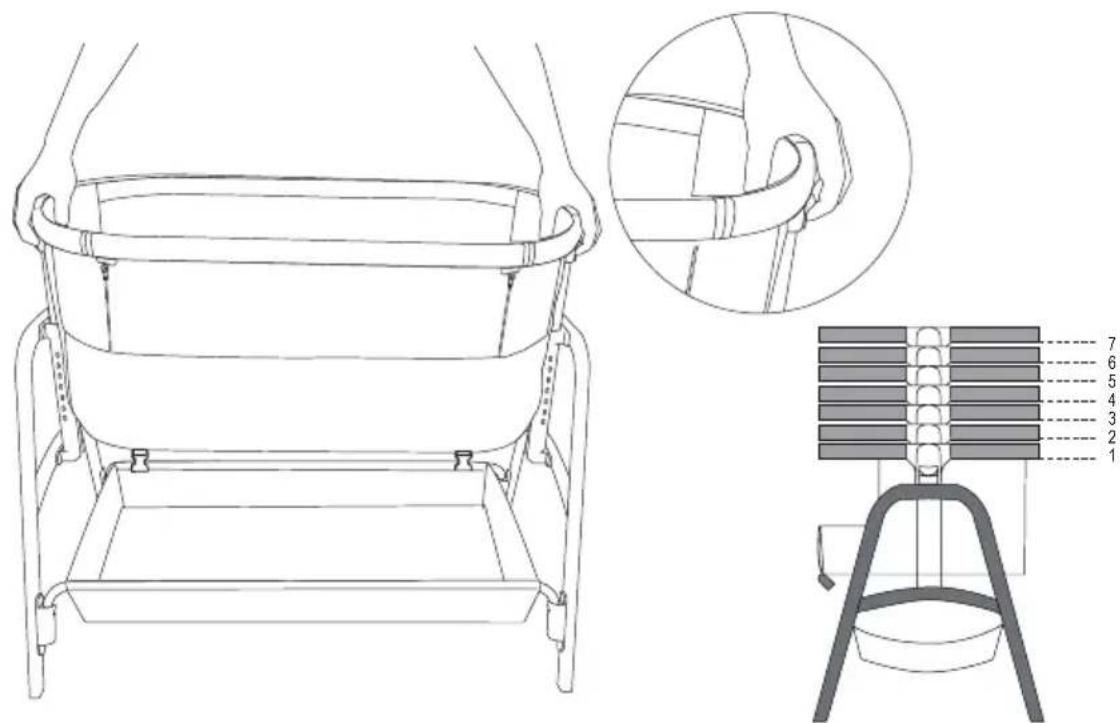
natural_image
Technical line drawing of a mechanical device with a top view and side view showing internal components (no text or symbols)Step 2. If needed, raise the head end higher to help with congestion and reflux.
WARNING! The height difference between the head end and foot end should
NEVER be more than two height level.
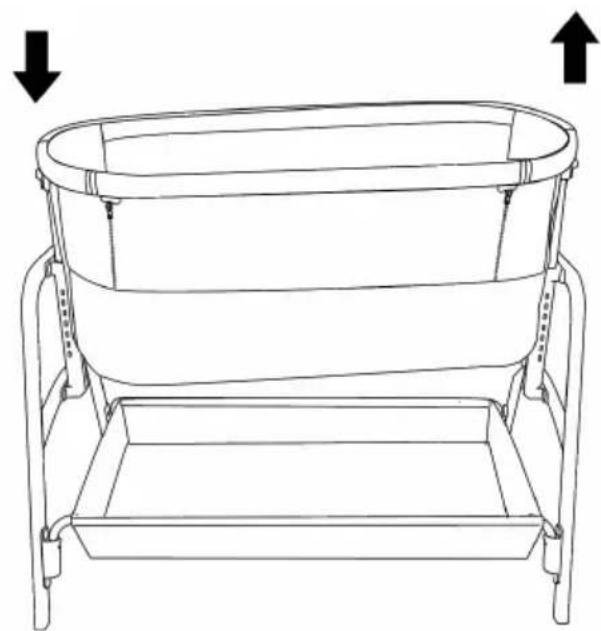
natural_image
Line drawing of a cylindrical basin with two side supports and directional arrows indicating top and bottom (no text or symbols)Measure Bed Height & Crib Height Setup
- Measure bed height
- Adjust crib to correct level by pulling up on the hand-held button
- Ensure the crib side wall closest to the bed is not higher than the mattress
- Ensure the crib is horizontal so both numbers on the arms are the same and the crib is not in incline mode
WARNING: To avoid death from the infant's neck being caught on the top rail on the side that is next to the adult bed, the top rail must be no higher than the adult mattress.
ALWAYS raise the side when not fastened to the adult bed.
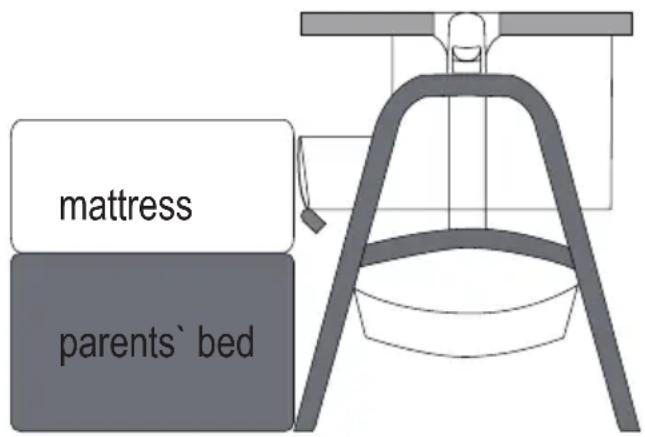
text_image
mattress parents' bedRecommended Ground To Mattress Height
L7 - 63,5+ cm
L6 - 61 cm
L5 - 58 cm
L4 - 56,5 cm
L3 - 54,6 cm
L2 - 52,7 cm
L1 - 50,8 cm
If your mattress is below 50,8 cm do not use product as the mattress must be at least 2,54 cm higher than the side opening.
CO-SLEEPER (FIXED TO BED)
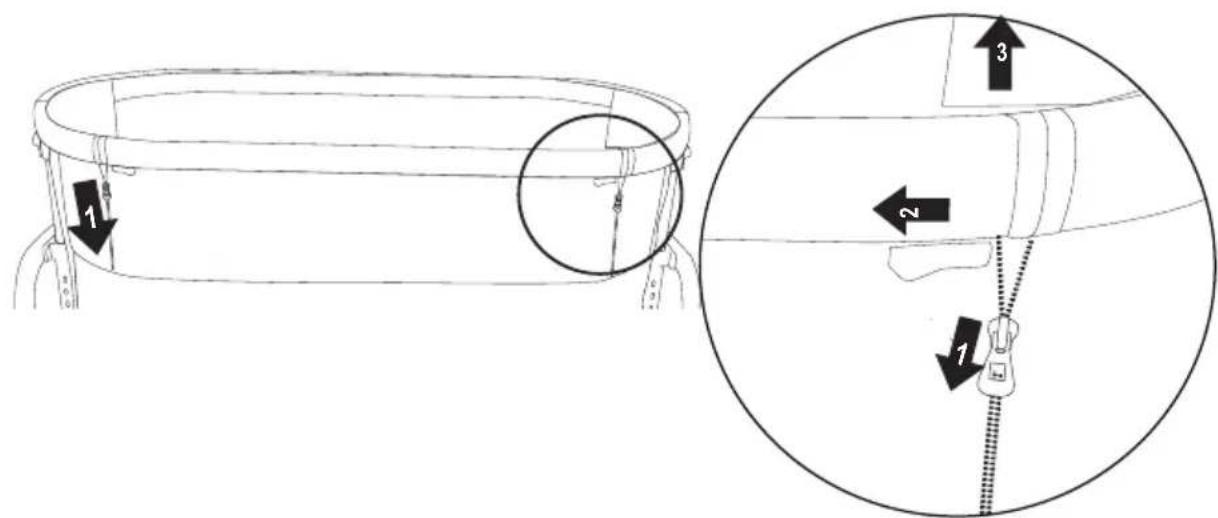
Step 1a. To lower the drop side: RFully unzip both zips.
Holding the side rail slide the buttons on the underside of the rail and lift the rail upwards. The drop side can be attached by Velcro® to the underside of the crib.
Step 1b. To raise the drop side: Lift the side rail and slide it into place ensuring it 'clicks' into position. Finally zip up the sides.
WARNING! If the child is left alone in the crib, always make sure that the drop side is raised.
text_image
Technical diagram showing a mechanical component with labeled parts and a magnified detail view highlighting internal features.Step 2. Attach the two clips on the "co-sleeper" belt (D) as the arrow show to the two buckles on the underside of the crib.

text_image
Technical diagram showing a mechanical device with a zoomed-in view of its internal components and directional arrows indicating motion.CO-SLEEPER (FIXED TO BED)
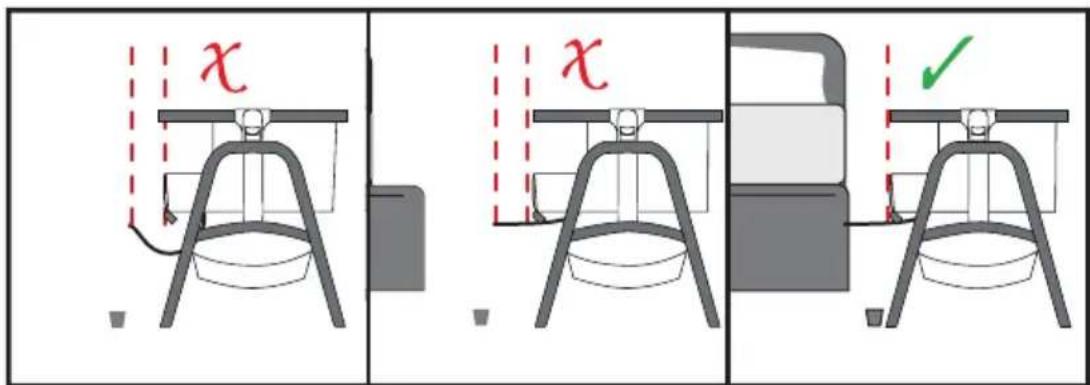
Step 3. Place the crib alongside the adult bed and with the drop side lowered, adjust the crib height until the top edge of the cribs lowest side is level or below the adult mattress.
WARNING! To avoid death from the infant's neck being caught on the top edge on the side that is next to the adult bed, the top edge next to the adult mattress MUST BE NO HIGHER than the adult mattress.
WARNING! Always raise the drop side when not fastened to an adult bed.

text_image
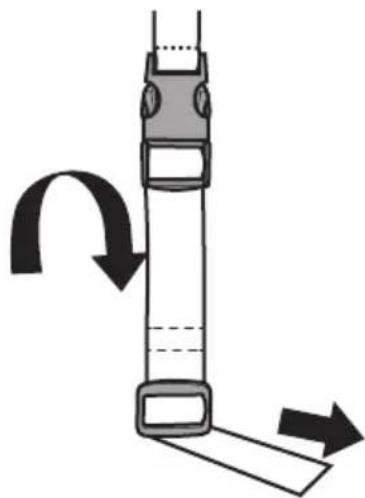
Technical diagram showing two views of a mechanical component with checkmark indicators and dimension annotation 'x'Step 4. Wrap the "co-sleeper" belt to the rail of hte adult's bed at side which next
to the baby crib or use the belt wrap the whole frame of the adult's bed.
Step 5. Tighten the "co-sleeper" belt ensuring there is no gap between the adult
bed and the bedside crib.
NOTE. Check tightness of the "co-sleeper" belt by pulling the bedside crib
away
from the adult bed.
natural_image
Diagram of a mechanical device with rotational arrow indicating motion (no text or symbols)WARNING! Entrapment hazard - to prevent death from entrapment, the bedside crib must be properly secured to the adult bed using the "co-sleeper" belt.
WARNING! There must be no more than 13mm gap between the bedside crib and the adult bed.
WARNING! if gap exceeds 13mm DO NOT use the product. DO NOT fill the gap with pillows, blankets or other items that are suffocation hazards.
WARNING! Both clips on the attachment strap MUST be attached to the crib when in co-sleeper mode. If one clip is broken or will not attach to the crib - DO NOT use the crib in co-sleeper mode until you have replaced the "co-sleeper" belt.
text_image
x x ✓DISASSEMBLY
Step 1. Remove the mattress from the crib. Squeeze the height adjustment buttons
at each end of the crib body
Step 2. Remove basket (O).
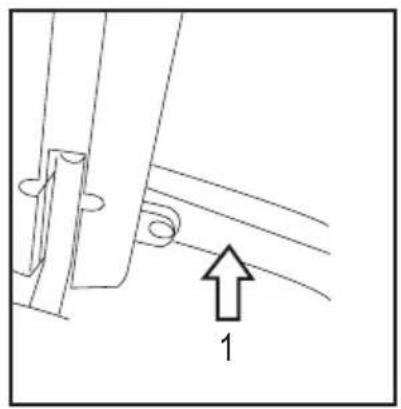
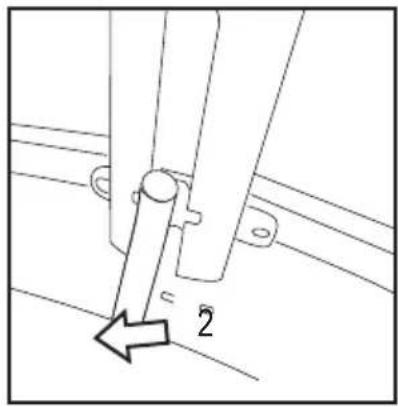
Step 3. Release the bottom flake (L) from the legs.
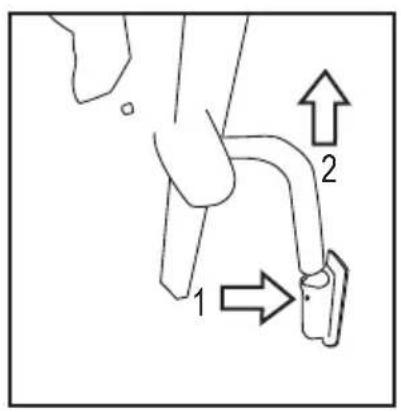
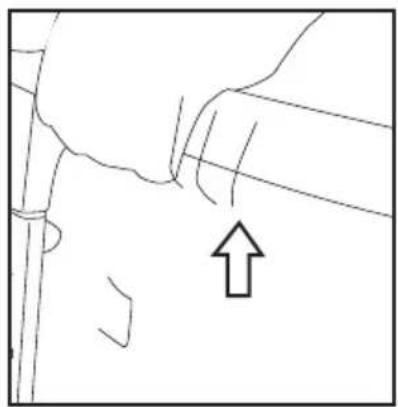
Step 4. Press on the button at the inner side of the side joint of the crib (M), and
at the same time raise the crib body(N). Release one side then the other side.
text_image
1 2(0)
natural_image
Technical line drawing of a mechanical bracket with an arrow indicating direction (no text or symbols)(L)
natural_image
Technical line drawing of a mechanical assembly with a directional arrow and label '2' (no text or symbols beyond basic lines)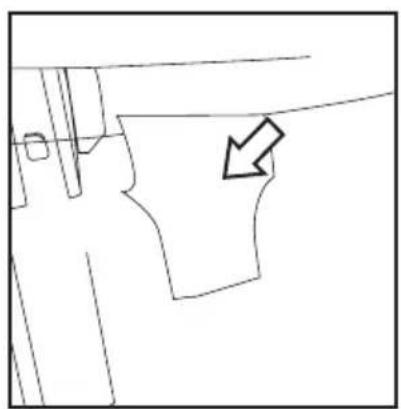
natural_image
Pure technical line drawing of a mechanical part with an arrow indicating direction (no text or symbols)(M)
natural_image
Simple line drawing of a hand holding a tool, with an arrow pointing upward (no text or symbols)(N)
WARNING! In "co-sleeping mode" the 2 legs of the crib should always be adjusted to the same height.
WARNING! Before every use always check to make sure that there is no space between the adult mattress and the side of the crib. On a regular basis check the condition of the product and the presence of any possible damage. In the case of damage do not use it and keep it out of reach of children.
This product conforms to EN 1130:2019 and EN16890:2017&LC:2017
WARNING! NEVER attempt to detach the crib from an adult bed whilst the child is in the crib.
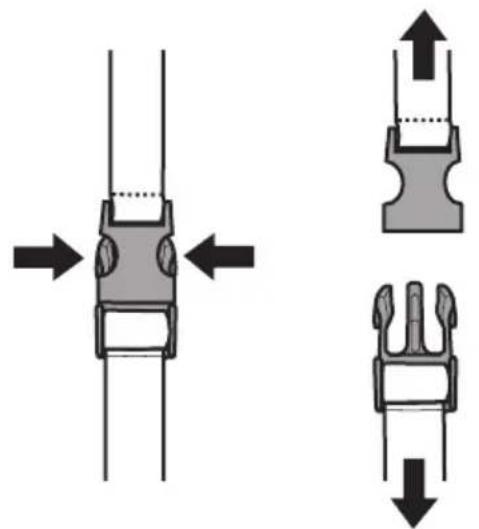
Step 1. Unfasten the "co-sleeper" belt from the two buckles on the underside of the crib.
NOTE. You can leave the "co-sleeper" belt under the adult mattress if you prefer not to keep feeding it under the adult mattress each time you come to attach the crib.
natural_image
Technical diagram showing two mechanical component assemblies with directional arrows indicating movement (no text or symbols)Step 2. Lift the side rail, slide it in to place ensuring it 'clicks' into position.
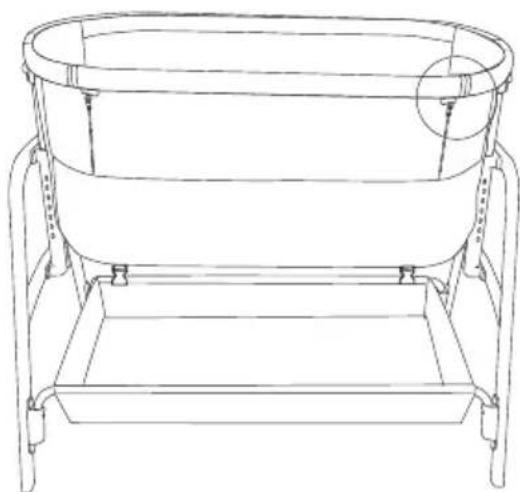
natural_image
Line drawing of a cylindrical basin supported by metal supports (no text or symbols)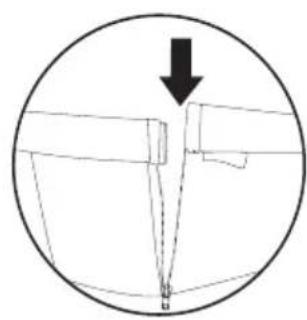
natural_image
Simple line drawing of a mechanical component with a downward arrow indicating force or direction (no text or symbols)Company address
DERYAN B.V.
Marithaime 8
6662 WD Elst
The Netherlands
Telephone
+31 481 351 070
team@deryan.com
Website
www.deryan.com