
GAS 18V-6LS Professional - Vacuum Cleaner BOSCH - Free user manual and instructions
Find the device manual for free GAS 18V-6LS Professional BOSCH in PDF.

| Product type | Cordless dry vacuum cleaner |
| Brand | Bosch |
| Model | GAS 18V-6LS Professional |
| Nominal voltage | 18 V |
| Rated power input | 350 W |
| Gross container capacity | 6 L |
| Net container capacity | 4,5 L |
| Suction hose length | 0,5 to 2,8 m |
| Maximum vacuum | 100 hPa |
| Airflow | 22 l/s (79 m³/h) |
| Runtime (position I) | ~3,5 min/Ah |
| Runtime (position II) | ~2,5 min/Ah |
| Filter class | L (harmful dust with OEL > 1 mg/m³) |
| Weight (without battery) | 2,9 kg |
| Compatible batteries | GBA 18V…, ProCORE18V…, EXPERT18V…, EXBA18V…, CORE18V… |
| Recommended battery for optimal performance | ProCORE18V… ≥ 8 Ah |
| Recommended chargers | GAL 18…, GAL 36…, GAL 12V/18…, GAX 18…, EXAL18… |
| Functions | Suction and blowing, manual filter cleaning, two power levels |
| Supplied accessories | Suction hose, elbow, combination adapter, tubes, floor nozzle, crevice nozzle, non-woven filter bag, shoulder strap |
| Filter maintenance | Manual air pulse cleaning, washable with water if necessary |
| Warranty | Consult Bosch after-sales service |
Frequently Asked Questions - GAS 18V-6LS Professional BOSCH
User questions about GAS 18V-6LS Professional BOSCH
0 question about this device. Answer the ones you know or ask your own.
Ask a new question about this device
Download the instructions for your Vacuum Cleaner in PDF format for free! Find your manual GAS 18V-6LS Professional - BOSCH and take your electronic device back in hand. On this page are published all the documents necessary for the use of your device. GAS 18V-6LS Professional by BOSCH.
USER MANUAL GAS 18V-6LS Professional BOSCH
natural_image
3D rendering of a vacuum cleaner with visible spray bottle and control panel (no text or symbols)English ...... Page 13
Français......Page 20

6

Deutsch
Safety instructions for dust extractors

Read all the safety information and instructions. Failure to observe the safety information and follow instructions may result in electric shock, fire and/or serious injury.
Save all warnings and instructions for future reference.
This dust extractor is not intended for use by children or persons with physical, sensory or mental impairments. It should not be used by persons who have insufficient experience and knowledge. Otherwise, there is a risk of operating errors and injuries.
▶ Supervise children. This will ensure that children do not play with the dust extractor.
▶ Comply with all safety provisions for the substances being extracted.
▶ Do not vacuum beech or oak wood dust or asbestos. Only vacuum rock dust in conjunction with dust extraction systems, which have been explicitly approved for use with GAS18V-6LS by Bosch. These substances are classified as carcinogenic.
▶ Only vacuum rock dust with the power tool and dust extraction system combination explicitly identified, for which it has been proven that the legal thresholds
14 | English
are not exceeded. You can find the evidence at www.bosch-professional.com/dust/.
WARNING
Only use the dust extractor if you have been adequately informed
about the use of the equipment, the substances to be vacuumed and how to dispose of these safely. Thorough instruction on how to use the equipment prevents accidental misuse and injuries.
WARNING
The dust extractor is only suitable for vacuuming dry substances. The
penetration of liquids increases the risk of an electric shock.
▶ Do not use the dust extractor to vacuum hot, burning or explosive dust. Do not operate the dust extractor in areas subject to explosion hazards. Dust can easily ignite or explode.
NOTE: The dust extractor must only be stored indoors.
▶ Ensure that the workplace is well ventilated.
The dust extractor should be repaired exclusively by a qualified professional using only genuine spare parts. This will ensure that the safety of the dust extractor is maintained.
WARNING
The dust extractor contains dust particles that pose a risk to health.
Emptying and maintenance procedures, including the disposal of dust containers, should only be carried out by professionals. Suitable protective equipment is required. Do not operate the dust extractor unless the complete filter system is correctly inserted. Otherwise, you are putting your health at risk.
Before using the equipment for the first time, check that the vacuum hose is in perfect condition. Leave the vacuum hose fitted to the dust extractor while doing this so that no dust escapes accidentally. Otherwise, you may end up inhaling dust particles.
▶ Do not clean the dust extractor by spraying a jet of water directly at it. Water entering the top of the dust extractor will increase the risk of electric shock.
▶ Do not modify or open the battery. There is a risk of short-circuiting.
In case of damage and improper use of the battery, vapours may be emitted. The battery can set alight or explode. Ensure the area is well ventilated and seek medical attention should you experience any adverse effects. The vapours may irritate the respiratory system.
If used incorrectly or if the battery is damaged, flammable liquid may be ejected from the battery. Contact with this liquid should be avoided. If contact accidentally occurs, rinse off with water. If the liquid comes into contact with your eyes, seek additional medical attention. Liquid ejected from the battery may cause irritation or burns.
The battery can be damaged by pointed objects such as nails or screwdrivers or by force applied externally. An internal short circuit may occur, causing the battery to burn, smoke, explode or overheat.
When the battery is not in use, keep it away from paper clips, coins, keys, nails, screws or other small metal objects that could make a connection from one terminal to another. A short circuit between the battery terminals may cause burns or a fire.
▶ Only use the battery in the manufacturer's products. This is the only way in which you can protect the battery against dangerous overload.
▶ Only charge the batteries using chargers recommended by the manufacturer. A charger that is suitable for one type of battery may pose a fire risk when used with a different battery.

Protect the rechargeable battery against heat, e.g. including prolonged sun exposure, fire, water, and moisture. There is a risk of explosion and short circuit.
▶ Use the carrying strap only in conjunction with the dust extractor.
▶ Do not sit or stand on the dust extractor. The dust extractor may tip over and become damaged if you do this. This poses a risk of injury.
Symbols
The following symbols may provide you with important information pertaining to the use of your dust extractor. Please take note of these symbols and their meaning. Knowing what these symbols mean will help you to use your extractor more effectively and more safely.
Symbols and their meaning


WARNING! Read all the safety and general instructions. Failure to observe the safety and general instructions may result in electric shock, fire and/or serious injury.

Dust extractor from dust class L in accordance with IEC/EN 60335-2-69 for the dry extraction of harmful dusts with an exposure limit of >1 mg/m ^3
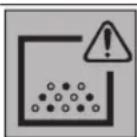
WARNING! The dust extractor contains dust particles that pose a risk to health. Emptying and maintenance procedures, including the disposal of dust containers, should only be carried out by professionals. Suitable protective equipment is required. Do not operate the dust extractor unless the complete filter system is correctly inserted. Otherwise, you are putting your health at risk.

Button for manual filter cleaning
Product Description and Specifications
Please observe the illustrations at the beginning of this operating manual.
Intended Use
The dust extractor is intended for collecting, vacuuming, conveying and separating non-flammable dry dusts. The dust extraction capability of the dust extractor has been tested and corresponds to dust class L. It is suitable for the increased demands of professional use, e.g. in trade, industry and workshops.
Dust extractors from dust class L in accordance with IEC/EN 60335-2-69 may only be used to vacuum and extract harmful dust with an exposure limit of >1 mg/m ^3 .
Only use the dust extractor if you can fully evaluate all functions and carry them out without restrictions, or if you have received corresponding instructions.
Product Features
The numbering of the product features refers to the representation of the dust extractor on the graphic pages.
(1) Hose adapter for vacuum hose
(2) Battery compartment cover
(3) Battery compartment cover release button
(4) On/off switch
(5) Carrying handle
(6) Hose adapter for blow-out hose
(7) Button for manual filter cleaning
(8) Top part of dust extractor
(9) Catch for top part of dust extractor
(10) Container
(11) Battery bay
(12) Rechargeable battery ^a)
(13) Battery release button ^a)
(14) Holder for accessories
(15) Vacuum hose
(16) Snap fastener
(17) Combi power tool adapter
(18) Curved nozzle
(19) Suction tube
(20) Crevice nozzle
(21) Floor nozzle
(22) Diffuser
(23) Blowing hose ^a)
(24) PowerTool adapter (front part)
(25) PowerTool adapter (rear part)
(26) Fleece filter bag
(27) Carrying strap
(28) Fastening eyes for carrying strap
(29) Filter
(30) Filter holder
a) This accessory is not part of the standard scope of delivery.
Technical data
| Cordless dry dust extractor GAS18V-6LS | ||
| Article number | 3 601 JK2 100 | |
| Voltage V 18 | ||
| Rated power input W 350 | ||
| Container volume | ||
| -gross I 6 | ||
| -net I 4.5 | ||
| Hose length m 0.5-2.8 | ||
| Dust extractor vacuum pres-sure ^A)(B) | hPa 100 | |
| Dust extractor flow rate ^A)(B) | I/s | 22 |
| m3/h | 79 | |
| Operating time per battery charge | ||
| -Power setting I | min/Ah 3.5 | |
| -Power setting II | min/Ah 2.5 | |
| Dust class L | ||
| Weight ^c) | kg 2.9 | |
| Recommended ambient tem-perature during charging | °C 0 to +35 | |
| Permitted ambient temperature during operation ^D) and during storage | °C -20 to +50 | |
| Compatible rechargeable bat-teries | GBA18V...GBA 18V...ProCORE18V...EXPERT18V...EXBA18V...CORE18V... | |
| Recommended rechargeable batteries for maximum perform-ance | ProCORE18V...≥ 8 Ah | |
| Recommended chargers GAL18... | GAL 18...GAL 36...GAL12V/18...GAL 12V/18...GAX 18...EXAL18... | |
A) Measured at 20–25 °C with rechargeable battery GBA 18V 8.0Ah
B) Measured with vacuum hose (15)
C) Without rechargeable battery (you can find the battery weight at www.bosch-professional.com.)
D) Limited performance at temperatures < 0 °C
Values can vary depending on the product, scope of application and environmental conditions. To find out more, visit www.bosch-professional.com/wac.
16 | English
Noise/Vibration Information
Noise emission values determined according to EN 60335-2-69.
Typically the A-weighted sound pressure level of the dust extractor is 71 dB(A). Uncertainty K = 2 dB. The noise level when working can exceed the volume stated. Wear hearing protection!
Vibration values a_h (continuous vibrations), p_F (repeated shock vibrations) and uncertainty K determined according to EN 60335-2-69:
$$ a _ {h} = 0. 2 \mathrm{m} / \mathrm{s} ^ {2} (K = 0. 5 \mathrm{m} / \mathrm{s} ^ {2}), p _ {F} = 6. 1 \mathrm{m} / \mathrm{s} ^ {2} (K = 0. 2 \mathrm{m} / \mathrm{s} ^ {2}) $$
Rechargeable battery
Bosch sells some cordless dust extractors without a rechargeable battery. You can tell whether a rechargeable battery is included with the dust extractor by looking at the packaging.
Charging the battery
▶ Use only the chargers listed in the technical data. Only these chargers are matched to the lithium-ion battery of your dust extractor.
Note: Lithium-ion rechargeable batteries are supplied partially charged according to international transport regulations. To ensure full rechargeable battery capacity, fully charge the rechargeable battery before using your tool for the first time.
Inserting and Removing the Battery (see figure A)
▶ Do not use force to insert the battery. The battery is designed in such a way that it can only be inserted into the dust extractor when it is in the right position.
▶ Keep the battery compartment and the battery bay clean and dry at all times to ensure good, safe operation.
- Slide the release button (3) in the direction of the arrow and open the battery compartment cover (2).
- Slide the battery (12) into the battery bay (11) until it audibly clicks into place.
- To remove the battery (12), press the release button (13) on the battery and pull it out of the battery bay (11).
- Close the battery compartment cover (2) so that you hear it click into place.
Battery charge indicator
If the rechargeable battery is removed from dust extractor, its state of charge may be indicated by the green LEDs of the battery charge indicator on the battery.
Press the button for the battery charge indicator or to show the state of charge.
If no LED lights up after pressing the button for the battery charge indicator, then the battery is defective and must be replaced.
Note: Not all battery types have a battery charge indicator.
Rechargeable battery type GBA 18V... | GBA18V...


LED Capacity
| 3× continuous green light 60–100 % |
| 2× continuous green light 30–60 % |
| 1× continuous green light 5–30 % |
| 1× flashing green light 0–5 % |
Battery model ProCORE18V... | EXPERT18V... | EXBA18V... | CORE18V...

LED Capacity
| 5 × continuous green light 80-100 % |
| 4 × continuous green light 60-80 % |
| 3 × continuous green light 40-60 % |
| 2 × continuous green light 20-40 % |
| 1 × continuous green light 5-20 % |
| 1 × flashing green light 0-5 % |
Battery defect risk detection
EXPERT18V... | EXBA18V...
In addition to the state of charge of the rechargeable battery, the LEDs on the battery charge indicator can also indicate the risk of a battery defect.
To activate the function, press and hold the button for the battery charge indicator for 3 seconds. The analysis of the battery is signalled by a moving light on the battery charge indicator. The result of is shown on the battery charge indicator.
1 LED: The rechargeable battery has a high defect risk. Performance and runtime may already be reduced. Replacing the rechargeable battery is recommended.
5 LEDs: The rechargeable battery is in good condition and has a low defect risk.
Please note: The rechargeable battery defect risk assessment works in a binary manner and offers a simplified status assessment, indicating either that the rechargeable battery is in good condition or that the rechargeable battery has an increased defect risk. A percentage of the battery status is not shown.
Recommendations for Optimal Handling of the Battery
Protect the battery against moisture and water.
Only store the battery within a temperature range of -20 to 50 °C. Do not leave the battery in your car in the summer, for example.
Occasionally clean the ventilation slots on the battery using a soft brush that is clean and dry.
A significantly reduced operating time after charging indicates that the battery has deteriorated and must be replaced. Follow the instructions on correct disposal.
Assembly
Remove the battery before cleaning or performing maintenance on the dust extractor, making tool adjustments, changing accessories or placing the dust extractor in storage. This safety measure prevents the dust extractor from being started accidentally.
Fitting the Bracket for Extractor Accessories (see figure B)
Place the holder (14) for the extractor accessories on the top part of the dust extractor and screw it on tight.
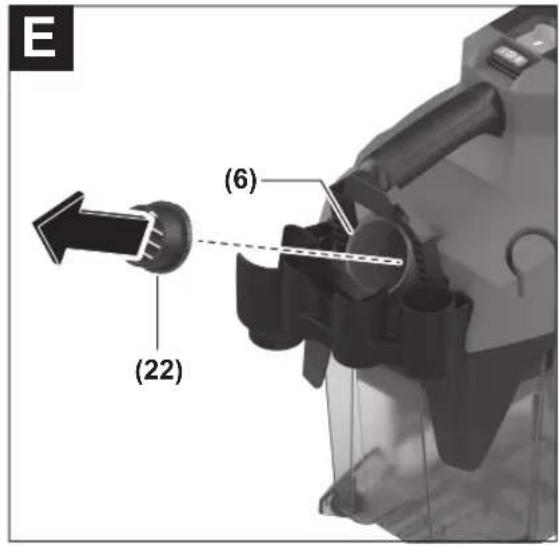
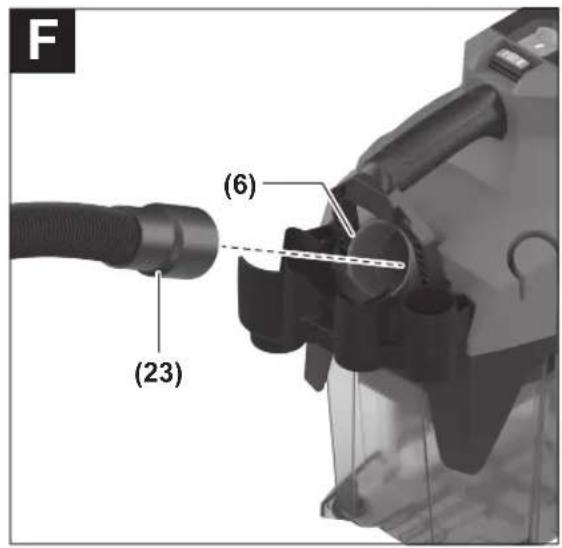
Fitting the Hose (see figures D-F)
Fit the appropriate hose depending on the application:
- To vacuum, insert the vacuum hose (15) all the way into the relevant hose adapter (1).
- To blow out air, remove the diffuser (22) and insert the blow-out hose (23) all the way into the relevant hose adapter (6). Insert the diffuser (22) back into the hose socket (6) when you remove the blow-out hose (23).
Note: Different connection sizes ensure that the vacuum hose (15) cannot be used for blowing out.
▶ Only use a clean blow-out hose for blowing out. Dust can be hazardous to health.
Fitting Extractor Accessories (see figures C and G)
The vacuum hose (15) is fitted with a clip system that can be used to connect the extractor accessories (combi power tool adapter (17), curved nozzle (18)).
Fitting the curved nozzle
- Push the curved nozzle (18) onto the vacuum hose (15) until you hear both snap fasteners (16) on the vacuum hose engage.
- To remove the adapter, press the snap fasteners (16) inwards and pull apart the components.
Fitting the Nozzles and Tubes
- If required, place the suction tubes (19) firmly inside one another and then attach them firmly to the curved nozzle (18).
- Attach the floor nozzle (21) or the crevice nozzle (20) firmly to the suction tube (19) or the curved nozzle (18).
Fitting the Combi Power Tool Adapter (see figure G)
The combi power tool adapter (17) consists of the PowerTool adapter (front part) (24) and the PowerTool adapter (rear part) (25).
Figure G shows the possible diameters of extraction nozzles that can be connected to the combi power tool adapter (17).
If necessary, place the PowerTool adapter (front part) (24) on the PowerTool adapter (rear part) (25) and lock it in place by turning it anticlockwise.
Depending on the required connection diameter, only fit the PowerTool adapter (rear part) (25) or the assembled combi power tool adapter (17) on the vacuum hose. Allow the two push buttons (16) of the vacuum hose in the PowerTool adapter (rear part) (25) to audibly click into place.
To separate the two adapter parts, turn the PowerTool adapter (front part) (24) clockwise and remove it.
To remove the combi power tool adapter (17) from the vacuum hose, push the push buttons (16) inwards and pull the combi power tool adapter out of the vacuum hose.
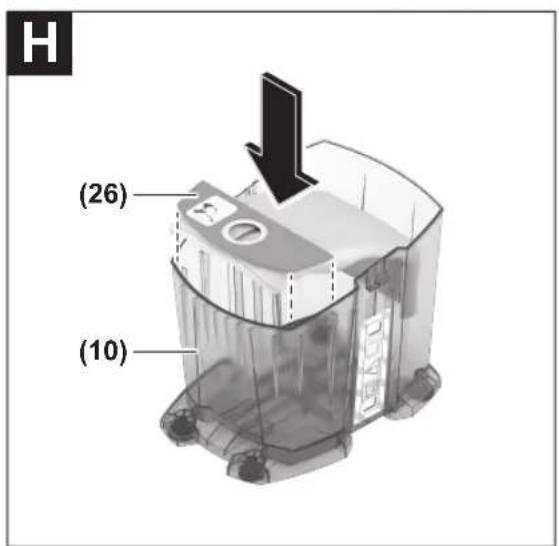
Inserting/Removing the Fleece Filter Bag (see figure H)
The use of a fleece filter bag (26) makes the dust easier to dispose of.
Open the catches (9) and remove the top part of the dust extractor (8).
Place the fleece filter bag (26) as shown in the figure into the holder on the container (10).
Hold the top part of the dust extractor (8) open and close both catches (9) until you hear them click into place.
Change a full fleece filter bag (26) in good time.
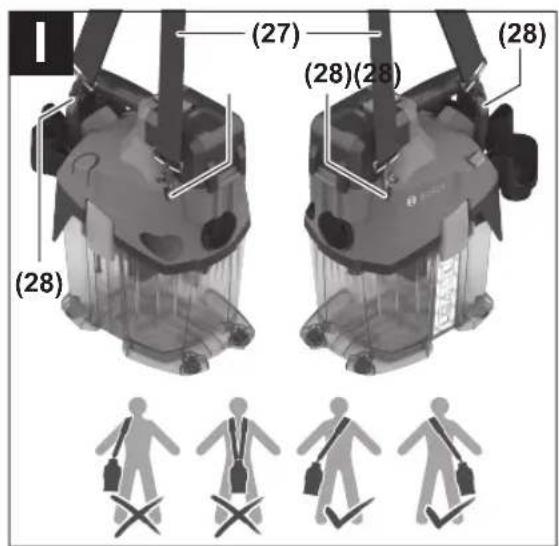
Attaching the carrying strap (see figure I)
The carrying strap is only intended for carrying and attaching the dust extractor!
You can attach the carrying strap (27) to the right or left of the dust extractor, depending on how you want to carry the extractor. Click the snap hooks of the carrying strap (27) into either the two right or two left fastening eyes (28) of the dust extractor.
Observe the correct carrying position shown in the figure I.
Operation
Remove the battery before cleaning or performing maintenance on the dust extractor, making tool adjustments, changing accessories or placing the dust extractor in storage. This safety measure prevents the dust extractor from being started accidentally.
Starting Operation
The dust extractor must not be used without a filter.
▶ Do not use damaged filters (e.g. no cracks, small holes, etc.). Replace any damaged filters immediately.
▶ Before extraction, ensure that the filter unit is securely fitted.
18 | English
▶ Before extraction, ensure that the battery compartment cover is securely closed.
▶ Please inform yourself about the applicable regulations/laws on how to handle harmful types of dust in your country.
The dust extractor may be used for vacuuming and extracting the following materials:
- Dusts with an exposure limit of >1mg / m^3
The dust extractor must categorically not be used in potentially explosive areas.
The use of a fleece filter bag (26) is recommended.
Switching On and Off
To switch on the dust extractor, press the on/off switch (4) depending on the required power setting:
- Press the on/off switch (4) for work with medium suction/blowing power and for a longer battery life in position I (e.g. for vacuuming smooth surfaces, vacuuming power tools with a low level of dust generation or for blowing clear dirty surfaces).
- Press the on/off switch (4) for work with high suction/ blowing power in position II (e.g. for vacuuming carpets or power tools with a high level of dust generation).
To switch off the dust extractor, press the on/off switch (4) to the centre position.
Extracting dust that accumulates from working power tools
There must be a sufficient air exchange rate in the room when the exhaust air comes back into the room. Be aware of the corresponding national regulations.
Push the curved nozzle (18) or the combi power tool adapter (17) onto the vacuum hose (15) until you hear it click into place.
Push the curved nozzle (18) or the combi power tool adapter (17) into or onto the extraction outlet of the power tool.
Manual Filter Cleaning
You should clean the filter at the latest when the suction power is no longer sufficient.
How often filter cleaning needs to be carried out will depend on the type and quantity of dust that has been extracted. With regular use, the maximum conveying capacity will be maintained for longer.
Switch on the dust extractor at power setting II. Hold either the hose adapter (1) of the vacuum hose or the hose adapter (6) of the blow-out hose closed by hand (or its opening if the hose/accessories is/are connected).
Press the manual filter cleaning button (7) at least three times in succession. The filter is cleaned by a strong air flow.
Maintenance and Service
Maintenance and Cleaning
Remove the battery before cleaning or performing maintenance on the dust extractor, making tool adjustments, changing accessories or placing the dust extractor in storage. This safety measure prevents the dust extractor from being started accidentally.
▶ To ensure safe and efficient operation, always keep the dust extractor and the ventilation slots clean.
▶ Wear a dust mask when servicing and cleaning the dust extractor.
Clean the housing of the dust extractor occasionally with a damp cloth.
Clean dirty charging pins using a dry cloth.
▶ Do not use compressed air to clean the dust extractor. The filter or other components may become damaged.
At least once a year a technical inspection of the dust extractor must be carried out by the manufacturer or someone who has been trained (e.g. to check for filter damage, to check that the dust extractor is tight and that the control unit is in perfect working order).
Cleaning and maintenance after extracting hazardous substances
- All parts that may have come into contact with the hazardous substances must be considered contaminated.
– Vacuum, wipe down and seal the outside of the dust extractor thoroughly before removing it from the area containing the hazardous substances. - Only clean, dismantle and perform maintenance on the dust extractor if this can be done without endangering yourself or other persons. Wear personal protective equipment for cleaning and maintenance tasks. Undertake the work in a well ventilated room.
- First clean the outside of the dust extractor before dismantling it.
- All parts of the dust extractor that cannot be adequately cleaned must be disposed of in impermeable bags. Please observe the applicable regulations for the disposal of such waste.
- Clean the maintenance area after completing the work.
Cleaning the container
If you have not used a fleece filter bag during dry extraction (26), clean the container (10) after every use.
- Open the catches (9) and remove the top part of the dust extractor (8).
- Shake out the container (10) over a suitable waste bin.
- If necessary, clean the container with a damp cloth. If necessary, clean the filter (29).
Allow the container and filter to dry.
- Hold the top part of the dust extractor (8) open again and close both catches (9) until you hear them click into place.
Cleaning/Changing the Filter (see figure J)
The suction power is dependent on the condition of the filter. Therefore, the filters (29) should be cleaned regularly. Replace any damaged filters immediately.
- Start manual filter cleaning (see "Manual Filter Cleaning", page 18) and then switch off the dust extractor.
- Open the catches (9) and remove the top part of the dust extractor (8).
- Loosen the screw on the filter holder (30).
- Turn the top part of the dust extractor so that you can remove the filter with the filter holder facing downwards. Otherwise, dust may fall from the filter into the motor compartment of the dust extractor.
- Remove the filter (29) from the filter holder (30).
- Tap the filter (29) on the side of a suitable waste bin. When doing so, ensure that you do not damage the flaps on the filter.
If the filter is very dirty, brush the flaps of the filter with water and a soft brush.
or
Replace a damaged filter (29).
- Place the clean and dry filter (29) into the filter holder (30).
- Insert the filter holder (30) into the top part of the dust extractor and screw it tight with six turns.
- Check that the filter (29) and filter holder (30) are seated correctly and securely.
- Put the top part of the dust extractor (8) back on again and close both catches (9) until you hear them click into place.
Faults
If the suction power is insufficient, check:
- Is the container (10) or fleece filter bag (26) full? ▷ Empty the container or replace the fleece filter bag.
- Are the hose, pipes or nozzles blocked? ▷ Clean the extractor accessories.
- Is the filter (29) clogged with dust? ▷ Clean or change the filter.
- Is the capacity of the battery (12) too low?
▶ Charge the battery or insert a battery with a higher capacity.
Regularly emptying the container (10) and cleaning the filter (29) ensures optimum suction power.
If the usual suction power is not achieved after this, contact a Bosch after-sales service centre.
If the dust extractor switches off on its own or cannot be switched on:
- Dust extractor and/or battery have heated up too much due to overload.
▷ Allow the dust extractor and battery to cool down.
If the dust extractor cannot be switched on after this, contact a Bosch after-sales service centre.
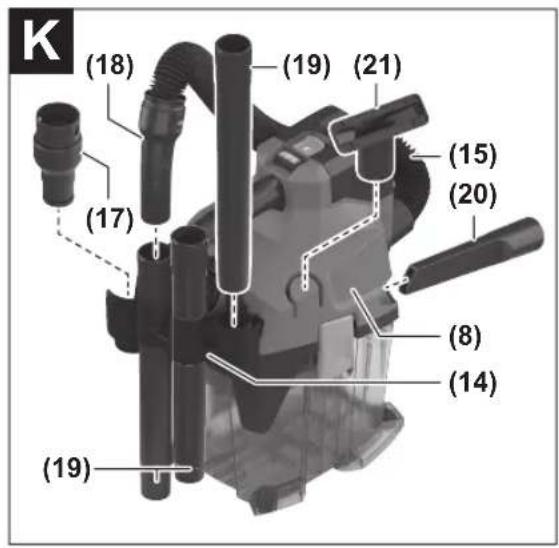
Storage (see figure K)
- Insert the suction tubes (19) and the combi power tool adapter (17) into the holder (14).
- Insert the crevice nozzle (20) into the holder on the top part of the dust extractor (8).
- Insert the floor nozzle (21) into the holder on the top part of the dust extractor (8).
- Insert the vacuum hose (15) with the attached curved nozzle (18) into one of the suction tubes (19).
- Only carry the dust extractor by the carrying handle (5) or the carrying strap (27).
- Store the dust extractor in a dry room and secure it so that it cannot be used by unauthorised persons.
After-Sales Service and Application Service
Great Britain
Tel. Service: (0344) 7360109
GB Importer:
Robert Bosch Ltd.
Broadwater Park
North Orbital Road
Uxbridge
UB9 5HJ
Malaysia
Tel.: (03) 79663194
You can find the link to our service addresses and warranty conditions on the last page.
In all correspondence and spare parts orders, please always include the 10-digit article number given on the nameplate of the product.
Disposal
Dust extractors, batteries, accessories and packaging should be sorted for environmentally friendly recycling.
Do not dispose of dust extractors or battery packs/batteries with household waste.
Only for EU countries and United Kingdom:
Electrical and electronic equipment or used batteries that are no longer suitable for use must be collected separately and disposed of in an environmentally friendly manner. Use the designated collection systems. Incorrect disposal may cause harmful effects on the environment and human health, due to the potential presence of hazardous substances.
Français
Calle Robert Bosch No. 405
C.P. 50071 Zona Industrial,
Toluca - México, RFC: RBO910102QJ9
Tel.: (52) 55 528430-62
Tel.: 800 6271286
España
(17) Combi-afzuigadapter
Risicoherkenning accudefect
EXPERT18V... | EXBA18V...
Tlf. Service Center: 44898855
(D-FTurkish Fractuom (anjahr Supur
(27) Tesla hotel and non-
| 5% 100-80 | |
| 4% 80-60 | |
| 3% 60-40 | |
| 2% 40-20 | |
| 1% 20-5 | |
| 1% 5-0 |
https://www.bosch-pt.com/serviceaddresses
Garantiebedingungen Guarantee Conditions Conditions de Garantie Condiciones de Garantía

https://www.bosch-pt.com/guarantee/202507

- Deutsch
- Safety instructions for dust extractors
- Save all warnings and instructions for future reference.
- | English
- WARNING
- Symbols
- Symbols and their meaning
- Product Description and Specifications
- Intended Use
- Product Features
- | English
- Noise/Vibration Information
- Rechargeable battery
- Charging the battery
- Inserting and Removing the Battery (see figure A)
- Battery charge indicator
- Battery defect risk detection
- EXPERT18V... | EXBA18V...
- Recommendations for Optimal Handling of the Battery
- Assembly
- Fitting the Bracket for Extractor Accessories (see figure B)
- Fitting the Hose (see figures D-F)
- Fitting Extractor Accessories (see figures C and G)
- Fitting the curved nozzle
- Fitting the Nozzles and Tubes
- Fitting the Combi Power Tool Adapter (see figure G)
- Inserting/Removing the Fleece Filter Bag (see figure H)
- Attaching the carrying strap (see figure I)
- Operation
- Starting Operation
- | English
- Switching On and Off
- Extracting dust that accumulates from working power tools
- Manual Filter Cleaning
- Maintenance and Service
- Maintenance and Cleaning
- Cleaning and maintenance after extracting hazardous substances
- Cleaning the container
- Cleaning/Changing the Filter (see figure J)
- Faults
- Storage (see figure K)
- After-Sales Service and Application Service
- Great Britain
- GB Importer:
- Malaysia
- Disposal
- Only for EU countries and United Kingdom:
- Français
- España
- Risicoherkenning accudefect
Brand : BOSCH
Model : GAS 18V-6LS Professional
Category : Vacuum Cleaner