
ELM320 - Lawn mower SCHEPPACH - Free user manual and instructions
Find the device manual for free ELM320 SCHEPPACH in PDF.


User questions about ELM320 SCHEPPACH
0 question about this device. Answer the ones you know or ask your own.
Ask a new question about this device
Download the instructions for your Lawn mower in PDF format for free! Find your manual ELM320 - SCHEPPACH and take your electronic device back in hand. On this page are published all the documents necessary for the use of your device. ELM320 by SCHEPPACH.
USER MANUAL ELM320 SCHEPPACH
natural_image
Black lawn mower with attached blade and magazine (no visible text or symbols)
text_image
https://www.scheepsch.com/de/service scheppachELM320
| DE | Elektro-RasenmäherOriginalbetriebsanleitung | 7 |
| GB | Electric lawnmowerTranslation of original instruction manual | 22 |
| FR | Tondeuse à gazon électriqueTraduction des instructions d'origine | 33 |
text_image
1 3 425 6 7 8 9 10 11 121.1
text_image
2 g i c c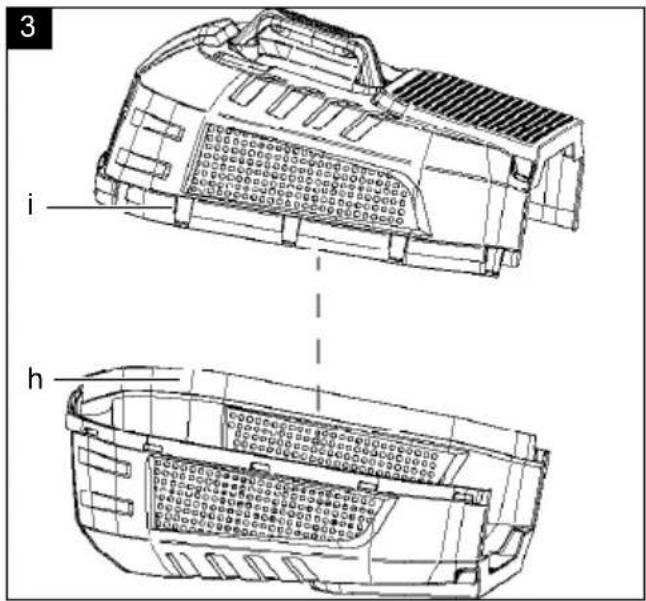
text_image
3 i h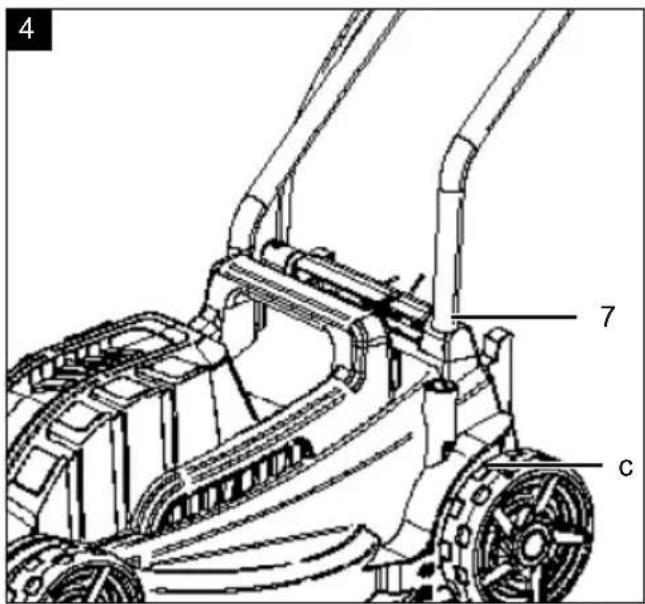
text_image
4 7 C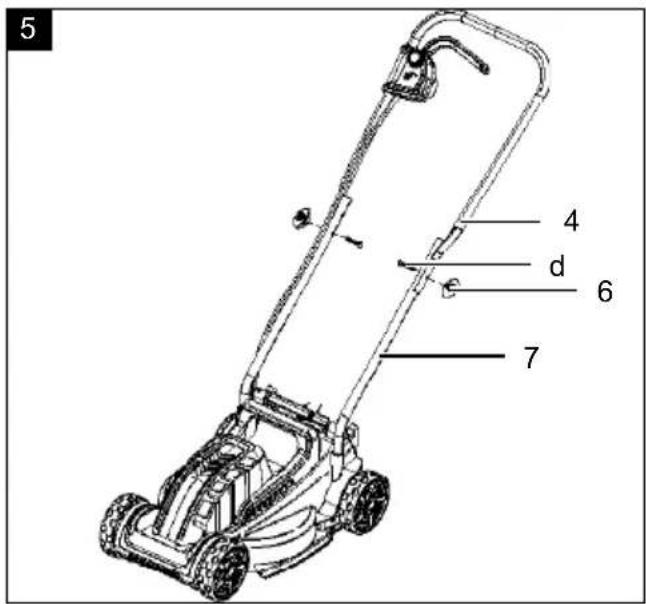
text_image
5 4 d 6 7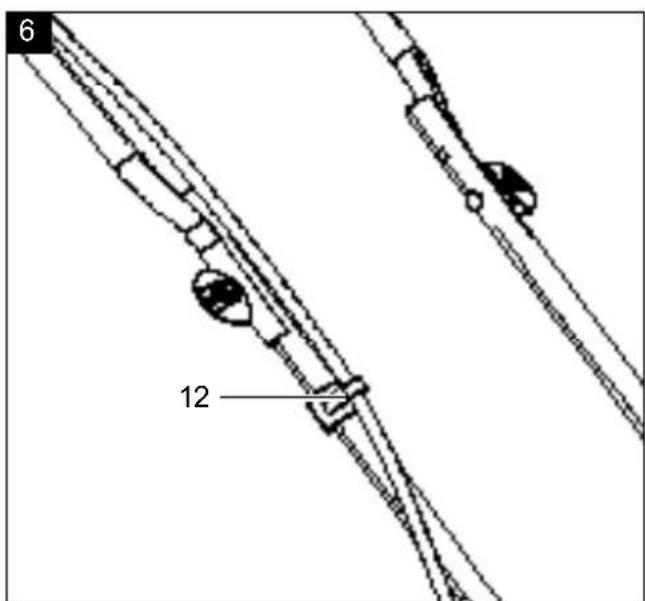
text_image
6 12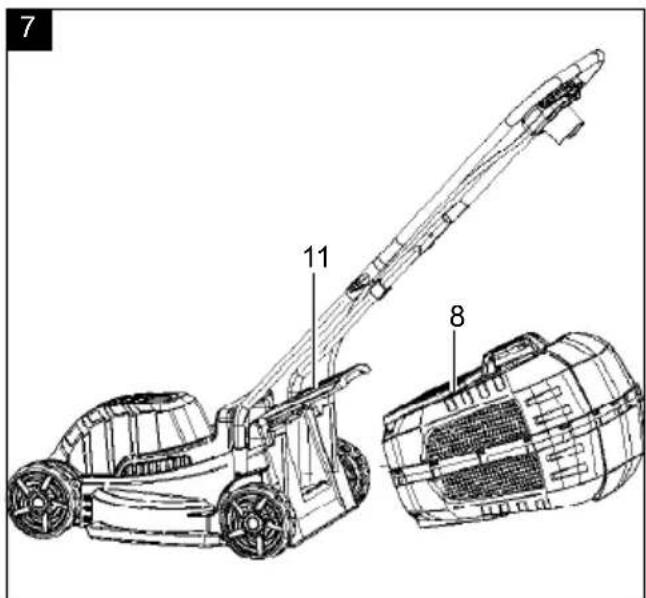
text_image
7 11 8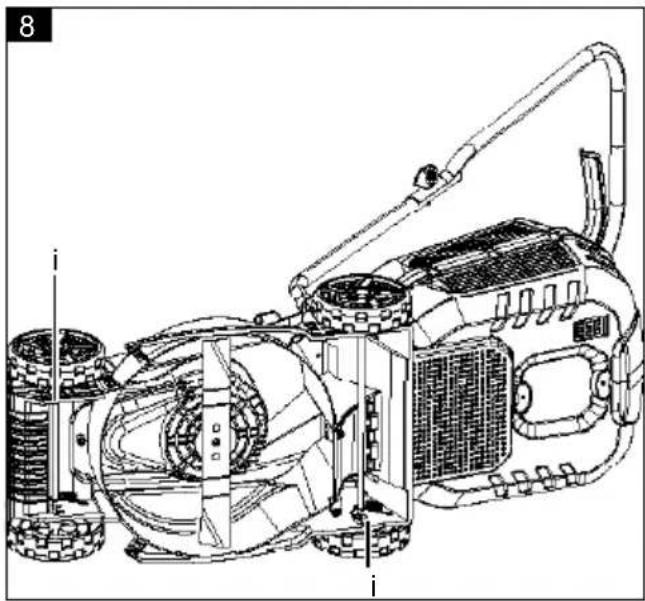
natural_image
Technical line drawing of a lawn mower assembly (no text or labels)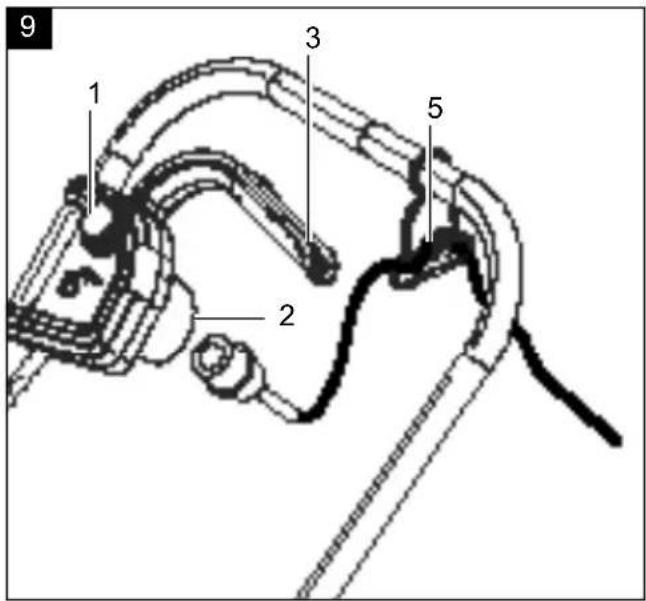
text_image
9 1 2 3 5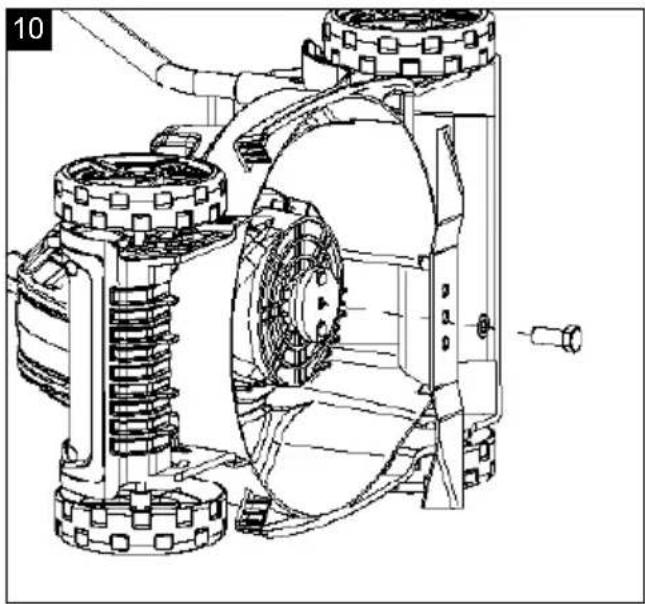
natural_image
Technical line drawing of a mechanical assembly with springs and gears (no text or symbols)Günzburger Straße 69
D-89335 Ichenhausen
Verehrter Kunde
Homepage: https://www.scheppach.com/de/service
text_image
https://www.scheppach.com/de/service scheppachExplanation of the symbols on the device
Symbols are used in this manual to draw your attention to potential hazards. The safety symbols and the accompanying explanations must be fully understood. The warnings themselves will not rectify a hazard and cannot replace proper accident prevention measures.
 | Observe all safety instructions before use. |
 | Warning - Read the operating manual to reduce the risk of injury. |
 | Wear hearing protection. Excessive noise can result in a loss of hearing. |
 | Wear safety goggles. Sparks created during work or fragments, chippings and dust ejected by the device can case sight loss. |
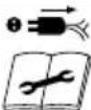 | Pull the mains plug out of the socket before performing maintenance work or if the lead is damaged. |
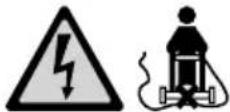 | ⚠ Attention! Danger of electric shock. Do not drive over the connection cable! |
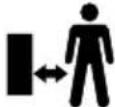 | Keep third parties (people and animals) away from the danger zone. |
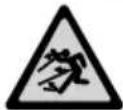 | Danger due to parts ying o while the engine is running. |
 | Do not use the device in wet conditions. |
 | Keep your hands and feet away from the rotating blades. |
 | The blades continue to turn for a few seconds after the engine has stopped. Only touch rotating parts once these have come to a complete stop! |
 | Protection class II |
 | The product complies with the applicable European directives. |
| ⚠ Attention! | We have marked points in these operating instructions that impact your safety with this symbol. |
Table of contents: Page:
- Introduction....24
- Device description (Fig. 1)....24
- Scope of delivery (Fig.1.1) 24
- Proper use 24
- General safety instructions.... 25
- Residual risks 28
- Technical data....29
- Unpacking 29
- Layout 29
- Start-up 30
- Electrical connection 30
- Cleaning....31
- Storage 31
- Maintenance .... 31
- Disposal and recycling....32
- Troubleshooting 32
- Declaration of conformity 47
1. Introduction
Manufacturer:
Scheppach GmbH
Günzburger Straße 69
D-89335 Ichenhausen
Dear Customer
We hope your new device brings you much enjoyment and success.
Note:
In accordance with the applicable product liability laws, the manufacturer of this device assumes no liability for damage to the device or caused by the device arising from:
- Improper handling
• Non-compliance with the operating manual
• Repairs carried out by third parties, unauthorised specialists
• Installing and replacing non-original spare parts - Improper use
- Failure of the electrical system in the event of the electrical regulations and VDE provisions 0100, DIN 57113 / VDE 0113 not being observed
Note:
Read the whole text of the operating manual before assembly and commissioning. This operating manual should help you to familiarise yourself with your device and to use it for its intended purpose. The operating manual includes important instructions for safe, proper and economic operation of the device, for avoiding danger, for minimising repair costs and downtimes, and for increasing the reliability and extending the service life of the device. In addition to the safety instructions in this operating manual, you must also observe the regulations applicable to the operation of the device in your country. Keep the operating manual at the device, in a plastic sleeve, protected from dirt and moisture. They must be read and carefully observed by all operating personnel before starting the work. The device may only be used by personnel who have been trained to use it and who have been instructed with respect to the associated hazards. The required minimum age must be observed. In addition to the safety instructions in this operating manual and the separate regulations of your country, the generally recognised technical rules relating to the operation of such machines must also be observed. We accept no liability for accidents or damage that occur due to a failure to observe this manual and the safety instructions.
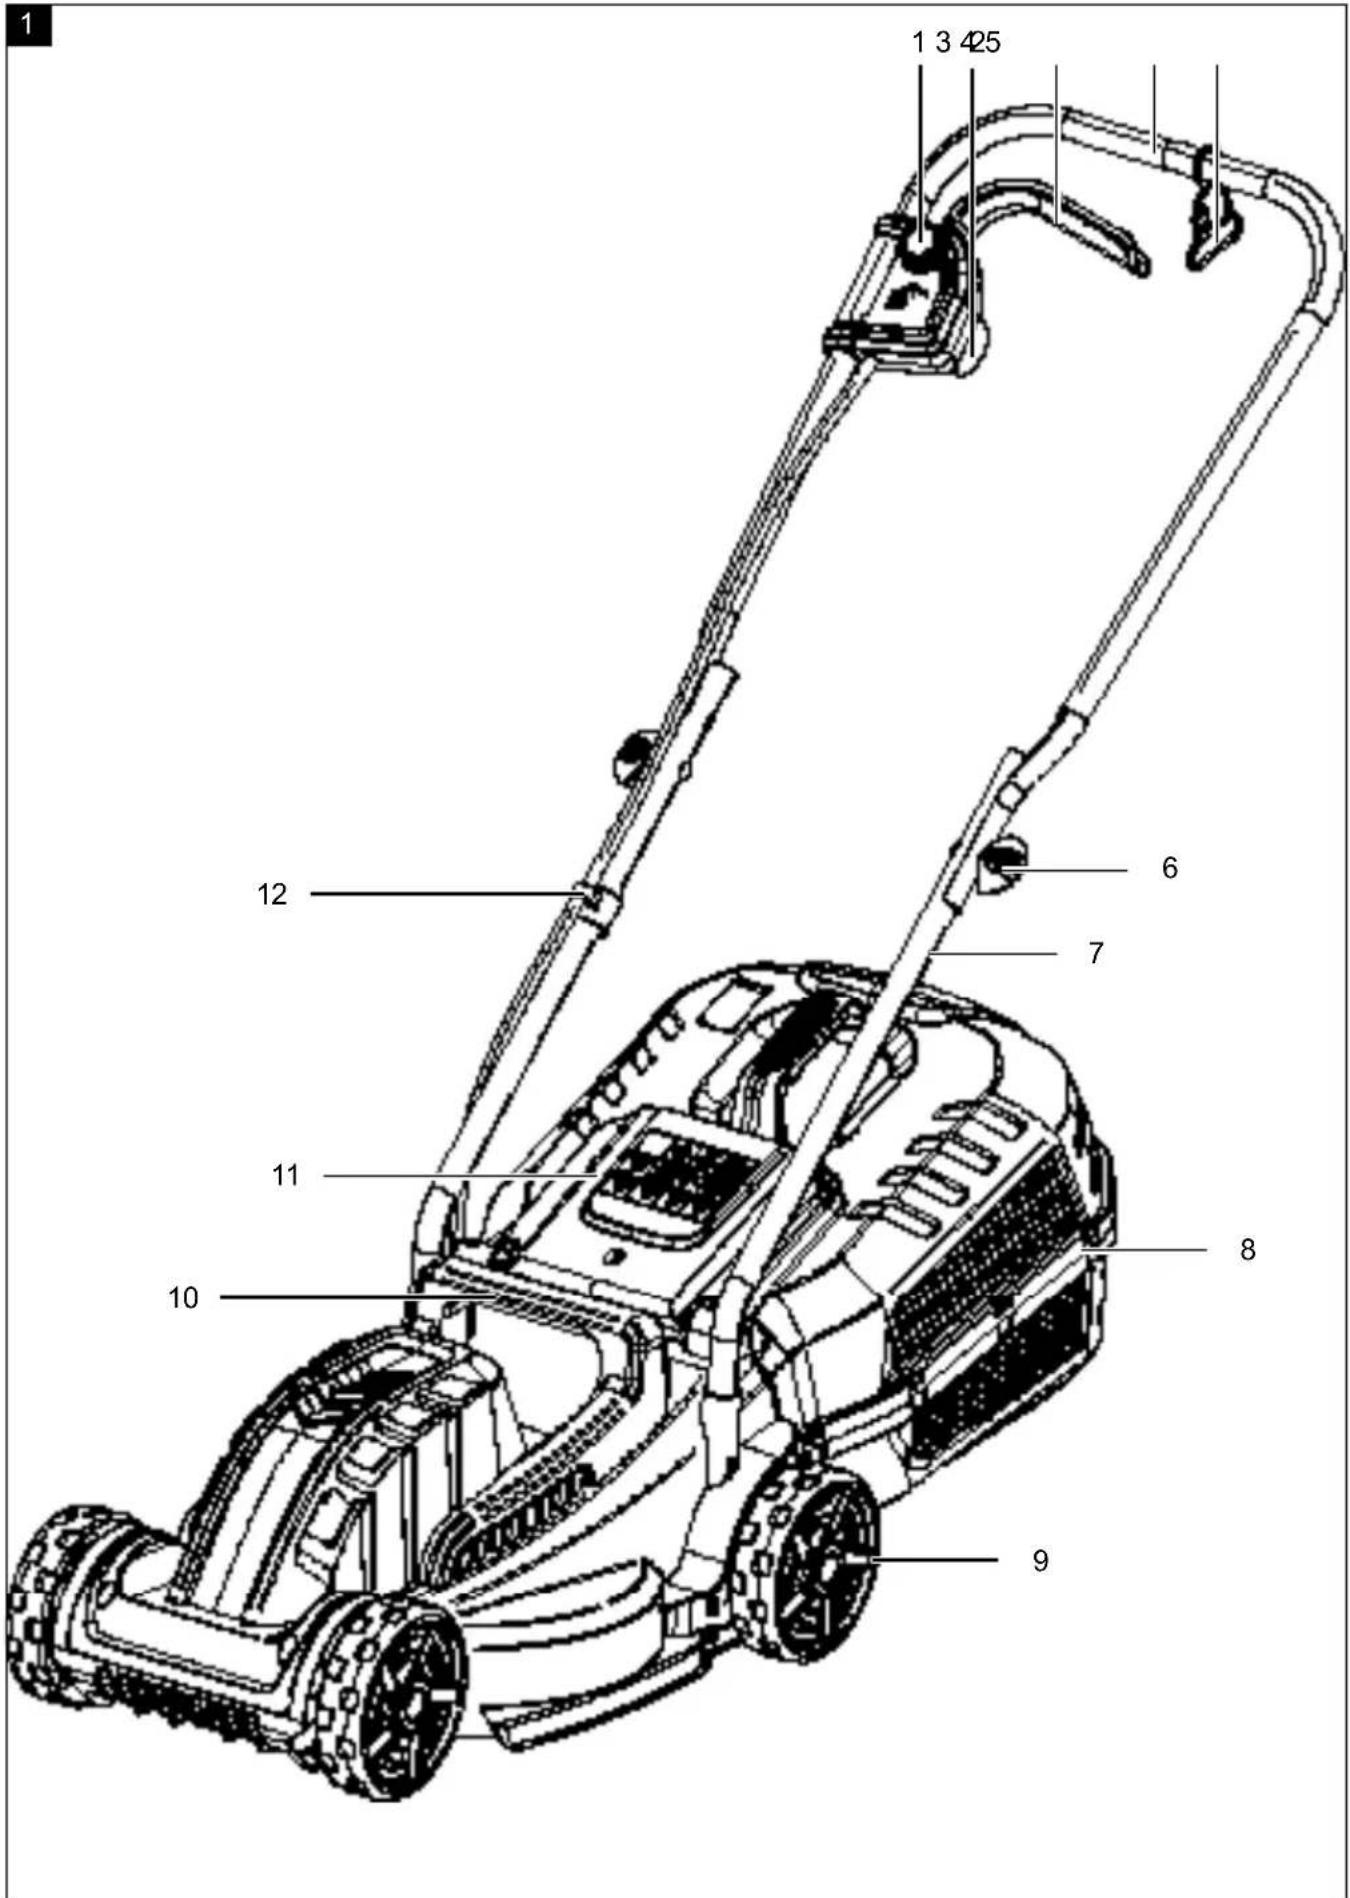
2. Device description (Fig. 1)
- Switch lock
- Mains power connection
- Start lever
- Upper push bar
- Cable strain relief
- Wing nut
- Lower push rods
- Catch basket
- Wheels
- Transport handle
- Discharge flap
- Cable clip
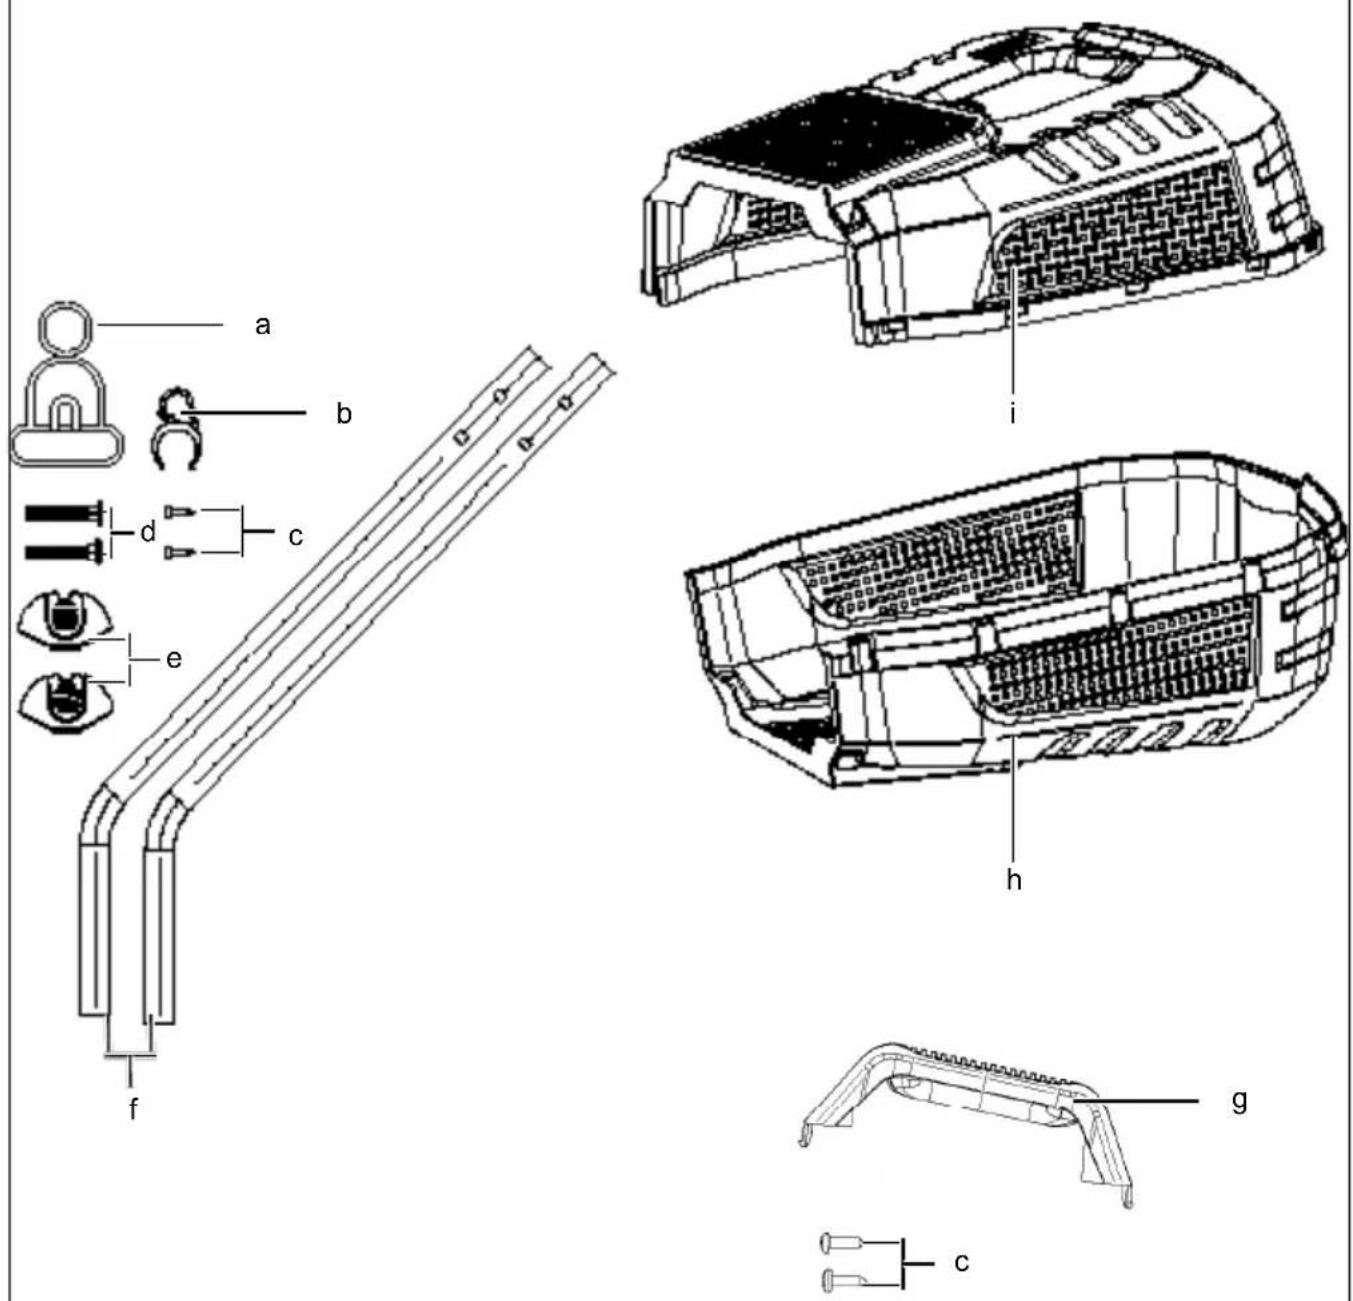
3. Scope of delivery (Fig.1.1)
- Operating manual
- Cable strain relief (a)
- Cable clip (b)
- 4 x screw, ST 4.2x16mm (c)
- 2 x M6 screw (d)
- 2 x wing nut (e)
- 2 x lower push bars (f)
- Catch basket handle (g)
• Bottom half of the catch basket (h)
• Top half of the catch basket (i)
4. Proper use
The machine may only be used in the intended manner. Any use beyond this is improper. The user/operator, not the manufacturer, is responsible for damages or injuries of any type resulting from this.
An element of the intended use is also the observance of the safety instructions, as well as the assembly instructions and operating information in the operating manual. Persons who operate and maintain the machine must be familiar with it and must be informed about potential dangers. The liability of the manufacturer and resulting damages are excluded in the event of modifications of the machine. The machine may only be operated with original parts and original accessories from the manufacturer. The safety, operating and maintenance specifications of the manufacturer, as well as the dimensions specified in the technical data, must be observed.
Please note that our equipment was not designed with the intention of use for commercial or industrial purposes. We assume no guarantee if the device is used in commercial or industrial applications, or for equivalent work.
The device is intended for use by adults. Children under the age of 16 may only use the device when supervised. The manufacturer is not liable for damage caused by improper use or incorrect operation.
5. General safety instructions
General power tool safety warnings
WARNING!
Read all safety warnings, instructions, illustrations and specifications provided with this power tool.
Failure to follow all instructions listed below may result in electric shock, fire and/or serious injury.
Save all warnings and instructions for future reference.
The term “power tool” in the warnings refers to your mains-operated (corded) power tool or battery-operated (cordless) power tool.
- Work area safety
a) Keep your work area clean and well-lit. Cluttered or dark areas invite accidents.
b) Do not operate power tools in explosive atmospheres, such as in the presence of flammable liquids, gases or dust. Power tools create sparks which may ignite the dust or fumes.
c) Keep children and bystanders away while operating a power tool. Distractions can cause you to lose control.
- Electrical safety
a) The connection plug of the electric tool must fit into the socket. Never modify the plug in any way. Do not use any adapter plugs with earthed (grounded) power tools. Unmodified plugs and matching outlets will reduce risk of electric shock.
b) Avoid body contact with earthed or grounded surfaces, such as pipes, radiators, ranges and refrigerators. There is an increased risk of electric shock if your body is earthed or grounded.
c) Keep your electric tools away from rain and moisture. Water penetrating an electric device increases the risk of an electric shock.
d) Do not abuse the cord. Never use the cord for carrying, pulling or unplugging the power tool. Keep cord away from heat, oil, sharp edges or moving parts. Damaged or entangled cords increase the risk of electric shock.
e) When operating a power tool outdoors, use an extension cord suitable for outdoor use. Use of a cord suitable for outdoor use reduces the risk of electric shock.
f) If operating a power tool in a damp location is unavoidable, use a residual current device (RCD) protected supply. Use of an RCD reduces the risk of electric shock.
- Personal safety
a) Stay alert, watch what you are doing and use common sense when operating a power tool. Do not use a power tool while you are tired or under the influence of drugs, alcohol or medication. A moment of inattention while operating power tools may result in serious personal injury.
b) Wear personal protective equipment and always safety goggles. Protective equipment such as a dust mask, non-skid safety shoes, safety helmet or hearing protection used for appropriate conditions will reduce personal injuries.
c) Prevent unintentional starting. Ensure the switch is in the off-position before connecting to power source and/or rechargeable battery, picking up or carrying the tool. Carrying power tools with your finger on the switch or energising power tools that have the switch on invites accidents.
d) Remove any adjusting tools or spanners/keys before turning the power tool on. A wrench or a key left attached to a rotating part of the power tool may result in personal injury.
e) Avoid abnormal postures. Make sure that you have secure footing and always maintain your balance. This enables better control of the power tool in unexpected situations.
f) Wear suitable clothing. Do not wear loose clothing or jewellery. Keep your hair and clothing away from moving parts. Loose clothes, jewellery or long hair can be caught in moving parts.
g) If devices are provided for the connection of dust extraction and collection facilities, ensure these are connected and properly used. Using a dust extraction unit can reduce hazards caused by dust.
h) Do not let familiarity gained from frequent use of tools allow you to become complacent and ignore tool safety principles. A careless action can cause severe injury within a fraction of a second.
- Power tool use and care
a) Do not force the power tool. Use the correct power tool for your application. The correct power tool will do the job better and safer at the rate for which it was designed.
b) Do not use the power tool if the switch does not turn it on and off. Any power tool that cannot be controlled with the switch is dangerous and must be repaired.
c) Disconnect the plug from the power source and/or remove the battery pack, if detachable, from the power tool before making any adjustments, changing accessories, or storing power tools. These precautionary measures will prevent the electric tool from starting unintentionally.
d) Store idle power tools out of the reach of children. Do not allow persons unfamiliar with the power tool or these instructions to operate the power tool. Power tools are dangerous in the hands of untrained users.
e) Maintain electric tools and accessories with care. Check for misalignment or binding of moving parts, breakage of parts and any other condition that may affect the power tool's operation. If damaged, have the power tool repaired before use. Many accidents are caused by poorly maintained power tools.
f) Keep cutting tools sharp and clean. Properly maintained cutting tools with sharp cutting edges are less likely to bind and are easier to control.
g) Use electric tools, accessories and tool attachment, etc. according to these instructions. Take into account the working conditions and the work to be performed. Use of the power tool for operations different from those intended could result in a hazardous situation.
h) Keep handles and grasping surfaces dry, clean and free from oil and grease. Slippery handles and grasping surfaces do not allow for safe handling and control of the tool in unexpected situations.
- Service
a) Only have your power tool repaired by qualified specialists and only with original spare parts. This ensures that safety of the electric tool is maintained.
⚠ WARNING - Read all safety information, instructions, illustrations and technical data for this electric tool.
Failure to follow all instructions listed below may result in electric shock, fire and/or serious injury.
Save all warnings and instructions for future reference.
The term "electric tool" used in the safety instructions refers to mains-powered electrical tools (with a mains cable) and battery-powered electrical tools (without a mains cable).
- This device must not be used by children. Children may not play with the device. Cleaning and user maintenance must not be carried out by children. This device can be used by people with reduced physical, sensory or mental capabilities or with a lack of experience or knowledge, if they are supervised or if they have been trained in the safe use of the device and understand the resultant hazards.
- If the mains connection cable of this device is damaged, it must be replaced by a special connection cable which can be obtained from the manufacturer or its service department.
- The device must not be used at altitudes higher than 2000 m.
Preparation
- Read the usage instructions with due care. Familiarise yourself with the control devices and proper operation of the machine.
- Never allow children or other persons who do not know the operating manual to use the device. Local provisions can determine the minimum age of the operator.
- Never use the device when people and especially children or pets are nearby.
- The operator or user is responsible for accidents sustained by other persons or damage to their property.
- Check the area in which the device is to be used and remove any stones, sticks, wires, or other foreign objects that could be caught and ejected.
- Wear suitable work clothing such as sturdy shoes with non-slip soles and sturdy long trousers. Do not use the device if barefoot or wearing open sandals.
- Before use, always visually check whether the cutting blades, fastening bolts and the entire cutting unit are worn out or damaged. To avoid any imbalance, worn or damaged cutting blades and fastening bolts may only be replaced in sets. Worn or damaged warning labels must be replaced.
- Handle devices with multiple cutting tools carefully, as moving one blade can cause the remaining blades to rotate.
- Only use spare or accessory parts which are supplied or recommended by the manufacturer. Using third-party parts leads to a loss of guarantee claims.
- Avoid wearing loose clothing or clothing with hanging strings or belts.
- Worn or damaged warning labels must be replaced.
- Only use approved extension cables of the type H05RN-F, which are no longer than 75 m and are intended for outdoor use. The conductor core cross-section of the extension cable must be at least 2.5 mm2. Always unroll a cable drum completely before use. Check the cable for damage.
- Switch off the device and disconnect the mains plug from the socket if the mains cable is damaged. If the connection cable for this device is damaged, it must be replaced by a special connection cable which can be obtained from the manufacturer or its service department.
- Do not connect a damaged mains cable to the mains. Do not touch any damaged mains cable as long as it is connected to the mains. A damaged mains cable can cause live parts to be touched.
- Before use, always inspect the connection lead and the extension lead for signs of damage or ageing. If the lead is damaged during use, it must be disconnected from the mains supply immediately. Do not touch the lead until it is disconnected. Do not use the machine if the lead is worn or damaged.
Working with the device
⚠ Do not put feet and hands close to or underneath rotating parts when working. There is a danger of injury!
Note
Observe the noise protection and local regulations. Use of the device may be restricted or prohibited on certain days (e.g. Sundays and public holidays) at certain times (e.g. lunch time, overnight) or in specific areas (e.g. spa towns, hospitals, etc.).
- Switch the motor on according to the instructions and only when your feet are a safe distance from the cutting tools.
- Do not use the device in the rain, in bad weather, in damp surroundings or on wet grass. Only work in daylight or with good, artificial lighting. Avoid using the device on wet grass as far as possible.
-
Do not work with the device when you are tired or are unfocused or after taking alcohol or tablets. Always take breaks from work in good time. Remain sensible when working.
-
Ensure you have secure footing when working, particularly on slopes. Always work across a slope, never upwards or downwards. Take particular care when changing direction on a slope. Do not work on excessively steep slopes.
- Only guide the device at walking pace. Take particular care when reversing the device, pulling it towards you or moving it backwards.
- Switch the device on carefully in accordance with the instructions in these operating instructions. Ensure that your feet are far enough away from rotating blades.
- Do not tilt the lawnmower when you start the engine unless the mower must raised off of the ground a little in order to start it. In this case, only tilt as far as absolutely required and only lift the side away from the operator. In this case, tilt the device by pressing the handle bar down until the device's front wheels are raised slightly. Always check that both hands are in the working position before placing the device on the ground again.
- Never use the lawnmower if the blade or safety grilles are damaged, or without the attached guards, e.g. deflectors and/or grass catching devices. Always keep clear of the ejection opening.
- The device must not be lifted or transported as long as the motor is running. Switch the device off if it has to be tilted for transport, if it is moved over surfaces other than grass and when moving the device to and from the areas to be mown.
• Always keep the grass ejection opening clean and clear. Only remove the cuttings when the device is at a standstill. - Never leave the device unattended at the workplace.
- Do not work with a damaged, incomplete or modified device without the manufacturer's consent. Never use the device with damaged protective devices or shields, or missing safety equipment such as deflectors and/or grass catching devices.
- Do not overload your device. Only work in the specified power range and do not change the controller settings on the motor regularly. Do not use low-output machines for heavy work. Do not use your device for purposes for which it is not intended.
- Do not use the device in the vicinity of flammable fluids or gases. There is a risk of fire or explosion if disregarded.
-
Never lift or move the device away when the motor is running. Switch the device off and pull out the mains plug. Ensure that all moving parts have come to a complete standstill:
-
Whenever you leave the machine,
- before releasing blockages or rectifying obstructions in the ejector chute,
- when the device is not being used,
- before checking, cleaning or working on the device,
- if the mains cable is damaged or tangled,
- if it came into contact with a foreign object. Inspect the lawnmower for damage and perform the required repairs before starting again and working with the lawnmower.
- Ensure that all nuts, pins and screws are tight. If the lawnmower begins to experience exceptionally strong vibrations, check it immediately.
- Check for damage;
- Repair damaged parts accordingly;
- Ensure that all nuts, pins and screws are tight.
- Never move hands and feet close to or under rotating parts. Do not stand in front of the grass ejection opening on rotary lawnmowers.
- Do not start the engine if you are standing in front of the ejector chute. Start or press the starter switch with caution in accordance with the manufacturer's instructions. Make sure that your feet are far enough away from the cutting blade!
- Never put hands and feet on or under rotating parts.
Maintenance and storage
- Make sure that all nuts, bolts and screws are securely tightened so that the device is in a safe working condition.
- Do not try to repair the device yourself unless you have been trained to do so. All work that is not specified in these operating instructions may only be carried out by a customer service centre authorised by us.
- Store the device in a dry place and out of reach of children.
- Handle your device with care. Keep tools sharp and clean in order to be able to work better and more safely. Follow the maintenance instructions.
- Wear protective gloves when replacing the cutting device.
- Check the grass catcher regularly for wear and deformations. For safety reasons, replace worn or damaged parts. Take particular care when adjusting the blades to ensure that your fingers are not jammed between the rotating blades and the stationary parts of the machine.
- Ensure that only replacement cutting tools approved by the manufacturer are used.
- When maintaining the cutting blades, be aware that the cutting blades can be moved even when the power source is switched off.
- Allow the engine to cool down before parking the device in enclosed spaces.
- Note that moving one cutting blade on machines with several cutting blades can cause the remaining cutting blades to rotate.
- For safety reasons, replace worn or damaged parts. Only use original spare parts and accessories.
Electrical safety
- Ensure that the mains voltage corresponds to the specifications on the type plate.
- Only connect the device to sockets with an RCD with a tripping current of no more than 30mA.
- Avoid body contact with earthed parts (e.g. metal fences, metal posts).
- Use the cable attachment provided to attach the mains cable.
- Keep the mains cable away from the cutting tools when working. The cutting blade can damage the mains cable and cause you to touch live parts. Always guide the mains cable behind you.
- Do not use the mains cable to pull the mains plug out of the socket. Protect the mains cable from heat, oil and sharp edges.
Warning! This power tool generates an electromagnetic field during operation. This field can impair active or passive medical implants under certain circumstances. In order to prevent the risk of serious or deadly injuries, we recommend that persons with medical implants consult with their physician and the manufacturer of the medical implant prior to operating the power tool.
6. Residual risks
The machine has been built according to the state-of-the-art and the recognised technical safety requirements. However, individual residual risks can arise during operation.
• Health hazard due to electrical power, with the use of improper electrical connection cables.
• Furthermore, despite all precautions having been met, some non-obvious residual risks may still remain.
- Residual risks can be minimised if the "Safety Instructions" and the "Intended Use" together with the operating manual as a whole are observed.
- Avoid accidental starting of the machine: the operating button may not be pressed when inserting the plug in an outlet. Use the tool attachment that is recommended in this operating manual. This is how to ensure that your machine provides optimum performance.
- Keep your hands away from the working area when the machine is in operation.
7. Technical data
Mains voltage 220 -240 V / 50 Hz
| Power consumption 1300 W |
| Speed 3500 rpm |
| Cutting width 320 mm |
| Height adjustment 3-fold (20mm,40mm,60mm) |
| Protection class II |
| Catch basket contents 30 l |
| Weight 8.87 kg |
Subject to technical changes!
Noise and vibration
⚠ Warning: Noise can have serious effects on your health. If the machine noise exceeds 85 dB, please wear suitable hearing protection.
Noise data
| Sound power level L_WA | 90.2 dB |
| Sound pressure level L_pA | 80.4 dB |
| Uncertainty K_wa/pA | 3 dB |
Vibration parameters
| Vibration a_h | 1.97 m/s ^2 |
| Uncertainty K_h | 1.5 m/s ^2 |
8. Unpacking
- Open the packaging and carefully remove the device.
- Remove the packaging material, as well as the packaging and transport safety devices (if present).
- Check whether the scope of delivery is complete.
-
Check the device and accessory parts for transport damage. In the event of complaints the carrier must be informed immediately. Later claims will not be recognised.
-
If possible, keep the packaging until the expiry of the warranty period.
- Familiarise yourself with the device by means of the operating manual before using for the first time.
- With accessories as well as wearing parts and replacement parts use only original parts. Spare parts can be obtained from your specialist dealer.
- When ordering please provide our article number as well as type and year of manufacture for your equipment.
⚠ WARNING!
The device and the packaging material are not children's toys! Do not let children play with plastic bags, films or small parts! There is a danger of choking or suffocating!
9. Layout
Warning!
Always remove the mains plug before carrying out adjustments on the device.
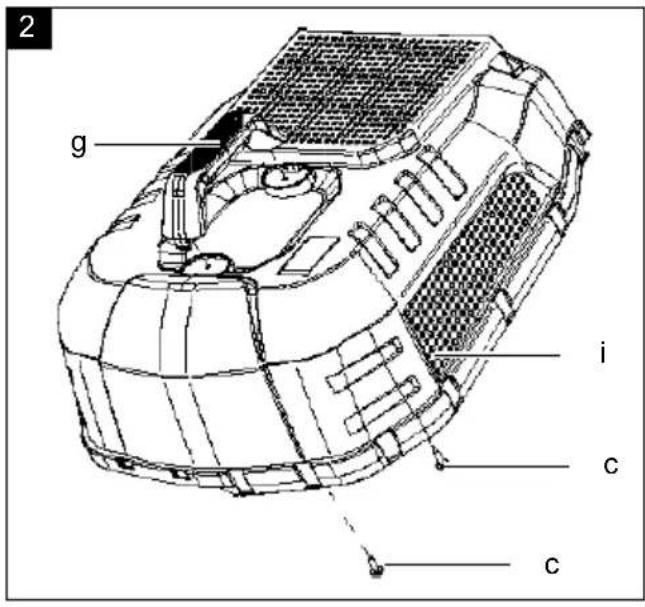
Fitting the catch basket handle (Fig.2)
- Place the catch basket handle (g) onto the top half of the catch basket (i).
- Use two ST 4.2 x 16mm screws (c) to screw the catch basket handle (g) on.
Assembling the catch basket (Fig.3)
- Attach the top half of the catch basket (h) to the bottom half of the catch basket (i).
- Ensure that both engage tightly into the brackets.
Fitting the bottom push bars (Fig.4)
- Insert the bottom push bars (7) into the brackets provided.
- Use the enclosed ST 4.2x16mm screws (c) to screw the push bars (7) on to the side.
Fitting the top push bar (Fig.5)
- Place the top push bar (4) onto the end of the bottom push bars (7).
- Push the M6 bolts (d) through the overlapping push bars from the inside on both sides.
- Put the wing nuts (e) on the M6 bolts (d) on the outside and tighten them.
Attaching the cable to the push bar (Fig.6)
- Guide the cable along the push bar and use the cable clips (12) provided to attach it.
Inserting the catch basket (Fig.7)
- Lift the discharge flap (11) on the lawnmower.
- Insert the completely assembled catch basket (8) so that it is attached on both sides.
- Lower the catch basket (8) and lower the discharge flap (11) onto the catch basket.
Preparing the area to be mowed
Before mowing, carefully examine the area. Remove stones, sticks, bones, wires, toys and other objects that may be ejected by the device.
10. Start-up
⚠ Attention!
Always make sure the device is fully assembled before commissioning!
Setting the cutting height (Fig.8)
- Lay the lawnmower on its side.
- Grasp the entire front or rear axle with both hands and pull it out of the recess (j).
- Now move it to the required recess.
• This process must be completed on both axles.
Note
The lawnmower has three different cutting heights (20 mm, 40mm, 60mm). Ensure that the cutting heights on the front and rear axles are always set to the same height.
Connecting the mains connection (Fig.9)
- Use an extension cable (not supplied).
- Use the cable strain relief (5) to prevent the cable being pulled out inadvertently when using the device.
Switching the lawnmower on (Fig.1)
- Press and hold down the switch lock (1).
• Now press the start lever (3).
• The lawnmower starts. - You can release the switch lock (1).
Note: The cutter blade rotates when the engine is started.
Switching the lawnmower off (Fig.1)
- Release the start lever (3) to switch the lawnmower off.
Attention!
The cutting blade continues to run.
Cut only with sharp, clean cutting blades so that the blades of grass do not fray and the lawn does not turn yellow. To achieve a clean cut, guide the lawnmower in the straightest possible paths. These strips should always overlap by a few centimetres so that no patches remain. Keep the underside of the mower housing clean and remove any grass deposits. Deposits make the starting process more difficult, impair cutting quality and grass discharge. On slopes, the cutting path should be made perpendicular to the slope. It is possible to prevent the lawnmower from slipping by lifting it upwards at an angle. Set the cutting height depending on the actual length of the lawn. Carry out several passes so that a maximum of 4 cm of lawn is removed at a time.
Switch off the engine before carrying out any checks on the blade. Remember that the blade will continue to rotate for a few seconds after the engine is switched off. Never try to stop the blade.
Regularly check that the blade is properly fastened, in good condition and sharpened. Sharpen or replace it if this is not the case. If the moving blade strikes an object, stop the mower and wait for the blade to come to a complete stop. Then check the condition of the blade and the blade holder. If it is damaged, it must be replaced.
11. Electrical connection
The electrical motor installed is connected and ready for operation. The connection complies with the applicable VDE and DIN provisions.
The customer's mains connection as well as the extension cable used must also comply with these regulations.
Damaged electrical connection cable
The insulation on electrical connection cables is often damaged.
This may have the following causes:
- Pressure points, where connection cables are passed through windows or doors.
- Kinks where the connection cable has been improperly fastened or routed.
- Places where the connection cables have been cut due to being driven over.
• Insulation damage due to being ripped out of the wall outlet.
- Cracks due to the insulation ageing.
Such damaged electrical connection cables must not be used and are life-threatening due to the insulation damage.
Check the electrical connection cables for damage regularly. Ensure that the connection cables are disconnected from electrical power when checking for damage.
Electrical connection cables must comply with the applicable VDE and DIN provisions. Only use connection cables of the same designation.
The printing of the type designation on the connection cable is mandatory.
For single-phase AC motors, we recommend a fuse rating of C 16A or K 16A for machines with a high starting current (from 3000 watts)!
Connection type Y
If the mains connection cable of this device is damaged, it must be replaced by the manufacturer, their service department or a similarly qualified person to avoid dangers.
12. Cleaning
Danger!
Pull out the battery before carrying out any cleaning work.
- Keep protective devices, air vents and the motor housing as free of dust and dirt as possible. Rub the device clean with a clean cloth or blow it off with compressed air at low pressure.
• We recommend that you clean the device directly after every use. - Clean the device at regular intervals using a damp cloth and a little soft soap. Do not use any cleaning products or solvents; they could attack the plastic parts of the device. Make sure that no water can penetrate the device interior. Water penetrating an electric device increases the risk of an electric shock.
13. Storage
Store the device and its accessories in a dark, dry and frost-free place that is inaccessible to children. The optimum storage temperature is between 5 and 30 °C. Keep the tool in its original packaging. Cover the tool to protect it from dust or moisture. Store the operating manual with the tool.
14. Maintenance
Warning!
Always remove the mains plug before carrying out adjustments on the device.
Spare parts / accessories Article no.
Cutting blade 3911303012
Replacing the cutting blade (Fig.10)
- Pull out the mains plug.
- Lay the lawnmower on its side.
Wear protective gloves to protect your hands.
- Use a piece of wood to block the cutting blade and use a hand ratchet to undo the fastening screw.
- Remove the cutting blade.
- Insert the new cutting blade and ensure that the blade is centred using the positioning pins when it is inserted.
- Use the hand ratchet to tighten the fastening screw to secure the new cutting blade.
- Re-tighten the fastening screw after a short functional test.
Service information
With this product, it is necessary to note that the following parts are subject to natural or usage-related wear, or that the following parts are required as consumables.
Wearing parts*: Cutting blade
* may not be included in the scope of delivery!
Connections and repairs
Connections and repair work on the electrical equipment may only be carried out by electricians.
Please provide the following information in the event of any queries:
• Type of current for the motor
• Machine data - type plate
- Motor data - type plate
Spare parts and accessories can be obtained from our Service Centre. To do this, scan the QR code on the front page.
15. Disposal and recycling
Notes for packaging


The packaging materials are recyclable. Please dispose of packaging in an environmentally friendly manner.
Notes on the electrical and electronic equipment act (ElektroG)
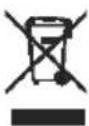
Waste electrical and electronic equipment does not belong in household waste, but must be collected and disposed of separately!
• Used batteries or rechargeable batteries that are not installed permanently in the old device must be removed non-destructively before disposal! Their disposal is regulated by the battery act.
- Owners or users of electrical and electronic devices are legally obliged to return them after use.
- The end user is responsible for deleting their personal data from the old device being disposed of!
- The symbol of the crossed-out dustbin means that waste electrical and electronic equipment must not be disposed of with household waste.
- Waste electrical and electronic equipment can be handed in free of charge at the following places:
- Public disposal or collection points (e.g. municipal works yards).
- Points of sale of electrical appliances (stationary and online), provided that dealers are obliged to take them back or offer to do so voluntarily.
- Up to three waste electrical devices per type of device, with an edge length of no more than 25 centimetres, can be returned free of charge to the manufacturer without prior purchase of a new device from the manufacturer or taken to another authorised collection point in your vicinity.
- Further supplementary take-back conditions of the manufacturers and distributors can be obtained from the respective customer service.
- If the manufacturer delivers a new electrical device to a private household, the manufacturer can arrange for the free collection of the old electrical device upon request from the end user. Please contact the manufacturer's customer service for this.
• These statements only apply to devices installed and sold in the countries of the European Union and which are subject to the European Directive 2012/19/EU. In countries outside the European Union, different regulations may apply to the disposal of waste electrical and electronic equipment.
16. Troubleshooting
The following table shows fault symptoms and describes remedial measures in the event of your machine failing to work properly. If you cannot localise and rectify the problem with this, please contact your service workshop.
| Fault Possible cause Remedy | ||
| Device does not start | The device is not powered Check the lead and fuses | |
| Cable defective Request a repair by an accredited electrician | ||
| On/off switch defective Repair by an authorised service centre | ||
| Engine defective Repair by an authorised service centre | ||
| Motor stops during operation | Housing clogged Clean housing | |
| The device is not powered Check the lead and fuses | ||
| Device defective | Repair by an authorised service centre | |
| Reduced power | Housing clogged Clean housing | |
| Cutting blade worn out Repair by an authorised service centre | ||
Günzburger Straße 69
D-89335 Ichenhausen
Cher client,
text_image
Exploded view diagram of a motorcycle's internal components with numbered parts for identificationEU Declaration of Conformity
| Annex V | |
| X | Annex VINoise: measured L_WA = 90,2 dB; guaranteed L_WA = 92 dBTÜV Süd Industrie Service GmbH, Westendstraße 199,80686 München, GermanyNotified Body No. 0036 |
2016/1628/EU
Emission. No:
Standard references:
EN 62841-1:2015; EN IEC 62841-4-3:2021+A11:2021; EN IEC 55014-1:2021; EN IEC 55014-2:2021;
EN 61000-3-3:2013+A1:2019+A2:2021; EN IEC 61000-3-2:2019+A1:2021
This declaration of conformity is issued under the sole responsibility of the manufacturer.
The object of the declaration described above fulfils the regulations of the directive 2011/65/EU of the European Parliament and Council from 8th June 2011, on the restriction of the use of certain hazardous substances in electrical and electronic equipment.
Subject to change without notice
Documents registrar: Gabriel Baur
Günzburger Str. 69, D-89335 Ichenhausen
Garantie DE
Apparent defects must be notified within 8 days from the receipt of the goods. Otherwise, the buyer loses its rights of claim due to such defects are invalidated. We guarantee for our machines in case of proper treatment for the time of the statutory warranty period from delivery in such a way that we replace any machine part free of charge which provably becomes unusable due to faulty material or defects of fabrication within such period of time. With respect to parts not manufactured by us we only warrant insofar as we are entitled to warranty claims against the upstream suppliers. The costs for the installation of the new parts shall be borne by the buyer. The cancellation of sale or the reduction of purchase price as well as any other claims for damages shall be excluded.