
HBX1500VS - Hand blender GORENJE - Free user manual and instructions
Find the device manual for free HBX1500VS GORENJE in PDF.

| Product type | Immersion blender |
| Brand | Gorenje |
| Model | HBX1500VS |
| Blending shaft | Stainless steel |
| Main functions | Blend, chop, whisk, crush ice, puree |
| Speed control | Variable speed + Turbo button |
| Max continuous running time | 30 seconds |
| Maximum food temperature | 80 °C |
| Noise level | < 72 dB(A) |
| Chopper bowl material | Dishwasher-safe plastic |
| Included accessories | Chopper bowl, whisk, beaker |
| Safety | Do not immerse the motor unit |
| Safety | Very sharp blades, handle with care |
| Safety | Household use only |
| Cleaning the motor unit | Damp sponge, do not immerse |
| Cleaning the chopper bowl and blade | Dishwasher |
| Cleaning the blending shaft and lid | Damp sponge, dry with a cloth |
| Warranty | Gorenje international warranty |
| Use | Household use only |
| Recycling | Selective WEEE collection |
Frequently Asked Questions - HBX1500VS GORENJE
User questions about HBX1500VS GORENJE
0 question about this device. Answer the ones you know or ask your own.
Ask a new question about this device
Download the instructions for your Hand blender in PDF format for free! Find your manual HBX1500VS - GORENJE and take your electronic device back in hand. On this page are published all the documents necessary for the use of your device. HBX1500VS by GORENJE.
USER MANUAL HBX1500VS GORENJE
natural_image
Product photo of a kitchen blender with four different kitchen utensils (no text or symbols visible)HBX1500VS
| Palični mešalnik | Navodila za uporabo | SI |
| Štapni mixer | Upute za uporabu | BIH HR |
| Štapni mixer | Uputstvo za upotrebu | BIH SRB MNE |
| Рака миксер | Упатства за употреба | MK |
| Hand blender | Instruction manual | GB |
| Blender de mână | Manual de utilizare | RO |
| Ruční mixér | Návod na použití | CZ |
| Ručný mixér | Návod na obsluhu | SK |
| Kézi Mixer | Használati utasítás | H |
| Ръчен Миксер | Инструкции за употреба | BG |
| Blender ręczny | Instrukcja obsługi | PL |
| Ручний Миксер | Інцтрукція з експлуатації | UA |
| Minipimer | Istruzioni d'uso | I |
| Ручной Миксер | Инструкция по эксплуатации | RUS |
| Stabmixer | Gebrauchsanweisung | D |
| Mixeur Plongeant Ac Hachoiver | Notice d'utilisation | F |
SL Navodila za uporabo ....3
- Vstavite metlico (8) v nastavek za mešanje (7) in ga obrnite v smeri urinih kazalcev(zaslišite »klik«).
• V posodo dodajte sestavine. - Primate aparat in sekljalnik in pritisnite tipko za vklop.
- Potpuno odmotajte priključni kabel.
- Priključite nastavak za miješanje (3) na aparat (1).
- U priloženu posudu, ili u neku drugu prikladnu posudu stavite hranu.
- Uhvatite mikser i posudu. Da hrana ne prska naokolo, najprije potopite mikser u hranu, a zatim pritisnite tipku za uključenje (2).
- Umetnite metlicu (8) u jedinicu za miješanje i okrenite je u smjeru kazaljki na satu do kraja.
• Stavite namirnice u posudu. - Uhvatite aparat i posudu, te pritisnite tipku za uključenje (2).
- Pogonska jedinica
- Soft/Tač dugme za uključenje /isključenje / regulisanje brzine
- Noga za mešanje iz nerđajućeg čelika
- Jedinica za seckanje
- Nož za seckanje
- Posuda za seckanje
- Jedinica za mešanje
- Metlica
- Čaša
Kako ga koristiti
Aparat je namenjen korištenju u kućanstvu i nije predviđen za korištenje u komercijalne svrhe. Koristite ga za obradu količina hrane koje su uobičajene za domaćinstvo. Uputstva spremite i priložite aparatu u slučaju. Pre prve upotrebe obrišite mikser i nastavke vlažnom krpom. Propisno sastavite aparat pre nego što utikač uključite u zidnu utičnicu. Isecite velike sastojke na male delove veličine oko 2 cm pre obrade. Pustite da se sastojci ohlade pre nego što ih iseckate ili sipate u posudu (maks. Temperature (80° C).
Važna upozorenja
- Potpuno odmotajte priključni gajtan.
- Priključite nastavak za mešanje (3) na aparat (1).
- U priložen sud, ili u neku drugu prikladnu posudu stavite hranu.
- Pridržite mikser i posudu. Da hrana ne prska naokolo, najpre potopite mikser u hranu, a zatim pritisnite tipku za paljenje (2).
Napomena: Kad završite, najpre isključite mikser, a tek zatim ga izvucite iz hrane.
- Seckalicu (6) postavite na glatku, čistu radnu površinu i pritisnite nadole.
- Umetnite nož (5).
• U posudu stavite hranu. - Na univerzalnu seckalicu stavite nastavak (4) i okrenite ga u smeru kazaljki na časovniku do kraja.
- Priključite aparat (1) na nastavak (4) i tokom rezanja ga čvrsto pritiskajte nadole.
- Uhvatite aparat i seckalicu i pritisnite tipku za paljenje (2).
Napomena: Ako se sastojci zalepe na zid posude, otpustite dugme da biste isključili aparat i lopaticom ihodlepite ili dodajte malo tečnosti.
- Umetnite metlicu (8) u jedinicu za mešanje i okrenite je u smeru kazaljki na časovniku do kraja.
• Stavite namirnice u posudu. - Uvatite aparat i posudu, te pritisnite tipku za uključenje (2). Za mešanje koristite čašu ili neku drugu prikladnu posudu.
- Motor Body Unit
- On / Off / speed control knob
- StainlessSteel Blending Attachment
- Chopping Body Unit
- Chopping Blade
- Chopping Bowl
- Beater Body
- Whisk
- Beaker
How to use
This hand blender is a household appliance and is not intended for commercial use. Use it for processing of food in the usual quantities for domestic use.
Store these instructions in a safe place and pass them on in case the appliance changes hands. Before first use, wipe of the handle of the blender with a damp cloth. Assemble the appliance properly before you put the plug in the wall socket. Cut large ingredients into pieces of approximately 2cm before you process them. Let hot ingredients cool down before you chop them or pour them into the beaker (max. temperature 80°C).
Important safeguards
When using electrical appliances, in order to reduce the risk of fire, electric shock, and/or injury to persons, basic safety precautions should always be followed, including the following:
- Read all instructions carefully, even if you are familiar with the appliance.
This appliance is marked according to the European directive 2012/19/EU on Waste Electrical and Electronic Equipment (WEEE). This guideline is the frame of a European-wide validity of return and recycling on Waste Electrical and Electronic Equipment.
- To protect against the risk of electric shock DO NOT IMMERSE the appliance, Cordset or Plug in water or other liquid.
- To clean, wipe exterior with a damp cloth.
- Never leave an appliance unattended when in use.
- Switch off and remove the plug from the power outlet when not in use, before assembling or disassembling parts and before cleaning. To unplug, grasp plug and pull from power outlet. Never pull cord.
- Do not operate any appliance with a damaged cord or plug, or after the appliance malfunctions or is dropped or damaged in any manner. Return the complete appliance to your nearest authorised service facility for examination, electrical repair, mechanical repair or adjustment.
- The use of attachments or accessories not recommended or sold by this appliance manufacturer may result in fire, electric shock or personal injury.
- Do not overfull.
- Do not let cord hang over edge of a table, counter, or touch hot surface.
-
Avoid touching hot surfaces, use handles and knobs.
-
Do not operate or place any part of this appliance on or near any hot surface (such as a gas or electric burner, or in a heated oven).
- Do not abuse the cord. Never carry the appliance by the cord or yank it to disconnect it from the outlet; instead, grasp the plug and pull to disconnect.
- When using the extension cord with your appliance make sure the extension cord is correctly wired and rated for its use.
- This product is intended for household use only.
- Do not attempt to repair the appliance yourself; instead, take it your nearest Service Centre or Authorised Service Agent for repair.
- This appliance can be used by children aged from 8 years and above and persons with reduced physical, sensory or mental capabilities or lack of experience and knowledge if they have been given supervision or instruction concerning use of the appliance in a safe way and understand the hazards involved.
- Children shall not play with the appliance.
- Cleaning and maintenance shall not be made by children unless they are older than 8 and supervised.
- Handle carefully the sharp blades especially during removing and emptying the container and during cleaning.
-
Do not touch the blades of the blender bar, especially when the appliance is plugged in. The blades are very sharp.
-
If the blades get stuck, unplug the appliance before you remove the ingredients that block the blades.
- Be very careful when you handle or clean the blade unit or the combination disc. Their cutting edges are very sharp. Be especially careful when you clean them and when you empty the bowl.
- The bowl is not suitable for use in microwave ovens.
- Noise level: Lc < 72 dB(A)
Handling the appliance
The appliance is used for mixing mayonnaise, gravy, shakes, baby food, and for chopping onions, ice, cooked fruit and vegetables.
Caution! Hand blender is not suitable for the preparation of mashed potatoes.
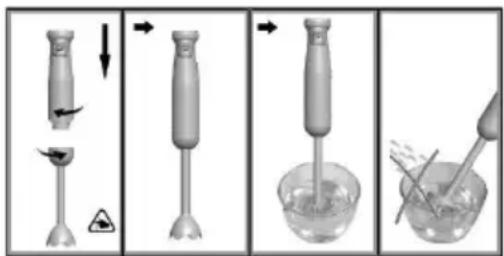
- Attach the blending device (3) to the appliance (1).
- Insert food into the beaker or any other suitable bowl.
- Grip both the blender and the bowl. To prevent splashing first dip the blender blade into the food and then press the ON button (2).
- Press and hold the normal (2) to switch on the appliance. The cutting speed is controlled by pressing the power button.
- Caution! When finished first switch the blender off and then lift it from the bowl.
Caution! When finished first switch the blender off and then lift it from the bowl.
Warning: Do not process more than 30 seconds without interruption. Let the appliance cool down to room temperature before you continue processing.
Universal chopper
It is used for chopping herbs, onions, fruit, vegetables, ice, hard cheese and meat.
Caution! Before chopping meat remove tendon, gristle and bone tissue. Universal chopper is not suitable for chopping coffee beans or horse radish.
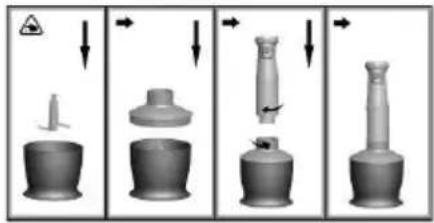
- Place the chopper bowl (6) on flat, solid worktop and press the body unit (1) downwards.
- Insert the chopping blade (5).
- Put food in the chopping bowl (6).
- Place the chopping bowl unit (4) on the chopper bowl (6).
- Turn the motor unit (1 on the chopper bowl unit (4) until it looks.
- Hold the appliance and the chopper bowl and push the start button (2).
Note: If the ingredients stick to the wall of the bowl, release the button to switch off the appliance and loosen the ingredients with a spatula or add some liquid.
Warning: Do not process more than 30 seconds without interruption. Let the appliance cool down to room temperature before you continue processing.
Using the beater
Before connecting the beater onto the motor unit make sure the blender is disconnected from the electrical outlet.
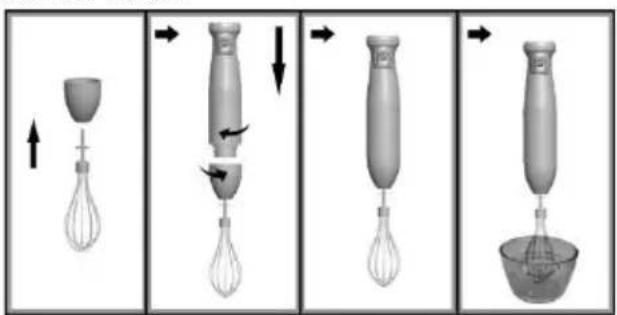
- Insert the whisk (8) by grasping into the beater body (7). Screw the beating attachment to the main unit by turning counter clockwise.
- Place the ingredients to be mixed in the bowl/beaker.
- Hold the appliance and the bowl and push the start button (2).
Warning: Do not process more than 30 seconds without interruption. Let the appliance cool down to room temperature before you continue processing.
Cleaning and Maintenance
Caution! Do not immerse the appliance in water and do not wash it in the dishwasher.
- Wipe the appliance first with damp and then with dry cloth.
- The beaker (9), Whisk (8), Chopping bowl (6), Chopping blade (5) you can used in the dishwasher.
- Chopping Body Unit (4), Blending Attachment (3), Beater Body (7) wipe first with damp and then with dry cloth.
Remark: During the processing of vegetables with aggressive coloring, e.g. red cabbage, plastic parts may be subject to discoloration. This may be removed by rubbing such surfaces with a few drops of cooking oil.
Environment
This marking indicates that this product should not be disposed of with other household waste throughout the EU. To prevent possible harm to the environment or human health from uncontrolled waste disposal, recycle it responsibly to promote the sustainable reuse of material resources. To return your used device, please use the return and collection systems or contact the retailer where the product was purchased. They can take this product for environmentally safe recycling.

Guarantee & service
If you need information or if you have a problem, please contact the Gorenje Customer Care Centre in your country (you find its phone number in the worldwide guarantee leaflet). If there is no Customer Care Centre in your country, go to your local Gorenje dealer or contact the Service department of Gorenje domestic appliances.
For personal use only!
GORENJE WISHES YOU A LOT OF PLEASURE WHEN USING YOUR APPLIANCE
We reserve the right to any modifications!

- Telo motora
- Jemné tlačidlo zapnutia / vypnutia / ovládač rýchlosti
- Mixovací nástavec z nerezu
- Nástavec na sekanie
- Čepel'nástavca na sekanie
- Miska
- Telo šl'ahača
- Šl'ahač
- Pohárik
AKO POUŽÍVAŤ
natural_image
Four-step cooking process diagram showing mixing of a bowl with whisk, pouring into a pan, and adding a whisk (no text or symbols)natural_image
Four-step cooking process diagram showing mixing of a bowl with whisk and whisk, then adding a pan to form a bowl (no text or symbols)flowchart
graph TD
    A["Initial cylinder with warning symbol"] --> B["Step 1: Inserted part"]
    B --> C["Step 2: Inserted part with plastic cap"]
    C --> D["Step 3: Inserted part with plastic bulb"]
    D --> E["Step 4: Inserted part with plastic bottle"]
natural_image
Four-panel diagram showing a mixing process: whisking, pouring into a bowl, and adding a brush (no text or symbols)
Brand : GORENJE
Model : HBX1500VS
Category : Hand blender