VRT 66421 VC - Vacuum Cleaner BEKO - Free user manual and instructions
Find the device manual for free VRT 66421 VC BEKO in PDF.

| Brand | Beko |
| Model | VRT 66421 VC |
| Category | Cordless Vacuum Cleaner |
| Type | Stick / Handheld Vacuum |
| Power Supply | Rechargeable Li-ion Battery |
| Charger Input Voltage | 100-240V ~ 50/60Hz |
| Charger Output Voltage | 27V 0.5A |
| Rated Power | 250 W |
| Charging Time | 3 to 4.5 hours |
| Runtime (Minimum Speed) | 40 minutes |
| Runtime (Maximum Speed) | 15 minutes |
| Filter | Washable Filter (Pre-filter and Plastic Filter) |
| Included Accessories | Crevice Tool, 2-in-1 Tool, Motorized Bed Brush, Motorized Floor Brush |
| Charging Station | Yes, with Wall Mount |
| Power Adjustment | 2 Levels (Standard / High) |
| Safety | Automatic Shut-off, Overload Protection |
| Maintenance | Cleaning the dust container and filters with water, cleaning the brush |
| Battery | Integrated, Replacement by a Professional |
| Compliance | WEEE, RoHS |
Frequently Asked Questions - VRT 66421 VC BEKO
User questions about VRT 66421 VC BEKO
0 question about this device. Answer the ones you know or ask your own.
Ask a new question about this device
Download the instructions for your Vacuum Cleaner in PDF format for free! Find your manual VRT 66421 VC - BEKO and take your electronic device back in hand. On this page are published all the documents necessary for the use of your device. VRT 66421 VC by BEKO.
USER MANUAL VRT 66421 VC BEKO
Cordless Stick Vacuum Cleaner
User Manual

natural_image
Pure electrical circuit lines without any symbolsVRT 65421 VC
VRT 66421 VC
EN - PL - FR - RO - IT - BG - SL - SQ - SR - HR
Please read this guide first!
Dear Customer,
Thank you for choosing a Beko product. We would like you to achieve the optimal efficiency from this high quality product which has been manufactured with the state of the art technology. Please make sure you read and understand this guide and supplementary documentation fully before use and keep it as a reference. Include this guide with the unit if you hand it over to someone else. Observe all warnings and information herein and follow the instructions.
Symbols and their meanings
These symbols are used in this manual:

Important information and advice on using the device.

CAUTION: Warnings against personal injury and property damage.

Protection class against electric shock.
CONTENTS
ENGLISH 4-14
POLISH 15-30
FRANÇAIS 31-43
ROMÂNĂ 44-59
ITALIANO 60-74
БЪЛГАРСКИ 75-87
SLOVENŠČINA 88-99
SHQIP 100-112
SRPSKI 113-124
HRVATSKI 125-137
1 Important safety and environmental instructions
This section contains instructions for avoiding hazards that could result in injury or material damage. Failure to follow these instructions will void all warranties for this appliance.
1.1 General safety
- This appliance complies with international safety standards.
- This appliance can be used by children aged 8 years and over and people with reduced physical, sensory, or mental capabilities of lack of experience if they are supervised or instructed how to use the appliance safely and understand the hazards involved. Children should not play with the appliance. Children must not clean or maintain the appliance unless they are supervised.
- This appliance is not intended for use by persons (including children) with reduced physical, sensory or mental capabilities, or lack of experience and knowledge, unless they have been given supervision or instruction concerning use of the appliance by a person responsible for their safety.
- It must only be supplied at safety extra low voltage corresponding to the marking on the appliance.
- Do not use the appliance if the power cord or the appliance is damaged. Contact the authorised service.
- Make sure the mains power matches the information on the appliance's rating plate/label.
- Do not use the appliance with an extension cord.
- To avoid damage to the power cord, prevent it from being pinched, crimped or rubbed against sharp edges.
- Do not handle the appliance or its plug with wet hands when plugged in.
- Do not pull on the cord while unplugging the appliance.
- Do not vacuum combustible materials and make sure that cigarette ashes are cold before you vacuum them.
- Do not vacuum water and other liquids.
- Protect the appliance from rain, moisture, and heat sources.
- Do not use the appliance in or near explosive or flammable environments and substances.
- Unplug the appliance before cleaning and maintenance.
- Do not clean the appliance or power cord by immersing in water.
- Do not disassemble the appliance.
- Use original parts or parts recommended by the manufacturer only.
- To prevent blocking the filer or damaging the motor, do not vacuum cement, plaster or fragments of compressed paper. Use the appliance only with the station provided.
- Do not use the appliance without filters otherwise it could get damaged.
- If you keep the packaging, keep it out of reach of children.
- This appliance is not intended to be used by persons, including children, with sensory or mental disabilities or lack of experience and knowledge unless they are supervised by the persons responsible for their safety and instructed in its use.
• Children must be supervised to prevent them from playing with the appliance. - Remove the plug and battery group before cleaning and maintenance.
- Remove the batteries before disposing of the appliance.
- Unplug the appliance before removing the battery.
- Dispose of used batteries in accordance with local laws and regulations.
- This appliance contains batteries that are only replaceable by skilled persons.
- This appliance is not intended for commercial use. This appliance is intended for domestic and not commercial use as follows:
- In the staff kitchens of stores, offices and other working environments
- Farms - By guests in hotels, motels or other accommodation facilities
- In B&Bs and similar places.
1 Important safety and environmental instructions
- This appliance must not be used by persons with limited physical, sensory, and cognitive abilities or who lack experience and knowledge unless they are supervised or have been instructed in its operation.
• Children must be supervised to prevent them from playing with the appliance. - Do not place the handset on the table; We recommend that you attach the wall-mounted charging base after cleaning.
- If the supply cord is damaged, it must be replaced by the manufacturer, its service agent or similarly qualified persons in order to avoid a hazard.
- Keep rotating brush away from supply cords.
- Keep fingers, hair and loose clothing from moving parts and openings whilst using the vacuum cleaner.
- WARNING: For the purposes of recharging the battery, only use the detachable supply unit ZD012A270050EU provided with this appliance.
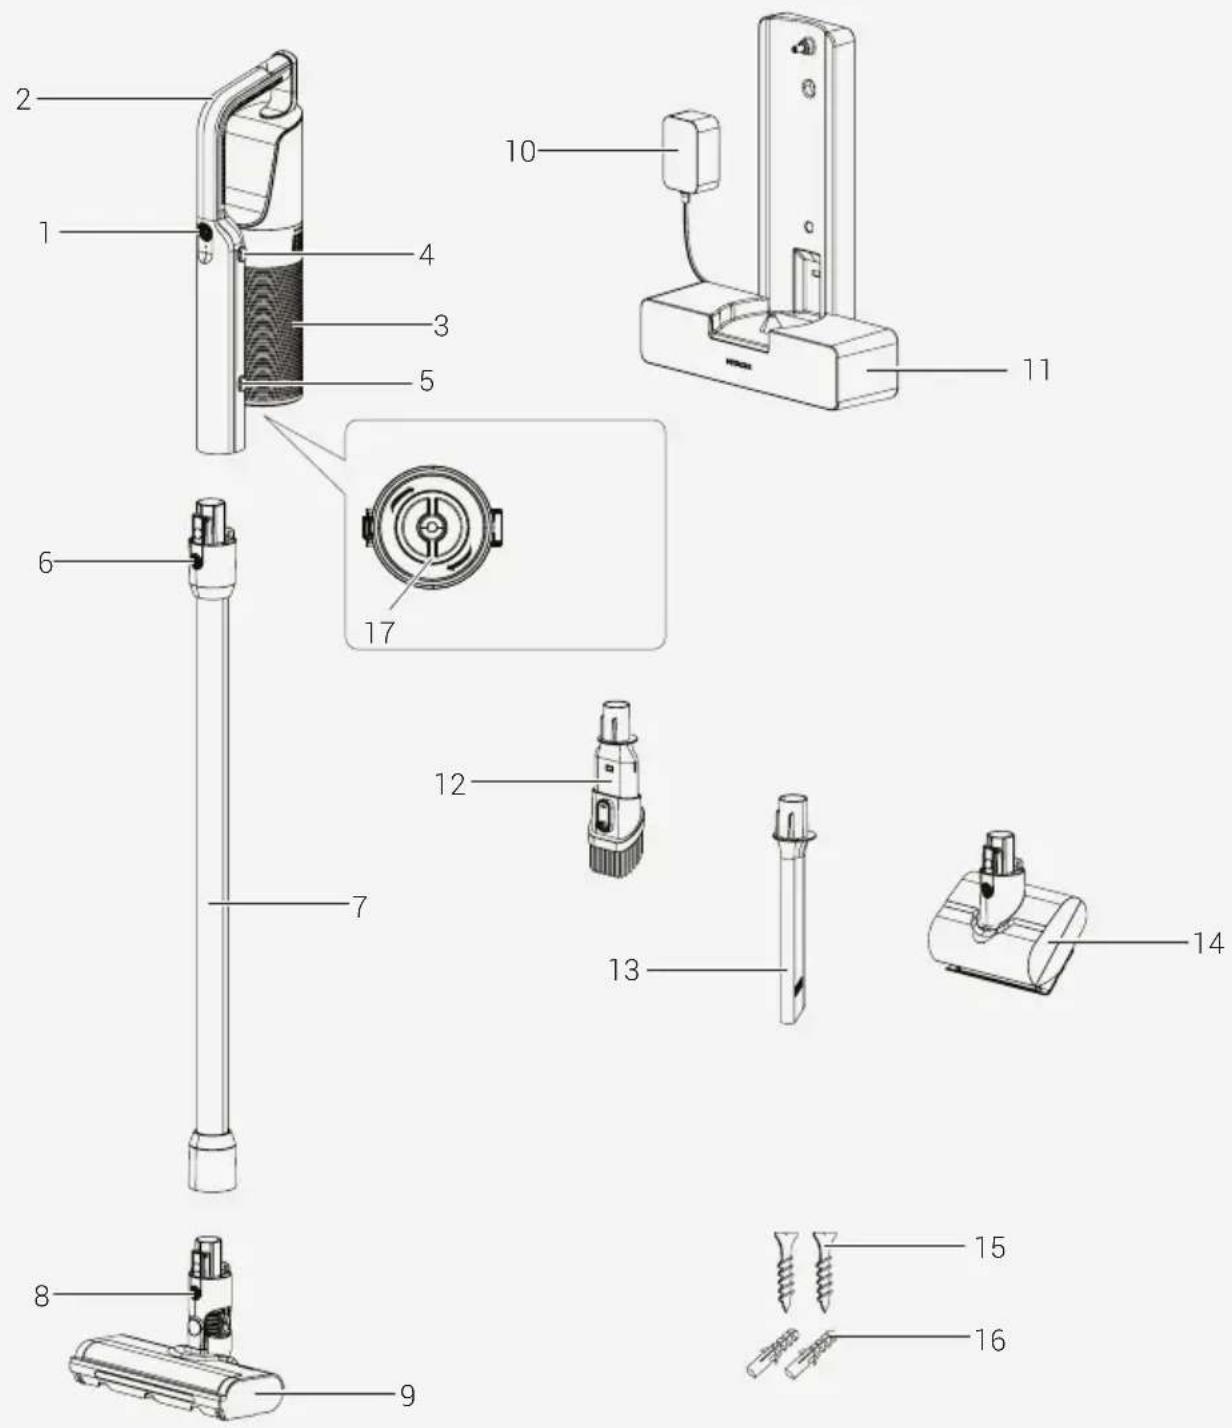
1.2 Compliance with the WEEE Directive and Disposing of the Waste Product
This product complies with EU WEEE Directive (2012/19/EU). This product bears a classification symbol for waste electrical and electronic equipment (WEEE).
This symbol indicates that this product shall not be disposed with other household wastes at the end of its service life. Used device must be returned to official collection point for recycling of electrical and electronic devices. To find these collection systems please contact to your
local authorities or retailer where the product was purchased. Each household performs important role in recovering and recycling of old appliance. Appropriate disposal of used appliance helps prevent potential negative consequences for the environment and human health.
1.3 Package information

Packaging materials of the product are manufactured from recyclable materials in accordance with our National Environment Regulations. Do not dispose of the packaging materials together with the domestic or other wastes. Take them to the packaging material collection points designated by the local authorities.
1.4 Information on Waste Batteries

This symbol on rechargeable batteries/batteries or on the packaging indicates that the rechargeable battery/battery may not be disposed of with regular house hold rubbish. For certain rechargeable batteries/batteries, this symbol may be supplemented by a chemical symbol. Symbols for mercury (Hg) or lead (Pb) are provided if the rechargeable batteries/batteries contain more than 0,0005 % mercury or more than 0,004 % lead.
Rechargeable batteries/batteries, including those which do not contain heavy metal, may not be disposed of with household waste. Always dispose of used batteries in accordance with local environmental regulations. Make enquiries about the applicable disposal regulations where you live.
1.5 Compliance with RoHS Directive
The product you have purchased complies with EU RoHS Directive (2011/65/EU). It does not contain harmful and prohibited materials specified in the Directive.
1.6 Actions to be taken for energy saving
- To avoid redundant energy consumption while using the device, set the speed levels according to the floor you are sweeping.
- Under normal conditions, low speeds are used to clean the hard floors, curtains and sofas, and high speeds are used to clean the carpets.
2 Overview
2 Overview
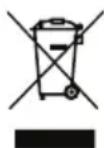
2.1 Controls and components
- On/Off and Level Adjust button
- Handle
- Dust contrainer
- Dust container release button
- Dust container lid release button
- Tube release button
- Tube
- Electrical turbo brush release button
- Electrical turbo brush
- AC adaptor
- Charging dock
- Combination tool
- Crevice
- Motorized bed brush (VRT 66421 VC only)
- Screw (2 pcs)
- Screws anchors (2 pcs)
- Filter Cleaning Knob
2.3 Technical data
| Nominal input power 250 W | |
| Input 100-240V~ 50-60Hz0.5A | |
| Output 27V 0.5A | |
| Charging time 3-4.5 hours | |
| Runtime at max.power | 15 minutes |
| Runtime at min.power | 40 minutes |
Parameter of External Power Supply
| Manufacturer E-TEK Electronics Manufactory Co.,LTD. | |
| Model Identifier ZD012A270050EU | |
| Input Voltage 100-240V~ | |
| Input Frequency 50-60Hz | |
| Input Current 0.5A | |
| Output Voltage 27.0V | |
| Output Current 0.5A | |
| Output Power 13.5W | |
| Average active efficiency | 85.69% |
| Efficiency at low load(10%) | 77.98% |
| No-load power consumption | 0.086W |
Values supplied with the instrument or accompanying documentation are laboratory readings per relevant standards. These values may differ depending on operation and ambient conditions.
3 Installation
3.1 Intended use
This appliance is intended for household use and it is not suitable for industrial use.
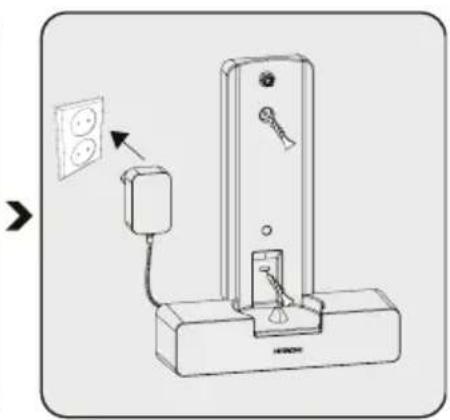
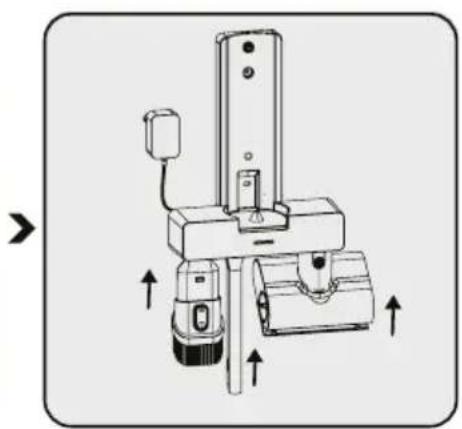
3.2 Installation of the charging dock
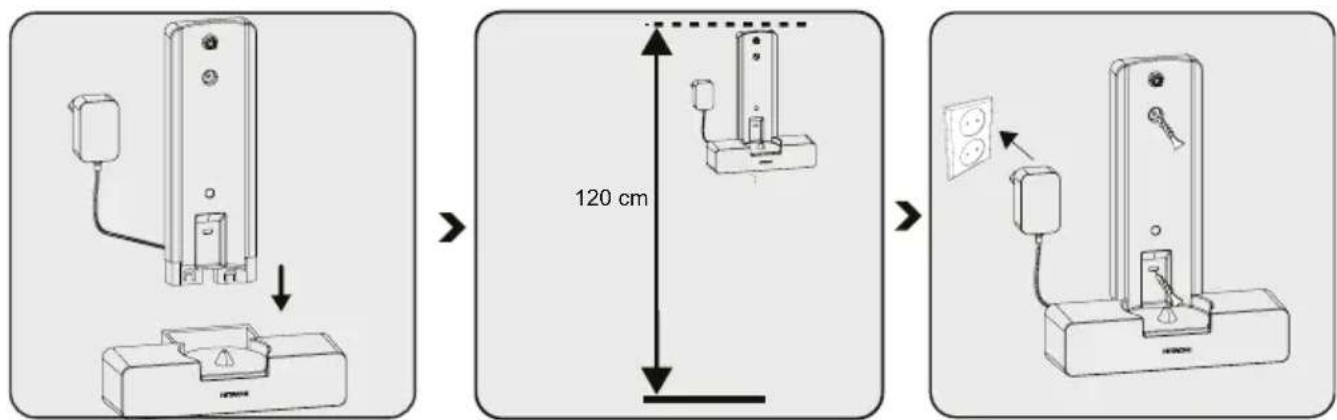
Assembly the charging dock in the direction of arrow.
Install the charging dock at a height of minimum 120 cm from the ground.
Fix two dowels on the wall.
Place two screw into their location on the charging dock and mount on the dowels on the wall.
Plug the AC Adaptor to the socket.
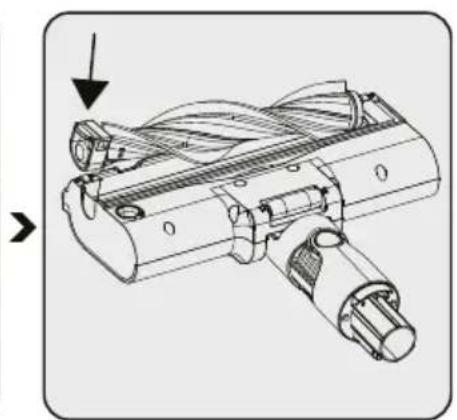
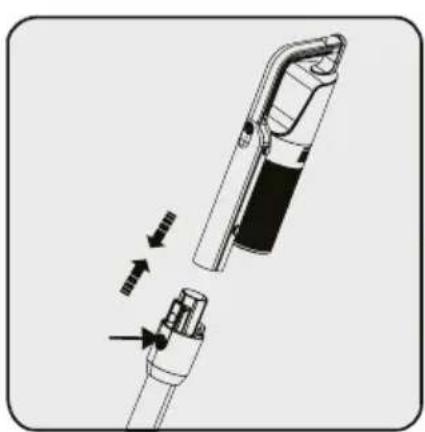
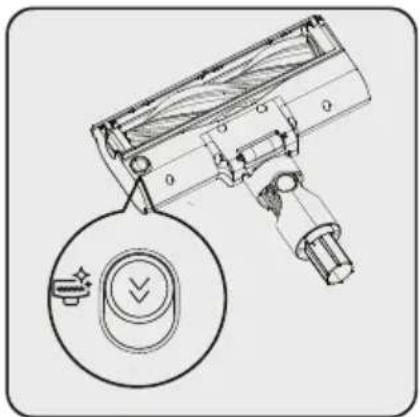
3.2 Installation of the body and the brush
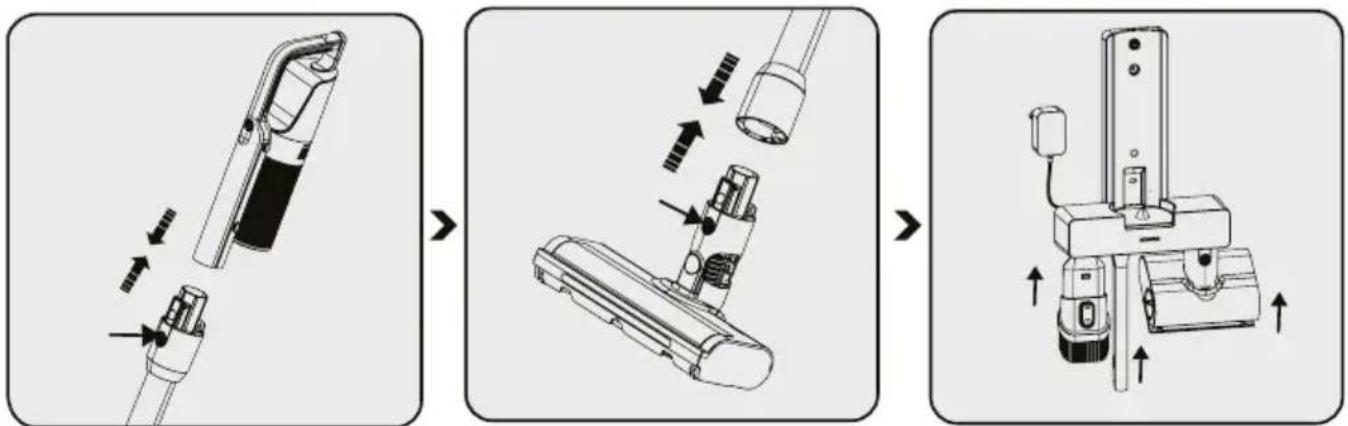
Push the tube in the direction of arrow towards the body by pushing on the tube release button
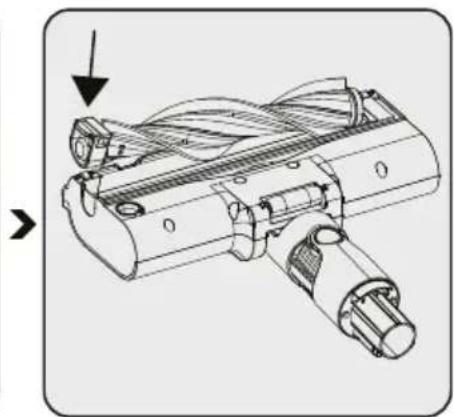
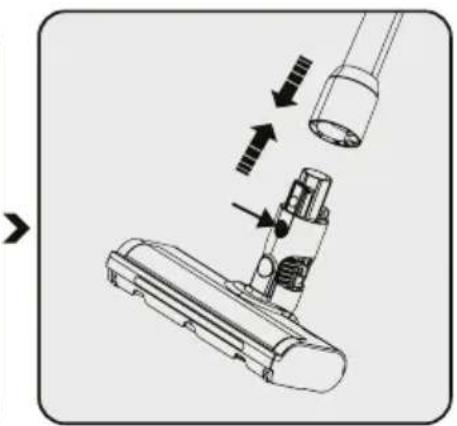
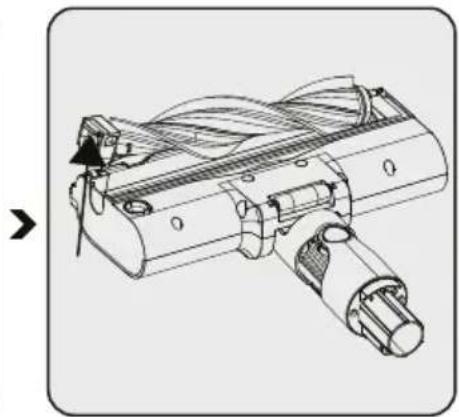
Press the electric turbo brush release button on the electric turbo brush and push it in the direction of arrow towards the tube
Attach crevice attachment and combination tool, Motorized bed brush to the charging dock.
4 Operation
4.1 Charging the appliance

Place the appliance on the charging dock.
After placing dust container on the charging dock, push the appliance towards the charging dock.
Plug the AC Adaptor to the socket.
When you place appliance to the charging dock, it starts to charge shall be displayed on the screen.

It takes up to 3 to 4.5 hours to charge the appliance completely. The appliance shall not be operated while charging.

If the appliance is placed on the charging dock while it is being operated, it shall be stopped automatically.
4 Operation
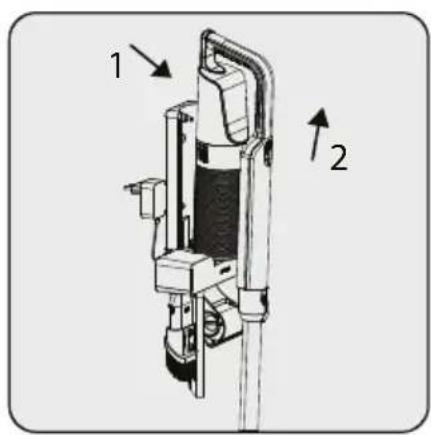
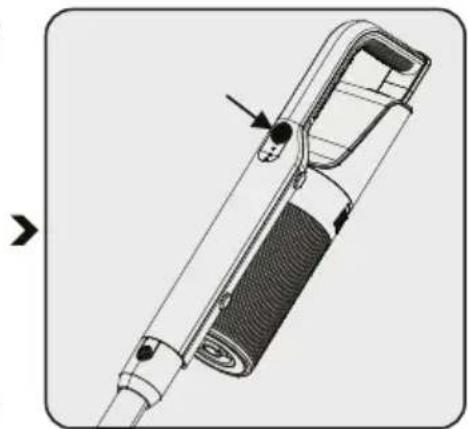
4.2 Operation
natural_image
Technical illustration of a handheld device with a handle and internal structure (no text or symbols)1-Pull the appliance towards yourself.
2-Remove the appliance from the charging dock.
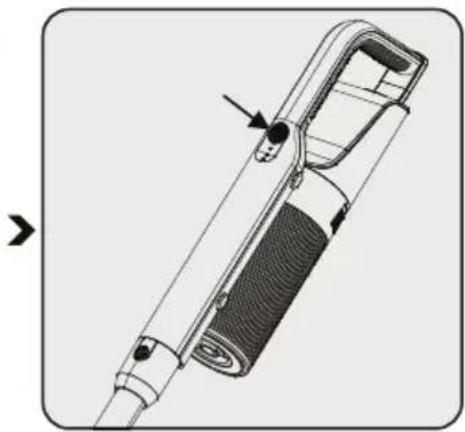
- Every time the control button of the handy cleaner is
pressed to "power on", the operation switches in the
following order: Standard/ High.
- To stop operation, Press 3 sec to power off. The
indicator lamp and operation stops.
natural_image
Technical line drawing of a mechanical component with an inset view showing internal components (no text or symbols)
The appliance may be placed for charging before the complete discharging of the battery. The appliance may be kept continuously as charging on the charging dock until the next operation.

Pay attention to the battery level percentage during operation. Battery level should be tracked during usage when it is empty, the appliance stops operating automatically.
4 Operation

natural_image
Technical line drawing of a handheld device with no visible text or symbolsThis appliance is suitable for use on carpets and hard floors.
4.3 Accessories
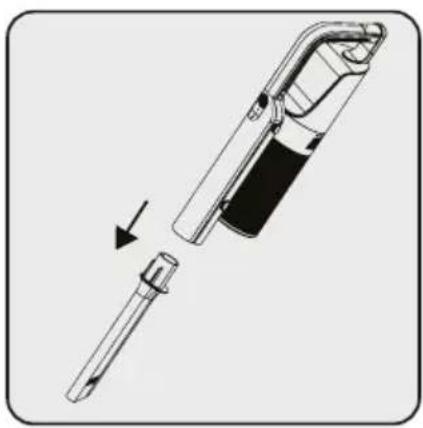
natural_image
Technical illustration of a soldering iron with an arrow indicating disassembly (no text or symbols present)
natural_image
Diagram of a handheld device with a plug and connector, showing a cutaway view (no text or symbols)
natural_image
Diagram showing a device being inserted into a housing, with an arrow indicating the process (no text or symbols present)Crevice: Suitable for vacuuming the rear of the furnitures, hard to reach areas and narrow areas.
Combination tool: Suitable for vacuuming curtains, sofas, waxed furniture and delicate and fragile objects.
(VRT 66421 VC only)
Motorized bed brush: Suitable for vacuuming floorings, stair steps, car interiors, sofas and seat, etc. It is also used for vacuuming pet hair on such surfaces.
5 Cleaning and maintenance
Turn off and unplug the appliance before cleaning.

WARNING! Do not use benzene, solvents, abrasive cleaners, metal objects or hard brushes to clean the appliance.

WARNING! Deformation may occur on the filters within time as a result of usage. It shall be replaced with a new one to prevent loss of performance. Contact with the customer services to buy a new one
5.1 Cleaning the Dust container and Filters

Wash the filters with water.

WARNING! After washing filter, allow it to thoroughly air dry before you reassemble it.
Do not use it without drying. Doing so might clog the filters soon and cause weak suction power or abnormal odor.

We recommend you to clean the dust container after each operation.

To clean the dust container, be careful the rubber cover may fall off. After cleaning, ensure that the rubber cover is in the same position in reassemble steps.
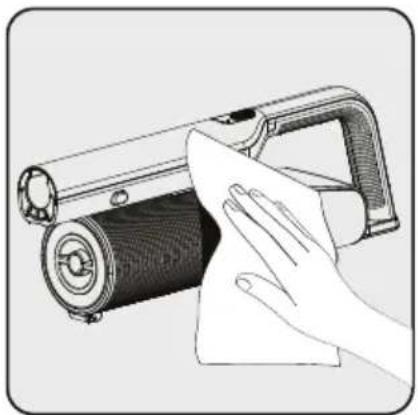
natural_image
Illustration of a hand cleaning a cylindrical device with a cloth (no text or symbols)
natural_image
Technical line drawing of a mechanical device with internal components and directional arrows (no text or symbols)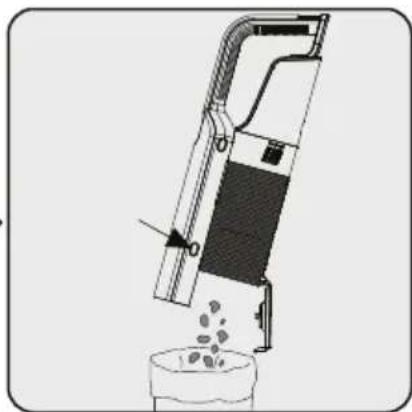
natural_image
Diagram of a mechanical device pouring liquid into a container (no text or symbols visible)Wipe the surface of the body with a wet cloth.
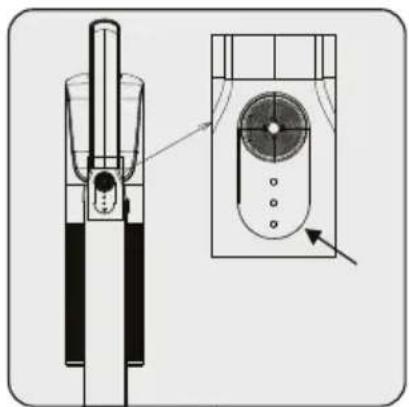
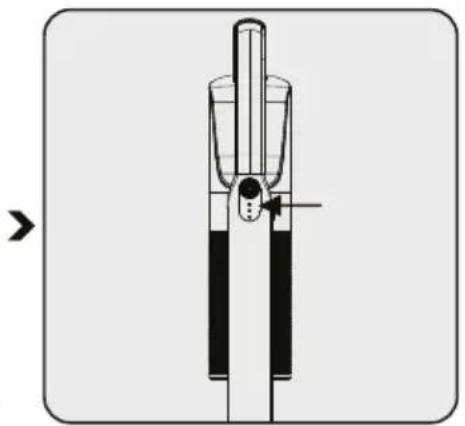
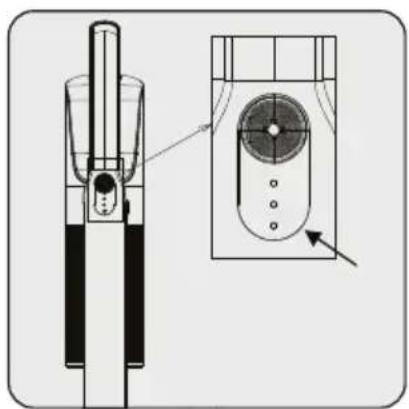
In order to operate the product at high performance for a long time, it may be necessary to clean the filter by rotating the knob under the dust container. It will help to clean the filter easily.
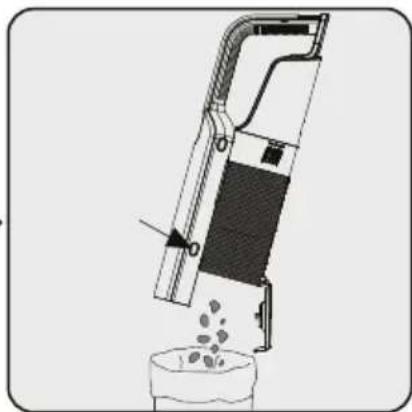
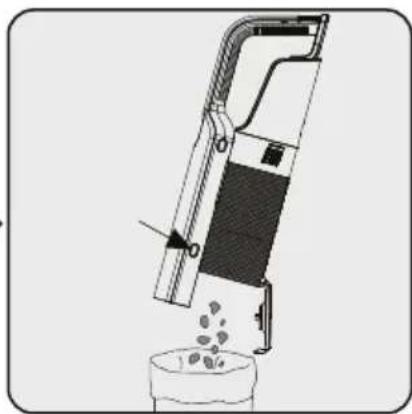
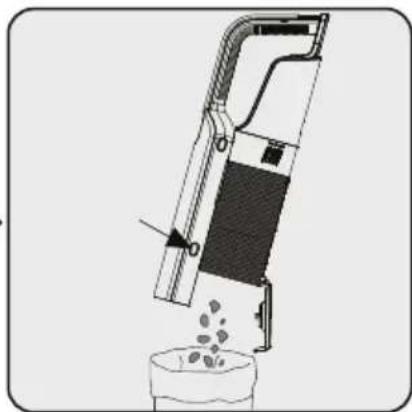
Push the button emptying dust. Dust container lid will be opened. Empty all the dust it contains.

WARNING! Should be caught at the dust box to prevent the dust box falling.
Risk of broken and damage.
5 Cleaning and maintenance
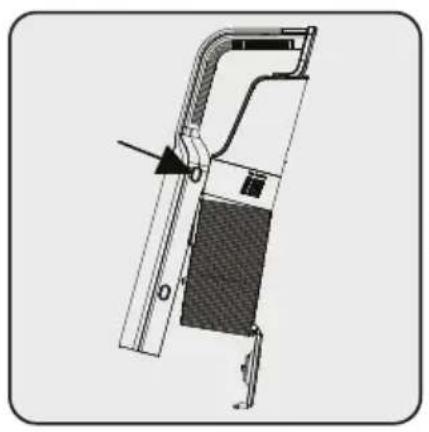
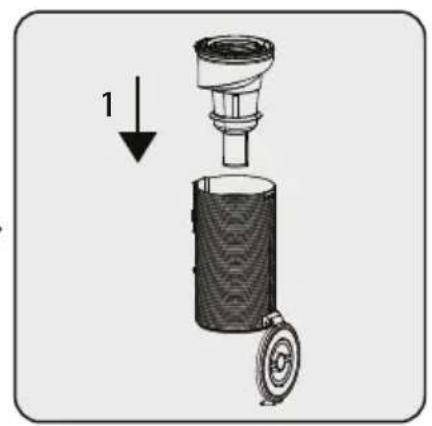
natural_image
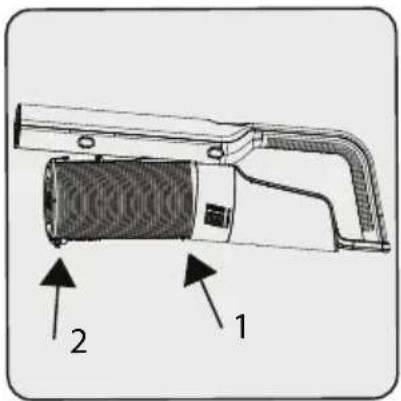
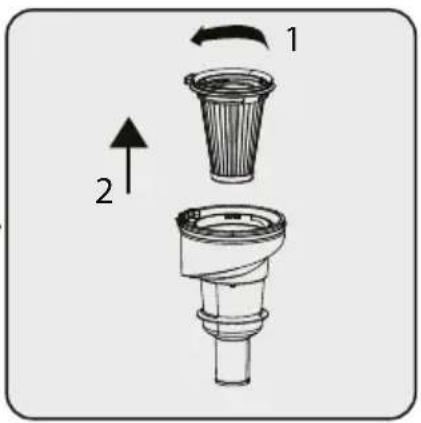
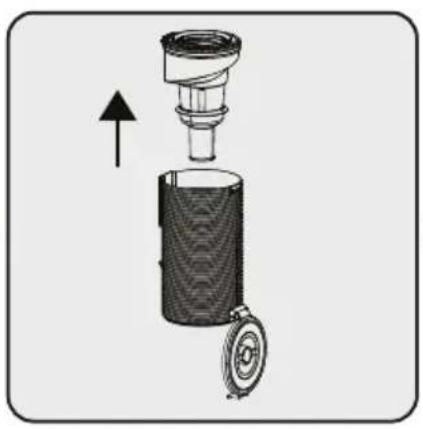
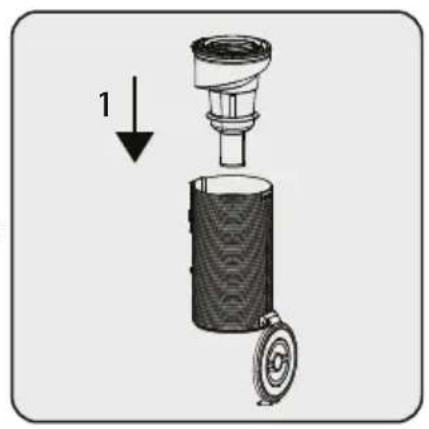
Technical diagram of a mechanical component with no visible text or symbolsFor a detailed cleaning of filters, remove the dust container by pushing the button to the Top side.


natural_image
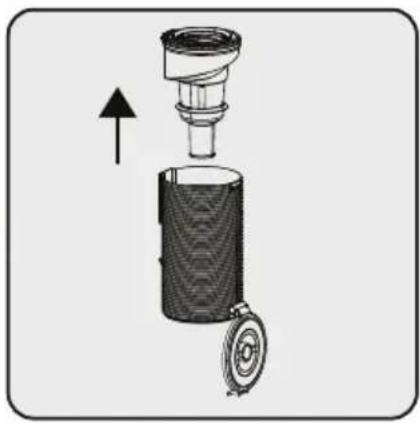
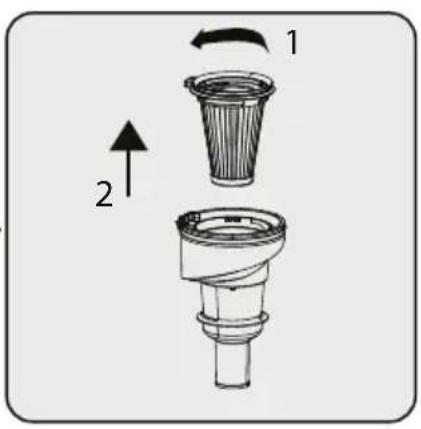
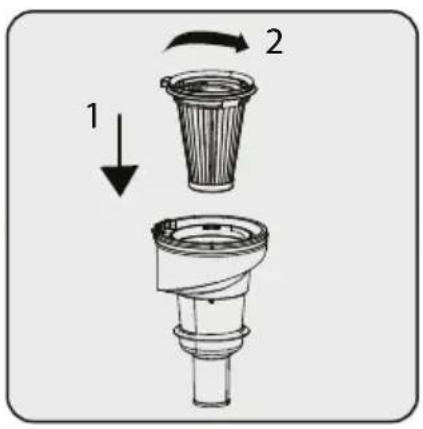
Diagram of a mechanical device with a cylindrical component and an arrow indicating upward motion (no text or symbols)Seperate pre-filter and plastic filter from each other.

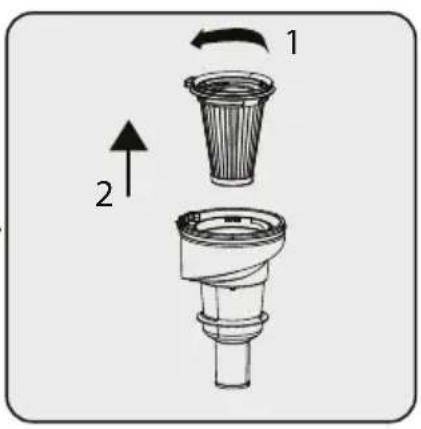
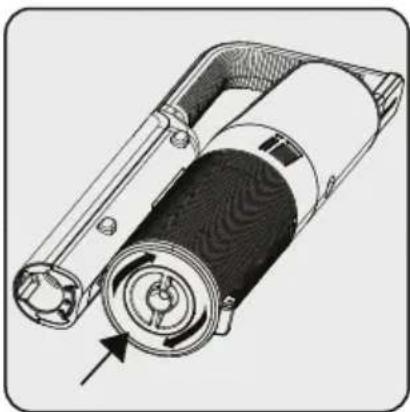
To take out the pre-filter first rotate the pre-filter counter clockwise (1), then pull out the pre-filter (2).

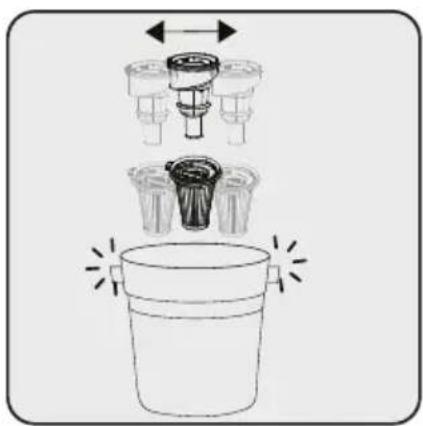
natural_image
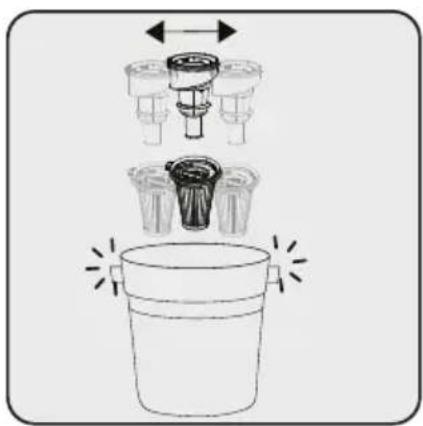
Diagram of a bucket with internal components and directional arrows indicating movement (no text or symbols)Remove the dust on the prefilter and the plastic filter by tapping it on a hard surface such as a waste bin or by using a brush.


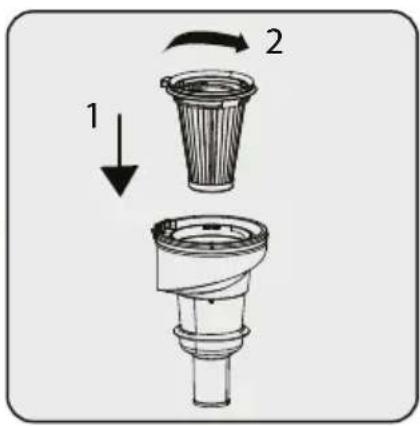
To insert the pre filter, firstly place the plastic filter


Attach pre-filter and plastic back.

WARNING! If the dust container, metal filter and inlet foam did not put into the device the product will not turn on.
5 Cleaning and maintenance
Hook the protrusion of the dust container on the slot in the handy cleaner and attach the dust case until you hear a click.
5.2 Cleaning of the brush

WARNING! Do not wash the turbo brush and the main roller.
natural_image
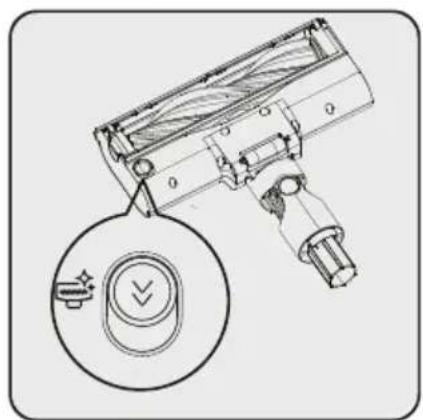
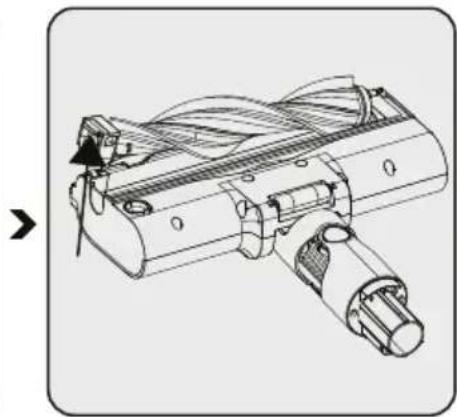
Technical line drawing of a handheld device with a circular button and a magnified inset showing a control knob (no text or symbols)Push the roller release button to the bottom side.
natural_image
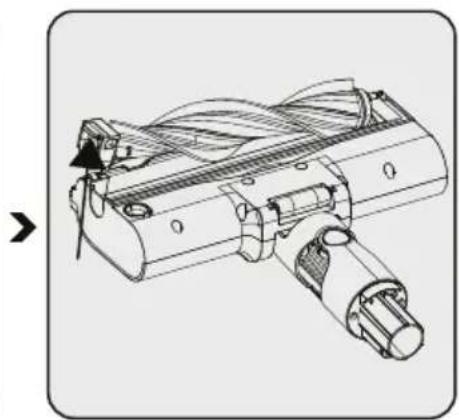
Technical line drawing of a mechanical component with no visible text or symbolsRemove the dust on it by tapping it lightly to a hard surface or remove the dust with a brush. If any hair, etc. is tangled, remove it by cutting it off.
natural_image
Technical line drawing of a mechanical device with no visible text or symbolsFix the roller back to its place by pushing.
5.3 Storage
- If you do not plan to use the appliance for a long while, store carefully.
• Unplug the appliance. - Ensure that the appliance is kept out of reach of children.
- If you shall not be using the battery for a long period of time, please keep it in a cool and dry place at half charged condition. Do not charge or discharge completely.
- Store the battery on a non-conducting material, and do not allow the battery to contact metal directly. This shall damage the battery.
5.4 Transport and shipping
- During transport and shipping, carry the appliance with its original packaging. The packaging of the appliance will protect the appliance against physical damage.
- Do not put heavy objects on the appliance or its packaging. Otherwise the appliance may be damaged.
- If the appliance is dropped, the appliance may not operate or permanent damage may occur.
2 Omówienie
natural_image
Diagram showing a device with a cable connected to a vertical panel and a base with a warning symbol, no text or labels present.natural_image
Diagram of a handheld vacuum cleaner with internal components and directional arrows indicating movement (no text or symbols)natural_image
Diagram of a vacuum cleaner assembly showing internal components and motion arrows (no text or labels)natural_image
Mechanical device diagram showing a lever mechanism with arrows indicating motion direction (no text or symbols)natural_image
Technical illustration of a handheld device with a handle and internal structure (no text or symbols)natural_image
Technical line drawing of a mechanical device with an inset view showing internal components (no text or symbols)
natural_image
Technical line drawing of a handheld device with no visible text or symbolsnatural_image
Diagram of a handheld electronic device with a screwdriver inserted, showing the tool's internal structure and an arrow indicating motion (no text or symbols present)
natural_image
Diagram of a handheld device with a plug and connector, showing a cutaway view (no text or symbols)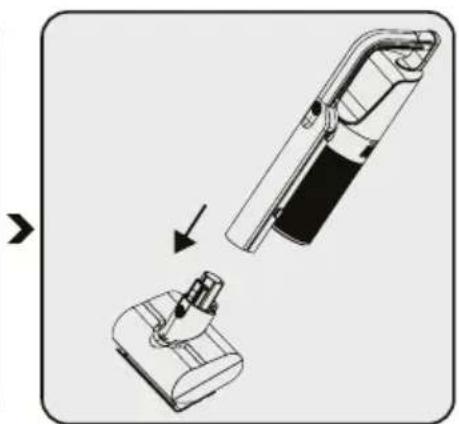
natural_image
Diagram showing a device being inserted into a base, with an arrow indicating the process (no text or symbols present)natural_image
Illustration of a hand cleaning a cylindrical device with a cloth (no text or symbols)

natural_image
Technical illustration of a mechanical device with rotating components and a directional arrow (no text or symbols)
natural_image
Diagram of a mechanical device pouring liquid into a container (no text or symbols visible)natural_image
Technical diagram of a mechanical component with no visible text or symbolsnatural_image
Cross-sectional diagram of a mechanical device with an upward arrow indicating motion or assembly (no text or symbols present)natural_image
Diagram of a bucket with two different parts, one above and one below, showing mechanical components (no text or symbols)natural_image
Technical line drawing of a handheld device with a circular button and directional arrow symbol (no text or labels)natural_image
Technical line drawing of a mechanical device with internal components and a directional arrow (no text or symbols)natural_image
Technical line drawing of a mechanical assembly with no visible text or symbolsCher/Chère client(e),
2 Aperçu Général
natural_image
Diagram showing a device with a cable connected to a vertical panel and a base with a warning symbol, no text or labels present.natural_image
Diagram of a handheld vacuum cleaner with internal components and directional arrows indicating movement (no text or symbols)natural_image
Diagram of a vacuum cleaner assembly with arrows indicating motion direction (no text or symbols)natural_image
Mechanical device diagram showing a lever mechanism with directional arrows indicating movement or force (no text or symbols present)natural_image
Technical line drawing of a mechanical device with an arrow indicating direction (no text or symbols)natural_image
Diagram of a mechanical device with directional arrows indicating movement or force (no text or symbols)natural_image
Diagram of a mechanical device with a piston and shaft, showing internal components and an arrow indicating direction (no text or symbols)natural_image
Technical line drawing of a handheld device with a handle and internal structure (no text or symbols)natural_image
Technical line drawing of a mechanical device with a side view showing internal components (no text or symbols)
natural_image
Technical line drawing of a handheld device with no visible text or symbolsnatural_image
Diagram of a handheld electronic device with a screwdriver inserted, showing the tool's internal structure and an arrow indicating motion (no text or symbols present)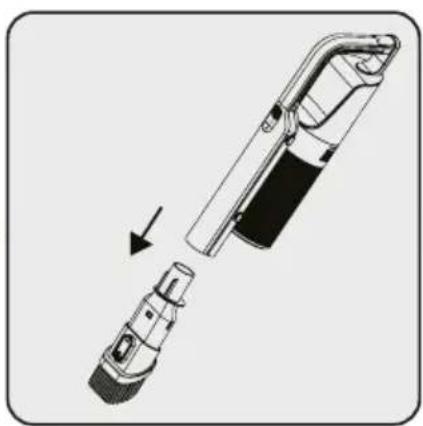
natural_image
Diagram of a mechanical device with an arrow indicating assembly or disassembly (no text or symbols present)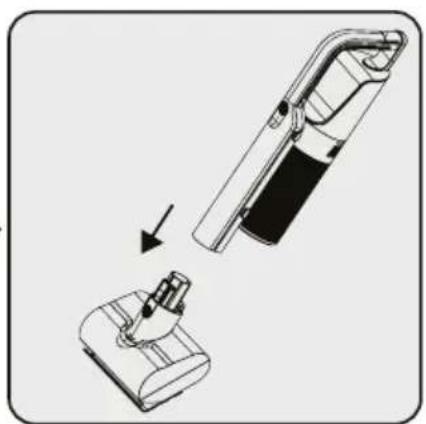
natural_image
Diagram showing a device being processed from a base to a top, with an arrow indicating the process (no text or symbols present)natural_image
Illustration of a hand cleaning a cylindrical device with a cloth (no text or symbols)natural_image
Technical illustration of a mechanical device with rotating components and a directional arrow (no text or symbols)natural_image
Diagram of a mechanical device pouring granular material into a container (no text or symbols)natural_image
Technical diagram of a mechanical component with no visible text or symbolsnatural_image
Cross-sectional diagram of a mechanical device with an upward arrow indicating motion (no text or symbols present)natural_image
Diagram of a bucket with two different parts, one above and one below, showing mechanical components (no text or symbols)natural_image
Technical line drawing of a handheld device with a circular dial indicator (no text or symbols)
natural_image
Technical line drawing of a mechanical device with internal components and motion arrows (no text or symbols)
natural_image
Technical line drawing of a mechanical component with no visible text or symbolsnatural_image
Diagram showing a device with a cable connected to a vertical panel, and a base with a switch (no text or symbols present)natural_image
Diagram of a handheld device with a handle and internal components, showing movement arrows (no text or symbols)natural_image
Diagram of a vacuum cleaner's internal structure showing blade, handle, and mounting components (no text or labels)natural_image
Mechanical device diagram showing a lever mechanism with arrows indicating motion or force direction (no text or symbols present)natural_image
Technical illustration of a handheld device with a handle and internal structure (no text or symbols)natural_image
Technical line drawing of a mechanical device with a side view showing internal components (no text or symbols)
natural_image
Technical line drawing of a handheld vacuum cleaner with mounting bracket and control panel (no text or symbols)natural_image
Diagram of a disassembled tool with an arrow indicating assembly (no text or symbols present)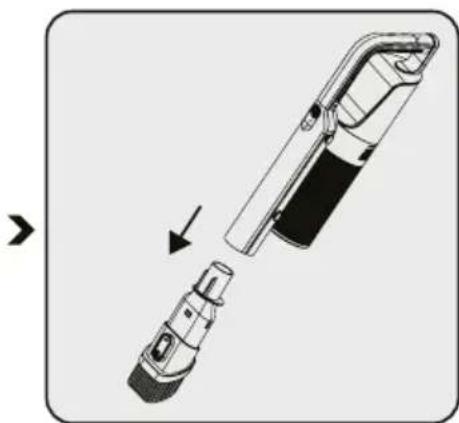
natural_image
Diagram of a handheld device with a plug and connector, showing a cutaway view (no text or symbols)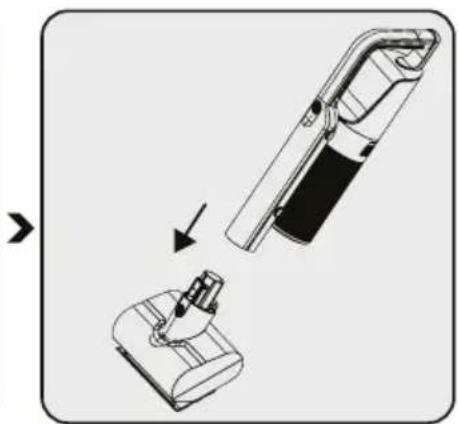
natural_image
Diagram showing a device being inserted into a housing, with an arrow indicating the process (no text or symbols present)natural_image
Illustration of a hand cleaning a cylindrical device with a cloth (no text or symbols)

natural_image
Technical illustration of a mechanical device with internal components and directional arrows (no text or symbols)
natural_image
Diagram of a mechanical device pouring liquid into a container (no text or symbols visible)natural_image
Technical diagram of a mechanical component with no visible text or symbolsnatural_image
Diagram of a mechanical device with a cylindrical component and a circular base, showing an upward arrow (no text or symbols present)natural_image
Diagram of a bucket with internal components and directional arrows indicating movement (no text or symbols)natural_image
Technical line drawing of a handheld device with a circular button and directional arrow symbol (no text or labels)natural_image
Technical line drawing of a mechanical assembly with no visible text or symbolsnatural_image
Technical line drawing of a mechanical device with no visible text or symbols2 Panoramica
natural_image
Diagram showing a device with a cable connected to a vertical panel and a base with a warning symbol, no text or labels present.natural_image
Diagram of a handheld vacuum cleaner with internal components and directional arrows indicating motion (no text or symbols)natural_image
Diagram of a vacuum cleaner assembly showing internal components and motion arrows (no text or labels)natural_image
Mechanical device diagram showing a lever mechanism with directional arrows indicating movement or force (no text or symbols present)natural_image
Technical line drawing of a mechanical device with an arrow indicating direction (no text or symbols)natural_image
Diagram of a mechanical device with directional arrows indicating movement or force (no text or symbols)natural_image
Diagram of a mechanical device with a piston and shaft, showing internal components (no text or symbols)natural_image
Technical illustration of a handheld device with a handle and internal structure (no text or symbols)natural_image
Technical line drawing of a mechanical component with an inset view showing internal components (no text or symbols)
natural_image
Technical line drawing of a mechanical device with no visible text or symbolsnatural_image
Diagram of a disassembled tool with an arrow indicating process (no text or symbols present)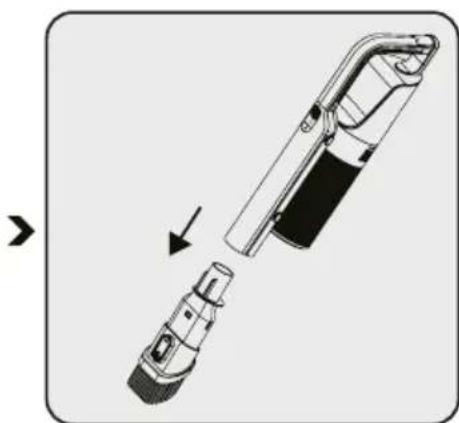
natural_image
Diagram of a handheld device with a plug and connector, showing a cutaway view (no text or symbols)
natural_image
Diagram showing a device being inserted into a base, with an arrow indicating the process (no text or symbols present)natural_image
Illustration of a hand cleaning a cylindrical device with a cloth (no text or symbols)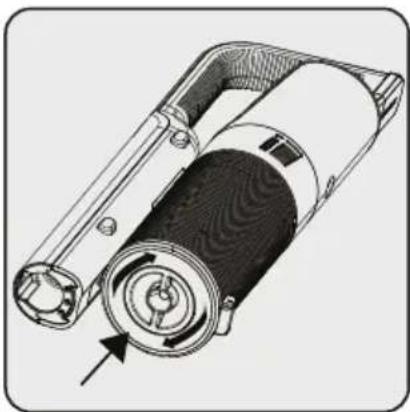
natural_image
Technical line drawing of a mechanical device with internal components and directional arrows (no text or symbols)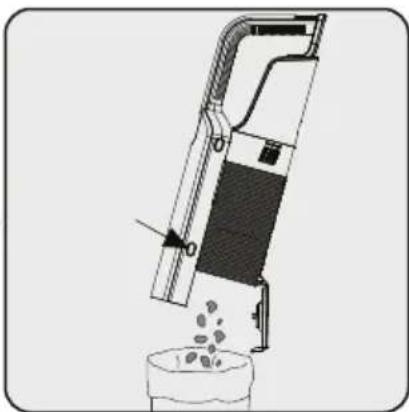
natural_image
Diagram of a mechanical device pouring liquid into a container (no text or symbols visible)Pulire la superficie del corpo con un panno umido.
natural_image
Technical diagram of a mechanical component with no visible text or symbolsnatural_image
Cross-sectional diagram of a mechanical device with an upward arrow indicating motion or assembly (no text or symbols present)natural_image
Diagram showing a bucket with a cylindrical component inserted into a container, with arrows indicating direction (no text or symbols)natural_image
Technical line drawing of a handheld device with a circular dial and control knob (no text or symbols)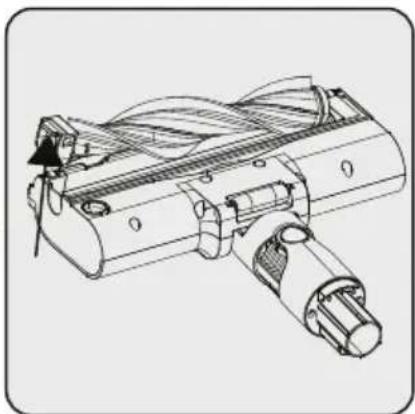
natural_image
Technical line drawing of a mechanical device with no visible text or symbols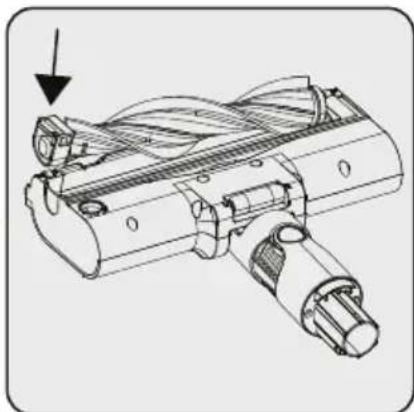
natural_image
Technical line drawing of a mechanical component with no visible text or symbols2.1 Органи за управление и компоненти
natural_image
Diagram showing a device with a cable connected to a vertical panel and a base with a warning symbol, no text or labels present.natural_image
Diagram of a handheld vacuum cleaner with internal components and directional arrows indicating movement (no text or symbols)natural_image
Diagram of a vacuum cleaner assembly showing internal components and motion arrows (no text or labels)natural_image
Mechanical device diagram showing a lever mechanism with arrows indicating motion direction (no text or symbols)natural_image
Technical line drawing of a mechanical device with an arrow indicating direction (no text or symbols)natural_image
Diagram of a mechanical device with directional arrows indicating movement or force (no text or symbols)natural_image
Diagram of a mechanical device with a piston and shaft assembly (no text or symbols)natural_image
Technical line drawing of a handheld device with a handle and internal structure (no text or symbols)natural_image
Technical line drawing of a mechanical device with a close-up inset showing internal components (no text or symbols)
natural_image
Technical line drawing of a mechanical device with no visible text or symbolsnatural_image
Diagram of a soldering iron with a disassembled tip and arrow indicating process (no text or symbols)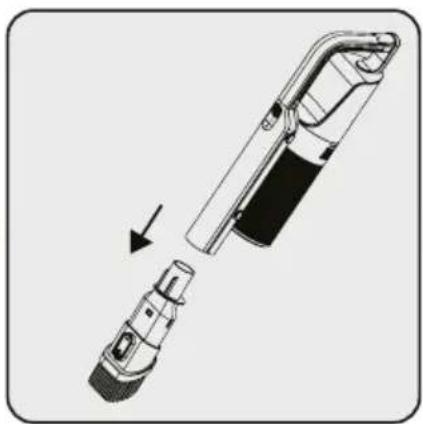
natural_image
Diagram of a handheld device with an arrow indicating assembly or operation (no text or symbols present)
natural_image
Diagram showing a device being processed from a base to a top, with an arrow indicating the process (no text or symbols present)natural_image
Illustration of a hand cleaning a cylindrical device with a cloth (no text or symbols)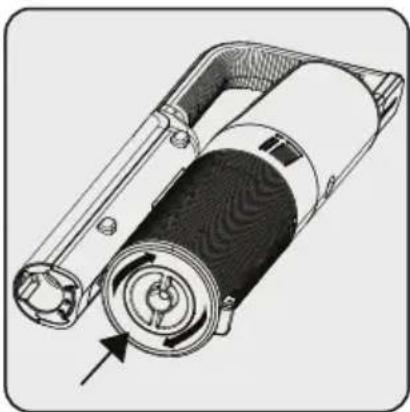
natural_image
Technical illustration of a mechanical device with rotating components and a directional arrow (no text or symbols)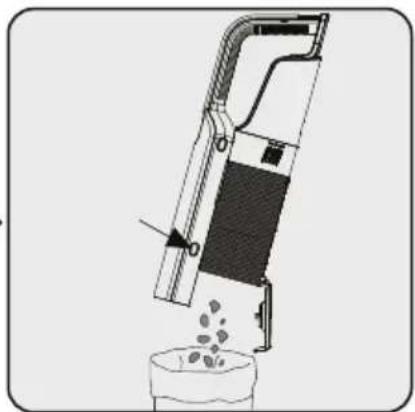
natural_image
Diagram of a mechanical device pouring liquid into a container (no text or symbols visible)natural_image
Technical diagram of a mechanical component with no visible text or symbolsnatural_image
Diagram of a mechanical device with a cylindrical component and a rotating knob, showing an upward arrow (no text or symbols present)natural_image
Diagram of a bucket with a water level sensor and a cylindrical component, showing no text or symbols.natural_image
Technical line drawing of a handheld device with a circular dial indicator (no text or symbols)
natural_image
Technical line drawing of a mechanical device with internal components and no visible text or symbols
natural_image
Technical line drawing of a mechanical component with no visible text or symbols2 Pregled
2.1 Upravljalni gumbi in sestavni deli
natural_image
Diagram showing a device with a cable connected to a vertical panel and a base with a warning symbol, no text or labels present.natural_image
Diagram of a handheld vacuum cleaner with internal components and directional arrows indicating motion (no text or symbols)natural_image
Diagram of a vacuum cleaner assembly showing internal components and motion arrows (no text or labels)natural_image
Mechanical device diagram showing a lever mechanism with arrows indicating motion direction (no text or symbols)Pritrdite nastavek za reže, kombinirani nastavek in motorizirano krtačo za posteljo na polnilno postajo.
4 Delovanje
natural_image
Technical line drawing of a mechanical device with an arrow indicating direction (no text or symbols)natural_image
Diagram of a mechanical device with directional arrows indicating movement or force (no text or symbols)Priklopite napajalni adapter v vtičnico.
natural_image
Diagram of a mechanical device with a lever and handle, showing internal components and an arrow indicating direction (no text or symbols)natural_image
Technical illustration of a handheld device with a handle and internal structure (no text or symbols)1 – Povlecite napravo k sebi. 2 – Odstranite napravo s polnilne postaje.
natural_image
Technical line drawing of a mechanical device with a close-up inset showing internal components (no text or symbols)
natural_image
Technical line drawing of a handheld device with no visible text or symbolsnatural_image
Diagram of a handheld electronic device with a screwdriver inserted, showing the tool's internal structure and an arrow indicating motion (no text or symbols present)
natural_image
Diagram of a handheld device with a plug and connector, showing a cutaway view (no text or symbols)
natural_image
Diagram showing a device being inserted into a base, with an arrow indicating the process (no text or symbols present)natural_image
Illustration of a hand cleaning a cylindrical device with a cloth (no text or symbols)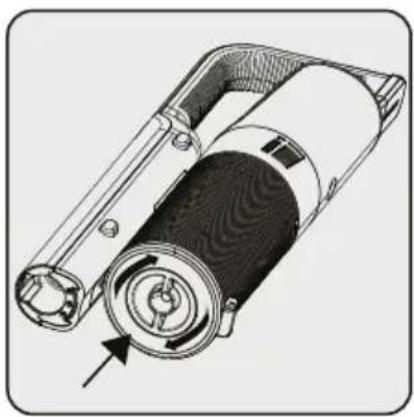
natural_image
Technical line drawing of a mechanical device with internal components and directional arrow (no text or symbols)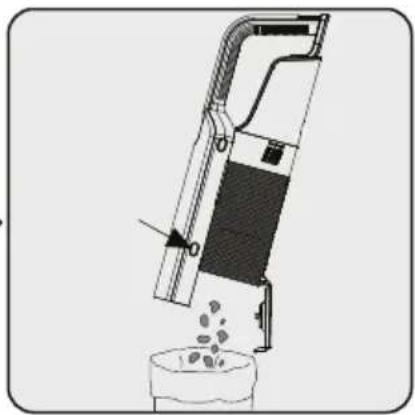
natural_image
Diagram of a mechanical device pouring granular material into a container (no text or symbols)Obrišite površino ohišja z mokro krpo.
natural_image
Technical diagram of a mechanical component with no visible text or symbolsnatural_image
Cross-sectional diagram of a mechanical device with an upward arrow indicating motion (no text or symbols present)Če želite odstraniti predfilter, ga najprej zavrtite v nasprotni smeri urinega kazalca (1), nato pa izvlecite predfilter (2).
natural_image
Diagram of a bucket with two different parts, one above and one below, showing mechanical components (no text or symbols)natural_image
Technical line drawing of a handheld device with a circular button and directional arrow symbol (no text or labels)natural_image
Technical line drawing of a mechanical assembly with no visible text or symbolsnatural_image
Technical line drawing of a mechanical device with no visible text or symbolsS potiskom pritrdite valj nazaj na svoje mesto.
5.3 Shranjevanje
2 Përmbledhja
natural_image
Diagram showing a device with a cable connected to a vertical-mounted device, and a base device with a warning symbol (no text or labels present)natural_image
Diagram of a wall-mounted electrical enclosure with a power outlet and plug, no text or symbols presentnatural_image
Diagram of a handheld device with internal components and directional arrows indicating movement (no text or symbols)natural_image
Diagram of a vacuum cleaner's internal structure showing blade, handle, and mounting components (no text or labels)natural_image
Technical line drawing of a mechanical device with directional arrows indicating movement or force (no text or symbols present)natural_image
Technical illustration of a handheld device with a handle and internal structure (no text or symbols)1 - Tërhiqeni pajisjen drejt vetes. 2 - Hiqeni pajisjen nga stacioni i karikimit.
natural_image
Technical line drawing of a mechanical component with an inset view showing internal components (no text or symbols)
natural_image
Technical line drawing of a handheld device with no visible text or symbolsnatural_image
Diagram of a disassembled tool with an arrow indicating process (no text or symbols present)
natural_image
Diagram of a handheld device with a plug and connector, showing a cutaway view (no text or symbols)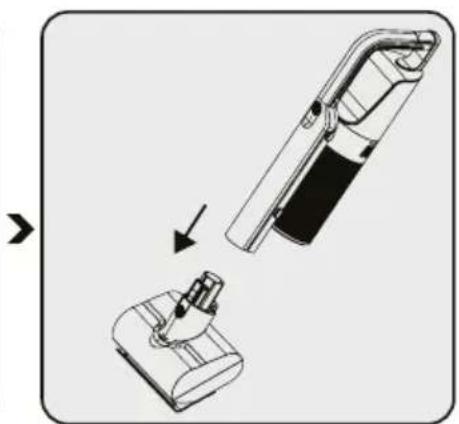
natural_image
Diagram showing a device being inserted into a base, with an arrow indicating the process (no text or symbols present)natural_image
Illustration of a hand cleaning a cylindrical device with a cloth (no text or symbols)natural_image
Technical line drawing of a mechanical device with internal components and directional arrows (no text or symbols)natural_image
Diagram of a mechanical device pouring liquid into a container (no text or symbols visible)natural_image
Technical diagram of a mechanical component with no visible text or symbolsnatural_image
Diagram of a mechanical device with a cylindrical component and an attached circular component, showing an upward arrow (no text or symbols present)natural_image
Diagram of a bucket with internal components and arrows indicating movement (no text or symbols)natural_image
Technical line drawing of a handheld device with a circular button and a magnified inset showing a control knob (no text or symbols)natural_image
Technical line drawing of a mechanical component with no visible text or symbolsnatural_image
Technical line drawing of a mechanical device with no visible text or symbols2 Pregled
2.1 Kontrole i komponente
- Dugme za uključivanje/isključivanje i podešavanje nivoa
- Ručka
- Posuda za sakupljanje prašine
- Dugme za otpuštanje posude za prašinu
- Dugme za otpuštanje poklopca posude za prašinu
- Dugme za otpuštanje cevi
- Cev
- Dugme za otpuštanje električne turbo četke
- Električna tubro četka
- Ispravljač za naizmeničnu struju (AC adapter)
- Stanica za punjenje
- Alat za kombinovanje
- Otvor
- Motorizovana četka za krevete (samo za VRT 66421 VC)
- Zavrtanj (2 kom.)
- Ankeri (2 kom.)
- Dugme za čišćenje filtera
2.3 Tehnički podaci
| Nominalna ulazna snaga : | 250 W |
| Ulazna jačina | 100-240V~ 50-60Hz0.5A |
| Izlazna snaga 27V 0,5A | |
| Vreme punjenja 3-4,5 sati | |
| Vreme rada na maks.snazi | 15 minuta |
| Vreme rada na min.snazi | 40 minuta |
natural_image
Diagram showing a device with a cable connected to a vertical panel and a base with a warning symbol, no text or labels present.Postavite stanicu za punjenje u pravcu strelice.

Ugradite stanicu za punjenje na visinu od najmanje 120 cm od podloge.
Pričvrstite dva tipla na zid.
Postavite dva vijka na njihova mesta na priključnoj stanici za punjenje i montirajte ih na tiple na zidu.
Priključite adapter za naizmeničnu struju u utičnicu.
3.2 Ugradnja tela i četke
natural_image
Diagram of a handheld device with arrows indicating movement or assembly (no text or symbols)Gurajte cev u smeru strelice prema telu pritiskajući dugme za otpuštanje.
natural_image
Diagram of a vacuum cleaner assembly with arrows indicating motion direction (no text or symbols)Pritisnite dugme za otpuštanje električne turbo četke koje se nalazi na električnoj turbo četki i pritisnite ga u smeru strelice prema.
natural_image
Mechanical device with directional arrows indicating movement or force (no text or symbols)Postaviti dva zavrtnja na njihovo mesto na priključnoj stanici za punjenje i montirati na tiple na zidu.
4 Rad
natural_image
Technical line drawing of a mechanical device with an arrow indicating direction (no text or symbols)natural_image
Diagram of a mechanical device with directional arrows indicating movement or force (no text or symbols)natural_image
Diagram of a mechanical device with a piston and shaft, showing internal components and an arrow indicating direction (no text or symbols)Kada aparat postavite na priključnu stanicu za punjenje, on počinje da se puni i to će biti prikazano na ekranu.

natural_image
Technical illustration of a handheld device with a handle and internal structure (no text or symbols)1-Povucite uređaj prema sebi. 2-Uklonite aparat sa priključne stanice za punjenje.
- Svaki put kada se na ručnom usisivaču pritisne dugme za uključivanje, režim rada se odvija prema sledećem redosledu: Standardno/Visoko. - Da biste prekinuli rad, držite dugme za isključivanje 3 sekunde, lampica i uređaj će se ugasiti.
natural_image
Technical line drawing of a mechanical component with an inset view showing internal components (no text or symbols)
Uređaj se može se postaviti na punjenje pre nego se baterije potpuno isprazne. Uređaj se može neprekidno puniti na stanici za punjenje do sledećeg korišćenja.

Obratite pažnju na procenat napunjenosti baterije tokom rada. Nivo baterije treba pratiti tokom upotrebe kada je prazna, uređaj automatski prestaje da radi.
4 Rad

natural_image
Technical line drawing of a mechanical device with no visible text or symbolsnatural_image
Technical illustration of a soldering iron with an arrow indicating disassembly (no text or symbols present)
natural_image
Diagram of a handheld device with a plug and connector, showing a cutaway view (no text or symbols)
natural_image
Diagram showing a device being inserted into a housing, with an arrow indicating the process (no text or symbols present)natural_image
Illustration of a hand cleaning a cylindrical device with a cloth (no text or symbols)
natural_image
Technical illustration of a mechanical device with rotating components and a directional arrow (no text or symbols)

natural_image
Diagram of a mechanical device pouring liquid into a container (no text or symbols visible)Unutrašnjost uređaja obrišite vlažnom krpom.
natural_image
Technical diagram of a mechanical component with no visible text or symbolsDa biste detaljno očistili filtere, uklonite posudu za prašinu pritiskom na dugme sa gornje strane.

natural_image
Cross-sectional diagram of a mechanical device with an upward arrow indicating motion or assembly (no text or symbols present)Odvojite pred-filter i plastični filter jedan od drugog.

Da biste izvadili predfilter, prvo ga rotirajte u smeru suprotnom od kazaljke na satu (1), a zatim ga izvucite (2).
natural_image
Diagram showing a bucket with a cylindrical component inserted into a container, with arrows indicating direction (no text or symbols)Uklonite prašinu sa predfilterai metalnog filtera tapkajući ga o tvrdu površinu kao što je kanta za smeće ili to uradite pomoću četke.

Da biste umetnuli predfilter, prvo postavite plastični filter

Pričvrstite predfilter na plastični filter nazad.

Zakačite izbočinu posude za prašinu na prorez u ručnom usisivaču i pričvrstite kutiju za prašinu dok ne čujete klik.
5.2 Čišćenje četke

UPOZORENJE! Ne perite turbo četku i glavnu rolo-četku.
natural_image
Technical line drawing of a handheld device with a circular dial indicator (no text or symbols)Pritisnite dugme za otpuštanje rolo-četke sa donje strane.
natural_image
Technical line drawing of a mechanical device with no visible text or symbolsnatural_image
Technical line drawing of a mechanical device with no visible text or symbols5.4 Transport i otprema
- Za vreme transporta i otpreme, uređaj nosite u originalnom pakovanju. Ambalaža uređaja ga štiti od fizičkih oštećenja.
- Nemojte stavljati teške predmete na uređaj ili njegovu ambalažu. U suprotnom, uređaj se može ošetiti.
- Ako aparat padne, aparat možda neće raditi ili može doći do trajnih oštećenja.
Molimo, prvo pročitajte ove upute!
Poštovani korisniče,
2 Pregled
natural_image
Diagram showing a device with a cable connected to a vertical panel and a base with a warning symbol, no text or labels present.Postavite dva vijka na njihova mjesta na stanici za punjenje i montirajte tiple u zid.
Ukopčajte AC strujni adapter u zidnu utičnicu.
3.2 Instalacija kućišta i četke

natural_image
Diagram of a handheld device with internal components and directional arrows indicating movement (no text or symbols)natural_image
Diagram of a vacuum cleaner assembly showing internal components and motion arrows (no text or labels)natural_image
Mechanical device diagram showing a lever mechanism with directional arrows indicating movement or force (no text or symbols present)Pričvrstite cjevasti nastavak i kombinirani alat, motoriziranu četku za krevet na stanicu za punjenje.
4 Rukovanje
natural_image
Technical line drawing of a mechanical device with an arrow indicating direction (no text or symbols)natural_image
Diagram of a mechanical device with directional arrows indicating movement or force (no text or symbols)natural_image
Diagram of a mechanical device with a piston and shaft assembly, showing internal components (no text or labels)Kada uređaj stavite na stanicu za punjenje, započinje punjenje koje se prikazuje na zaslonu.

Treba približno 3 do 4,5 sati da bi se uređaj potpuno napunio. Uređaj se ne smije koristiti dok se puni.

Ako se uređaj postavi na stanicu za punjenje dok radi, tada će se automatski zaustaviti.
4 Rukovanje
4.2 Rukovanje

1-Povucite uredaj prema sebi. 2-Uklonite uredaj sa stanice za punjenje.
natural_image
Technical illustration of a handheld device with a handle and internal structure (no text or symbols)natural_image
Technical line drawing of a mechanical device with a close-up inset showing internal components (no text or symbols)
Uređaj možete staviti na punjenje prije nego se baterija potpuno isprazni. Uređaj se može držati na stanici za punjenje i neprekidno se puniti do iduće upotrebe.

natural_image
Technical line drawing of a handheld device with no visible text or symbolsOvaj uređaj prikladan je za uporabu na tepisima i tvrdim podovima.
4.3 Pribor

natural_image
Diagram of a handheld electronic device with a screwdriver inserted, showing the tool's internal structure and an arrow indicating motion (no text or symbols present)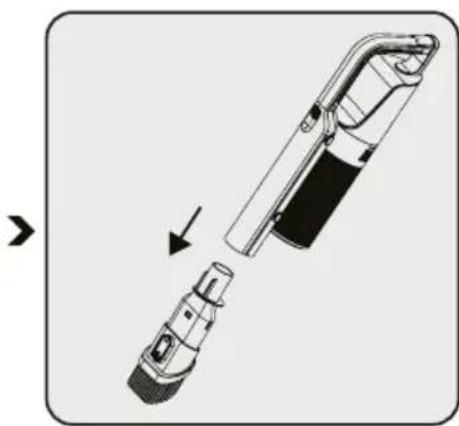
natural_image
Diagram of a handheld device with a plug and connector, showing a cutaway view (no text or symbols)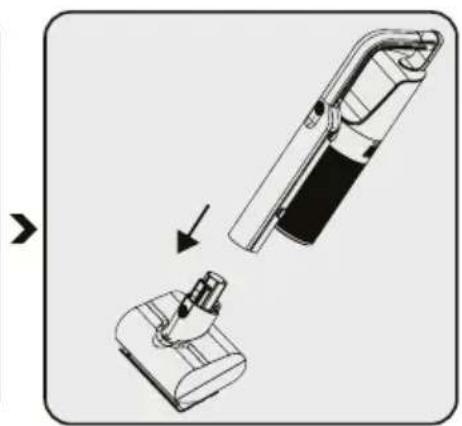
natural_image
Diagram showing a device being processed from a base to a top, with an arrow indicating the process (no text or symbols present)natural_image
Illustration of a hand cleaning a cylindrical device with a cloth (no text or symbols)

natural_image
Technical illustration of a mechanical device with rotating components and a directional arrow (no text or symbols)
natural_image
Diagram of a mechanical device pouring liquid into a container (no text or symbols visible)natural_image
Technical diagram of a mechanical component with no visible text or symbolsZa pojedinosti o čišćenju filtra, uklonite spremnik za prašinu. guranjem gumba na gornjoj strani.

natural_image
Diagram of a mechanical device with a cylindrical component and an arrow indicating upward motion (no text or symbols)Odvojite predfilter i plastični fil-tar.

natural_image
Diagram of a bucket with internal components and directional arrows indicating movement (no text or symbols)Uklonite prašinu s predfiltra i plastičnog filtra laganim lupkanjem o tvrdu površinu poput kante za smeće ili četke.

Za umetanje predfiltra, prvo postavite plastični filtar

Pričvrstite natrag predfilter i plastični filter.

UPOZORENJE! Ako se u uređaj ne stave spremnik za prašinu, metalni filtar i spužvica otvora za ulaz zraka, proizvod se neće uključiti.
Zakačite jezičac spremnika za prašinu za utor na ručnom čistaču i pričvrstite vrećicu za prašinu dok ne čujete zvuk klik.
5.2 Čišćenje četke

natural_image
Technical line drawing of a handheld device with a circular button and directional arrow symbol (no text or labels)Pritisnite gumb za odvajanje okrugle četke na donjoj strani.
natural_image
Technical line drawing of a mechanical assembly with no visible text or symbolsUklonite prašinu s nje laganim lupkanjem o tvrdu površinu ili prašinu uklonite četkom. Ako su se zapetljale dlake, odrežite ih.