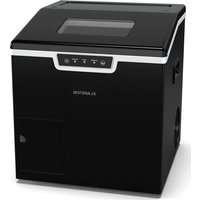
Icefestival Cube - Ice Maker Klarstein - Free user manual and instructions
Find the device manual for free Icefestival Cube Klarstein in PDF.


User questions about Icefestival Cube Klarstein
0 question about this device. Answer the ones you know or ask your own.
Ask a new question about this device
Download the instructions for your Ice Maker in PDF format for free! Find your manual Icefestival Cube - Klarstein and take your electronic device back in hand. On this page are published all the documents necessary for the use of your device. Icefestival Cube by Klarstein.
USER MANUAL Icefestival Cube Klarstein
text_image
COOKINGCO COOKINGCO KINGCOOKING KINGCOOKING COOKINGCO KINGCOOKING KINGCOOKING KINGCOOKING
KLARSTEIN
www.klarstein.com

area
| Category | Value | | -------- | ----- | | A | 100 | | B | 100 | | C | 100 | | D | 100 |text_image
QR code image containing encoded data, no visible human-readable textINHALT
text_image
Labeled diagram of an appliance showing internal components and parts with numbered annotationsnatural_image
Symbol of a trash bin with crossed lines indicating no waste or discharge, and a solid black rectangle below (no text or labels)Berlin Brands Group UK Limited
PO Box 42
272 Kensington High Street
London, W8 6ND
United Kingdom
Dear Customer,
Congratulations on purchasing this device. Please read the following instructions carefully and follow them to prevent possible damages. We assume no liability for damage caused by disregard of the instructions and improper use. Scan the QR code to get access to the latest user manual and more product information.

text_image
QR code image containing encoded data, no visible human-readable textCONTENTS
Safety Instructions 14
Product Description 16
Control Panel Operation 17
Cleaning and Care 20
Troubleshooting 21
Disposal Considerations 22
Manufacturer & Importer (UK) 22
TECHNICAL DATA
| Item number 10035579, 10046384 | |
| Daily Ice Output 15-20 kg/24 h | |
| Ice Storage Capacity 1.8 kg | |
| Water Reservoir Capacity 1.8 L | |
| Refrigerant R290 | |
| Ice Shape Cube | |
| Dimensions 378x398x420 mm | |
SAFETY INSTRUCTIONS
In order to avoid any accidents, please refer to following operation:
- Disconnect power before servicing.
- Do not pull directly on wire when plugging or unplugging the unit.
- If ice is abnormal, please call the seller.
- It is normal for the compressor and condenser surface to reach temperatures between 70^ and 90^ during operation and surrounding areas may be hot. Please don't touch it.
- Due to fast freezing, ice cubes may appear "Cloudy". This is trapped air in the water and it will not affect quality or taste of ice.
- When out of use, please open the drawer at least 2cm to allow for air circulation and avoid any metallic components becoming rusted.
- This appliance can be used by children aged from 8 years and above and persons with reduced physical, sensory or mental capabilities or lack of experience and knowledge if they have been given supervision or instruction concerning use of the appliance in a safe way and understand the hazards involved.
• Children shall not play with the appliance,
- Cleaning and user maintenance shall not be made by children without supervision.
- If the supply cord is damaged; it must be replaced by the manufacturer, its service agent or a similarly qualified person in order to avoid a hazard.
- Please according to local regulations regarding disposal of the appliance for its flammable blowing gas. Before you scrap the appliance, please take off the doors to prevent children trapped.
- This appliance is intended to be used in household and similar applications such as
- staff kitchen areas in shops, offices and other working environments;
- farm houses and by clients in hotels, motels and other residential type environments;
- bed and breakfast type environments;
- catering and similar non-retail applications.
- Do not store explosive substances such as aerosol cans with a flammable propellant in this appliance.
- Children aged from 3 to 8 years are allowed to load and unload refrigerating appliances.
- Opening the door for long periods can cause a significant increase of the temperature in the compartments of the appliance.
- Clean regularly surfaces that can come in contact with food and accessible drainage systems.
- Clean water tanks if they have not been used for 48 h.
- If the refrigerating appliance is left empty for long periods, switch off, defrost, clean, dry, and leave the door open to prevent mould developing within the appliance.
- When positioning the appliance, ensure the supply cord is not trapped or damaged.
- Do not locate multiple portable socket-outlets or portable power supplies at the rear of the appliance.
- Fill with potable water only or connect to potable water supply only.
- Keep ventilation openings, in the appliance enclosure or in the built-in structure, clear of obstruction.
- Do not use mechanical devices or other means to accelerate the defrosting process, other than those recommended by the manufacturer.
- Do not damage the refrigerant circuit.
- Do not use electrical appliances inside the food storage compartments of the appliance, unless they are of the type recommended by the manufacturer.
- Risk of fire / flammable materials, taking care to avoid causing a fire by igniting flammable material.
- The new hose-sets supplied with the appliance are to be used and that old hose-sets should not be reused.
PRODUCT DESCRIPTION
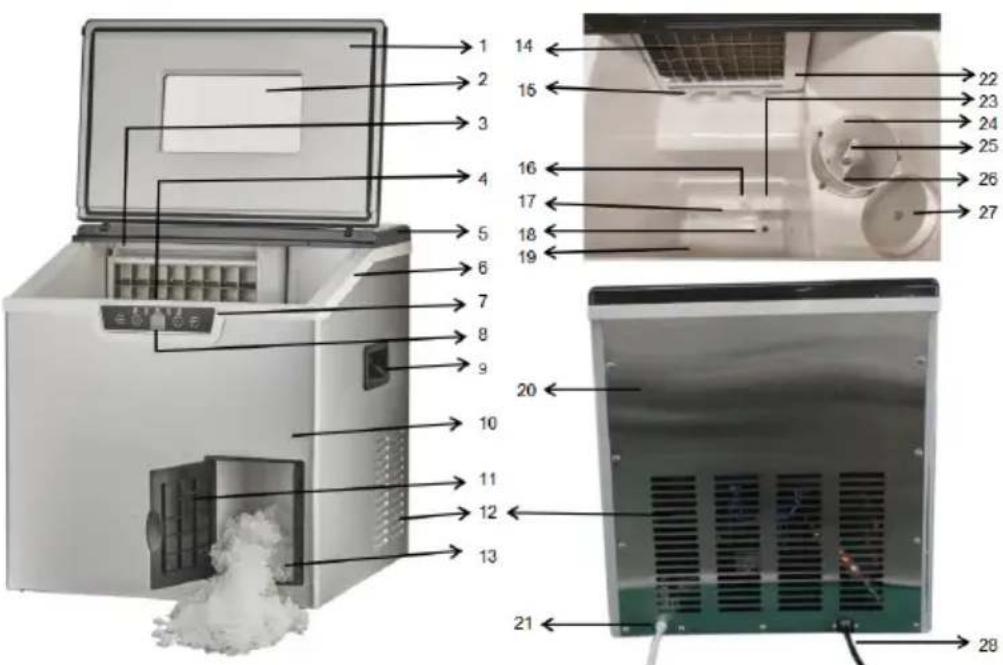
text_image
Labeled diagram of an appliance showing internal components and parts with numbered annotations1 Front top lid
2 Viewing window
3 Spray pipe
4 Ice basket
b Cleaver seat
5 Back top lid
6 Middle Frame
7 Control Panel
8 LCD screen
9 Handle
10 Housing
11 Decoration door
12 Fan Cover
13 Shaved ice outlet
14 Evaporator
15 Icefull sensor
16 Water buoy
17 Isolation plate
18 Drain plug
19 Max water filling line
20 Back cover
21 Water inlet hole
22 Evaporator frame
23 Water suction hole
24 Shaved ice bowl
25 Shaving paddle
26 Knife
27 Bowl cap
28 Power Cord and Plug
Before/First Use of Your Ice Maker
1 During transportation, the incline angle of the cabinet should not be over 45 °C. Do not turn the Ice maker upside down. As this may damage the compressor and sealed system.
2 Remove all packing material and carefully check your ice maker to ensure it is in good condition and that there is no damage to the ice maker or power cord and plug.
3 The Ice maker should be placed horizontally on a level surface. To ensure proper ventilation for your Ice maker allow 150 mm of space at the top, the back and on each side. Do not install the Ice maker near an oven, radiator, or any other heat source.
4 Before using the Ice maker for the first time, please wait 2 hours after positioning it, and keep the front lid open for at least 2 hours
5 Ensure that the voltage indicated on the ice maker corresponds with the voltage in your home.
6 Pure water is not allowed to be used on this unit, spring water is recommended.
7 Please always keep the viewing window close during ice making.
| SHAVEDICE ADD WATER ICE ICEFULL CLEANING | |
| SHAVEDICE + | - ON/OFF |
| SHAVEDICE | Press this button to shaved ice. Before the press of this button, please put enough ice into the bowl and covers the bowl cover well. |
| + | Press this button to increase the ice making time. |
- | Press this button to decrease the ice making time.Press it to start or stop the ice making. |
 | It lights up if the machine is under ice shaving process. |
 | It lights up when the water in water tank is not enough |
 | It lights up when ice is on making |
 | It lights up when the ice basket is full |
 | It lights up when the unit is on auto cleaning process. |
Operating Instructions
Step 1
Add water by manual: Open the lid, take out of the ice basket and fill the water reservoir with water.
Note: Make sure the water is not over the bottom of the ice collecting tray.
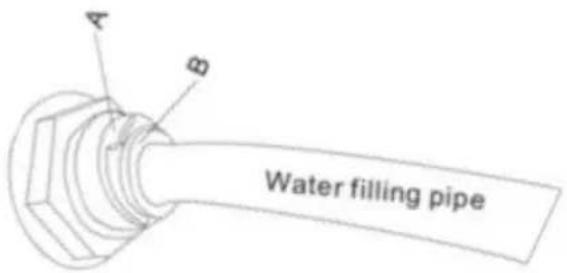
Add water by auto filling: please connect the pipe at back of the unit to the water tap directly.
text_image
A B Water filling pipeNote: The maximum permissible inlet water pressure: 0.6MPa. The minimum permissible inlet water pressure: 0.14MPa.
Step 2
Connect to the power
Step 3
Press ON/OFF button to turn unit on. The ice maker begins to work.
Note: For the first three cycles, the ice may be small and irregular in size, or even no ice.
Step 4
If indicator ADD WATER lights up, please take out the basket, then add water as per step 1.
Step 5
If indicator ICE FULL lights up, please take out the ice with the scoop.
Note: When the ice basket is full please remove the ice immediately, Do not allow the ice collecting tray overfill.
Step 6
Press SHAVED ICE button to shave ice.
Note: Before the press of this button, please put enough ice into the shaved ice bowl and cover the bowl cap well.
Step 7
Press ON/OFF button to stop the machine.
Step 8
Put a tank in below the unit, then pull the unit a little forward, pull the drain plug at middle of the tank to drain water.
CLEANING AND CARE
- Clean the inner liner, ice collecting tray, water box, ice shovel and evaporator frequently. When cleaning, unplug the unit and remove the ice cubes. Use a diluted solution of water and vinegar to clean the inside and the outside surface of the Ice maker. Do not spray Ice maker with chemicals or diluted agents such as acids, gasoline or oil. Rinse thoroughly before starting.
- Keep ventilation openings in the appliance enclosure, or in the built-in structure, clear of obstruction. Do not use mechanical devices or other means to accelerate the defrosting process, other than those recommended by the manufacturer.
- To ensure the cleanliness of the ice cubes, water in the water reservoir is suggested to be replaced every 24 hours.
- If the compressor stops for any reason such as water shortage, too much Ice, power off, etc. Do not start the system right away, wait 3 minutes, and then re-start the Ice maker.
- Always use fresh water before starting ice production either at initial installation or after a long shut-off period.
- This unit is for home use only, not for outdoor use, if it is necessary for use outside, please make sure the view window is closed.
TROUBLESHOOTING
1 Please note, if a power failure occurs due to disconnection of the power cord, or the off power button has been pushed off during an ice making cycle, small ice chips may formed and lodge in the automatic shovel causing it to jam. If this occurs, the ice chips may be removed by disconnecting the power cord and gently pushing the shovel to the rear of the cabinet and removing the ice chips, then restarting.
2 Please restart the ice maker by pressing ON/OFF. If the Ice shovel does not push the Ice into the Ice collector after the formed Ice drops from the evaporator finger while at the same time the M light is on, check to see if the water tray is horizontal or balanced. If not then adjust by pressing the Ice shovel lightly with your finger. Then re-start the Ice maker.
| Problem Reason Solution | ||
| The compressor works abnormally with a Buzzing noise. | The voltage is lower than recommended | Stop the Ice maker and do not restart until the voltage is normal. |
| Conditions for Ice making Cycle are right but no ice is made. | Refrigerant leaks. Sealed system is blocked. | Call for service. |
| The lights of ice full and add water come at in the same time. | Water tray is blocked by ice cube. | Clear the ice cube under the ice shovel pull out the plug and insert It again then press the ICE button, 3 minutes later the machine will restart automatically. |
| Machine keeps running,but the water is warmer than the normal water. | The magnetic valve is broken. | Replace the magnetic valve. |
DISPOSAL CONSIDERATIONS
natural_image
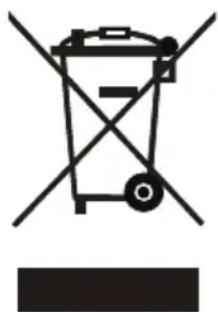
Symbol of a trash bin with crossed lines indicating no waste or discharge, and a solid black rectangle below (no text or labels)If there is a legal regulation for the disposal of electrical and electronic devices in your country, this symbol on the product or on the packaging indicates that this product must not be disposed of with household waste. Instead, it must be taken to a collection point for the recycling of electrical and electronic equipment. By disposing of it in accordance with the rules, you are protecting the environment and the health of your fellow human beings from negative consequences. For information about the recycling and disposal of this product, please contact your local authority or your household waste disposal service.
MANUFACTURER & IMPORTER (UK)
Manufacturer:
Chal-Tec GmbH, Wallstrasse 16, 10179 Berlin, Germany.
Importer for Great Britain:
Berlin Brands Group UK Limited
PO Box 42
272 Kensington High Street
London, W8 6ND
United Kingdom
Chère cliente, cher client,
text_image
QR code image containing encoded data, no visible human-readable textSOMMAIRE
text_image
Labeled diagram of an appliance showing internal components and parts with numbered annotationsnatural_image
Symbol of a trash bin with crossed lines indicating no waste or discharge, and a solid black rectangle below (no text or labels)Berlin Brands Group UK Limited
PO Box 42
272 Kensington High Street
London, W8 6ND
United Kingdom
Gentile cliente,
text_image
QR code image containing encoded data, no visible human-readable textINDICE
text_image
Labeled diagram of an appliance showing internal components and parts with numbered annotationsnatural_image
Symbol of a trash bin with crossed lines indicating no waste or discharge, and a solid black rectangle below (no text or labels)Berlin Brands Group UK Limited
PO Box 42
272 Kensington High Street
London, W8 6ND
United Kingdom
Estimado cliente:
text_image
QR code image containing encoded data, no visible human-readable textÍNDICE
text_image
Labeled diagram of an appliance showing internal components and parts with numbered annotationsnatural_image
Symbol of a trash bin with crossed lines indicating no waste or discharge, and a solid black rectangle below (no text or labels)Berlin Brands Group UK Limited
PO Box 42
272 Kensington High Street
London, W8 6ND
United Kingdom

area
| Category | Value | | -------- | ----- | | 1 | 100 | | 2 | 100 | | 3 | 100 | | 4 | 100 | | 5 | 100 | | 6 | 100 | | 7 | 100 | | 8 | 100 | | 9 | 100 | | 10 | 100 | | 11 | 100 | | 12 | 100 | | 13 | 100 | | 14 | 100 | | 15 | 100 | | 16 | 100 | | 17 | 100 | | 18 | 100 | | 19 | 100 | | 20 | 100 | | 21 | 100 | | 22 | 100 | | 23 | 100 | | 24 | 100 | | 25 | 100 | | 26 | 100 | | 27 | 100 | | 28 | 100 | | 29 | 100 | | 30 | 100 | | 31 | 100 | | 32 | 100 | | 33 | 100 | | 34 | 100 | | 35 | 100 | | 36 | 100 | | 37 | 100 | | 38 | 100 | | 39 | 100 | | 40 | 100 | | 41 | 100 | | 42 | 100 | | 43 | 100 | | 44 | 100 | | 45 | 100 | | 46 | 100 | | 47 | 100 | | 48 | 100 | | 49 | 100 | | 50 | 100 | | 51 | 100 | | 52 | 100 | | 53 | 100 | | 54 | 100 | | 55 | 100 | | 56 | 100 | | 57 | 100 | | 58 | 100 | | 59 | 100 | | 60 | 100 | | 61 | 100 | | 62 | 100 | | 63 | 100 | | 64 | 100 | | 65 | 100 | | 66 | 100 | | 67 | 100 | | 68 | 100 | | 69 | 100 | | 70 | 100 | | 71 | 100 | | 72 | 100 | | 73 | 100 | | 74 | 100 | | 75 | 100 | | 76 | 100 | | 77 | 100 | | 78 | 100 | | 79 | 100 | | 80 | 100 | | Note: The actual values are not provided in the code. I have used the label 'Value' as a placeholder for the value detection. You would need to run the code to get the actual values from the code list. Please note that the actual values would be the result of this example. You would need to run the code to get the actual values from the code list. You would need to run the code to get the actual values from the code list. You would need to run the code to get the actual values from the code list. You would need to run the code to get the actual values from the code list. You would need to run the code to get the actual values from the code list. You would need to run the code to get the actual values from the code list. You would need to run the code to get the actual values from you would need to run the code. You would need to run the code to get the actual values from you would need to run the code.