
BL300G-A - Electric scooter Vevor - Free user manual and instructions
Find the device manual for free BL300G-A Vevor in PDF.

User questions about BL300G-A Vevor
0 question about this device. Answer the ones you know or ask your own.
Ask a new question about this device
Download the instructions for your Electric scooter in PDF format for free! Find your manual BL300G-A - Vevor and take your electronic device back in hand. On this page are published all the documents necessary for the use of your device. BL300G-A by Vevor.
USER MANUAL BL300G-A Vevor
Technical Support and E-Warranty Certificate www.vevor.com/support
FOLDING MOBILITY SCOOTER
MODEL: BL300G-A; BL300G-E
We continue to be committed to provide you tools with competitive price. "Save Half", "Half Price" or any other similar expressions used by us only represents a estimate of savings you might benefit from buying certain tools with us compared to the top brands and does not necessarily mean to cover all categories of tools offered by us are kindly reminded to verify carefully when you are placing an order with us if you actually saving half in comparison with the top major bran
VEVOR®
TOUGH TOOLS, HALF PRICE
FOLDING MOBILITY SCOOTER
MODEL: BL300G-A; BL300G-E

natural_image
Red three-wheeled electric scooter with black seat, battery, and rear-mounted wheels (no visible text or symbols)NEED HELP? CONTACT US!
Have product questions? Need technical support? Please feel fr contact us:
Technical Support and E-Warranty Certificate www.vevor.com/support
This is the original instruction, please read all manual instruction carefully before operating. VEVOR reserves a clear interpretation user manual. The appearance of the product shall be subject to product you received. Please forgive us that we won't inform you there are any technology or software updates on our product.
Dear users:
The electric vehicle produced by our company is a transportation vehicle with advanced technology at home and abroad, green environmental protection, low noise, simple operation and other characteristics. It has simple operation, safe and reliable (with brake power off, under pressure protection, over current protection, soft start, electromagnetic brake) and other functions. The company with first-class science and technology, advanced production equipment, perfect quality assurance and after-sales service system, let you buy at ease, use the comfortable!
Remind: please read this manual carefully, before you do not understand the performance of the electric vehicle, do not operate the electric vehicle, do no to the people who can not use the electric vehicle to ride, otherwise our co will not assume the responsibility for accidental injury.
- Electric vehicles are non-motor vehicles, please be sure to drive on the motor vehicle lane, do not take people to ride, consciously obey the traffic run
- Do not give electric vehicles to minors, pregnant women, people with heart disease, high blood pressure, physical disabilities and sports disorders to use!
- Do not ride after drinking!
- In rain and snow weather or bad road conditions, pay attention to increase braking safety distance.
- On the way, please concentrate and pay attention to the driving range. If abnormal, brake the front and rear brakes immediately and close the switch quickly!
- In order to maintain the common green home, please leave the waste ba to dealers or service providers, do not throw it at will!
- Due to the unauthorized disassembly of related lines or parts of the vehicle company is not responsible for the product performance instability!
- The exposed metal contact on the battery box is a positive and negative electrode, which can not be touched with wet hands at the same time, but contact with the metal at the same time, otherwise it will produce a short ci and cause accidents, please pay attention!
Special explanation:
- Due to the continuous improvement and update of the model, the data structure in this manual may be different from the product. Please refer to the actual sales pattern.
- When using, please reasonably avoid the water, can not wade cycling or implementation, when the water flooded to the electric wheel hub or controller cause a short circuit, bring losses to you, please pay attention!
-
Do not place the charger in the trunk of the electric vehicle. During the lead to damage to the electronic components in the charger.
-
Due to the continuous development of science and technological innovation, the company has the right to improve and improve its products without further notice! Thank you for your cooperation!

WARNING:
Check before riding
Please check before riding to assure safety driving. Battery power
Turn on the switch, watch battery meter indicator, when it approaches the re-mark position, vehicle should be charged.
◆ Warning:
You should regularly check the tires and adjust tire pressure.
◆ Check after the tire cooled.
You should regularly check whether there is a puncture on the tire,
especially tires leakage phenomenon which should repair immediately. Check whether the tread cuts, whether embedded nails or other sharp objects. Check whether the rim indentation, dent or deformation phenomena.
When the tire tread wear to the treadwear limit mark, it should be replaced new tires.
◆ Warning:
If the tire pressure sub-standard, it will make the tire surface subjected to excessive wear and tear could cause a car accident. Tire pressure which is low will cause tire slip or prolapsed wheels. It is dangerous to use great wheel it will affect the adhesion between the tires and the road surface, resulting in difficult driving on the accident or occurrence.
1. Riding operation
- Preparation before driving: open the parking lock; put the key into the switch turn it.
Slowly accelerate the throttle when at start, no throttle when decelerate.
Warning: No operate throttle on-off rapidly, otherwise the vehicle will rush out without control.
Brake operation
- Control the throttle
If you want to slow down, please close the throttle, and more important is to two brake systems.
Warning: Drive on wet or loose surface road or in rainy days, please be carried especially for operation of braking, accelerating or turning.
- Simultaneous operation for front and rear brakes
Attention: When driving down a steep slope, please close the throttle complex and use two brake systems to reduce the speed.
◆ Warning:
Don't use single brake at high speed, especially when you are on slippery turning corners. Use double brakes to avoid accident. 3. Stop operation
Turn the switch to stop the vehicle, and lock the parking lock.
Warning:
Electric scooter should be parked on solidity, flat ground; otherwise it may ca injury or vehicle consequences of dumping. Security highlights
Lock the parking lock, take away the key. Power-off when leave.
Select high-quality alarm system.
The product is constantly being upgraded, and there will be notification if there is any change
SAVE THESE INSTRUCTIONS
FCC Information
CAUTION:
Changes or modifications not expressly approved by the party responsible for compliance could void the user's authority to operate the equipment!
This device complies with Part 15 of the FCC Rules. Operation is subject to following two conditions:
1) This product may cause harmful interference.
2) This product must accept any interference received, including interference that may cause undesired operation.
WARNING:
Changes or modifications to this product not expressly approved by the party.responsible for compliance could void the user's authority to operate the product.
Note:
This product has been tested and found to comply with the limits for a Class digital device pursuant to Part 15 of the FCC Rules. These limits are designed to provide reasonable protection against harmful interference in a residential installation.
This product generates, uses and can radiate radio frequency energy, and if installed and used in accordance with the instructions, may cause harmful interference to radio communications. However, there is no guarantee that
interference will not occur in a particular installation. If this product does cause harmful interference to radio or television reception, which can be determined by turning the product off and on, the user is encouraged to try to correct the interference by one or more of the following measures.
- Reorient or relocate the receiving antenna.
- Increase the distance between the product and receiver.
- Connect the product to an outlet on a circuit different from that to which receiver is connected.
- Consult the dealer or an experienced radio/TV technician for assistance.
PRODUCT PARAMETERS
| Model | BL300G-A/E |
| Product size (LxWxH) | 1005x602x870 mm |
| Nominal voltage | DC 48V |
| Motor power | 350 W |
| Wheelbase | 800 mm |
| maximum load | 100 KG |
| Continuation mileage | About 12.4miles |
| Max. speed (speed limit) | 6 km/h |
| Climbing angle | 10° (Max) |
| Charging input voltage | AC 100-240V 50/60Hz |
| Battery capacity | 48V 5.2AH |
| Battery type | lithium batteries |
| Color | Orange |
Note:
"Continuous mileage" refers to the driving distance of the new battery with sufficient power under the experimental conditions stipulated. It generally refers the uninterrupted cycling at the rated speed and rated load on a 20°C flat line, the actual driving process, due to the influence of wind resistance, ambient temperature, tire pressure and load status, the continuation mileage will change
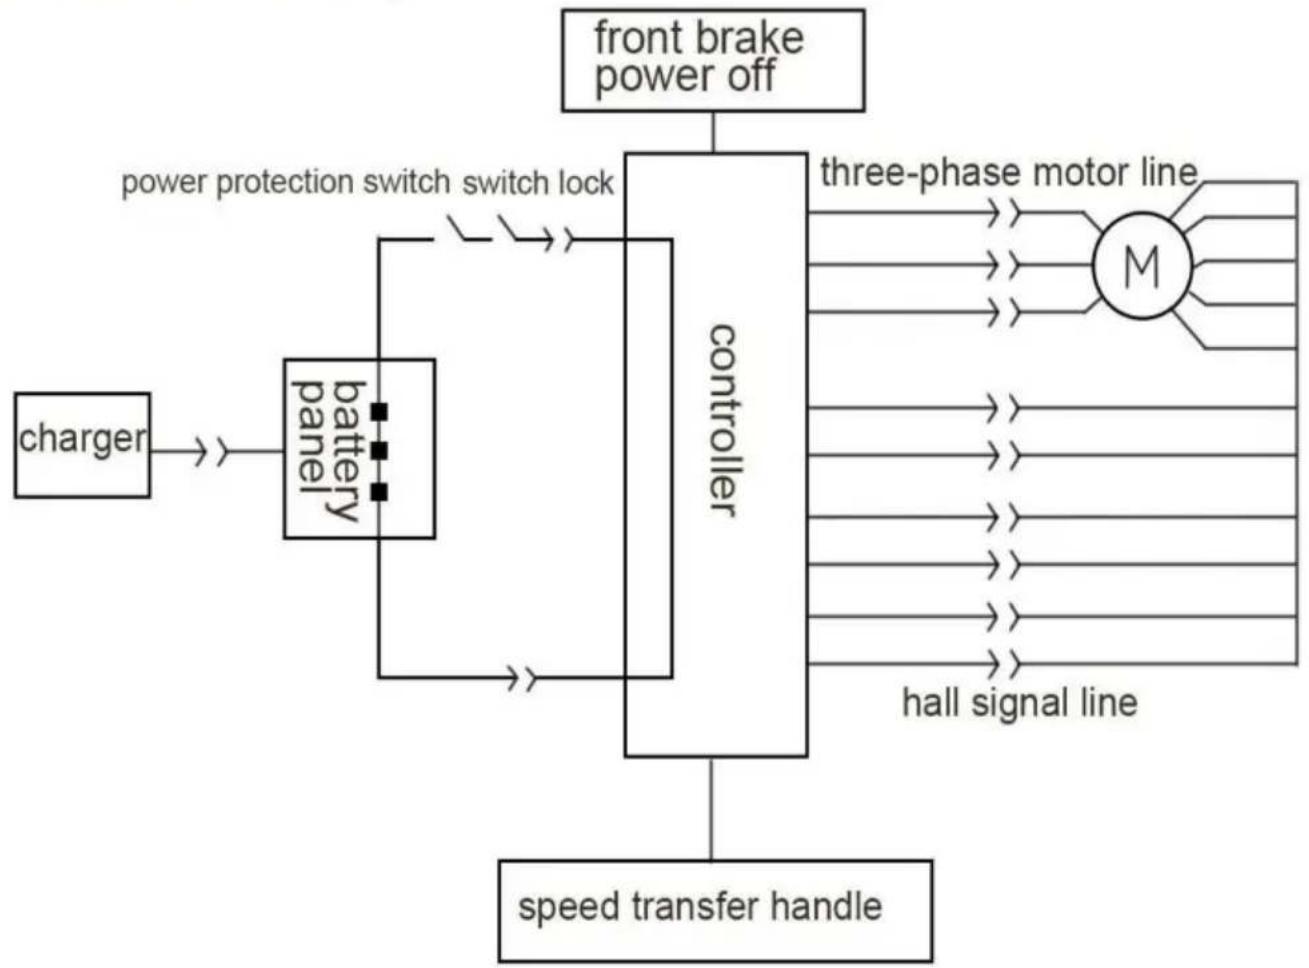
Electrical schematic diagram
Electrical schematic diagram
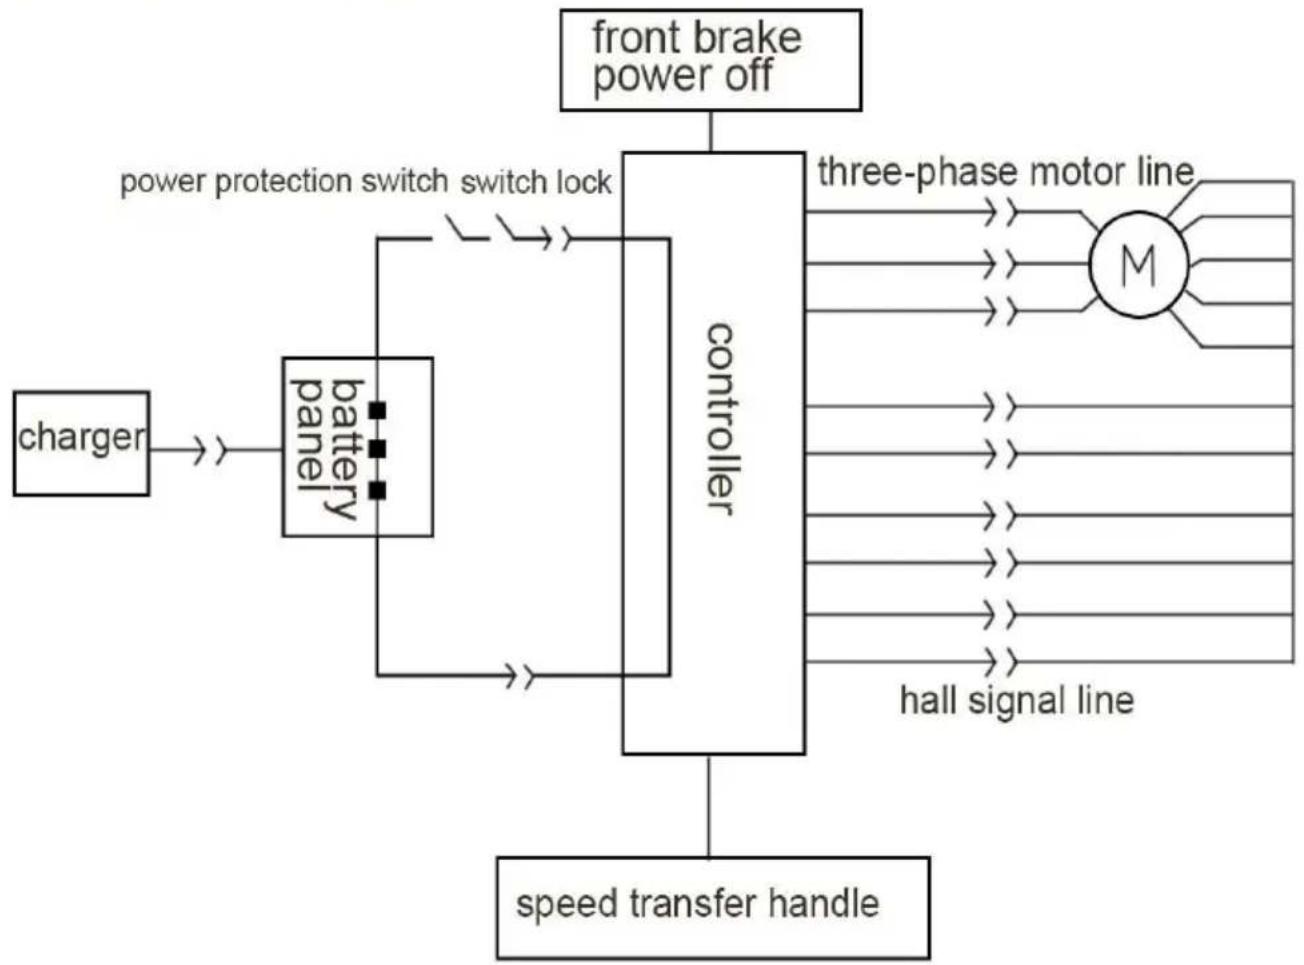
flowchart
graph TD
    A["charger"] --> B["battery panel"]
    B --> C["controller"]
    C --> D["force"]
    D --> E["three-phase motor line"]
    E --> F["M"]
    C --> G["hall signal line"]
    G --> H["speed transfer handle"]
    I["front brake power off"] --> D
    J["power protection switch switch lock"] --> C
Manipulative methods and considerations
1. Description of the manipulation section:
The manipulated part is shown in figure
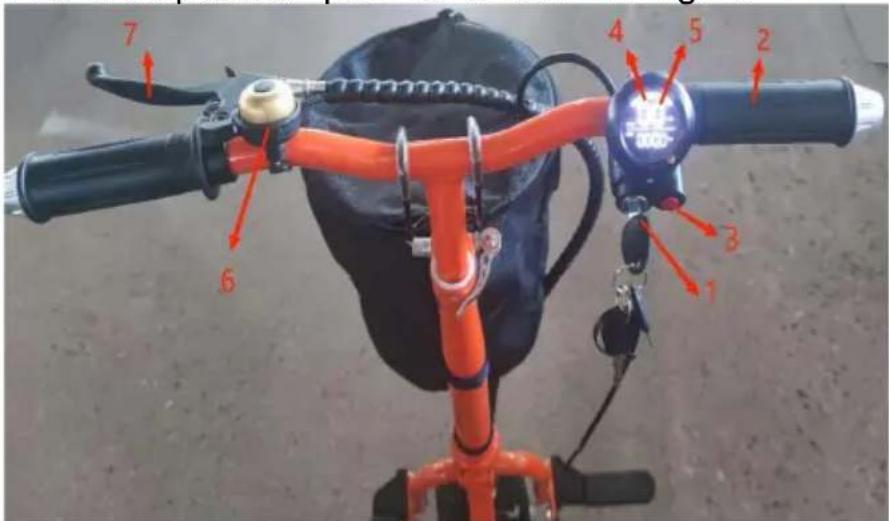
- switch key 2. throttle 3. forward and backward switch 4. battery power display 5. speeddisplay 6. small bell 7. Left brake handle
1.1 Switch key: for the main power switch, is a high current switch, turn on the switch key electric vehicle can work. Turn the main power supply switch to "ON" position, and the voltmeter pointer is moved to the corresponding position then the total power supply is switched on. When parking, please remove the to the OFF immediately to avoid damage caused by accidentally turning to the speed control rotor.
1.2 Throttle: The main function of the electric scooter is to control the speed. V the rider turns the wheel, the position of the magnetic steel changes, changing strength of the magnetic field induced by the Hall element, thus creating a voltage signal.
1.3forward and backward switch: The electric bicycle reverse gear refers to the reversal of the motor of the rear wheel of the electric bike to reverse rotary order to achieve a smaller steering radius.
1.4 Battery Power display : it is a capacity indicator showing the presence of battery.
1.5Speedmeter : Show the driving speed when driving.
1.6 Small bell::remind or alarm.
1.7 Left brake handle : it is the front brake handle; the power switch on the wheel closes.
2. Starting from driving:
2.1 Startup:
A. Fold away the single support and double support;
B. Put the key into the switch lock and turn clockwise to the ON position, instrument power indicator is on.
Note: After the main power supply is turned on, the rear wheel is on the g When the rider is not sitting on the cushion, do not turn the speed control prevent the vehicle from suddenly rushing forward, which can easily cause sa accidents. When parking, as much as possible to avoid losses caused by operation error.
2.2 Variable speed:
After electrification, the shift handle can rotate inward (counterclockwise) to accelerate the vehicle, and rotate the shift handle outward (clockwise) to slow down the vehicle. When the vehicle starts driving, do not suddenly increase the speed switch, should gradually turn the speed switch, the speed gradually accelerated that can save electricity and achieve safe driving.
2.3 Brake:
When tightening the front and rear wheel handles, the front and rear wheels be brake respectively.(Left is the rear brake, right is the front brake)
2.4 Parking:
After the car is completely stopped, put the key switch to the OFF position;
- Common faults and troubleshooting
| Common fault | The exclusion method |
| Turn on the power supply but the instrument does r display;Turn the speed regulator, the motor does not work. | 1. Check whether the storage battery is w connected;2. Check whether the air switch is tripped;3. Check whether the electric door lock fai4. Otherwise, it may be regarded as a pa failure of the controller. |
| Turn on the power supply and the instrument appea normal;Turn the speed regulator, the motor does not work. | 1. Check whether the speed control handle motor connection fall off;2, whether the left brake is in the state c failure;3. Otherwise, it may be regarded as a pa fault of the speed regulator or the controlle4. Motor fault. |
| Release the speed handle and power the motor | 1. Check whether the speed regulator is damaged;2, the line plug-in (line) contact disorder;3. Otherwise, it may be regarded as a pa failure of the controller. |
| Turn on the power supply and the motor runs | 1. Check whether the speed regulator is damaged;2, the speed regulation system line fault;3. Otherwise, it may be regarded as a pa failure of the controller. |
| When braking, the motor keeps constantly | 1. Check whether the brake power-off switd damaged;2, the line plug-in (line) contact disorder. |
| When riding, the automatic power is cut off | 1. Check whether the undervoltage protectic circuit operates. |
| The length of renewal is short | 1. Whether the battery is placed for a lon or aging, and the energy is insufficient;2. Check whether the tire air pressure is insufficient;3, check whether the brake has hard fricti4, whether the environmental factors, such strong wind, low temperature, etc. |
4. Handling of the brake failure state:
Brake failure will lead to safety risks, especially when sliding downhill, prone accidents. Therefore, the user should check the brake performance before ridir if the brake failure should adjust immediately, or ask a professional to adjust the best condition. Once the brake is not working when riding, please ride a very slow speed. In case, you should brake in advance and adjust to the maintenance department as soon as possible to achieve the purpose of safe cycling.
5. Instant power failure state processing:
There are many reasons for instant power failure, mainly may be poor contact brake power switch failure. On the one hand, the user can check the after-s service, on the other hand, the user can self-check the following points.
A. Check whether the fuse is burned out, check whether the battery connecti loose, and check whether the battery connection main line is loose.
B. Check whether the brake power switch is reset, whether there is any fore body stuck, please remove and the brake reset.
C. Check whether the brake power off switch is short circuit after rain. If the an available hot fan to dry the "water" in the switch, the power off switch of return to work.
6. Speed car status processing:
If the electric car appears, please close the door lock for further inspection, the maintenance department for inspection and treatment.
Assembly instructions
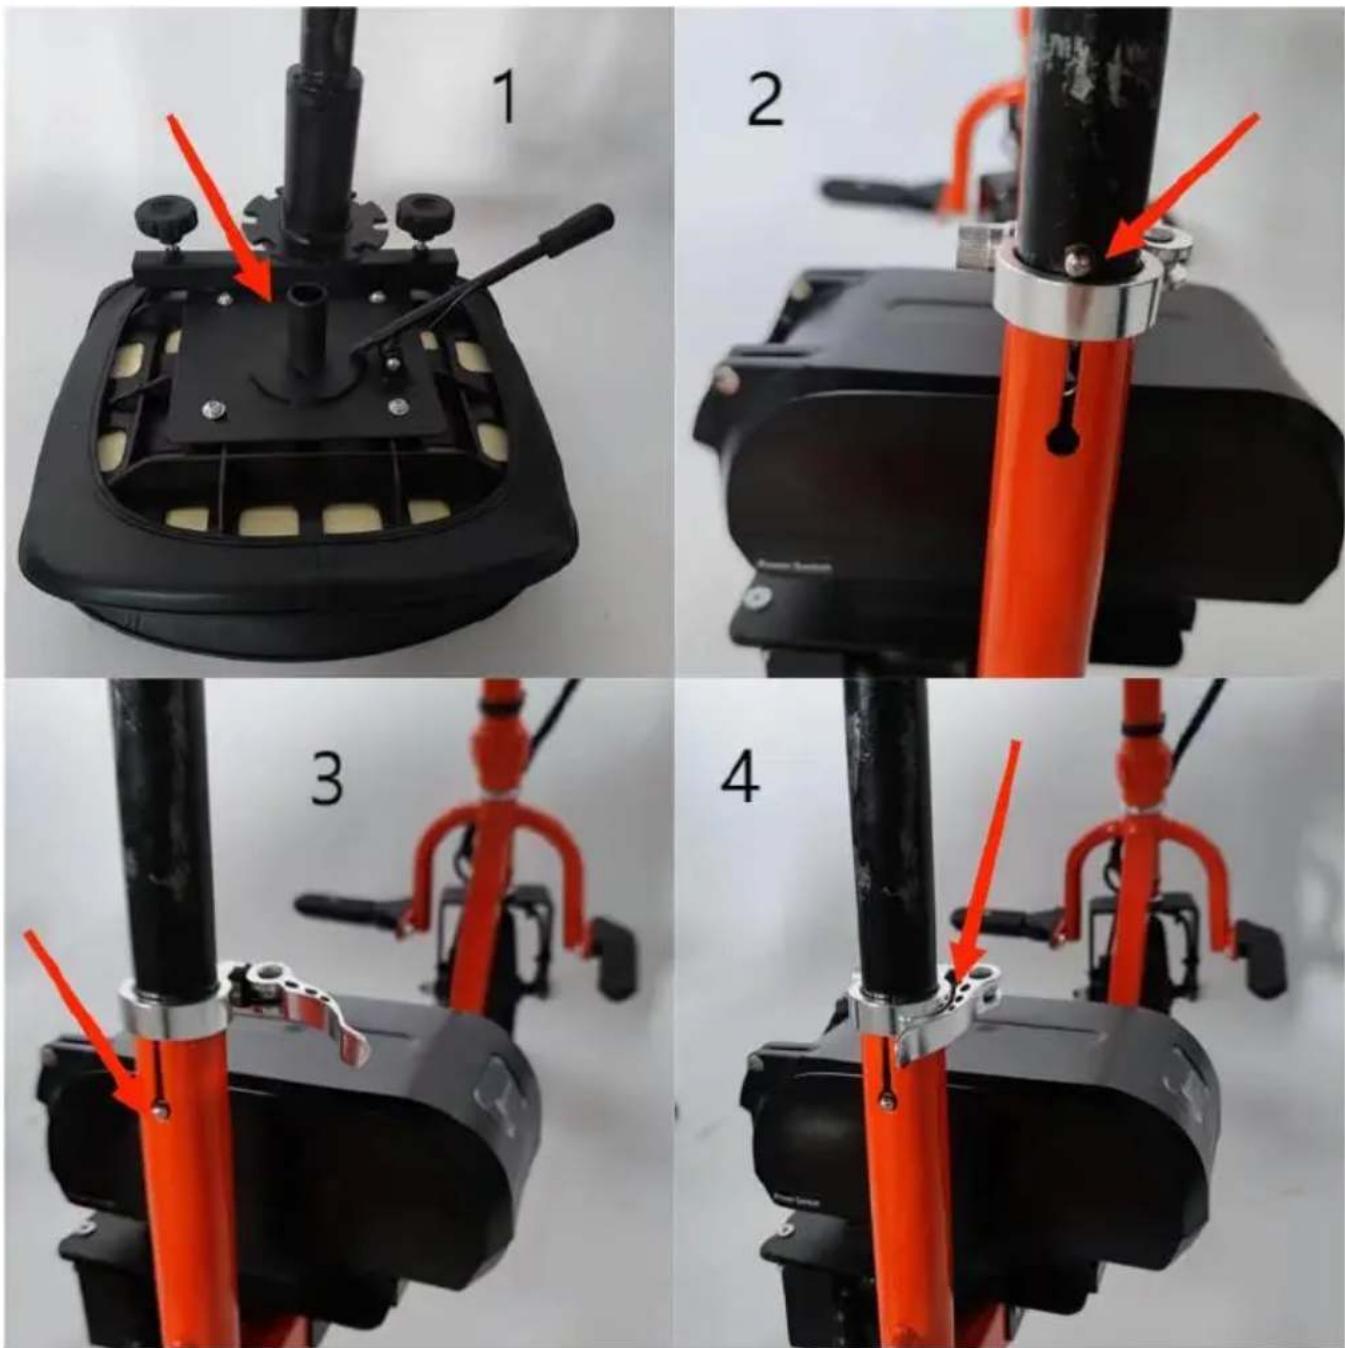
Step1. folding rod installation
In Figure 1, the place shown in the arrow, and in Figure 2, push the folding up, lock the lock up, push the buckle in the direction shown in the arrow, a the arrow in Figure 4, lock the buckle up.

Step2. installation the seat.
As shown in Figure 1, install one end of the seat pipe on the cushion, as Figure 2, adjust the direction of the cushion and the frame, hold the marble, the other end of the seat pipe on the frame, as shown in Figure 3, the mast stuck into the hole, as shown in Figure 4, lock the buckle.
Step3. Installation the armest of the seat.
As shown in Figure 1, install the square pipe of the left armrest on the square at the bottom of the cushion as shown in Figure 2. Tighten the screws as in Figure 3. Install the square pipe of the right armrest on the square pipe bottom of the cushion as shown in Figure 4 and tighten the screws.

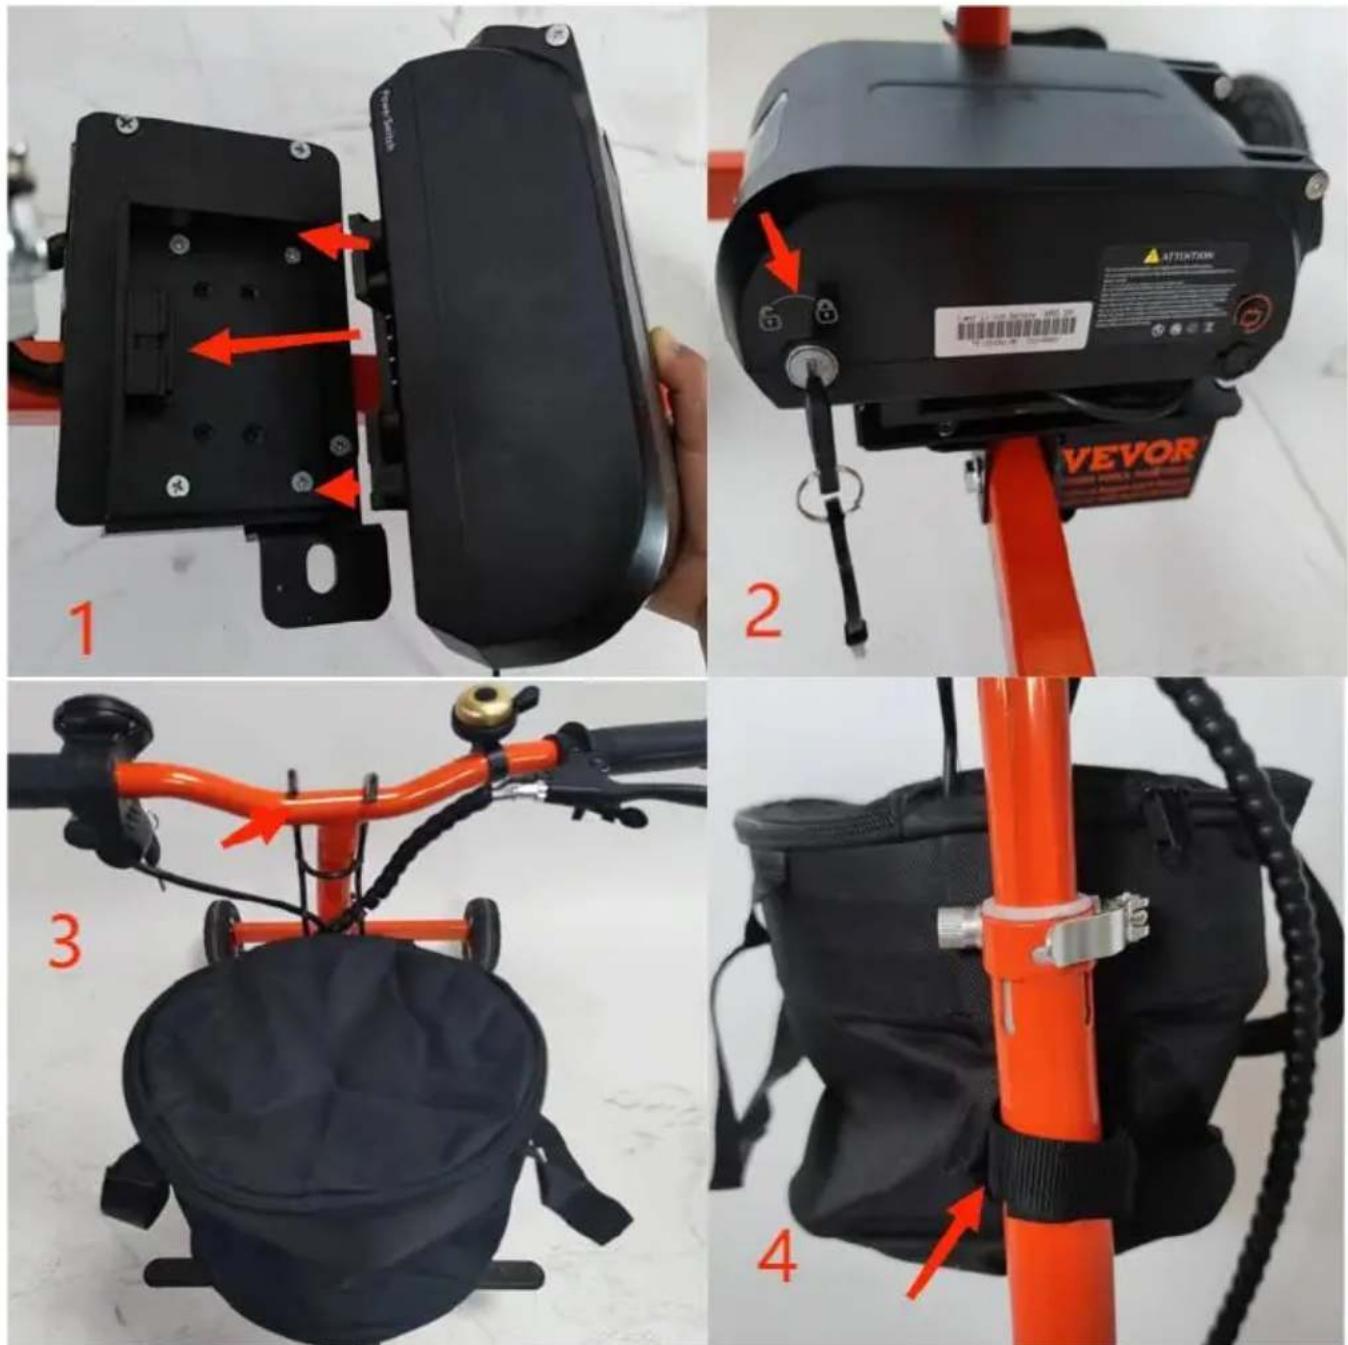
Step4. Install the baskets and battery box.
In the direction shown by the arrow in Figure 1, put the battery box into th and push it to the end. As shown in Figure 2, lock the battery case in the indicated by the arrow. In Figure 3, hang the basket on the front handlebar. Figure 4, the cloth band of the basket is tied to the folding rod.
How to remove the battery pack and charge

Maintenance
The maintenance is important to electric scooter, if drive at high speed in a situation for a long time, must add the times of maintenance; If electric sco have a big failure or have an accident, must check for mainly spare parts.
For example: frame, indicator parts and soon. Repair or change the worn part make sure safety. Notice:
To ensure the electric vehicle safety and reliability, do not allow the electric vehicles are modified. Use original parts or equivalent parts of similar quality during maintenance and replacement. If you use other parts of poor quality, it affects the performance of electric vehicles and operating functions.
Warning:
To ensure the safety of personnel, from harm, regardless of any program of maintenance work, be sure to turn the power off, parked the car on a flat hat surface.
Attention:
If you store your vehicle more than a month's time, or to stop using in the 'period, it is required to make maintenance work to bad tires, batteries, etc., and corrosion.
Often driving on uneven roads, in order to hold the good performance of your vehicle, it must be maintained. Maintenance for battery
If the vehicle will not use for a long time, please take out the battery, full and store it in a cool, well ventilated and dry place.
If the head of battery was corroded, please take out the battery and clean it off the ignition switch before takeout the battery, take apart the negative pole. When you assemble the battery, fix the positive pole first, then the negative don't mix.
Vehicle storage Storage
For long-term storage of the electric scooter, for example, in the winter time, some steps need to be taken to prevent malfunction and damage. Besides, before preparing storage also need to do part of the maintenance work, othe once use the electric scooter, they tend to forget to carry out the maintenant
Replace rear axle gear oil Cover the electric scooter Reuse the electric scoo
Take off the electric scooter and clean it, please replace the rear axle gear the storage period is over 4 months. If necessary, charge at time and put on battery.
Check all items before drive. Try at low speed around free traffic area.
· The POWER SWITCH must be turned in OFF position when charging.
- Before the first use, you should charge the battery for 4-6 hours. Do not recharge the battery for more than 10 hours to avoid overheating the charger. When the vehicle begins to run slowly, recharge the battery.
- After each use or once a month minimumrecharge time as 6 to 8 hours, than 10 hours at most.
- Use the only rechargeable battery and charger supplied with your vehicle. NEVER substitute the battery or the charger with another brand. Using another battery or charger may cause a fire or explosion.
- Do not use the battery or charger for any other product.
Disposal Of Battery
- Your sealed lead-acid battery must be recycled or disposed of in an environmentally sound manner.
- Do not dispose of your lead-acid battery in a fire. The battery may explore leak.
- Do not dispose of a lead-acid battery in your regular, household trash. Th incineration, land filling or mixing of sealed lead-acid batteries with household trash is prohibited by law.
Manufacturer: Shanghaimuxinmuyeyouxiangongsi
Address: Baoshanqu Shuangchenglu 803long 11hao 1602A-1609shi Shanghai
Imported to AUS: SIHAO PTY LTD.1 ROKEVA STREETEASTWOOD NSW 2122 Australia
Imported to USA: Sanven Technology Ltd. Suite 250,9166 Anaheim Place,Rancho Cucamonga,CA91730

Pooledas Group Ltd
Unit 5 Albert Edward House, The Pavilions Preston, United Kingdom

SHUNSHUN GmbH
Römeräcker 9 Z2021,76351
Technical Support and E-Warranty Certificate www.vevor.com/support
VEVOR®
TOUGH TOOLS, HALF PRICE
natural_image
Red three-wheeled electric scooter with black seat, battery, and rear-mounted wheels (no visible text or symbols)BESOIN D'AIDE? CONTACTEZ-NOUS!
PARAMÈTRES DU PRODUIT
Electrical schematic diagram

flowchart
graph TD
    A["charger"] --> B["battery panel"]
    B --> C["controller"]
    C --> D["force"]
    D --> E["three-phase motor line"]
    D --> F["hall signal line"]
    C --> G["speed transfer handle"]
    H["power protection switch switch lock"] --> C
    I["front brake power off"] --> D
Entretien
MODELL: BL300G-AÿBL300G-E
natural_image
Red three-wheeled electric scooter with black seat, battery, and rear-mounted wheels (no visible text or symbols)BRAUCHEN SIE HILFE? KONTAKTIERE UNS!
Electrical schematic diagram

flowchart
graph TD
    A["charger"] --> B["battery panel"]
    B --> C["controller"]
    C --> D["force head"]
    D --> E["force output"]
    F["front brake power off"] --> C
    G["speed transfer handle"] --> C
    H["power protection switch switch lock"] --> C
    I["three-phase motor line"] --> C
    J["hall signal line"] --> C
Wartung
MODELLO: BL300G-A yBL300G-E

natural_image
Red three-wheeled electric scooter with black seat, battery, and rear-mounted wheels (no visible text or symbols)HO BISOGNO DI AIUTO? CONTATTACI!
Electrical schematic diagram

flowchart
graph TD
    A["charger"] --> B["battery panel"]
    B --> C["controller"]
    C --> D["front brake power off"]
    D --> E["three-phase motor line"]
    C --> F["hall signal line"]
    C --> G["speed transfer handle"]
    style A fill:#f9f,stroke:#333
    style B fill:#ccf,stroke:#333
    style C fill:#cfc,stroke:#333
    style D fill:#fcc,stroke:#333
    style E fill:#ffc,stroke:#333
    style F fill:#cfc,stroke:#333
    style G fill:#fcc,stroke:#333
Manutenzione
Importato in Australia: SIHAO PTY LTD.1 ROKEVA STREETEASTWOOD NSW 2122Australia
MODELO: BL300G-A BL300G-E
MODELO: BL300G-A BL300G-E

natural_image
Red three-wheeled electric scooter with black seat, battery, and rear cover (no visible text or symbols)Electrical schematic diagram

flowchart
graph TD
    A["charger"] --> B["battery panel"]
    B --> C["controller"]
    C --> D["force brake power off"]
    D --> E["three-phase motor line"]
    E --> F["M"]
    C --> G["hall signal line"]
    G --> H["speed transfer handle"]
    B --> I["power protection switch switch lock"]
    I --> C
Mantenimiento
MODEL: BL300G-A; BL300G-E
MODEL: BL300G-A BL300G-E

natural_image
Red three-wheeled electric scooter with black seat, battery, and rear cover (no visible text or symbols)POTRZEBUJE POMOCY? SKONTAKTUJ SIĘ Z NAMI!
Electrical schematic diagram

flowchart
graph TD
    A["charger"] --> B["battery panel"]
    B --> C["controller"]
    C --> D["front brake power off"]
    D --> E["three-phase motor line"]
    C --> F["hall signal line"]
    C --> G["speed transfer handle"]
    style A fill:#f9f,stroke:#333
    style B fill:#ccf,stroke:#333
    style C fill:#cfc,stroke:#333
    style D fill:#fcc,stroke:#333
    style E fill:#ffc,stroke:#333
    style F fill:#cfc,stroke:#333
    style G fill:#fcc,stroke:#333
Konserwacja
SHUNSHUN GmbH
Römeräcker 9 Z2021,76351
MODEL: BL300G-A; BL300G-E
natural_image
Red three-wheeled electric scooter with black seat, battery, and rear cover (no visible text or symbols)HULP NODIG? NEEM CONTACT MET ONS OP!
Electrical schematic diagram
flowchart
graph TD
    A["charger"] --> B["battery panel"]
    B --> C["controller"]
    C --> D["force head"]
    D --> E["force output"]
    F["front brake power off"] --> C
    G["speed transfer handle"] --> C
    H["power protection switch switch lock"] --> C
    I["three-phase motor line"] --> C
    J["hall signal line"] --> C
Stap 4. Installeer de manden en de accubak.
Onderhoud
MODELL: BL300G-AÿBL300G-E
natural_image
Red three-wheeled electric scooter with black seat, battery, and rear-mounted wheels (no visible text or symbols)BEHÖVS HJÄLP? KONTAKTA OSS!
Electrical schematic diagram

flowchart
graph TD
    A["charger"] --> B["battery panel"]
    B --> C["controller"]
    C --> D["front brake power off"]
    D --> E["three-phase motor line"]
    C --> F["hall signal line"]
    C --> G["speed transfer handle"]
    style A fill:#f9f,stroke:#333
    style B fill:#ccf,stroke:#333
    style C fill:#cfc,stroke:#333
    style D fill:#fcc,stroke:#333
    style E fill:#ffc,stroke:#333
    style F fill:#cfc,stroke:#333
    style G fill:#fcc,stroke:#333
Underhåll
Pooledas Group Ltd Enhet 5 Albert Edward House, The Pavilions Preston, United Rike

SHUNSHUN GmbH Römeräcker 9 Z2021,76351 Linkenheim-Hochstetten, Tyskland
Made In Chinaeuvertreter@gmail.com
VEVOR®
TOUGH TOOLS, HALF PRICE


