
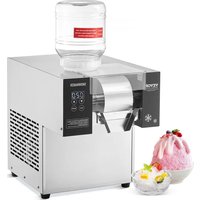
HS-210D-US - Ice machine Vevor - Free user manual and instructions
Find the device manual for free HS-210D-US Vevor in PDF.


| Product type | Commercial blender with ice crushing function |
| Brand | Vevor |
| Model | HS-210D-US |
| Approximate dimensions | 20 × 20 × 40 cm |
| Approximate weight | 5 kg |
| Rated voltage | 120 V ~ |
| Rated frequency | 60 Hz |
| Rated power | 1400 W |
| Maximum power | 2200 W |
| Rated bowl capacity | 2,0 L |
| Maximum rotation speed | 26 000 rpm ± 15 % |
| Programmed functions | Ice Crush, Smoothie, Juice, Milkshake |
| Pulse function (Pulse) | Yes, with soft start |
| Speed adjustment | Variable by rotary knob |
| Timer | Yes, adjustable from 0 to 5 minutes |
| Bowl material | Food-grade plastic |
| Blades | Stainless steel, sharp |
| Safety | Overload protection, safety switch, lid lock |
| Maintenance and cleaning | Clean the bowl with a sponge; do not immerse the motor base; wipe with a dry cloth |
| Spare parts | Contact Vevor after-sales service |
| Repairability | Do not disassemble yourself; entrust to a qualified professional |
| Warranty | Electronic warranty certificate available at www.vevor.com/support |
Frequently Asked Questions - HS-210D-US Vevor
User questions about HS-210D-US Vevor
0 question about this device. Answer the ones you know or ask your own.
Ask a new question about this device
Download the instructions for your Ice machine in PDF format for free! Find your manual HS-210D-US - Vevor and take your electronic device back in hand. On this page are published all the documents necessary for the use of your device. HS-210D-US by Vevor.
USER MANUAL HS-210D-US Vevor
Technical Support and E-Warranty Certificate www.vevor.com/support
Commercial Blender Operating Manual MODEL:HS-210D-US/HS-210D-EU
We continue to be committed to provide you tools with competitive price. "Save Half", "Half Price" or any other similar expressions used by us only represents an estimate of savings you might benefit from buying certain tools with us compared to the major top brands and does not necessarily mean to co all categories of tools offered by us. You are kindly reminded to verify carefully when you are placing an order with us if you are actually Saving Half in comparison with the top major brands.
MODEL:HS-210D-US/HS-210D-EU
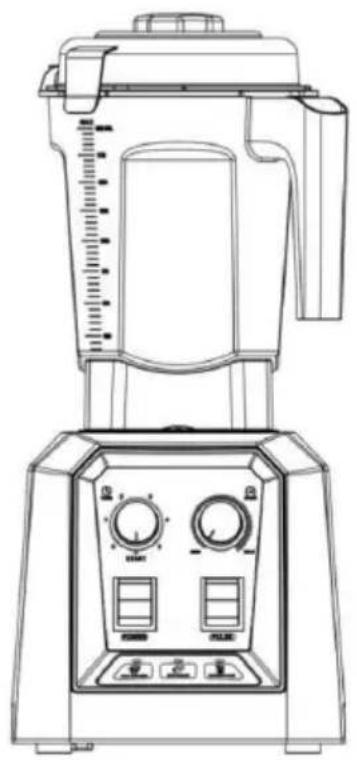
natural_image
Line drawing of a blender with control panel and gauges (no text or symbols)NEED HELP? CONTACT US!
Have product questions? Need technical support? Please feel free to contact us:
Technical Support and E-Warranty Certificate www.vevor.com/support
This is the original instruction, please read all manual instructions carefully before operating. VEVOR reserves a clear interpretation of user manual. The appearance of the product shall be subject to product you received. Please forgive us that we won't inform you and there are any technology or software updates on our product.
 | Warning-To reduce the risk of injury, user must re instructions manual carefully. |
 | Indoor Use Only |
 | CORRECT DISPOSALThis product is subject to the provision of European D 2012/19/EC. The symbol showing a wheelie bin cros through indicates that the product requires separate re collection in the European Union. This applies to the and all accessories marked with this symbol. Products as such may not be discarded with normal domestic w must be taken to a collection point for recycling electr electronic devices |
INSTRUCTIONS
Product in the long-term start-up operation or use in the presence of someone, such as long-term or personnel leave, out of the plug please up.
- There are still parts of the standby power on state, due to insulation deterioration or leakage of electricity caused by fire.
Do not spray volatile oils, paints, or insecticides on products.
- Can cause electric shocks, fire accidents.
Be sure to pull off the plug when you are not in use for a long time you are out of town.
- Some of them are still energized during standby and may cause fi accidents due to insulation cracking or leakage.
- Do not pull off the power cord when pulling off the plug. Always p the plug.
Please make sure to plug in the power cord before use.
- Make sure that the plug fits tightly with the socket.There must be loosening or incomplete insertion.
Do not trample on the power cord.
- Damage to the power cord or socket is the cause of leakage and the power cord is damaged, it must be replaced by the manufacturer of his service office or a similarly qualified person to avoid danger.
Switch off the power when you are out or sleeping at night.
- The utility model can avoid fire accidents caused by wiring personalization and save electricity.
Do not allow products to be inhaled or put into combustible substance. And shall not be used where mechanical oil composition floats.
- It can cause cracks, odors and fire accidents.
Do not use wet places such as bathrooms.
- Can cause poor insulation. Causing a leakage or malfunction.
Do not use damaged power cords or plugs.
- This is the cause of electric shock, short circuit and fire.
Do not use multiple power cord sockets.
- Do not overheat or cause fire hazards by using extension cord so sharing power sockets with other electrical appliances.
Do not unplug the power cord with a wet hand.
- Do not risk electric shock by unplugging the plug with a wet hand, the power supply needs to be unplugged.
- The contents of the cup should not be too full. Do not exceed two the capacity of the cup.
- Please close the lid of the cup when using.
- Before starting, make sure the cup is on the base.
- It is completely fixed on.
- Because of the high horsepower, please hold the cup slightly when start to use it.
- Be sure to cover the cup when using the stirring bar while the m
- Whether the cup is placed on the table or not.
- Do not use your hand to fetch food from that cup because the b sharp and easy to cut.
- To pour food out, remove the cup from the frame.
- Be careful to touch the switch before and after start-up.
- Utensils cannot be immersed in water.

Care should betaken when handling cutting blades especially when removing blad from containment cups,emptying containment cups,andduring cleaning.
SAFETY MATTERS
Remember to pull off the plug when not in use.
Do not lift the lid of the cup until the stirring knife has completely set pedrotating.
Be sure to separate the frame from the cup when cleaning and mak to pull off the plug first.
Do not immerse the motor base in water or put it in the dishwasher cleaning.
Keep a proper distance to prevent the child from improper movement causing danger when the child is not allowed to be nearby during the start-up.
If the power cord is damaged, it must be replaced by a professional manufacturer's maintenance department or similar department in order to avoid danger.
SAVE THESEINSTRUCTIONS
TECHNICAL PAPAMETER
| Model | |||
| HS-210D-US | HS-210D-EU | ||
| Rated Voltage | 120V~ | Rated Voltage | 220-240V~ |
| Rated Frequency | 60Hz | Rated Frequency | 50-60Hz |
| Rated Power | 1400W | Rated Power | 1400W |
| Max Power | 2200W | Max Power | 2200W |
| Rated Capacity | 2.0L | Rated Capacity | 2.0L |
| Rotational Speed | 26000RPM ±15% | Rotational Speed | 26000RPM ±15% |
MAJOR COMPONENT NAME
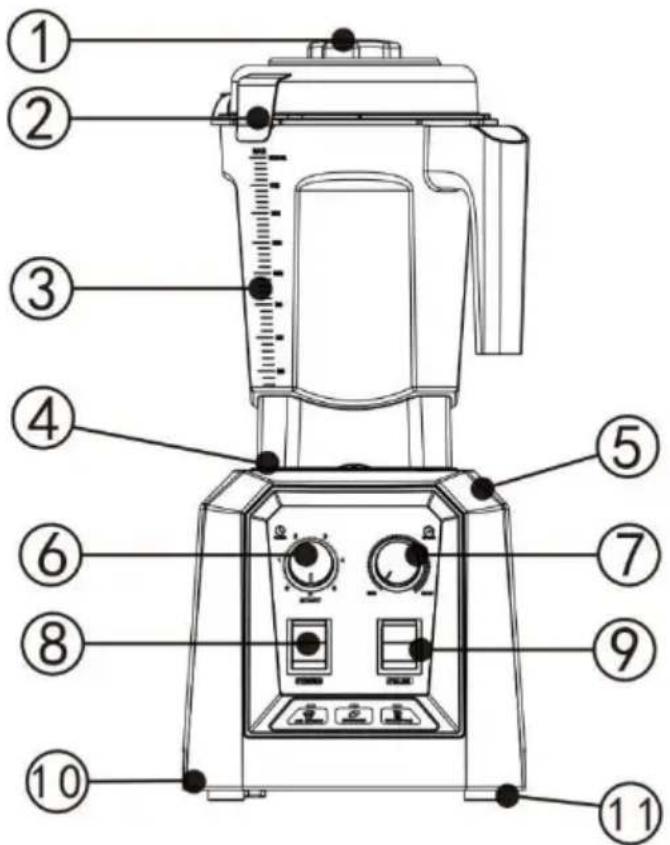
① steam cap
② cup cap
③ mixing cup
④ cup mat
⑤ epitheca
⑥ timer
⑦ governor
⑧ switch
⑨ inching
⑩base bottom
⑪ rubber feer
- The apparatus is intended to be used for domestic and similar applications such as:
-
kitchen employees in shops, offices and other work environments;
-
farms;
- by clients of hotels, motels and other residential-type environments;
- Bed and Breakfast type environments.
- Do not put metal objects, such as knives, forks, spoons, etc., into the cu
- When cleaning, do not clean the knife directly by hand. If you use tools, please pay attention to safety.
FUNCTION INTRODUCTION
- Initialization of power-on: When the system is powered on, the blu indicator of the function is always on, and the system is in the stan state.
2.Start/Cancel key (POWER):
(1) After the machine is powered on, click the start/cancel button, and machine will work immediately; at this time, you can turn the knob to the speed of the motor and the required working time as needed; (for example, when the timing knob is in the 0 gear, the machine will no
(2) Click the function button, when the function button indicator light is shining, click the start/cancel button, the function indicator light is always on, and the system will enter the set program to work; (turning the not affect the changed setting at this time program)
(3) After the system works unexpectedly, click the start/cancel button, the machine will stop working immediately and return to the standby state
3. Inching switch (PULSE):
(1) With soft start setting, after the machine is in stable operation, always work in the highest gear 9;
(2) When jog is working, release the button and the machine will store working immediately;
(3) Jog function limits the longest continuous working time to 30s. After 30s of constant work, you need to press and hold the jog key again the machine can jog again;
(4) The timer does not interfere with the jog switch, even if the time the 0 - 6 - position, long press the jog switch, the machine will still
4. Speed governor (SPEED):
(1) Rotate the knob to adjust the speed before and after the machin working;
(2) The adjustment of the governor does not affect the preset program (jogging, smoothie, juice, milkshake)
5. Timer (TIMER):
(1) The working time can be adjusted by rotating the knob before ar the machine is working;
(2) When the timer is in the STRAT gear, the machine is normally click to start /Cancel button, the machine will continue to work, until click the start/cancel button again, the machine will stop working; (the actual maximum working time is 5min)
(3)The adjustment of the timer does not affect the preset programs (j smoothies, juice, milkshakes);
6. The preset programs: smoothies, nuts, milkshakes;
(1)ICE CRUSH: After the machine is powered on and enters the star mode, click the ICE CRUSH button, and the ICE CRUSH indicator w On, click the start/cancel button at this time, the ice function indicator is always on, and the system starts to work according to the default program. The duration is about 40S; after the work is over, the ice fu indicator light goes out and the system returns to the standby state.
(2)Grains: After the machine is powered on and enters the standby
click the juice function button, and the juice function indicator light will flash.Click the start/cancel button at this time, the juice function indica light is always on, the system starts to work according to the default program, and the working time is long About 40S; after the work is function indicator light goes out and the system returns to the standby state.
(3)SMOOTHIES: After the machine is powered on and enters the star mode, click the milkshake function button, the milkshake function indicator flashes On, click the start/cancel button at this time, the milk function indicator light is always on, and the system starts to work according to the default program. The duration is about 45S; the functi indicator light goes out after the work, and the system returns to the standby state.
Crushed Ice Operation instructions. Use approximately 30-35 grams of Place dry ice into a dry container and blend Start the blending process pulsing for 5 seconds, then pause for 2 seconds, and repeat this cycle method yields the best crushed ice effect.
Dry grinding cup instructions:
-
Beans grinding: a single addition of no more than 200 grams of beans (the drier the better the effect of crushing), with the grinding of key (smart models only have this button) can be operated by one key. Pulse function key to operate, Pulse button works for 10 seconds and stops for 3 seconds, this is a round, repeat the operation until the g to the desired effect.
-
Spice Grinding: Add 250 grams of dried chili or other spices with of not more than 8 cm at a single time, use the grinding function b (smart models have this button) to operate it with one key or the Pu function button to operate it, the Pulse button works for 10 seconds stops for 3 seconds, and so on as a round, and repeat the operation the grinding is done to the desired effect.
Note: Do not cover the air vent on the lid to avoid the risk of hot being discharged.
CLEANING AND MAINTENANCE METHODS
- Always pull off the plug when cleaning and maintaining.
- Carefully scrub the cup body and lid with a sponge or cloth and
- Do not put your hand into the cup for cleaning.
- Wipe the rotating shaft and motor base with a dry cloth (remember not rinse with water).
- When it is not easy to wipe, wipe it with neutral lotion, and then wi dry cloth until it is clean.
- Use a cleaning cloth or cleaning brush to easily clean the mixing (remember not to be immersed in water for cleaning);
- The product is made of non-toxic food-grade materials, which are each clean and ensure food safety.
FAULT ANALYSI
| Fault Phenomenon | Cause Analysis | Exclusion Methods |
| Indicator light inot on | 1.The power cord is plugged in.2.The stirring cup and the main engine are assembled properly. | 1.Check the power cord to make sure itis plugged in.2.Makesure that the mixing cup and the main machine installed properly. |
| Indicator Light on Product Inoperative | 1.Long working hours, motoroverheat protection.2.The machine itself is out of order. | 1.Wait an hour before reus or check whether the prote at the bottom of the mach disconnected.If so,press the protector button to restore machine to work.2.S end to after-sales servi department.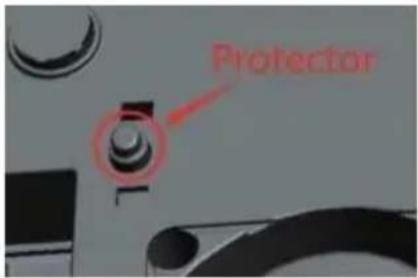 |
Note:
Above are common trouble analysis and troubleshooting methods. For other troubles, please contact our customer service department, or go directly to our designated repair point for repair. Do not dismantle and repair yourself.
CIRCUIT DIAGRAM
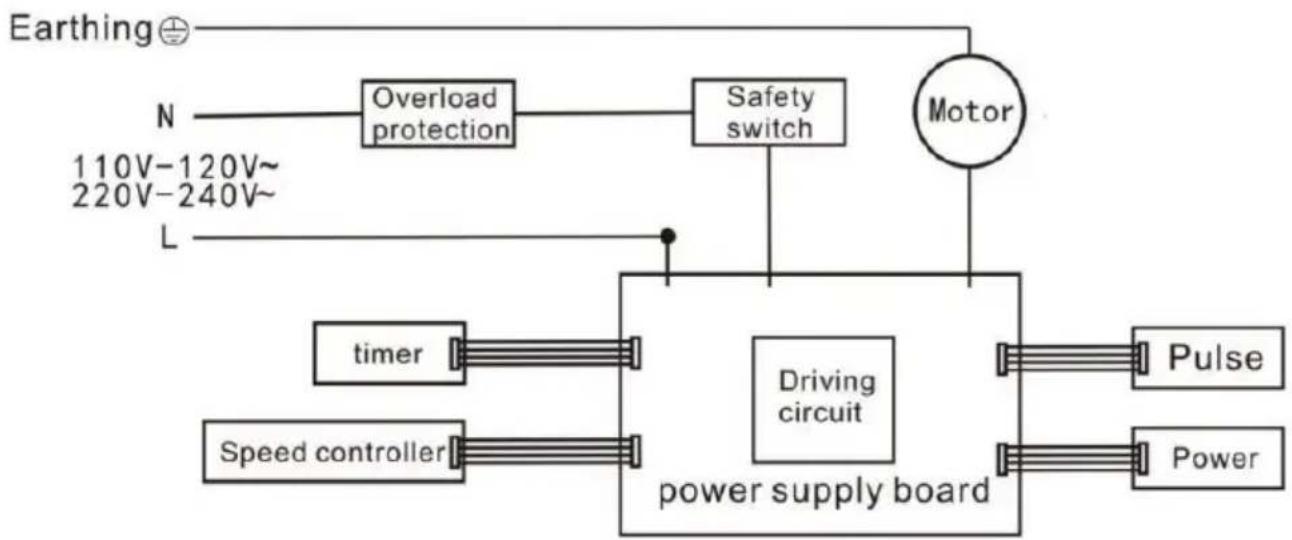
flowchart
graph TD
    A["Earthing ⊕"] --> B["Overload protection"]
    B --> C["Safety switch"]
    C --> D["Motor"]
    D --> E["pulse"]
    D --> F["Power"]
    G["N 110V-120V~ 220V-240V~ L"] --> H["timer"]
    H --> I["Speed controller"]
    I --> J["Driving circuit"]
    J --> K["power supply board"]
    K --> L["Pulse"]
    K --> M["Power"]
VEVOR®
TOUGH TOOLS, HALF PRICE
Technical Support and E-Warranty Certificate
www.vevor.com/support
VEVOR®
TOUGH TOOLS, HALF PRICE
natural_image
Line drawing of a blender with control panel and measurement scale (no text or symbols)BESOIN D'AIDE? CONTACTEZ-NOUS!
natural_image
Prohibition sign with crossed fork and knife symbols (no text)① steam cap
② cup cap
③ mixing cup
④ cup mat
⑤ epitheca
⑥ timer
⑦ governor
⑧ switch
⑨ inching
⑩base bottom
⑪ rubber feer
INTRODUCTION AUX FONCTIONS
www.vevor.com/support
natural_image
Line drawing of a blender with control panel and measurement scale (no text or symbols)natural_image
Prohibition sign with crossed fork and knife symbols (no text)① steam cap
② cup cap
③ mixing cup
④ cup mat
⑤ epitheca
⑥ timer
⑦ governor
⑧ switch
⑨ inching
⑩base bottom
⑪ rubber feer
elettronica www.vevor.com/support
natural_image
Line drawing of a blender with control panel and measurement scale (no text or symbols)natural_image
Prohibition sign with crossed fork and knife symbols (no text)① steam cap
② cup cap
③ mixing cup
④ cup mat
⑤ epitheca
⑥ timer
⑦ governor
⑧ switch
⑨ inching
⑩base bottom
⑪ rubber feer
natural_image
Line drawing of a blender with control panel and measurement scale (no text or symbols)www.vevor.com/support
natural_image
Prohibition sign with crossed fork and knife symbols (no text)① steam cap
② cup cap
③ mixing cup
④ cup mat
⑤ epitheca
⑥ timer
⑦ governor
⑧ switch
⑨ inching
⑩base bottom
⑪ rubber feer
natural_image
Line drawing of a blender with control panel and measurement scale (no text or symbols)POTRZEBUJESZ POMOCY? SKONTAKTUJ SIĘ Z NAMI!
natural_image
Prohibition sign with crossed fork and knife symbols (no text)① steam cap
② cup cap
③ mixing cup
④ cup mat
⑤ epitheca
⑥ timer
⑦ governor
⑧ switch
⑨ inching
⑩base bottom
⑪ rubber feer
natural_image
Line drawing of a blender with control panel and measurement scale (no text or symbols)HULP NODIG? NEEM CONTACT MET ONS OP!
natural_image
Prohibition sign with crossed fork and knife symbols (no text)① steam cap
② cup cap
③ mixing cup
④ cup mat
⑤ epitheca
⑥ timer
⑦ governor
⑧ switch
⑨ inching
⑩base bottom
⑪ rubber feer
www.vevor.com/support
natural_image
Line drawing of a blender with control panel and measurement scale (no text or symbols)BEHÖVER HJÄLP? KONTAKTA OSS!
natural_image
Prohibition sign with crossed fork and knife symbols (no text)① steam cap
② cup cap
③ mixing cup
④ cup mat
⑤ epitheca
⑥ timer
⑦ governor
⑧ switch
⑨ inching
⑩base bottom
⑪ rubber feer
www.vevor.com/support

- Commercial Blender Operating Manual MODEL:HS-210D-US/HS-210D-EU
- MODEL:HS-210D-US/HS-210D-EU
- NEED HELP? CONTACT US!
- Technical Support and E-Warranty Certificate www.vevor.com/support
- INSTRUCTIONS
- SAFETY MATTERS
- SAVE THESEINSTRUCTIONS
- FUNCTION INTRODUCTION
- 2.Start/Cancel key (POWER):
- Inching switch (PULSE):
- Speed governor (SPEED):
- Timer (TIMER):
- The preset programs: smoothies, nuts, milkshakes;
- CLEANING AND MAINTENANCE METHODS
- Note:
- CIRCUIT DIAGRAM
- VEVOR®
- TOUGH TOOLS, HALF PRICE
- BESOIN D'AIDE? CONTACTEZ-NOUS!
- INTRODUCTION AUX FONCTIONS
- HULP NODIG? NEEM CONTACT MET ONS OP!
- BEHÖVER HJÄLP? KONTAKTA OSS!
Brand : Vevor
Model : HS-210D-US
Category : Ice machine