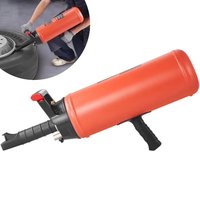
XW-9AL - Toys Vevor - Free user manual and instructions
Find the device manual for free XW-9AL Vevor in PDF.


User questions about XW-9AL Vevor
0 question about this device. Answer the ones you know or ask your own.
Ask a new question about this device
Download the instructions for your Toys in PDF format for free! Find your manual XW-9AL - Vevor and take your electronic device back in hand. On this page are published all the documents necessary for the use of your device. XW-9AL by Vevor.
USER MANUAL XW-9AL Vevor
Technical Support and E-Warranty Certificate www.vevor.com/support
BEAD SEATER
MODEL: XW-9AL
We continue to be committed to provide you tools with competitive price. "Save Half", "Half Price" or any other similar expressions used by us only represents an estimate of savings you might benefit from buying certain tools with us compared to the major top brands and doses necessarily mean to cover all categories of tools offered by us. You are kindly reminded to verify ca when you are placing an order with us if you are actually saving half in comparison with the top ma
VEVOR®
BEAD SEATER
MODEL:XW-9AL
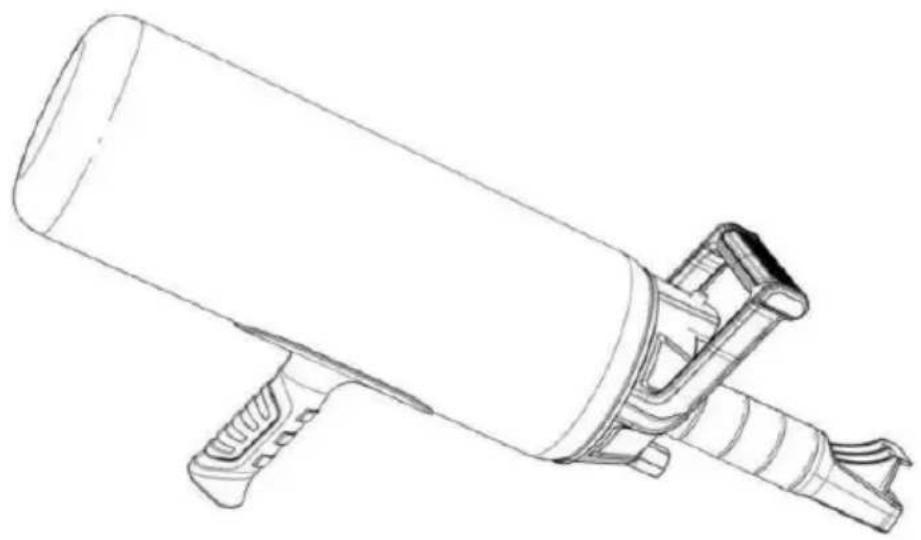
natural_image
Line drawing of a cylindrical mechanical device with attached lever and base (no text or symbols)NEED HELP? CONTACT US!
Have product questions? Need technical support? Please feel f contact us: Technical Support and E-Warranty Certificate www.vevor.com/support
This is the original instruction, please read all manual instruction carefully before operating. VEVOR reserves a clear interpretation user manual. The appearance of the product shall be subject to product you received. Please forgive us that we won't inform you there are any technology or software updates on our product.
I. Technical parameters
| Model | Capacity (L) | Operating Pressure (psi) | Limit Pressure (psi) | Weight (kg) | Product Size (mm) |
| XW-9AL | 9 | 87-116 | 150 | 4.2 | 700*168*340 |
II. Safety Precautions
 | Danger! Read the operating instructions to reduce th of inquiry. |
 | WARNING! This symbol, placed before a safety com indicates a kind of precaution, warning, or danger. I this warning may lead to an accident. To reduce th injury, fire, or electrocution, please always follow the recommendation shown below. |
 | Caution! Wear ear-muffs. The impact of noise can damage to hearing. |
 | Caution! Wear safety goggles. Sparks generated du working or splinters, chips and dust emitted by the device can cause lo sight. |
 | Caution!Wear gloves when using this product. |
WARNING! Read and understand all instructions before using this bea seater. The operator must follow basic precautions to reduce the risk personal injury and/or damage to the equipment.
DANGER! This notice indicates an immediate and specific hazard that result in severe personal injury or death if the proper precautions are taken.
WARNING! This notice indicates a specific hazard or unsafe practice could result in severe personal injury or death if the proper precaution not taken.
CAUTION! This notice indicates a potentially hazardous situation that result in minor or moderate injury if proper practices are not taken.
WORK AREA
- Operate in a safe work environment. Keep your work area clean, w and free of distractions.
- Keep anyone not wearing the appropriate safety equipment away from the work area.
- Store the unused bead seater properly in a safe and dry location prevent rust or damage. Lock bead seater away and keep out of the of children.
PERSONAL SAFETY
WARNING! Wear personal protective equipment approved by the Canadian Standards Association (CSA) or American National Standards Institute (ANSI).
PERSONA L PROTECTIVE EQUIPMENT
- It is recommended to use ear protectors and safety glasses when the inflatable tank. Eye protection equipment should comply with CSA Z94.3-07 or ANSI Z87.1 standards based on the type of work perform.
- Wear gloves that provide protection based on the work materials could reduce the effects of tool vibration.
PERSONA L PRECAUTIONS
Control the bead seater, personal movement and the work environment avoid personal injury or damage to bead seater.
- Do not operate any bead seater when tired or under the influence drugs, alcohol or medications.
- Avoid wearing clothes or jewelry that can become entangled with moving parts of a bead seater. Keep long hair covered or bound.
SPECIFIC SAFETY PRECAUTIONS
- Use the correct bead seater for the job. This bead seater was de for a specific function. Do not modify or alter this bead seater or use an unintended purpose.
- Ensure that the bead seater is properly installed before using.
- The air pressure in the gas tank cannot exceed 10 bar. If it exceeds bar, the safety valve on the gas tank will automatically open to ensure personal safety.
- The tire is placed accurately with the rim resting against the object reduce the clearance between the tire and the rim.
- The black exhaust pipe must be in close contact with the steel ri the hand holding the gas tank must be very strong, because there w recoil when opening the Exhaust valve to ensure personal safety.
- When not in use, it is forbidden to put the pressure gas in the tank.
- Never allow the nozzle to point in the direction of a person.
WARNING! DO NOT let comfort or familiarity with product (gained from repeated use) replace strict adherence to the bead seater safety rules you use this bead seater unsafely or incorrectly, you can suffer serious personal injury.
WARNING! Direct exposure of pressurized air to skin could result in severe bodily injury.
SAVE THESE INSTRUCTIONS
III. Package List
1× Gas Tank Assembly 1× Exhaust Pipe 1× Quick Connector
1× Screw 1×Handle 1×Manual
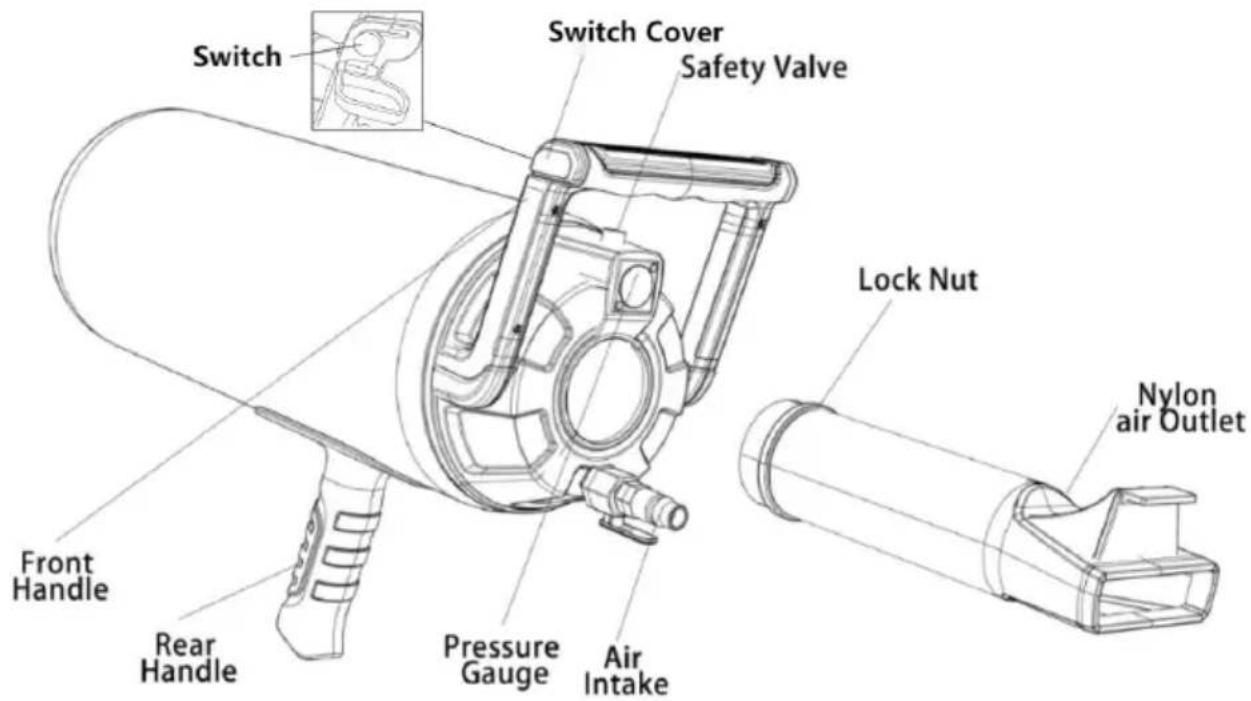
IV.Product structure diagram
text_image
Switch Switch Cover Safety Valve Lock Nut Nylon air Outlet Front Handle Rear Handle Pressure Gauge Air IntakeV. Instructions for use
-
Adjust the flange so that the flange of the air discharge noz top (opposite the side of the handle and the air discharge) and parallel to the ground.
-
Place the rim and the tire as shown below (the device supp size passenger tire and medium light truck tires). To ensure pro and smooth seating of the tire, the rim edge and bead should be properly lubricated)
-
Connect the air line to the air quick coupler plug and open valve to fill the air tank to the required pressure. Normal opera pressure is 6-8 Bar (read the pressure gauge value and close valve when the pressure reaches the required value).
-
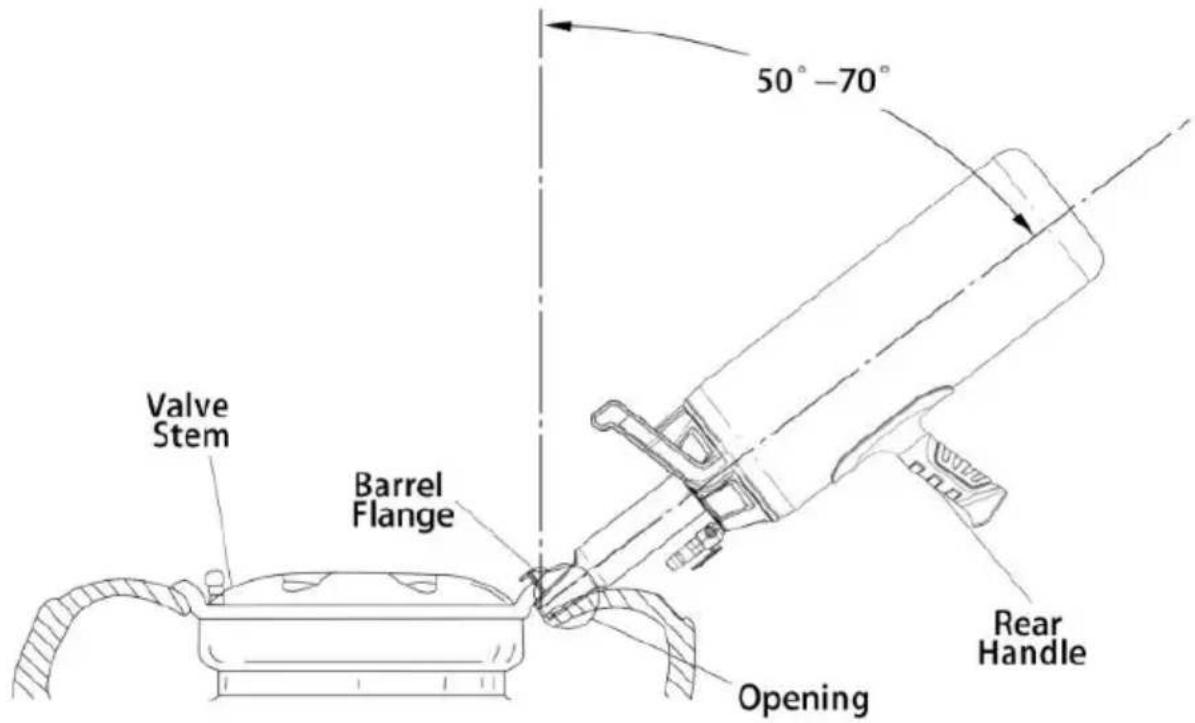
Using two hands; one on the handle with the air release, another on the handle on the bottom of the tank, point the nozzle towards the wheel opposite the valve. When you are able to sh compressed air, move the nozzle so that it does not get stuck
foot, which quickly rises under the influence of air force. The b angle at which the inflator should be held is 50-70 degrees.
text_image
Valve Stem Barrel Flange 50°-70° Rear Handle Opening- Gently press the trigger to release any air in the reservoir. Keep machine steady and always keep the airflow directed into the gap be the tire and wheel.
Note:
If this does not work, correct the position and repeat the procedure is higher pressure.
Using a bead seater on the opposite side of the tire valve stem will easier to succeed.
VI. Scope of application
Car-SUV, Bike, Truck, ATV, Lawn Tractor, Tractor, Motorcycle, Comper
VEVOR®
TOUGH TOOLS, HALF PRICE
Technical Support and E-Warranty Certificate
www.vevor.com/support
VEVOR®
TOUGH TOOLS, HALF PRICE
natural_image
Line drawing of a cylindrical mechanical device with attached lever and handle (no text or symbols)BESOIN D'AIDE? CONTACTEZ-NOUS!
text_image
Switch Switch Cover Safety Valve Lock Nut Nylon air Outlet Front Handle Rear Handle Pressure Gauge Air IntakeV. Mode d'emploi
text_image
Valve Stem Barrel Flange 50°-70° Rear Handle Openingnatural_image
Line drawing of a cylindrical mechanical device with attached lever and handle (no text or symbols)Canadian Standards Association (CSA) oder American National Standards
Institut (ANSI).
text_image
Switch Switch Cover Safety Valve Lock Nut Nylon air Outlet Front Handle Rear Handle Pressure Gauge Air Intaketext_image
Valve Stem Barrel Flange 50°-70° Rear Handle Openingwww.vevor.com/support
VEVOR®
TOUGH TOOLS, HALF PRICE
natural_image
Line drawing of a cylindrical mechanical device with attached lever and handle (no text or symbols)text_image
Switch Switch Cover Safety Valve Lock Nut Nylon air Outlet Front Handle Rear Handle Pressure Gauge Air Intaketext_image
Valve Stem Barrel Flange 50°-70° Rear Handle Openingelettronica www.vevor.com/support
VEVOR®
TOUGH TOOLS, HALF PRICE
natural_image
Line drawing of a cylindrical mechanical device with attached lever and handle (no text or symbols)text_image
Switch Switch Cover Safety Valve Lock Nut Nylon air Outlet Front Handle Rear Handle Pressure Gauge Air Intaketext_image
Valve Stem Barrel Flange 50°-70° Rear Handle Openingnatural_image
Line drawing of a cylindrical mechanical device with attached lever and handle (no text or symbols)POTRZEBUJESZ POMOCY? SKONTAKTUJ SIĘ Z NAMI!
text_image
Switch Switch Cover Safety Valve Lock Nut Nylon air Outlet Front Handle Rear Handle Pressure Gauge Air Intaketext_image
Valve Stem Barrel Flange 50°-70° Rear Handle Openingnatural_image
Line drawing of a cylindrical mechanical device with attached lever and handle (no text or symbols)HULP NODIG? NEEM CONTACT MET ONS OP!
text_image
Switch Switch Cover Safety Valve Lock Nut Nylon air Outlet Front Handle Rear Handle Pressure Gauge Air Intaketext_image
Valve Stem Barrel Flange 50°-70° Rear Handle Openingnatural_image
Line drawing of a cylindrical mechanical device with attached lever and handle (no text or symbols)BEHÖVER HJÄLP? KONTAKTA OSS!
text_image
Switch Switch Cover Safety Valve Lock Nut Nylon air Outlet Front Handle Rear Handle Pressure Gauge Air IntakeV. Bruksanvisning
text_image
Valve Stem Barrel Flange 50°-70° Rear Handle Openingwww.vevor.com/support