
PJV17G - Vacuum Cleaner Vevor - Free user manual and instructions
Find the device manual for free PJV17G Vevor in PDF.
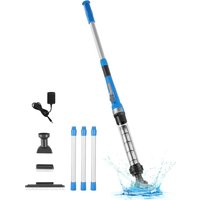


| Product Type | Rechargeable portable pool vacuum |
| Brand and Model | Vevor PJV17G |
| Dimensions (assembled) | 2250 mm × 180 mm × 95 mm |
| Battery Type | Rechargeable lithium-polymer, 4000 mAh |
| Rated Voltage | 4.2 V DC |
| Rated Power | 18 W |
| Charging Time | Approximately 4.5 hours |
| Runtime | Approximately 60 minutes |
| Charger (adapter) | Input AC 100-240 V ~ 50/60 Hz, output 5 V DC 1 A |
| Water level sensor | Automatic shutdown if the switch is not submerged within 60 seconds |
| Suction function | Collects debris (leaves, nuts, etc.) from the bottom and walls, ideal for small particles >120 µm and <1 cm |
| Included suction heads | Short brush, long brush, wide nozzle, triangular head, floating debris attachment |
| Filter material | Removable filter cartridge |
| Filter cleaning | Remove the cartridge, rinse with clean water after each use |
| Charge indicator | Red LED (charging), green LED (full charge) |
| Charging port protection | Waterproof cap to close after each charge |
| Battery maintenance | Recharge every 3 months if not in use to preserve battery |
| Use out of water | Never operate out of water; the outlet must remain submerged |
| Safety precautions | Do not use without filter, do not let children play with it, unplug before maintenance |
| Storage | Indoors, at room temperature, away from frost, sunlight and moisture |
| Color | Blue and gray |
| Weight | Approximately 1.5 kg (estimate) |
Frequently Asked Questions - PJV17G Vevor
User questions about PJV17G Vevor
0 question about this device. Answer the ones you know or ask your own.
Ask a new question about this device
Download the instructions for your Vacuum Cleaner in PDF format for free! Find your manual PJV17G - Vevor and take your electronic device back in hand. On this page are published all the documents necessary for the use of your device. PJV17G by Vevor.
USER MANUAL PJV17G Vevor
Technical Support and E-Warranty Certificate www.vevor.com/support
HANDHELD POOL VACUUM USER MANUAL
MODEL: PJV17G
We continue to be committed to provide you tools with competitive price. "Save Half", "Half Price" or any other similar expressions used by us only represents an estimate of savings you might benefit from buying certain tools with us compared to the major top brands and does not necessarily mean to cover all categories of tools offered by us. You are kindly reminded to verify carefully when you are placing an order with us if you are actually Saving Half in comparison with the top major brands.
VEVOR®
TOUGH TOOLS, HALF PRICE
HANDHELD POOL VACUUM
MODEL: PJV17G
NEED HELP? CONTACT US!
Have product questions? Need technical support? Please feel free to contact us:
Technical Support and E-Warranty Certificate
www.vevor.com/support
This is the original instruction, please read all manual instructions carefully before operating. VEVOR reserves a clear interpretation of our user manual. The appearance of the product shall be subject to the product you received. Please forgive us that we won't inform you again if there are any technology or software updates on our product.
WARNING:
Read this material before using this product. Failure to do so may result in serious injury.
Assembly precautions
- Assemble only according to these instructions. Improper assembly may create hazards.
- Wear ANSI-approved safety goggles and heavy-duty work gloves during assembly.
- Keep the assembly area clean and well-lit.
- Keep bystanders out of the area during assembly.
- Do not assemble if tired or when under the influence of alcohol, drugs or medication.
- The product capabilities apply to properly and completely assembled products only.
- Assemble on a flat, level, hard and smooth surface capable of safely supporting the Handheld Pool Vacuum.
- For additional information regarding the parts listed in the following pages, please refer to the Assembly Diagram of this manual. Unwrap and separate all parts in a clean work area.
Use precautions
- DO NOT SIT OR STAND ON THIS ITEM.
- This product is not a toy. Do not allow children to play with or near this item.
- Do not exceed specified weight capacities.
- Use only on a flat, level, hard, and smooth surface that can safely support a fully loaded Handheld Pool Vacuum.
- Use as intended only.
- Inspect before every use; do not use if parts are loose or damaged.
SAVE THIS MANUAL
PARTS LIST
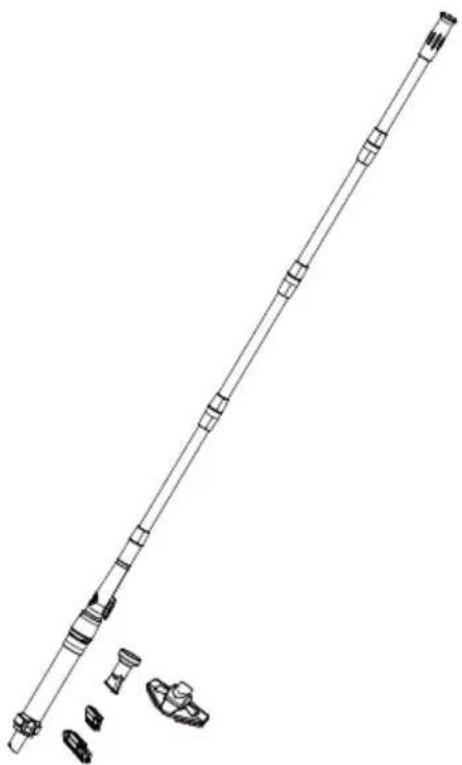
Cleaner comes with parts as below:
TRIANGLE HEAD, LONG BRUSH, SHORT BRUSH, WIDE-END NOZZLE, FILTER, BODY, CLEANER BODY, CHARGER

4 SECTIONS POLE
NOTE
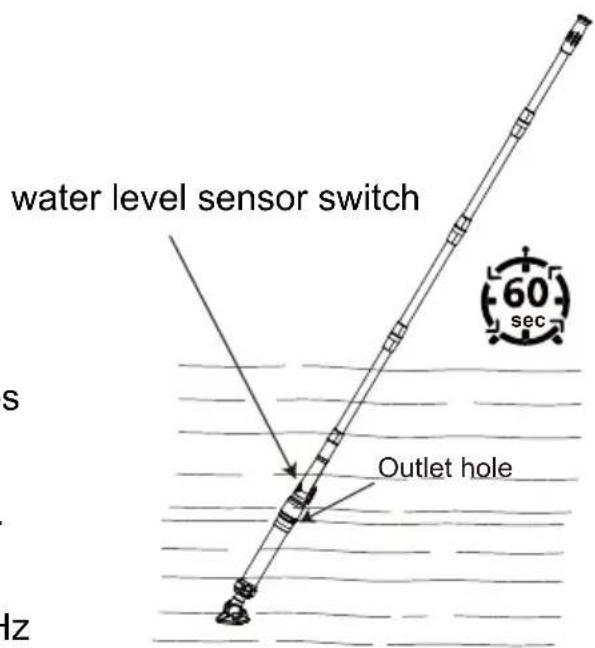
Please note that the outlet hole of the lower body (the right picture) must be submerged during operation to avoid damage to the pump.
It is designed to collect floor and seat debris - it is not a surface skimming device. The product is powered by 4000MAH
Rechargeable lithium polymer battery. It takes about 4.5 hours to fully charge, and it can be used for about 60 minutes after a full charge.
The charger used in this product is:
- XH0500-1000W AC 100V - 240V ~ 50/60Hz OUTPUT 5V 1A.
2. XH0500-1000WG AC 100V - 240V ~ 50/60Hz OUTPUT 5V 1A.
NOTE:
- This product has a water level sensor switch. The water level sensor is at the switch button position. If the product is not put into the water to overflow the switch position within 60 seconds after startup, it will stop.
- Please clean the filter in time when the suction decreases.
- Usage: Ideal for filtering small particles like leaves, nuts, and debris. Not suitable for algae, plankton, or fine sand.
- Please charge the battery every three months to maintain its activity, otherwise it will damage the battery and cause the machine not to work.
ASSEMBLY STEP
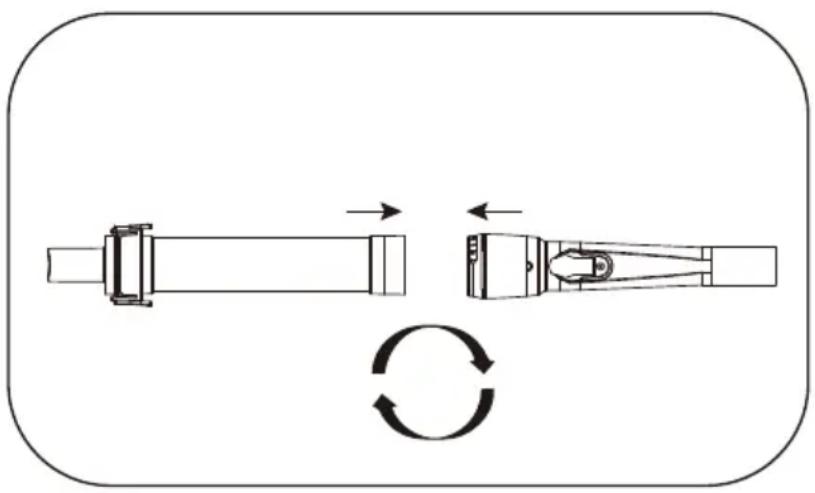
- Screw the filter body to the cleaner body, confirm two parts are tightly connected to be a whole set.
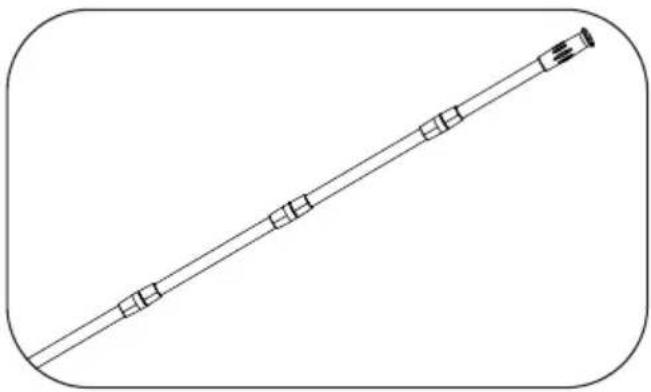
- Attach the pole with the cleaner body and aluminum pole connection by rotating thread as picture show.
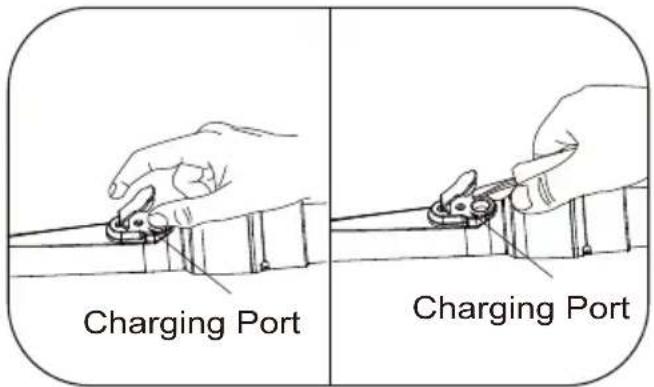
- Open the plug with fingers. If it is too hard to open, you could choose tool like screwdriver to open it as picture shows, please notice not to damage the plastic part and plug which may cause leakage and product damage risk.
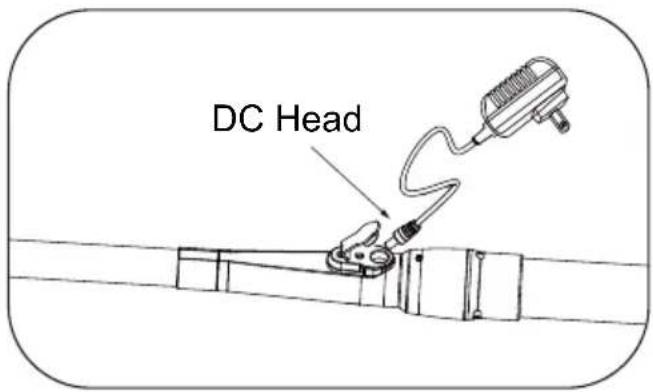
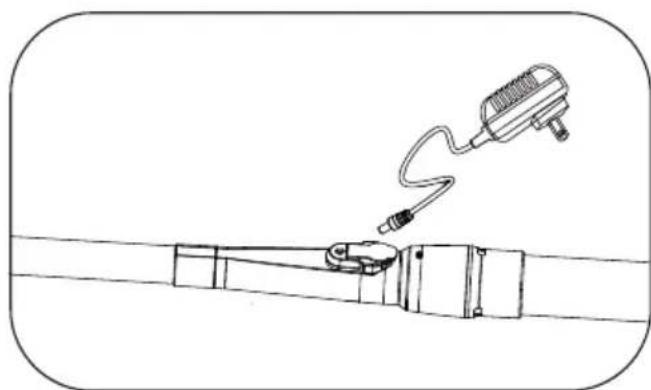
- Insert the adapter DC head into charging port as shown in the picture. Charging DC head has to be inserted in place to prevent sparking when charging is not tight.
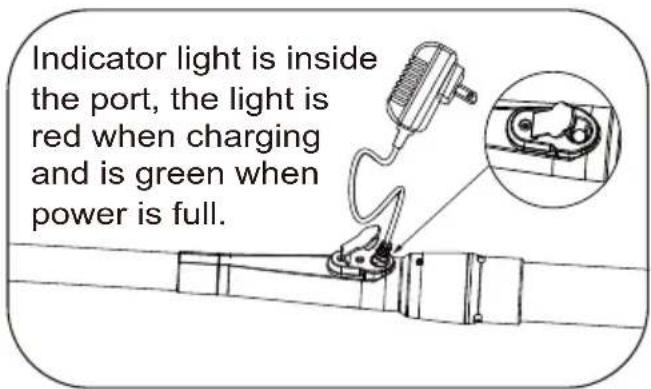
- Insert the charger into the AC100V-240V's power outlet. When charging, the indicator is red, and the indicator is green after power is full.
- After the power is charged, remove the charger from power outlet, pull off the DC head from the charging port, and make sure seal the charging port with soft plug. Now it is ready to use.
NOTE: If not sealed, it is easy to cause damage to the machine and affect its service life
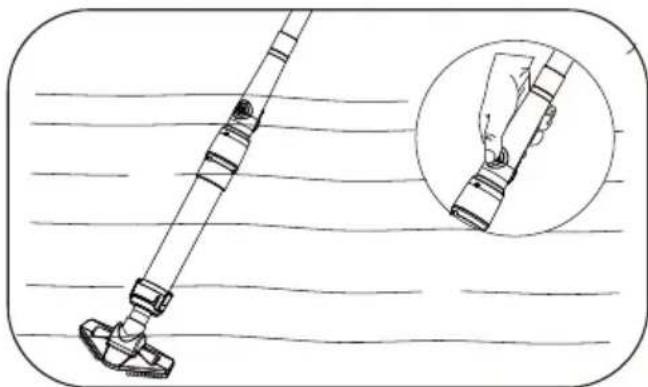
- Turn on the power by pressing the switch button and place the motorized head of cleaner into the spa/pool.
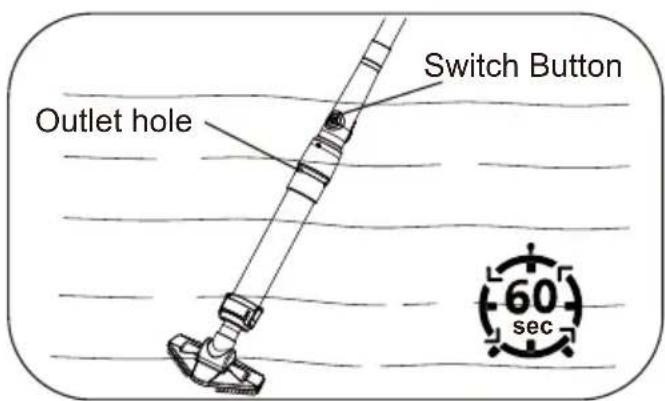
NOTE: This product has a water level sensor switch. The water level sensor is at the switch button position. If the product is not put into the water to overflow the switch position within 60 seconds after startup, it will stop. The outlet hole of the lower body must be submerged during operation to avoid damage to the pump.
CAUTION: To recharge the battery, use only the removable power supply supplied with the device. Always unplug the device from the power supply before assembly, disassembly or cleaning. The device should not be left outside in freezing weather. After you charge the cleaner every time, remember to cover the soft plug of the charging port. If it is more than three months no using after full charged, please recharge the cleaner once again before use.
Vacuum way with different vacuum head:
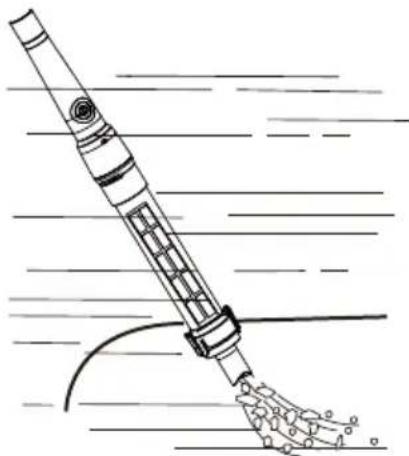
A. To remove large debris (larger than 120 μm and less than 1 cm) from the Spa/Pool bottom.
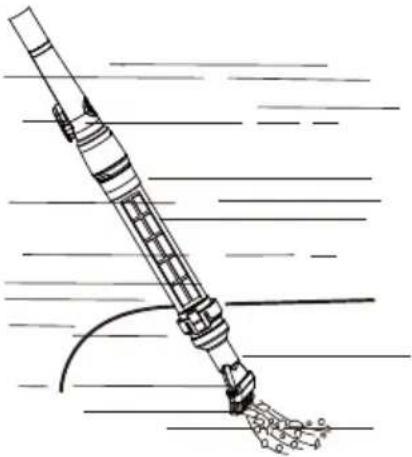
B. To brush and remove dirt from the Spa/Pool bottom.
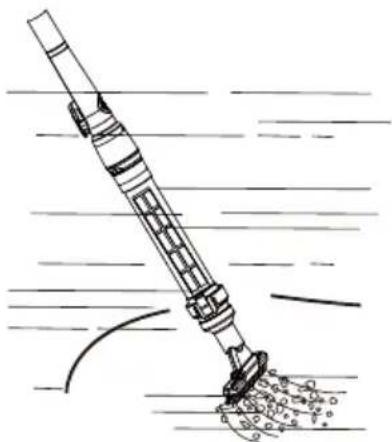
C. To brush and remove dirt from the Spa/Pool bottom with a long brush.
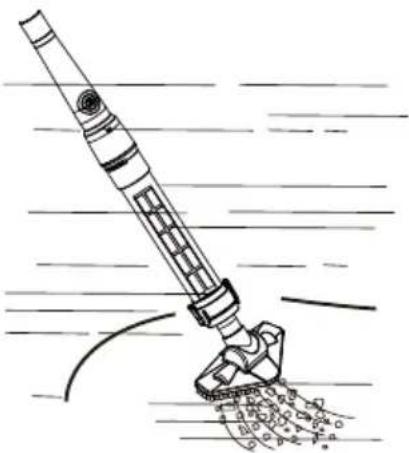
D. To brush and remove dirt (larger than 120 μm and less than 1 cm) from the Spa/Pool bottom with a triangle head.
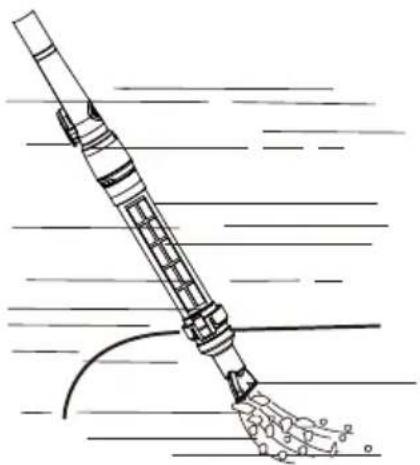
E. To remove the floating debris in the deep water from the Spa/Pool bottom.
When you find there is no power, please check if the cleaner is fully charged or has not been used for a long time. When power is weak after a period of time, please turn off the machine and charge it in time.
HOW TO CLEAN THE FILTER
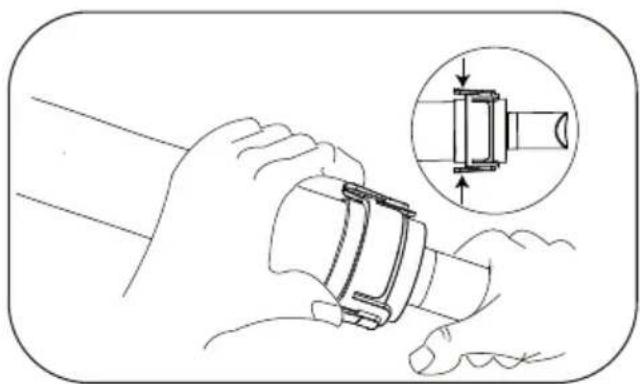
- Press two panels as shown in the picture at the head of the cleaner, gently pull the suction head out.
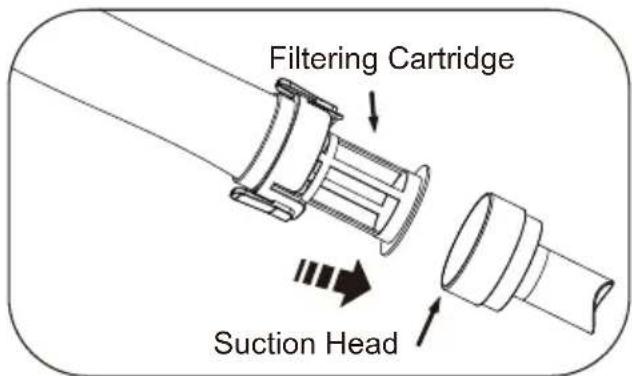
- Pull the filter cartridge out of the transparent tube.
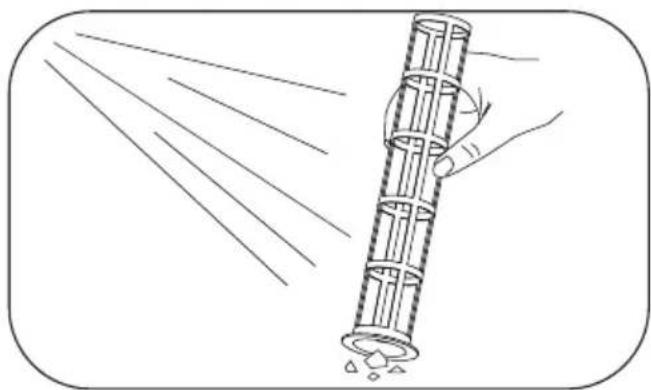
- Take the debris out and rinse the inside of the filter cartridge with clean water.
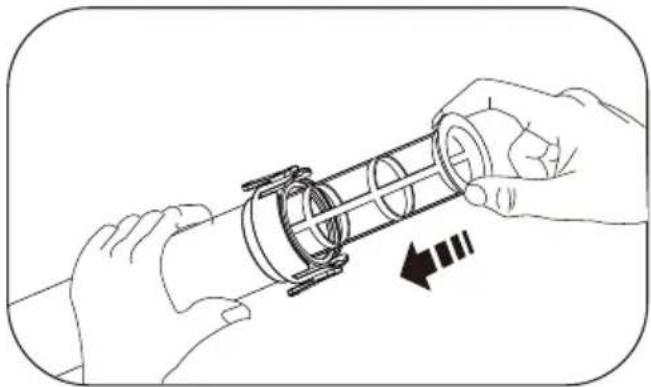
- Put the filter cartridge back into the transparent tube with the opening facing outside.
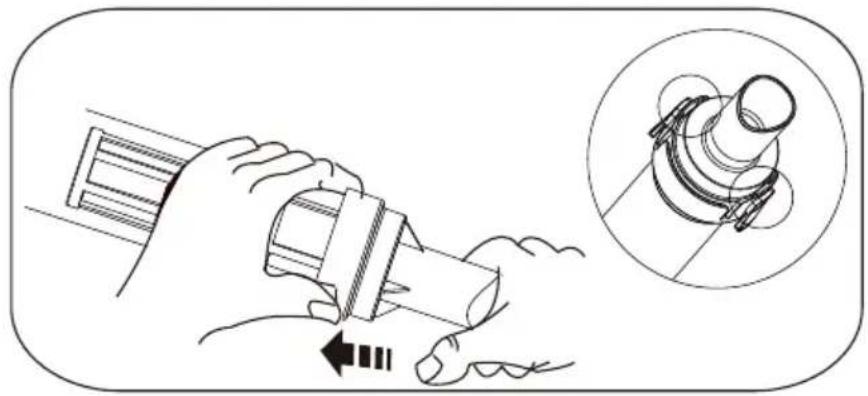
- Press the two panels and slide the suction head back. Make sure the two protruding lockers hold the suction head in place.
GENERAL MAINTENANCE
- After recharging, insert the water-proof plug into the charging port to prevent water from entering the battery part.
- Clean the cleaner with fresh water to prevent chemical damage after every use.
- Never leave cleaner in the water when it is off or has run out of battery power.
- Clean the filter after each time using.
- Never leave it outdoors in sunlight, heat, hot surfaces, rain, high moisture, and pool chemicals.
- Dry and clean the body with dry cloth, and keep stored indoors with room temperature.
- Never leave cleaner plugged into the main outlet for long term storage.
- Never run the motor out of water. Always keep outlet hole in the water
during operation.
- Do not use it without filter.
- Please fully charge cleaner before long term storage and it should be stored at room temperature. For long term storage, battery discharges on its own during storage. Please recharge it when reusing after long term storage.
- You must recharge the battery at least once every three months if it is not frequently used.
- Don't use cleaner when charging.
- Avoid picking up large, hard and sharp objects with the vacuum.
TROUBLESHOOTING
1. The cleaner doesn't work or low suction:
Check if the cleaner has no power because of long time no using. Please fully charge it.
Check if the impeller is jammed by large debris. If possible, use a small tool to remove it with intensive care.
Check if the filter is full, please clean the filter.
Check if any object was inserted or dropped into any opening on the device. Keep all
openings free of leaves, rocks or anything that may reduce water flow.
2. Debris escaping from the filter:
Check if the filter is damaged. Replace the filter.
Check if the canopy flap, which works like a door to prevent the debris from escaping from the filter, is damaged. If damaged, replace the head with canopy flap.
3. Cleaner can't be charged or recharged.
Make sure it is turned off while charging. If the indicator is not on during charging, please press the product switch to check whether the product is turned off or not. If red light is on, then it is in normal charging status.
If the cord or charger is damaged, replace it with a new one.
PRODUCT PARAMETER
| ModelPJV17G | |
| Rated capacity 18W | |
| Battery capacity 4000mAh | |
| Rated voltage 4.2V | |
| ColourBlue and Gray | |
| ProductSize2250mm*180mm*95mm |

This product is subject to the provision of European Directive 2012/19/EC. The symbol showing a wheelie bin crossed through indicates that the product requires separate refuse collection in the European Union. This applies to the product and all accessories marked with this symbol. Products marked as such may not be discarded with normal domestic waste, but must be taken to a collection point for recycling electrical and electronic devices.
Manufacturer: Shanghai Muxin Muye Youxiangongsi
Address: Shuangchenglu 803nong11hao1602A-1609shi, Baoshanqu, Shanghai 200000 CN.
Imported to AUS: SIHAO PTY LTD. 1 ROKEVA STREET EASTWOOD NSW 2122 Australia
Imported to USA: Sanven Technology Ltd. Suite 250, 9166 Anaheim Place, Rancho Cucamonga, CA 91730
| REPE |
E-CrossStu GmbH
C Mainzer Landstr.69, 60329 Frankfurt am Main.
| REPU |
YH CONSULTING LIMITED.
C/O YH Consulting Limited Office 147, Centurion
House, London Road, Staines-upon-Thames, Surrey, TW18 4AX
VEVOR®
TOUGH TOOLS, HALF PRICE
Technical Support and E-Warranty Certificate
www.vevor.com/support
VEVOR®
TOUGH TOOLS, HALF PRICE
NEED HELP? CONTACT US!
A/S YH Consulting Limited Office 147, Centurion
House, London Road, Staines-upon-Thames, Surrey, TW18 4AX
VEVOR®
TOUGH TOOLS, HALF PRICE
C/O YH Consulting Limited Office 147, Centurion
Haus, London Road, Staines-upon-Thames, Surrey, TW18 4AX
VEVOR®
TOUGH TOOLS, HALF PRICE
www.vevor.com/support
VEVOR®
TOUGH TOOLS, HALF PRICE
Imported in AUS: SIHAO PTY LTD. 1 ROKEVA STREETEASTWOOD NSW 2122 Australia
Imported in the USA: Sanven Technology Ltd. Suite 250, 9166 Anaheim Place, Rancho Cucamonga, CA 91730
C/O YH Consulting Limited Office 147, Centurion
House, London Road, Staines-upon-Thames, Surrey,
Model TW18 4AX
VEVOR®
TOUGH TOOLS, HALF PRICE
electronics www.vevor.com/support
VEVOR®
TOUGH TOOLS, HALF PRICE
www.vevor.com/support
A. To remove large residues
House, London Road, Staines-upon-Thames, Surrey, TW18 4AX
VEVOR®
TOUGH TOOLS, HALF PRICE
www.vevor.com/support
VEVOR®
TOUGH TOOLS, HALF PRICE
NEED HELP? CONTACT US!
A. Removing large
C/O YH Consulting Limited Office 147, Centurion
Dom, London Road, Staines-upon-Thames, Surrey, TW18 4AX
VEVOR®
TOUGH TOOLS, HALF PRICE
NEED HELP? CONTACT US!
C/O YH Consulting Limited Office 147, Centurion
House, London Road, Staines-upon-Thames, Surrey, TW18 4AX
VEVOR®
TOUGH TOOLS, HALF PRICE
www.vevor.com/support
VEVOR®
TOUGH TOOLS, HALF PRICE
NEED HELP? CONTACT US!
- Attach the rod with
C/O YH Consulting Limited Office 147, Centurion
House, London Road, Staines-upon-Thames, Surrey, TW18 4AX
VEVOR®
TOUGH TOOLS, HALF PRICE
www.vevor.com/support
- HANDHELD POOL VACUUM USER MANUAL
- VEVOR®
- HANDHELD POOL VACUUM
- NEED HELP? CONTACT US
- WARNING
- READ THIS MATERIAL BEFORE USING THIS PRODUCT. FAILURE TO DO SO MAY RESULT IN SERIOUS INJURY
- ASSEMBLY PRECAUTIONS
- USE PRECAUTIONS
- SAVE THIS MANUAL
- PARTS LIST
- NOTE
- PLEASE NOTE THAT THE OUTLET HOLE OF THE LOWER BODY (THE RIGHT PICTURE) MUST BE SUBMERGED DURING OPERATION TO AVOID DAMAGE TO THE PUMP
- ASSEMBLY STEP
- VACUUM WAY WITH DIFFERENT VACUUM HEAD
- HOW TO CLEAN THE FILTER
- GENERAL MAINTENANCE
- TROUBLESHOOTING
- THE CLEANER DOESN'T WORK OR LOW SUCTION
- DEBRIS ESCAPING FROM THE FILTER
- CLEANER CAN'T BE CHARGED OR RECHARGED
- PRODUCT PARAMETER
- TOUGH TOOLS, HALF PRICE
Brand : Vevor
Model : PJV17G
Category : Vacuum Cleaner