QJD60A - Jack Vevor - Free user manual and instructions
Find the device manual for free QJD60A Vevor in PDF.


User questions about QJD60A Vevor
0 question about this device. Answer the ones you know or ask your own.
Ask a new question about this device
Download the instructions for your Jack in PDF format for free! Find your manual QJD60A - Vevor and take your electronic device back in hand. On this page are published all the documents necessary for the use of your device. QJD60A by Vevor.
USER MANUAL QJD60A Vevor
Technical Support and E-Warranty Certificate www.vevor.com/support
HYDRAULIC FLOOR JACKS
MODEL:
QJD60A
QK20-QJD61A
We continue to be committed to provide you tools with competitive price. "Save Half", "Half Price" or any other similar expressions used by us only represent of savings you might benefit from buying certain tools with us compared top brands and does not necessarily mean to cover all categories of tools offered are kindly reminded to verify carefully when you are placing an order with us actually saving half in comparison with the top major brands.
VEVOR®
HYDRAULIC FLOOR JACKS
MODEL:QJD60A / QK20-QJD61A
natural_image
Yellow and black industrial machine with visible branding and mounting brackets (no text or symbols on the main body)NEED HELP? CONTACT US!
Have product questions? Need technical support? Please feel fr contact us:
Technical Support and E-Warranty Certificate www.vevor.com/support
This is the original instruction, please read all manual instruction carefully before operating. VEVOR reserves a clear interpretation user manual. The appearance of the product shall be subject to product you received. Please forgive us that we won't inform you there are any technology or software updates on our product.
WARNING: The jack must be used only on hard level surfaces and be to roll during lifting and lowering. Do not get under a vehicle that is supported by a trolley jack-use support stands.
CAUTION: Carefully read instructions and procedures for safe operations
INSPECTIONS
1. Before Each Use
Visual inspection should be made before each use of the garage jack for abnormal conditions such as cracked welds, leaks and damaged, loose, or missing parts.
2. After Each Use
The garage jack should be inspected immediately if the lift is believed to have been subjected to an abnormal load or shock. It is recommended that inspection be made by manufacturer's or supplier's authorised repair facility.
- The jack should be used on a hard level surface and be free to roll du lifting and lowering.
- The unlifted wheels of the vehicle should be chocked.
- The load should be centrally located on the head cap.
- No person should remain in a vehicle that is being lifted.
- The jack should be used for lifting and lowering only. The raised vehicle be supported on vehicle support stands.
- No person should get their body under a vehicle that is supported only by hydraulic trolley jack.
- The vehicle manufacturer owner's manual should be consulted prior to the lifting of the vehicle.
- Make sure that the lift point is stable and properly centered on the head
- Do not move or dolly the vehicle while on the jack.

CAUTION BEFORE USING
Due to shipment and/or handling air can be trapped in the hydraulic system, can interfere with the jacks lifting. To release air from the hydraulic system:
- Open release valve by turning the jack handle counterclockwise.
- Remove the oil filler plug from the cylinder.
- Rapidly pump jack handle through several full strokes.
- Replace the oil filler plug into the cylinder.

WARNING
- The unlifted wheels of the vehicle should be chocked.
- The load should be centrally located on the head cap.
- No person should remain in a vehicle that is being lifted.
- The vehicle manufacturer owner's manual should be consulted prior to lift in of the vehicle.
- The hydraulic trolley jack should be used for lifting and lowering only. And can not be used as a support tool.
SET UP - BEFORE USE

WARNING: Read the ENTIRE IMPORTANT SAFETY INFORMATION
section at the beginning of this manual including all text under subheadings therein before set up or use of this product.
| Part List | ||||
| No. | Name | Picture | QJD60A | QK20-QJD61A |
| 1 | Jack |  | 1 | 1 |
| 2 | Handle | 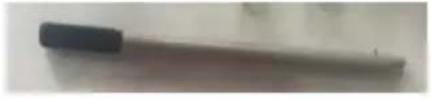 | 1 | 1 |
| 3 | Hand Shank |  | 1 | 1 |
| 4 | Box |  | 1 | 0 |
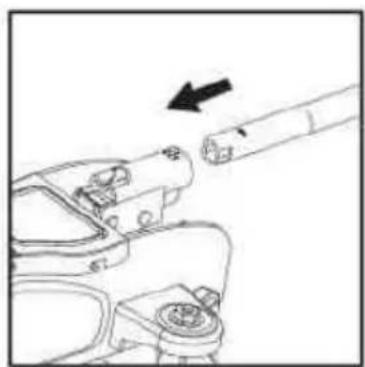
ATTACHING THE HANDLE
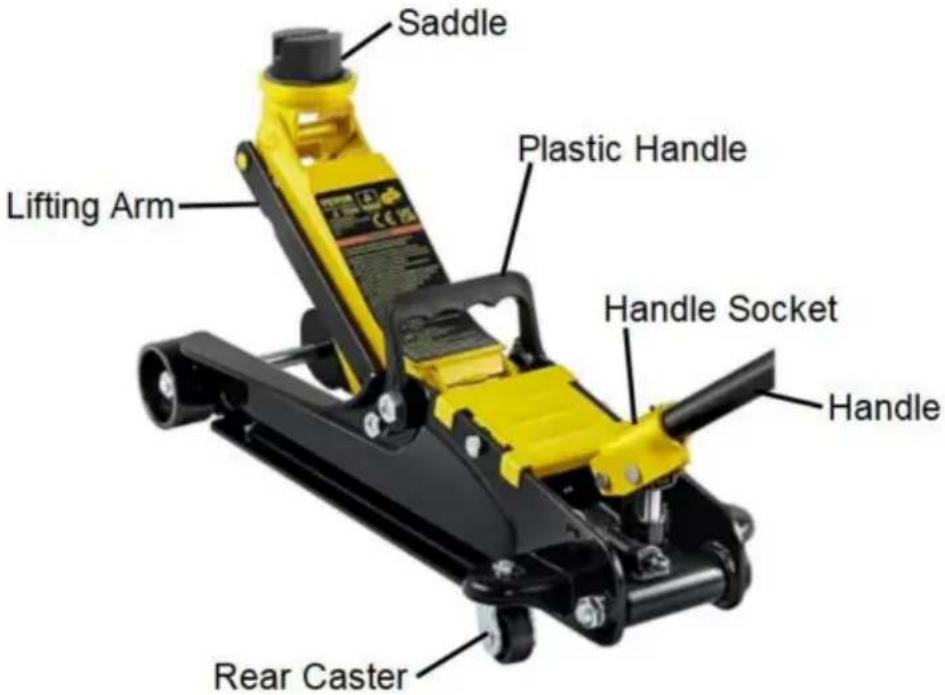
- Insert the Assembled Handle into the Handle Socket. The pin on the lower of the Handle fits into the Handle Socket Slot.
natural_image
Technical line drawing of a mechanical assembly with a directional arrow indicating motion (no text or symbols)FUNCTIONS
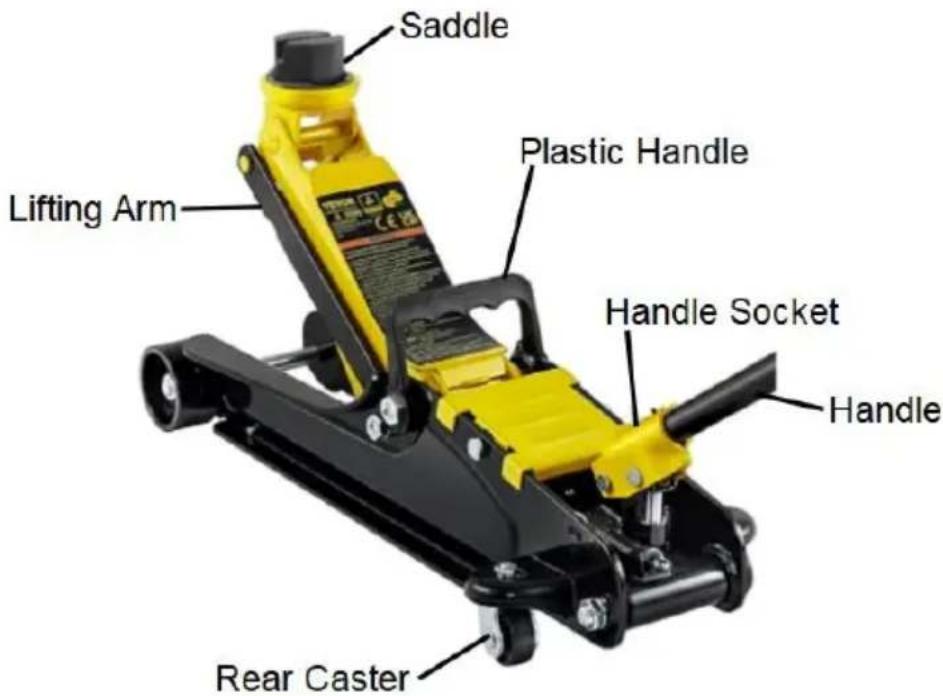
text_image
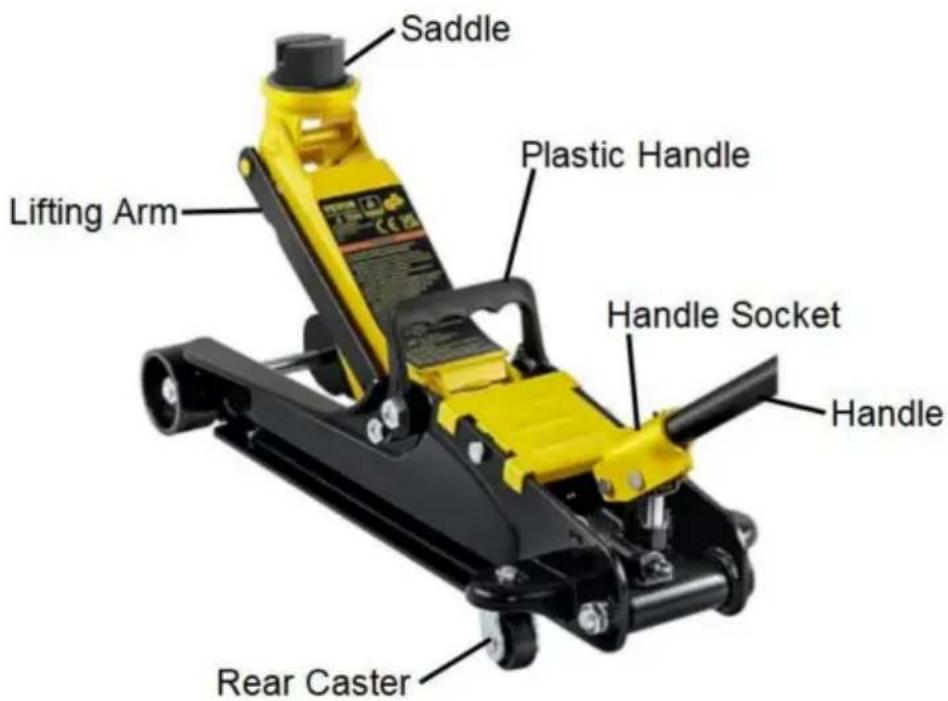
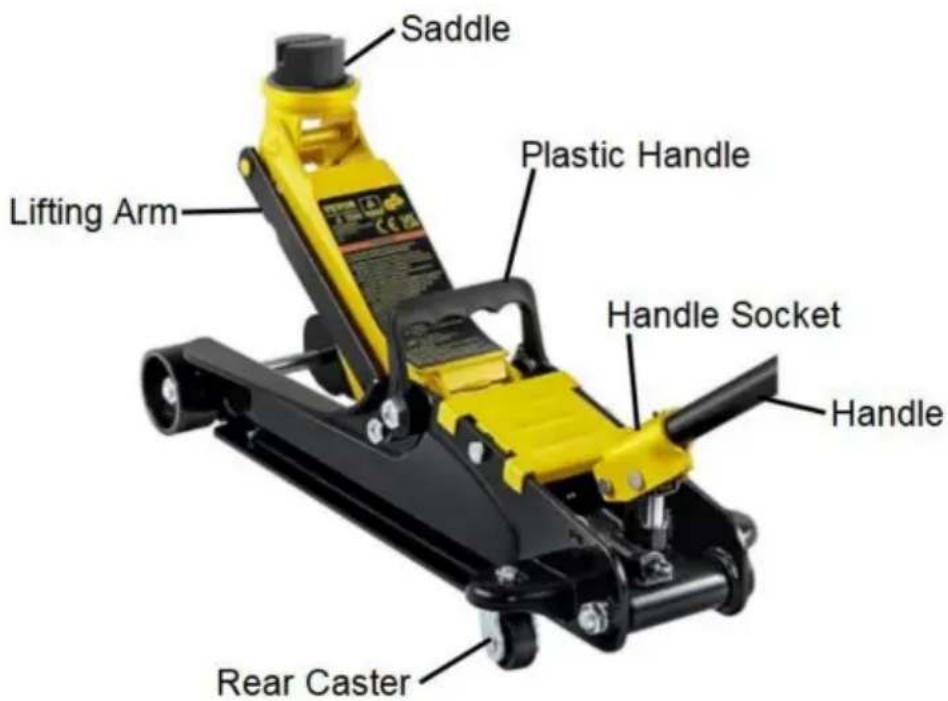
Saddle Plastic Handle Lifting Arm Handle Socket Handle Rear Caster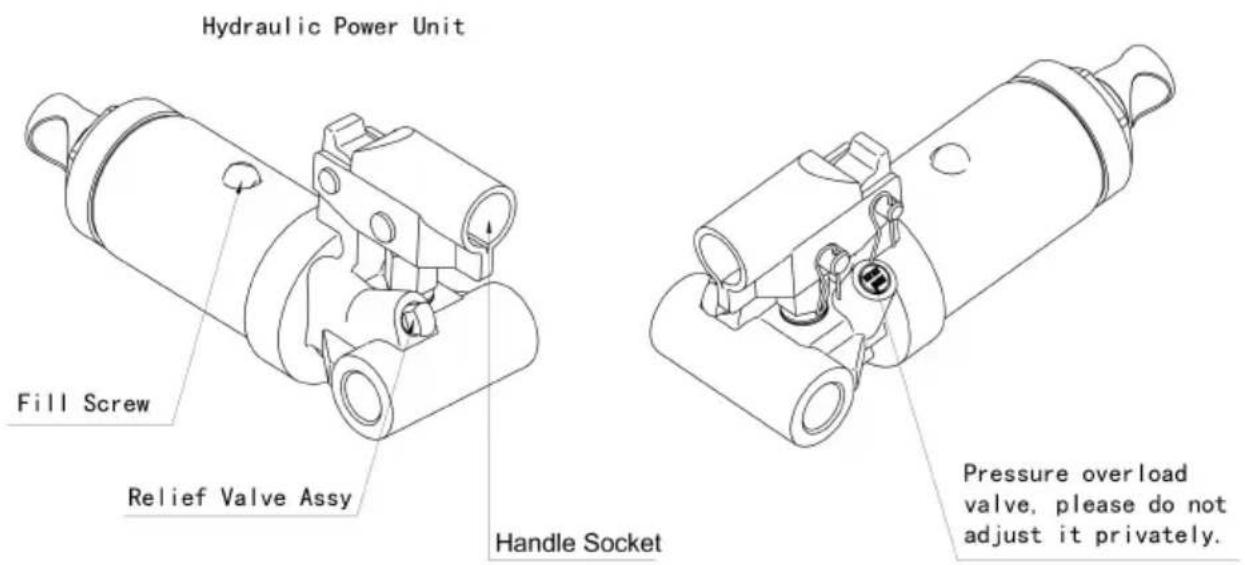
text_image
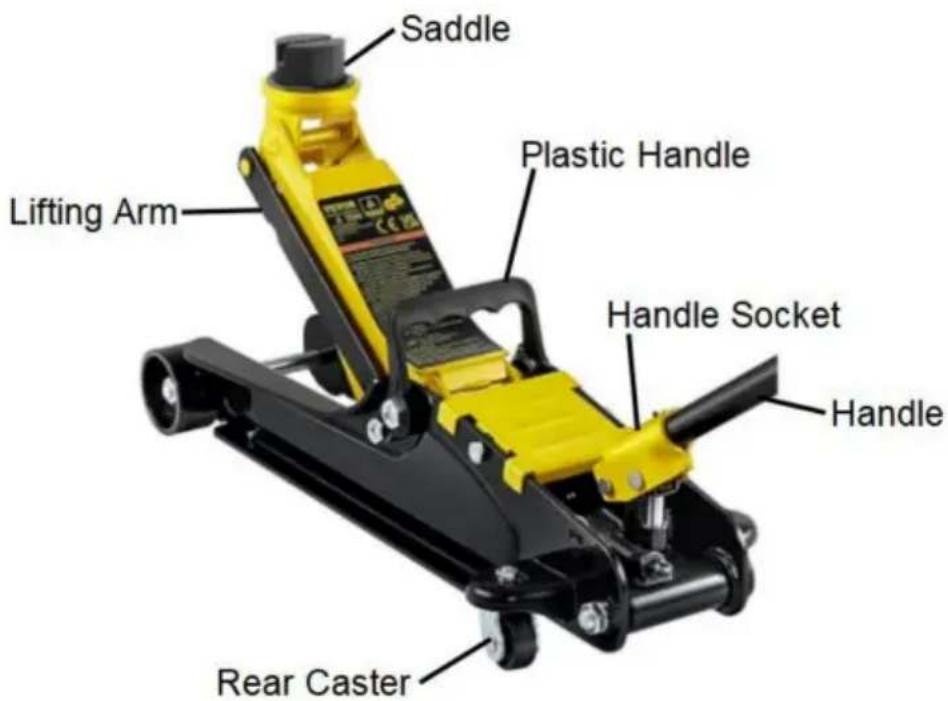
Hydraulic Power Unit Fill Screw Relief Valve Assy Handle Socket Pressure overload valve, please do not adjust it privately.OPERATING INSTRUCTIONS
WARNING: Read the ENTIRE IMPORTANT SAFETY INFORMATION section at the beginning of this manual including all text under subheadings therein before set up or use of this product.
AIR REMOVAL
BEFORE EACH USE OR IF JACK PERFORMANCE DECREASES
Check for excessive air and proper hydraulic fluid level in Jack. If Jack appears not to be working properly, it may be necessary to purge its hydraulic system excessive air as follows:
- Loosen the Fill Screw.
- Check fluid level and, if necessary, top off by adding Hydraulic Fluid.
- Twist the Handle clockwise to the tightest position to close the Valve, the pump the Handle several times quickly.
- IMPORTANT: After the air is removed, test the Jack for proper operation to its actual use.
- If the air is removed and the Jack does not appear to be working properly, not use it until repaired by a qualified service technician.
ADDING HYDRAULIC FLUID
-
Remove the Fill Screw. Do not remove or loosen Safety Valve Cover Scr
-
Add high grade hydraulic fluid (sold separately) slowly until the fluid reach 1/4" below the top of the Fill Port.
Note: Do not touch the handle when adding hydraulic fluid.
- Tighten the Fill Screw.
LIFTING

WARNING: Park vehicle on a flat, level, solid, surface safely away from oncoming traffic. Turn off the vehicle's engine. Place the vehicle's transmission "PARK" (if automatic) or in its lowest gear (if manual). Set the vehicle's emer brake. Then chock the wheels that are not being lifted.
- Slowly twist the Handle counterclockwise to lower the Jack. Once the Jack fully lowered, twist the Handle clockwise to the tightest position to close the 2. Carefully position the Jack's Saddle under the vehicle manufacturer's recommended lifting point.
(See the vehicle manufacturer's owner's manual for the location of the frame lifting point.) - Pump the Handle until the top of the Saddle has nearly reached the veh lifting point. Position the Saddle directly under the vehicle's lifting point.
- To lift the vehicle, pump the Handle. Use smooth, full strokes.
- Select matching jack stands (sold separately) of appropriate capacity. Set the jack stands to the same height according to the manufacturer's instructions, making sure they lock securely into position.
- Position the jack stands' saddles under the vehicle manufacturer's recommended support points.
WARNING! Ensure that the vehicle support points are fully seated in the sac of both jack's stands. Use a matched pair of jack stands per vehicle to sup one end only.
- Slowly twist the Handle counterclockwise to lower the vehicle onto the jacI stands' saddles.
- Once the vehicle is fully seated on the jack stands, continue slowly lower the Jack until it is completely lowered.
- Remove the Jack and store safely out of the way.
LOWERING
- Carefully remove all tools, parts, etc., from under the vehicle.
- Position the Jack's Saddle under the lifting point. Turn the Handle firmly clockwise and raise the vehicle high enough to clear the jack stands.
- Carefully remove the jack stands.
- Slowly turn the Handle counterclockwise to lower the vehicle onto the grou
- Lower the Jack completely. Store the Jack indoors out of children's reach.
MAINTENANCE AND SERVICING
WARNING: Procedures not specifically explained in this manual must be performed only by a qualified technician.
WARNING: TO PREVENT SERIOUS INJURY FROM TOOL FAILURE: Do not use damaged equipment. If abnormal noise or vibration occurs, have the problem corrected before further use.
CLEANING, MAINTENANCE AND LUBRICATION
- BEFORE EACH USE, inspect the general condition of the Jack. Check for
- Loose hardware
- Misalignment or binding of moving parts
-
Cracked or broken parts
● Any condition that may affect its safe operation -
BEFORE EACH USE, thoroughly test the Jack for proper operation prior to actual use. If the Jack appears not to be working properly, follow AIR REMO\ instructions.
-
AT LEAST ONCE EVERY THREE YEARS, change the hydraulic fluid:
-
With the Jack fully lowered, remove the Fill Screw.
- Tip the Jack over to allow the old hydraulic fluid to drain out completely.
Dispose of the old hydraulic fluid in accordance with local regulations. - With the Jack upright, completely fill the Hydraulic Unit with high grade hydraulic fluid until the fluid is 1/4" below the top of the Fill Port.
-
Turn the Handle counterclockwise to open the Release Valve.
-
Pump the Handle up and down quickly several times to purge air from the system.
● Recheck fluid level and refill as needed. -
Replace the Fill Screw.
-
AFTER EACH USE, wipe with a clean cloth. Store the Jack indoors out children's reach.
TROUBLE SHOOTING

WARNING
TO PREVENT SERIOUS INJURY:
Use caution when troubleshooting a malfunctioning jack. Stay well clear of the supported load. Completely resolve all problems before use. If the solutions presented in the Troubleshooting guide do not solve the problem, have a qua technician inspect and repair the jack before use.
After the jack is repaired:
Test it carefully without a load by raising and lowering it fully, checking for operation, BEFORE RETURNING THE JACK TO OPERATION.
DO NOT USE A DAMAGED OR MALFUNCTIONING JACK
| POSSIBLE SYMPTOMS | PROBABLE SOLUTION(Make certain that the Jack is not supporting load while attempting a solution.) | |||||
| Jack will not lift a its weight capacity | Saddle lowers under load | Pump stroke feels spongy | Saddle will not lift all the way | Handle moves up when jack is under load | Fluid leaking from the fill plug | |
| X | X | Check that the Release Valve is fully closed. | ||||
| The jack needs to exp air. | ||||||
| X | X | X | Valves may be blocked and may not close fully. flush the valves:1. Lower the saddle and securely close the releas valve.2. Manually lift the sadd several inches.3. Open the release val by turning the Handle counterclockwise. And force the saddle down a quickly as possible. | |||
| X | X | X | Jack may be low on hydraulic fluid. Check flu level and refill if needed | |||
| The jack needs to exp air. | ||||||
| X | The unit may have too much hydraulic fluid inside. Check fluid level and adjust if needed. | |||||
PLEASE READ THE FOLLOWING CAREFULLY
The manufacturer and/or distributor has provided the parts list and assembly diagram in this manual as a reference tool only. Neither the manufacturer no distributor makes any representation or warranty of any kind to the buyer that or she is qualified to make any repairs to the product or that he or she is to replace any parts of the product. In fact, the manufacturer and/or distribute expressly states that all repairs and parts replacements should be undertaken certified and licensed technicians and not by the buyer. The buyer assumes risk and liability arising out of his or her repairs to the original product or replacement parts thereto or arising out of his or her installation of replacement parts thereto.
NOTE: Some parts are listed and shown for illustration purposes only, and a available individually as replacement parts.
TECHNICAL SPECIFICATION
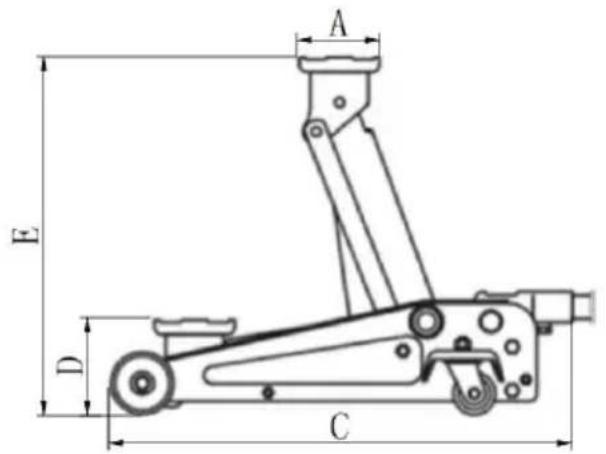
text_image
A B D C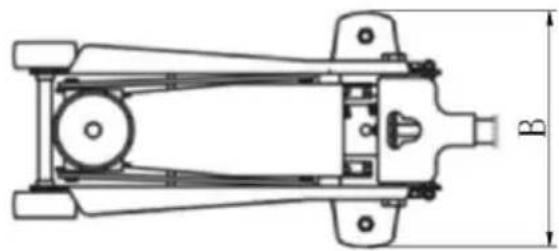
natural_image
Technical line drawing of a mechanical assembly with no visible text or symbols| Parameter\Model | QJD60A | QK20-QJD61A |
| Lift Weight Capacity | 1.5 Tons | 2.0 Tons |
| Load Bearing Method | Hydraulic Single Cylinder | |
| Tray Diameter A(mm) | Φ52 | Φ52 |
| Width B(mm) | 190 | 200 |
| Length C(mm) | 420 | 447 |
| Min Height D(mm) | 120 | 125 |
| Max Height E(mm) | 307 | 335 |
| Material | Steel | |
VEVOR®
TOUGH TOOLS, HALF PRICE
Technical Support and E-Warranty Certificate
www.vevor.com/support
VEVOR®
TOUGH TOOLS, HALF PRICE
natural_image
Yellow and black manual lift jack with visible branding and wheels (no text or symbols on the device itself)BESOIN D'AIDE? CONTACTEZ-NOUS!
natural_image
Technical line drawing of a mechanical assembly with a tool and directional arrow (no text or symbols)LES FONCTIONS
text_image
Saddle Plastic Handle Lifting Arm Handle Socket Handle Rear Caster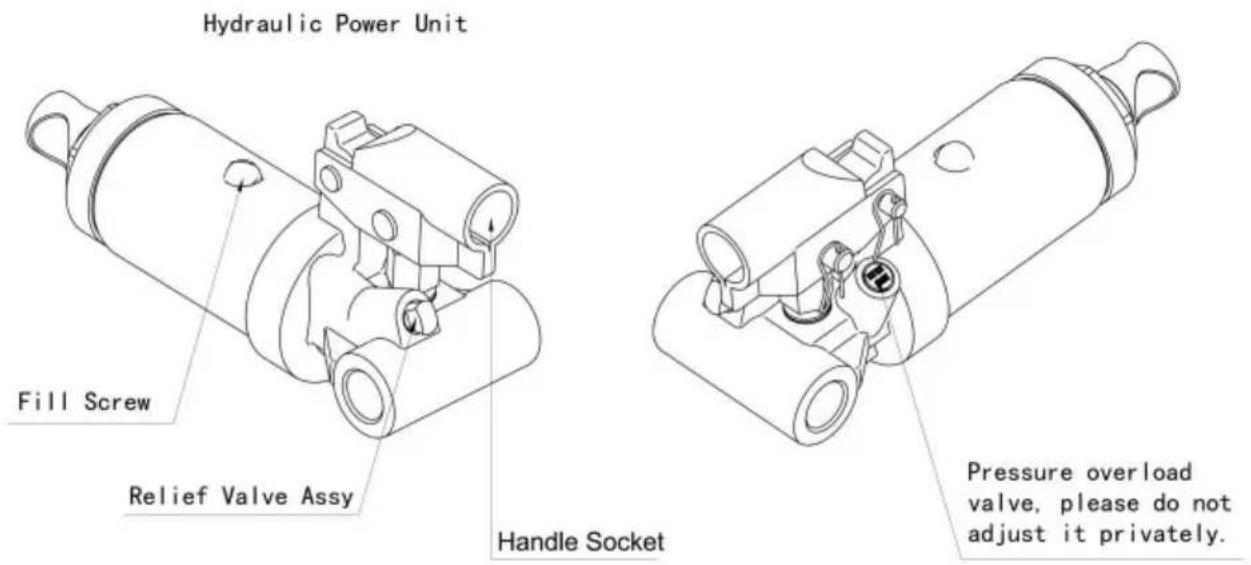
text_image
Hydraulic Power Unit Fill Screw Relief Valve Assy Handle Socket Pressure overload valve, please do not adjust it privately.MODE D'EMPLOI

AVERTISSEMENT : Lisez TOUTES LES INFORMATIONS DE SÉCURITÉ IMPORTANTES
natural_image
Technical line drawing of a mechanical device with labeled dimension B (no text or symbols beyond label)MODELL:QJD60A / QK20-QJD61A
natural_image
Yellow and black industrial machine with wheels and a handle (no visible text or symbols)natural_image
Technical line drawing of a mechanical assembly with a tool and component (no text or symbols)FUNKTIONEN
text_image
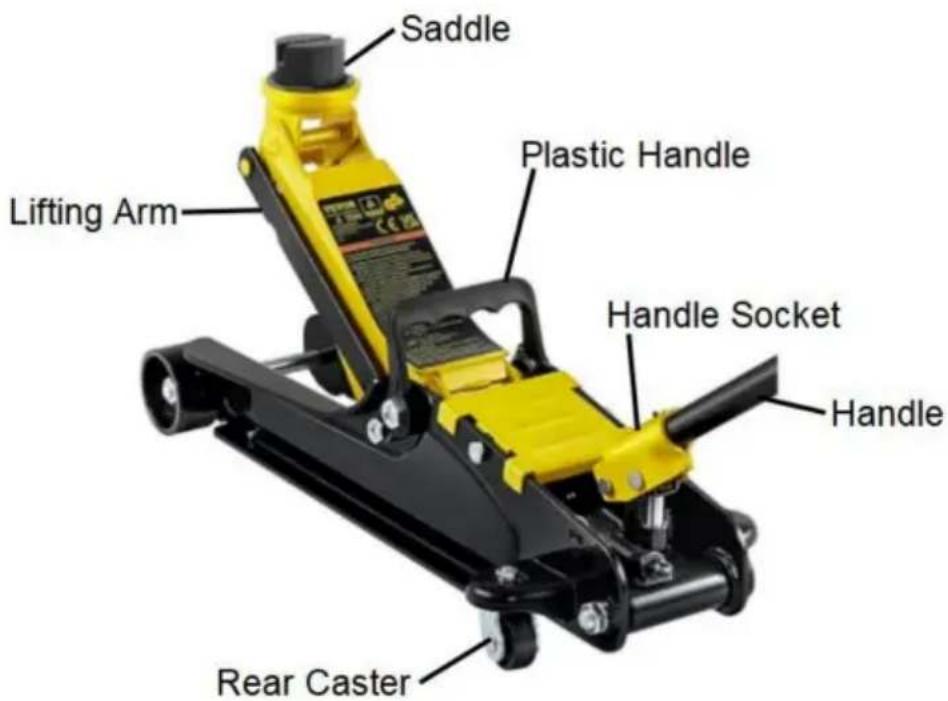
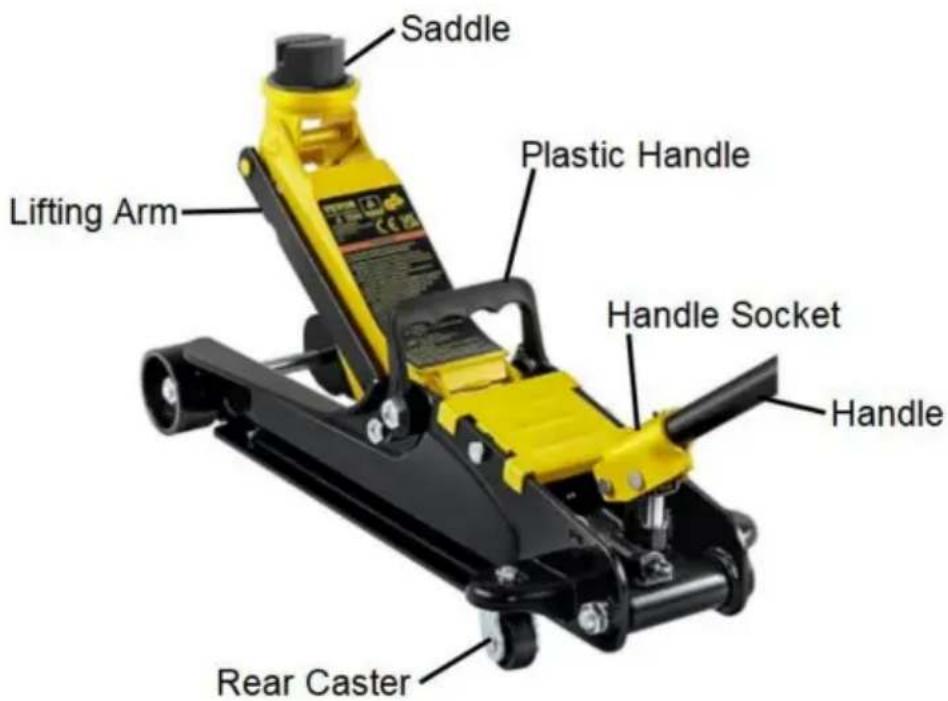
Saddle Plastic Handle Lifting Arm Handle Socket Handle Rear Caster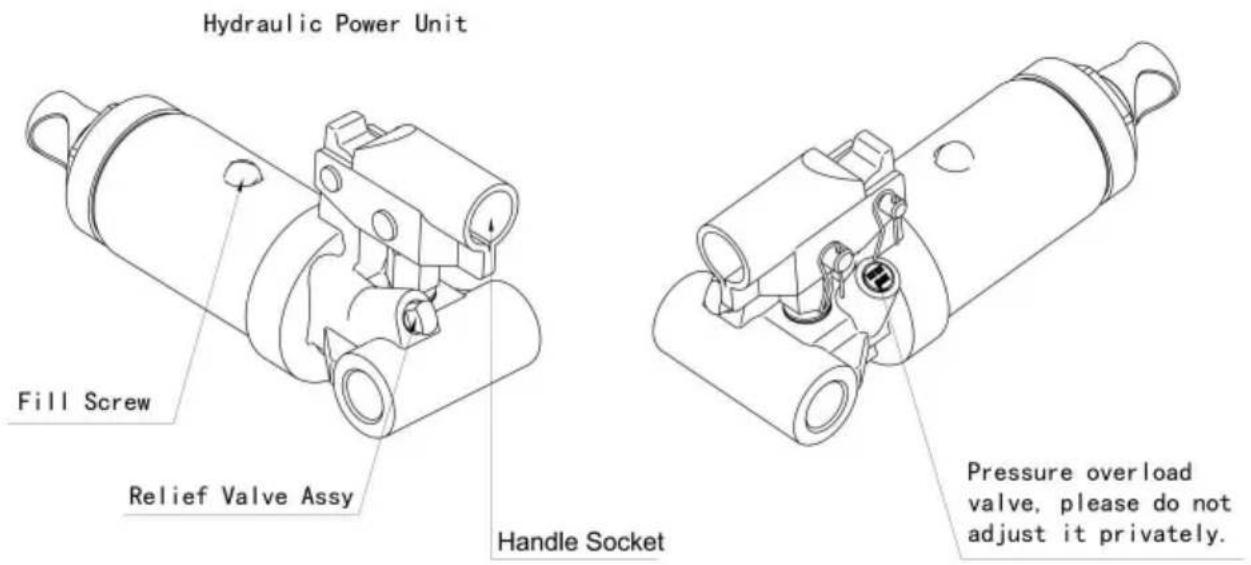
text_image
Hydraulic Power Unit Fill Screw Relief Valve Assy Handle Socket Pressure overload valve, please do not adjust it privately.BEDIENUNGSANLEITUNG

natural_image
Technical line drawing of a mechanical device with labeled dimension B (no text or symbols beyond label)www.vevor.com/support
VEVOR®
TOUGH TOOLS, HALF PRICE
natural_image
Yellow and black industrial machine with wheels and a handle (no visible text or symbols)HO BISOGNO DI AIUTO? CONTATTACI!
natural_image
Technical line drawing of a mechanical assembly with a tool and directional arrow (no text or symbols)FUNZIONI
text_image
Saddle Plastic Handle Lifting Arm Handle Socket Handle Rear Caster
text_image
Hydraulic Power Unit Fill Screw Relief Valve Assy Handle Socket Pressure overload valve, please do not adjust it privately.ISTRUZIONI PER L'USO

natural_image
Technical line drawing of a mechanical device with labeled dimension B (no text or symbols beyond label)elettronica www.vevor.com/support
VEVOR®
TOUGH TOOLS, HALF PRICE
MODELO:QJD60A / QK20-QJD61A
natural_image
Yellow and black industrial machine with wheels and a handle (no visible text or symbols)natural_image
Technical line drawing of a mechanical assembly with a directional arrow indicating motion (no text or symbols)FUNCIONES
text_image
Saddle Plastic Handle Lifting Arm Handle Socket Handle Rear Caster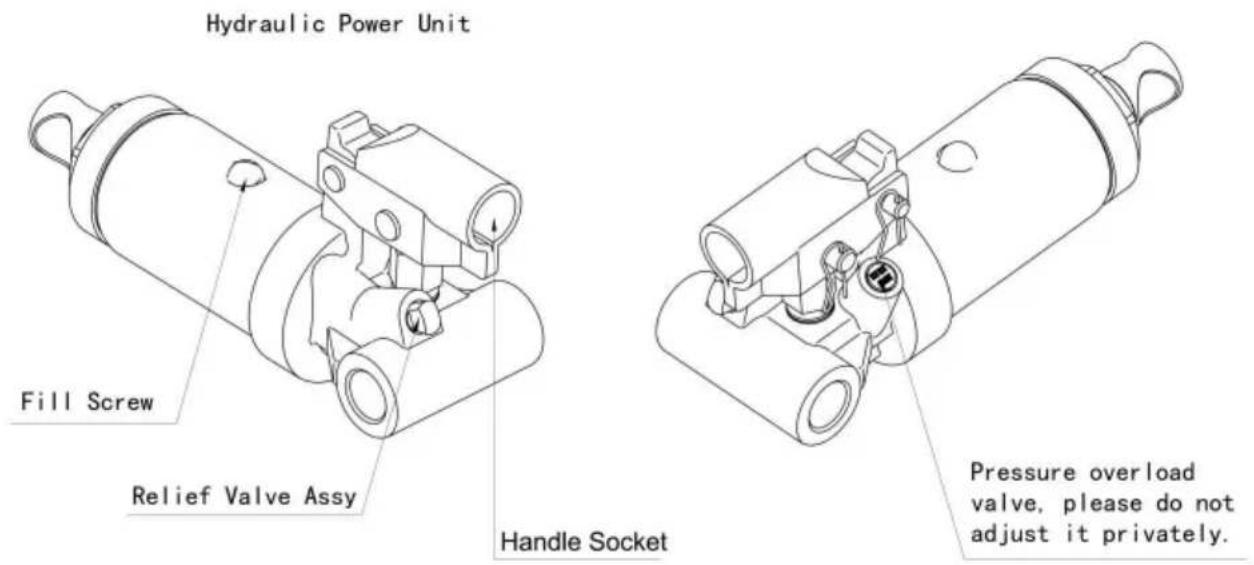
text_image
Hydraulic Power Unit Fill Screw Relief Valve Assy Handle Socket Pressure overload valve, please do not adjust it privately.natural_image
Technical line drawing of a mechanical device with labeled dimension B (no text or symbols beyond label)natural_image
Yellow and black industrial machine with wheels and a visible warning label (no text on the device itself)POTRZEBUJE POMOCY? SKONTAKTUJ SIĘ Z NAMI!
natural_image
Mechanical assembly diagram showing a shaft and housing with an arrow indicating direction (no text or symbols)FUNKCJE
text_image
Saddle Plastic Handle Lifting Arm Handle Socket Handle Rear Caster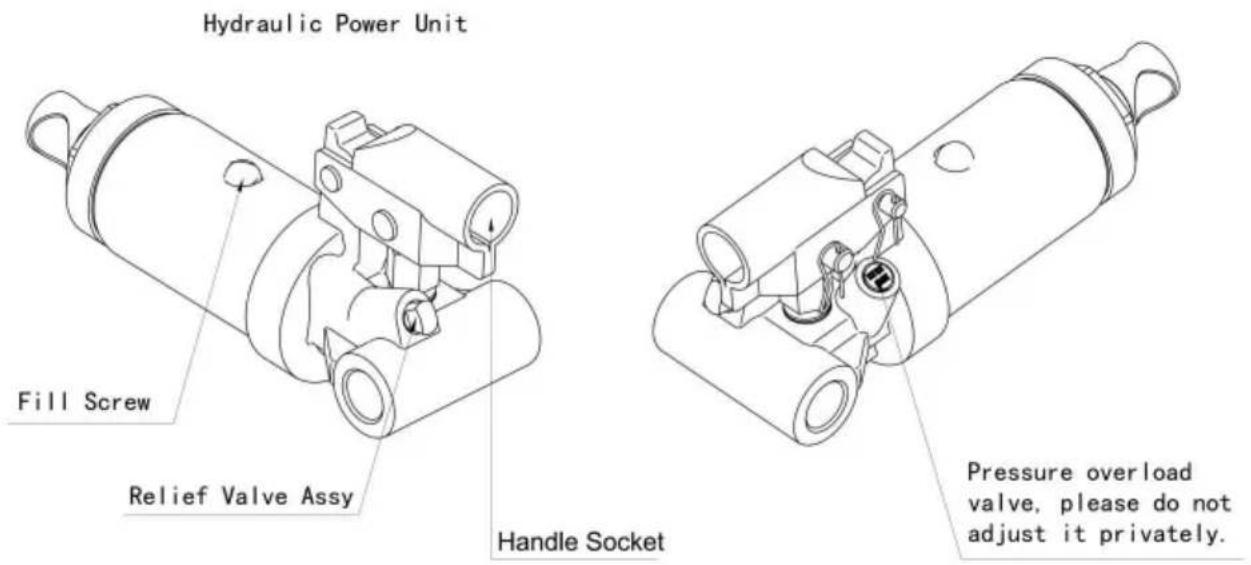
text_image
Hydraulic Power Unit Fill Screw Relief Valve Assy Handle Socket Pressure overload valve, please do not adjust it privately.INSTRUKCJA OBSŁUGI

natural_image
Technical line drawing of a mechanical device with labeled dimension B (no text or symbols beyond label)www.vevor.com/support
VEVOR®
TOUGH TOOLS, HALF PRICE
Technische ondersteuning en e-garantiecertificaat www.vevor.com/support
HYDRAULISCHE VLOERKRIKKEN
MODEL:
QJD60A
QK20-QJD61A
natural_image
Yellow and black industrial machine with wheels and a handle (no visible text or symbols)HULP NODIG? NEEM CONTACT MET ONS OP!
natural_image
Technical line drawing of a mechanical assembly with a pipe and component (no text or symbols)FUNCTIES
text_image
Saddle Plastic Handle Lifting Arm Handle Socket Handle Rear Caster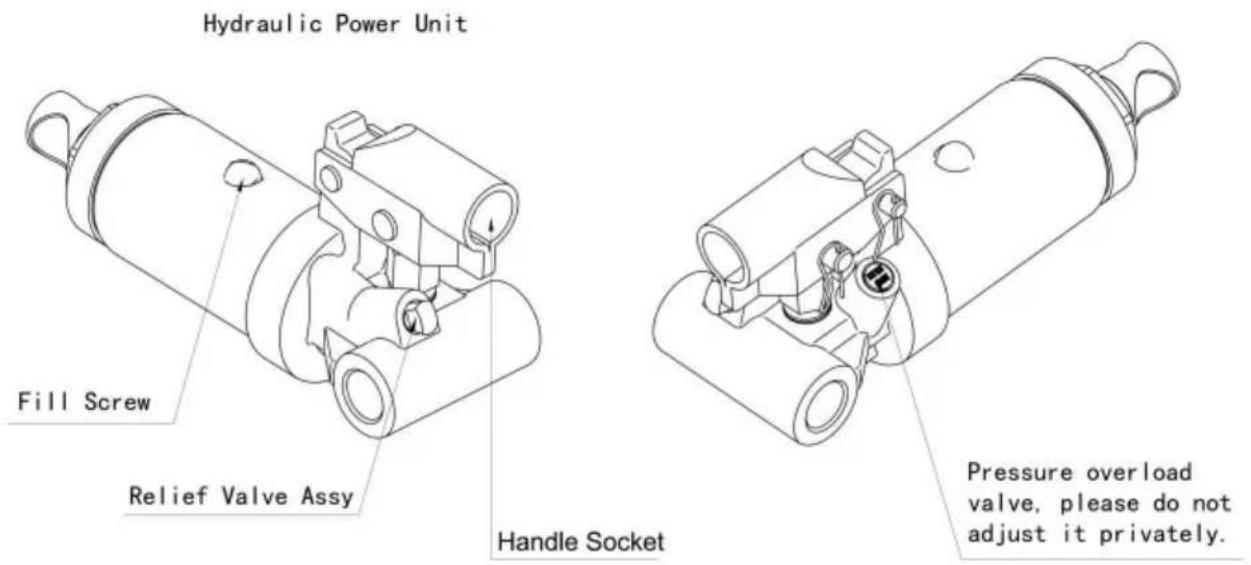
text_image
Hydraulic Power Unit Fill Screw Relief Valve Assy Handle Socket Pressure overload valve, please do not adjust it privately.GEBRUIKSAANWIJZING

WAARSCHUWING: Lees de VOLLEDIGE BELANGRIJKE VEILIGHEIDSINFORMATIE
natural_image
Technical line drawing of a mechanical device with labeled dimension B (no text or symbols beyond label)| Parameter\Model | QJD60A | QK20-QJD61A |
| Hefgewichtcapaciteit | 1,5 ton | 2,0 ton |
| Dragende methode | Hydraulische enkele cilinder | |
| Dienbladdiameter A (mm) | F52 | F52 |
| Breedte B(mm) | 190 | 200 |
| Lengte C (mm) | 420 | 447 |
| Min Hoogte D (mm) | 120 | 125 |
| Maximale hoogte E (mm) | 307 | 335 |
| Materiaal Staal | ||
VEVOR®
TOUGH TOOLS, HALF PRICE
garantiecertificaat www.vevor.com/support
VEVOR®
TOUGH TOOLS, HALF PRICE
natural_image
Yellow and black manual lift jack with visible branding and wheels (no text or symbols on the device itself)BEHÖVS HJÄLP? KONTAKTA OSS!
natural_image
Technical line drawing of a mechanical assembly with a tool and directional arrow (no text or symbols)FUNKTIONER
text_image
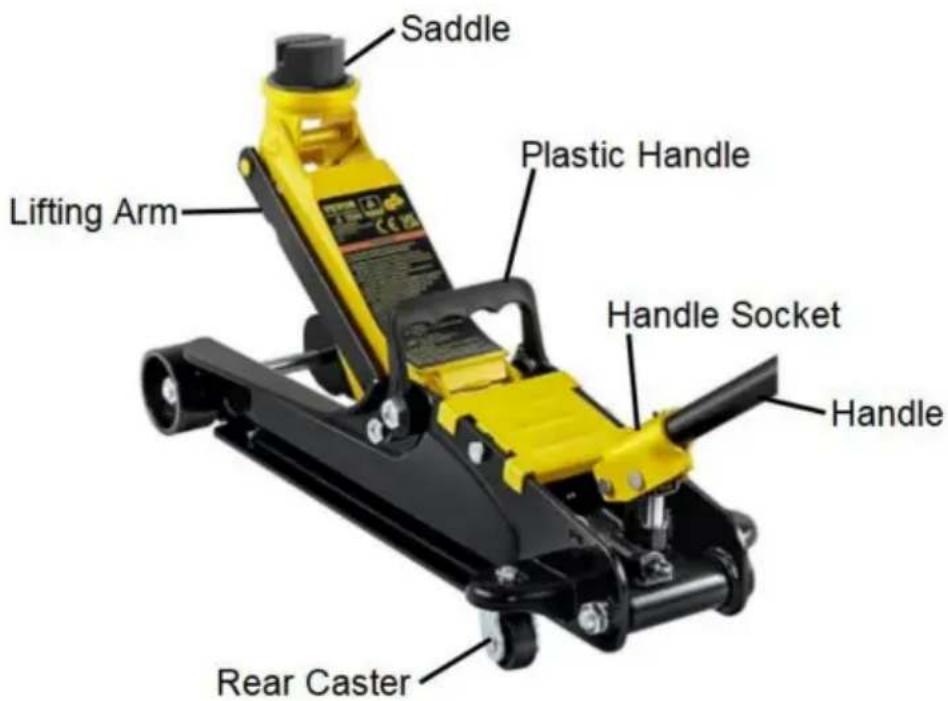
Saddle Plastic Handle Lifting Arm Handle Socket Handle Rear Caster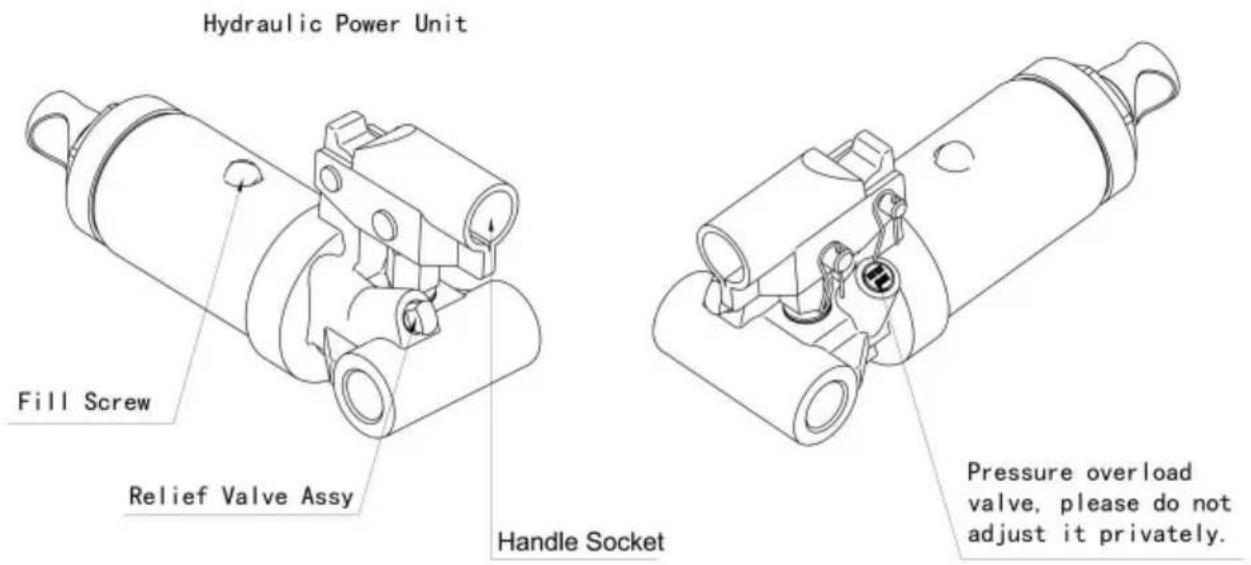
text_image
Hydraulic Power Unit Fill Screw Relief Valve Assy Handle Socket Pressure overload valve, please do not adjust it privately.BRUKSANVISNINGAR

WARNING: Läs HELA VIKTIG SÄKERHETSINFORMATION
natural_image
Technical line drawing of a mechanical device with labeled dimension B (no text or symbols beyond label)| Parameter Modell | QJD60A | QK20-QJD61A |
| Lyftviktskapacitet | 1,5 ton | 2,0 ton |
| Lastbärande metod | Hydraulisk encylinder | |
| Brickdiameter A(mm) | F52 | F52 |
| Bredd B(mm) | 190 | 200 |
| Längd C(mm) | 420 | 447 |
| Min höjd D(mm) | 120 | 125 |
| Max höjd E(mm) | 307 | 335 |
| Material | Stål | |
VEVOR®
TOUGH TOOLS, HALF PRICE
www.vevor.com/support