KW-20SA - Toys Vevor - Free user manual and instructions
Find the device manual for free KW-20SA Vevor in PDF.


User questions about KW-20SA Vevor
0 question about this device. Answer the ones you know or ask your own.
Ask a new question about this device
Download the instructions for your Toys in PDF format for free! Find your manual KW-20SA - Vevor and take your electronic device back in hand. On this page are published all the documents necessary for the use of your device. KW-20SA by Vevor.
USER MANUAL KW-20SA Vevor
Technical Support and E-Warranty Certificate www.vevor.com/support
We continue to be committed to provide you tools with competitive price. "Save Half", "Half Price" or any other similar expressions used by us only represents an estimate of savings you might benefit from buying certain tools with us compared to the major top brands and does not necessarily mean to co all categories of tools offered by us. You are kindly reminded to verify carefully when you are placing an order with us if you are actually Saving Half in comparison with the top major brands.
MODEL:KW-10SA,KW-15SA,KW-20SA

NEED HELP? CONTACT US!
Have product questions? Need technical support? Please feel free to contact us:
Technical Support and E-Warranty Certificate www.vevor.com/support
This is the original instruction, please read all manual instructions carefully before operating. VEVOR reserves a clear interpretation of user manual. The appearance of the product shall be subject to product you received. Please forgive us that we won't inform you as there are any technology or software updates on our product.
| Warning-To reduce the risk of injury, user must re instructions manual carefully. | |
| This device complies with Part 15 of the FCC Rules. is subject to the following two conditions:(1)This device not cause harmful interference, and (2)this device must any interference received, including interference that may cause undesired operation. | |
| This product is subject to the provision of European D 2012/19/EC. The symbol showing a wheelie bin cross through indicates that the product requires separate recollection in the European Union. This applies to the and all accessories marked with this symbol. Products as such may not be discarded with normal domestic w must be taken to a collection point for recycling elec electronic devices |
TECHNICAL SPECIFICATION
| NAME | COMMERCIAL WATER BOILER | |||||
| WATER-INPRESSURE | 100~400(kpa) | |||||
| VOLTAGE | 110V~ 120V~ | 220V~ 240V~ | ||||
| HERTZ | 60Hz | 50Hz/60Hz | ||||
| POWER | 1500W | 1500W | 1500W | 2500W | 2500W | 3000W |
| LITERS | 10L | 15L | 20L | 10L | 15L | 20L |
| RELATEDITEMS | KW-10SA,KW-15SA,KW-20SA | |||||
*Before installation and use, please use the voltage should be consist with the requirements of the machine voltage!
SAFETY INFORMATION
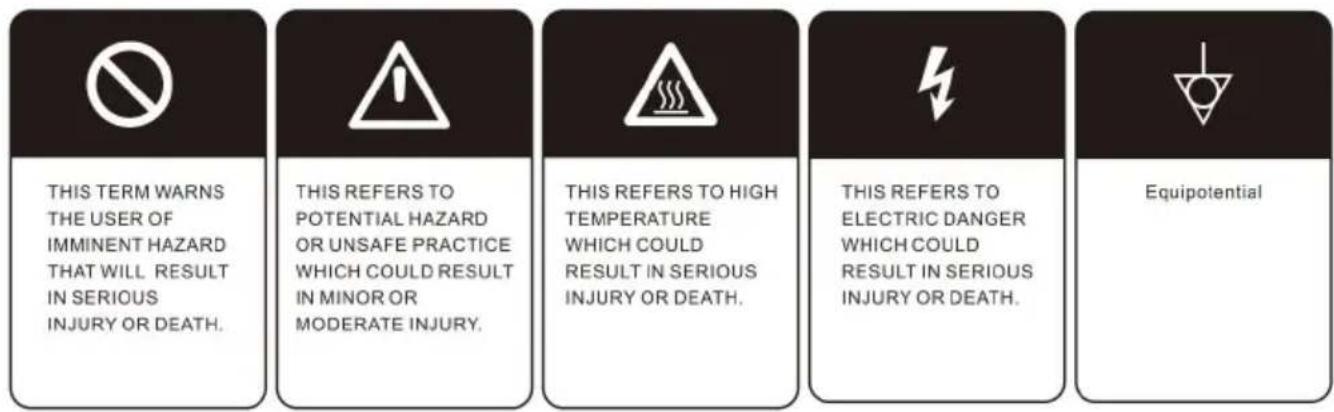
To reduce risk of electrical shock, do not remove or open cover. no serviceable parts inside. Repair should be done by authorized service personal only.
The appliance is not intended for outdoor use.
Do not clean with pressurized water or use in an area where pressur water may be used.
Cleaning and maintenance shall be made only by properly
Trained persons with supervision.
This appliance is not intended for use by persons with reduced physi sensory, or mental capabilities, or lack of experience and knowledge, unless they have been given supervision or instruction concerning use the appliance by a person responsible for their safety.
Children should be supervised to ensure that they do not play with the appliance.
Do not alter or deform the power cord or plug in any way! Altering deforming the plug may cause electrical shock, damage unit and will warranty.
To reduce risk of explosion or fire, do not use near combustibles.
SAFETY INFORMATION
For safe and proper operation, the appliance must be placed in a st
vertical position..
To reduce risk of serious burns or scalding, do not place hand or o body parts under dispenser or container while product isbrewing. Alway unplug unit from power supply before servicing. Surfaces are hot and cause burns.
Use only on a circuit that is properly protected and capable of thermal load.
Electronically ground the chassis.
Follow national and local electrical codes. Do not use extension cord. This equipment must be installed in compliance with applicable federal state and/or local electrical codes having jurisdiction. do not use exte cords. make sure that the outlet the boiler plugs into is grounded.
Check rating marking on boiler nameplate to be sure electric lines match voltage, phase, and amperage requirements of boiler. select the proper cord and cord grip for electrical rating of the boiler.
Installation of this appliance should be performed by qualified service personnel only. improper installation could result in electrocution.
These urns are heavy pieces of equipment. It's recommended that mc or lifting the unit be done by two people to avoid injury.
PRODUCT INTRODUCTION
Stepping water machine, as the name suggests, is by the bottom step heating, gradually heating until the water is boiled energy-saving water boiling equipment. Can improve the separation of hot and cold and ensure a boiling healthy boiling machine, ease the degree of "yir yang water," intelligent control to ensure only one boiling, thus comp avoiding repeated heating; After a part of the water is heated and both the water in the other part is heated from the bottom until the water full of water, and the stepper can continuously discharge boiling water avoiding the waiting time of the traditional boiling water machine after whole tank of water is boiled. The traditional boiling water machine is based on steam expansion from the heating box to the insulation box
which is equivalent to countless times of boiling; The stepper type bc water machine relies on electrode temperature measurement, accurate temperature control ,water temperature can be set and electronic temperature control to prevent dry burning without water.
ANTI DUMPING INSTALLATION METHOD
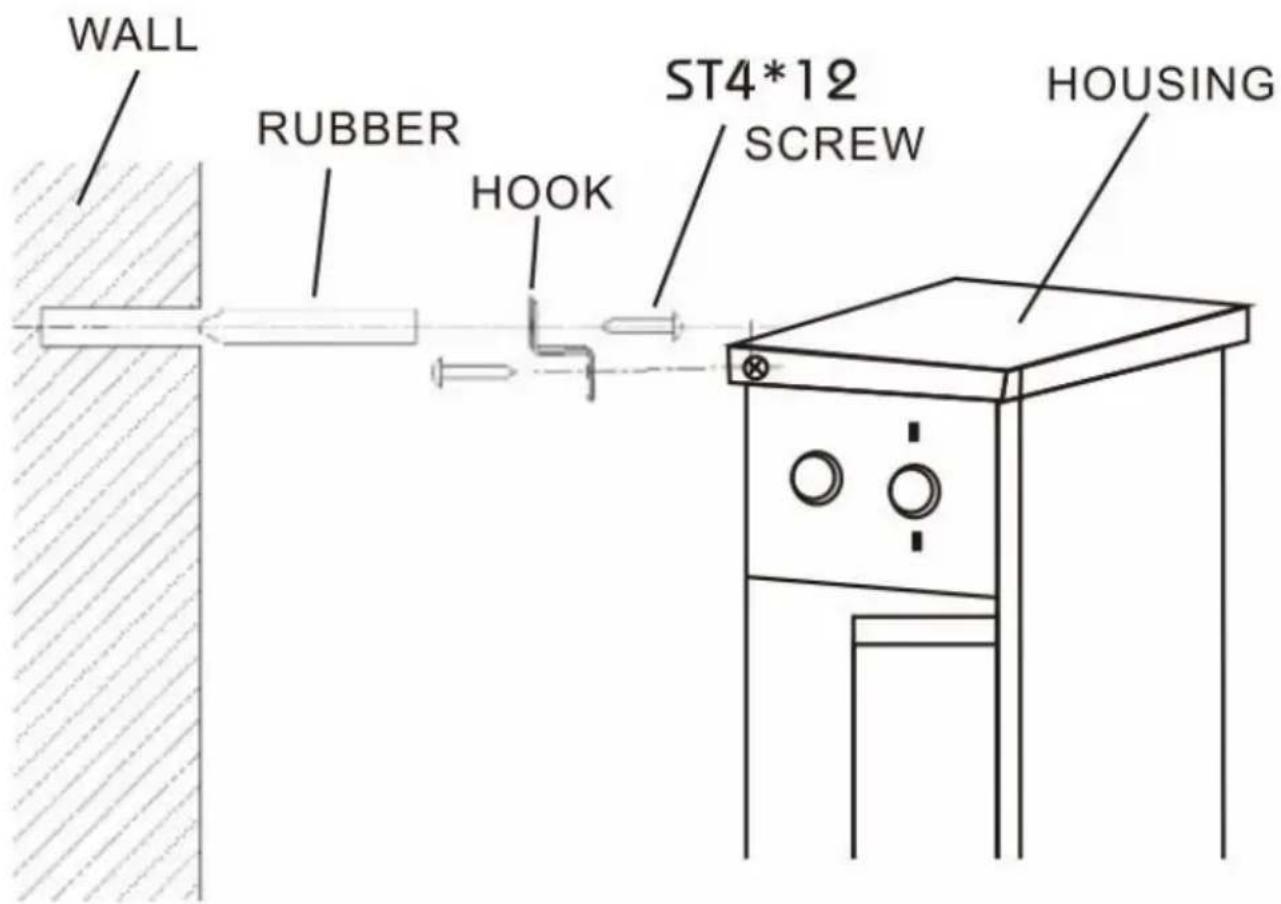
Installation steps:
1.Unscrew the back plate,
2.Add the hook,
3. Then screw and fix to the housing.
Installation Instructions:
If the equipment installation and use scenario is prone to dumping, it recommended to install this accessory!
PRODUCT PROFILE
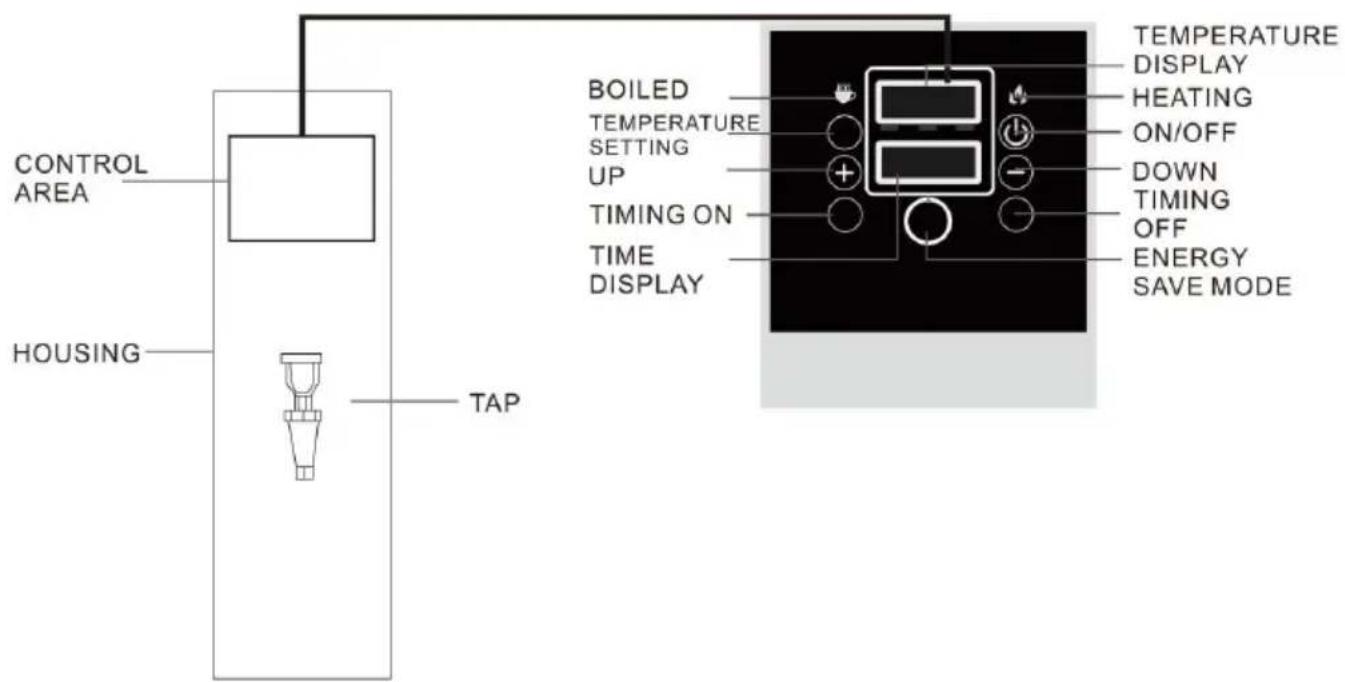
1.Display -shows ELL which means Power on or water temperature .
2. Ready water boiled and ready for drinking.
3. Heating water is heating and not ready for drinking.
4. Water shortage water supply is not connected , stopped , or water pressure lower than 100kPa .
5.Water Shortage -Water inside shortage or water level below safety setting.
6. Fault-Check fault code in user manual and call professional technician repair.
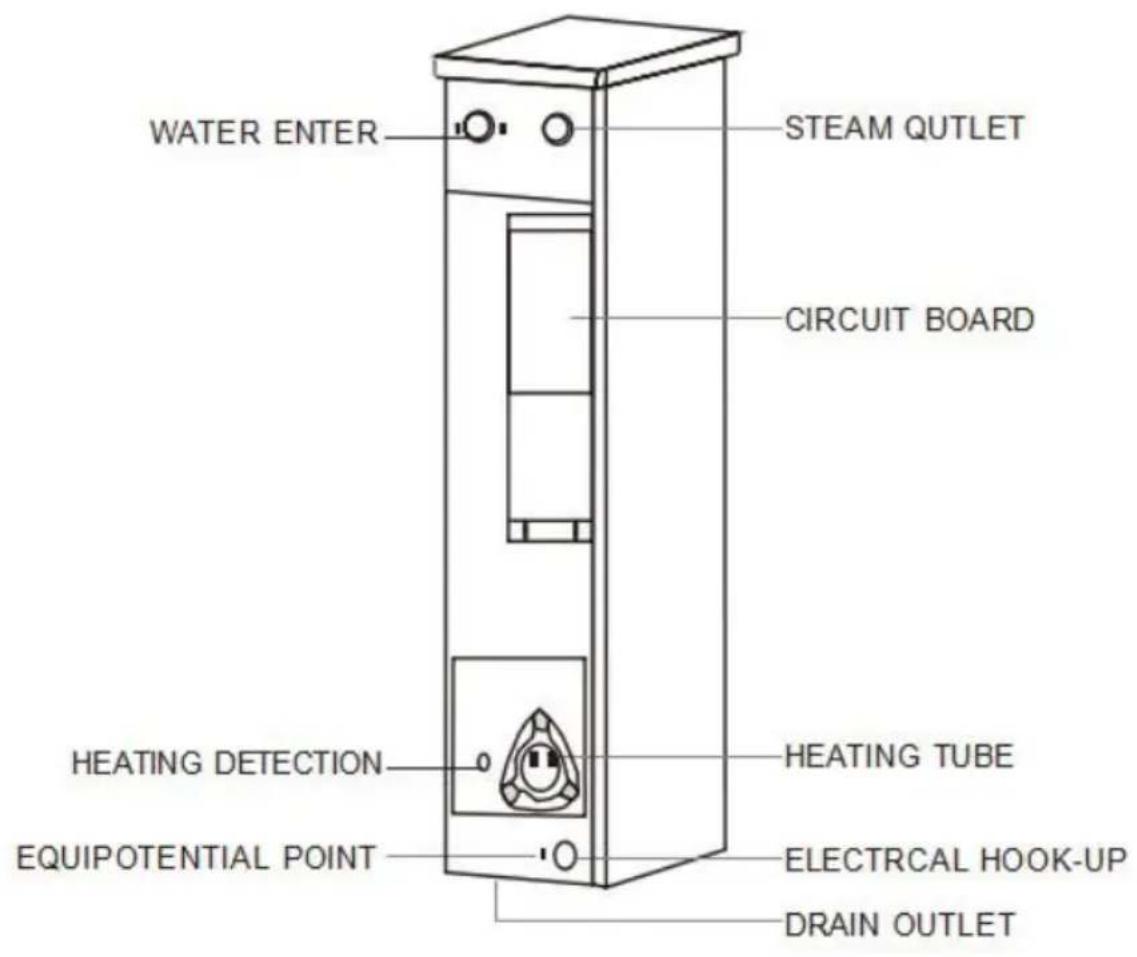
OPERATING INSTRUCTIONS
1.Start: Connect the power, the machine automatically access the selfinspection mode for 5 sec , and will turn into heating mode , the winto the machine and be heated by then . Unwatered and water-in liThe display will be
showed"ELL "which means the water in . When water reach the wate level , the unwatered and water-in lights off. The display shows the time temperature. The heating light on and the water is heating.
-
Heating Temperature Setting: Press"Temp Set"mode for one time display will show heating temperature. Use ^+ /“-”to adjust the temperature of the water. Wait 10 sec after the setting is finished, return to the real time temperature. (Note: when power cut off, the will recover to default setting)
-
Drink: When the water temperature reach the set temperature,
the" heating" light off", " boiled" light on , at that time the water is drink .
Recommend the temperature to be setting up from 95-100 °C(203-212°
- Fault: When " Fault" light on, stop using
the heater. Do not operate the machine before checking.
FAULT DIAGNOSIS
| Fault code | Reason | Reason |
| ELL | un water | 1. Check if the water supply is connected;2. Check if the water switch is open on the water switch;3. Water supply cuts-turn on when the water in;Note: When under the minimum wat level, it will also shows"ELL"when w in. That's not under fault. |
| E2 | overtime water-in | 1. Error of sensor- contact the after-sales team to change the sens 2. The tap is not open yet. Open |
| E4 | sensor in error | 1. sensor error, contactthestafftochang the sensor |
| E5 | High,low water level needle failure | Limescale is clogged. Clean the high,low water level needles or repl |
CLEANING AND MAINTENANCE
- Please cut off the power and water before cleaning and maintainar
- The machine in the use of the process should be managed by a
person, regularinspection . holidays or when not in use for a long petime, should be turn off the power and water source and drain the the water tank to prevent the aging of internal components , ensure safety of use and prolong the service life .
- Pay attention to clean the sensor, to prevent scale affect the auto operation of the machine mechanism. there are special scale remover sales on the market please refer to the packaging guidelines and the situation , it is recommended to clean it once a quarter.
- The machine with sewage device, should be based on the actual regular sewage cleaning, operation should be cut off all power supply; when the water temperature of the water tank drops to normal temperature, it begins to discharge.
It is strictly forbidden to knock or clean the scale inside the liner with metal tools.
- When the over flow pipe appears cold water out flow or not heatwork , should immediately stop using , overhaul the inlet valve is dirmaterial is blocked or the electric heating pipe is damaged , and itbe cleaned or replaced in time .
- Clean the outer box, remember to cut off the power supply, wipe rag, do not use corrosive liquids, strictly prohibit water spray or in water for cleaning.
- If you need to open the water pipe cleaning , the water pipe andshould be dried before use again .
- Due to the impact of water quality, calcium carbonate oxide deposits naturally occur during the heating water process, and must be removed regularly. Scale treatment, depending on the environment, must be thrice every 1-2 months.
Method: Water and vinegar (the best high-purity white vinegar), acco
to the ratio of 2: 1 into the water tank heating, boil and leave for
the next day the solution drained, and then boil with water to clear
9. Open the top cover of the water machine: first the four screws on
screw out and then up Lift the lid.
- Suggest to add carbon filter that takes chlorine out of water whe
connecting with tap water. clean inner tank on time to protect the ma 11 . Make sure electric supply voltage same as the machine voltage requirement before assembly.
△ Clean inner tank every month to protect the machine .
Only open sewage draining exit after water temperature falls down
Forbidden any block in steam exhaust vent.
VEVOR
TOUGH TOOLS, HALF PRICE
Technical Support and E-Warranty Certificate www.vevor.com/support
VEVOR®
TOUGH TOOLS, HALF PRICE
Assistance technique et certificat de garantie electronique www.vevor.com/support
HULP NODIG? NEEM CONTACT MET ONS OP!
ANTI-DUMPING INSTALLATIEMETHOD
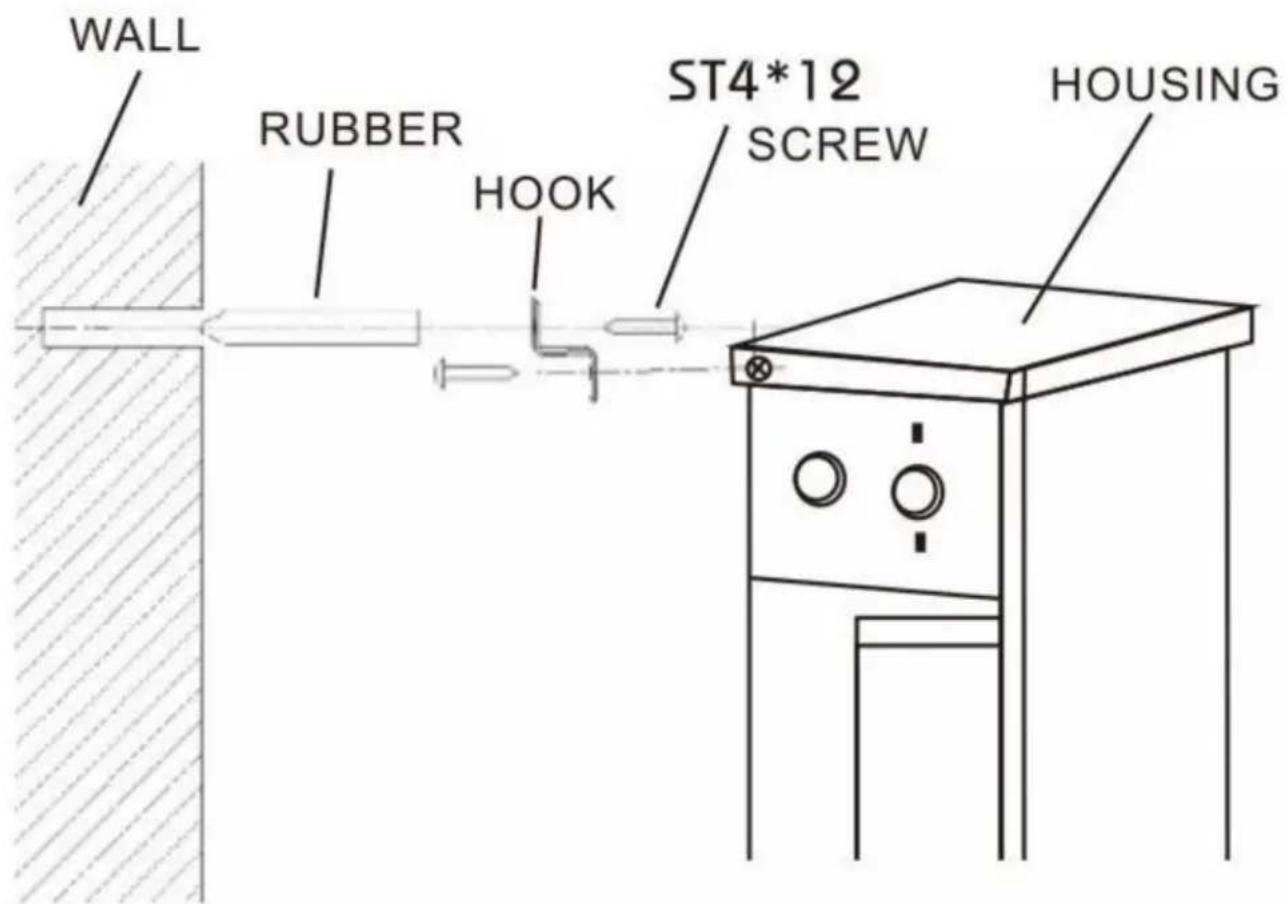
Installiestappen:
garantiecertificaat www.vevor.com/support
VEVOR®
TOUGH TOOLS, HALF PRICE
INSTALLATIONSMETOD FÖR ANTIDUMPNING
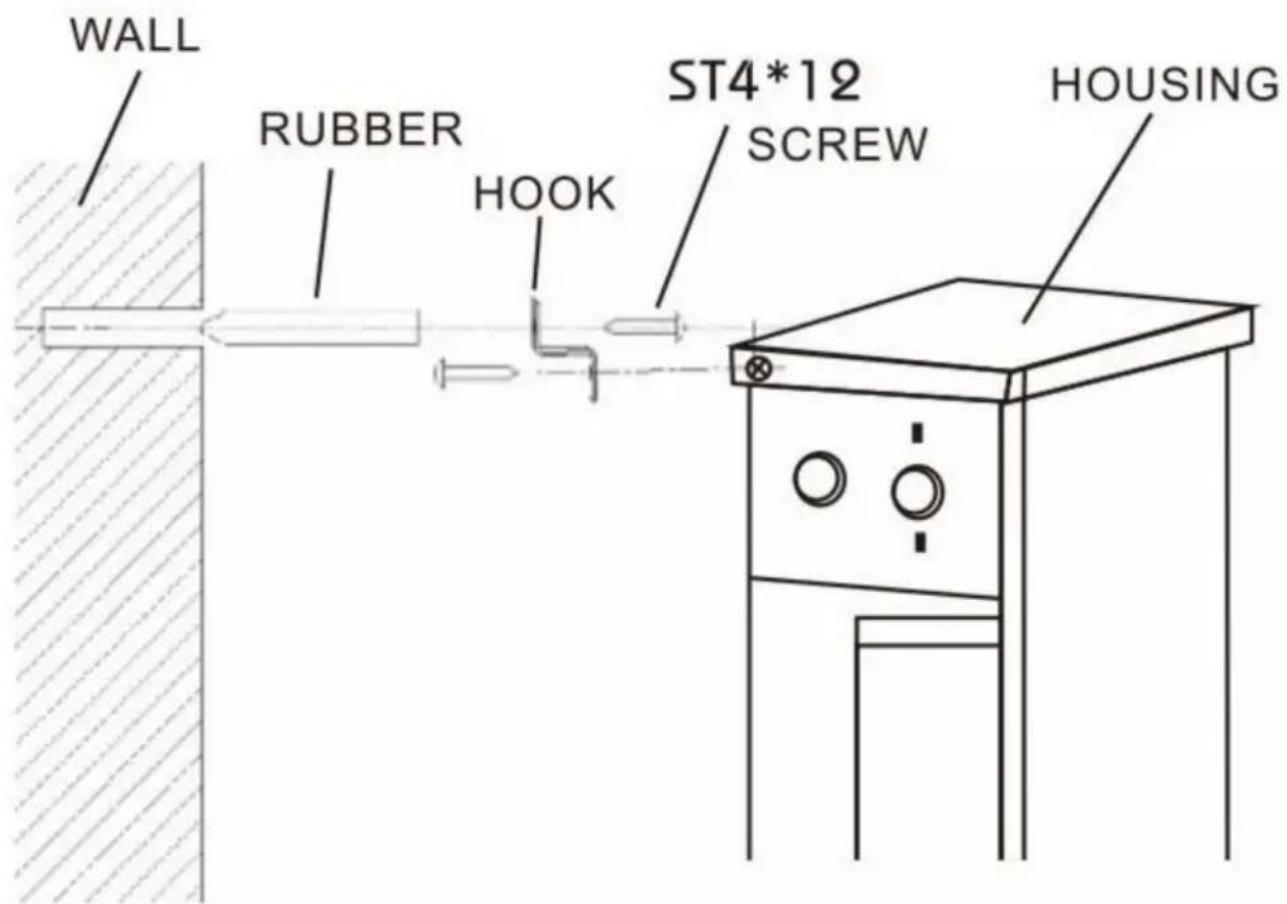
Installationsstag:
1.Skruva loss bakplattan, 2.Lagg
tillkroken