
PS150-18Li - Electric pruner SCHEPPACH - Free user manual and instructions
Find the device manual for free PS150-18Li SCHEPPACH in PDF.

| Brand | Scheppach |
| Model | PS150-18Li |
| Device type | Electric pole pruner |
| Total length (min/max) | 178 - 275 cm |
| Blade length | 240 mm |
| Cutting length | 150 mm |
| Chain pitch | 3/8" |
| Chain type | 91P033X |
| Tooth width | 1.3 mm |
| Rated voltage | 18 V |
| Weight with battery | 4.4 kg |
| Weight without battery | 3.8 kg |
| Sound pressure level | 70.2 dB(A) |
| Sound power level | 86.55 dB(A) |
| Acoustic uncertainty | 3 dB(A) |
| Vibration | 0.695 m/s² |
| Oil type | Chainsaw chain oil |
| Power supply | 18 V Li-ion battery (not included) |
| Safety | Switch lock, chain brake, carrying belt, personal protective equipment required |
| Warranty | Up to 10 years (subject to registration) |
Frequently Asked Questions - PS150-18Li SCHEPPACH
User questions about PS150-18Li SCHEPPACH
0 question about this device. Answer the ones you know or ask your own.
Ask a new question about this device
Download the instructions for your Electric pruner in PDF format for free! Find your manual PS150-18Li - SCHEPPACH and take your electronic device back in hand. On this page are published all the documents necessary for the use of your device. PS150-18Li by SCHEPPACH.
USER MANUAL PS150-18Li SCHEPPACH
natural_image
Exterior view of a handheld power tool with black and silver casing (no text or symbols visible)PS150-18Li
| DE | Akku-HochentasterOriginalbetriebsanleitung | 4 - 11 |
| GB | Pole-mounted cordless prunerOperating manual | 12 - 18 |
| FR | Perche-élagueuse sans fi lTraductions des instructions d'origine | 19 - 26 |


CAUTION: Read the manual carefully before operating this machine!
natural_image
Close-up of a chainmail with metal chains and a black mesh blade, no text or symbols visible
natural_image
Close-up of a white plastic electrical switch component with a magnified inset showing internal structure (no text or symbols visible)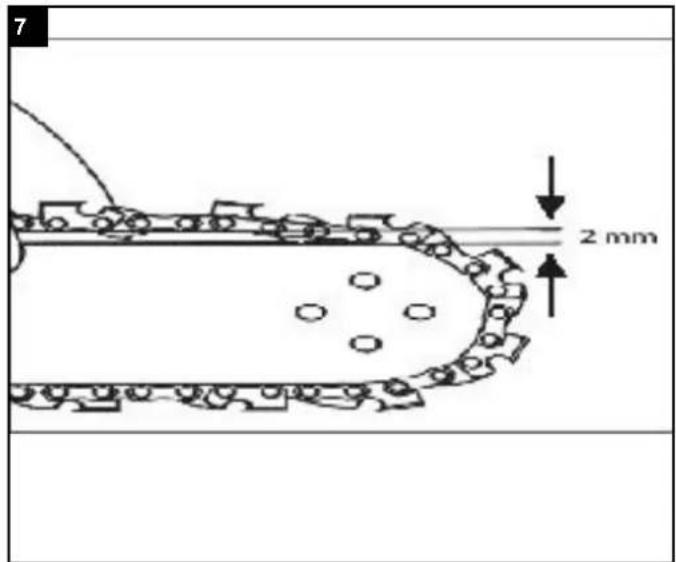


natural_image
Close-up of a gray plastic electrical plug connector with a black clip inserted (no text or symbols visible)
natural_image
Mechanical device with labeled parts, no visible text or symbols on the device itself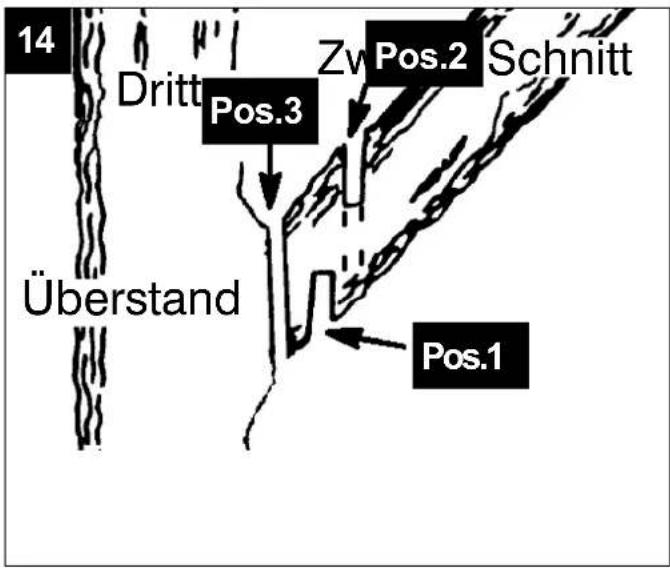
DE
Explanation of the symbols on the equipment
 | GB | Read the instruction manual. |
 | GB | Warning! Denotes risk of personal injury, loss of life, or damage to the tool in case of non-observance. |
 | GB | Wear robust footwear when using the device! |
 | GB | Wear ear, head and eye protection. |
 | GB | Wear protective gloves when using the device! |
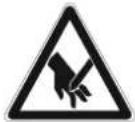 | GB | Warning! Risk of injury!Never put your hands close to the blades. Never touch the blades when turning the tool on or using it. |
 | GB | Protect the tool from getting wet. |
 | GB | Warning of surrounding parts |
 | GB | protection class II |
 | GB | The product complies with the applicable European directives |
 | GB | Beware of electrical wiring! Keep at least 10 m distance and 15 m to other persons |
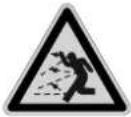
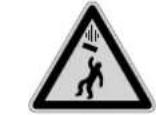 | GB | Warning of falling objects |
Introduction
MANUFACTURER:
scheppach
Günzburger Straße 69
D-89335 Ichenhausen
DEAR CUSTOMER,
We hope your new tool brings you much enjoyment and success.
NOTE:
According to the applicable product liability laws, the manufacturer of the device does not assume liability for damages to the product or damages caused by the product that occurs due to:
- Improper handling,
• Non-compliance of the operating instructions,
• Repairs by third parties, not by authorized service technicians,
• Installation and replacement of non-original spare parts,
• Application other than specified, - A breakdown of the electrical system that occurs due to the non-compliance of the electric regulations and VDE regulations 0100, DIN 57113 / VDE0113.
We recommend:
Read through the complete text in the operating instructions before installing and commissioning the device. The operating instructions are intended to help the user to become familiar with the machine and take advantage of its application possibilities in accordance with the recommendations. The operating instructions contain important information on how to operate the machine safely, professionally and economically, how to avoid danger, costly repairs, reduce downtimes and how to increase reliability and service life of the machine.
In addition to the safety regulations in the operating instructions, you have to meet the applicable regulations that apply for the operation of the machine in your country. Keep the operating instructions package with the machine at all times and store it in a plastic cover to protect it from dirt and moisture. Read the instruction manual each time before operating the machine and carefully follow its information. The machine can only be operated by persons who were instructed concerning the operation of the machine and who are informed about the associated dangers. The minimum age requirement must be complied with.
In addition to the safety instructions in this operating manual and the separate regulations of your country, the generally recognised technical rules for operating woodworking machines must also be observed.
Layout (Fig. 1/2)
- Battery pack
- On/Off switch
- Handle
- Switch lock
- Shoulder strap attachment
- Shoulder strap
- Chain wheel cover
- Oil tank cover
- Chain
- Chain bar
- Telescopic tube lock nut
- Grip area
- lock nut
- Cutter guard
- Button for angel adjustment
-
Lock / Open button
-
Top telescopic tube with motor housing
Scope of delivery
Motordevice with telescopic tube
Handle
Saw-device
Chain bar
Protection
Chain
- Open the packaging and remove the device carefully.
- Remove the packaging material as well as the packaging and transport bracing (if available).
- Check that the delivery is complete.
- Check the device and accessory parts for transport damage.
- If possible, store the packaging until the warranty period has expired.
ATTENTION
The device and packaging materials are not toys! Children must not be allowed to play with plastic bags, film and small parts! There is a risk of swallowing and suffocation!
Safety information
WARNING! Read all safety directions and instructions. Omissions in the compliance with safety directions and instructions can cause electrical shock, fire and/or severe injuries. Retain all safety directions and instructions for future use. Read these instructions before using the charger and follow them:
- operating instructions provided,
- rules and regulations for accident prevention applicable to the operating site.
This gardening tool is not intended for use by people (including children) with limited physical, sensory or mental abilities or with a lack of experience and/or lack of knowledge, unless they are supervised by a person responsible for their safety or they receive instructions from such a person on how to use this gardening tool.
Never let children or people unfamiliar with these instructions use this gardening tool. Children must be supervised to ensure that they do not play with the device.
Safety notices for the charger
⚠ WARNING! Carefully read all safety notices and instructions. Failure to comply with safety notices and instructions can cause electric shock, fire and/or severe injuries.
Store all safety notices and instructions for future reference.
The term “power tool” used in the safety instructions refers to mains-powered tools (with a mains cable) and to battery-powered tools (without a mains cable).
Work area safety
- Keep work area clean and well lit. Cluttered or dark areas invite accidents.
- Do not operate power tools in explosive atmospheres, such as in the presence of flammable liquids, gases or dust. Power tools create sparks which may ignite the dust or fumes.
- Keep children and bystanders away while operating a power tool. Distractions can cause you to lose control.
Personal safety
- Stay alert, watch what you are doing and use common sense when operating a power tool. Do not use a power tool while you are tired or under the influence of drugs, alcohol or medication. A moment of inattention white operating power tools may result in serious personal injury.
- Use personal protective equipment. Always wear eye protection. Protective equipment such as dust mask, non-skid safety shoes, hard hat, or hearing protection used for appropriate conditions will reduce personal injuries.
- Prevent unintentional starting. Ensure the switch is in the off-position before connecting to power source and/or battery pack, picking up or carrying the tool. Carrying power tools with your finger on the switch or energising power tools that have the switch on invites accidents.
- Remove any adjusting key or wrench before turning the power tool on. A wrench or a key left attached to a rotating part of the power tool may result in personal injury.
- Do not overreach. Keep proper footing and balance at all times. This enables better control of the power tool in unexpected situations.
- Dress properly. Do not wear loose clothing or jewellery. Keep your hair, clothing and gloves away from moving parts. Loose clothes, jewellery or long hair can be caught in moving parts.
Power tool use and care
- Do not force the power tool. Use the correct power tool for your application. The correct power tool will do the job better and safer at the rate for which it was designed.
- Do not use the power tool if the switch does not turn it on and off. Any power tool that cannot be controlled with the switch is dangerous and must be repaired.
- Disconnect the plug from the power source and/or the battery pack from the power tool before making any adjust -ments, changing accessories, or storing power tools. Such preventive safety measures reduce the risk of starting the power tool accidentally.
- Store idle power tools out of the reach of children and do not allow persons unfamiliar with the power tool or these instructions to operate the power tool. Power tools are dangerous in the hands of untrained users.
- Maintain power tools. Check for misalignment or binding of moving parts, breakage of parts and any other condition that may affect the power tool's operation. If damaged, have the power tool repaired before use. Many accidents are caused by poorly maintained power tools.
- Keep cutting tools sharp and clean. Properly maintained cutting tools with sharp cutting edges are less likely to bind and are easier to control.
- Use the power tool, accessories and tool bits etc. in accordance with these instructions, taking into account the working conditions and the work to be performed. Use of the power tool for operations different from those intended could result in a hazardous situation.
Careful handling and use of Battery devices
- Charge the batteries only in chargers that are recommended by the manufacturer. Risk of fire if a charger that is suitable for a specific type of battery is used with other batteries
- In the power tools, use only the batteries designed for the purpose. The use of other batteries may result in injuries and risk of fire
- Keep the unused battery away from paper clips, coins, keys, nails, screws and other small metal objects, which could cause bridging of the contacts. A short circuit between the battery contacts may cause burns or fire
- If used incorrectly, liquid may leak from the battery. Avoid contact with this. In the event of accidental contact, rinse off with water. If the liquid gets into eyes, seek medical assistance. Leaking battery fluid may cause skin irritations or burns
Service
- Have your power tool serviced by a qualified repair person using only identical replacement parts. This will ensure that the safety of the power tool is maintained
SAFETY INSTRUCTIONS FOR WORKING WITH THE POLE SAW
PROTECTIVE GEAR
- In order to prevent head, eye, hand and foot injuries and to protect your hearing, appropriate protective equipment must be used during operation of the pusher.
- Wear suitable clothing. Do not wear loose clothing or jewelry. Keep hair, clothing and gloves away from moving parts of the machine. Loose clothing, jewelry and long hair can get caught in rotating parts of the machine.
- Wear cut-resistant jackets and cut-resistant pants.
- Operation of the machine may cause foreign objects to be thrown out. Therefore always wear safety goggles with side protection to protect your eyes.
• Always wear a safety helmet when working with the machine. - Use ear protection. The effects of noise can cause hearing damage.
- Wear safety shoes with steel toe cap and non-slip sole.
- Wear cut-resistant work gloves when working with the machine.
SAFETY INSTRUCTIONS FOR CHAINSAWS
- Do not start the unit until the chainwheel, saw chain, sprocket and sprocket cover are properly installed.
- Do not use the device if it is damaged or incomplete, or if you have made adjustments without the manufacturer's permission. Check the device for faults before each use. In particular, check the power connections, switches and protective covers.
- Check the safety status of the pusher, especially the chain bar, chain brake and chain, before each use.
- Do not use the device when you are tired or under the influence of alcohol, drugs or medications. Also, be sure to take regular breaks.
- Keep your work area clean. Do not start work until your work area is clear of obstacles and you have a safe path to escape from falling wood.
- Never use the device when other people, especially children, or pets are nearby.
- Do not use the device near flammable liquids or gases. Failure to do so may result in fire or explosion.
- The device is designed for two-handed operation. Always hold both hands firmly by the handle and never work with just one hand. During operation, hold the device with the right hand on the rear handle
and with the left hand on the front handle. A secure grip keeps you in control of the device. Never let the device go while the engine is running.
- Keep the handles dry, clean and free from oil and grease. Greasy or oily handles can lead to loss of control.
- Hold the device only by the insulated gripping surfaces. The saw can come in contact with a live cable and the user may suffer an electric shock.
- Be sure to stand securely when working. Do not work on ladders, trees, or other unstable surfaces. Be especially careful when working on slopes.
- Risk of electric shock! Always keep a minimum distance of 10m from high voltage and high voltage cables.
- Before switching on, make sure that the saw has no contact with any objects. Switch off the device before changing location.
- Whenever you change your location, make sure that the chain is secured with the chain brake and the device is switched off and the power connection has been disconnected. Attach the chain guard and carry the unit with the saw blade behind you. In addition, make sure that you do not accidentally press the on / off switch.
- Do not work in the rain, in bad weather, or in a damp environment. Only work in good light.
- Be particularly careful when pruning small shrubs and twigs, they can get caught in the saw chain and be thrown in your direction or unbalance you.
- Never cut wood that is lying on the floor.
- Pay attention to any spring-back when sawing a branch under tension.
- Store the device in a dry, closed place and out of the reach of children. Attention: These instructions are intended to prevent injuries and accidents and must be followed.
Careful handling of the device:
- Keep the saw chain sharp and clean to ensure optimum operation of the unit.
- Use the device only in the power range for which it was designed and use it only for its intended purpose.
- Follow the maintenance and inspection instructions in this manual.
- Damaged parts and safety covers must be repaired by an Authorized Service Center unless noted otherwise in this manual.
- Maintenance and repairs not mentioned in this manual may only be performed by a service workshop.
- Only use original spare parts and accessories that are supplied and recommended by the manufacturer.
PRECAUTIONS AGAINST SAW CHECK
- Kickback is the name given to a lightning-fast reverse pulse from the pruner and the chain sword from the sawn object.
- A kickback occurs when the rotating chain at the top of the guide rail contacts an object or when the chain
jams during sawing and gets stuck in the wood. This contact of the guide rail tip can in some cases lead to a lightning-like reverse reaction and toss the guide rail up and back in the direction of the operator. The pinching of the saw chain in the upper region of the guide rail can lead to a violent kickback of the guide rail in the direction of the operator. In both cases, you can lose control of the chainsaw and seriously injure yourself and bystanders.
- The tip of the guide rail of a chain saw is also known as the RADIUS HAZARD ZONE. Upon contact with an object such as a branch or tree trunk, there is a danger of a sudden kickback of the guide rail tip.
- In order to avoid setback, the following must be considered fundamentally:
- Do not rely on the safety features of your saw.
- Reduce the element of surprise and realize what a setback is.
- Hold the saw firmly in both hands and use both handles.
- Grooving (a direct piercing with the rail tip into the wood) may only be carried out by specially trained persons!
- Always observe the tip of the rail. Be careful when continuing already started cuts.
- Start cutting with the saw chain running.
- Always sharpen the saw chain correctly. Particular attention should be paid to the correct height of the depth limiter.
- Never saw through several branches at once! When unlocking make sure that no other branch is touched.
- When cutting to length, pay attention to closely adjacent stems.
WARNING Kickback DANGER! A kickback can lead to the loss of control of the saw and serious injury or death! Always be alert. The recoil / kickback is one of the biggest dangers of working with a chainsaw and is the main cause of most accidents.
Safety notices for the charger
- Keep the charger away from rain and wet conditions. Water ingress into the charger increases the risk of an electric shock.
- Keep the charger clean. Dirt increases the risk of an electric shock.
- Before every use, check the charger, cable and plug. Do not use the charger if you notice any damage. Do not open the charger yourself but have it repaired exclusively by qualified specialists and only with original spare parts. Damaged chargers, cables and plugs increase the risk of electric shock. Do not place objects on the charger and do not put the charger on soft surfaces. Risk of fire
- Always check if the mains voltage corresponds with the voltage specified on the rating plate of the charger.
- Never use the charger if the cable, plug or the charger itself have been damaged by external
influences. Take the charger to the nearest specialist service centre
- Do not open the charger under any circumstances. In the event of a fault, take it to a specialist service centre.
Safety notices for Li-Ion batteries
- Do not open the battery. Risk of short-circuiting!
- Protect the battery from heat, e.g. from constant sun exposure, and from fire, water and humidity. Risk of explosion.
- When the battery has been damaged or it is being used inappropriately, fumes can be released. Let fresh air in and consult a doctor if the fumes cause you any problems. The fumes can irritate the respiratory tract.
- Only use original batteries with the voltage specified on the rating plate of your power tool. If other batteries are used, e.g. imitations, reconditioned batteries or products from third party manufacturers, there is a risk of personal injury as well as property damage based on exploding batteries.
- The battery voltage must correspond with the battery charging voltage of the charger. Otherwise, there is a risk of fire and explosion.
- Charge the batteries only in chargers that have been recommended by the manufacturer. There is a risk of fire if a charger for a particular type of battery is used for another type of battery.
- The battery can be damaged by sharp objects such as a nail or screwdriver or by external application of force. The battery may short-circuit and start burning, smoking, exploding or overheating.
Warning! This electric tool generates an electromagnetic field during operation. This field can impair active or passive medical implants under certain conditions. In order to prevent the risk of serious or deadly injuries, we recommend that persons with medical implants consult with their physician and the manufacturer of the medical implant prior to operating the electric tool.
Intended use
Equipment designed for use in private and hobby gardens is regarded as unsuitable for use in public facilities, parks and sports centers, along roadways, or in agriculture and forestry. The operating instructions as supplied by the manufacturer must be kept and referred to in order to ensure that the equipment is properly used and maintained.
The equipment may be used only for the tasks it is designed to handle. Any other use is deemed to be a case of misuse. The user/operator and not the
manufacturer will be liable for any damage or injuries of any kind resulting from such misuse.
Please note that our equipment has not been designed for use in commercial, trade or industrial applications. Our warranty will be voided if the equipment is used in commercial, trade or industrial businesses or for equivalent purposes.
Remaining hazards
The machine has been built using modern technology and in accordance with recognized safety rules.
Some hazards, however, may still remain.
- Wear regulation safety gear such as safety boots and tight work clothing.
- Electrical hazards exist when unsuitable electric connections are used.
- Although having regarded all considerable rules there may still remain not obvious remaining hazards.
- Minimize remaining hazards by following the instructions in "Safety Rules", "Use only as authorized" and in the entire operating manual.
Technical data
| Pole saw | |
| Technical data | |
| Data pole saw | |
| Bar length mm | 240 |
| Cutting length mm | 150 |
| Guide bar typ | 080SDEA041 |
| chain pitch | 3/8" |
| Saw chain type | 91P033X |
| Chain link thickness " | 1,3 |
| Oil | Chainsaw oil |
| Pruner length min./max. cm | 178 - 275 |
| Power unit | |
| Nominal Voltage | 18 V |
| Weight with battery kg | 4,4 |
| Weight without battery kg | 3,8 |
Noise and vibration
The noise and vibration values were developed using a standardised measuring process.
| Sound pressure L_pA | 70,2 dB(A) |
| Sound power L_wA | 86,55 dB(A) |
| Uncertainty K_WA | 3 dB(A) |
| Vibration A_hv | 0,695 m/s ^2 |
| Uncertainty K 1,5 m/s ^2 |
Wear ear-muffs.
The impact of noise can cause damage to hearing.
Reduce noise generation and vibration to a minimum!
- Use only equipment that is in perfect condition.
-
Maintain and clean the equipment regularly.
-
Adopt your way of working to the equipment.
- Do not overload the equipment.
- Have the equipment checked if necessary.
- Switch off the equipment when not in use.
- Wear gloves
Before starting the equipment
Unpack the device and check it for complete delivery contents and transport damage.
NOTE
The batteries (optional; depending on the delivery scope) are not fully charged on delivery. Before first use, fully charge the batteries. See charger instruction manual.
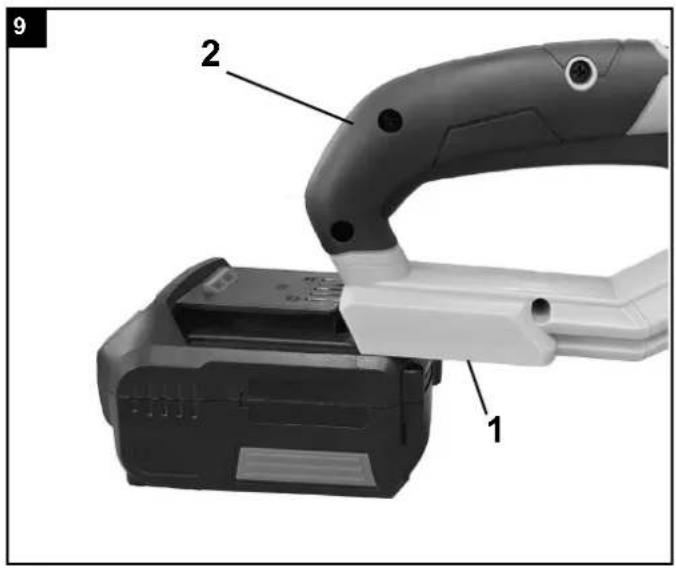
Removing / inserting the battery
- To remove the battery from the appliance, press the release button on the battery and pull out the battery.
- To insert the battery, place it on the guide track and push it back into the appliance. It will audibly snap in.
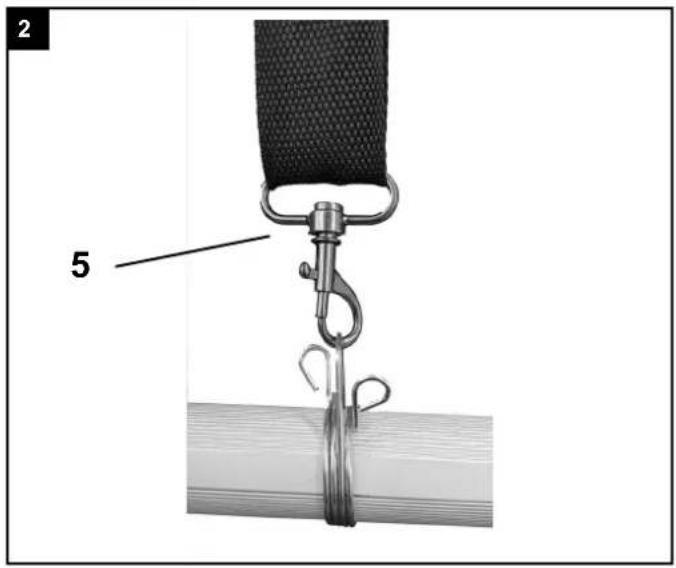
Assembly of the shoulder strap (Fig. 2)
Hook the fastener of the shoulder strap into the shoulder strap attachment.
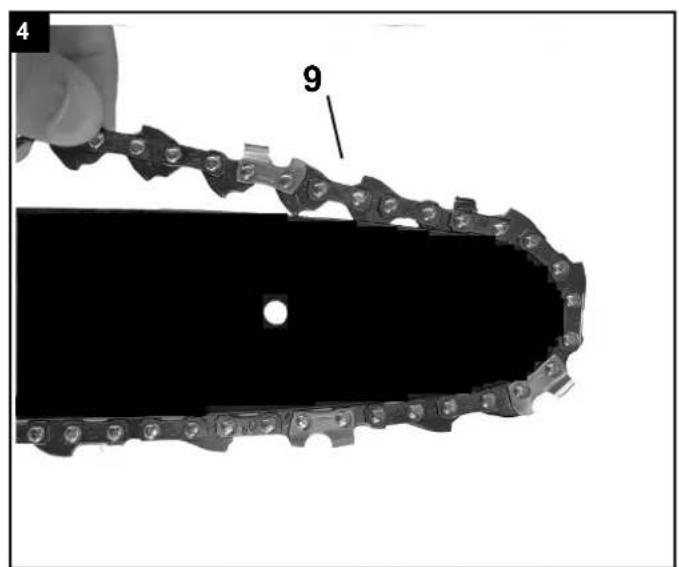
Assembly of the cutter rail and the saw chain
Take off the chain wheel cover. • Lay the chain as shown in the groove which runs around the cutter rail • Insert the cutter rail and chain as shown in the mounting in the chainsaw. At the same time guide the chain around the chain wheel and hook the cutter rail into the chain tensioning bolt.
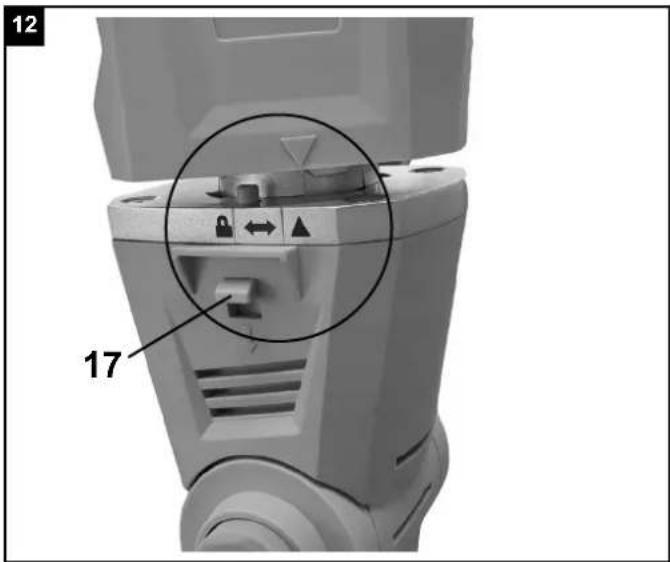
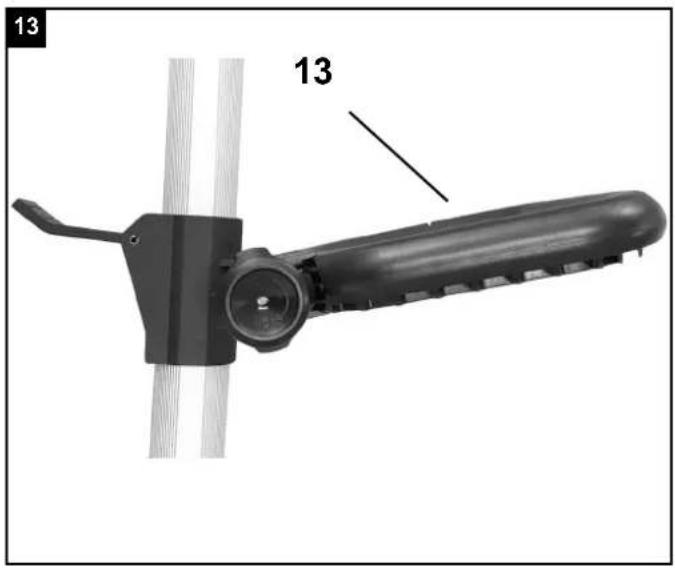
Assembly / disassembly the saw head. (Fig. 12)
To assemble the head, place the saw unit as shown in Fig. No. 12 on the telescope unit. You have to place the saw unit at an angle in order to be able to insert the unit in the form lock. Look at both surfaces first. Then squeeze the two components together. Then turn the head until it snaps into place (item 17). Now the pruner is operational.
If you want to disassemble the saw head, simply slide down the splitter (Pos.17) and turn the head until you can loosen the unit.
Assembly of telescopic rod and handle (Fig. 10 + 11)
Push the telescopic rod and the handle together. The guide prevents incorrect installation. Then screw the locking nut (Pos.14) together with the thread of the handle
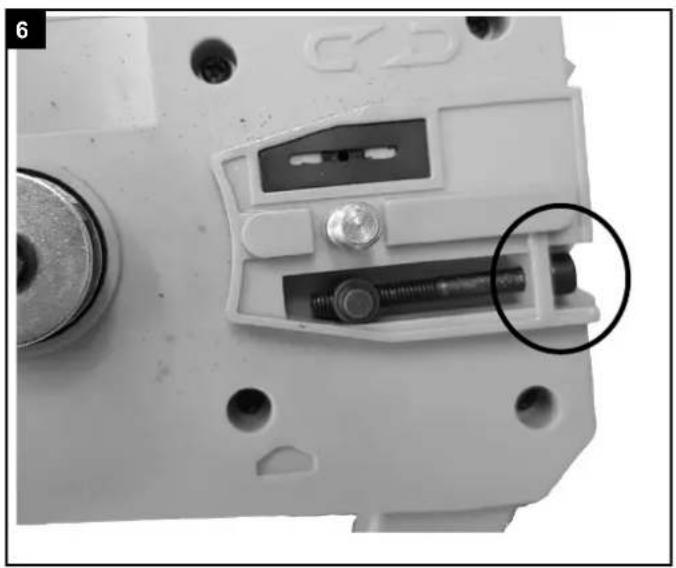
Tensioning the saw chain
Caution! Always remove the battery from the device before inspection and adjustment. Always wear protective gloves when working on the pruner to protect yourself against injury.
- Undo the fixing screws of the chain wheel cover a few turns.
- Adjust the chain tension with the chain tensioning screw. Turning the screw clockwise increases the chain tension, turning it counter-clockwise decreases the chain tension. The saw chain is correctly tensioned if it can be lifted around 2mm in the middle of the cutter rail.
- Tighten the fixing screws for the chain wheel cover.
Caution! All the chain links must lie properly in the guide groove of the cutter bar.
Notes on tensioning the chain:
The chain must be properly tensioned to ensure safe operation. When the saw chain can be raised by around 2 mm in the middle of the cutter bar, you know that the chain tension is ideal. As the saw chain heats up during cutting and thus changes in length, check the chain tension no less than every 10 minutes and adjust it again as required. This applies in particular to new saw chains. When you have fi nished working, slacken the chain again as it will shorten when it cools down. This will help to prevent damage to the chain.
Saw chain lubrication
Caution! Always remove the battery from the device before inspection and adjustment. Always wear protective gloves when working on the pruner to protect yourself against injury.
Caution! Never operate the chain if it is not lubricated with saw chain oil! Use of the pole-operated pruner without saw chain oil or if the oil level is below the „min“ mark will damage the chainsaw.
Caution! Be aware of the temperature conditions: Different lubricants with completely different viscosities are required at different ambient temperatures.
At lower temperatures you will need low viscosity oils in order to achieve a sufficient lubricating fi Im. However, if the same low viscosity oil is used during the summer it will become even thinner due to the ambient temperatures alone, and as a result the lubricating fi Im could break down, causing the chain to overheat and become damaged. In addition, the lubricating oil will burn and cause unnecessary pollution.
Filling the oil tank
- Power saw chain oil into the oil filling bottle and screw the attachment onto the oil filling bottle. Cut a little bit off the tip of the attachment.
- Set the pole-mounted pruner on an even surface.
-
Clean the area around the oil tank lid and remove the lid.
-
Fill the tank with saw chain oil. In the process, make sure that no dirt enters the tank, as this could cause the oil nozzle to become blocked.
- Screw the oil tank lid back on again
Use
Operation
Please note that the statutory regulations governing noise abatement may differ from one location to another.
Using the shoulder strap
Caution! Always use the shoulder strap when working with the equipment. Switch off the equipment before you take off the shoulder strap (risk of injury).
- Slip the shoulder strap (6) over your shoulder.
- Adjust the length of the shoulder strap so that the strap attachment is at waist level
- The shoulder strap is equipped with a buckle.
Press the hooks together if you need to put down the equipment quickly.
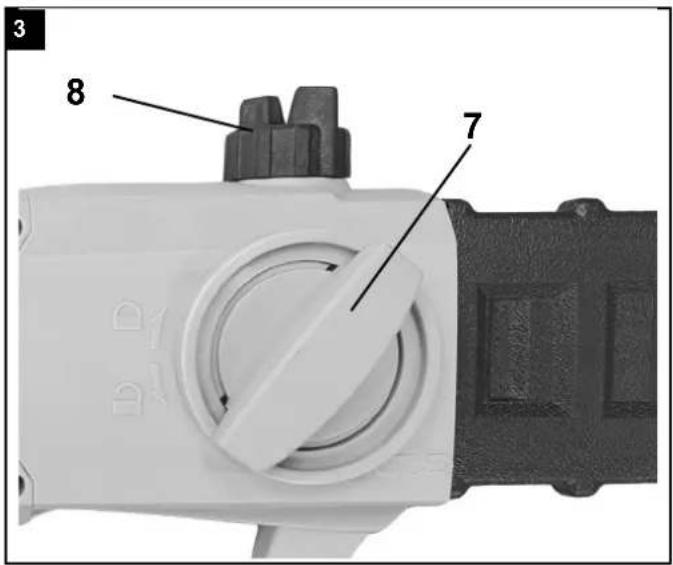
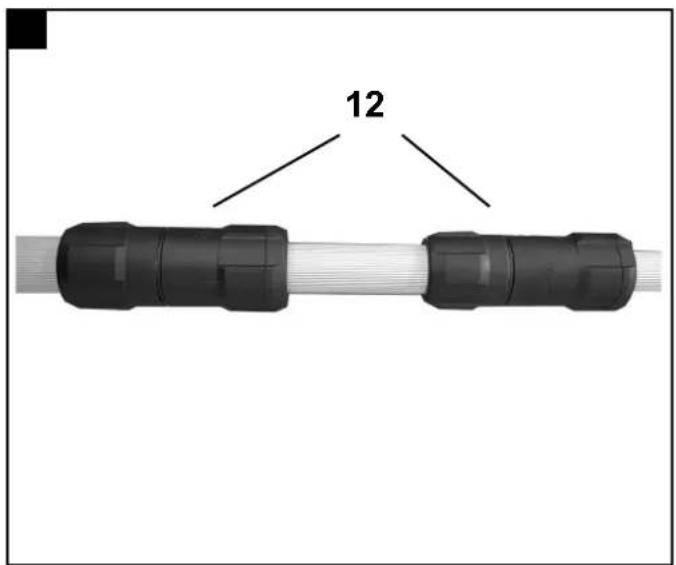
Setting the telescopic tube
- Undo the telescopic tube lock nut (12) by turning it counter-clockwise
- Pull out the top telescopic tube (11) until it reaches the required working height.
- Tighten the telescopic tube lock nut (12) again by turning it clockwise. The telescopic tube must be tightly locked.
Switching on/off
Switching on • Hold the pole-operated pruner firmly with one
hand on the handle (Fig. 1/item 3) and the other hand on the grip area
- Pull back the switch lock (4) and press the ON/OFF switch (2).
Switching off
Release the ON/OFF
Working with the chainsaw
Preparations
To ensure that you can work safely, check the following points before every use:
Condition of the chainsaw
Inspect the chainsaw before the start of work for damage to the housing, the power cable, the saw chain and the cutter rail. Neve aw which is obviously damaged.
Oil container
Check the oil level in the oil container. Both befo-re and during your work make sure that there is always su-cient oil in the system. To avoid dama-ging the chainsaw, never run the saw if there is no oil in the
system or if the oil drops below the „min“ mark. On average, a single filling will last around 15 minutes depending on the nu es in cutting and the loads involved.
Chain
Check the tension of the saw chain and the condition of the cutting elements. The sharper the chain, the easier and more controllable it is to operate the chainsaw. The same also applies to the chain tension. For greater safety you must check the chain tension before your work and at least every 10 minutes during your work. New chains in particular tend to expand more.
Safety clothing
Always wear appropriate tight-fitting safety clothing such as special trousers which protect against cuts, protective gloves and safety shoes.
Hearing protection and protective goggles. Wear a protective helmet with integral face and hearing protection. This will offer protection against falling branches and recoiling branches.
Safe working
- To ensure that you can work in safety you must use the equipment at a working angle of max. 60^ (Fig. 15).
- Never stand under the branch you want to saw.
- Use special caution when working with branches under tension and splintering wood.
•Possible risk of injury caused by falling bran-ches and catapulting pieces of wood.
- When the equipment is in operation, keep other persons and animals away from the danger zone.
- The equipment is not protected from electric shock through contact with high-voltage cables. Keep a minimum distance of 10m from live cables. Electric shock can cause fatal injury.
- When working on slopes always stand to the upper or left or right side of the branch you want to cut.
- Hold the equipment as close as possible to your body. This will help you to keep your ba-lance.
Cutting techniques
- When removing branches, hold the equip-ment at an angle of max. 60^ to the horizontal to avoid being hit by a falling branch (fig. 15).
- Start with the bottom branches on the tree.
This will make it easier for the cut branches to drop.
- After completing a cut, the weight of the saw will abruptly increase for the operator as the saw is no longer supported by the branch. This can result in you losing control over the saw.
- Remove the saw from the cut only with the saw chain still running. This will prevent the saw from getting jammed.
- Never cut with the tip of the saw.
- Never cut into the bulging branch collar. This will prevent the tree from healing.
Sawing smaller branches:
Place the contact surface of the saw onto the branch. This will prevent the saw from making jerky movements when you begin a cut. Exerting slight pressure, guide the saw from the top to the bottom through the branch.
Sawing large and long branches
Carry out a relief cut when working on large branches.
Start by sawing through 1/3 of the branch diameter (a) from the top to the bottom with the top side of the cutter rail. Then saw towards the first cut (b) from the top to the bottom with the bottom side of the cutter rail.
in several steps to keep e impact location.
Cleaning and maintenance
Before putting away or cleaning, switch off and remove the battery pack.
Maintenance
Replacing the saw chain and cutter rail
The cutter bar needs to be replaced if the guide groove of the cutter bar is worn. Proceed as described
in the section "Assembly of the cutter rail and the saw chain".
Checking the automatic chain lubrication
You should check the operation of the automatic chain lubrication system on a regular basis in order to guard against overheating and the damage this can cause to the cutter bar and the chain.
Point the tip of the cutter bar at a smooth surface (a board or a cut tree face) and allow the chainsaw to run. If you see a growing oil stain on the smooth surface, the automatic chain lubrication system is working properly. If no clear oil trace is evident then please refer to the corresponding instructions in "Troubleshooting". If the information contained there still fails to remedy the situation, please contact our service department or another similarly qualified workshop.
Caution! Do not actually touch the surface with the tip of the cutter bar when performing this test. Keep a safe distance (approx. 20 cm).
Sharpening the saw chain
Working eff ectively with the chainsaw is only possible if the chain is in good condition and sharp.
This also reduces the risk of kickback. The chain can be re-sharpened by any dealer. Do
not attempt to sharpen the chain yourself unless you have the necessary special tools and experience.
Cleaning
- Regularly check the device before starting work
- Damaged parts have to be repaired or replaced by an authorised service department before you can work with the device
- Only ever use original accessories and spare parts.
- Use the device only with batteries and chargers intended for it.
- Do not use the charger if it is damaged.
• Using other components can lead to fire. - Keep all safety devices, air vents and the motor housing free of dirt and dust as far as possible. Wipe the equipment with a clean cloth or blow it down with compressed air at low pressure.
• We recommend that you clean the equipment immediately after you use it.
- Clean the equipment regularly with a damp cloth and some soft soap. Do not use cleaning agents or solvents; these may be aggressive to the plastic parts in the equipment. Ensure that no water can get into the interior of the equipment. The ingress of water into an electric tool increases the risk of an electric shock.
- Use a brush to remove deposits from the safety guard.
Maintenance
There are no other parts inside the equipment which require maintenance.
Service information
Please note that the following parts of this product are subject to normal or natural wear and that the following parts are therefore also required for use as consumables.
Wear parts*:
* Not necessarily included in the scope of delivery!
Storage
NOTE
- Store the device in a dry and frost-free (10-25 °C) place.
- Store the battery and the device separately from each other.
- Charge the battery before storing it for the winter.
- Keep the device, and its plastic components in particular, away from brake fluid, petrol, products containing oil, penetrating oil etc. They contain chemical substances that may damage or destroy the plastic parts of the device.
- Fertilisers and other garden chemicals contain substances which can have a heavily corrosive effect on metal parts. Do not store the device close to these substances.
Disposal and recycling
The equipment is supplied in packaging to prevent it from being damaged in transit. The raw materials in this packaging can be reused or recycled. The equipment and its accessories are made of various types of material, such as metal and plastic. Defective components must be disposed of as special waste. Ask your dealer or your local council.
Old devices must not be disposed of with household waste!
This symbol indicates that this product must not be disposed of together with domestic waste in compliance with the Directive (2012/19/EU) pertaining to waste electrical and electronic equipment (WEEE). This product must be disposed of at a designated collection point. This can occur, for example, by handing it in at an authorised collecting point for the recycling of waste electrical and electronic equipment. Improper handling of waste equipment may have negative consequences for the environment and human health due to potentially hazardous substances that are often contained in electrical and electronic equipment. By properly disposing of this product, you are also contributing to the effective use of natural resources. You can obtain information on collection points for waste equipment from your municipal administration, public waste disposal authority, an authorised body for the disposal of waste electrical and electronic equipment or your waste disposal company.
Trouble shooting
| Problem Possible Cause Help | ||
| Device does not start • | Battery empty• On/Off switch faulty• Motor faultyt | • Check the battery, if required, arrange repair by an authorised electrician.• Repair by an authorised Service Centre• Repair by an authorised Service Centrer |
| Motor stops during operation | • Battery empt• Battery not inserted correctly• Battery faulty | • Charge battery• Re-insert battery• Clean terminals, replace original battery |
| Decreased performance | • Battery exhausted• Battery not fully charged• Grass is too long | • Replace battery• Charge battery• Cut it in phases |

Günzburger Straße 69
D-89335 Ichenhausen
CHER CLIENT,
CE - Declaration of Conformity
Pole-mounted cordless pruner - PS150-18Li
Standard references:
EN 60335-1; EN 62233; EN 55014-1; EN 55014-2; EN 61000-3-2; EN 61000-3-3; EN 50636-2-91
This declaration of conformity is issued under the sole responsibility of the manufacturer.
The object of the declaration described above fulfils the regulations of the directive 2011/65/EU of the European Parliament and Council from 8th June 2011, on the restriction of the use of certain hazardous substances in electrical and electronic equipment.
Subject to change without notice
Documents registar: Bücheler Fabian
Günzburger Str. 69, D-89335 Ichenhausen