EHM-729 - Water filter Vevor - Free user manual and instructions
Find the device manual for free EHM-729 Vevor in PDF.

| Product Type | Water Ionizer / Alkaline Water Filter |
| Brand | Vevor |
| Model | EHM-729 |
| Power Supply | AC220-240V ~ 50/60 Hz or AC115V ~ 60 Hz |
| Working Power | 100 W |
| Standby Power | 1.5 W |
| Water Pressure | 0.1 ~ 0.3 MPa |
| Inlet Water TDS | 50 ~ 1000 mg/L |
| Flow Rate | 1.0 ~ 3.5 L/min (best: 2 ~ 3 L/min) |
| Continuous Operation Time | ≤ 30 minutes |
| Filter Life | 8,000 liters (depending on water quality) |
| Electrolysis Plate Material | Titanium with Platinum Coating |
| Number of Plates | 5 default / 7 optional |
| Plate Surface Area | 5 pieces: 320 cm² / 7 pieces: 480 cm² |
| pH Range | 3.5 ~ 10.5 |
| ORP Range | 5 pieces: +500 ~ -550 mV / 7 pieces: +500 ~ -650 mV |
| Inlet Water Temperature | 5 ~ 40 °C |
| Display | 3.8-inch Color LCD Screen |
| Control Panel | Touch Panel (CDC Touch) |
| Main Functions | Alkaline water (4 levels), purified water, acidic water (2 levels), self-cleaning, voice adjustment |
| Maintenance and Cleaning | Wipe with a soft cloth and soapy water; scheduled automatic cleaning; replace the filter regularly |
| Safety | Overheat protection, automatic shutdown in case of insufficient flow, indoor use only |
| Spare Parts and Repairability | Filter, faucet adapters, hoses; repair by a qualified electrician only |
| General Information | Made in China; FCC Part 15 standards; WEEE Directive 2012/19/EU |
Frequently Asked Questions - EHM-729 Vevor
User questions about EHM-729 Vevor
0 question about this device. Answer the ones you know or ask your own.
Ask a new question about this device
Download the instructions for your Water filter in PDF format for free! Find your manual EHM-729 - Vevor and take your electronic device back in hand. On this page are published all the documents necessary for the use of your device. EHM-729 by Vevor.
USER MANUAL EHM-729 Vevor
Technical Support and E-Warranty Certificate www.vevor.com/support
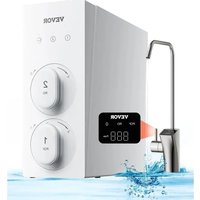
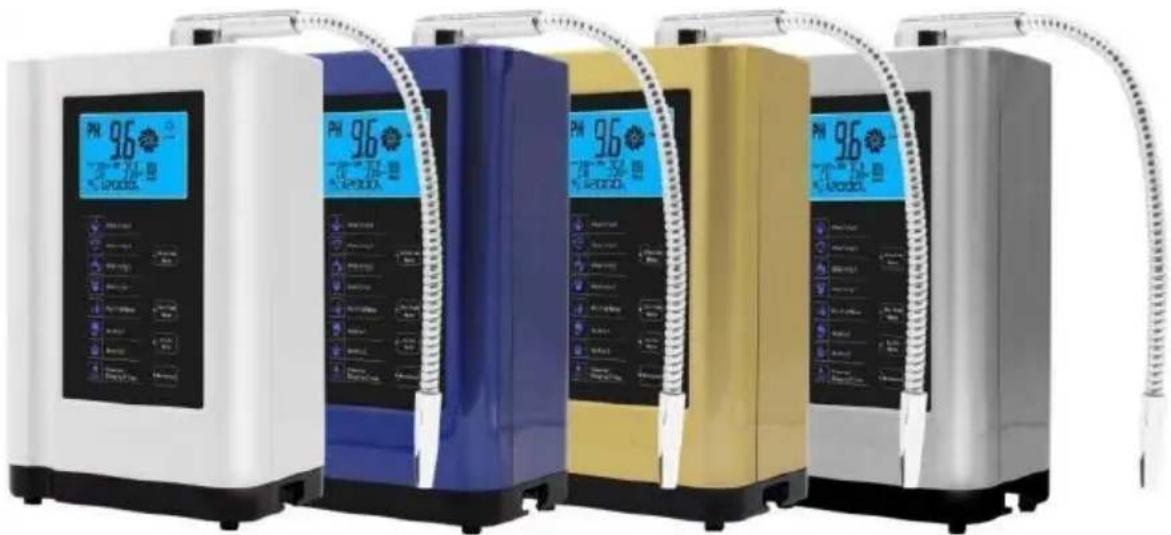
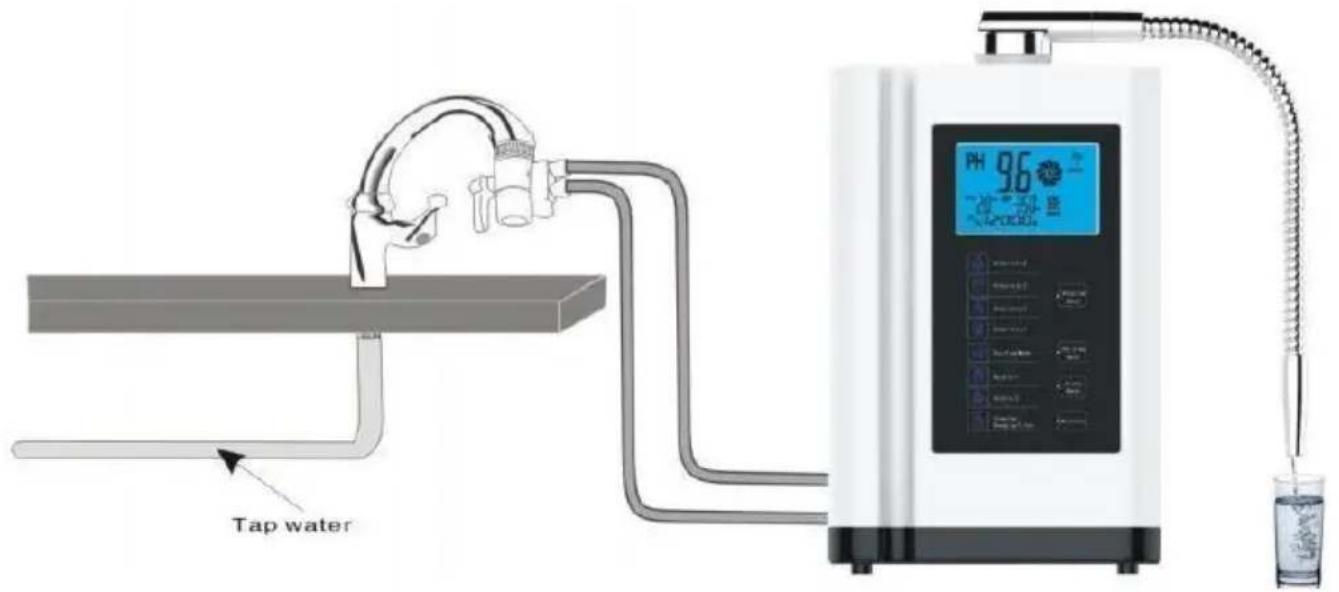
WATER IONIZER MACHINE
We continue to be committed to provide you tools with competitive price. "Save Half", "Half Price" or any other similar expressions used by us only represer estimate of savings you might benefit from buying certain tools with us compared to top brands and does not necessarily mean to cover all categories of tools offered by are kindly reminded to verify carefully when you are placing an order with us if yo actually saving half in comparison with the top major brands.
MODEL: EHM-729

natural_image
White water purifier with digital display and connected tubing, set against a blue water backdrop (no visible text or symbols)NEED HELP? CONTACT US!
Have product questions? Need technical support? Please feel free contact us:
Technical Support and E-Warranty Certificate www.vevor.com/support
This is the original instruction, please read all manual instructions carefully before operating. VEVOR reserves a clear interpretation of user manual. The appearance of the product shall be subject to the product you received. Please forgive us that we won't inform you there are any technology or software updates on our product.
 | Warning-To reduce the risk of injury, user must read instructions manual carefully. |
 | Indoor Use only |
 | CORRECT DISPOSALThis product is subject to the provision of European Direct 2012/19/EC. The symbol showing a wheelie bin crossed through indicates that the product requires separate refuse collection in the European Union. This applies to the product and all accessories marked with this symbol. Products may not be discarded with normal domestic waste must be taken to a collection point for recycling electrical electronic devices |
IMPORTANT SAFEGUARDS
When using your Buffet Warmer, basic safety precautions should always be followed:
- Read all instructions.
- Check that the voltage indicated on the data plate corresponds with that of the local network before connecting the appliance to the mains power supply.
- Do not leave the appliance unattended whilst connected to the mains power supply.
4.Do not immerse the appliance in water or any other liquids. - It is imperative to unplug the power cord after the appliance has been used, before it is cleaned and whilst being repaired.
- Close supervision is required when using this appliance near children. Never leave the appliance within reach of children.
- Repairs to electrical appliances should only be performed by a qualified electrician. Improper repairs may place the user at serious risk.
- This appliance is intended for household use only and should not be
used for commercial purposes.
- Do not operate the appliance with a damaged plug or cord, after a malfunction, or after being dropped or damaged in any way.
- Do not use the appliance for anything other that its intended use.
- Do not touch hot surfaces, use handle or knobs when working with the unit.
- This appliance can be used by children aged from 8 years and above and persons with reduce physical, sensory or mental capabilities or lack of experience and knowledge if they have been given supervision or
instruction concerning use of the appliance in a safe way and understand the hazards involved. Children shall not play with the appliance. Cleaning and user maintenance shall not be made by children without supervision.
Keep the appliance and its cord out of reach of children less than 8 years.
- Type Y attachment: If the supply cord is damaged, it must be replaced by the manufacturer, its service agent or similarly qualified persons in order to avoid a hazard.
SAVE THESE INSTRUCTIONS
FCC INFORMATION
CAUTION:
Changes or modifications not expressly approved by the party responsible for compliance could void the user's authority to operate the equipment!
This device complies with Part 15 of the FCC Rules. Operation is subject to the following two conditions:
1) This product may cause harmful interference.
2) This product must accept any interference received, including interference that may cause undesired operation.
WARNING:
Changes or modifications to this product not expressly approved by the party.responsible for compliance could void the user's authority to operate the product.
Note:
This product has been tested and found to comply with the limits for a Class B digital device pursuant to Part 15 of the FCC Rules, These limits are designed to provide reasonable protection against harmful interference in a residential installation.
This product generates, uses and can radiate radio frequency energy, and if not installed and used in accordance with the instructions, may cause harmful interference to radio communications. However, there is no guarantee that interference will not occur in a particular installation. If this product does cause harmful interference to radio or television
reception, which can be determined by turning the product off and on, the user is encouraged to try to correct the interference by one or more of the following measures.
- Reorient or relocate the receiving antenna.
- Increase the distance between the product and receiver.
- Connect the product to an outlet on a circuit different from that to which the receiver is connected.
- Consult the dealer or an experienced radio/TV technician for assistance.
PRODUCT MAIN FEATURES
This Multifunctional Water Ionizer can be used freely in different water quality and different standards of the power supplies.
- A large 3.8-inch colorful LCD screen display, displaying more information.
- The LCD displays pH and ORP, flow rate, temperature, filter usage life, helping user to select suitable water.
- Elegant and solid CDC Touch control panel, easy to be used by children & elderly people.
- Using high-power SMPS power supply, it is suitable for many different power supplies in the world, safe and reliable.
- The electrolysis with the Microcomputer automatic control system can work perfectly in the water TDS from 50 to 1000PPM.
- It has a built-in water filtering system, showing the filter life span in time
make sure the water quality is safe to use.
- It has the self-cleaning function, to prevent scaling.
- Japan imported stainless steel spouts, never rust, free to be bent to any direction.
- large size Titanium with Platinum coating plates, applied with Japan imported ionic membrane, providing higher efficiency electrolysis and longer working life.
- Built-in overheat protection system, prevents high temperature water from entering the machine, assure the machine.
TECHNICAL PARAMETERS AND SPECIFICATIONS
| 1 | Power supply | AC220-240V 50/60Hz or AC115V 60H |
| 2 | Work power | 100W |
| 3 | Bide power | 1.5W |
| 4 | Water pressure | 0.1~0.3MPa |
| 5 | Inlet water TDS | 50~1000mg/L |
| 6 | Flow rate | 1.0~3.5L/Min |
| 7 | Best flow rate | 2~3 L/Min |
| 8 | Continuously working time | ≤30minutes |
| 9 | Filter usage life | 8000L(Depend on the water quality |
| 10 | Plates material | Titanium with platinum coating |
| 11 | Number of plates | 5PCS(Default)/7PCS |
| 12 | Electrolytic plate area | 5PCS:320cm2 / 7PCS:480cm2 |
| 13 | pH range | 3.5-10.5 |
| 14 | ORP range | 5PCS:+500~-550mv / 7PCS:+500~-650m |
| 15 | Inlet water temperature | 5-40°C(41-104°F) |
Note:
- The pH&ORP range, Filter usage life and Flow rate etc is depending on your local water supply condition.
- The PH data is laboratory data, different regions are affected by TDS value, the data may be different, which is a normal phenomenon.
METHOD OF ERECTION
Installation tools:
- One Phillips screwdriver 2. A paper knife or scissors
- A hammer drill 4. A table opener 5. A wrench
 statement statement | If there are technical improvements to the product, the be included in the new manual without prior notice. If appearance and color of the product are changed, the actual product shall prevail. |
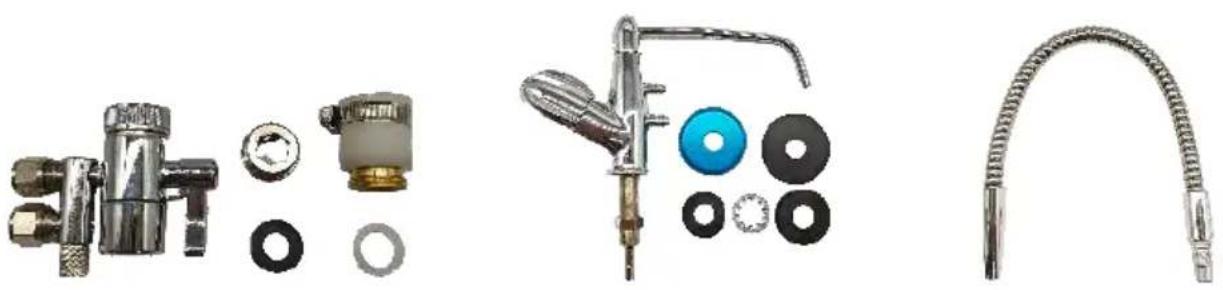
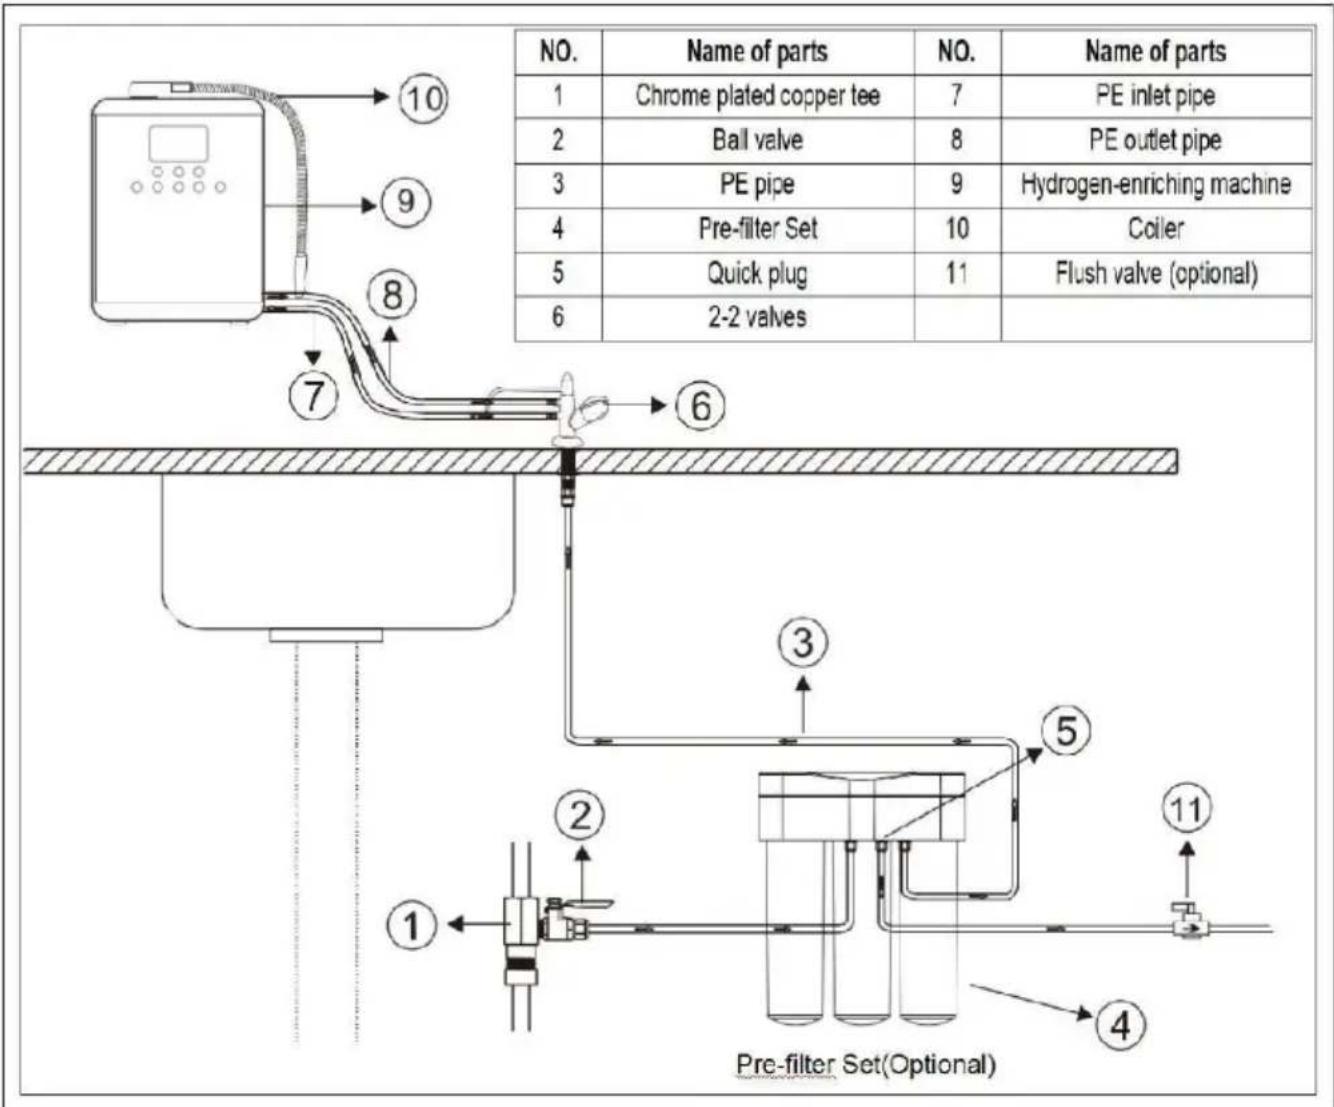
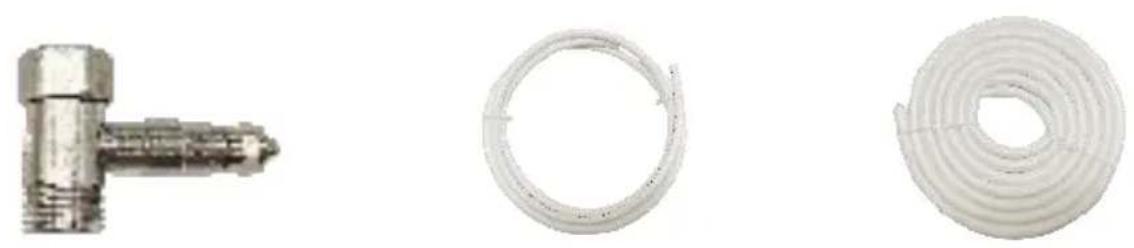
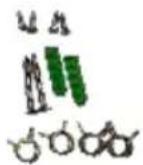
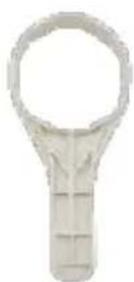
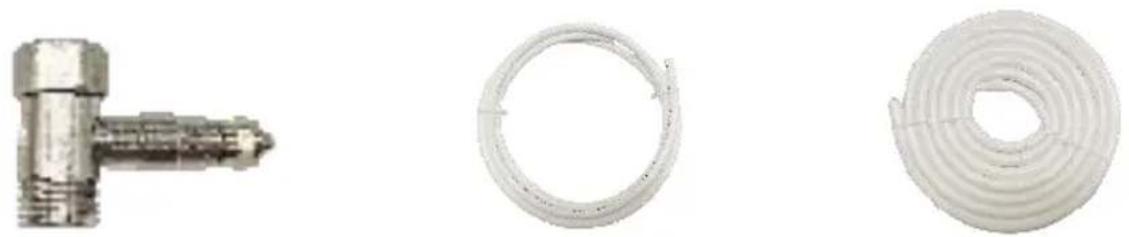
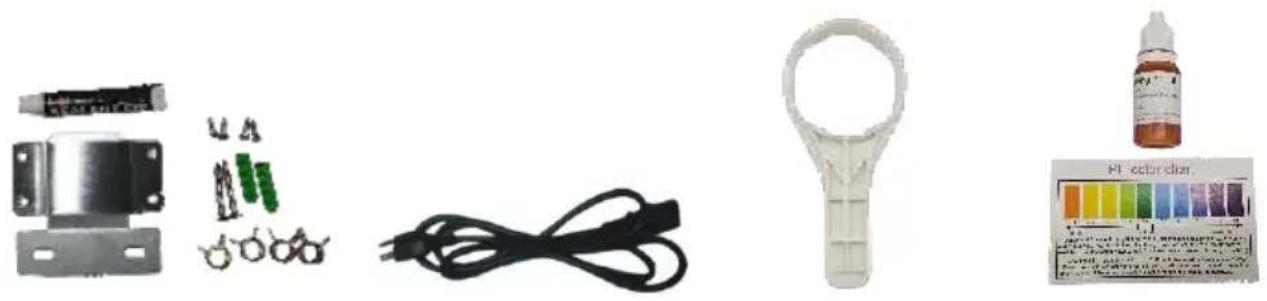
Parts and Accessories:
natural_image
Product catalog image showing various kitchen fixtures including a faucet, washer, and hose (no text or labels visible)Tap adapter A Tap adapter B Coiler
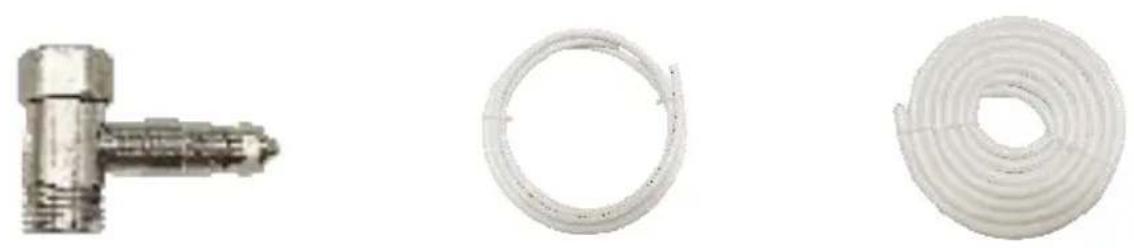
Tee assembly 1/4"PE pipe 3/8" soft pipe
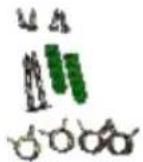
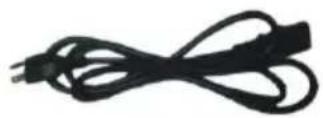
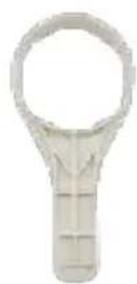
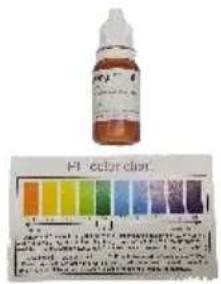
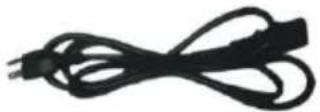
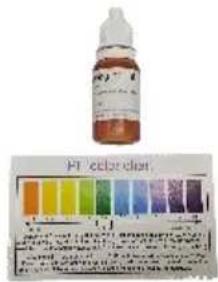
Accessory bag Power cord Filter wrench pH test reagent
Installing the hoses for the water:
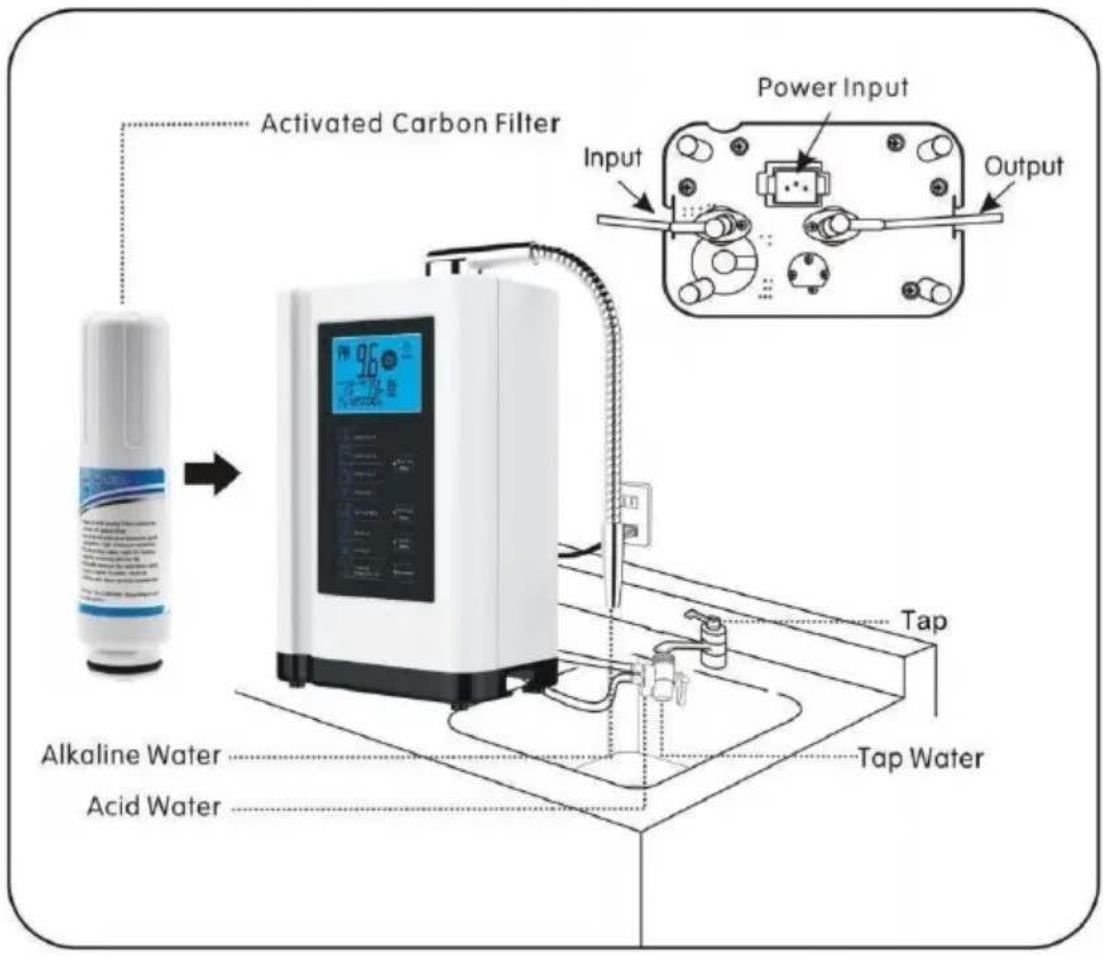
flowchart
graph TD
    A["Input"] --> B["Activated Carbon Filter"]
    B --> C["Alkaline Water"]
    B --> D["Acid Water"]
    C --> E["Tap Water"]
    D --> F["Tap Water"]
    E --> G["Output"]
    F --> G
    H["Power Input"] --> I["Diagram of a water tank with digital display"]
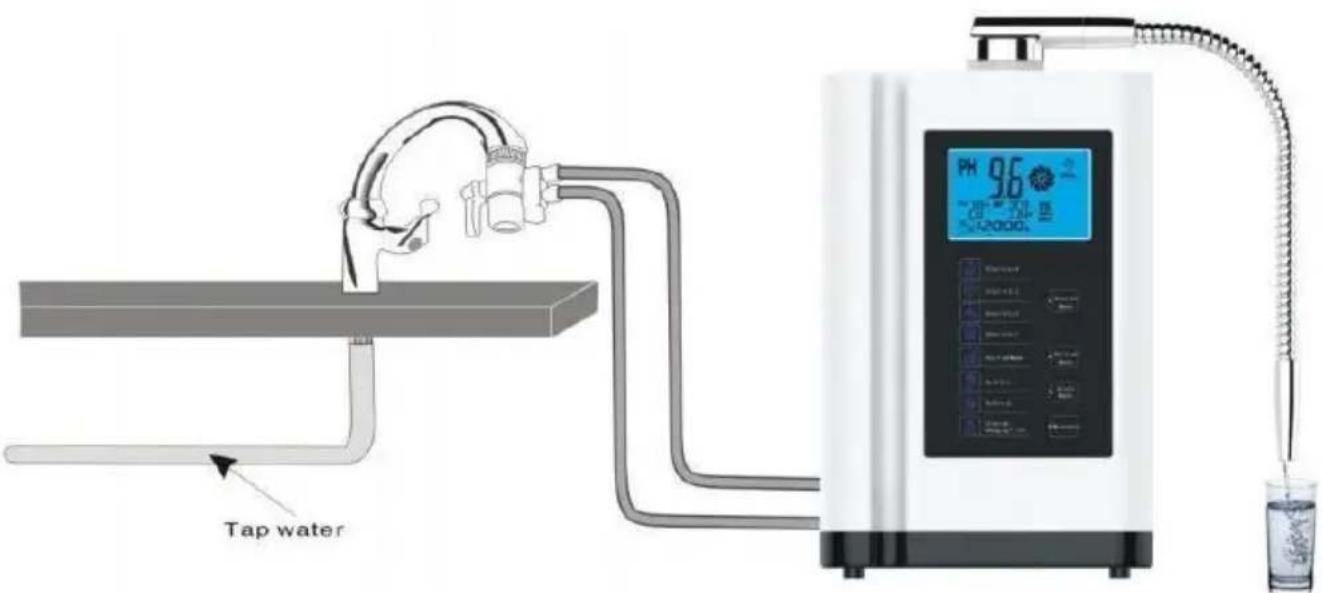
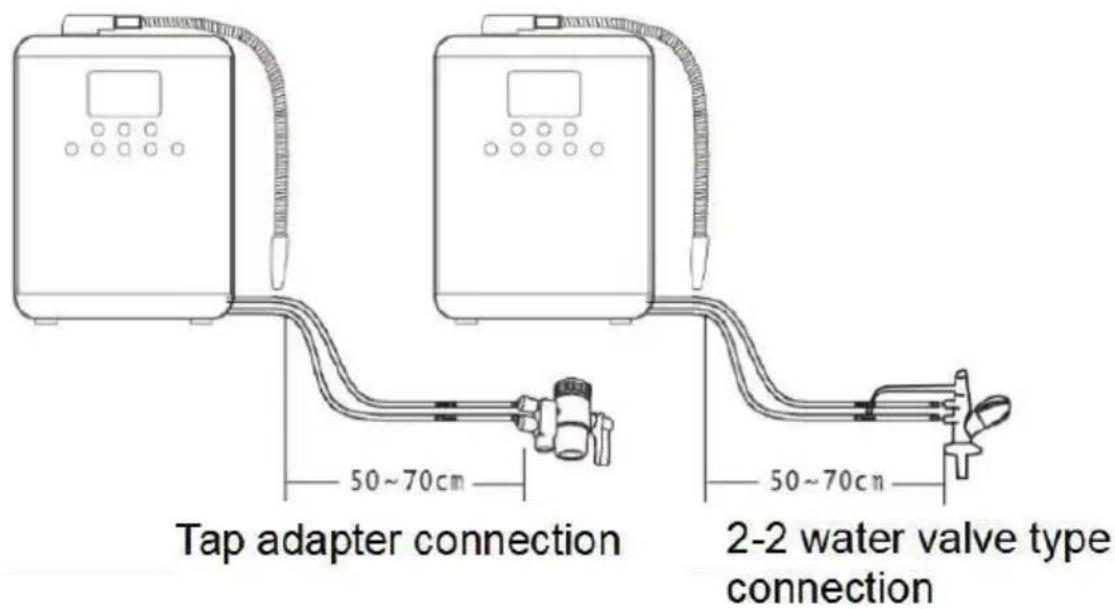
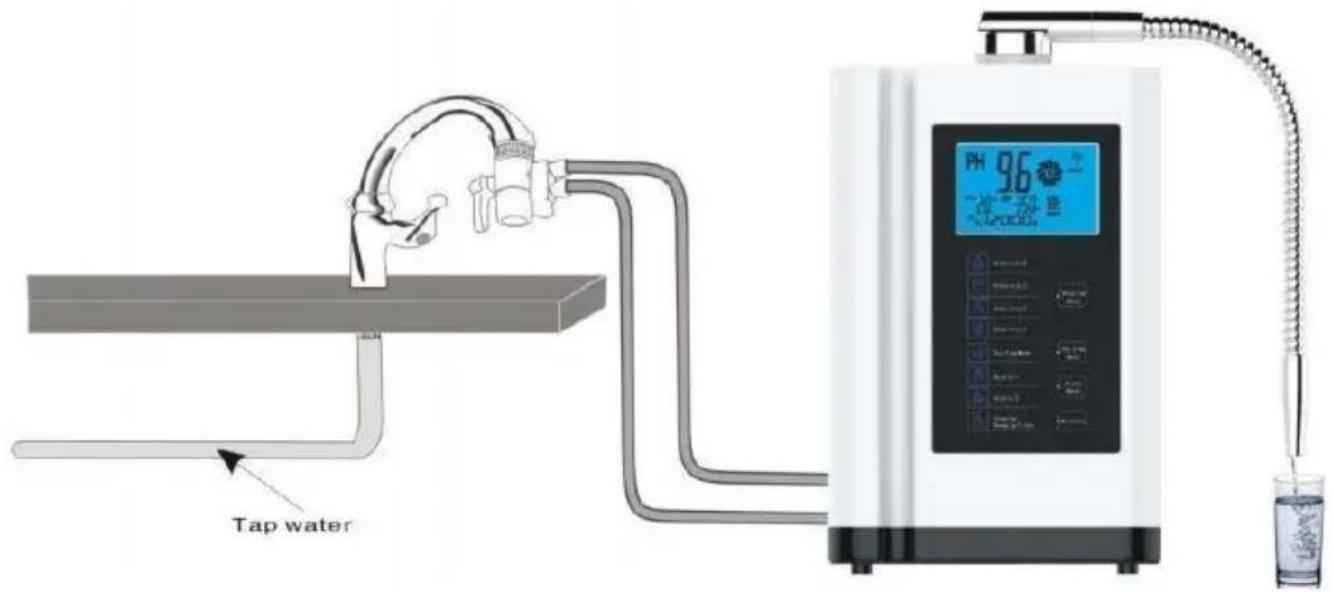
Cut the water hose into 2 pieces. Insert one hose into the IN outlet on the back of the unit and the other end should be inserted into the top insert the adaptor. Repeat the process for the OUT outlet to the bottom insert. When getting ready to insert other end of hose into the adaptor, first insert the hollow bolt through the hose and bolt screw the bolt into the adaptor as seen in the picture below.
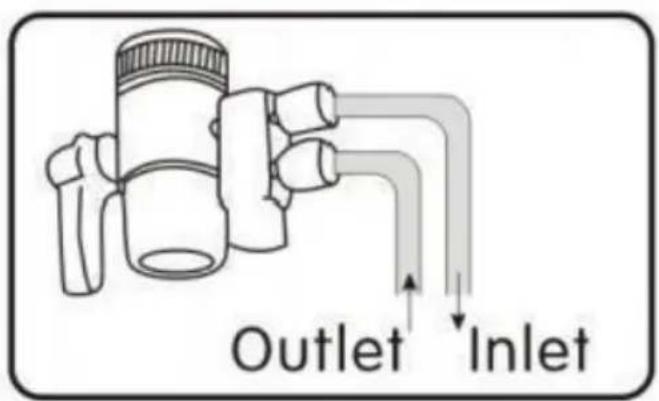
Insert the top hose to the out nozzle behind the unit and insert the bottle hose to the in nozzle. The hoses are identical, so either hose is affixed to which part of the adaptor will not matter.
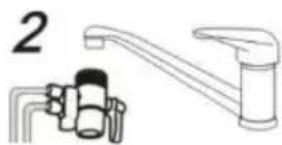
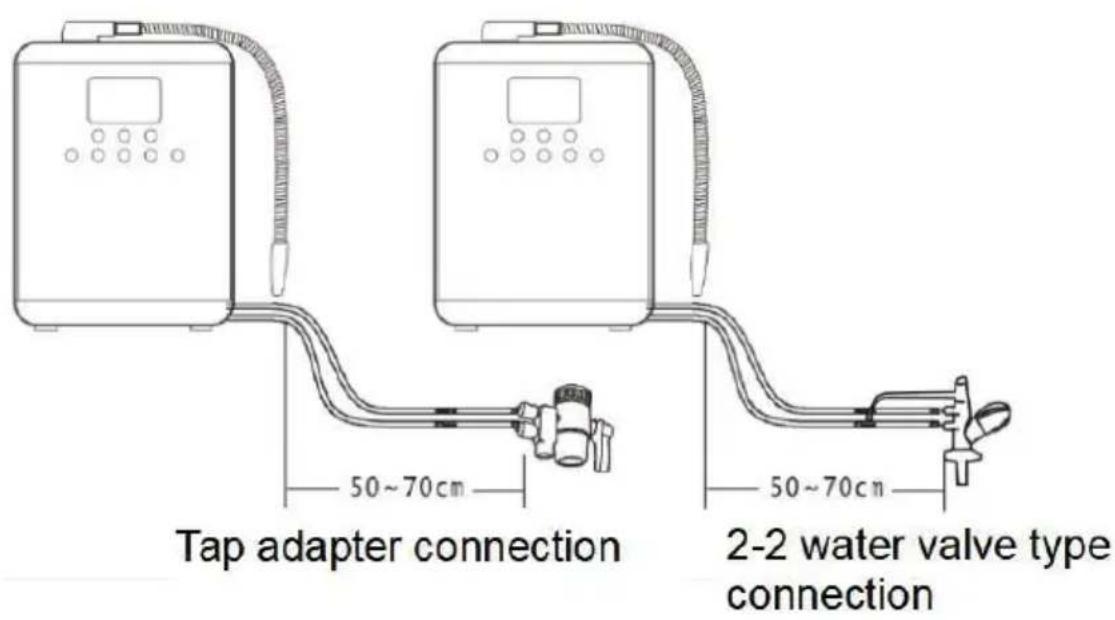
| How to connect th adaptor to 2 common types of faucets: | 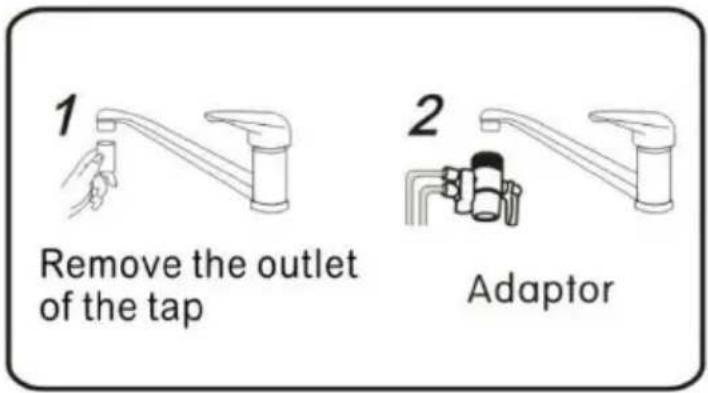 |
Type A:
Remove the outlet of the tap and fasten the adaptor. If there are leaks, turn slightly as shown in the diagram until the leak stops, ensure that the washer has been inserted before tightening.
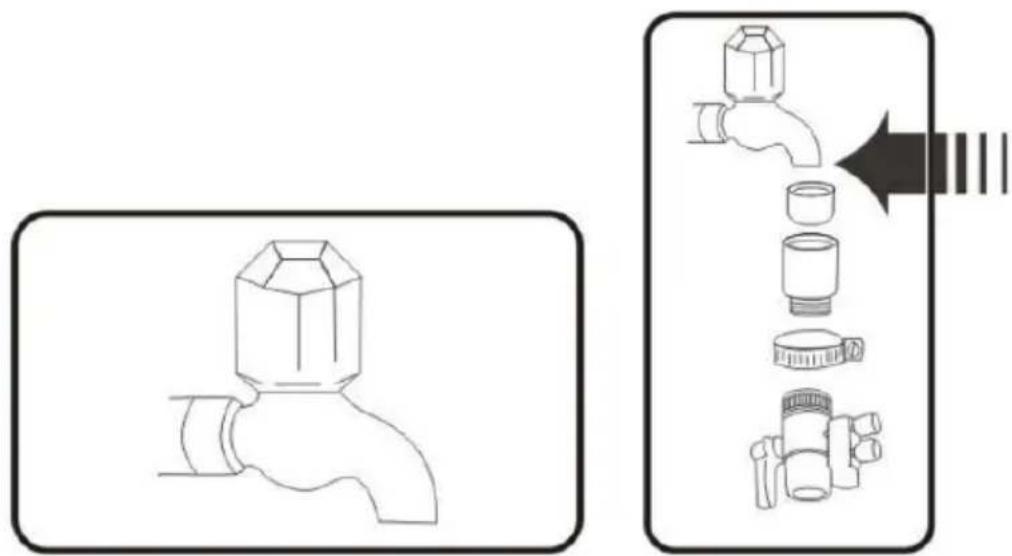
Type B:
Installation procedure(As shown in the figure) · Fix the installation ring first · Use the internal ring set and affix to the tap · Tighten with a wrench · Finally, affix the value.
Installation environment
A. Fix the water machine in A place without direct sunlight, and away from the fire source 1 meter away, to avoid the machine caused by heat shell deformation.
B. The power supply of the machine is AC120V or AC220-240V, in order to ensure safety, there must be a good grounding wire, please keep the machine away from the microwave oven, rice cooker and other high-power household appliances, use a separate power socket.
The water pressure of this machine is 0.1-0.3mpa, if the water pressure lower than 0.1MPa, please install the booster pump.
Installation mode B:
NOTE: Existing products do not have a pre-filter component, if you need to assemble, you need to purchase separately.
Installation steps:
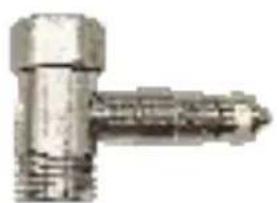
Install three-way ball valve > PE pipe > 1/4" quick connector> tap adapter B
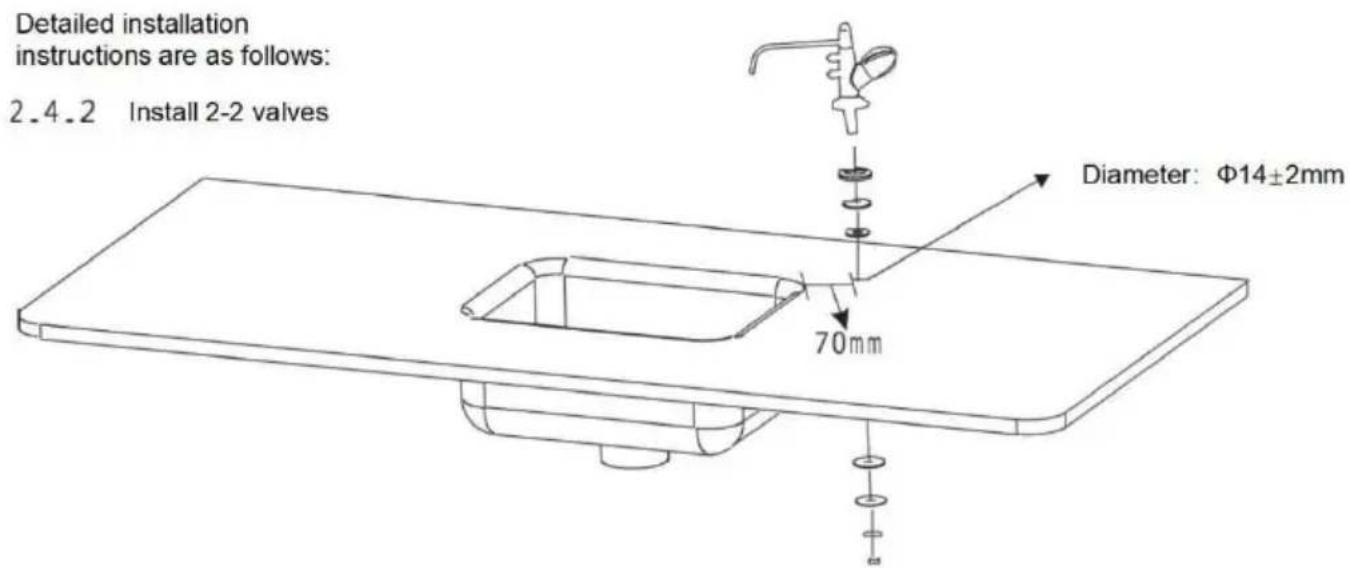
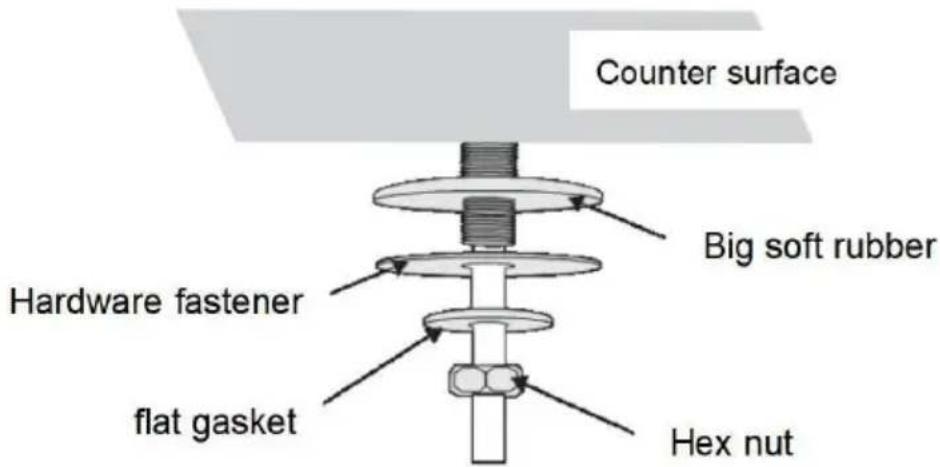
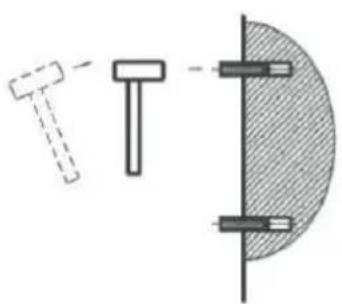
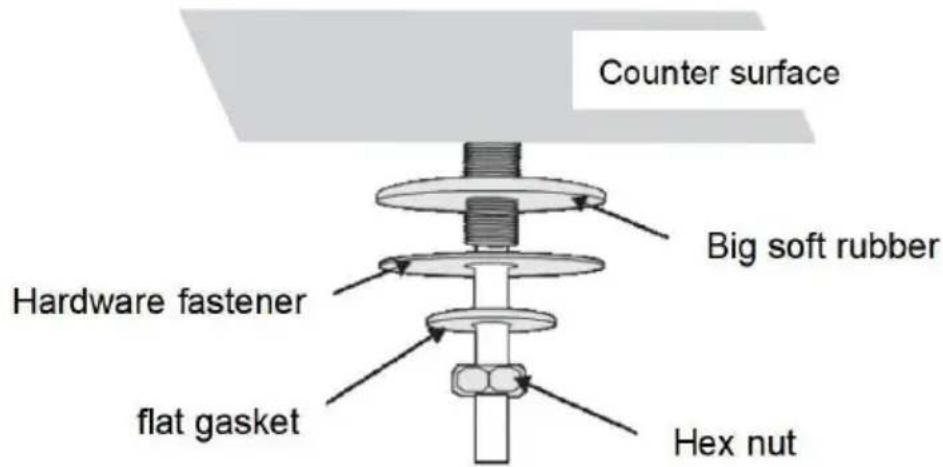
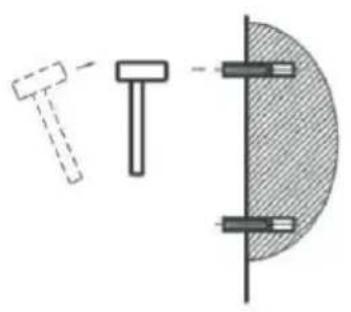
Step 1: Drilling: Within 70mm of the edge of the sink, drill a through ho (diameter 142mm) on the counter surface with an electric drill. Note: Marble counter tops need to use an 14mm glass hole opener.
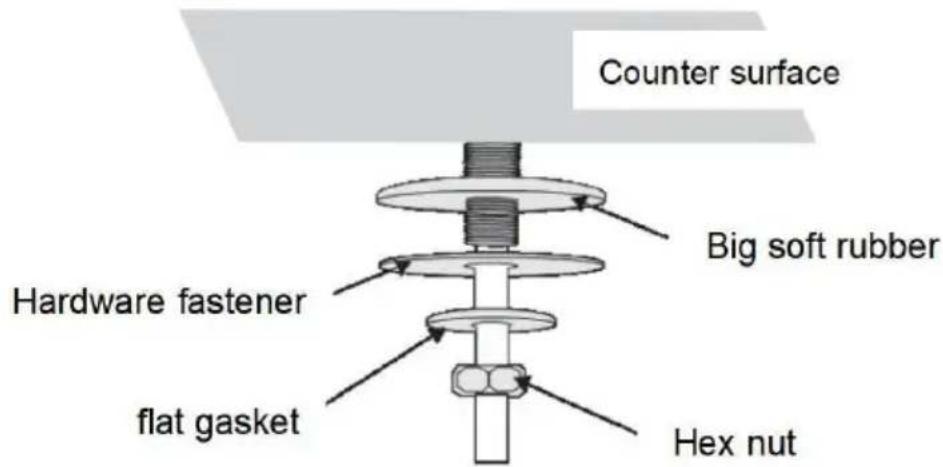
Step 2: Fix the 2-2 valve: Insert the 2-2 valve into the hole and fix it a counter with a hex nut.
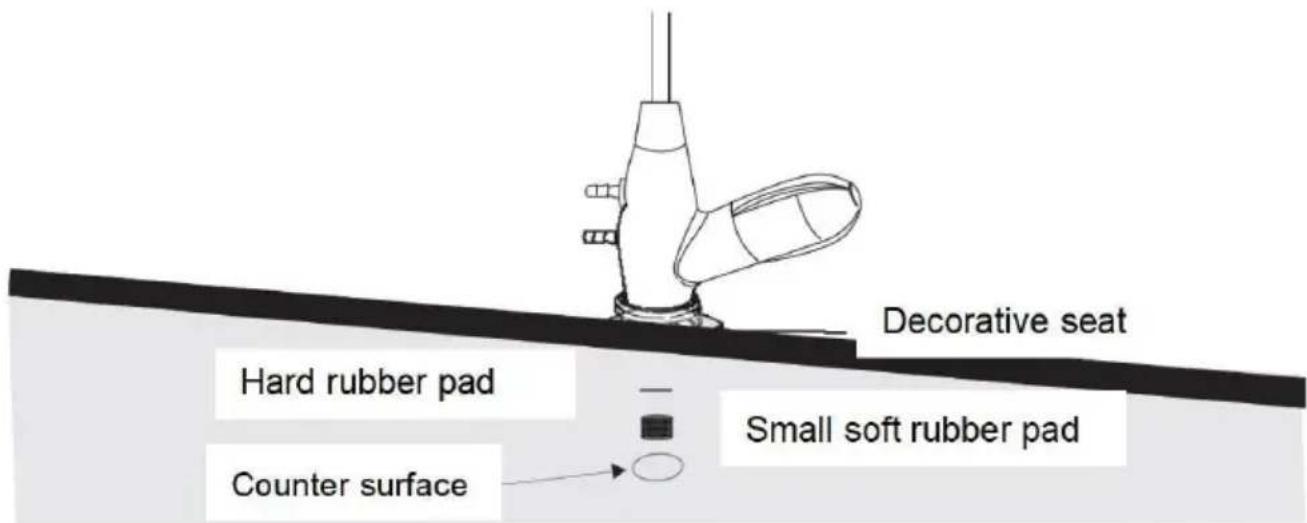
When fixing the 2-2 valve on the countertop, first put a decorative seat, and then put a hard rubber pad on the top of the screw, and then stick a small soft rubber pad.
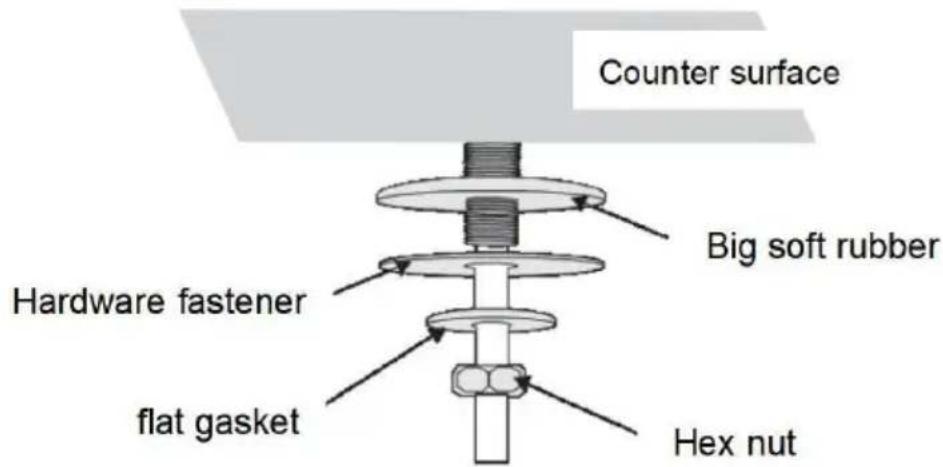
After the screw is inserted into the Counter surface, first put a big soft rubber pad, then put a hardware fixing piece, a flat gasket, and finally fixed with a hex nut.
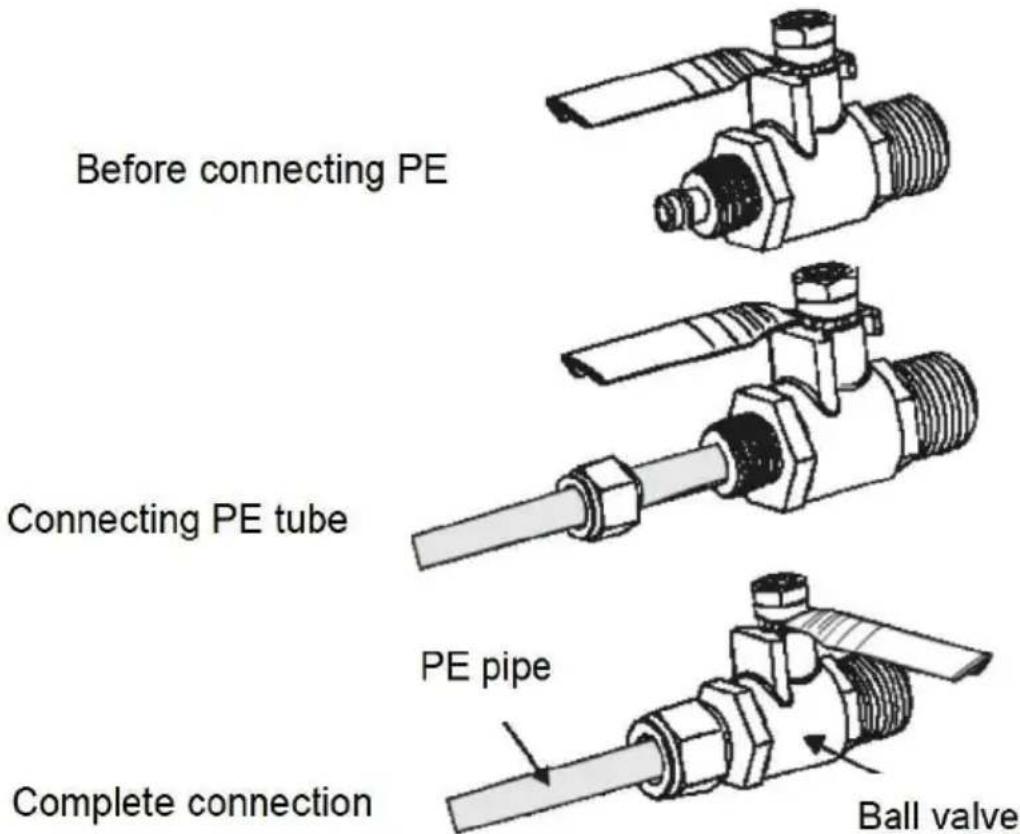
Three-way ball valve installation
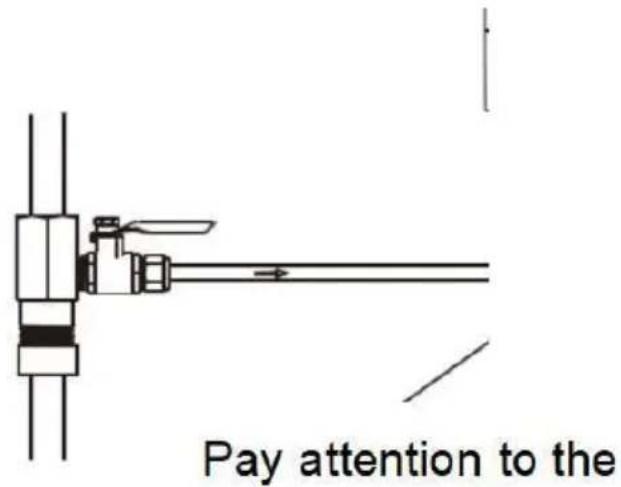
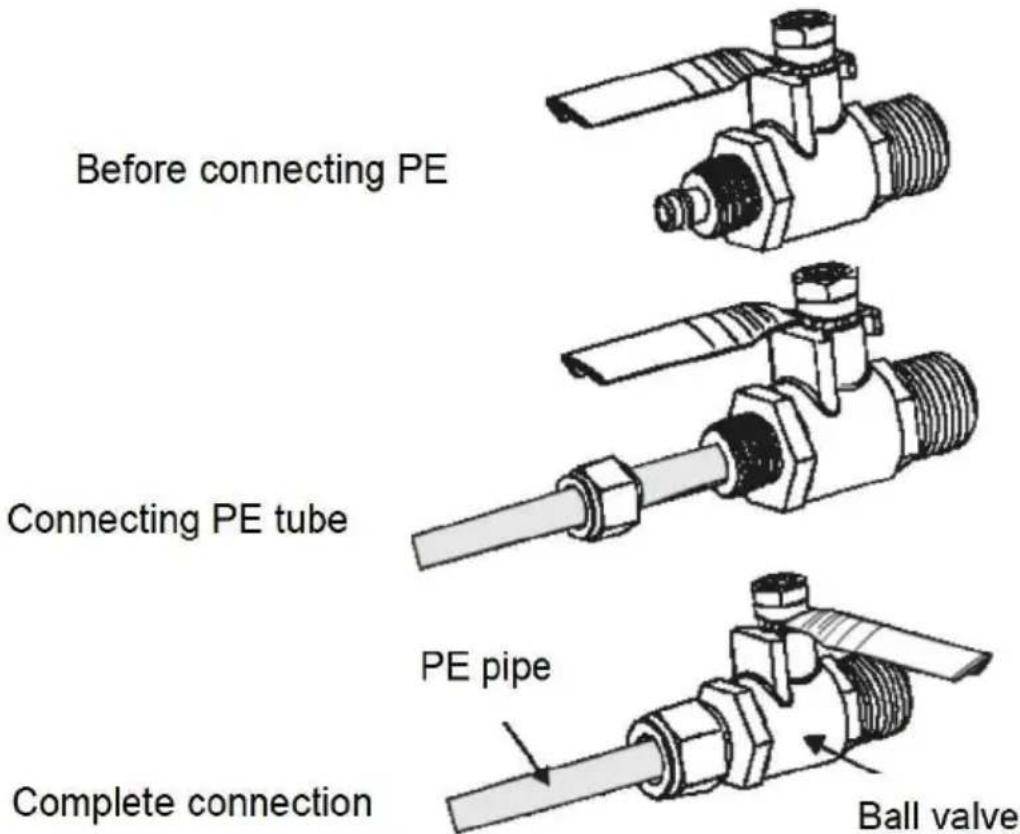
Should close the household main water valve switch, connect the three-way ball valve from the user's home water pipe, so that one end of the three-way ball valve is connected to the water inlet pipe, the other e is connected to the external water equipment pipe, and then connect the PE water pipe (1/4" water pipe) from the three-way ball valve outlet.
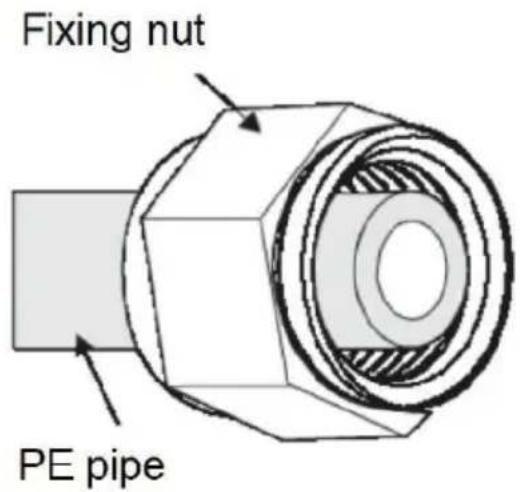
When connecting the PE pipe to the ball valve, insert the PE pipe into the fixing nut of the ball valve.
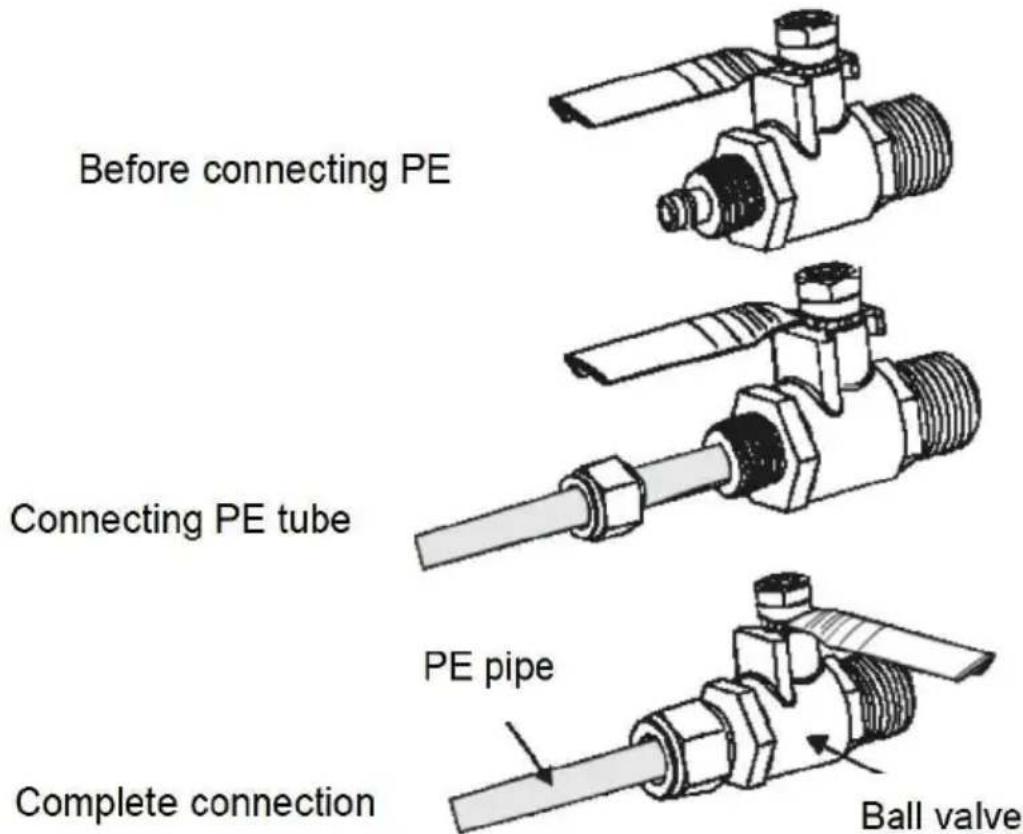
After the PE tube is inserted into the ball valve fixing nut, pull out the F tube with sufficient operating length, insert the PE tube into the fixing screw of the ball valve base, and then screw the fixing nut into the fixing screw and tighten it with a wrench to set the ball valve in the closed position. This time, the three-way ball valve and PE pipe are installed and connect
Then insert the other end of the PE pipe into the 1/4" quick connector, the other end of the quick connector is connected to the bottom interface the faucet adapter B, and the under-counter part is installed.

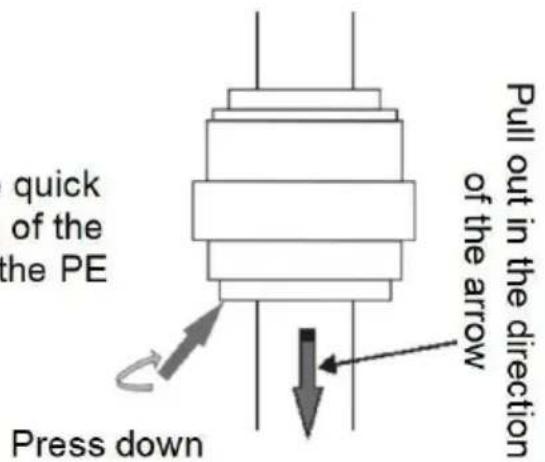
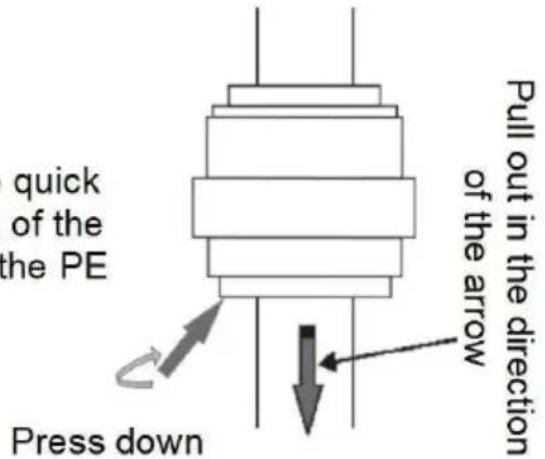
NOTE
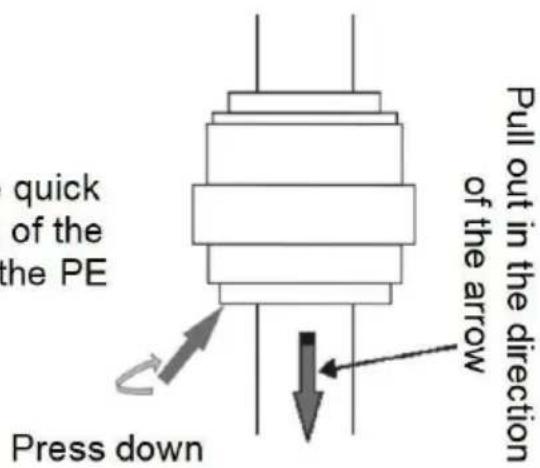
If you want to take out the PE tube in the quick connector, just press down the inner ring of the quick connector with one hand, and pull the PE tube outward with the other hand.

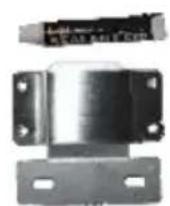
Installation of the water ionizer machine
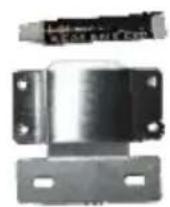
Fix the water ionizer machine on the wall with hanging kit.
The first step is to directly place the machine in a convenient and suitable position on the counter.
The second step is to measure the appropriate height above the sink (30-50cm above the sink is appropriate), take out the accessories in the accessory bag, take out the hanging plate to determine the machine hanging holes position.
If the installation environment is not convenient to drill holes, please use nail-free glue to fix the wall hanging plate. After determining the position the wall hanging plate, evenly apply the nail-free glue to the fixing surface of the wall hanging plate, and then stick to the fixed position of the wall surface (complete the operation within 5 minutes to prevent glue solidification). After fixing with nail-free glue, it is necessary to wait 24 hours after the glue is completely solidified before hanging the machine of the wall.
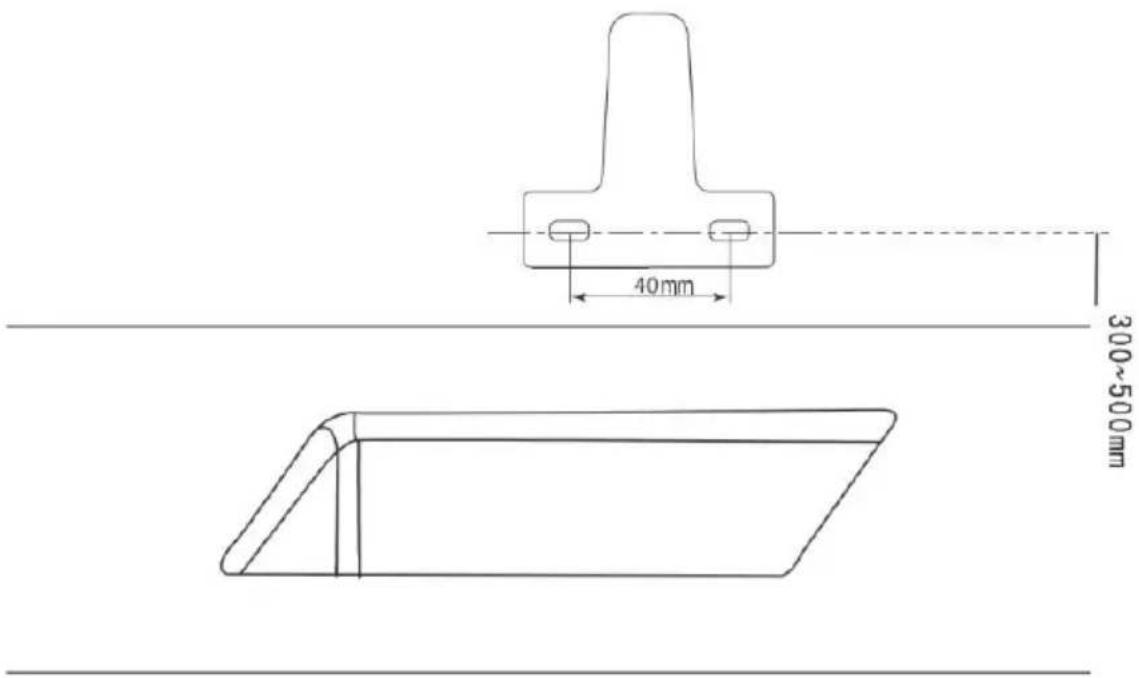
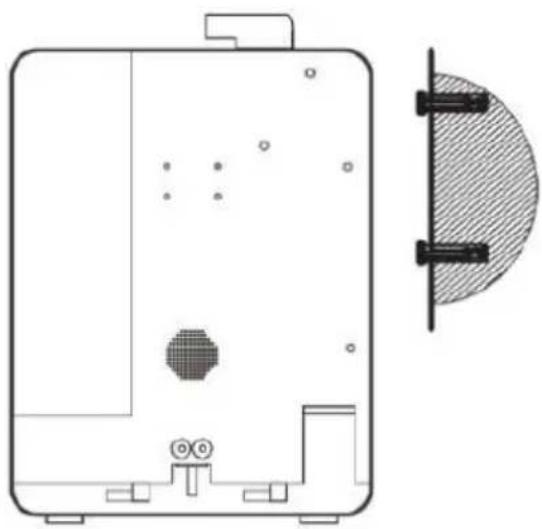
The third step is to use an electric drill to drill two holes with a vertical of about 50mm and a diameter of 6mm according to the drilling position, and the center distance of the two holes is 40mm.
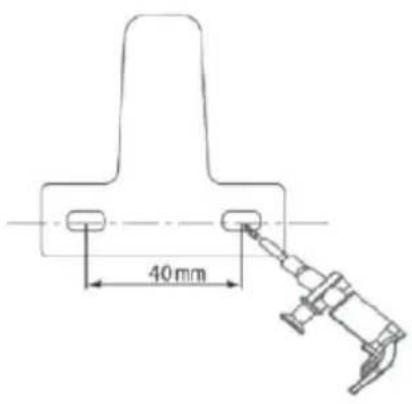
Step 4: Insert the plastic expansion tube into the hole.
Step 5: Fix the metal hanging plate to the wall with stainless steel screws.

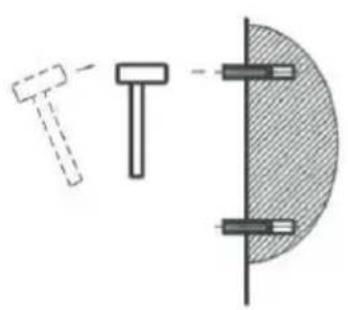
natural_image
Pure mechanical diagram showing a hammer, screw, and circular component with no text or symbols
natural_image
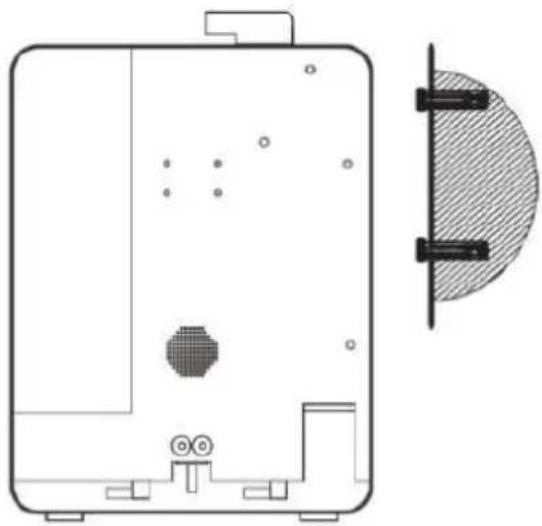
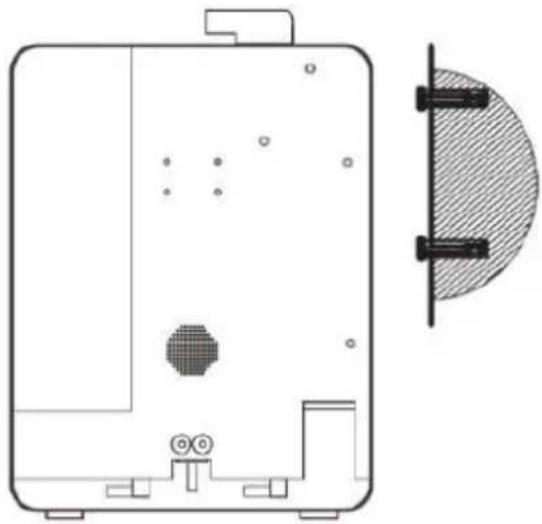
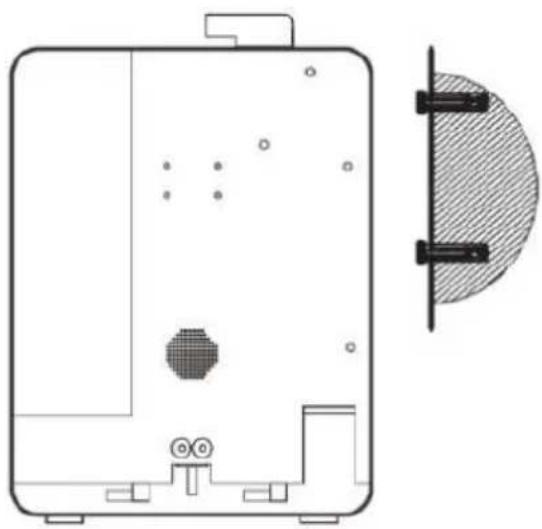
Pure mechanical diagram showing a semicircular component with two vertical supports and a diagonal hatching (no text or symbols)Step 6: Install the square metal hanging plate behind the water ionizer machine, and then hang it on the previously fixed hanging plate on the wall.
natural_image
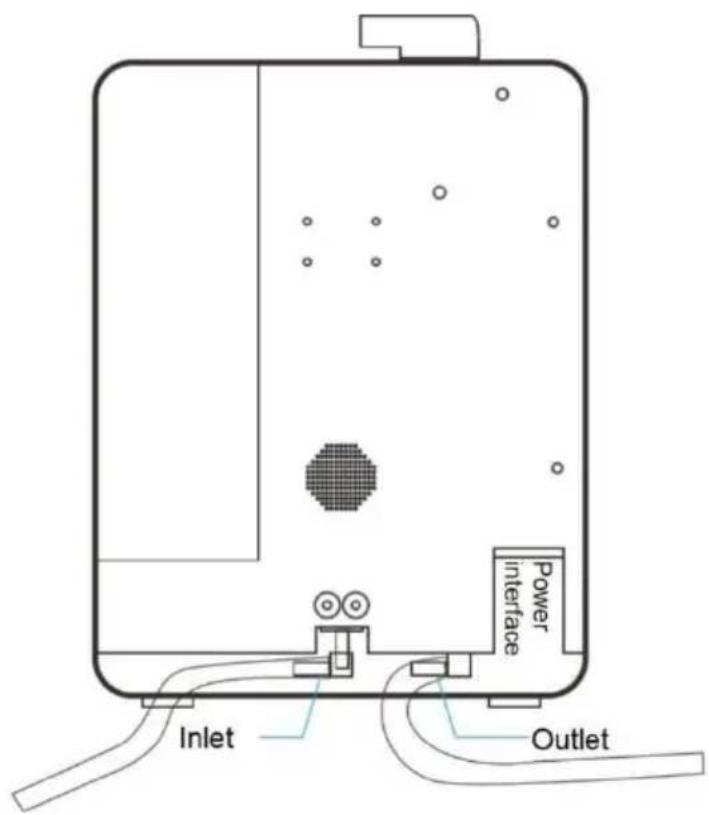
Technical line drawing of a device casing with internal components and a side-view cross-section (no text or symbols)Step 7: Measure the distance from the adapter to the bottom of the machine, and cut off the appropriate length of the water inlet PE pipe and the drainage PE pipe.

Step 8: Take down the machine from wall. Cut the 3/8" hose into pieces with appropriate length. Connect the hoses to the IN and OUT nozzles at the bottom of machine base.
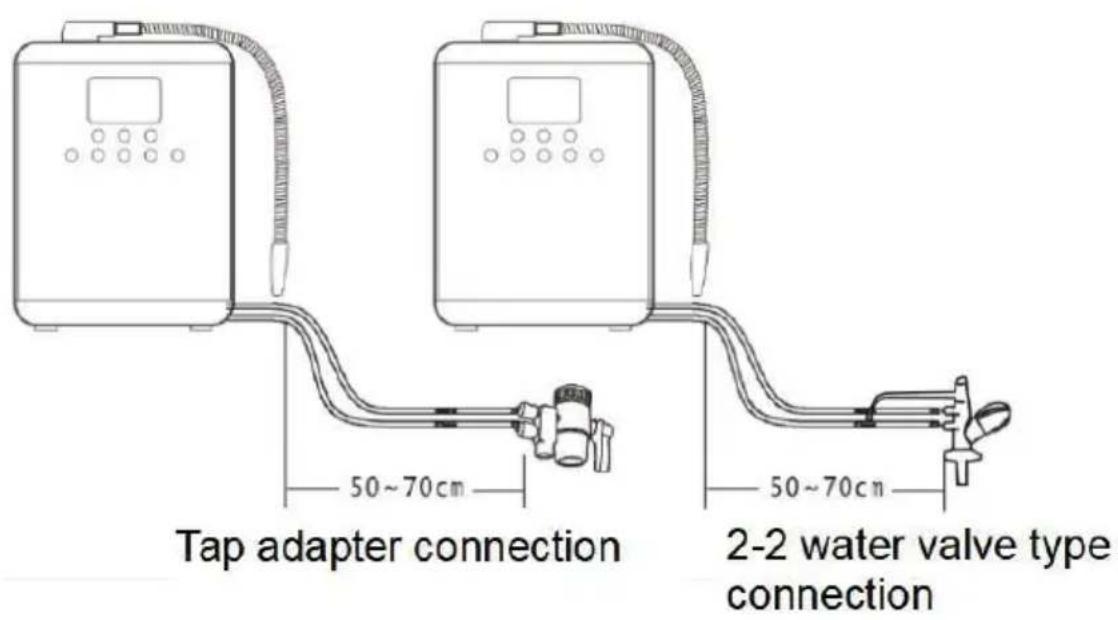
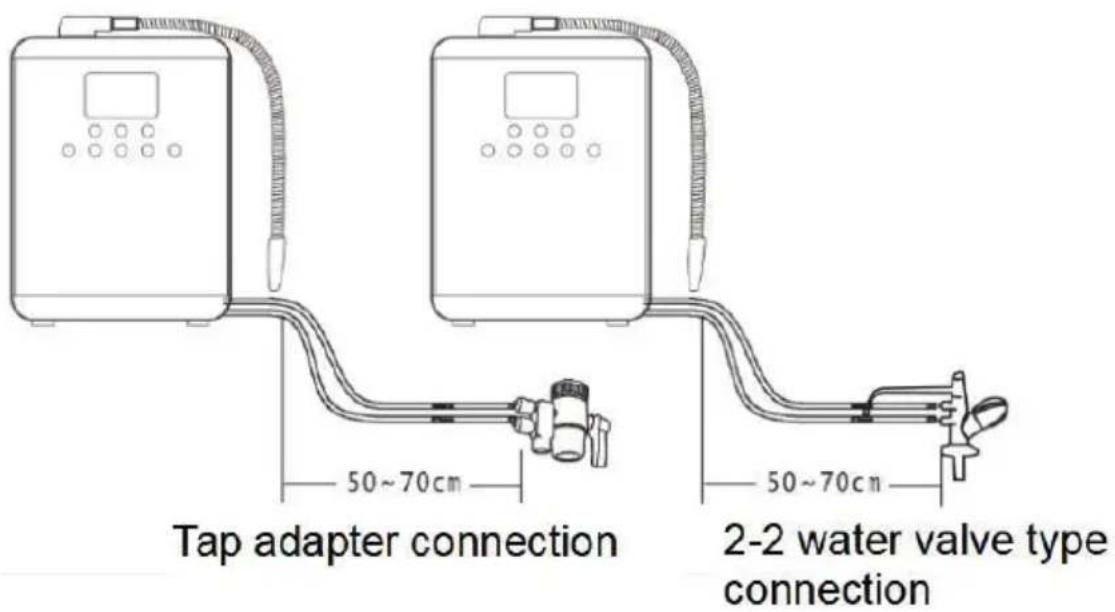
Tap adapter A:
Insert one end of the first 3/8" hose into the top water outlet of the tap adapter A and fix it tightly with a pipe clamp. Connect the other end to water inlet at the IN nozzle of the machine base and fix it tightly with a clamp.
Insert one end of the second 3/8" hose into the bottom outlet of the tap adapter A and fix it tightly with a pipe clamp. Connect the other end to OUT nozzle of the machine base and fix it tightly with a pipe clamp.
Tap adapter B:
Insert one end of the first 3/8" hose into the bottom outlet of the tap ad B and secure it tightly with a pipe clamp, and connect the other end to water intake at the IN nozzle of the machine base and fix it tightly with pipe clamp.
Insert one end of the second 3/8" hose into the top outlet of the tap ad B and fix it tightly with a pipe clamp. Connect the other end to the outlet the machine base and fix it tightly with a pipe clamp.
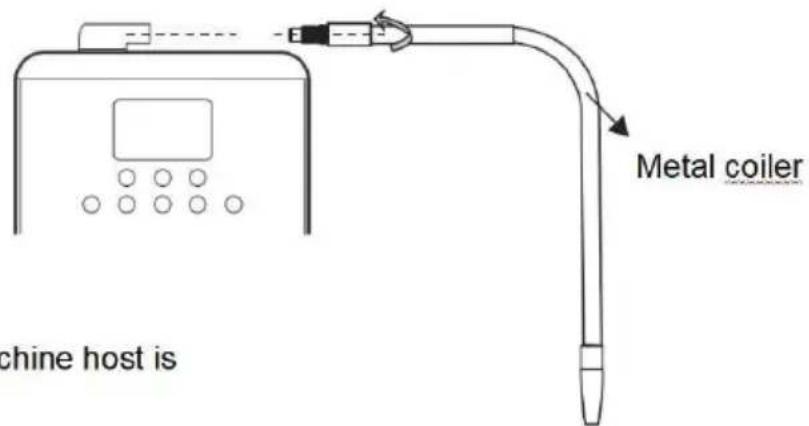
Step 9: Install metal coiler
Screw the metal coiler clockwise into the outlet connector of the machine as showing in the picture below.
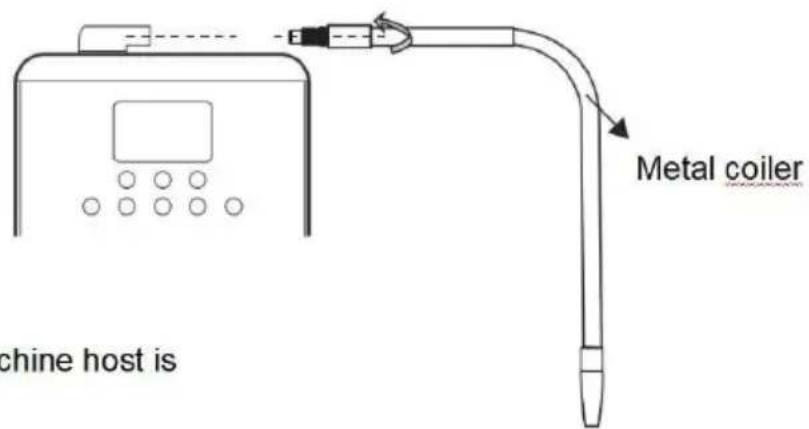
At this point, the water ionizer machine host is installed.
Plug in the power cord
First make sure that the specifications of the power supply to be connected are consistent with the requirements of the nameplate, and then insert the power cord plug (one end is connected to the lower end of the machine the other end is connected to the power supply).
After the power cable is plugged in, the LCD and indicator light up. In d use, the power cable plug can not be disconnected.
How to operate
When the tap is turned on, water enters the ionizer. As soon as the water flow rate is over 0.8L/minute, the screen will be lit up, and the default pH level is on Alkaline Water Level 2, and at the same time, the music and a voice of "Alkaline Water Level 2" will be heard. You may press the Alkaline Water Button to select different levels
Of 1,2,3, and 4 for different pH values. You will hear "Alkaline Water Level","Alkaline Water Level 3" and "Super Alkaline Water" for the different Alkaline Water Levels. When the screen light turns violet, it indicates strong alkaline condition while blue indicates normal alkaline.
When the Purified Water Button is pressed, a voice of "Filtered water" will be heard. There will be no ionizing of the water (screen light turns green). The light turns off 1 minute after water supply is turned off. The ionizer automatically switches to Alkaline Water Level 2.
When the Acidic Water Button is pressed, a different music and a voice of "Mild Acidic Water" will be heard (screen light turns yellow). Press the Acidic Water Button again, a voice of "Super Acidic Water" will be heard (screen light turns red). Light turns off 1 minute after water supply is turn off. The ionizer automatically switches to Alkaline Water Level 2.
When the Maintenance Button is pressed, the voice of "Unit Is Now Cleaning" will be heard. The screen light is red. After the cleaning, the ionizer will automatically switches to Alkaline Water Level 2.
Note: The machine will be auto-clean when the flow rate is lower than 0.8L/M (LCD is red). After 5 seconds the machine are on standby(LCD is blue). No-operation for 15 seconds, the machine will be power-down mode(LCD is out).
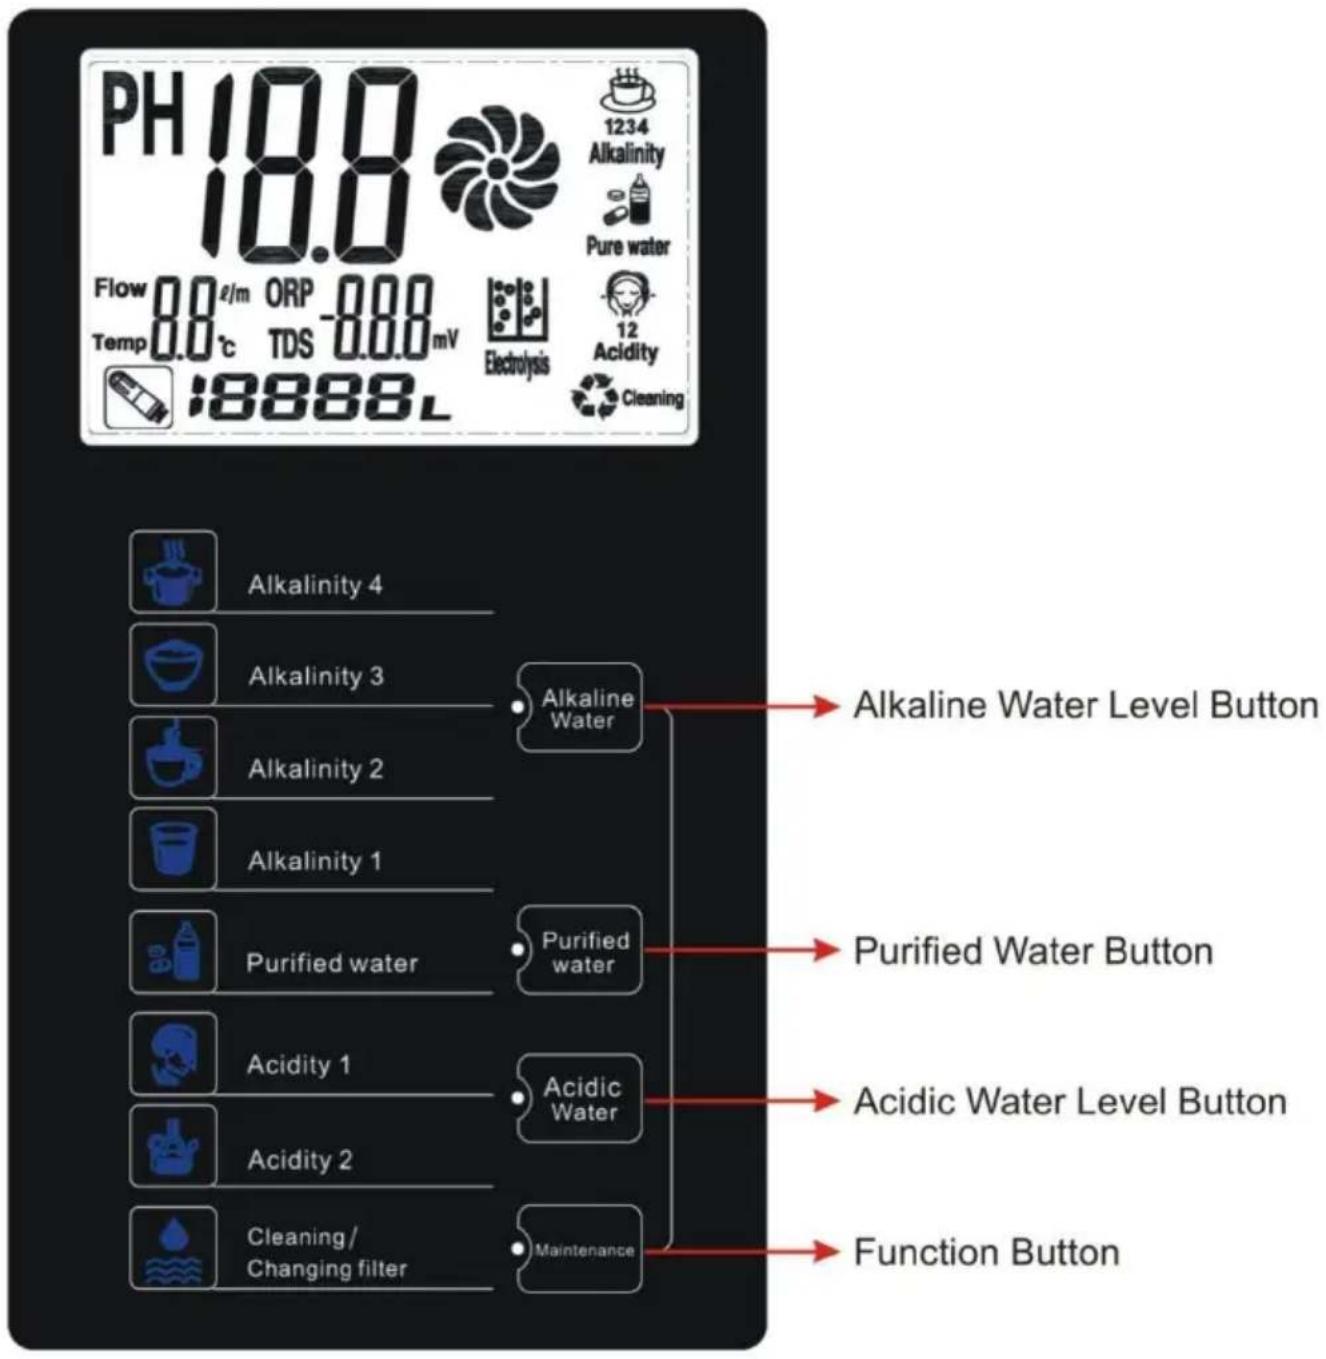
PANEL OPERATION AND FEATURES
Alkaline water button
There are four sections of the alkaline water. You may choose the most suitable alkaline water, according to your needs, like cooking food, making tea, or daily drinking
Purified Water Button
The machine will out put the neutral pH purified water for taking medicine, brewing milk etc.
Acidic water button
There are two sections of the acidic water. You may choose the acidic water
for washing, cleansing or sterilizing.
Function button
When the water capacity reaches the set value, the cleaning light will be on. Press the cleaning button to start the internal cleansing during the machine is working.
When the filter life is exhausted, after replacement the filter, long press the function button, the filter life will be restored to the set value.
GENERAL USE PH INSTRUCTION TABLES FOR WATER LONI
| Function | Uses Of Different pH Water | Same pH Foods Reference | |
| Cooking & Food Disinfection &Dishes Cleaning | pH 9.0~10.5 Alkaline Water Level 4(strong alkaline)·Good for making soups and stews.It is helpful for maintain their nutrients and colors.·Soaking vegetables,beef,pork and fresh fish to remove fish taste and keep the food's natu flavors.·Effectively reduces pesticides of fruits and vegetables.·Good for cleaning tough stain dishes.·Strong antioxidant for removing the free radicals from body. | Ginger Grapes Kelps Seaweeds | |
| Alkaline Water | Cooking & preparing bakeries | PH 8.5~10 Alkaline Water Lev 3Good for cooking rice,preparin noodles bread and cake,and preserve its nature flavor long | Mushrooms Soy beans Spinach |
| Prepare coffee and tea | pH 8.0~9.0 Alkaline Water Lev 2·Good for making tea or coffee,reduce bitterness and give better taste.·After initial period use,this lev is also suitable for daily drinking and improving your overall health ·Improve conditions for upset stomach, constipation,diarrhea and gout. | Banana Carro Chestnut Lettuce Red beans | |
| Initial and daily drinking | PH7.5~8.5 Alkaline Water Lev 1·For people just beginning to drink alkaline water.Balancing internal pH,improving the assimilation of Calcium and other minerals. | Apple Cabbage Eggplant Onion Tea | |
| Purified Water | Purified water | pH 7.0 Purified Water·No color,no taste,no impurity·Suitable for taking medicine,preparing formula and for baby's diet. | Asparagus Bread Milk Miso Tofu |
| Acidic Water | Facial &skin cleaning | PH 5.0~6.5 Acidic Water Level·Not suitable for drinking.·Close to the skin pH value,it an astringent effect when fac cleaning.·Ideal for bathing sensitive skin and infants,sunburn relief.·Minimize the appearance of pores,and good for brushing teeth.·Restores shine to hair and a nature after shave. | Beef Beer Clam Rice Octopus |
| Sterilization & disinfection & Chemicals elimination | pH 3.5~5.5 Acidic Water Level·Not suitable for drinking·Anti-bacterial for tableware an floor cleaning.·Eliminates the residual agricultural chemicals on fruits and vegetables when soaking them in acidic water. | Cheese Egg yolk Oats squid |
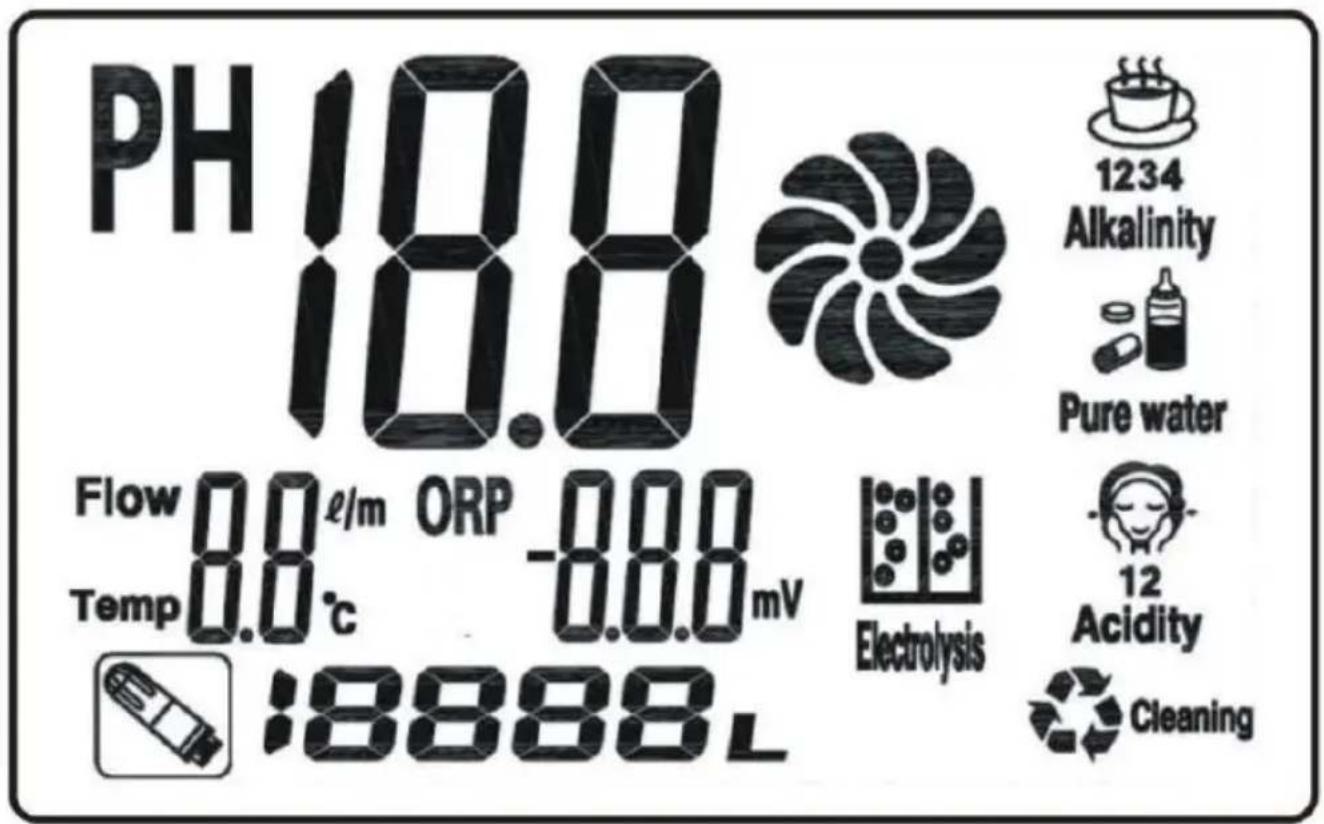
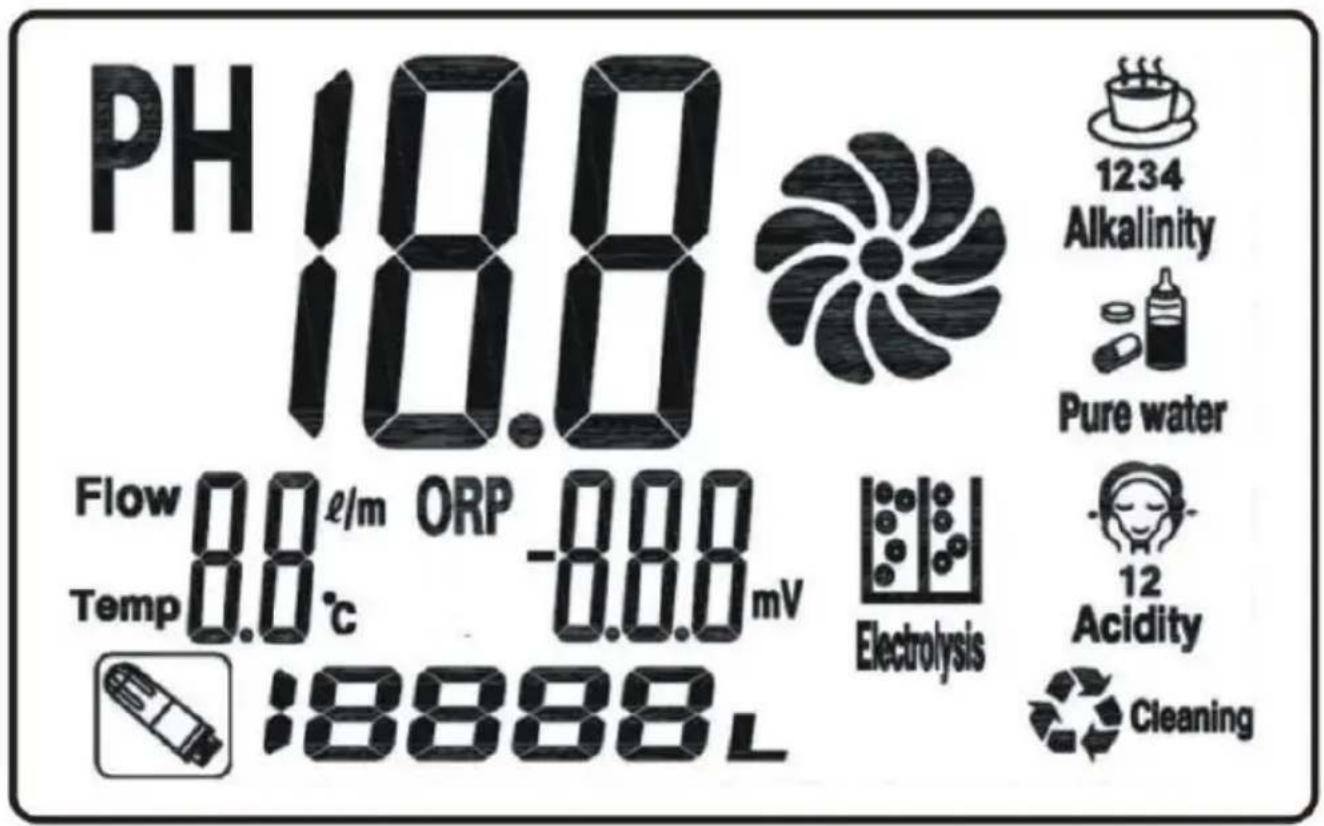
LCD DISPLAY INTRODUCTION
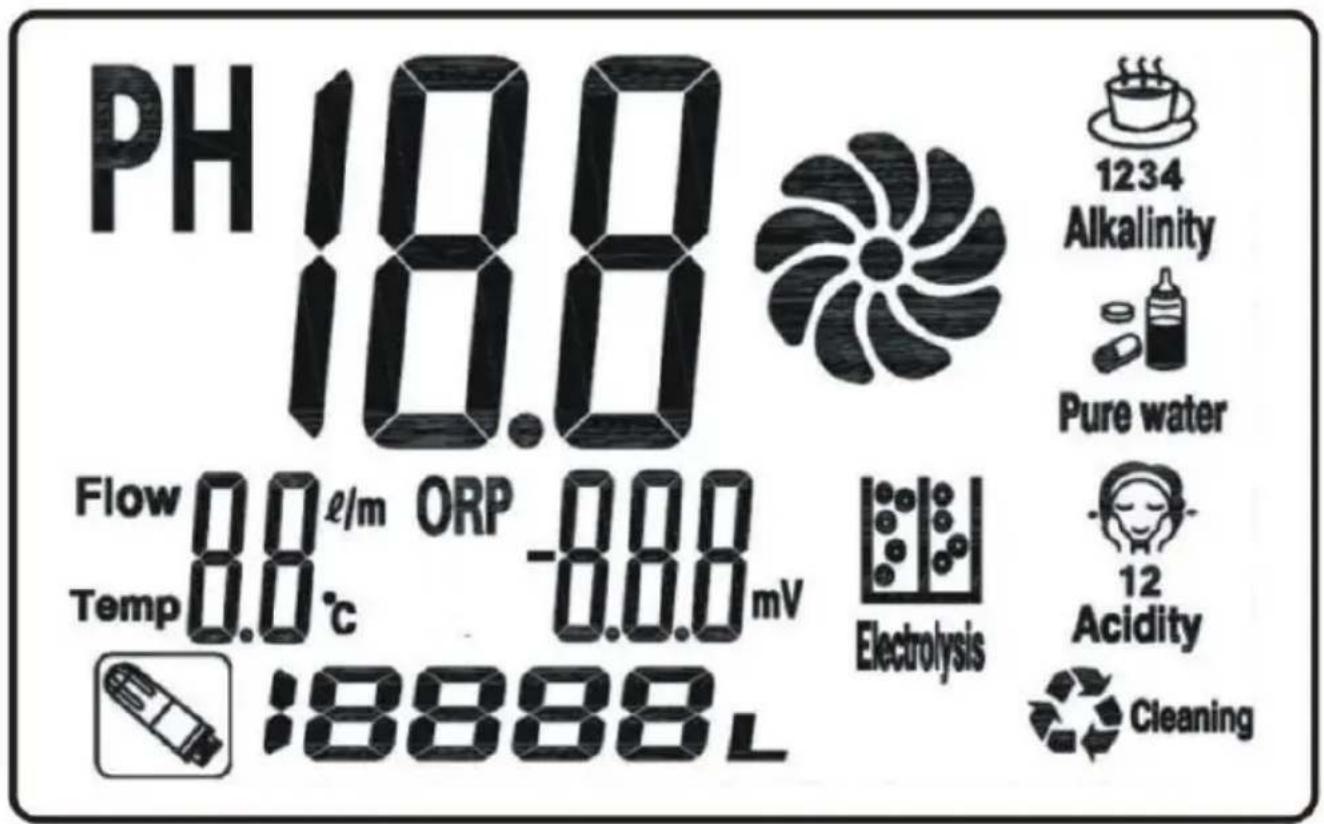
Alkaline water display: Alkaline 4 (purple), Alkaline 3 (dark blue),
Alkaline 2(light blue), Alkaline 1(white)
Pure water display: Green
Acidic water display:Acidity 2(red),Acidity 1(yellow)
Flow rate: Displays the current rate of water flow through the machine
Temperature: Displays the current temperature of the water
PH:Showing output water pH value
ORP: Showing the output water oxidation reduction potential
Cleaning:The machine is cleaning
Electrolysis:The machine is electrolyzing
Impeller: The machine is working with the water passing through
The basic principle of the water ionizer is electrolysis of water to change the PH and Oxidation-Reduction Potential (ORP) to separate the hydrogen and the hydroxide ion. In general, the water cannot decompose into O, and H, in the state of nature, but according to Faraday law of electrolysis, if
adding cathode and anode into water. When the current is switched on, the water will be electrolyzed
The Anode materials are usually titanium and platinum. They are not easy to dissolve. The oxidation-reduction reaction of cathode and anode is as follows
2H_2O+2e=2OH+H^2 Alkaline electrolytic water with reductive EO=0-0.0591pH
H_2O=2H+1/2O_2+2e Acidic electrolytic water with oxidative EO=1.228-0.0591pH
After the hydrogen and oxygen are produced on the surface of the cathode and anode, the water around the electrodes become alkaline and acidic. At the same time, the ORP is changed. The porous semipermeable membrane or the semipermeable membrane that Cation-anion can selectively go through the insert into the two poles to limit the water. The acidic water with high concentration and oxidative will be collected from positive pole, the alkaline water with high concentration and reductive will be collected from negative pole. This is the operation principle of water ionizer.
FUNCTION SETTING
The following operations are limited to technician setting the machine only. Do not turn on the water tap when you are going to set the machine.
- Alkaline Water Button: pH adjusting (to make displayed pH value and actual PH close)
Pressing and holding Alkaline Water Button for about 4 seconds, buzzer sounds
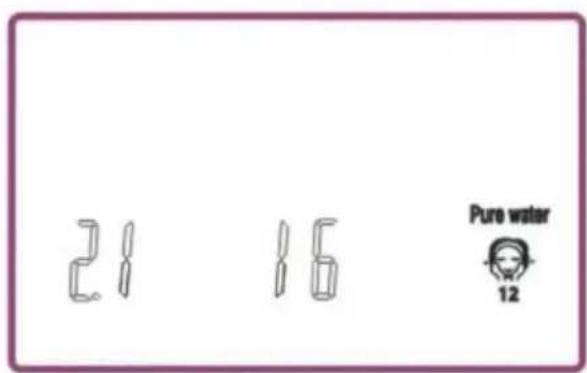
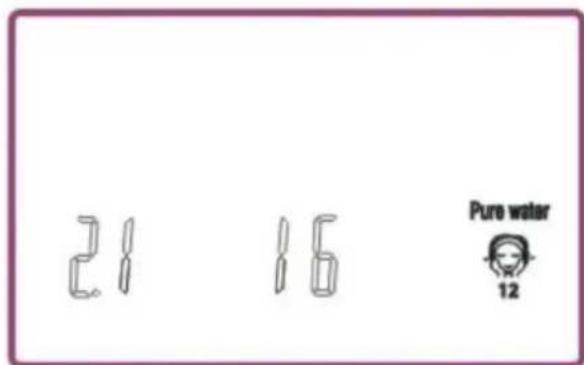
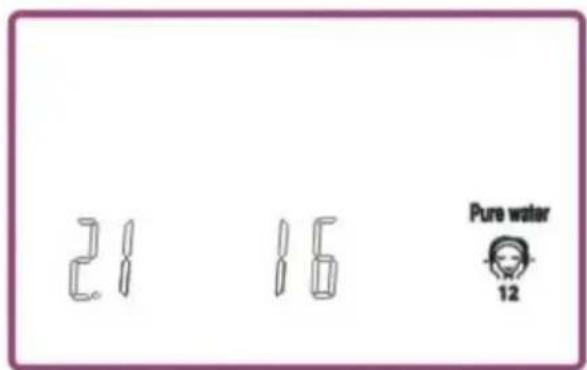
ding-a-dong, comes into Alkaline Water Level 1 pH adjusting and displaying "1.1" (as shown in figure), Pressing Purified Water Button(+) and Acidic Water Button(-) to do cycle adjustment from 1 to 10.
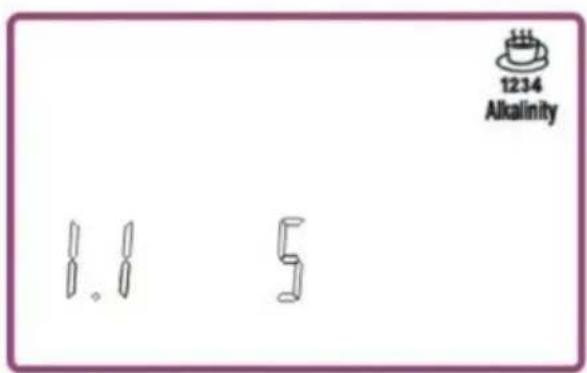
Alkaline1 Adjusting

Acidic 1 Adjusting
When you press the Alkaline Water Button the second time, comes into Alkaline Water Level 2 PH adjusting and displaying "1.2" Pressing Purified Water Button (+)
and Acidic Water Button(-) to do cycle adjustment from 3 to 12.
When you press the Alkaline Water Button the third time, comes into Alkaline Water Level 3 pH adjusting and displaying "1.3 "Pressing Purified Water Button(+) and Acidic Water Button(-) to do cycle adjustment from 8,10,12,14,16,18,20,22, to 24. When you press the Alkaline Water Button the fourth time, comes into Alkaline Water Level 4 pH adjusting and displaying "1.4"Pressing Purified Water Button(+) and Acidic Water Button(-) to do cycle adjustment from 18,20,22,24,26, 28,30,32,34,36, to 40
When you press the Alkaline Water Button the fifth time, comes into Acidi Water Level 1 pH adjusting and displaying "2.1(as shown in figure)"Pressing Purified Water Button(+)and Acidic Water Button(-)to do cycle adjustment from 10,12,14, 16,18,20,22,24,26,to 28.
When you press the Alkaline Water Button the sixth time, comes into Acid Water Level 2 PH adjusting and displaying "2.2 "Pressing Purified Water Button(+)and Acidic. Water Button(-)to do cycle adjustment from 18,20,22,24,26,28,30,32,36, to 40
When you press the Alkaline Water Button the seventh time, the buzzer sounds, and the settings are saved and the ionizer will return to standby the Alkaline Water Level 2.
Attention:The higher you set,the higher pH value you get.
- Purified Water Button: Filter Life, Cleaning Setting, Voice Setting
Filter Life Setting
Pressing and holding Purified Water Button for about 4 seconds, the buzzes sounds ding-a-dong, comes to filter life setting, 12 items are available. They are 1000, 2000, 3000, 4000, 5000, 6000, 7000, 8000, 9000, 1000, 0, 11000, 12000. Use Alkaline Water Button(+) and Acidic Water Button(-) to do cycle adjustment.
Specifications of filter life setting:
The filter life begins to count down when the machine starts. Life setting range is 1000L to 12000L----each level is 1000L. When filter life reaches the set value, the filter pattern flashes prompt.
1.Under the filter life setting state,if you don't press Alkaline Water Button (+)and Acidic Water Button(-)to adjust,the old memory of filter life will not be overwritten. If you press Alkaline Water Button(+)and Acidic Water Button(-)to adjust,the current filter life settings will directly return to zero. The input water flow rate should be over 0.8L/min,then it will drive the water flow.
sensor to start the water ionizer.If less than 0.8L/min,the water ionizer can be turned on to work.Then you may need a pump to help.
- When the filter life is expired, press the "Maintenance"5 seconds "directly under the standby state, the setting value returns to zero.
Press the Purified Water Button the second time, goes to cleaning setting. Press Alkaline Water Button(+) and Purified Water Button(-) to do cycle adjustment among the "30,60,90,EL" four numerical.
Cleaning Setting Description:
When set to 30, means when the total discharge capacity reaches 30L, cleaning light flashes. If set to "EL", when the total water discharge capacity reaches 60L, cleaning light flashes, and automatic cleaning action will go ahead next time as the water connects.


Third pressing Purified Water Button to enter the voice language settings, setting items are "ENG,CHN". Press Alkaline Water Button(+) and Purified Water Button (-) to adjust.
ENG: Voice broadcasting in English. CHN: Voice broadcasting in other language.
Third pressing Purified Water Button to enter the voice and background music settings, setting items are "S1,S2,S3". Press Alkaline Water Button(+) and Purified Water Button(-) to adjust.
S1: Play voice and background music. S2: only play voice, no background music. S3: Turn off voice and background music.
Fourth pressing Purified Water Button to save the settings, and the ionizer will return to standby on the Alkaline Water Level 2.
- Acidic Water Button: Settings on pH display -nominal settings have been preset in the factory, but you can adjust the electrolysis strength setting for each level as
follows:
Press on the Acidic Water Button for about 4 seconds, the buzzer will give tune to enter the pH adjustment on the Alkaline Water Level 1. It is displaying "1.1", as in the above picture. And press Alkaline Water Button to increase the level or the Purified Water Button to lower the electrolysis level to adjust the pH to "7.5,8.0,8.5, 9.0,9.5", Etc.
Press the 2nd time on the Acidic Water Button to enter pH adjustment of the Alkaline Water Level 2. Repeat same procedure as above to set the strength levels for all settings.
PRECAUTIONS FOR USE
Before using this water ionizer, please read these precautions carefully. Please operate this water ionizer following the precautions to avoid the damages to the machine or your health.
City or municipal water is recommended. Well water is not recommended. Please replace the water filters timely, to assure the water quality is good for your health and machine's lifespan.
The input water flow rate should be over 0.8L/min, then it will drive the water flow sensor to start the water ionizer. If less than 0.8L/min, the water ionizer can't be turned on to work. Then you may need a pump to help.
Don't connect it with a water heater. Make sure the inlet water temperature is below 113 Fahrenheit degrees (45 Celsius degrees). Keep the machine away from high temperatures and direct sunlight.
Don't use water to rinse the machine directly, and don't use alcohol and other volatilesolvents to wipe it, either. Please use a soft cloth with soapy water to wipe it gently. Don't use the aluminum or copper container for th alkaline or acidity water, as the water could be contaminated by these typ of containers.
Don't disassemble the machine & components. Don't block, fold or break the out let tube. When the machine is working, for the purpose of expelling water freely, don't keep the acidity water outlet tube in a high place. And t acidity water tube should be no more than 60cm in length.
Every morning before collecting alkaline water from the ionizer, allow the water to run for 10\~30 seconds to flush out the water in the machine and filters. And the end of the day, it is suggested to flush for 10-15 seconds the "Purified water" level and "Acidic Water" level to prevent scaling.
The ionized alkaline & acidic water should be used as soon as possible within 24 hours.
Don't take medicine with alkaline water, Use purified water. Don't drink acidic water.
Please disconnect the power plug when not using the machine for long period.
Please do not damage the power cord and power latch.
- Ensure that the power cable and power latch are intact.
- Do not bend or twist the power cable or power latch forcibly.
- Do not drag the power cord.
-
The power cable cannot bear heavy loads.
-
Do not squeeze the power cable or clip the power cable to a certain place.
If the use of damaged power cord, latch will cause electric short circuit phenomenon, resulting in fire. Contact a professional if you need to repai
the power cord or latch.
When inserting the power plug, make sure that it is fully inserted. If the plug is not fully inserted, it can also cause electric shock or fire. If the latch is damaged or the socket is loose, do not use it again.
Remove the dust on the power latch regularly. If the dust accumulates on the power latch for a long time, it will cause an electric shock and cause a fire due to the humid air. Do not use volatile solvents such as alcohol when cleaning the machine. Wipe with a cotton cloth dipped in dishwashing liquid.
TROUBLESHOOTING
Issue 1: The power supply light is not on or LCD screen does not display. Solution: Please check if electricity is connected properly and re-plug in the cord.
Issue 2: The machine keeps beeping(alarming).
(Note the symbols on the LCD display while the machine beeping)
Solution: If there is a"H1" displayed on the LCD, it means the tap water temperature is too high, please turn off the tap water and do not let HOT water enter the machine.
Issue 3: Touch control panel does not function or respond (but the machine can still work normally).
Solution: Please unplug the power cord and wait a minute, then plug in the power cord. After the power is re-applied, the unit should return to normal operation. Note: do not locate the ionizer near electromagnetic radiation appliances, ie microwave ovens.
Issue 4: Background light on LCD is not on and the LCD is dark.
Solution: the tap water pressure is LOW, please increase the water pressure and check if the filter blocked or not. Replace filters as needed.
Issue 5: Acidic /alkaline water or purified water does come out.
Solution: Please replace the water filters if needed. If water pressure is too LOW, please increase it. If "cleaning indicator" light is "ON", please initiate cleaning cycle.
Issue 6: There is some white sediment in the alkaline water.
Solution: The alkaline water after the production is usually whitish color, this is normal and the water is OK to drink.
Issue 7:A white film appears on the inner wall of the alkaline water container.Solution:This is a crystallization of calcium carbonate by gas in the air after the reaction of solid components of calcium.These white substances are normal when generating alkaline water.It does not imply there is anything wrong with the water.The water is OK to drink.
Note: If this condition persists, please use food grade citric acid to clean the plates or white vinegar. Allow the machine to soak for a few hours and fill thoroughly. Please see maintenance procedures.
Note: If the machine will not be used for a long period, please unplug the power cord, remove the filter and remove the Water Converter and water purifier. Drain thoroughly and place the filter in a sealed plastic bag and store in the refrigerator.
Issue 8: Alkaline water output amount reduces gradually.
Possible causes and solutions:
Inlet Water Pressure-make sure input water pressure is sufficient -above 40 psi.Filter blockage -please make sure filter life is OK and replace filter as needed.Excessive build up of calcium deposits in the outlet tube -plea clean the out let tube as needed.Soak in vinegar as needed.
Excessive build up of calcium deposits on the electrolysis plates -please contact customer service for support.
Made In China
VEVOR®
TOUGH TOOLS, HALF PRICE
Technical Support and E-Warranty Certificate
www.vevor.com/support
VEVOR®
TOUGH TOOLS, HALF PRICE
We continue to be committed to provide you tools with competitive price. "Save Half", "Half Price" or any other similar expressions used by us only represer estimate of savings you might benefit from buying certain tools with us compared to top brands and does not necessarily mean to cover all categories of tools offered by are kindly reminded to verify carefully when you are placing an order with us if yo actually saving half in comparison with the top major brands.
MODÈLE : EHM-729

natural_image
White water purifier with digital display and connected tubing, floating in blue water (no visible text or symbols)NEED HELP? CONTACT US!
Have product questions? Need technical support? Please feel free contact us:
Technical Support and E-Warranty Certificate www.vevor.com/support
This is the original instruction, please read all manual instructions carefully before operating. VEVOR reserves a clear interpretation of user manual. The appearance of the product shall be subject to the product you received. Please forgive us that we won't inform you there are any technology or software updates on our product.
PRODUCT MAIN FEATURES
natural_image
Three types of kitchen plumbing fixtures: a valve, a pressure relief valve, and a curved hose (no text or symbols visible)natural_image
Three white plastic pipe fittings and coiled wire, no text or symbols visibleAssemblage en T Tuyau PE 1/4" Tuyau souple 3/8"
natural_image
Product display image showing four items: a motor, wire connectors, a handheld device, and a color calibration tool (no visible text or symbols)
Tapez B :
When fixing the 2-2 valve on the countertop, first put a decorative seat, and then put a hard rubber pad on the top of the screw, and then stick a small soft rubber pad.

After the screw is inserted into the Counter surface, first put a big soft rubber pad, then put a hardware fixing piece, a flat gasket, and finally fixed with a hex nut.
When connecting the PE pipe to the ball valve, insert the PE pipe into the fixing nut of the ball valve.

If you want to take out the PE tube in the quick connector, just press down the inner ring of the quick connector with one hand, and pull the PE tube outward with the other hand.
Step 5: Fix the metal hanging plate to the wall with stainless steel screws.
Step 4: Insert the plastic expansion tube into the hole.

natural_image
Pure mechanical diagram showing three components: a T-shaped tool, a cylindrical component, and a shaded circular section (no text or symbols)
natural_image
Pure diagram of a semi-circular structure with vertical supports and diagonal lines, no text or symbols present.Step 6: Install the square metal hanging plate behind the water ionizer machine, and then hang it on the previously fixed hanging plate on the wall.
natural_image
Technical line drawing of a device casing with internal components and a side view showing a circular component (no text or symbols)Step 7: Measure the distance from the adapter to the bottom of the machine, and cut off the appropriate length of the water inlet PE pipe and the drainage PE pipe.
Step 9: Install metal coiler
Screw the metal coiler clockwise into the outlet connector of the machine as showing in the picture below.

At this point, the water ionizer machine host is installed.
LCD DISPLAY INTRODUCTION

Alkaline1 Adjusting
Acidic 1 Adjusting
www.vevor.com/support
VEVOR®
TOUGH TOOLS, HALF PRICE
We continue to be committed to provide you tools with competitive price. "Save Half", "Half Price" or any other similar expressions used by us only represer estimate of savings you might benefit from buying certain tools with us compared to top brands and does not necessarily mean to cover all categories of tools offered by are kindly reminded to verify carefully when you are placing an order with us if yo actually saving half in comparison with the top major brands.
MODELL: EHM-729
natural_image
White water purifier with digital display and connected tubing, set against a blue water backdrop (no visible text or symbols)NEED HELP? CONTACT US!
Have product questions? Need technical support? Please feel free contact us:
Technical Support and E-Warranty Certificate www.vevor.com/support
This is the original instruction, please read all manual instructions carefully before operating. VEVOR reserves a clear interpretation of user manual. The appearance of the product shall be subject to the product you received. Please forgive us that we won't inform you there are any technology or software updates on our product.
PRODUCT MAIN FEATURES
natural_image
Three sets of kitchen fixtures including a valve, washer, and hose assembly (no text or symbols visible)Zapfhahnadapter A Zapfhahnadapter B Haspel
T-Stück-Montage 1/4-Zoll-PE-Rohr 3/8" weiches Rohr
Remove the outlet of the tap
natural_image
Illustration of a kitchen faucet with a pipe fitting and a numbered label '2' (no text or symbols on the diagram itself)Adaptor
Tippe A:
Typ B:
When fixing the 2-2 valve on the countertop, first put a decorative seat, and then put a hard rubber pad on the top of the screw, and then stick a small soft rubber pad.

After the screw is inserted into the Counter surface, first put a big soft rubber pad, then put a hardware fixing piece, a flat gasket, and finally fixed with a hex nut.
When connecting the PE pipe to the ball valve, insert the PE pipe into the fixing nut of the ball valve.

If you want to take out the PE tube in the quick connector, just press down the inner ring of the quick connector with one hand, and pull the PE tube outward with the other hand.
Step 4: Insert the plastic expansion tube into the hole.
Step 5: Fix the metal hanging plate to the wall with stainless steel screws.
natural_image
Pure mechanical diagram showing three components: a hammer, a pin, and a shaded circular section (no text or symbols)
natural_image
Pure diagram of a semi-circular structure with two vertical supports and a diagonal line, no text or symbols present.Step 6: Install the square metal hanging plate behind the water ionizer machine, and then hang it on the previously fixed hanging plate on the wall.
natural_image
Technical line drawing of a device casing with internal components and a side view showing a circular component (no text or symbols)Step 7: Measure the distance from the adapter to the bottom of the machine, and cut off the appropriate length of the water inlet PE pipe and the drainage PE pipe.
Step 9: Install metal coiler
Screw the metal coiler clockwise into the outlet connector of the machine as showing in the picture below.

At this point, the water ionizer machine host is installed.
Wie Zu arbeiten
LCD DISPLAY INTRODUCTION

Alkaline1 Adjusting

Acidic 1 Adjusting
www.vevor.com/support
VEVOR®
TOUGH TOOLS, HALF PRICE
We continue to be committed to provide you tools with competitive price. "Save Half", "Half Price" or any other similar expressions used by us only repressor estimate of savings you might benefit from buying certain tools with us compared to top brands and does not necessarily mean to cover all categories of tools offered by are kindly reminded to verify carefully when you are placing an order with us if yo actually saving half in comparison with the top major brands.
MODELLO: EHM-729

natural_image
White water purifier with digital display and connected tubing, floating in blue water (no visible text or symbols)NEED HELP? CONTACT US!
Have product questions? Need technical support? Please feel free contact us:
Technical Support and E-Warranty Certificate www.vevor.com/support
This is the original instruction, please read all manual instructions carefully before operating. VEVOR reserves a clear interpretation of user manual. The appearance of the product shall be subject to the product you received. Please forgive us that we won't inform you there are any technology or software updates on our product.
PRODUCT MAIN FEATURES
TECHNICAL PARAMETERS AND SPECIFICATIONS
natural_image
Product catalog image showing various kitchen fixtures including a valve, pressure gauge, and hose (no text or labels visible)natural_image
Three white plastic pipe fittings and coiled wire, no text or symbols visibleAssemblaggio a T Tubo PE da 1/4". Tubo morbido da 3/8".

natural_image
Product display of a medical or laboratory device set including electrical contactor, wires, a handheld tool, and a color picker (no visible text or symbols on main objects)
Tipo B:
When fixing the 2-2 valve on the countertop, first put a decorative seat, and then put a hard rubber pad on the top of the screw, and then stick a small soft rubber pad.
After the screw is inserted into the Counter surface, first put a big soft rubber pad, then put a hardware fixing piece, a flat gasket, and finally fixed with a hex nut.
When connecting the PE pipe to the ball valve, insert the PE pipe into the fixing nut of the ball valve.
If you want to take out the PE tube in the quick connector, just press down the inner ring of the quick connector with one hand, and pull the PE tube outward with the other hand.
Step 5: Fix the metal hanging plate to the wall with stainless steel screws.
Step 4: Insert the plastic expansion tube into the hole.
natural_image
Pure mechanical diagram showing three components: a T-shaped tool, a cylindrical component with dashed lines, and a circular cross-section with shaded area (no text or symbols)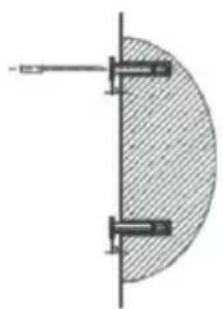
natural_image
Pure mechanical diagram showing a semicircular component with two vertical supports and a central shaft (no text or symbols)Step 6: Install the square metal hanging plate behind the water ionizer machine, and then hang it on the previously fixed hanging plate on the wall.
natural_image
Technical line drawing of a device casing with internal components and a side view showing a circular component (no text or symbols)Step 7: Measure the distance from the adapter to the bottom of the machine, and cut off the appropriate length of the water inlet PE pipe and the drainage PE pipe.
Step 9: Install metal coiler
Screw the metal coiler clockwise into the outlet connector of the machine as showing in the picture below.

At this point, the water ionizer machine host is installed.
Come A operare
LCD DISPLAY INTRODUCTION

Display acqua alcalina: alcalino 4 (viola), alcalino 3 (blu scuro), Alcalina 2 (azzurro), Alcalina 1 (bianco)
Alkaline1 Adjusting
Acidic 1 Adjusting
www.vevor.com/support
VEVOR®
TOUGH TOOLS, HALF PRICE
We continue to be committed to provide you tools with competitive price. "Save Half", "Half Price" or any other similar expressions used by us only represer estimate of savings you might benefit from buying certain tools with us compared to top brands and does not necessarily mean to cover all categories of tools offered by are kindly reminded to verify carefully when you are placing an order with us if yo actually saving half in comparison with the top major brands.
MODELO: EHM-729

natural_image
White water purifier with digital display and connected tubing, floating in blue water (no visible text or symbols)NEED HELP? CONTACT US!
Have product questions? Need technical support? Please feel free contact us:
Technical Support and E-Warranty Certificate www.vevor.com/support
This is the original instruction, please read all manual instructions carefully before operating. VEVOR reserves a clear interpretation of user manual. The appearance of the product shall be subject to the product you received. Please forgive us that we won't inform you there are any technology or software updates on our product.
PRODUCT MAIN FEATURES
natural_image
Three types of kitchen plumbing fixtures: a valve, a pressure relief valve, and a curved hose (no text or symbols visible)natural_image
Three metallic pipe fittings and coiled wire components (no text or symbols visible)natural_image
Product display image showing various electrical components including a motor, wires, a plug, and a color calibration palette (no visible text or symbols)
Escribe un:
Tipo B:
When fixing the 2-2 valve on the countertop, first put a decorative seat, and then put a hard rubber pad on the top of the screw, and then stick a small soft rubber pad.

After the screw is inserted into the Counter surface, first put a big soft rubber pad, then put a hardware fixing piece, a flat gasket, and finally fixed with a hex nut.
When connecting the PE pipe to the ball valve, insert the PE pipe into the fixing nut of the ball valve.
If you want to take out the PE tube in the quick connector, just press down the inner ring of the quick connector with one hand, and pull the PE tube outward with the other hand.
Step 5: Fix the metal hanging plate to the wall with stainless steel screws.
Step 4: Insert the plastic expansion tube into the hole.

natural_image
Pure mechanical diagram showing three components: a T-shaped tool, a cylindrical component, and a shaded circular section (no text or symbols)
natural_image
Pure diagram of a semi-circular structure with vertical supports and diagonal lines, no text or symbols present.Step 6: Install the square metal hanging plate behind the water ionizer machine, and then hang it on the previously fixed hanging plate on the wall.

natural_image
Technical line drawing of a device casing with internal components and a side view showing a circular component (no text or symbols)Step 7: Measure the distance from the adapter to the bottom of the machine, and cut off the appropriate length of the water inlet PE pipe and the drainage PE pipe.

Step 9: Install metal coiler
Screw the metal coiler clockwise into the outlet connector of the machine as showing in the picture below.
At this point, the water ionizer machine host is installed.
Cómo a funcionar
LCD DISPLAY INTRODUCTION

Alkaline1 Adjusting
Acidic 1 Adjusting
www.vevor.com/support
VEVOR®
TOUGH TOOLS, HALF PRICE
We continue to be committed to provide you tools with competitive price. "Save Half", "Half Price" or any other similar expressions used by us only represer estimate of savings you might benefit from buying certain tools with us compared to top brands and does not necessarily mean to cover all categories of tools offered by are kindly reminded to verify carefully when you are placing an order with us if yo actually saving half in comparison with the top major brands.
MODEL: EHM-729

natural_image
White water purifier with digital display and connected tubing, floating in blue water (no visible text or symbols)NEED HELP? CONTACT US!
Have product questions? Need technical support? Please feel free contact us:
Technical Support and E-Warranty Certificate www.vevor.com/support
This is the original instruction, please read all manual instructions carefully before operating. VEVOR reserves a clear interpretation of user manual. The appearance of the product shall be subject to the product you received. Please forgive us that we won't inform you there are any technology or software updates on our product.
PRODUCT MAIN FEATURES
natural_image
Three-panel image showing various kitchen fixtures and tubing components (no text or symbols visible)natural_image
Three white plastic pipe fittings and a separate spiral coil, shown against a white background (no text or symbols)natural_image
Product display of a medical or laboratory instrument set including a device, test tube, electrical cable, and color calibration palette (no visible text or symbols)
Typ A:
Typ B:
When fixing the 2-2 valve on the countertop, first put a decorative seat, and then put a hard rubber pad on the top of the screw, and then stick a small soft rubber pad.
After the screw is inserted into the Counter surface, first put a big soft rubber pad, then put a hardware fixing piece, a flat gasket, and finally fixed with a hex nut.
When connecting the PE pipe to the ball valve, insert the PE pipe into the fixing nut of the ball valve.

If you want to take out the PE tube in the quick connector, just press down the inner ring of the quick connector with one hand, and pull the PE tube outward with the other hand.

Step 5: Fix the metal hanging plate to the wall with stainless steel screws.
Step 4: Insert the plastic expansion tube into the hole.
natural_image
Pure mechanical diagram showing three components: a T-shaped tool, a cylindrical component, and a shaded circular section (no text or symbols)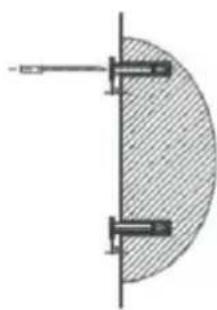
natural_image
Pure diagram of a semi-circular structure with vertical supports and diagonal hatching, no text or symbols present.Step 6: Install the square metal hanging plate behind the water ionizer machine, and then hang it on the previously fixed hanging plate on the wall.

natural_image
Technical line drawing of a device casing with internal components and a side view showing a circular component (no text or symbols)Step 7: Measure the distance from the adapter to the bottom of the machine, and cut off the appropriate length of the water inlet PE pipe and the drainage PE pipe.
Step 9: Install metal coiler
Screw the metal coiler clockwise into the outlet connector of the machine as showing in the picture below.
At this point, the water ionizer machine host is installed.
Jak Do działać
LCD DISPLAY INTRODUCTION
Alkaline1 Adjusting
Acidic 1 Adjusting
www.vevor.com/support
VEVOR®
TOUGH TOOLS, HALF PRICE
Technisch Ondersteuning en e-garantiecertificaat www.vevor.com/support
WATERIONISATORMACHINE
BEDIENINGSINSTRUCTIE
MODEL: EHM-729
We continue to be committed to provide you tools with competitive price. "Save Half", "Half Price" or any other similar expressions used by us only represer estimate of savings you might benefit from buying certain tools with us compared to top brands and does not necessarily mean to cover all categories of tools offered by are kindly reminded to verify carefully when you are placing an order with us if yo actually saving half in comparison with the top major brands.
MODEL: EHM-729

natural_image
White water purifier with digital display and connected tubing, floating in blue water (no visible text or symbols)NEED HELP? CONTACT US!
Have product questions? Need technical support? Please feel free contact us:
Technical Support and E-Warranty Certificate www.vevor.com/support
This is the original instruction, please read all manual instructions carefully before operating. VEVOR reserves a clear interpretation of user manual. The appearance of the product shall be subject to the product you received. Please forgive us that we won't inform you there are any technology or software updates on our product.
PRODUCT MAIN FEATURES
natural_image
Three-panel image showing kitchen fixtures: a pressure relief valve, a shower faucet with blue circular components, and a curved hose (no text or symbols visible)Kraanadapter A Kraanadapter B Spoelmachine
natural_image
Three white plastic pipe fittings and coiled wire, no text or symbols visibleT-montage 1/4"PE-buis 3/8" zachte pijp
natural_image
Product display image showing various electrical components including a motor, wires, a handheld device, and a color calibration meter (no visible text or symbols on main objects)Accessoire tas Stroomdraad _ Filtersleutel _ pH-testreagens
Type B:
When fixing the 2-2 valve on the countertop, first put a decorative seat, and then put a hard rubber pad on the top of the screw, and then stick a small soft rubber pad.
After the screw is inserted into the Counter surface, first put a big soft rubber pad, then put a hardware fixing piece, a flat gasket, and finally fixed with a hex nut.
When connecting the PE pipe to the ball valve, insert the PE pipe into the fixing nut of the ball valve.

If you want to take out the PE tube in the quick connector, just press down the inner ring of the quick connector with one hand, and pull the PE tube outward with the other hand.
Step 5: Fix the metal hanging plate to the wall with stainless steel screws.
Step 4: Insert the plastic expansion tube into the hole.

natural_image
Pure mechanical diagram showing three components: a T-shaped tool, a cylindrical component, and a shaded circular section (no text or symbols)
natural_image
Pure diagram of a semi-circular structure with vertical supports and diagonal hatching, no text or symbols present.Step 6: Install the square metal hanging plate behind the water ionizer machine, and then hang it on the previously fixed hanging plate on the wall.

natural_image
Technical line drawing of a device casing with internal components and a side view showing a circular component (no text or symbols)Step 7: Measure the distance from the adapter to the bottom of the machine, and cut off the appropriate length of the water inlet PE pipe and the drainage PE pipe.

Step 9: Install metal coiler
Screw the metal coiler clockwise into the outlet connector of the machine as showing in the picture below.

At this point, the water ionizer machine host is installed.
Hoe naar bedienen
LCD DISPLAY INTRODUCTION

Alkaline1 Adjusting

Acidic 1 Adjusting
www.vevor.com/support
VEVOR®
TOUGH TOOLS, HALF PRICE
We continue to be committed to provide you tools with competitive price. "Save Half", "Half Price" or any other similar expressions used by us only represer estimate of savings you might benefit from buying certain tools with us compared to top brands and does not necessarily mean to cover all categories of tools offered by are kindly reminded to verify carefully when you are placing an order with us if yo actually saving half in comparison with the top major brands.
MODELL: EHM-729

natural_image
White water purifier with digital display and connected tubing, against a blue water backdrop (no visible text or symbols)NEED HELP? CONTACT US!
Have product questions? Need technical support? Please feel free contact us:
Technical Support and E-Warranty Certificate www.vevor.com/support
This is the original instruction, please read all manual instructions carefully before operating. VEVOR reserves a clear interpretation of user manual. The appearance of the product shall be subject to the product you received. Please forgive us that we won't inform you there are any technology or software updates on our product.
PRODUCT MAIN FEATURES
natural_image
Product catalog image showing various kitchen fixtures including a faucet, washers, and a curved hose (no text or labels visible)T apadapter A T apadapter B Coiler
natural_image
Close-up of a metallic T-shaped mechanical component (no visible text or symbols)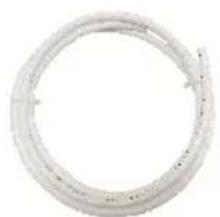
natural_image
Circular white plastic ring or wire with no visible text or symbols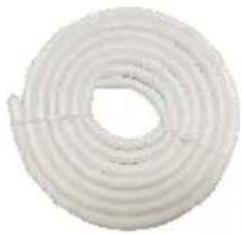
natural_image
Circular white plastic film or coiled material, no visible text or symbolsTyp B:
When fixing the 2-2 valve on the countertop, first put a decorative seat, and then put a hard rubber pad on the top of the screw, and then stick a small soft rubber pad.

After the screw is inserted into the Counter surface, first put a big soft rubber pad, then put a hardware fixing piece, a flat gasket, and finally fixed with a hex nut.
When connecting the PE pipe to the ball valve, insert the PE pipe into the fixing nut of the ball valve.
If you want to take out the PE tube in the quick connector, just press down the inner ring of the quick connector with one hand, and pull the PE tube outward with the other hand.

Step 4: Insert the plastic expansion tube into the hole.
Step 5: Fix the metal hanging plate to the wall with stainless steel screws.
natural_image
Pure mechanical diagram showing a hammer, screw, and circular component with no text or symbols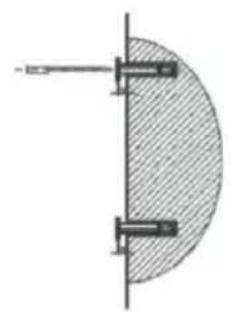
natural_image
Pure mechanical diagram showing a semicircular component with two vertical supports and a diagonal hatching (no text or symbols)Step 6: Install the square metal hanging plate behind the water ionizer machine, and then hang it on the previously fixed hanging plate on the wall.

natural_image
Technical line drawing of a device casing with internal components and a side-view cross-section (no text or symbols)Step 7: Measure the distance from the adapter to the bottom of the machine, and cut off the appropriate length of the water inlet PE pipe and the drainage PE pipe.
Step 9: Install metal coiler
Screw the metal coiler clockwise into the outlet connector of the machine as showing in the picture below.

At this point, the water ionizer machine host is installed.
Sätt i nätsladden
Hur till fungera
LCD DISPLAY INTRODUCTION
Alkaline1 Adjusting

Acidic 1 Adjusting
www.vevor.com/support